BELLISSIMO HNTB65XL Operation manual

Instructions for Use and
Installation
60cm built-in electric oven
HNTB65XL

Contents
2
For Your Safety .....................................3
Use and Care
Controls ...........................................6
Oven & accessories..................................7
How to use your oven ................................8
Positioning the oven trays & shelves .....................9
Cooking modes .................................... 10
3 Button Digital Clock ...............................12
The oven light .....................................15
Cooling ventilation ..................................15
Practical cooking advice .............................15
Cooking guide .....................................19
Cleaning and maintenance ...........................20
How to dismantle the oven door for cleaning..............21
How to remove the oven door .........................23
Replacing the oven lamp .............................24
Disposal..........................................24
Installation
Cabinet details.....................................25
Electrical connection ................................26
Technical data .....................................27

For Your Safety
We recommend that you read the instructions in this owner's
manual carefully before use for the best performance and to extend
the life of your appliance. It will provide you with all the information
you need to ensure its safe installation, use and maintenance.
Retain this owner's manual for future reference.
When handling the appliance, we recommend you always use the
handles recessed into the sides of the oven to prevent personal
injury or damage to the appliance.
To maintain the efficiency and safety of this appliance, we
recommend that you do the following:
·Always call the Technika service department if there are any
faults with your appliance.
·Always use original spare parts available from Technika.
·This appliance is designed for non-commercial, household use
and it must not be altered in any way.
·WARNING: This appliance is a domestic kitchen appliance
suitable for indoor installation. It is not suitable for outdoor
installations such as alfresco kitchens or garages unless a
qualified, competent installer has deemed the location and
installation to be suitable & compliant.
·This appliance can only be used safely when it is correctly
connected to an efficient earthing system in compliance
with current electrical safety standards.
·If the supply cord is damaged, it must be replaced by the
manufacturer or its service agent or a similarly qualified
person in order to avoid a hazard.
·During use, the appliance becomes hot. Care should be
taken to avoid touching heating elements inside the oven.
WARNING: Accessible parts will become hot when in use.
To avoid burns and scalds, children should be kept away.
·This appliance is not intended for use by persons (including
children) with reduced physical, sensory or mental
capabilities, or lack of experience and knowledge, unless
they have been given supervision or instruction concerning
use of the appliance by a person responsible for their safety.
·Young children should be supervised to ensure that they do
not play with the appliance.
·DO NOT use a steam cleaner to clean the appliance.
3

For Your Safety
Packaging items such as plastic bags, polystyrene, nails, etc. are
potentially dangerous, and therefore appropriate measures must
be taken to prevent children and the disabled from coming into
contact with them.
Avoid the following:
·
Touching the appliance with wet parts of the body.
·
·
Using the appliance while barefoot.
Pulling on the supply cable to unplug it from the outlet.
·Improper or dangerous operation.
·Obstructing the ventilation or heat dissipation slots.
·Allowing power supply cables of other appliances to come into
contact with hot parts of the oven.
·Exposing the appliance to atmospheric agents such as rain, or
direct sunlight.
·Using the oven for storage purposes.
·
·
·
Using flammable liquids near the appliance.
Using adapters, multiple sockets and / or extension leads.
Attempting to install or repair the appliance without the
assistance of authorised personal.
Authorised personnel must be contracted to...
·Install the appliance according to these installation instructions
and any local requirements.
·Replace the temperature probe if it is damaged. The probe is
part of thermostat. Only use the temperature sensing probe
recommended for this oven.
Technika Service Department must be contacted...
·If in doubt about the operation of the appliance.
·If in doubt about the soundness of the appliance after removing
it from its packaging.
·If the power supply cable has been damaged or needs to be
replaced.
·If the appliance requires a service.
·If you need spare parts.
4

For Your Safety
5
WARNINGS:
·DO NOT steam clean the oven.
·DO NOT use harsh abrasive cleaners or sharp metal
scrapers to clean the oven door glass since they can
scratch the surface, which may result in shattering of the
glass.
·DO NOT install the appliance behind a decorative door in
order to avoid overheating.
·Only use the appliance to cook food and nothing else.
·When left unused for a long period, unplug the appliance
from the electricity mains.
·Check that the appliance has not been damaged
immediately after it has been unpacked.
·Disconnect the appliance from the electrical mains if it is
not functioning properly and before cleaning or performing
maintenance.
·Use oven gloves to place cookware in the oven or when
removing it.
·Always grip the oven door handle in the centre.
·Make sure the knobs are in the ‘ ’ or ‘ ’ position when the
appliance is not in use.
·Techika will not accept any liability as a result of any
damage due to incorrect installation or improper use.
Use and Care
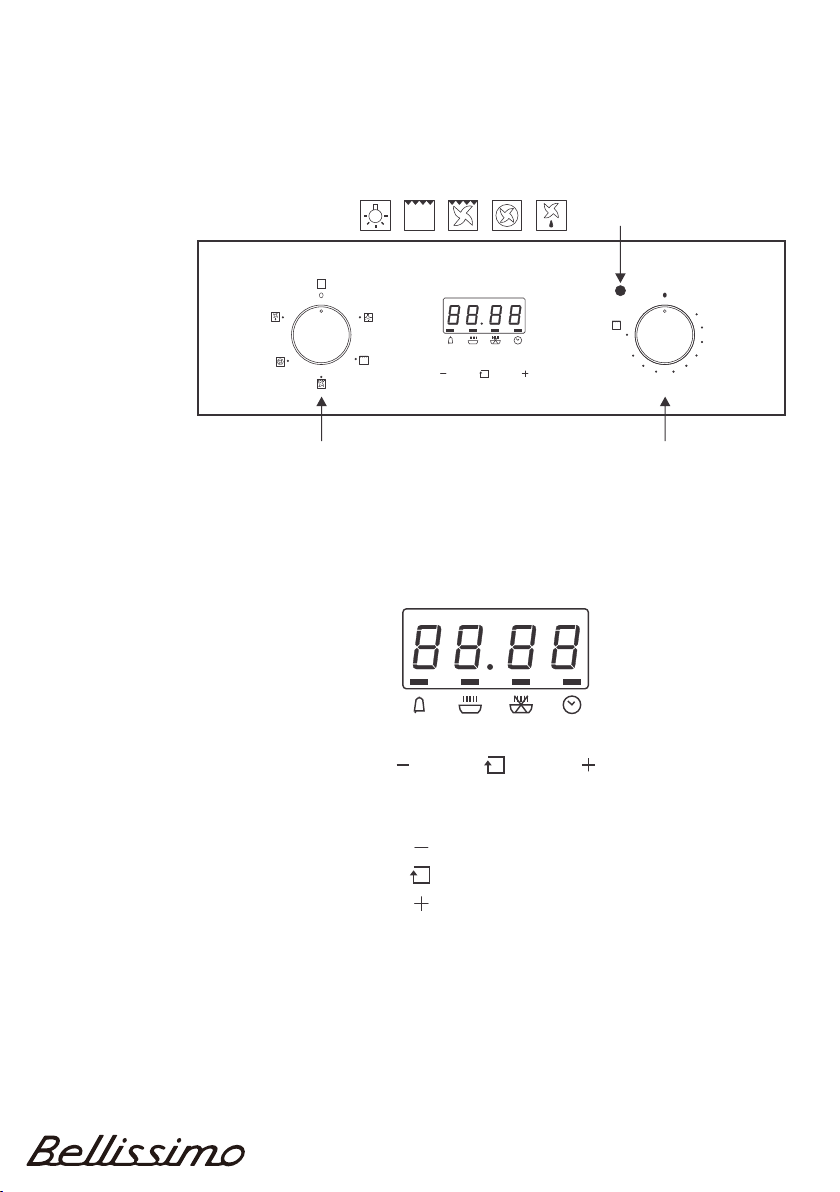
Controls
Oven
Temperature
Indicator Light
60
5 Function Model
180
220
MAX
160
120
100
°C
80
140
200
Cooking Mode
Selection Knob
Cooking Temperature
Selection Knob
Decrease time
Function
Increase time
6

7
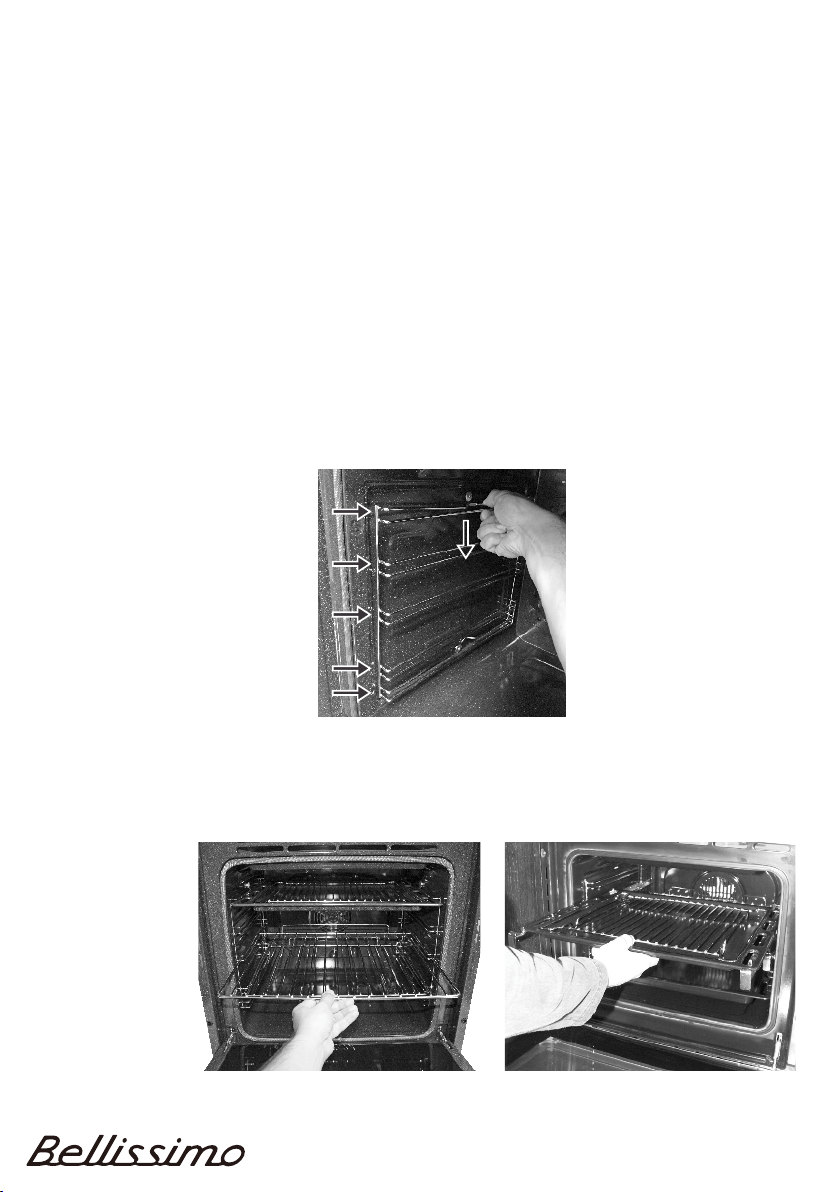
Use and Care
Grill Tray with
removable insert
Oven Shelf
Baking Tray
(If supplied)
Oven Door
Level 1
Level 2
Level 3
Level 4
Level 5
Oven & Accessories
Depending on which model you have, ovens are supplied with
chrome wire Shelf Supports or chrome wire/telescopic Shelf
Supports. There are five shelf positions for all models, some
models include two telescopic supports.

Use and Care
8
How to use your oven
This Fan Forced Oven is an extremely versatile appliance that
allows you to choose easily and safely between different cooking
modes. The various cooking modes are selected by means of a
cooking mode selection knob, located on the control panel.
To operate the oven:
·Ensure that manual mode is selected (page 12)
·Turn the cooking mode selection knob to the desired cooking
mode (explanation of cooking modes is on pages 10 to 11)
·Turn the cooking temperature selection knob to the desired
temperature (cooking guide is on page 19) or to ‘MAX’ if Grilling.
The first time you use your appliance, we recommend that you set
the thermostat to the highest setting, set the cooking mode
selection knob to a cooking mode and leave the oven on for about
half an hour with nothing in it and the oven door closed. Then, open
the oven door and allow the oven to cool. Any odour that may be
detected during this initial use is due to the evaporation of
substances used to protect the oven during storage.
Note: Place tray on the bottom shelf position of the oven to prevent
any spillages from dripping onto the bottom of the oven. Never
place anything (including foil and oven trays) on the bottom of
the oven when it is in operation because this could damage
the enamel. Only place your cookware (dishes, trays, aluminum
foil, etc.) on the oven shelves provided with the appliance.
If supplied, use the chrome
wire handle shown left
when removing the trays
from the oven.
9
Positioning the oven trays & shelves
The Grill Tray or Oven Shelf can be located in any of the five height
positions in the oven.
Refer to the ‘Cooking Guide Table’ for the recommended shelf
position. When fitting the trays or shelves, ensure they are fitted
between the two wires that are closest together as shown below.
Oven Shelves have a stop so that they are not fully withdrawn by
accident. To fully remove the Oven Shelves, lift the front of the shelf
slightly and withdraw fully from the oven. Note that the Grill Tray
does not have a stop position and can be fully withdrawn without
interruption, so be careful not to accidentally fully withdraw the tray.
To remove the Oven Shelf
Support, push down on the
wire below the top locking
pin, pull away from the oven
wall until you can release
the top of the support from
the holes in the oven wall.
Replace in reverse
procedure.
Fit Trays and
Shelves
between bars
as shown right
Use and Care
Shown with Oven Shelf Shown with Grill Tray
Chrome Wire Shelf Support Chrome Wire Shelf with
Shelf Support (If fitted)
Telescopic

Use and Care
COOKING MODES
Grill mode
Select ‘Grill’ mode with cooking mode selection knob and turn
cooking temperature selection knob to ‘Max’. When set to Grill
mode, the top element operates. The extremely high and
direct temperature of the grill makes it possible to brown the
surface of meats and roasts while locking the juices in to keep
them tender. Grill mode can also be used for dishes that require a
high temperature on the surface such as beef steaks, veal, rib
steak, filets, hamburgers, etc.
Grill food with the oven door closed.
Fan assisted grill mode
Select ‘Fan Assisted Grill’ mode with cooking mode selection knob
and turn cooking temperature selection knob to the desired
temperature setting. When set to Fan Assisted Grill mode, the top
inner element and the fan operate. This mode increases the
circulation of air throughout the oven, which helps prevent food
from burning on the surface, allowing the heat to penetrate right
into the food. Particularly suitable for kebabs made with meats and
vegetables, sausages, ribs, lamb chops, chicken, quail, pork
chops, fish steaks, stuffed cuttlefish etc.
In Fan Assisted Grill mode, grill with the oven door closed.
Fan forced mode
When set to ‘Fan Forced’ mode, the fan element and the fan
operate providing a delicate heat distributed uniformly throughout
the oven.
This mode is ideal for baking and cooking delicate foods on
multiple shelves, especially cakes that need to rise such as cream
puffs and for certain tartlets, sweet or savoury biscuits, savoury
puffs, swiss rolls and small portions of vegetables, etc.
10

Use and Care
Defrost mode
When set to ‘Defrost’ mode, the fan located at the back of the oven
circulates room temperature air around the food. This is
recommended for the defrosting of all types of food, but in
particular for delicate types of food which do not require heat, for
example: ice cream cakes, cream or custard desserts, fruit cakes,
etc. By using ‘Defrost’ mode, the defrosting time is approximately
halved.
11

12
3 BUTTON DIGITAL CLOCK
This model has a digital display, 24hr clock with 3 control buttons.
When the power is connected, the screen displays ‘12:00’ and the
bar above the symbol.
Adjusting the digital clock
To set the correct time, press the + or - button to advance forward
or backward until the correct time is displayed. After 5 seconds it
will start automatically or you can press the function button to
make it work.
Manual operation setting
Press the function button to select manual operation.
Automatic setting
Automatic setting of the oven allows you to select the end time,
cooking time, temperature and cooking mode. The oven will switch
on, cook according to the selected cooking mode and temperature
and then switch off automatically.
1. Press the function button repeatedly until the bar above
flashes, then press + or - button to set the time frame for
baking.
2. Press the function button repeatedly until the bar above
flashes and then press + or - button to set the time to switch off.
3. Set cooking temperature and cooking mode by turning the
thermostat knob and selector knob.
After these settings, the bars above and will flash,
indicating that the automatic cooking feature of the oven is set.
For example: if cooking time takes 45 minutes and you want it to
finish at 14:00:
1. Press the function button repeatedly until the bar above
flashes and set the cooking time 45 minutes.
2. Press the function button repeatedly until the bar above
flashes and set the finish time to 14:00.
After the above setting, the current time is displayed and the bars
above and will flash indicating that the automatic cooking
feature is set. When the clock displays 13:15, the oven will start
cooking automatically. While cooking the bar will flash.
Use and Care

13
When the clock displays 14:00, the oven automatically stops
cooking. The alarm will ring and the bar will flash, press any
button and the ringing will stop.
Semi-automatic setting
There are two methods of semi-automatic cooking:
A. Start cooking now and set cooking time:
This semi-automatic setting of the oven allows you to start
cooking immediately, set the cooking time (up to 10 hours), select
the temperature and cooking mode. The oven will cook according
to the selected cooking mode and temperature and then switch off
automatically once the cooking time has elapsed.
1. Press the function button repeatedly until the bar above is
displayed and set the cooking time.
2. Set cooking temperature and cooking mode by turning the
thermostat knob and selector knob.
The oven starts immediately, the bar above will flash. After
the cooking time has elapsed, the oven automatically stops
cooking. The alarm will ring and the bar above will flash. To
stop the ringing press any button.
B. Start cooking now and set the finish time:
1. Press the function button repeatedly until the bar above is
displayed and set the cooking time (up to 23 hours and 59
minutes).
2. Set cooking temperature and cooking mode by turning the
thermostat knob and selector knob.
The oven starts immediately, the bar above will flash. When
the finish time is reached, the oven automatically stops cooking.
The alarm will ring and the bar above will flash. To stop the
ringing press any button.
When any button is pressed during semi-automatic cooking, the
set cooking time is displayed. If the finish time is set to the current
time, the semi-automatic setting will be cancelled.
Use and Care

14
Timer
The digital countdown timer can be set up to 23 hours and 59
minutes maximum.
To set the timer, press the function button repeatedly until the bar
above is displayed. Once the function button is released, the
current time is displayed and the bar above flashes. When the
function button is pressed the remaining time is displayed. When
the set time is reached, disappears and the alarm will ring. To
stop the alarm, press any button.
Note: After pressing the function button, timer settings should be
done within 5 seconds.
In case of a power failure, all settings including the time display
will be lost. When the power is returned, the bar above and
‘12:00’ will be displayed.
Use and Care

Use and Care
The oven light
Set cooking mode selection knob to symbol to switch on the
oven light/s. The oven light/s stay on when the oven is operating.
Cooling ventilation
In order to cool down the exterior of the appliance, this model is
equipped with a cooling fan, which switches on automatically.
When the cooling fan is on, you will notice a flow of air exiting
between the oven door and the control panel.
Note: When cooking is finished, the cooling fan continues to
operate until the oven cools down and then switches off
automatically.
PRACTICAL COOKING ADVICE
The oven offers a wide range of settings which allow you to cook
any type of food in the best possible way. With time you will learn to
make the best use of this versatile cooking appliance and the
following directions are only a guideline which may be varied
according to your own personal experience.
Preheating
If the oven needs to be preheated, the ‘Fan Forced’ mode
should be selected. These are the most efficient modes, which will
reach the desired temperature as quickly as possible using the
least amount of energy.
Once the food has been placed in the oven, the desired cooking
mode should then be selected.
15

Use and Care
Multi shelf cooking
If you want to cook food on several shelves, select the ‘Fan Forced’
mode as this is the only cooking mode that allows you to do so.
When cooking delicate foods on more than one shelf, use the ‘Fan
Forced’ mode. This mode allows you to cook on 3 shelves at the
same time. Refer to the ‘Cooking Guide’ table.
Using the grill
This multi-function oven has 2 different grilling modes.
Use the ‘Grill’ mode with the oven door closed, place the food
on the centre of the grill pan, insert and fit the grill pan on either
the 3rd or 4th shelf from the bottom. Note: only the central part of
the top heating element operates for grilling.
When using ‘Grill’ mode, we recommend you set the thermostat to
the highest setting. However, this does not mean you cannot use
lower temperatures, simply adjust the thermostat knob to the
desired temperature.
Use ‘Fan assisted grill’ mode with the oven door closed. This
mode is very useful for grilling foods rapidly, as the distribution of
heat by the fan makes it possible not only to brown the surface, but
also to cook the bottom of the food. It can also be used for
browning foods at the end of the cooking process, such as adding
that gratin finish to pasta bakes for example.
When using ‘Fan assisted grill’ mode, place the food on the 2nd or
3rd oven shelf from the bottom, then place a dripping-pan on the
1st rack from the bottom to prevent fat and grease from dripping
onto the oven floor. We recommend you set the thermostat to
200°C, as it is the most efficient temperature for ‘Fan assisted grill’
mode. However, this does not mean you cannot use lower
temperatures, simply adjust the thermostat knob to the desired
temperature.
Important: for best results and to save energy, always use the ‘Fan
assisted grill’ with the oven door closed.
16

Use and Care
Baking cakes
When baking cakes ,always place them in a preheated oven. Make
sure you wait until the oven has been preheated thoroughly (the
indicator light will turn off). To prevent heat loss and the cake from
dropping, do not open the oven door during baking.
In general...
... if pastry is too dry
Increase the temperature by 10°C and reduce the cooking time.
... if pastry has dropped
Use less liquid or lower the temperature by 10°C.
... if pastry is too dark on top
Place it on a lower shelf, lower the temperature, and increase the
cooking time.
... if cooked well on the inside but sticky on the outside
Use less liquid, lower the temperature, and increase the cooking
time.
... if the pastry sticks to the pan
Grease the pan well and sprinkle it with a dusting of flour or use
greaseproof paper.
... if I used multi shelf cooking and one shelf is more cooked
Use a lower temperature setting next time. It is not necessary to
remove the food from all the racks at the same time.
17

Use and Care
18
Cooking pizza
For best results when cooking pizza, use the ‘Fan Forced’ mode
·Preheat the oven for at least 10 minutes.
·Use a light aluminum pizza pan, placing it on the shelf supplied
with the oven. Don’t use the dripping pan since this will extend
the cooking time, making it difficult to get a crispy crust.
·Do not open the oven door frequently while the pizza is cooking;
·If the pizza has a lot of toppings (three or four), we recommend
you add the mozzarella cheese on top halfway through the
cooking process.
·For best results, only use one shelf at a time, but it you want to
cook on two shelves, use the 2nd and 4th racks from the bottom
with a temperature of 220°C and swap them halfway through
cooking.
Cooking fish and meat
When cooking white meat, fowl and fish, use a temperature setting
from 180°C to 200°C.
For red meat that you want well done on the outside while tender
and juicy in the inside, it is best to start with a high temperature
setting (200°C-220°C) for a short time, then turn the oven down
afterwards.
In general, the larger the roast, the lower the temperature setting.
Place the meat on the centre of the shelf and place the dripping
pan beneath it to catch the fat.
Make sure that the shelf is inserted so that it is in the centre of the
oven. If you would like to increase the amount of heat from below,
use a lower shelf height. For savoury roasts (especially duck and
wild game), dress the meat with lard or bacon on the top.
Use and Care
Cooking guide
19
Note: Cooking times are approximate and may vary according to
personal taste. When cooking using the grill or fan assisted grill,
the dripping pan must always be placed on the 1st oven shelf
from the bottom.
(on 2 shelves)
(on 2 shelves)
(on 2 shelves)
(on 3 shelves)
(on 3 shelves)
(on 3 shelves)

Use and Care
20
Cleaning and maintenance
Before cleaning your oven or performing maintenance, make sure
that the cooking mode selection knob is set to ‘OFF’ and the
cooking temperature selection knob is set to ‘OFF’. To extend the
life of your oven, it must be cleaned frequently.
The enamelled or stainless steel parts should be washed with
lukewarm water without using any abrasive powders or corrosive
substances. If any stainless steel has difficult to remove stains, use
cleaners specifically recommended to clean stainless steel. After
cleaning any surface, it is advisable to rinse thoroughly and dry.
The inside of the oven should preferably be cleaned immediately
after use, when it is still warm (but not hot), with warm water and
soap. The soap should be rinsed away and the interior dried
thoroughly. Avoid using abrasive detergents, scourers acidic
cleaners such as lime scale remover, etc. as these could damage
the enamel. If stains are particularly tough to remove, use cleaners
specifically recommended to clean ovens and follow the
instructions provided with the cleaner. Never use a steam cleaner
or caustic oven cleaners for cleaning inside the oven.
If you operate your oven for an extended period of time, or if you
are cooking dishes that contain a lot of water, condensation may
form on the oven door. Dry it using a soft cloth and try reducing the
cooking temperature.
There is a seal surrounding the oven opening which is necessary
to ensure the correct operation of the oven. Check the condition of
this seal on a regular basis. If necessary, clean it but avoid using
abrasive products or objects to do so. Should it become damaged,
please contact Technika Service Department. We recommend you
avoid using the oven until it has been repaired.
Never place anything (including foil and oven trays) on the
bottom of the oven when it is in operation because this could
damage the enamel.
Clean the glass door using non-abrasive products or sponges and
dry it with a soft cloth.
Do not use harsh abrasive cleaners or sharp metal scrapers to
clean the oven door glass since they can scratch the surface,
which may result in shattering of the glass.
Use only non caustic oven cleaners purchased from hardware
stores or supermarkets.
Table of contents
Other BELLISSIMO Oven manuals


