Tisira TOT644E User manual

Electric Oven User Manual
TM
USER MANUAL
600 // ELECTRIC OVENS
TOT644E | TOC648E
IMPORTANT // Please ensure that you read through this manual prior to installation and use.
This user manual contains important information to ensure optimal performance and keep you safe.
Please retain your proof of purchase, as this will be needed in the event that you require a warranty
service. Remember to keep this user manual for future reference.
www.tisira.com
Version 1.0

Page 2 Electric Oven User Manual
Content
Content 2
Warning & Safety Instructions 3-4
Product Overview 5
Product Specications 6
Installation 6-13
Control Panel Overview 13
Using the Oven 17
Digital Timer/Clock Instructions 18-21
Replacing the Oven Lamp 22
Cleaning the Oven Glass 22
Cleaning the Oven Door 23
Maintenance & Cleaning 24
Steam Cleaning 24
Accessories (Optional) 25
Trouble Shooting 25
Notes 26-27

Electric Oven User Manual Page 3
IMPORTANT // To ensure best performance, avoid risk of damage or accidents.
Please read the operating instructions prior to rst time use.
To maintain the eiciency and safety of this
appliance, we recommend that you do the
following:
• Only call the Service Centers authorized by
the manufacturer.
• Always use original spare parts.
• In case of damage to the power cord,
a special purpose cord or component
bought from the manufacturer or
maintenance department shall be used for
replacement.
When handling the appliance, we
recommend you always use the purpose
provided handles recessed into the sides
of the oven to prevent harming people or
damaging the appliance itself.
This appliance is designed for non-
commercial, house-hold use and its functions
must not be changed .
The electrical system of this appliance can
only be used safely when it is correctly
connected to an eicient earthing system in
compliance with current safety standards.
WARNING // Accessible parts may become
hot during use. To avoid burns, young children
should be kept away.
WARNING // Accessible parts may become
hot when the grill is in use. Children should
be kept away.
WARNING // This appliance is not intended for
use by persons (including children) with reduced
physical, sensory or mental capabilities, or lack
of experience and knowledge, unless they have
been given supervision or instruction concerning
use of the appliance by a person responsible for
their safety.
WARNING // Children should be supervised
to ensure that they do not play with the
appliance.
The following items are potentially
dangerous, and therefore appropriate
measures must be taken to prevent children
and the disabled from coming into contact
with them:
• Controls and the appliance in general;
• Packaging (bags, polystyrene, nails, etc.);
• The appliance itself, immediately aer
use of the oven or grill due to the heat
generated;
• The appliance itself, when no longer in
use (potentially dangerous parts must be
made safe).
Avoid the following:
• Touching the appliance with wet parts of
the body.
• Using the appliance when barefoot
• Pulling on the supply cable to unplug it
from the electrical outlet.
• Improper or dangerous operations;
• Obstructing the ventilation or heat
dissipation slots.
Warning & Safety Instructions

Page 4 Electric Oven User Manual
• Allowing power supply cables of small
appliances to come into contact with the
hot parts of the appliance.
• Exposing the appliance to atmospheric
agents such as rain or sunlight.
• Using the oven for storage purposes;
• Using ammable liquids near the
appliance
• Using adapters, multiple sockets and /or
extension leads.
• Attempting to install or repair the
appliance without the assistance of
qualied personnel.
Qualied personnel must be
contacted in the following cases:
• Installation (following the manufacturer’s
instructions).
• When in doubt about operating the
appliance.
• Replacing the electrical socket when it is
not compatible with the appliance plug.
• Damaged thermostat - The temperature
probe is part of the thermostat and an
authorised service agent should replace
the entire assembly. Only use temperature
probes recommended for this oven.
• If in doubt about the soundness of the
appliance aer removing it from its
packaging.
• If the power supply cable has been
damaged or needs to be replaced.
• If the appliance breaks down or functions
poorly; ask for original spare parts.
NOTICE // The manufacturer may not be
held responsible for any damage due to:
Incorrect installation, improper, incorrect and
irrational use.
• Steam cleaner cannot be used to clean the
oven.
• Only use the appliance to cook food and
nothing else.
• Disconnect the appliance from the
electrical mains if it is not functioning
properly and before cleaning or
performing maintenance.
• When le unused, unplug the appliance
form the electricity mains.
• Use oven gloves to place cookware in the
oven or when removing it.
• Make sure the knobs are in the “0” position
when the appliance is not in use.
• Never line the bottom of the oven with
aluminium foil.
• Never rest pots or pans on the bottom
of the oven cavity as it may damage the
enamel coating.
Warning & Safety Instructions

Electric Oven User Manual Page 5
Product Overview
1. Control Panel
2. Deep Tray*
3. Roast Chicken Skewer*
4. In Tray Wire Grill
5. Standard Tray
6. Oven door
7. Lamp
8. In Tray Wire Grill
9. Standard Tray
Page 6 Electric Oven User Manual
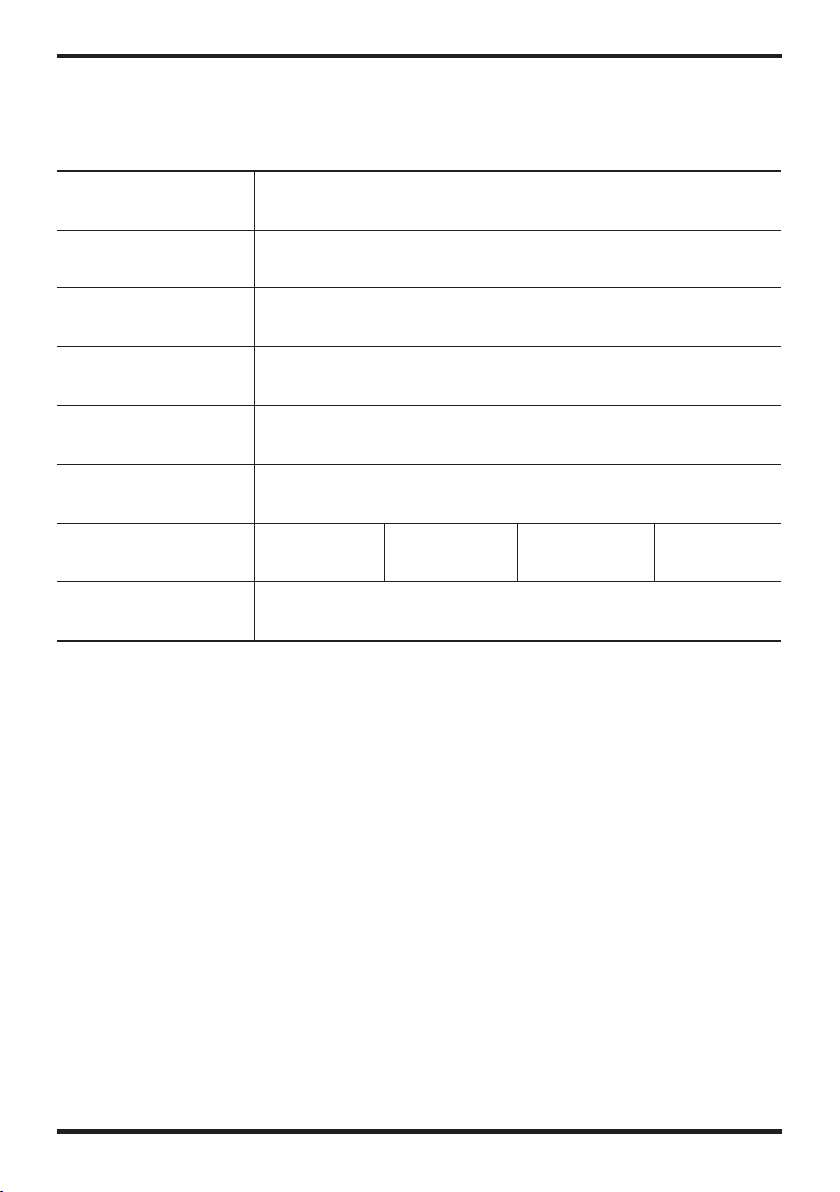
Product Specifications
Specifications TOT644E and TOC648E
Lamp Power 15-25W
Thermostat 40-240 / Max °C
Lower Heater 1200W
Upper Heater 1000W
Turbo Heater 1800W
Grill Heater Small Grill 1000W Big Grill 2000W
Supply Voltage 220V-240V 50/60 Hz
Technical specifications can be changed without prior notice to improve product quality.
The values provided with the appliance or its accompanying documents are laboratory
readings in accordance with the respective standards. These values may differ depending on
the use and ambient conditions. Figures in this guide are schematic and may not be exactly
match your product.
Installation
Ensure that electrical installation is suitable for operationalising the appliance. If not, call
an electrician and plumber to make necessary arrangements. Manufacturing firm can’t
be hold responsible for damages to arise due to operations by unauthorized people and
product warranty becomes void.
WARNING: It is customer’s responsibility to prepare the location the product shall be placed
on and also have power utility prepared.
Electric Oven User Manual Page 7
Installation
WARNING: The rules about electrical local standards must be adhered to during product
installation.
WARNING: Check for any damage on the product before installing it.
Do not have product installed if it’s damaged. Damaged products pose danger for your
safety.
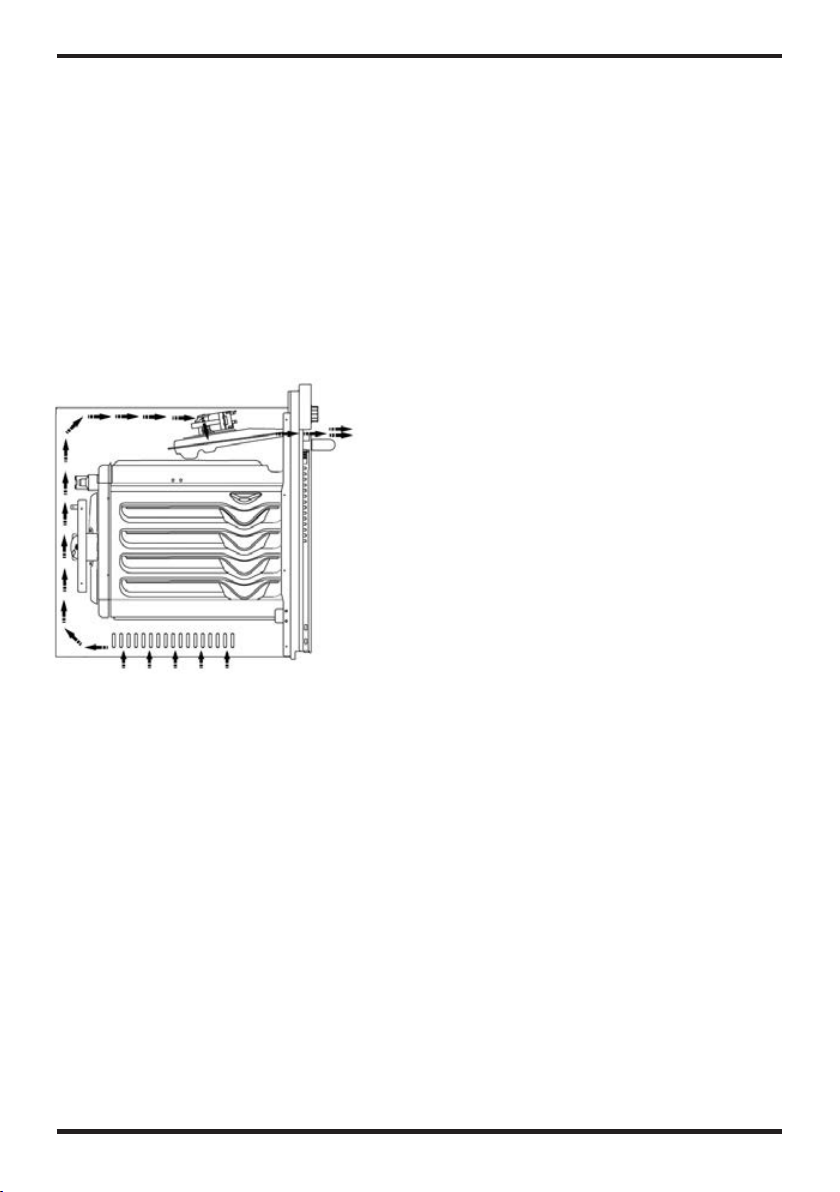
Important Warnings for Installation:
Cooling fan shall take extra steam out and prevent
outer surfaces of appliance from overheating during
operation of oven. This is a necessary condition for
better appliance operation and better cooking.
Cooling fan shall continue operation after cooking is
finished. Fan shall automatically stop after cooling
is completed.
A clearance must be left behind the enclosure where
you’ll place the appliance for efficient and good
operation. This clearance shouldn’t be ignored as
it’s required for ventilation system of the appliance
to operate.
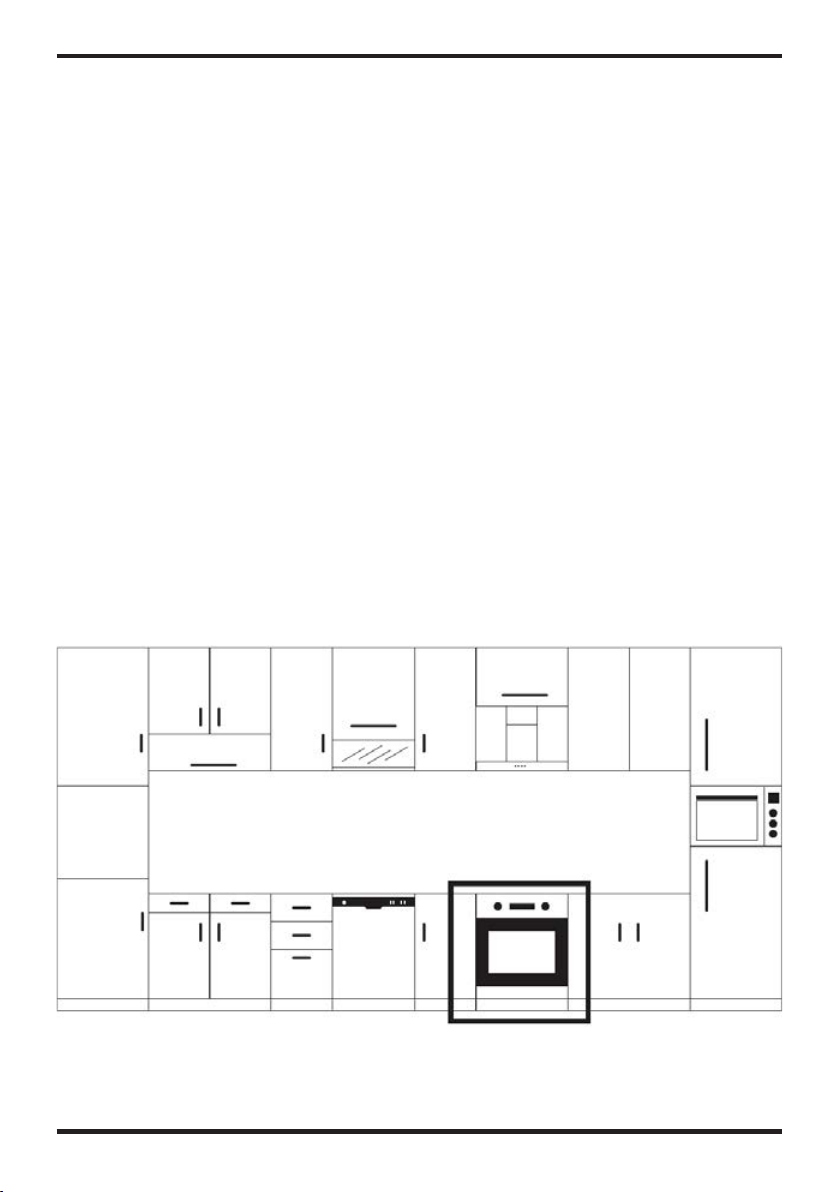
Right Place For Installation
Product has been designed to be mounted to worktops procured from market. A safe
distance must be left between the product and kitchen walls or furniture. See the drawing
provided on the next page for proper distances. (values in mm).
• Used surfaces, synthetic laminates and adhesives must be heat resistant. (minimum 100°C).
• Kitchen cupboards must be level with product and secured.
• If there is a drawer below the oven, a rack must be placed between oven and drawer.
WARNING: Do not install the product next to refrigerators or coolers. The heat emitted by
the product increases the energy consumption of cooling devices.
WARNING: Do not use door and/or handle to carry or move the product.
Figure 1

Page 8 Electric Oven User Manual
60 cm Built-In Oven Installation and Mounting
Place of use for product must be located before starting installation. Product mustn’t be
installed in places which are under the eect of strong air ow. Carry the product with minimum
two people. Do not drag the product so that oor isn’t damaged.
Remove all transportation materials inside and outside the product. Remove all materials and
documents in the product.
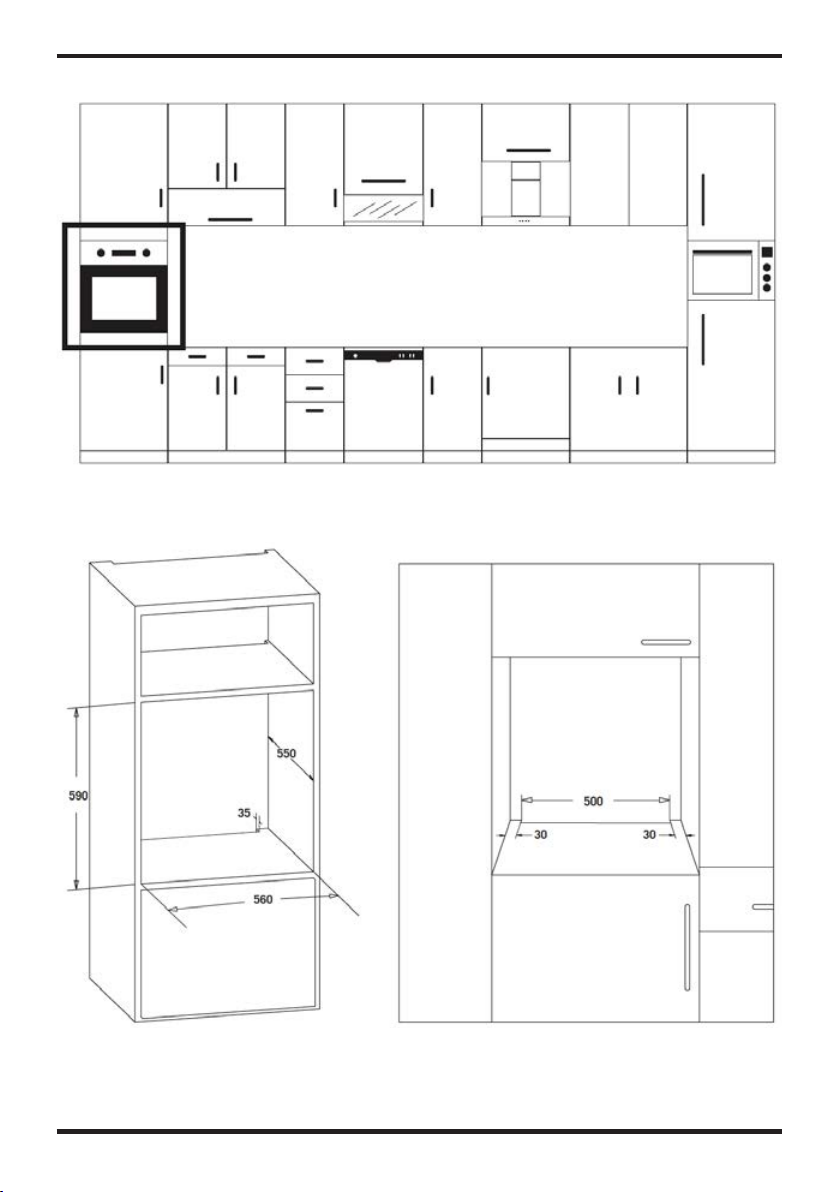
Installation Under Counter
Cabin must match the dimensions provided in Figure 2. A clearance must be provided at the rear
part of the cabin as indicated in the gure so that necessary ventilation can be achieved.
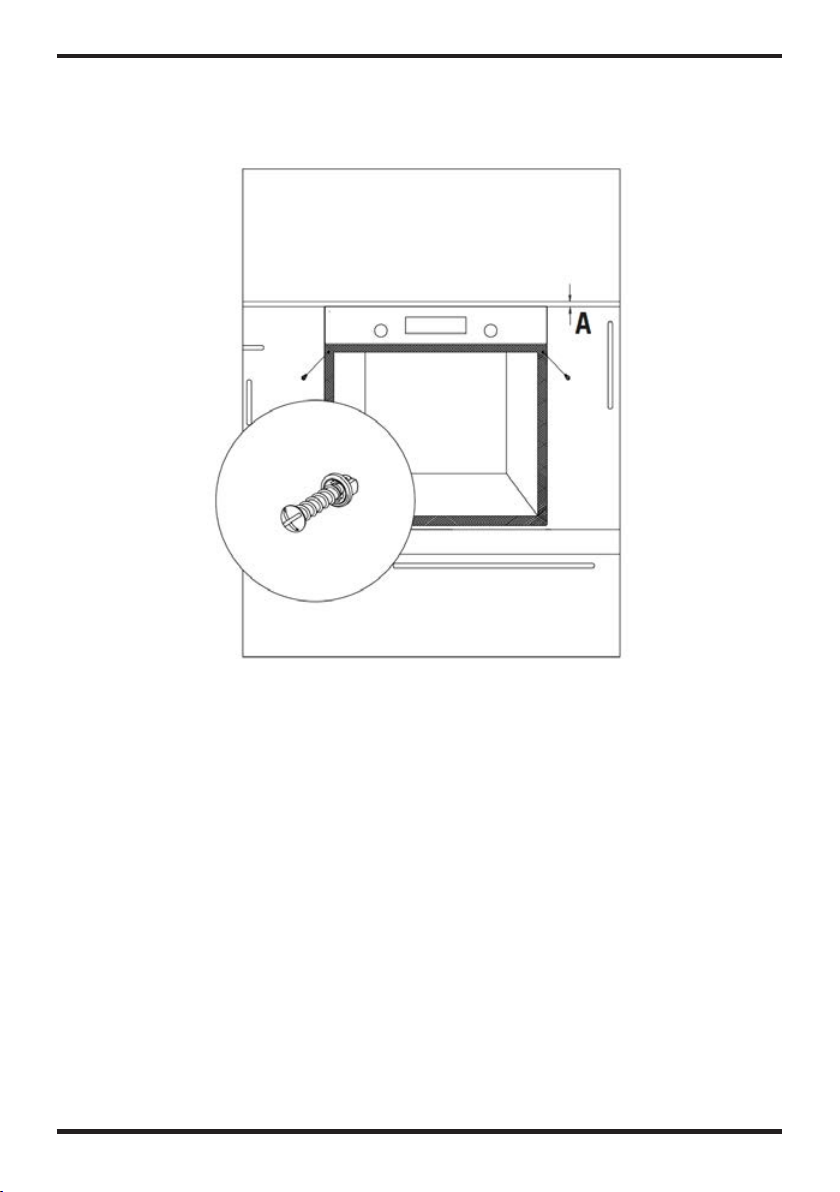
Aer mounting, the clearance between lower and upper part of the counter is indicated in Figure
5 with “A”. It’s for ventilation and shouldn’t be covered.
Installation In An Elevated Cabinet
Cabin must match the dimensions provided in Figure 4. The clearances with the dimensions
indicated in the gure must be provided at the rear part of cabin, upper and lower sections so
that necessary ventilation can be achieved.
Installation Requirements
Product dimensions are provided in the Figure 3. Furniture surfaces for mounting and mounting
materials to be used must have a minimum temperature resistance of 100 °C.
Mounting cabin must be secured and its oor must be plane for product not to tilt over.
Cabin oor must have a minimum strength that would handle a load of 60 kg.
Placing and Securing the Oven
Place the oven into the cabin with two or more people.
Ensure that oven’s frame and front edge of the furniture match uniformly.
Installation
Electric Oven User Manual Page 9
Supply cord mustn’t be under the oven, squeeze in between oven and furniture or bend.
Fix the oven to the furniture by using the screws provided with the product. Screws must
be mounted as shown in Figure 5 by passing them through plastics attached to frame of the
product. Screws mustn’t be overtightened. Otherwise, screw sockets might be worn.
Check that oven doesn’t move aer mounting. If oven isn’t mounted in accordance with
instructions, there is a risk of tilt over during operation.
Electrical Connection
Mounting place of the product must have appropriate electrical installation.
Network voltage must be compatible with the values provided on type label of product.
Product connection must be made in accordance with local and national electrical
requirements.
Before starting the mounting disconnect network power. Do not connect the product to network
until its mounting is completed.
Mounting
Figure 2
Installation

Page 10 Electric Oven User Manual
Figure 3
Electric Oven User Manual Page 11
Figure 4
Page 12 Electric Oven User Manual
IMPORTANT WARNINGS
Electrical Connection
This oven must be installed and connected to its place correctly according to manufacturer
instructions and by an authorized service.
Appliance must be installed in an oven enclosure providing high ventilation.
Electrical connections of the appliance must be made only via sockets having earth system
furnished in compliance with rules. Contact an authorized electrician if there is no socket
complying with the earthed system at where appliance will be placed. Manufacturing
company is by no means responsible for damage resulting from connection of non-earthed
sockets to appliance.
Plug of your oven must be earthed; ensure that socket for the plug is earthed. Plug must be
located in a place that can be accessed after installation.
Figure 5
Installation
Electric Oven User Manual Page 13
Your oven has been manufactured as 220-240 V 50/60 Hz. AC power supply compliant and
requires a 16 Amp fuse. If your power network is different that these indicated values, refer
to an electrician or your authorized service.
When you need to replace the electrical fuse, please ensure that electrical connection is
made as follows:
1. Phase (to live terminal) brown cable
2. Blue cable to neutral terminal
3. Yellow-green cable to earth terminal
Oven disconnecting switches must be in an accessible place for nal user while oven is in its place.
Power supply cable (plug in cable) mustn’t touch hot parts of the appliance.
If supply cord (plug in cable) is damaged, this cord must be replaced by the importer or its
service agent or an equally competent personnel to prevent a hazardous situation.
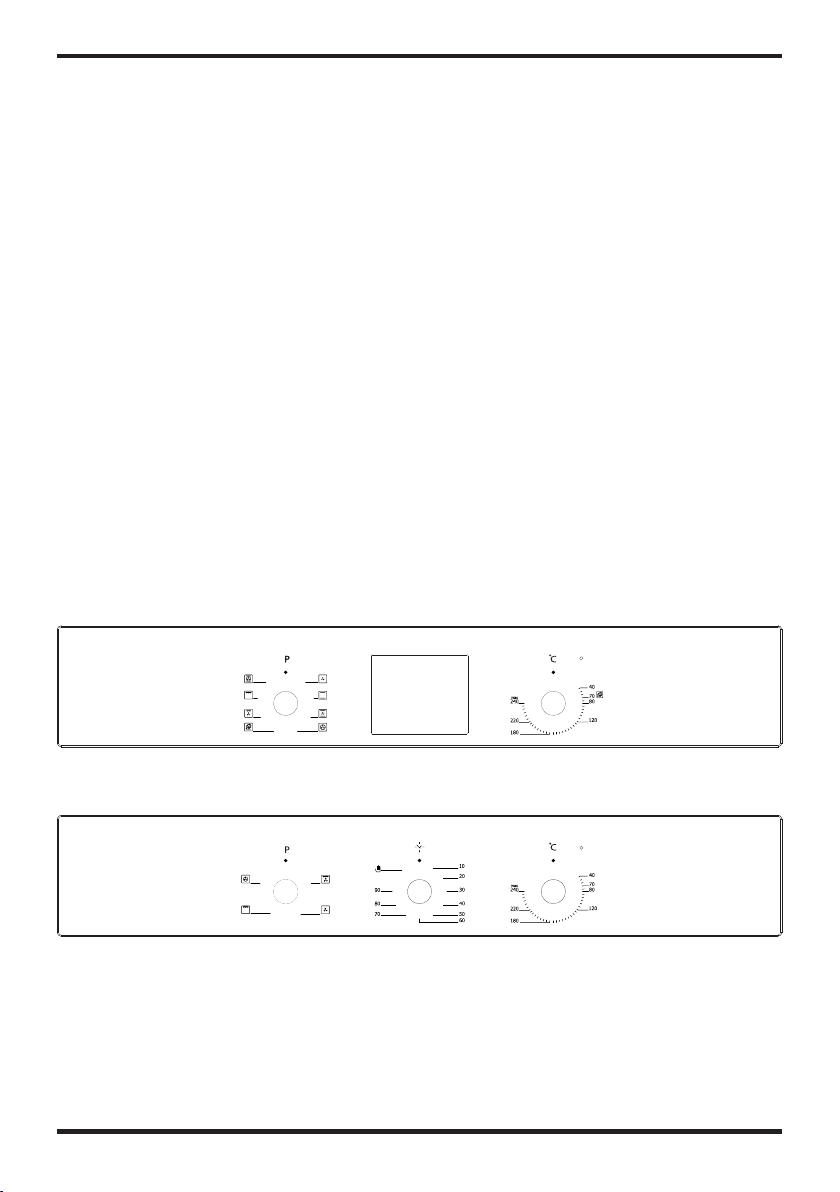
Control Panel Overview
Digital Panel
Mechanical Panel Visual
Installation

Page 14 Electric Oven User Manual
Figure 6
You can make necessary adjustments by turning right or left
when button is popped enough.
Adjustment can be made only when button is popped for
models with pop-up button.
Make sure that button is popped by pressing on the button
as shown in the figure at left side.
Thermostat Button: Helps to
set cooking temperature of
the food to be cooked in the
oven. You can set the desired
temperature by turning the
button aer placing the food
into the oven. Check cooking
table related to cooking
temperatures of dierent
foods.
*Mechanical Timer Button:
Helps to set time for the
food to be cooked in the
oven. Timer de-energizes the
heaters when set time expires
and warns you by ringing.
See cooking table for cooking
times.
Program Button: Helps to set
with which heaters the food
placed in oven will be cooked.
Heater program types in this
button and their functions are
stated below. Every model
might not have all heater
types and thus program types
of these heaters.
Control Panel
Electric Oven User Manual Page 15
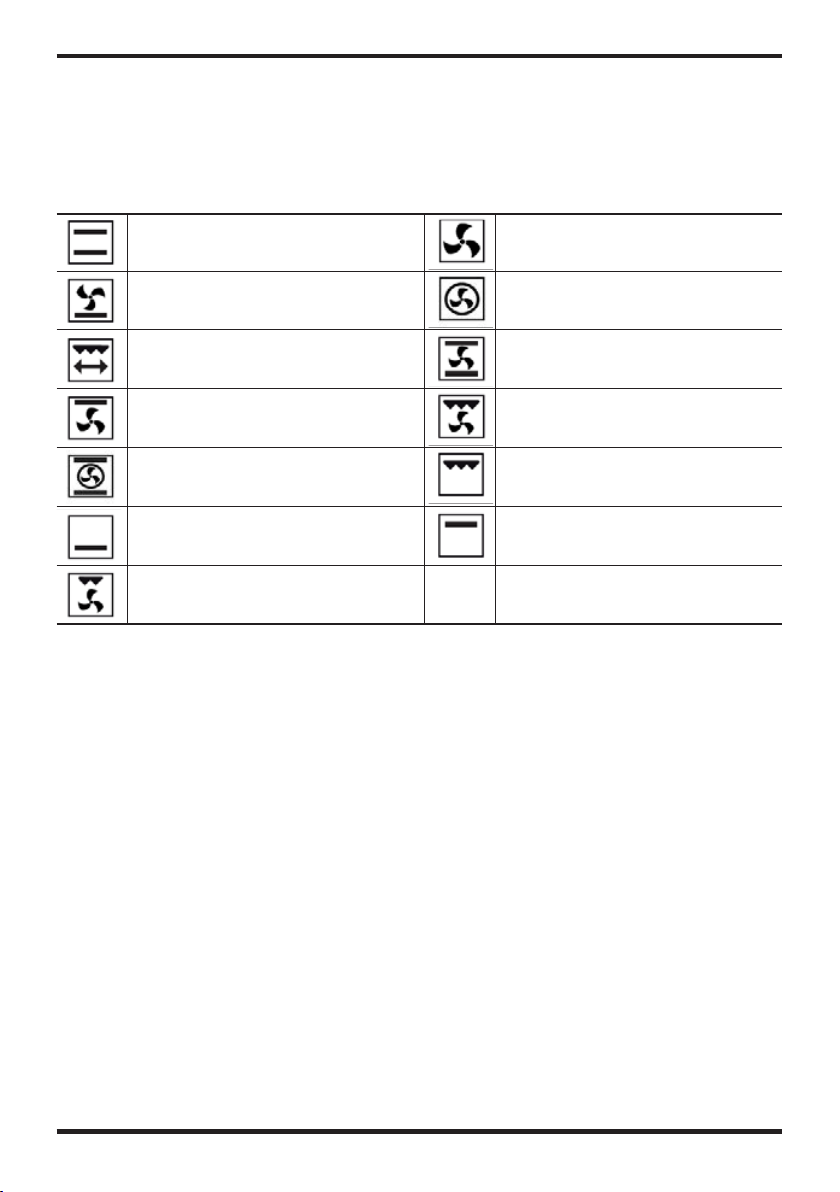
Program Types
Heating program types in your appliance and important explanations of them are provided
below for you can cook different foods appealing to your taste.
Lower heating element: Select this program towards end of cooking time if lower part of the
food cooked will be roasted.
Upper heating element: Used for post heating or roasting very little pieces of foods.
Lower and upper heating elements: A program that can be used for cooking foods like cake,
pizza, biscuit and cookie.
Lower heating element and fan: Use mostly for cooking foods like fruit cake.
Lower and upper heating element and fan: The program suitable for cooking foods like
cakes, dried cakes, lasagne. Suitable for cooking meat dishes, as well.
Grill: Grill cooker is used for grilling meat like foods such as steak, sausage and fish. While
grilling, tray should be placed in the lower rack and water must be placed in it.
Turbo heater and fan: Suitable for baking and roasting. Keep heat setting lower than “Lower
and Upper Heater” program since heat is conveyed immediately via air flow.
Grill and fan: Suitable for cooking meat type foods. Do not forget to place a cooking tray in a
lower rack inside the oven and a little water in it while grilling.
Lower and Upper Heating
Elements
Fan
Lower Heating Element and Fan Turbo Heater and Fan
Grill and Roast Chicken Lower-Upper Heating Element
and Fan
Upper Heating Element and Fan Grill and Fan
Multifunctional Cooking Grill
Lower Heating Element Upper Heating Element
Small Grill and Fan
Page 16 Electric Oven User Manual
Multi Functional Cooking: Suitable for baking and roasting. Lower and upper heaters operate as
well as quick transmission of heat via air ow.
Suitable for cooking requiring single tray and intense heat.
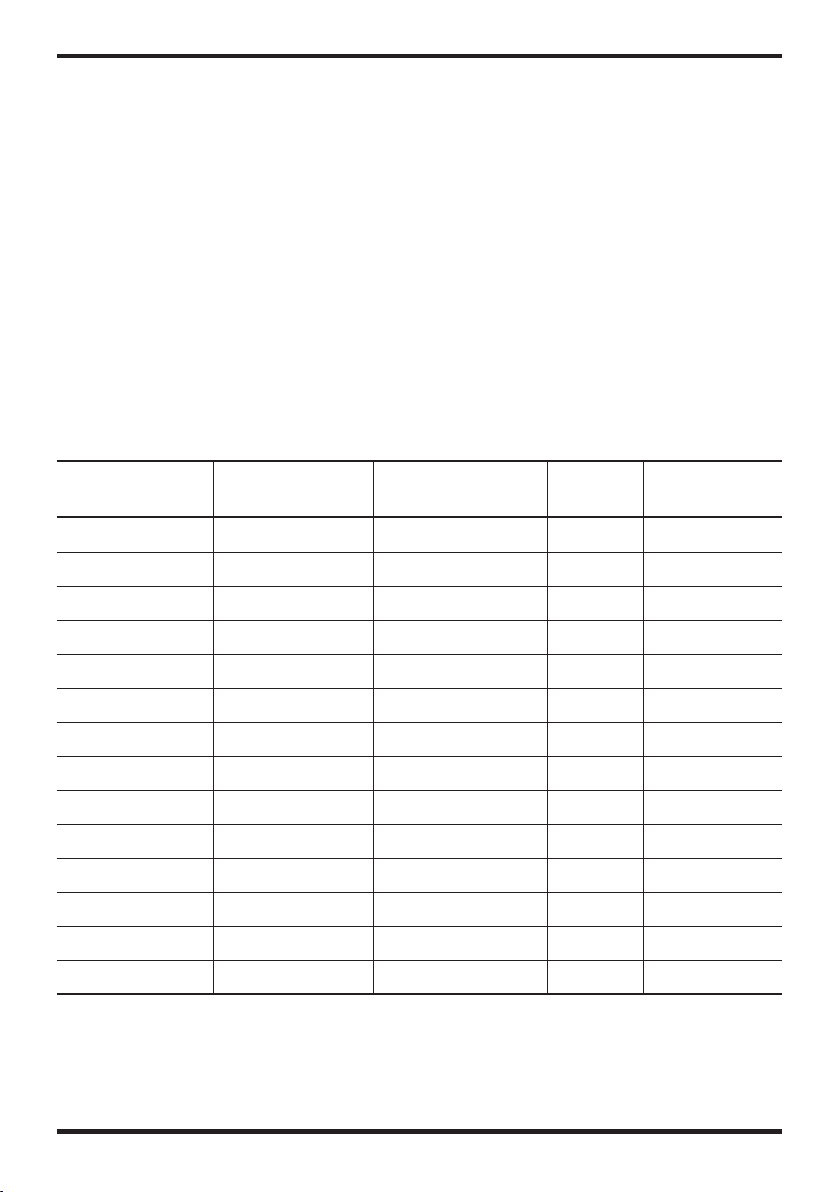
Cooking Recommendations
You can nd in the following table the information of food types which we tested and identied
their cooking values in our labs. Cooking times can vary depending on the network voltage,
quality of material to be cooked, quantity and temperature. Dishes to cook by using these values
might not appeal to your taste. You can set various values for obtaining dierent tastes and
results appealing to your taste by making tests.
WARNING: Oven must be preheated for 7-10 minutes before placing the food in it.
Cooking Table
Food Cooking Function Cooking
Temperature (ºC)
Cooking
Rack
Cooking Time
(min.)
Cake Static/Static+Fan 170-180 2-3 35-45
Small Cake Static / Static+Fan 170-180 225-30
Pie Static / Static+Fan 180-200 235-45
Pastry Static 180-190 220-25
Cookie Static 170-180 220-25
Apple Pie Static / Turbo+Fan 180-190 150-70
Sponge cake Static 200/150* 220-25
Pizza Static Fan 180-200 320-30
Lasagne Static 180-200 2-3 25-40
Meringue Static 100 250
Grilled Chicken** Grill + Fan 200-220 325-35
Grill Fish** Grill + Fan 200-220 325-35
Calf Steak** Grill + Fan Max 415-20
Grilled Meatball** Grill + Fan Max 420-25
* Do not preheat. First half of cooking time is recommended to be at 200°C de while the other
half at 150°C.
** Food must be turned aer half of the cooking time.

Electric Oven User Manual Page 17
Using the Oven
Initial Use of Oven
Here are the things you must do at rst use of your oven aer making its necessary connections
as per instructions:
1. Remove labels or accessories attached inside the oven. If any, take out the protective folio on
front side of the appliance.
2. Remove dust and package residues by wiping inside of the oven with a damp cloth. Inside of
oven must be empty. Plug the cable of appliance into the electrical socket.
3. Set the thermostat button to the highest temperature (240 Max. °C) and run the oven for 30
minutes with its door closed. Meanwhile a slight smoke and smell might occur and that’s a
normal situation. (See next page for digital timer/clock instructions)
4. Wipe inside of the oven with a slightly warm water with detergent aer it becomes cold and
then dry with a clean cloth. Now you can use your oven.
Normal Use of Oven
1. Adjust thermostat button and temperature at which you want to cook the food to start
cooking.
2. You can set cooking time to any desired time by using the timer nob on models with
mechanical timer. Timer will de-energize heaters when time expired and provide warning
beep as ringing.
3. Timer turns the heaters o and provides audible signal when cooking time expires in line
with the information entered in the models with digital timer. (See next page for digital
timer/clock instructions)
4. Cooling system of the appliance will continue to operate aer cooking is completed. Do not
cut the power of appliance in this situation which is required for appliance to cool down.
System will shut down aer cooling is completed.
Page 18 Electric Oven User Manual
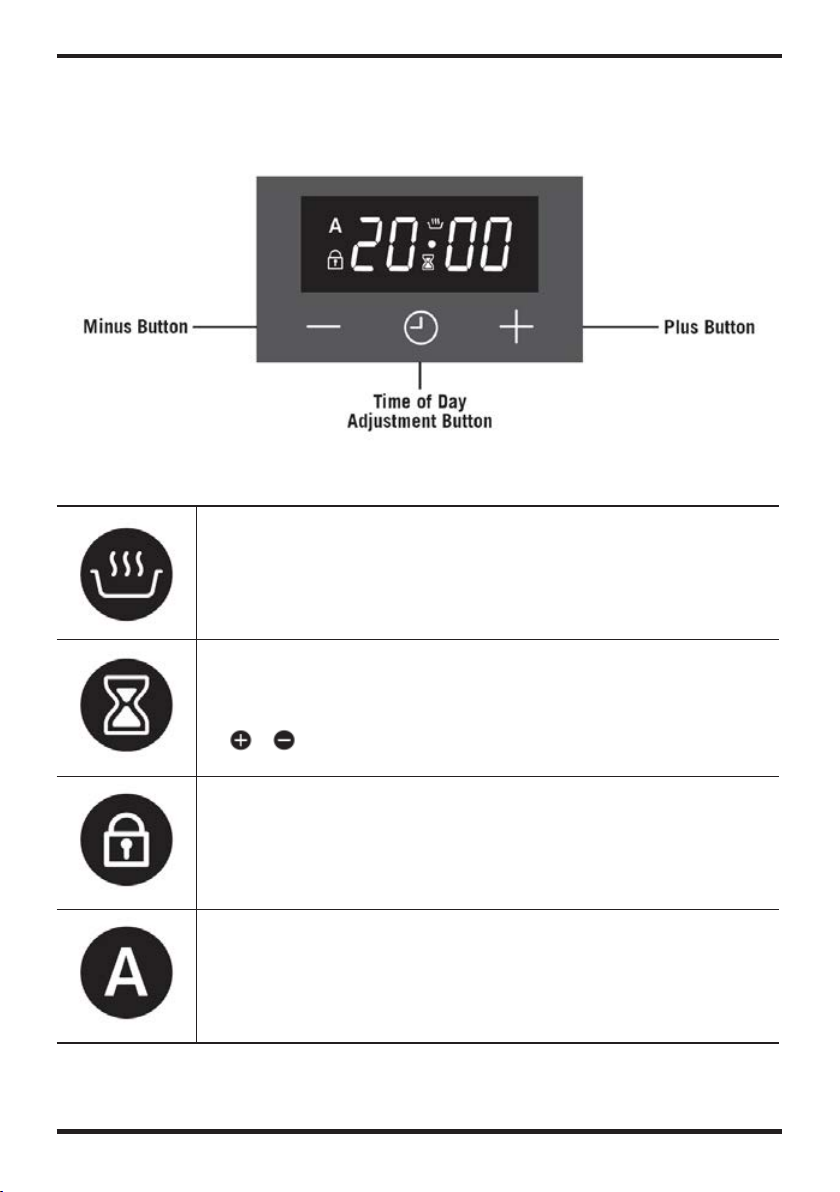
Digital Timer/Clock Instructions
Screen Symbols
Oven Status Indication
• On: Cooking or ready for cooking.
• Off: No cooking
Minute Minder Status Indication
• On: Minute minder alarm active.
• Flashing: Minute minder adjustment mode , adjustment possible by
or buttons or current minute minder alarm completed.
• Off: Minute minder is not active.
Child Lock Indication
• On: Child Lock is active.
• Off: Child Lock is inactive.
Automatic Cooking Status Indication
• On: Full or semi auto-cooking active.
• Flashing: Auto cooking completed or power on condition.
• Off: No auto cooking active.

Electric Oven User Manual Page 19
Digital Timer/Clock Instructions
It is an electronic timing module enabling your food you have put in the oven to be ready
for service at any time you like. The only thing you need to do is to programme the cooking
time of the food and also the time when you would like your food to be ready.
It is also possible to use a minute-programmed alarm clock independent from the oven.
The case where the time clock is behind or ahead is not a malfunction. The oven time clock
may be put back or ahead according to mains frequency as it runs directly with mains
voltage. This is not a malfunction.
Power On
At power on, oven is inactive, time of day and symbols are flashing. The indicated time
of day is not correct and has to be adjusted. Press to activate the oven and proceed
adjusting the time of day as below.
Time of Day Adjustment
Time of Day adjustment is only possible when no cooking program is in progress. Press and
simultaneously for 3 seconds to enter the adjustment mode and then the dot symbol in between
hours and minutes digits will start to ash. Using either and adjust the desired duration.
The maximum adjustable duration is 23h 59 minutes. Adjustment mode will be abandoned
within 6 seconds aer the last button press or can be terminated immediately by pressing the
button.
Note: Time of Day adjustment is also activated in first 7 seconds after power on.
Setting the Minute Minder
With this function, you can adjust a duration in minutes. Aer the adjusted time has been
elapsed, an alarm sound will be produced. Press the button once to enter the minute minder
adjustment mode, the symbol will start ashing on the screen. Using either or adjust
the desired duration. The maximum adjustable duration is 10 hour.
Adjustment mode will be abandoned within 6 seconds aer the last button press or can be
terminated immediately by pressing the button.

Page 20 Electric Oven User Manual
Cancelling the Alarm Buzzer Sound
Once the adjusted minute minder duration is elapsed, the buzzer alarm will start to sound ,
accompanied by the ashing symbol on the screen. Any button press will stop the alarm
sound and this indication. If no button is pressed, the alarm sound will end automatically aer 5
minutes, but the ashing symbol will go on.
Semi Automatic Cooking
This cooking program is intented to start cooking immediately for a specied duration. Aer the
oven is set to the desired function and Temperature via the oven knobs:
1. Press the button twice, symbol will ash on the screen, and duration of
cooking will show on the screen one aer another.
2. Using or buttons, adjust the desired cooking duration.
3. Aer 6 seconds of the last button press or by pressing twice, the adjustment is completed.
will be steady on the screen and the display shows the current time of day.
Full Automatic Cooking
This cooking program is intented to perform a delayed cooking by programming the time of day
when the food should be ready. In other words, the oven will start cooking not immediately but
will automatically calculate the time to start cooking.
1. Perform step 1 and 2 of the semi auto cooking as above. (cooking duration adjustment)
2. Press button once again, symbol will ash on the screen and duration of cooking will
show on the screen one aer another.
3. Using or buttons, adjust the desired end of cooking time. symbol will disappear
but symbol will be still ashing on the screen. This indicates that an automatic cooking is
programmed but cooking has not started yet.
4. Aer 6 seconds of the last button press or by pressing , the adjustment will be completed,
the display shows the current time of day.
Digital Timer/Clock Instructions
This manual suits for next models
1
Table of contents
Other Tisira Oven manuals


Popular Oven manuals by other brands


Siemens
Siemens HE578AB 1 Series instruction manual

Moffat
Moffat CR5L OPERATING & SERVICE MANUAL

Electrolux
Electrolux EOU43002 user manual

AEG
AEG BPS551020M user manual

Ovention
Ovention Matchbox M360-12 Installation and operating manual

Merloni
Merloni FV 37 GB Instructions for and use Instructions for installation and use