IM PORTANT
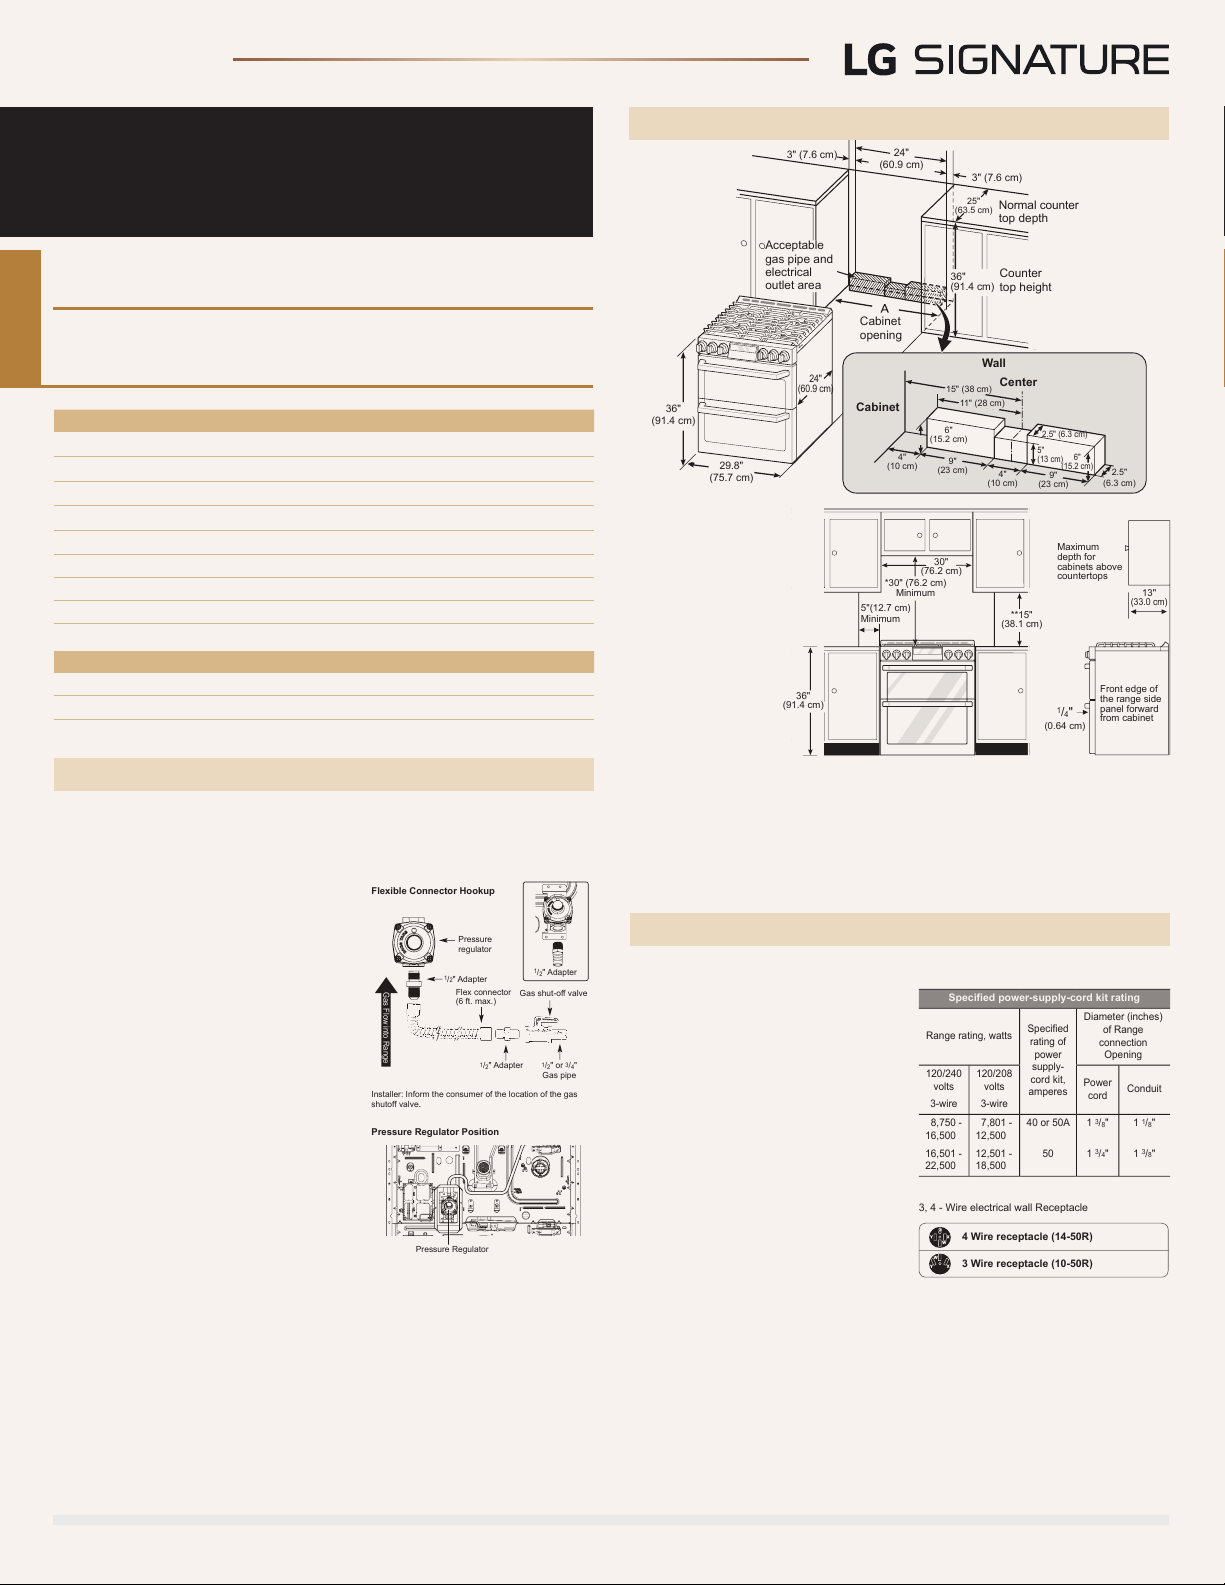
QUICK INSTALL & CLEARANCES
For full installation directions/clearances please refer to
the corresponding User Manual and Installation Guide.
PRODUCT DIMENSIONS
DIMENSIONS
Cabinet Width (in) 30”
Overall Depth (in) - including handle 28 15/16”
Overall Height (in) - including backguard -
Overall Width (in) 29 7/8”
Upper Oven Interior Dimensions 24 13/16” x 10 13/16” x 20”
Lower Oven Interior Dimensions 24 13/16” x 14 1/4” x 20”
Height to Cooking Surface (in) 36”
Drawer Dimensions (in) (W x H x D) 24 13/16” x 14 1/4” x 20”
Carton Dimensions (in) (W x H x D) 32 1/2” x 44” x 30 1/2”
POWER/RATINGS
Amp at 208V / 240V 56A / 64.6A
kW at 208V / 240V 6kW / 6.9 kW
HOME APPLIANCES
© 2018 LG Electronics USA, Inc. All rights reserved. "LG Life’s Good" is a registered trademark of LG Corp. All other product and brand names are trademarks or registered trademarks of their respective owners. Design, features and specifications are subject to
change without notice. Non-metric weights and measurements are approximate. Some features may require Internet access. Content and services may vary by product and are subject to change without notice. 11/1/18
CONNECTING THE RANGE TO GAS
LUTD4919SN
LG SIGNATURE Slide-In Double Oven
3" (7.6 cm) 24"
(60.9 cm)
24"
(60.9 cm)
36"
29.8"
(75.7 cm)
15" (38 cm)
11" (28 cm)
2.5" (6.3 cm)
2.5"
(6.3 cm)
9"
(23 cm)
4"
(10 cm)
9"
(23 cm)
4"
(10 cm)
6"
(15.2 cm)
5"
(13 cm) 6"
(15.2 cm)
25"
(63.5 cm)
36"
(91.4 cm)
3" (7.6 cm)
Acceptable
gas pipe and
electrical
outlet area
Normal counter
top depth
Counter
top height
Cabinet
opening
Wall
Center
Cabinet
30"
(76.2 cm)
36"
(91.4 cm)
**15"
(38.1 cm)
*30" (76.2 cm)
Minimum 13"
(33.0 cm)
Maximum
depth for
cabinets above
countertops
Front edge of
the range side
panel forward
from cabinet
1
/
4
"
(0.64 cm)
5"(12.7 cm)
Minimum
3" (7.6 cm) 24"
(60.9 cm)
24"
(60.9 cm)
36"
(91.4 cm)
29.8"
(75.7 cm)
15" (38 cm)
11" (28 cm)
2.5" (6.3 cm)
2.5"
(6.3 cm)
9"
(23 cm)
4"
(10 cm)
9"
(23 cm)
4"
(10 cm)
6"
(15.2 cm)
5"
(13 cm) 6"
(15.2 cm)
25"
(63.5 cm)
36"
(91.4 cm)
3" (7.6 cm)
Acceptable
gas pipe and
electrical
outlet area
Normal counter
top depth
Counter
top height
Cabinet
opening
Wall
Center
Cabinet
30"
(76.2 cm)
36"
(91.4 cm)
**15"
(38.1 cm)
*30" (76.2 cm)
Minimum 13"
(33.0 cm)
Maximum
depth for
cabinets above
countertops
Front edge of
the range side
panel forward
from cabinet
1
/
4
"
(0.64 cm)
5"(12.7 cm)
Minimum
•
A = 30” (76.2 cm)
For U.S.A
= 30” ~ 31”
(76.2 ~ 78.7 cm)
for Canada
•
For installation in
Canada, a free-
standing range is
not to be installed
closer than 15/32”
(12 mm) from any
adjacent surface.
Minimum Dimensions
•
30” (76.2 cm) minimum clearance between the top of the cooking surface
and the bottom of an unprotected wood or metal cabinet; or 24” (60.9 cm)
minimum when bottom of wood or metal cabinet is protected by not less
than 1/4” (0.64 cm) flame retardant millboard covered with not less than
no. 28 MSG sheet steel, 0.015” (0.381 mm) stainless steel, 0.024” (0.610
mm) aluminum or 0.020” (0.508 mm) copper.
•
15” (38.1 cm) minimum between countertop and adjacent cabinet bottom.
Shut off the range gas supply valve before removing the old range and leave
it off until the new hook-up has been completed.
Because hard piping restricts movement of the range, a CSA International-
certified flexible metal appliance connector should be used unless local codes
require a hard-piped connection.
A manual valve shall be installed in an
accessible location in the gas piping
external to the appliance for the purpose
of turning on or shutting off gas to the
appliance.
Never reuse an old connector when
installing a new range.
To protect against gas leaks, use a qualified
pipe joint sealant on all external threads.
•
Install a male 1/2” or 3/4” flare union
adapter to the NPT internal thread of
the manual shut-off valve, taking care
to back-up the shut-off valve to keep it
from turning.
•
Install a male 1/2” flare union adapter to
the 1/2” NPT internal thread at the inlet
of the pressure regulator. Use a backup
wrench on the pressure regulator fitting
to prevent damage.
•
Connect a flexible metal appliance
connector to the adapter on the range.
Position the range to permit connection
at the shut-off valve.
•
When all connections have been made,
be sure all range controls are in the Off position and turn on the main gas
supply valve. Gas leaks may occur in your system and create a hazard. Gas
leaks may not be detected by smell alone.
•
Check all gas connection joints and fittings for leaks with a non-corrosive leak
detection fluid, then wipe off.
•
Gas suppliers recommend you purchase and install a UL approved gas
detector. Install and use in accordance with the installation instructions.
▲
! WARNING
•
Do not use a flame to check for gas leaks.
•
Isolate the range from the gas supply system by closing its individual
shut-off valve during any pressure testing of the gas supply system at test
pressures equal to or less than 1/2” psig (3.5 kPa).
Flexible Connector Hookup
1
/
2
" Adapter
1
/
2
" Adapter
1
/
2
" Adapter
Pressure
regulator
Flex connector
(6 ft. max.)
Gas shut-off valve
1
/
2
" or
3
/
4
"
Gas pipe
Gas Flow into Range
Installer: Inform the consumer of the location of the gas
shuto
Pressure Regulator Position
CONNECTING ELECTRICITY - ELECTRICAL REQUIREMENTS
This appliance must be installed and grounded on a branch circuit by a qualified
technician in accordance with the National Electrical code ANSI/NFPA NO. 70 - latest
edition.
All wiring should conform to Local and NEC
codes. This range requires a single-phase,
3 wire, A.C 120/208 V or 120/240 V 60 Hz
electrical system. Use only a 3-conductor or
a 4-conductor UL - listed range cord with
closed-loop terminals, open-end spade lugs
with upturned ends or similar termination.
Do not install the power cord without a
strain relief.
A range cord rated at 40 amps with 120/208
or 120/240 minimum volt range is required.
If a 50 amp range cord is used, it should
be marked for use with 13/8” diameter
connection openings. This appliance may be
connected by means of a conduit or power
cord. If a conduit is being used, go to page
23 for 3 wire conduit connections or 4 wire
conduit connections
▲
! WARNING
•
Allow 2 to 3 ft (61.0 cm to 91.4 cm) of slack in the line so that the range can be
moved if servicing is ever necessary.
•
The power supply cord and plug should not be modified. If it will not fit the outlet,
have a proper outlet Installed by a qualified electrician.
•
Using an extension cord to connect the power is prohibited. Connect the power
cord and plug directly.
•
Electrical ground is required on this appliance.
•
Make sure that the power cord is not pinched by the range or heavy objects.
Failure to do so can result in serious burns or electrical shock.
•
Do not use a damaged power plug, power cord, or loose power outlet.
•
Do not put a fuse in a neutral or ground circuit.
•
Do not connect the ground wire to plastic plumbing lines, gas lines, or
hot water pipes.
Specified power-supply-cord kit rating
Range rating, watts Specified
rating of
power
supply-
cord kit,
amperes
Diameter (inches)
of Range
connection
Opening
120/240
volts
3-wire
120/208
volts
3-wire
Power
cord Conduit
8,750 -
16,500
16,501 -
22,500
7,801 -
12,500
12,501 -
18,500
40 or 50A
50
1
3
/
8
"
1
3
/
4
"
1
1
/
8
"
1
3
/
8
"
3, 4 - Wire electrical wall Receptacle
4 Wire receptacle (14-50R)
3 Wire receptacle (10-50R)


