Belnick JJ-GZ88-WH-GG User manual
Pop-Up Canopy Tent
Page # : 1 / 5
Customer Service Email: [email protected] | Phone: 866-552-2810
JJ-GZ88-WH-GG/JJ-GZ88-BL-GG/JJ-GZ88-BK-GG/JJ-GZ1010-WH-GG/JJ-GZ1010-BL-GG/JJ-GZ1010-BK-GG
ASSEMBLY INSTRUCTIONS
Before You Begin
Please identify all co:mponent parts and hardware pieces required before you begin. Carefully remove all of the
components from the packaging and set aside for assembly. Assemble on a soft surface to prevent scratching
during assembly.
Caution:
Tighten all components securely before use. Failure to do so may result in personal injury.
DO NOT use any sharp objects to open plastic wrapped components as damage to product or
components may result.
Warning:
CHOKING HAZARD - Small Parts. Adult Assembly Required.
Keep all flame and heat sources away from canopy!
This is not a permanent structure and should not be used or left open in inclement weather!
Thank
you
for
your
purchase!

Have a Question/Concern?
Quality products and first-class customer service are the cornerstone of long-
lasting consumer relationships. We strive toward excellence in all we do and
want you to be completely satisfied with your purchase.
Please contact our exceptional Customer Experience Agents at the email
address or phone number shown below to assist you with any product
questions or issues before requesting a return.
We look forward to serving you in a friendly, efficient manner to resolve any
issues you may have.
Customer Service Email: CustomerExperience@belnick.com
Customer Service Phone: 866-552-2810
Our Warranty Statement
This warranty covers manufacturing defects associated with your new product. The product
is warranted from the original purchase date and to the original purchaser for normal usage,
according to the below-referenced specifications and limitations.
Non-moving metal parts are warranted for 5 years.
Component parts including pneumatic cylinder, control mechanism, base and casters
are warranted for 2 years.
All other items are warranted for 1 year.
Normal usage means use in compliance with the restrictions and weight limits specified for
the product. In the absence of product-specific restrictions and weight limits, normal usage
means use for no more than forty hours per week by persons weighing 250 lbs. or less.
Coverage terminates if the product is sold or otherwise transferred. Repairs made by
parties other than Belnick also void this warranty.
This warranty will not cover: (1) labor, freight, or damage from misuse, abuse, negligence,
alteration, assembly, installation, attachments, accident, vandalism, acts of nature or any
other event beyond the control of Belnick; (2) tearing, scratching, scuffing, or blemishing of
leather or fabric; (3) cosmetic damage that may result from normal usage; (4) damage
attributable to use by persons exceeding specified weight limits or commercial use
exceeding forty hours per week; or (5) rust or other damage caused by exposure to
moisture. The user assumes all risk of injury resulting from use of this product. Liability for
incidental or consequential damage is excluded. Some states do not allow the exclusion or
limitation of incidental or consequential damages, so the above limitation or exclusion may
not apply to you.
Page # : 2 / 5

PARTS
Outer carry bag x 1 pc
Folding Steel Frame x 1 pc
Fabric Canpoy Top x 1 pc
Ropes x 4 pcs “L” Nail x 8 pcs
ASSEMBLY STEPS
Step 1
Unfold the pre-assembled steel frame
Step 2
Fix the canopy with hook and loop tabs at
corner
Step 3
Adjust the height for preferred shade
coverage
Page # : 3 / 5

HOW TO SET UP (OPEN GENTLY)
Follow these instructions carefully to avoid pinching your hands or fingers in any of the moving parts as the frame
opens and closes. To erect the folding gazebo requires two people.
1.Place your folding gazebo in the center of the area to be sheltered. Remove the carry bag and stand the folding
gazebo over on its feet.
With partner on the opposite side, grasp two outer legs, slightly lift the frame off the ground and take a step
backwards, stopping at full (outstretched) arm’s length.
2.Each partner should grasp the top and bottom of the diamond (see diagram) formed by the side supports on
opposite sides and push hands together while stepping backwards until the shelter is fully opened. Be careful not to
pinch your fingers or to pull backwards too hard as this will result in the side supports bending.
3.Engage the slider at each corner by pushing up with one hand while holding down the top of the leg with the other
hand (see diagram). A snap button will engage in the locating hole. Repeat this operation on the remaining three legs.
4.You and your partner should each place a foot on the foot plate of the bottom of adjacent legs and lift up the leg,
sliding the inner leg out until the snap button locks in the locating hole. Repeat this operation for the other two legs.
5.Square up the folding gazebo. Attach the hook and loop tabs located on the underside of the top cover, around the
frame struts.
6.Attach the guide ropes to the ring at each corner of the roof cover and attach to stakes, to secure your folding
gazebo to the ground or just hammer the stakes through the holes in each legs foot.
Page # : 4 / 5
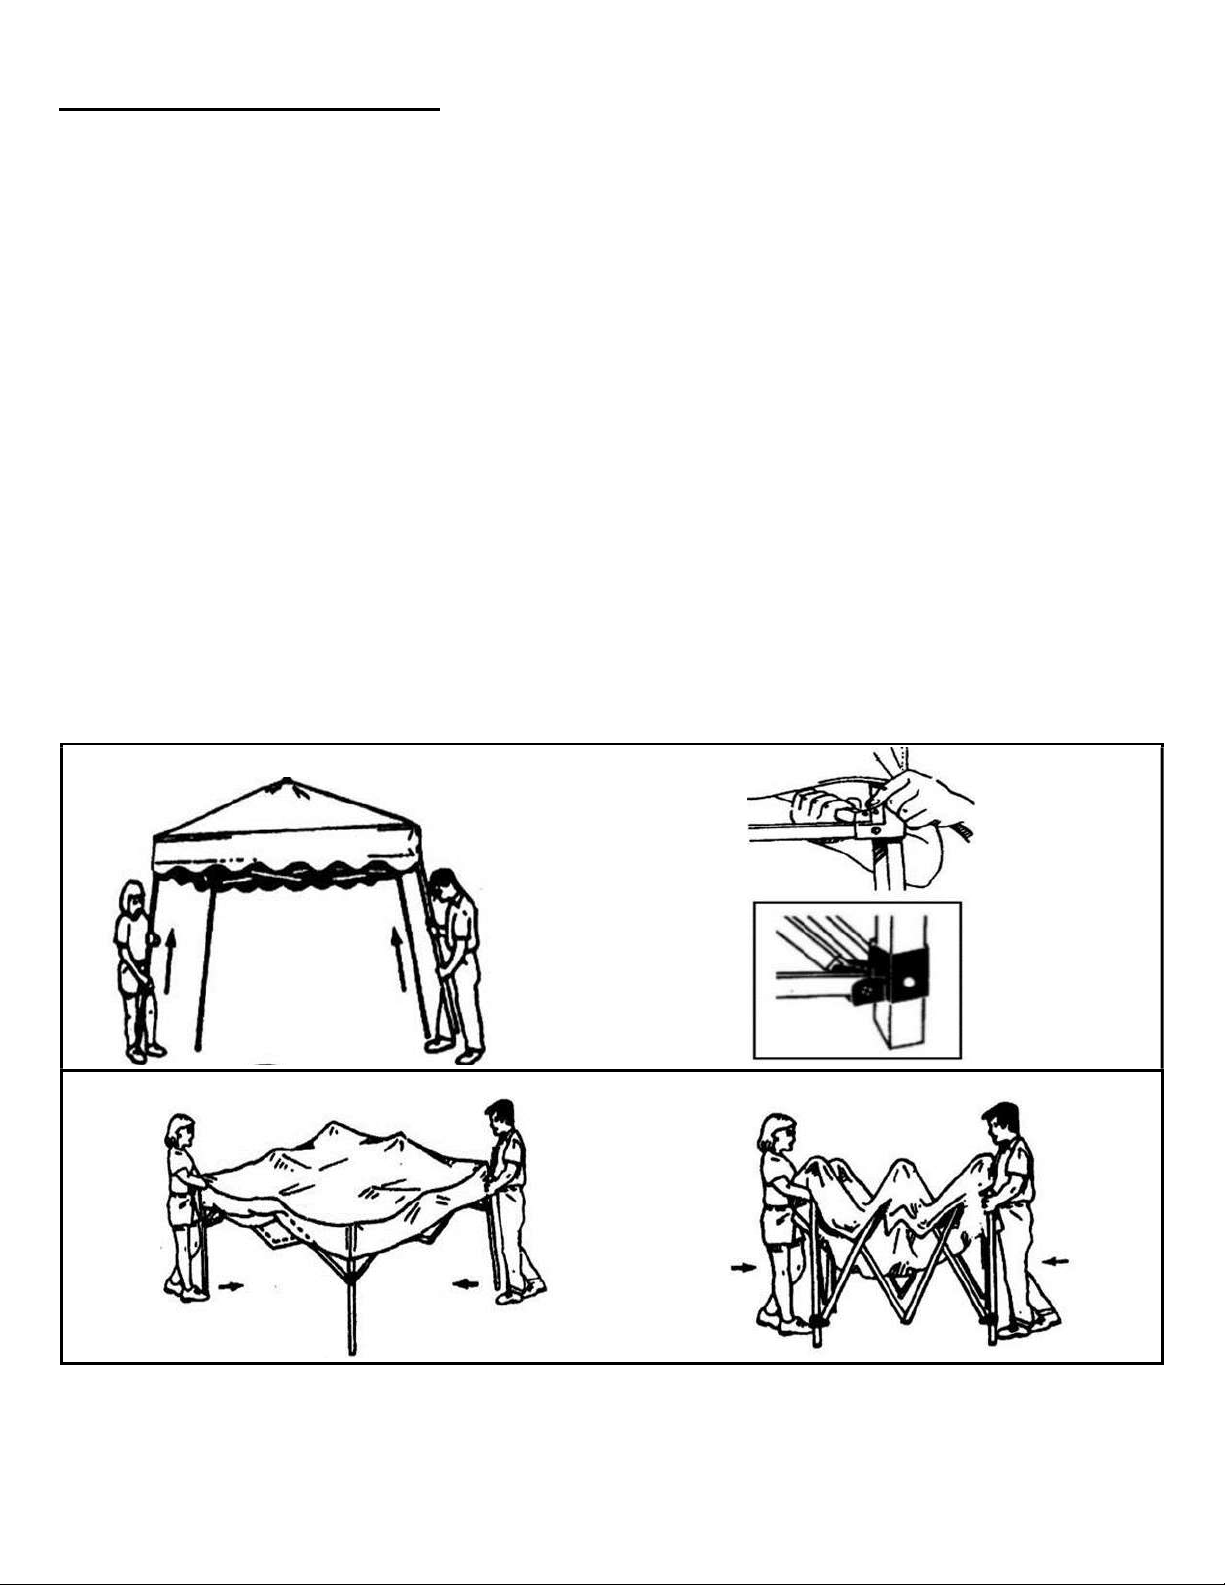
HOW TO TAKE DOWN (CLOSE GENTLY)
Attempting to erect this folding gazebo in windy conditions may be hazardous and could result in injury and or damage to the
product.
1.Remove any leg stakes and guide ropes, undo the hook and loop tabs of the top cover from around the frame.
2.You and your partner should each lift up two adjacent outer legs slightly, depress the snap button and push the telescopic
inner legs into the outer legs. Repeat for the remaining two legs.
3.Release the slider at all four corners using a slight upward pressure with one hand while depressing the snap button to
release the slider with the other. Push slider down past the snap button.
4.Each partner should grasp the top of the diamond (see diagram) on opposite sides and slightly lift up. Shake the canopy a
little. Pull hands apart while stepping towards your partner until the unit is three quarters closed.
5.Grasp the two outer legs slightly lift off the ground and push together to fully close.
BE CAREFUL NOT TO PINCH FINGERS. DO NOT PUSH HARD.
Finally, having made sure the canopy material is completely dry return your folding gazebo to its storage bag.
CAUTION:
This gazebo’s fabric is water resistant but NOT waterproof and may leak during heavy precipitation. This Gazebo’s fabric is
NOT fireproof and will burn if left in continuous contact with any flame source.
Page # : 5 / 5
This manual suits for next models
5
Table of contents
Other Belnick Tent manuals

Popular Tent manuals by other brands


Alpkit
Alpkit ORDOS 2 manual

Décor et Jardin
Décor et Jardin Gamagran 81801S000 Assembly Notice

Trailside
Trailside North Star 5 Assembly instructions

ShelterLogic
ShelterLogic 58432 Assembly & instruction manual

Vango
Vango SIERRA TENT PITCHING INSTRUCTIONS

COVERPRO
COVERPRO 63297 Owner's manual & safety instructions

Vango
Vango NEMESIS Pitching instructions

RioOutdoors
RioOutdoors 4S-DH installation instructions

skandika outdoor
skandika outdoor TRONDHEIM 5 Setup Instruction

SunnyTent
SunnyTent Oval M manual

Asweets
Asweets Wonder & Wise CAMO SCOUT TENT Assembly instructions

Skandika
Skandika Copenhagen 6 Setup & maintenance