manuals.online logo
Brands
  1. Home
  2. •
  3. Brands
  4. •
  5. Coleman
  6. •
  7. Tent
  8. •
  9. Coleman 400+ Installation guide

Coleman 400+ Installation guide

Model 2000033116
TOUGH SCREEN TARP /400+
19
[ タフスクリーンタープ/400+ ]
[ 터프 스크린 타프/400+ ]
取扱い・組立て説明書
Handling and Assembly Instruction Manual
취급·조립 설명서
この取扱い説明書は大切に保管してください。
Please keep this instruction manual with care for future reference.
이 설명서를 잘 보관하십시오.
저희 콜맨 제품을 구입해주셔서 감사합니다. 설치 시에는 배수가 잘 되도록 평평한 장소를 선택하십시오. 돌이나 나뭇가지 등 본 제품을 손상시킬
우려가 있는 것은 미리 제거한 후 설치하십시오.
Thank you for your purchase of the Coleman product. When setting up the tents or tarps, please choose an area
where drainage is good and the ground surface is flat. Be sure to remove any rocks, tree branches, and other
objects and flatten any uneven surface before installing the tents or tarps, as they could cause damage to the
tents or tarps.
この度はコールマン製品をお買い上げいただき誠に有難うございました。設営の際には水はけが良く、できるだけ平らな場所を選んで
ください。また、石や木の枝等、本製品を傷つけるおそれのあるものは、あらかじめ取り除き、整地してから設営してください。
お問い合わせ先 コールマンカスタマーサービス:0 12 0 -111- 9 5 7 受付時間:月曜日~金曜日(祝祭日を除く)10:00~17:30
Coleman Brands Pty Ltd AB 74 091 681 195 Suite W2C1,75-85 O’Riordan Street,
Sydney Corporate Park Alexandria NSW 2015 Australia Tel : +612 8762 5000
콜맨코리아 유한회사 서울특별시 강남구 도산대로 532 인희빌딩 2층 TEL. 1577-5932 www.coleman.co.kr
1
撤収手順│Folding instructions│해체 순서
2ポールを全ておりたたみポールケースに収納し、シェードスキンを下図のように巻いて、キャリーバッグに収納して完了です。
Fold all poles and put them back into the pole case. Roll up the shade skin as shown in the figures below.
Stow them into the carry bag.
폴을 전부 접어 넣은 후 폴 케이스에 수납하고, 쉐이드 스킨을 아래 그림처럼 말아서 수납케이스에 수납하십시오.
ポールケース
Pole Case
폴 케이스
シェードスキン
Shade Skin
쉐이드 스킨
ポール
Pole
폴대
ショックコード
Shock Cord
쇼크 코드
ポールを収納する際は、真ん中から折りたたむようにすると、ショックコード(ゴム)全 体に均一に、テンションがかかり、ショックコー
ドの寿命を延ばす事が出来ます。
When folding a pole, it is recommended that you start folding it in the middle as it will keep the tension even throughout
the shock cord (rubber) and allow it to last longer.
폴대를 보관할 때, 정중앙부터 접게되면 쇼크 코드(고무)전체에 균일하게 힘이 가해져 쇼크 코드의 수명이 길어집니다.
1 で た た ん だ シェード スキ ン をポ ー ル ケ ースを 芯 にして 巻 い て い く。
After folding the shade skin at the 1, put the pole case on it and roll it up.
1에서 접은 타프 안에 폴 케이스를 넣은 후 감으십시오.
両端を中へ折り込んで長 方形にする。
Fold both ends inward to make a rectangular shape.
양쪽 끝을 접어서 긴 사각형모양을 만드십시오.
前後の屋根の四隅を持ち、中央を折り込みながら半分にする。
Pick up the 4 corners of shade skin and fold in half.
앞뒤 지붕의 네 모서를 잡고 중앙을 반으로 접습니다.
長方形を更に中へ折り込み、1/4のサイズにたたむ。
Fold it further inward to make it a 1/4 size.
긴 사각형을 안으로 접어서 1/4 사이즈로 만드십시오.
テント・タープ生地を濡れたままで収納しますと防水効果が著しく損なわれる為、ご使用後はフライシート・インナーテント(タープの
場合スキン)の、汚 れをよく落 とし、十 分 乾 かしてか ら収 納・保 管してください 。
If you stow the tent・Tarp while it is still wet, its water-proof performance will significantly deteriorate. Therefore,
please carefully clean the fly sheet and inner tent after use and then fold and stow them after making sure that
they have dried up.
텐트와 타프의 패브릭을 젖은 채로 보관하면 방수효과가 크게 떨어지게 됩니다.사용 후에는 플라이 시트 이너 텐트(타프의 경우, 스킨)에 뭍은 오염을
제거하고 충분히 건조시킨 다음 보관하십시오.
タープ を固定したペグ、ロープ、ポールをすべて 取り外し、下図のようにしてタープをたたみます。
Take o the shade skin. Remove all pegs, ropes, and poles that have been installed to hold the shade skin.
Then fold the shade skin as illustrated below.
타프를 고정한 팩와 폴대를 모두 분리한 후, 아래 그림과 같이 접으십시오.
1
2
The following warnings must be paid attention to, as wrong assembling or use of
the tents or tarps could lead to a severe injury or death.
The following cautionary notes must be followed during the assembling and
use of the products, as wrong assembly or use could cause an accident
involving bodily harm and/or property damage.
The following cautionary notes must be followed during the assembling and
use of the products, as wrong assembly or use could cause an accident
involving bodily harm and/or property damage.
DANGER
CAUTION
CAUTION
Precautions to be followed and prohibited acts while assembling the tents or tarps
Precautions for storage and management
●Before departing for a campsite, please make sure all items and parts are included in the package.
●Use of excessive force could result in damaged poles, tent, and tarp.
●Put on gloves when installing the tent and tarp.
●When extending the poles, be sure to insert each joint all the way. Please also be careful not to get your
fingers caught.
●When pitching the tent, please be careful to the broken poles and not to get hit by the poles snapping back.
●When driving the pegs into the ground, please be alert not to hit your fingers.
●Do not allow a small child to assemble the poles or hit the pegs into the ground.
●When there is strong wind, please do not set up the tent or tarp, as they could be blown away and cause an
unexpected accident, break the poles, and damage the tent and tarp.
●When setting up the tent and tarp, please choose an area where drainage is good and the ground surface is
flat. Please also make sure that the area chosen won’t be aected by the wind too much.
●Be sure to remove any rocks, tree branches, and other objects and flatten any uneven surface before install-
ing the tent, as they could cause damage to the tent.
●Be sure to securely anchor the tent and tarp to the ground using the pegs and rope. Not doing so could lead
to the tent and tarp blown away by the wind or allowing rainwater to accumulate to cause an unexpected
accident.
●The pegs that come standard in the product package may not be usable depending on the area that has been
chosen for installing the tent and tarp. Please check the condition of the ground surface where you are
planning on setting up the tent and tarp beforehand.
●When you will be away from the tent and tarp for an extended period of time, be sure to take them down. Any
sudden change in weather, gust, etc. could blow away the tent and tarp to possibly cause an unexpected
accident.
●Condensation
 As the fly sheet and tarp are waterproofed, water droplets may emerge on the inner surface if there is a large
dierence in air temperature between the inside and outside of the tent. It is not water leakage, and such
phenomenon can be improved by ventilation of the air inside the tent.
●After each use, please make sure that the tent has become suciently dry before storing. If the tent is stored
while it is still wet, it could lead to discoloration and mold germination.
●If you are unable to dry the tent right after taking it down due to rain, etc., please dry it as soon as possible
after returning home. Leaving the tent wet for an extended period of time could lead to discoloration and
mold germination.
●If you need to remove any smudge on the tent, please wipe it o using a well-wrung cloth and let the area dry
before storing.
●Use of any organic solvent such as a paint thinner and benzine could lead to discoloration, color alteration,
removal of printed items or resin finish.
●If any sand or dirt is attached to the poles, please carefully wipe it o before storing. Also, if the poles are
stored while still wet, it could cause corrosion.
●Please do not use a washing machine to clean the tent, other items, or the case.
●Store the tent in a place that is out of reach of children.
●Use of fire inside the tents or tarps is extremely dangerous and is strictly prohibited, as it could cause a
life-threatening situation such as carbon monoxide poison.
●Use of the tent and tarp in inclement weather such as typhoon, rain storm, thunder, etc. is dangerous and
should be avoided.
●Avoid installing the tent and tarp on a sandbank in a river or under a cli where there is a danger of flooding
or falling rocks.
この警告を無視して誤った組み立て方や使い方をすると、人が死亡、または重傷を負う事故が想
定される内容を表しています。
この注意を無視して誤った組み立て方や使い方をすると、事故やケガといった人的傷害、又は物
的傷害の発生が想定される内容を表しています。
この注意を無視して誤った組み立て方や使い方をすると、事故やケガといった人的傷害、又は物
的傷害の発生が想定される内容を表しています。
危険
注意
注意
組立・使用上の注意及び禁止事項
収 納・管 理 の 注 意
●キャンプ場へお出かけの前に全ての部品が揃っているか確認してください。
●無理な設営はポールの破損や本体破れの原因となります。
●テント、タープの設営の際はグローブを着用してください。
●ポールを伸ばす際は各節を完全に差し込んでください。指を挟まないように注意してください。また、周囲に十分注意してくだ
さい。近くに人がいないことを確認してください。
●テント本体を立ち上げる際はポールのはね返りに注意してください。
●ペグを打つ際にハンマーで指を打たないように注意してください。
●小さいお子様にポールの組み立てやペグ打ちの作業をさせないでください。
●風が強い時はテント、タープの設営を行わないでください。本体が飛ばされて思わぬ事故やポール折れ、本体破損の原因となり
 ま す。
●テント、タープ設営の際は水はけが良く、できるだけ平らな場所を選んでください。また、風の影響を受けにくい場所を選んで
 ください。
●石や木の枝等、テント、タープを傷つけるおそれのあるものはあらかじめ取り除き、整地してから設営してください。
●テント、タープ本体はペグとロープで確実に地面に固定してください。風で飛ばされたり雨水が溜まって思わぬ事故につながる
 こと が ありま す。
●テント、タープを設営する場所によっては付属のペグが使用できない場合があります。あらかじめ行かれる場所の地面の状態を
 確認しておいてください。
●テント、タープから長時間離れる場合は必ず撤収してください。急な天候の変化、突風などにより、テント、タープが飛ばされて
  思わ ぬ 事 故 の原 因 となりま す。
●結露について
テントのフライシート、タープの生地には防水加工が施されていますので、外気との温度差が大きいと生地の内側の壁面に水
滴がつくことがあります。これは水漏れではありません。テント、タープ内の換気を行うことで改善することができます。
●使用後は汚れを落とし、十分に乾かしてから収納、保管してください。濡れたままの状態で収納しますと、色移りやカビ発生の
 原 因 となりま す。
●撤収時、雨などで本体を乾かせない場合は、持ち帰ったあとできるだけ早く乾燥させてください。そのまま放置しますと色移り
  やカビ 発 生 の 原 因と なりま す。
●汚れを落とす場合は、固く絞った布で拭き取りよく乾燥してから保管してください。
●シンナー、ベンジンなどの有機溶剤の使用は、色落ち、変色およびプリントや樹脂加工の剥がれの原因になります。
●ポ ー ル 本 体 に 付 い た 砂 や 土 は き れ い に 拭 き 取 っ て か ら 収 納 し て く だ さ い 。ま た 、濡 れ た ま ま 収 納 し ま す と 腐 食 の 原 因 と な り ま す 。
●本体、収納ケースは洗濯しないでください。
●幼児、子どもの手の届かない場所に保管してください。
●テント、タープ内での火気の使用は、大変危険です。一酸化炭素中毒等、生命をおびやかすおそれがありますので、絶対におや
 めください。
●台風、暴風雨、落雷等の悪天候の際は危険ですのでテント、タープの使用はおやめください。
●河原の中洲や崖下などの増水、落石の危険のある場所にテント、タープを設営しないでください。
3
4
セット 内 容 | Items included | 세트 구성
お出掛けになる前に一度、パーツ等の不足がないかご確認ください。
Before going camping, please make sure that all items are included in the package.
사용하시기 전에 먼저 부품 등 부족하지 않은지 확인하십시오.
各部の名称・セット内容│Names of the items and what are included│각 제품의 명칭과 세트 구성
●シェードスキン | Shade Skin | 쉐이드 스킨 ×1
●
メインポール(シルバー/
レッド
)| Main Pole(Silver/Red) | 메인 폴대(실버/레드)
×2
● セ ン タ ー ポ ー ル( シ ル バ ー / グ レ ー )| Center Pole(Silver/Gray) | 센터 폴대(실버/그레이) ×1
●スタンディング テ ープ | Standing Tape | 스탠딩 테이프
● ジョ イントフ ラップ|Joint Flap|조인트 플랩
●自在ロープ | Guyline Adjuster | 로프 ×14
●スチール ペグ | Steel Peg | 스틸 팩 ×18
●プラスチックペグ | Plastic Peg | 플라스틱 팩 ×6
●ハンマー | Hammer | 망치 ×1
設置時|Pitched Image|설치 시
セ ン タ ー ポ ー ル( シ ル バ ー / グ レ ー )
Center Pole(Silver/Gray)
센터 폴대(실버/그레이)
メインポール(シルバー/レッド)
Main Pole(Silver/Red)
메인 폴대(실버/레드)
自在ロープ
Guyline Adjuster
로프
スタンディング テープ
Standing Tape
스탠딩 테이프 ジョイントフラップ
Joint Flap
조인트 플랩
シェードスキン
Shade Skin
쉐이드 스킨
본 경고를 무시하고 잘못된 방법으로 사용하거나 조립할 경우, 사망 또는 중상을 입을 수 있습니다.
본 주의를 무시하고 잘못된 방법으로 사용하거나 조립할 경우, 사고나 부상 등 신체적 손상 또는 물적
손해가 발생할 수 있습니다.
본 주의를 무시하고 잘못된 방법으로 사용하거나 조립할 경우, 사고나 부상 등 신체적 손상 또는 물적
손해가 발생할 수 있습니다.
위험
주의
주의
조립·사용시 주의사항 및 금지사항
보관·관리시 주의사항
●설치하기 전에 모든 부품이 들어있는지 확인하십시오.
●무리한 설치로 인해 폴대나 본체가 파손될 수 있습니다.
●텐트, 타프를 설치할 때는 장갑 등 보호도구를 착용하십시오.
●폴대를 잡아당길 때는 마디를 끝까지 꽂으십시오. 이때, 손가락이 끼지 않도록 주의하십시오.주위를 잘 살피고 근처에 사람이 없는 것을 확인하십시오.
●텐트 본체 설치시 폴대가 튀어오를 수 있으니 주의하십시오.
●팩를 설치할 때는 해머로 손가락 등을 치지 않도록 주의하십시오.
●유아나 어린이가 폴대를 조립하거나 팩를 설치하지 않도록 하십시오.
●바람이 강할 경우에는 텐트, 타프를 설치하지 마십시오. 강한 바람으로 인해 본체가 날아가거나 예상치 못한 사고, 폴대 부러짐, 본체 파손 등이 발생할
수 있습니다.
●텐트, 타프를 설치할 때는 배수가 잘 되도록 평평한 장소를 선택하십시오. 또한 바람의 영향을 받지 않는 장소를 선택하십시오.
●돌이나 나뭇가지 등 텐트, 타프를 손상시킬 우려가 있는 것은 미리 제거하고 설치하십시오.
●텐트, 타프 본체는 반드시 팩와 로프를 이용하여 지면에 단단히 고정하십시오. 바람에 날아가거나 빗물이 고여서 예상하지 못한 사고가 발생할 수
있습니다.
●텐트, 타프를 설치한 장소에 따라 제공된 팩를 사용할 수 없는 경우가 있습니다. 사전에 설치하고자 하는 장소의 지면 상태를 확인하고 적절한 팩를
준비하십시오.
●텐트, 타프를 장시간 사용하지 않을 경우에는 반드시 철거하십시오. 돌풍 등 갑작스런 기후 변화로 인해 텐트, 타프가 날아가서 예상하지 못한 사고가
발생할 수 있습니다.
●결로 현상
 텐트 플라이 시트, 타프 원단은 방수 가공이 되어 있어 바깥과 온도 차이가 클 경우 원단 안쪽 벽면에 물방울이 맺힐 수 있습니다. 이는 누수 현상이
아닙니다. 텐트, 타프의 내부 환기를 통해 결로 현상을 개선할 수 있습니다.
●사용하신 후에는 오염을 제거하고 충분히 말려서 수납, 보관하십시오. 젖은 상태로 보관하면, 제품의 변색 및 곰팡이 발생의 원인이 됩니다.
●철수시 비 등으로 본체를 말릴 수 없는 경우에는 귀가 후 가능한 한 빨리 건조시키십시오. 그대로 두면 제품의 변색 및 곰팡이 발생의 원인이 됩니다.
●세척할 때는 물기를 제거한 젖은 천으로 닦은 후 잘 말려서 보관하십시오.
●시너, 벤젠 등 유기용제를 사용하게 되면 탈색, 변색의 원인이 되며 프린트나 수지가공이 벗겨질 우려가 있습니다.
●폴대 본체에 묻은 수분이나 모래, 흙은 깨끗이 닦은 후 보관하십시오. 젖은 채로 보관하면 부식의 원인이 됩니다.
●본체, 수납 케이스는 세탁하지 마십시오.
●유아나 어린이의 손이 닿지 않는 곳에 보관하십시오.
●텐트 내에서의 화기 사용은 매우 위험합니다. 일산화탄소 중독 등 생명을 위협할 우려가 있으므로 절대로 하지 마십시오.
●태풍, 폭풍, 번개 등 이상 기후 발생시 위험할 수 있으므로 텐트, 타프의 사용을 삼가십시오.
●강변이나 모래톱, 절벽 아래 등 갑자기 물이 불어나거나 암석이 떨어질 위험이 있는 장소에서 텐트, 타프를 설치하지 마십시오.
3
4
セット 内 容 | Items included | 세트 구성
お出掛けになる前に一度、パーツ等の不足がないかご確認ください。
Before going camping, please make sure that all items are included in the package.
사용하시기 전에 먼저 부품 등 부족하지 않은지 확인하십시오.
各部の名称・セット内容│Names of the items and what are included│각 제품의 명칭과 세트 구성
●シェードスキン | Shade Skin | 쉐이드 스킨 ×1
●
メインポール(シルバー/
レッド
)| Main Pole(Silver/Red) | 메인 폴대(실버/레드)
×2
● セ ン タ ー ポ ー ル( シ ル バ ー / グ レ ー )| Center Pole(Silver/Gray) | 센터 폴대(실버/그레이) ×1
●スタンディング テ ープ | Standing Tape | 스탠딩 테이프
● ジョ イントフ ラップ|Joint Flap|조인트 플랩
●自在ロープ | Guyline Adjuster | 로프 ×14
●スチール ペグ | Steel Peg | 스틸 팩 ×18
●プラスチックペグ | Plastic Peg | 플라스틱 팩 ×6
●ハンマー | Hammer | 망치 ×1
設置時|Pitched Image|설치 시
セ ン タ ー ポ ー ル( シ ル バ ー / グ レ ー )
Center Pole(Silver/Gray)
센터 폴대(실버/그레이)
メインポール(シルバー/レッド)
Main Pole(Silver/Red)
메인 폴대(실버/레드)
自在ロープ
Guyline Adjuster
로프
スタンディング テープ
Standing Tape
스탠딩 테이프 ジョイントフラップ
Joint Flap
조인트 플랩
シェードスキン
Shade Skin
쉐이드 스킨
본 경고를 무시하고 잘못된 방법으로 사용하거나 조립할 경우, 사망 또는 중상을 입을 수 있습니다.
본 주의를 무시하고 잘못된 방법으로 사용하거나 조립할 경우, 사고나 부상 등 신체적 손상 또는 물적
손해가 발생할 수 있습니다.
본 주의를 무시하고 잘못된 방법으로 사용하거나 조립할 경우, 사고나 부상 등 신체적 손상 또는 물적
손해가 발생할 수 있습니다.
위험
주의
주의
조립·사용시 주의사항 및 금지사항
보관·관리시 주의사항
●설치하기 전에 모든 부품이 들어있는지 확인하십시오.
●무리한 설치로 인해 폴대나 본체가 파손될 수 있습니다.
●텐트, 타프를 설치할 때는 장갑 등 보호도구를 착용하십시오.
●폴대를 잡아당길 때는 마디를 끝까지 꽂으십시오. 이때, 손가락이 끼지 않도록 주의하십시오.주위를 잘 살피고 근처에 사람이 없는 것을 확인하십시오.
●텐트 본체 설치시 폴대가 튀어오를 수 있으니 주의하십시오.
●팩를 설치할 때는 해머로 손가락 등을 치지 않도록 주의하십시오.
●유아나 어린이가 폴대를 조립하거나 팩를 설치하지 않도록 하십시오.
●바람이 강할 경우에는 텐트, 타프를 설치하지 마십시오. 강한 바람으로 인해 본체가 날아가거나 예상치 못한 사고, 폴대 부러짐, 본체 파손 등이 발생할
수 있습니다.
●텐트, 타프를 설치할 때는 배수가 잘 되도록 평평한 장소를 선택하십시오. 또한 바람의 영향을 받지 않는 장소를 선택하십시오.
●돌이나 나뭇가지 등 텐트, 타프를 손상시킬 우려가 있는 것은 미리 제거하고 설치하십시오.
●텐트, 타프 본체는 반드시 팩와 로프를 이용하여 지면에 단단히 고정하십시오. 바람에 날아가거나 빗물이 고여서 예상하지 못한 사고가 발생할 수
있습니다.
●텐트, 타프를 설치한 장소에 따라 제공된 팩를 사용할 수 없는 경우가 있습니다. 사전에 설치하고자 하는 장소의 지면 상태를 확인하고 적절한 팩를
준비하십시오.
●텐트, 타프를 장시간 사용하지 않을 경우에는 반드시 철거하십시오. 돌풍 등 갑작스런 기후 변화로 인해 텐트, 타프가 날아가서 예상하지 못한 사고가
발생할 수 있습니다.
●결로 현상
 텐트 플라이 시트, 타프 원단은 방수 가공이 되어 있어 바깥과 온도 차이가 클 경우 원단 안쪽 벽면에 물방울이 맺힐 수 있습니다. 이는 누수 현상이
아닙니다. 텐트, 타프의 내부 환기를 통해 결로 현상을 개선할 수 있습니다.
●사용하신 후에는 오염을 제거하고 충분히 말려서 수납, 보관하십시오. 젖은 상태로 보관하면, 제품의 변색 및 곰팡이 발생의 원인이 됩니다.
●철수시 비 등으로 본체를 말릴 수 없는 경우에는 귀가 후 가능한 한 빨리 건조시키십시오. 그대로 두면 제품의 변색 및 곰팡이 발생의 원인이 됩니다.
●세척할 때는 물기를 제거한 젖은 천으로 닦은 후 잘 말려서 보관하십시오.
●시너, 벤젠 등 유기용제를 사용하게 되면 탈색, 변색의 원인이 되며 프린트나 수지가공이 벗겨질 우려가 있습니다.
●폴대 본체에 묻은 수분이나 모래, 흙은 깨끗이 닦은 후 보관하십시오. 젖은 채로 보관하면 부식의 원인이 됩니다.
●본체, 수납 케이스는 세탁하지 마십시오.
●유아나 어린이의 손이 닿지 않는 곳에 보관하십시오.
●텐트 내에서의 화기 사용은 매우 위험합니다. 일산화탄소 중독 등 생명을 위협할 우려가 있으므로 절대로 하지 마십시오.
●태풍, 폭풍, 번개 등 이상 기후 발생시 위험할 수 있으므로 텐트, 타프의 사용을 삼가십시오.
●강변이나 모래톱, 절벽 아래 등 갑자기 물이 불어나거나 암석이 떨어질 위험이 있는 장소에서 텐트, 타프를 설치하지 마십시오.
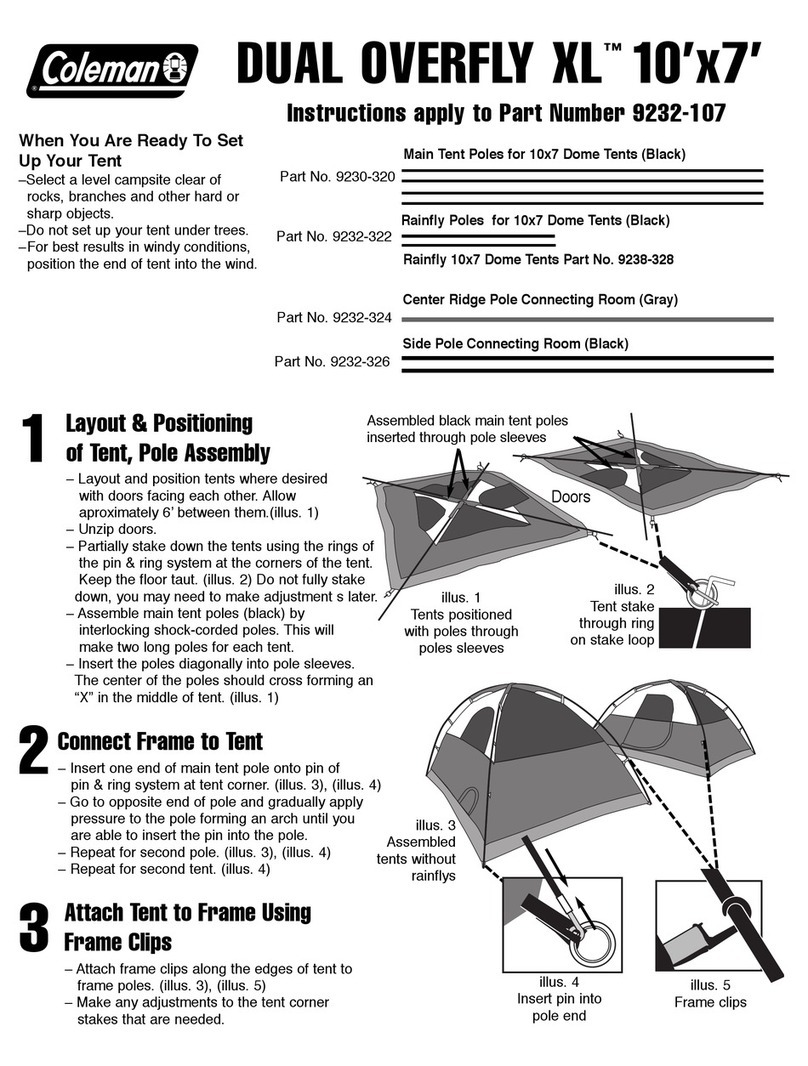
3メインポール(シルバー/レッド)2本をクロスになるようにスリーブに通します。
Put each main pole (Silver/Red) through the each sleeve as they are crossed.
메인 폴대(실버/레드) 2개가 교차되도록 슬리브에 통과시키십시오.
4メインポール(シルバー/レッド)2本の奥側の端を、シェードスキンのコーナーにあるアシストクリップにそれぞれ差し込み
ます。
Insert the assist clip located at the corner of shade skin into the rear side main pole (Silver/Red) end
respectively.
메인 폴대(실버/레드) 2개의 안쪽 끝을 쉐이드 스킨 모서리에 있는 어시스트 클립에 각각 연결하십시오.
ポールをスリーブに通す際は引っ張らず必ず押し入れてください。
When putting up each pole through the sleeve, do not pull the pole but push the pole in.
폴대를 슬리브에 통과시킬 때는 잡아당기지 말고 반드시 눌러서 넣어주십시오.
5
6
設営手順|Installation instructions|설치 순서
シェード ス キ ン を 広 げ る
Spread the shade skin
쉐이드 스킨을 펼친다
Ⅰ
メインポールをセットする
Set Up the Main Poles
메인 폴대를 설치한다
Ⅱ
シェードスキンを広げます。
(スタンディングテープのバックルが留まっているか確認してください。留まっていないとタープが上手く立ち上がりません。)
Spread the shade skin.
(Make sure the standing tapes' buckles are fasten. If not fasten, the tarp does not stand well.)
쉐이드 스킨을 펼치십시오. (스탠딩 테이프 버클이 채워져 있는지 확인하십시오. 그렇지 않으면 타프가 잘 설치되지 않습니다.)
メインポール(シルバー/レッド)の2本を伸ばします。
Put together the main pole (Silver/Red) respectively.
메인 폴대(실버/레드) 2개를 늘리십시오.
メインスリーブ
Main Sleeve
메인 슬리브
メインポール(シルバー/レッド)
Main Pole(Silver/Red)
메인 폴대(실버/레드)
1
2
ポールを伸ばす際には、各節を完全に差し込んでください。不十分な場合、ポールが折れる可能性があります。
When putting together the pole, make sure that each joint is fully inserted.
If each joint is not fully inserted, it could cause the pole to break.
폴대를 늘릴 때 마디를 완전히 꽂으십시오. 제대로 꽂지 않은 경우, 폴대가 부러질 수 있습니다.
1人で 設 営 さ れる方 は A( P.17 ) へ
Go to A (P.17) for setting up alone
혼자서 설치하실 경우 A( P.17 )에
ポールをアシストクリップに差し込む際、指をはさまないように注意してください。
When inserting the poles through the assist clips, please be careful not to get your fingers caught.
폴대를 어시스트 클립에 꽂을 때 손가락이 끼이지 않도록 주의하십시오.
メインポール
Main Pole
메인 폴대
アシストクリップ
Assist Clip
어시스트 클립
3メインポール(シルバー/レッド)2本をクロスになるようにスリーブに通します。
Put each main pole (Silver/Red) through the each sleeve as they are crossed.
메인 폴대(실버/레드) 2개가 교차되도록 슬리브에 통과시키십시오.
4メインポール(シルバー/レッド)2本の奥側の端を、シェードスキンのコーナーにあるアシストクリップにそれぞれ差し込み
ます。
Insert the assist clip located at the corner of shade skin into the rear side main pole (Silver/Red) end
respectively.
메인 폴대(실버/레드) 2개의 안쪽 끝을 쉐이드 스킨 모서리에 있는 어시스트 클립에 각각 연결하십시오.
ポールをスリーブに通す際は引っ張らず必ず押し入れてください。
When putting up each pole through the sleeve, do not pull the pole but push the pole in.
폴대를 슬리브에 통과시킬 때는 잡아당기지 말고 반드시 눌러서 넣어주십시오.
5
6
設営手順|Installation instructions|설치 순서
シェード ス キ ン を 広 げ る
Spread the shade skin
쉐이드 스킨을 펼친다
Ⅰ
メインポールをセットする
Set Up the Main Poles
메인 폴대를 설치한다
Ⅱ
シェードスキンを広げます。
(スタンディングテープのバックルが留まっているか確認してください。留まっていないとタープが上手く立ち上がりません。)
Spread the shade skin.
(Make sure the standing tapes' buckles are fasten. If not fasten, the tarp does not stand well.)
쉐이드 스킨을 펼치십시오. (스탠딩 테이프 버클이 채워져 있는지 확인하십시오. 그렇지 않으면 타프가 잘 설치되지 않습니다.)
メインポール(シルバー/レッド)の2本を伸ばします。
Put together the main pole (Silver/Red) respectively.
메인 폴대(실버/레드) 2개를 늘리십시오.
メインスリーブ
Main Sleeve
메인 슬리브
メインポール(シルバー/レッド)
Main Pole(Silver/Red)
메인 폴대(실버/레드)
1
2
ポールを伸ばす際には、各節を完全に差し込んでください。不十分な場合、ポールが折れる可能性があります。
When putting together the pole, make sure that each joint is fully inserted.
If each joint is not fully inserted, it could cause the pole to break.
폴대를 늘릴 때 마디를 완전히 꽂으십시오. 제대로 꽂지 않은 경우, 폴대가 부러질 수 있습니다.
1人で 設 営 さ れる方 は A( P.17 ) へ
Go to A (P.17) for setting up alone
혼자서 설치하실 경우 A( P.17 )에
ポールをアシストクリップに差し込む際、指をはさまないように注意してください。
When inserting the poles through the assist clips, please be careful not to get your fingers caught.
폴대를 어시스트 클립에 꽂을 때 손가락이 끼이지 않도록 주의하십시오.
メインポール
Main Pole
메인 폴대
アシストクリップ
Assist Clip
어시스트 클립
センターポール(シルバー/グレー)をセットする
Set Up Center Pole (Silver/Gray)
센터 폴대(실버/그레이)를 설치한다
Ⅲ
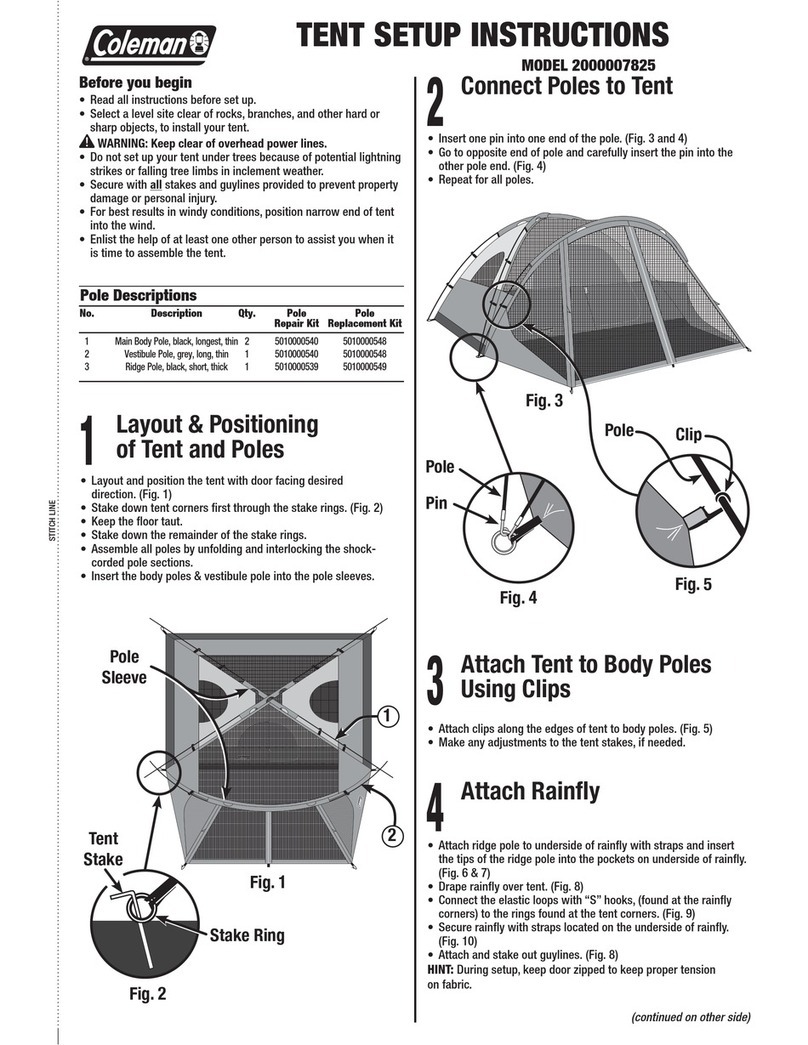
7センターポール(シルバー/グレー)をスリーブに通します。
Put the center pole (Silver/Gray) through the sleeve.
센터 폴대(실버/그레이)를 슬리브에 통과시키십시오.
6センターポール(シルバー/グレー)を伸ばします。
Put together center pole (Silver/Gray).
센터 폴대(실버/그레이)를 늘리십시오.
7
8
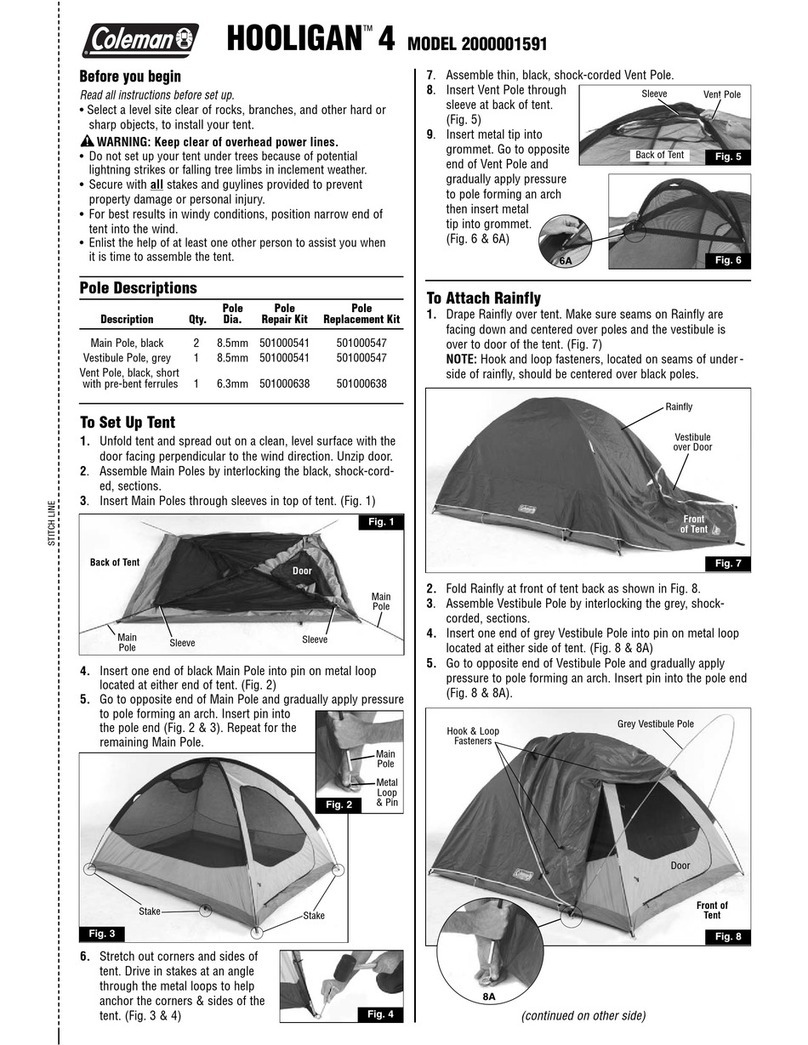
5手前のスリーブの端を持ち、メインポール(シルバー/レッド)2本をそれぞれ押し入れながら、シェードスキンを立ち上げま
す。立ち上がったら、メインポール(シルバー/レッド)2本の手前側の端を、シェードスキンのコーナーにあるアシストクリ
ップ にそ れぞ れ 差し 込 み ます。
Hold the end of sleeve, and stand the shade skin while pushing the main poles (Silver/Red) x 2 together.
After standing, insert the assist clip located at shade skin corner into front side main poles (Silver/Red) end.
슬리브 앞쪽 끝을 잡고, 메인 폴대(실버/레드) 2개를 각각 눌러 넣으면서 쉐이드 스킨을 세워 주십시오. 그 다음, 메인 폴대(실버/레드) 2개의
앞쪽 끝을 쉐이드 스킨 모서리에 있는 어시스트 클립에 각각 끼워 넣어 주십시오.
立ち上げの際は片手でスリーブを引きながら、
もう片方の手でポールをゆっくりと押し入れます。
When pitching, push the pole slowly
with one hand while pulling
the sleeve end with the other hand.
들어올릴 때는한 손으로 슬리브를 잡아당기면서
다른 산 한 손으로 폴대를 천천 히 밀어 넣으십시오.
ル ー プ( レ ッ ド )
Loop (Red)
루프(레드)
メインポール
Main Pole
메인 폴대
アシストクリップ
Assist Clip
어시스트 클립
スリーブ
Sleeve
슬리브
センターポール(シルバー/グレー)
Center Pole (Silver/Gray)
센터 폴대(실버/그레이)
センターポール(シルバー/グレー)端を、シェードスキンサイド側中間にあるアシストクリップに左 右それぞれ差し込みます。
Insert both sides of assist clip located at the middle of shade skin into center poles (Silver/Gray) end.
센터 폴대(실버/그레이) 끝을 쉐이드 스킨의 측면 중간에 있는 어시스트 클립에 좌우 각각 꽂아 주십시오.
8
ポールをアシストクリップに差し込む際、指をはさまないように注意してください。
When inserting the poles through the assist clips, please be careful not to get your fingers caught.
폴대를 어시스트 클립에 꽂을 때 손가락이 끼이지 않도록 주의하십시오.
ポールを通す際は必ずスリーブを持って押し込んでください。スリーブを持たずに押し込んだり、ポールを引き入れたりすると、ポール
やスリーブが破損するおそれがあります。ポールをアシストクリップに差し込む際、指を挟まないように注意してください。|When
putting up each pole, pull the sleeve with one hand and push the pole in slowly using the other hand. Poles and
sleeves may be damaged if the sleeves are not held when putting the poles. When inserting the poles through the
assist clips, please be careful not to get your fingers caught.|폴대를 통과시킬 때는 반드시 슬리브를 잡고 누르십시오. 슬리브를 잡지
않고 끼워 넣거나, 폴대를 잡아당기면 폴대와 슬리브가 손상될 수 있습니다. 폴대를 어시스트 클립에 꽂을 때, 손가락이 끼지 않도록 주의하십시오.
ポールを伸ばす際には、各節を完全に差し込んでください。不十分な場合、ポールが折れる可能性があります。
When putting together the pole, make sure that each joint is fully inserted.
If each joint is not fully inserted, it could cause the pole to break.
폴대를 늘릴 때 마디를 완전히 꽂으십시오. 제대로 꽂지 않은 경우, 폴대가 부러질 수 있습니다.
メインポールは2人で2本同時に、徐々に立ち上げてください。立ち上げの際は片手でスリーブを引きながら、もう片方の手でポールをゆっ
くりと 押 し 入 れ ま す 。スリーブを持たずに押し込むと、ポールが折れたり生地が破れたりします。|Stand the 2 main poles gradually
with more than 2 persons at the same time. When pitching, push the pole slowly with one hand while pulling the
sleeve end with the other hand. Poles and sleeves may be damaged if the sleeves are not held when putting the poles.
메인 폴은 2명이 2개를 동시에 천천히 세워 주세요. 세울 때는 한 손으로 슬리브를 당기면서 다른 손으로 폴을 천천히 밀어 넣습니다. 슬리브를 잡지 않고
끼워 넣을 경우, 폴이 부러지거나 천이 찢어질 수 있습니다.
ポールを通す際は必ずスリーブを持って押し込んでください。スリーブを持たずに押し込んだり、ポールを引き入れたりすると、ポール
やスリーブが破損するおそれがあります。
When putting up each pole, pull the sleeve with one hand and push the pole in slowly using the other hand. Poles and
sleeves may be damaged if the sleeves are not held when putting the poles.
폴대를 통과시킬 때는 반드시 슬리브를 잡고 누르십시오. 슬리브를 잡지 않고 넣거나, 폴대를 잡아당기면 폴대와 슬리브가 손상될 수 있습니다.
C( P.18)の続きはここから
Continuation of C(P.18)
C( P.18)의 뒷부분은 여기부터
センターポール(シルバー/グレー)
Center Pole (Silver/Gray)
센터 폴대(실버/그레이)
アシストクリップ
Assist Clip
어시스트 클립
ル ー プ( グ レ ー )
Loop (Gray)
루프(그레이)
9シェードスキンの各コーナーおよびサイドの中間にあるフックをポールにかけポールを固定します。
Fasten the shade skin to the poles by putting the hooks that are attached to the shade skin onto the
poles.
쉐이드 스킨의 각 모서리 및 측면 중간에 있는 후크를 폴대에 걸어서 고정하십시오.
9
10
設置場所を決め、図のように6ヶ所のループを風上より順に(A~F)対角線にペグを打ち、本体を固定してください。
Decide the installation point. Install the tarp by driving the pegs into the ground through the 6 loops diagonally
(A-F) as shown in the figure, starting from the most windward one.
설치할 장소를 정한 후, 그림과 같이 6곳에 루프를 순서대로(A~F) 바람이 부는 방향에 따라 대각선방향으로 팩를 박아서 본체를 고정하십시오.
10
シェードスキンとポールを固定する
Fasten the Shade Skin and Poles
쉐이드 스킨과 폴대를 고정한다
Ⅳ
設置場所を決めペグで固定する
Decide the installation point and peg down the tarp
설치 장소를 정한 후, 팩로 고정한다
Ⅴ
フックをポールにかける際、指を挟まないように注意してください。
When putting the hooks onto the poles, please be careful not to get your fingers caught.
후크를 폴대에 걸 때 손가락이 끼이지 않도록 주의하십시오.
ポール
Pole
폴대
フック
Hook
후크
B
EF
D A
C
ペグは60°~90°の角度に打ち込むと
風に対して強く設営できます。
It is recommended to drive
the pegs into the ground at a 60°to 90°angle,
as it will make the tents and tarps most wind-resistant.
팩를 60°~90°의 각도로 설치하면 바람에 보다 강하게
대응할 수 있습니다.
ストームガードシステムはタープの安定性を高めます。各コーナーに付属のロープを結び、図のようにペグで固定します。
The storm guard system (i.e., fastening method that involves tying the ropes that comes standard in the product
package to the storm guards and then pegging them down to the ground) improves the stability of the tarp.
Tie the ropes that are included in the package to the corner loops and storm guards on both sides of the
tarp and peg them down to the ground.
스톰 가드 시스템은 타프의 안정성을 향상시킵니다. 각 모서리에 로프를 묶어서 그림과 같이 팩으로 고정하십시오.
11
ペグ
Peg
팩
上図の要領にて6ヵ所にロープをセットし、本体から約1m程離れた位置にペグ打ちして固定します。
自在をしめあげて、ポールが前後左右に大きく動かなくなるよう調節してください。
Set up the ropes in the 6 spots as shown and drive the pegs into the ground approx.
1 meter away from the tarp, as shown in the figure.
Tighten the ropes using the guyline adjusters to a point
where the poles will no longer move back and forth or sideways so much.
위쪽 그림과 같이 6곳에 로프를 설치하고, 본체에서 약 1m정도 떨어진 위치에 팩을 박아서 고정합니다.
로프로 단단히 묶어서 폴대가 앞뒤좌우로 움직이지 않도록 조절하십시오.
しめあげて調整する
Tighten and Adjust
the tension
잡아당겨서 조절한다
自在金具
Guyline Adjuster
로프 핀
自在の使用方法
The usage of guyline adjuster
로프 사용방법 ストー ム ガ ード | Storm guard|스톰가드
ウェビングテープをポールに巻きつけることで、生地とポールに力を分散。
For this product, safety is enhanced by the strap-type storm guard
as it can be wrapped around the pole for more secure fastening.
웨이빙 테이프를 폴대에 감으면 패브릭과 폴대에 가해지는 힘이 분산됨.
大きなサイズのタープは構造上、風の抵抗を受けやすくなっています。「ストームガードシステム」を必ずご活用ください。
A large tarp is naturally prone to the eect of wind due to its structure. Be sure to use the storm guard each time
you set up the tarp.
대형 사이즈의 돔은 구조상, 바람의 저항을 받기 쉽습니다.반드시 '스톰 가드'를 활용하십시오.
ロープを張り固定する
Tighten the ropes to securely install the tarp on the ground
로프를 묶어서 고정한다
VI
自 在ロ ープの 端 をストーム ガ ードの ル ープ に 結 び ま す。
ペグを打ち、ロープをかけて自在をしめ
ロ ープの 長 さ を 調 節し ま す。
Tie the end of each guyline adjuster
to the loop attached to the storm guard.
Then drive the peg into the ground,
and then hitch the rope onto peg,
and tighten the rope using the guyline adjuster.
로프 끝을 스톰 가드의 루프에 묶습니다.
팩를 박고 로프를 걸어서 묶은 후, 로프의 길이를 조 절합니다.
自在ロ ープ
Guyline Adjuster
로프
1m
スト ーム ガ ード
Storm Guard
스톰 가드
ル ープ
Loop
루프
ペグ
Peg
팩
60°~90°
3cm
プラスチックペグ
Plastic Peg
플라스틱 팩
地 面│Ground│지면
11
12
キャノピーの活用など
Using the canopy and others
캐노피 활용방법 등
VII
別 売 キャノピ ーポ ール
長さ180cmが最適です。
Canopy poles sold separately
180cm canopy poles fits for this tarp.
캐노피 폴대(별매)
길이는 180cm 정도가 좋습니다.
前室をキャノピーとして使用する場合は、別売のキャノピーポールと自在ロープを使用します。
To use the canopy, take out the canopy poles and guyline adjusters that are sold separately.
전실을 캐노피로 사용하는 경우에는 캐노피 폴대(별매)와 로프를 사용하십시오.
12
設営後に、スタンディングテープに足をひっかけるおそれがある時は、スタンディングテープを外すことができます(下図赤位
置)。スタンディングテープを外す際には、グレーのループを内側に向けてペグを打ち込んで固定してください。グレーのループ
は各側2つずつあります。1つは外側にペグで固定し、もう1つは内側にペグで固定します。ポールの横への広がりを抑えます。ス
タンディングテープを外したら側のポケットに収納してください。
To avoid being caught on the standing tape, you may remove the tape. (Refer to the red mark shown
below.) To remove the standing tape, pull the gray loop inward and fix it with the peg. There are two gray
loops on each side. Fix one of them outside with a peg, and the other inside with a peg. It prevents the
poles from spreading sideways. After removing the standing tape, store it in the pocket on the side.
설치 후에 스탠딩 테이프에 발이 걸릴 위험성이 있을 경우, 스탠딩 테이프를 제거하실 수 있습니다(하단 빨간색 표시 위치) 스탠딩 테이프를
제거할 경우에는 그레이 루프를 안쪽을 향하게 하여 팩을 고정시켜 주십시오. 그레이 루프는 각각 2개씩 있습니다. 하나는 바깥쪽에 팩으로
고정하시고, 다른 하나는 안쪽에 팩으로 고정하십시오. 폴이 옆으로 빠지는 것을 방지합니다. 스탠딩 테이프를 제거하였을 경우, 포켓에
수납하여 주십시오.
13
別 売|Sold Separately|별매
雨天にキャノピーとして活用する場合は水がたまりやすくなります。その際はキャノピーに傾斜を作るか、図のように中央部にロープを
結びペグ止めして雨水を流してください。風の強い時は、必ずキャノピーを閉じてください。ポールが折れるおそれがあります。
When you use the canopy in the rain, it tends to hold water. To avoid such water accumulation, set the canopy slightly
at an angle to create a slope or tie a rope to the center of the canopy and peg the rope down to the ground so that
the rainwater can flow down. Please close the canopy when there is strong wind. Not doing so could break the poles.
우천시 캐노피로 활용하실 경우 물이 고이기 쉽습니다. 캐노피를 경사지게 설치하거나, 그림과 같이 중앙부에 로프를 묶고 팩으로 고정하여 빗물이
흐르도록 하십시오. 바람이 강할 경우, 반드시 캐노피를 닫아 주십시오. 폴대가 부러질 수 있습니다.
60°~90°3cm
ペグは60°~90°の角度に打ち込むと
風に対して強く設営できます。
It is recommended to drive
the pegs into the ground at a 60°to 90°angle,
as it will make the tents and tarps most wind-resistant.
팩를 60°~90°의 각도로 설치하면 바람에 보다 강하게
대응할 수 있습니다.
地 面|Ground|지면
ペグ
Peg
팩
スタン ディングテープ
収 納 用 ポ ケ ット
Pocket
for Standing tape
스탠딩 테이프 수납용 포켓
撤収時にはスタンディングテープを装着してから撤収してください。次回立ち上げる時にスムーズに設営に取り掛かれます。
Before folding, install the standing tape. You can start pitching smoothly next time.
철거할 때는 스탠딩 테이프를 장착한 후 철거하십시오. 다음번에 설치할 때, 보다 원활하게 설치할 수 있습니다.
外側|Outside|외측
ペグ
Peg
팩
内側|Inside|내측
ペグ
Peg
팩
ル ー プ( グ レ ー )
Loop (Gray)
루프(그레이)
ル ー プ( グ レ ー )
Loop (Gray)
루프(그레이)
13
14
テントとの連結|Connecting with a tent|텐트와 연결하기
上下のフラップを張り出すことで、通気性を保ちながら、雨天時や日差しが強い日中でもより涼しく快適に過ごすことが出来ます。
Hanging the flaps on the top and the bottom allows you to feel comfortable even in the rain or in the daytime
with strong sun light, while maintaining good ventilation.
상하의 플랩을 펴면 공기 순환을 유지한채로 우천시와 햇빛이 강한 날에도 시원하고 쾌적하게 지낼 수 있습니다.
14
ドアがファスナーと連動することで、開閉時にドアが汚れにくくなります。
The door moves along with the zipper, preventing it from getting dirty when it is opened and closed.
도어와 패스너가 연동하여 개폐시에 도어의 오염을 방지하여 줍니다.
15
テントと連結をしない場合は、ジョイントフラップを巻き上げてトグルとループで固定してください。
When the tarp is not connected to the tent, roll up the joint flaps and fix it with the toggle and loop.
텐트를 연결하지 않을 경우에는 조인트플랩을 말아올려서 토글과 루프로 고정하여 주십시오.
16
1ジョイントフラップがついている出 入り口のフラップおよびメッシュを巻 き上げ、本体 のジョイントフラップを広げます。
Roll up the flap and mesh of entrance where the joint flap is attached, and spread the joint flap.
조인트 플랩이 부착된 출입구의 플랩과 메시를 감아서 본체의 조인트 플랩을 펼치십시오.
本 製 品は、コ ールマン 製 の キャノピー タイプの テントとジョイントが 可 能 で す。
ジョイントはタープ設営後に以下の手順で行います。
This tarp is able to connect with a tent made by Coleman.
For connecting to a tent, please follow the below steps after the tarp is pitched.
본 제품은 콜맨이 판매하는 캐노피 타입 텐트와 연결할 수 있습니다.연결할 때는 타프 설치 후, 다음에 순서를 따르십시오.
2連結するテントのキャノピーとサイドフラップを巻き上げます。
Roll up the canopy flap and side flaps of a tent connected to the tarp
연결하고자 하는 캐노피와 사이드 플랩을 감으십시오.
ファスナーを開けます。
Open the zipper.
패스너를 열어주십시오.
それぞれのフラップを巻き上げます。
Roll up each flap.
각각의 플랩을 말아올립니다.
ル ープ
Loop
루프
トグル
Toggle
토글
トグルとループ
で固定します。
Fix the flap
with the
toggle and the
loop.
토글과 루프로
고정합니다.
13
14
テントとの連結|Connecting with a tent|텐트와 연결하기
上下のフラップを張り出すことで、通気性を保ちながら、雨天時や日差しが強い日中でもより涼しく快適に過ごすことが出来ます。
Hanging the flaps on the top and the bottom allows you to feel comfortable even in the rain or in the daytime
with strong sun light, while maintaining good ventilation.
상하의 플랩을 펴면 공기 순환을 유지한채로 우천시와 햇빛이 강한 날에도 시원하고 쾌적하게 지낼 수 있습니다.
14
ドアがファスナーと連動することで、開閉時にドアが汚れにくくなります。
The door moves along with the zipper, preventing it from getting dirty when it is opened and closed.
도어와 패스너가 연동하여 개폐시에 도어의 오염을 방지하여 줍니다.
15
テントと連結をしない場合は、ジョイントフラップを巻き上げてトグルとループで固定してください。
When the tarp is not connected to the tent, roll up the joint flaps and fix it with the toggle and loop.
텐트를 연결하지 않을 경우에는 조인트플랩을 말아올려서 토글과 루프로 고정하여 주십시오.
16
1ジョイントフラップがついている出 入り口のフラップおよびメッシュを巻 き上げ、本体 のジョイントフラップを広げます。
Roll up the flap and mesh of entrance where the joint flap is attached, and spread the joint flap.
조인트 플랩이 부착된 출입구의 플랩과 메시를 감아서 본체의 조인트 플랩을 펼치십시오.
本 製 品は、コ ールマン 製 の キャノピー タイプの テントとジョイントが 可 能 で す。
ジョイントはタープ設営後に以下の手順で行います。
This tarp is able to connect with a tent made by Coleman.
For connecting to a tent, please follow the below steps after the tarp is pitched.
본 제품은 콜맨이 판매하는 캐노피 타입 텐트와 연결할 수 있습니다.연결할 때는 타프 설치 후, 다음에 순서를 따르십시오.
ジョイントフラップ
Joint Flap
조인트 플랩
2連結するテントのキャノピーとサイドフラップを巻き上げます。
Roll up the canopy flap and side flaps of a tent connected to the tarp
연결하고자 하는 캐노피와 사이드 플랩을 감으십시오.
15
16
3連 結 す るテント を タープ の 中に 移 動し 、ジョイントフラップ を テント にか ぶせ ます。
テント のフ ロントポール にジョイントフラップ がしっかりか ぶさる 様 に 調 整しま す。
Move a tent into the tarp and put the joint flap over a tent front side.
Adjust the joint flap as it covers the tent front pole well.
연결하고자 하는 텐트를 타프 안으로 옮기고 조인트 플랩을 텐트에 겹치십시오.
텐트의 프론트 폴대에 조인트 플랩이 제대로 겹쳐지도록 조정하십시오.
4テント 位 置を 決 め 、テントを ペグ で 固 定しま す。
Decide the installation point and peg down the tent.
텐트의 위치를 정한 후, 텐트를 팩로 고정하십시오.
●ジョイントフラップの端を固定します。
  テント 側 にフ ロントポ ール が ある 場 合 は 、ジョ イントフラ ップ 端 の ル ー プを テント の フロント ポール 固 定 ペグ に 引 っ 掛 けま す。
 引っ掛けられない場 合は、ジョイントフラップ 端のループをペグで固定します。
●Fasten the end of joint flap.
 If there is a front pole at a tent, hitch the loop of joint flap end at the peg for the front pole.
 If hitching the loop is dicult, peg down the loop of joint flap end.
●조인트 플랩의 끝부분을 고정하십시오.
 텐트에 프론트 폴대가 있는 경우, 조인트 플랩 끝의 루프를 텐트에 있는 프론트 폴대의 고정 팩에 거십시오.
 불가능한 경우에는 조인트 플랩 끝부분의 루프를 팩로 고정하십시오.
テ ント の フ ロ ント ポ ー ル に ジョイ ント フ ラップ が しっ か り か ぶ さ る 様 に 調 整 し ま す 。
Adjust the position of a tent for covering the joint flap fully.
텐트 프런트 폴대에 조인트 플랩이 제대로 덮히도록 조정해 주십시오.
5
ジョイントフラップ
Joint Flap
조인트 플랩
17
18
Ⅱ- 4(P.6)の続きはここから
Continuation of Ⅱ-4 (P.6)
Ⅱ- 4(P.6)의 뒷부분은 여기부터
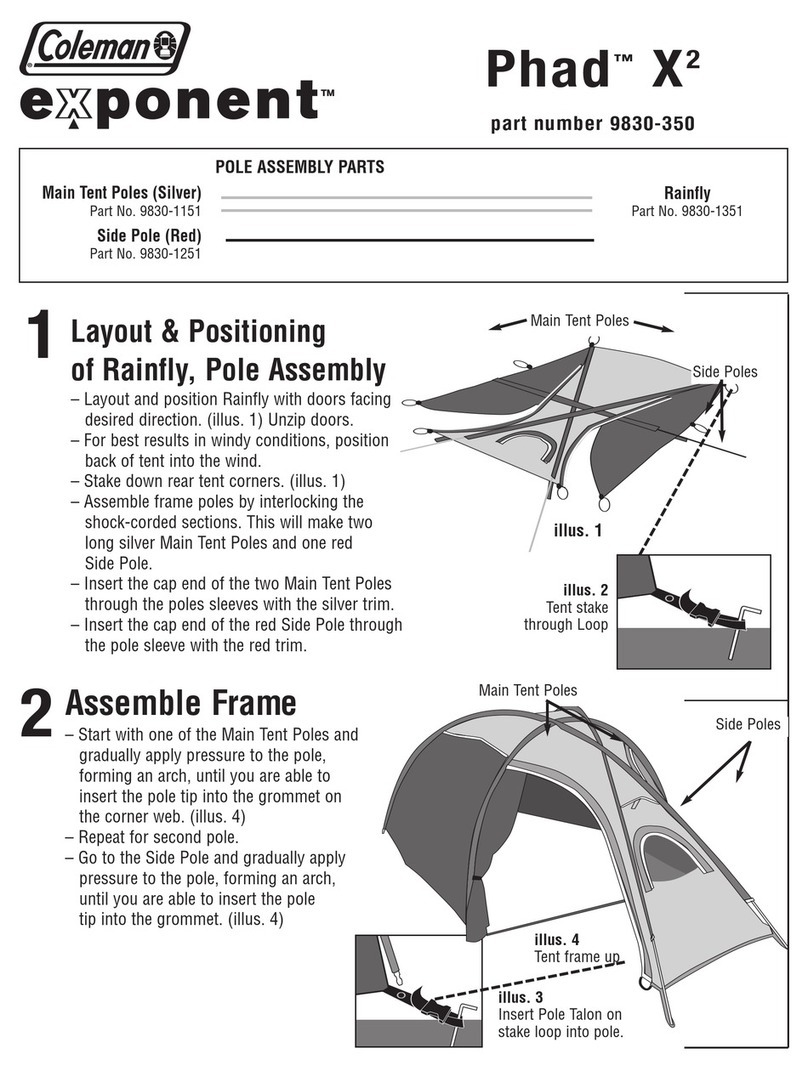
A手前のスリーブの端を持ち、メインポール(シルバー/レッド)1本を押し入れながらメインポール(シルバー/レッド)の手前側の端
を、シェードスキンのコーナーにあるアシストクリップに差し込みます。
Hold the end of front side sleeve, and insert the assist clip at the corner of shade skin into the end of main
pole (Silver/Red) while pushing the main pole (Silver/Red).
슬리브 모서리를 잡고 메인 폴대(실버/레드) 1개를 눌러 넣으면서, 메인 폴대(실버/레드)의 앞쪽 끝을 쉐이드 스킨 모서리에 있는 어시스트
클립에 끼워 넣으십시오.
C手前のスリーブの端を持ち、メインポール(シルバー/レッド)を押し入れながら、シェードスキンを完全に立ち上げます。立ち上が
ったら、メインポール(シルバー/レッド)の手前側の端を、シェードスキンのコーナーにあるアシストクリップに差し込みます。
Hold the end of sleeve and stand the shade skin completely while pushing the main pole (Silver/Red). After
standing, insert the assist clip located at shade skin corner into front side main pole (Silver/Red) end.
슬리브 끝을 잡고 메인 폴대(실버/레드)을 늘리면서 쉐이드 스킨을 완전히 들어 올리십시오. 그 다음, 메인 폴대(실버/레드) 양쪽 끝을 쉐이드 스킨
모서리에 있는 어시스트 클립에 끼워 넣으십시오.
立ち上げの際は片手でスリーブを
引きながら、もう片方の手でポールを
ゆっくりと押し入 れます。
When putting up each pole,
pull the sleeve with one hand
and push the pole in slowly
using the other hand.
세울 때는 한 손으로 슬리브를 당기면서
다른 손으로 폴을 천천히 밀어 넣습니다.
立ち上げの際は片手でスリーブを引きながら、もう片方の手でポールをゆっくりと押し入れます。スリーブを持たずに押し込むと、ポール
が折れたり生地が破れたりします。
When putting up each pole, pull the sleeve with one hand and push the pole in slowly using the other hand. Poles and
sleeves may be damaged if the sleeves are not held when putting the poles.
폴대를 통과시킬 때는 반드시 슬리브를 잡고 누르십시오. 슬리브를 잡지 않고 넣거나, 폴대를 잡아당기면 폴대와 슬리브가 손상될 수 있습니다.
メインポール
Main Pole
메인 폴대
アシストクリップ
Assist Clip
어시스트 클립
ル ー プ( レ ッ ド )
Loop(Red)
루프(레드)
1人で設営する場合|In the case of setting up alone|1명이 설치할 경우
Ⅲ- 6(P.7 )へ戻る
Go back to Ⅲ-6 (P.7)
Ⅲ- 6(P.7 )로 돌아가기
設置時のポールの形に注意してください。S字になるとポールへの負荷が強くなり立ち上がらなくなるため必ずアーチ状の形でポールを
設置してください。
Please be aware of the pole shape in setting up. If the pole shape becomes "S" shape, the tarp can not stand up
because of the overload to the pole. Be sure to set up the pole with "Arch" shape.
설치 시 폴의 형태에 주의하세요. S자가 되면 폴에 걸리는 부하가 커져 잘 세울 수 없으므로 반드시 아치 모양으로 폴을 설치하세요.
Bメインポール(シルバー/レッド)のクロスしている中心を片方の手で持ち上げ(1m程)ながらアシストクリップで固定されている3ヶ
所のポールを立たせます。中心を持っている手をまだポールがアシストクリップに差し込まれていない方のスリーブの端に徐々に
移動し、もう片方の手でポールを押しながらスリーブを引いていきます。
Lift the center of crossed main poles (Silver/Red) up around 1m from the ground. After that, move your
hand gradually to the sleeve end which side of assist clip has not been inserted yet while standing the
poles already fixed by assist clips, and pull the sleeve end while pushing the pole by the other hand.
크로스된 메인 폴(실버/레드)의 중심을 한 손으로 들어(1m 정도), 어시스트 클립으로 고정한 세 군데의 폴을 세워 주십시오. 그 후, 메인 폴
쪽의 손을 폴이 어시스트 클립에 꽂혀있지 않은 슬리브 끝으로 천천히 옮기십시오. 이 때, 다른 손은 폴을 누르면서 슬리브를 당겨 주십시오.
中心を持ち上げて3ヶ所のポールを立たせます。
Lift up the center of crossed main poles and stand the poles.
중심을 들어 올려 세 군데의 폴을 세워 주십시오.
メインポール
Main Pole
메인 폴대
アシストクリップ
Assist Clip
어시스트 클립
Model 2000033116
TOUGH SCREEN TARP /400+
19
[ タフスクリーンタープ/400+ ]
[ 터프 스크린 타프/400+ ]
取扱い・組立て説明書
Handling and Assembly Instruction Manual
취급·조립 설명서
この取扱い説明書は大切に保管してください。
Please keep this instruction manual with care for future reference.
이 설명서를 잘 보관하십시오.
저희 콜맨 제품을 구입해주셔서 감사합니다. 설치 시에는 배수가 잘 되도록 평평한 장소를 선택하십시오. 돌이나 나뭇가지 등 본 제품을 손상시킬
우려가 있는 것은 미리 제거한 후 설치하십시오.
Thank you for your purchase of the Coleman product. When setting up the tents or tarps, please choose an area
where drainage is good and the ground surface is flat. Be sure to remove any rocks, tree branches, and other
objects and flatten any uneven surface before installing the tents or tarps, as they could cause damage to the
tents or tarps.
この度はコールマン製品をお買い上げいただき誠に有難うございました。設営の際には水はけが良く、できるだけ平らな場所を選んで
ください。また、石や木の枝等、本製品を傷つけるおそれのあるものは、あらかじめ取り除き、整地してから設営してください。
お問い合わせ先 コールマンカスタマーサービス:0 12 0 -111- 9 5 7 受付時間:月曜日~金曜日(祝祭日を除く)10:00~17:30
Coleman Brands Pty Ltd AB 74 091 681 195 Suite W2C1,75-85 O’Riordan Street,
Sydney Corporate Park Alexandria NSW 2015 Australia Tel : +612 8762 5000
콜맨코리아 유한회사 서울특별시 강남구 도산대로 532 인희빌딩 2층 TEL. 1577-5932 www.coleman.co.kr
1
撤収手順│Folding instructions│해체 순서
2ポールを全ておりたたみポールケースに収納し、シェードスキンを下図のように巻いて、キャリーバッグに収納して完了です。
Fold all poles and put them back into the pole case. Roll up the shade skin as shown in the figures below.
Stow them into the carry bag.
폴을 전부 접어 넣은 후 폴 케이스에 수납하고, 쉐이드 스킨을 아래 그림처럼 말아서 수납케이스에 수납하십시오.
ポールケース
Pole Case
폴 케이스
シェードスキン
Shade Skin
쉐이드 스킨
ポール
Pole
폴대
ショックコード
Shock Cord
쇼크 코드
ポールを収納する際は、真ん中から折りたたむようにすると、ショックコード(ゴム)全 体に均一に、テンションがかかり、ショックコー
ドの寿命を延ばす事が出来ます。
When folding a pole, it is recommended that you start folding it in the middle as it will keep the tension even throughout
the shock cord (rubber) and allow it to last longer.
폴대를 보관할 때, 정중앙부터 접게되면 쇼크 코드(고무)전체에 균일하게 힘이 가해져 쇼크 코드의 수명이 길어집니다.
1 で た た ん だ シェード スキ ン をポ ー ル ケ ースを 芯 にして 巻 い て い く。
After folding the shade skin at the 1, put the pole case on it and roll it up.
1에서 접은 타프 안에 폴 케이스를 넣은 후 감으십시오.
両端を中へ折り込んで長 方形にする。
Fold both ends inward to make a rectangular shape.
양쪽 끝을 접어서 긴 사각형모양을 만드십시오.
前後の屋根の四隅を持ち、中央を折り込みながら半分にする。
Pick up the 4 corners of shade skin and fold in half.
앞뒤 지붕의 네 모서를 잡고 중앙을 반으로 접습니다.
長方形を更に中へ折り込み、1/4のサイズにたたむ。
Fold it further inward to make it a 1/4 size.
긴 사각형을 안으로 접어서 1/4 사이즈로 만드십시오.
テント・タープ生地を濡れたままで収納しますと防水効果が著しく損なわれる為、ご使用後はフライシート・インナーテント(タープの
場合スキン)の、汚 れをよく落 とし、十 分 乾 かしてか ら収 納・保 管してください 。
If you stow the tent・Tarp while it is still wet, its water-proof performance will significantly deteriorate. Therefore,
please carefully clean the fly sheet and inner tent after use and then fold and stow them after making sure that
they have dried up.
텐트와 타프의 패브릭을 젖은 채로 보관하면 방수효과가 크게 떨어지게 됩니다.사용 후에는 플라이 시트 이너 텐트(타프의 경우, 스킨)에 뭍은 오염을
제거하고 충분히 건조시킨 다음 보관하십시오.
タープ を固定したペグ、ロープ、ポールをすべて 取り外し、下 図のようにしてタープ をた たみます。
Take o the shade skin. Remove all pegs, ropes, and poles that have been installed to hold the shade skin.
Then fold the shade skin as illustrated below.
타프를 고정한 팩와 폴대를 모두 분리한 후, 아래 그림과 같이 접으십시오.

This manual suits for next models

1

Other Coleman Tent manuals

Coleman 9271H133 User manual

Coleman

Coleman 9271H133 User manual

Coleman Phad X3TM User manual

Coleman

Coleman Phad X3TM User manual

Coleman 2000007828 Manual

Coleman

Coleman 2000007828 Manual

Coleman American Heritage Weathermaster 9232B129 User manual

Coleman

Coleman American Heritage Weathermaster 9232B129 User manual

Coleman 2000002596 User manual

Coleman

Coleman 2000002596 User manual

Coleman Phad X2 2000000456 User manual

Coleman

Coleman Phad X2 2000000456 User manual

Coleman 9391-251 User manual

Coleman

Coleman 9391-251 User manual

Coleman EVANSTON 2000000144 User manual

Coleman

Coleman EVANSTON 2000000144 User manual

Coleman SUNDOME 9262C905 User manual

Coleman

Coleman SUNDOME 9262C905 User manual

Coleman HOOLIGAN 2000001978 User manual

Coleman

Coleman HOOLIGAN 2000001978 User manual

Coleman FAST PITCH User manual

Coleman

Coleman FAST PITCH User manual

Coleman Ridgeview 9271L133 User manual

Coleman

Coleman Ridgeview 9271L133 User manual

Coleman Instant up 6P Gold Series Manual

Coleman

Coleman Instant up 6P Gold Series Manual

Coleman ELITE WEATHERMASTER TENT User manual

Coleman

Coleman ELITE WEATHERMASTER TENT User manual

Coleman Echo Lake 6p Fast Pitch Manual

Coleman

Coleman Echo Lake 6p Fast Pitch Manual

Coleman Ridgeline Tunnel Tent Manual

Coleman

Coleman Ridgeline Tunnel Tent Manual

Coleman MAX 2000002251 User manual

Coleman

Coleman MAX 2000002251 User manual

Coleman CIMMARON 9260-107 User manual

Coleman

Coleman CIMMARON 9260-107 User manual

Coleman 2000007823 Manual

Coleman

Coleman 2000007823 Manual

Coleman Fast Pitch Dome Manual

Coleman

Coleman Fast Pitch Dome Manual

Coleman AMERICAN HERITAGE WEATHERMASTER 2000000148 User manual

Coleman

Coleman AMERICAN HERITAGE WEATHERMASTER 2000000148 User manual

Coleman Sundome 2000000136 User manual

Coleman

Coleman Sundome 2000000136 User manual

Coleman 2125967 Manual

Coleman

Coleman 2125967 Manual

Coleman 076-5969-6 Manual

Coleman

Coleman 076-5969-6 Manual

Popular Tent manuals by other brands

Isabella CASA manual

Isabella

Isabella CASA manual

Snow Peak SSD-630-1 instruction manual

Snow Peak

Snow Peak SSD-630-1 instruction manual

Texsport 02848 instructions

Texsport

Texsport 02848 instructions

Palram CANOPIA GARAMOND 3x4 / 1x1.4 How to assemble

Palram

Palram CANOPIA GARAMOND 3x4 / 1x1.4 How to assemble

Outsunny A20-166 manual

Outsunny

Outsunny A20-166 manual

BEGA 13 231 Instructions for use

BEGA

BEGA 13 231 Instructions for use

Napier SPORTZ 84000 installation instructions

Napier

Napier SPORTZ 84000 installation instructions

Ozark Trail ConnecTent W531 Assembly instructions

Ozark Trail

Ozark Trail ConnecTent W531 Assembly instructions

GigaTent Greylock Mt. FT018 owner's manual

GigaTent

GigaTent Greylock Mt. FT018 owner's manual

Axley 014122 operating instructions

Axley

Axley 014122 operating instructions

Palram Sierra Series Assembly instructions

Palram

Palram Sierra Series Assembly instructions

Eclipse canopy 3641S Installation

Eclipse canopy

Eclipse canopy 3641S Installation

Harbor Freight Tools 69039 Owner's manual & safety instructions

Harbor Freight Tools

Harbor Freight Tools 69039 Owner's manual & safety instructions

RUSTA EASY UP manual

RUSTA

RUSTA EASY UP manual

OZTENT RV-3 PlUS owner's manual

OZTENT

OZTENT RV-3 PlUS owner's manual

Vango Odyssey 400 instructions

Vango

Vango Odyssey 400 instructions

Ohenry Productions Premium 15x40 quick start guide

Ohenry Productions

Ohenry Productions Premium 15x40 quick start guide

Maverick GALAXY Instruction booklet

Maverick

Maverick GALAXY Instruction booklet

manuals.online logo
manuals.online logoBrands
  • About & Mission
  • Contact us
  • Privacy Policy
  • Terms and Conditions

Copyright 2025 Manuals.Online. All Rights Reserved.