BELRAD BE1200500 User manual

www.belrad.be
ELECTRISCHE HANDDOEKDROGER
BE1200500-BE1600500-BE1800550-BEZ1200500-BEZ1600500-BEZ1800550

www.belrad.be
1-Towel rail powered by the heating element only, not connected to the central heating system.
2-Water, water with anti-freezing agent or the right type of oil should be used as a heating agent — possibility of installation
and correct use is conditioned by meeting manufacturer's requirements on the towel rail and heating element.
3-Filling the towel rail with too much liquid leads to exceeding of acceptable pressure and damaging of the towel rail or
heating element.
4-Heating element should not be fitted horizontally or turned downwards.
5-The towel rail is to be installed so that switches and other controls can not be touched by a person in the bath or shower.
WARNING: In order to avoid a hazard for very young children, this appliance
should be installed so that the lowest heated rail is at least 600 mm above the floor.
CONSTRUCTION OG THE
HEATING ELEMENT UNIT
ELECTRISCHE HANDDOEKDROGER
BE1200500-BE1600500-BE1800550-BEZ1200500-BEZ1600500-BEZ1800550
Model code
Electric supply
Heating output available
Device protection class
Towel rail connection
Casing protection mark
Certification
Lauda Digital
230V / 50Hz
200, 300, 400, 600, 800, 1000W
G 1/2”
Class I
IPX4
These products are in compliance with 2014/30/EU
Electromagnetic Compatibility Directive
and 2014/35/EU Low Voltage Directive.
These products carry CE mark accordingly.
1. Heating element
2. Controller
3. Power cord
1
2
3

1
User’s Manual
LCD controller
SAFETY GUIDE
1. Do not open the case in any condition.
2. Never use device that is damaged in any way.
3. Please check the input voltage used in your home equals to the marking on
the label of device prior to connect it.
4. The power cable should not be repaired once it is damaged. Asking help
from an agency or specialized shop for replacement.
5. Always ground the device.(Connect to a grounded socket)
6. The device should not be connected to a power socket while being installed.
7. Do not use the device no other open flame equipment. The product is
designed to fit with towel warmer. Be caution of the level of liquid agent. The
heating element must work in a full liquid agent environment. Do not let it work
in dry condition.
8. Do not splash water or other liquids on the plastic body of the device.
9. Do not touch the device with a wet body.
10.The device is not allowed to be operated by children or persons with limited
mental capacity.
Please read this manual carefully before you start using the controller.
2
1.Technical information:
a) Power supply specification:AC230V/50HZ
b) Operating temperature range:0~55℃
c) Set temperature range:30~70℃
d) Time mode:24-hour
e) Week mode:digital display 1~7
f) System mode:free,schedule,constant temperature,timing
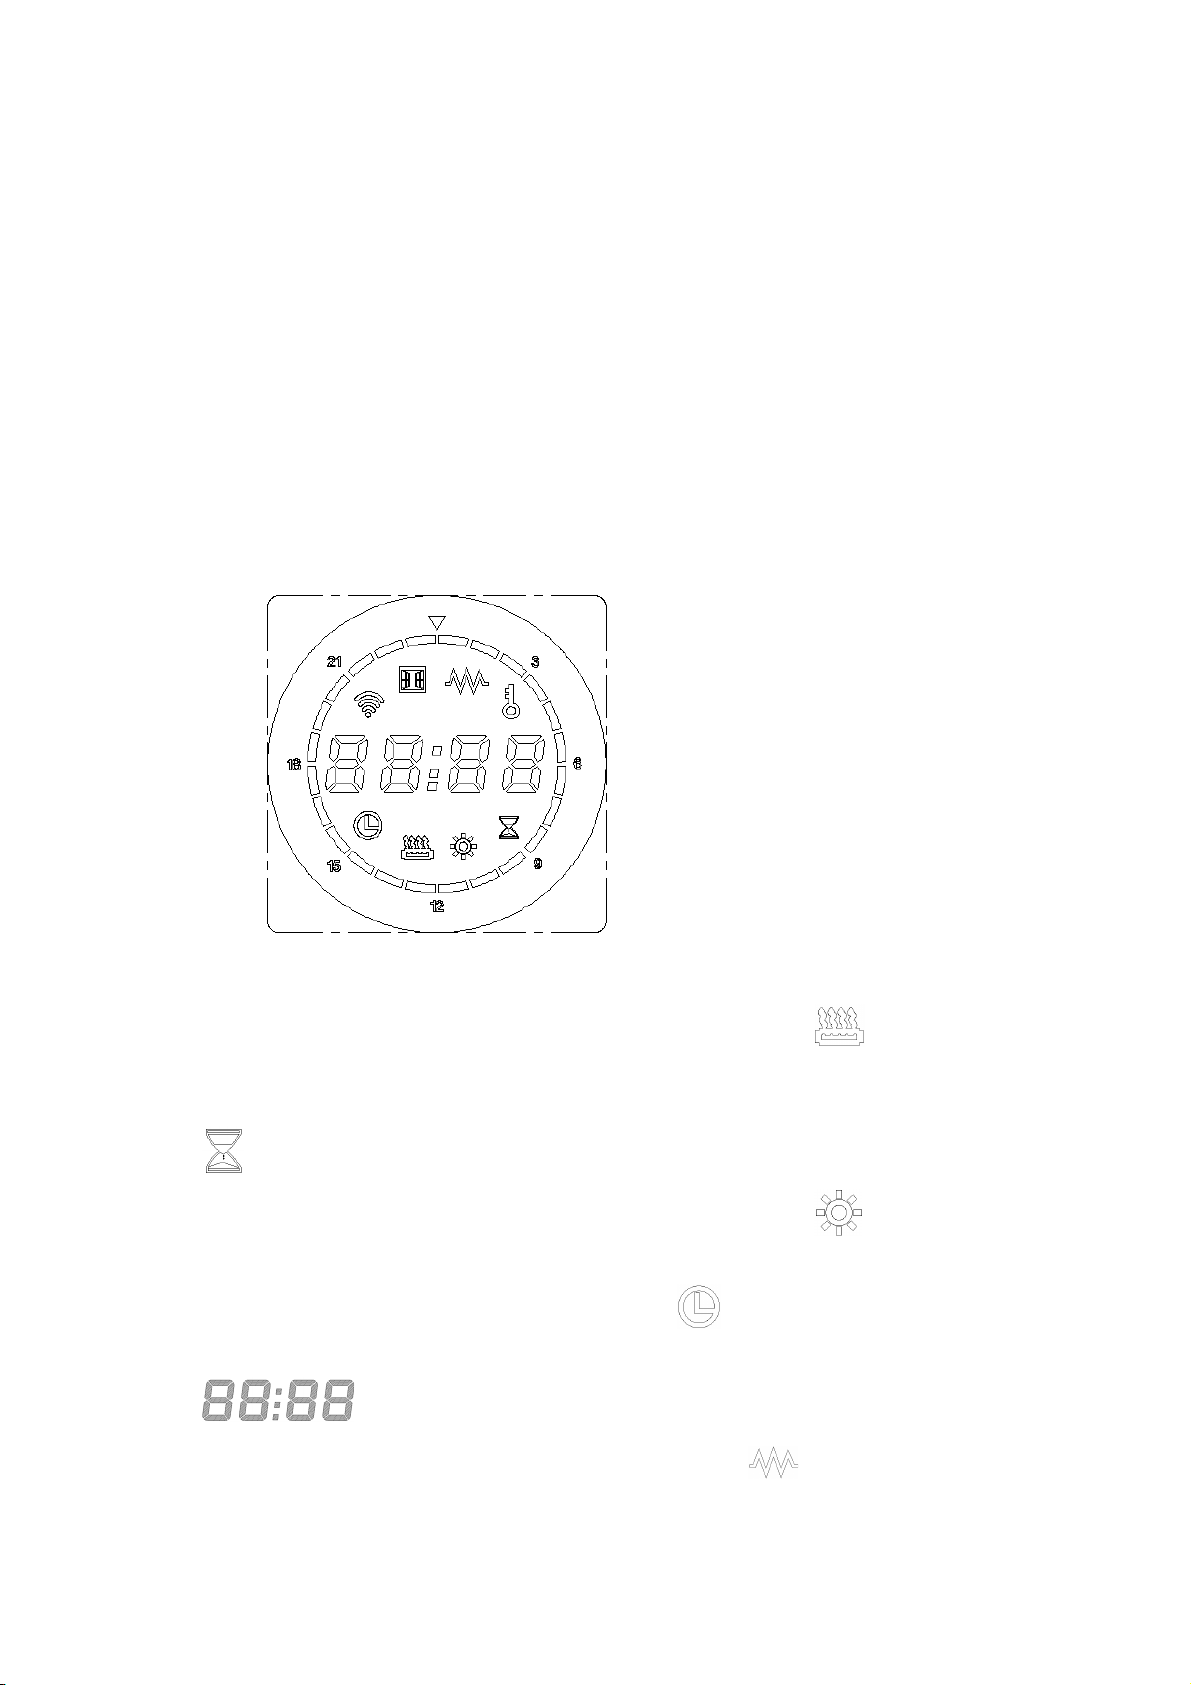
2.LCD display :
3.Icon display instructions:
3.1 Free mode:Temperature can be set separately,shown as , the adjustable
range is 30℃~70℃.
3.2 Constant temperature mode: Temp e r a ture is not adjustable, shown
as ,the temperature is fixed at 50℃.
3.3 Timing mode: The temperature is fixed at 65℃,shown as ,drying time can
be adjustable,the adjustable range is from 30 minutes to 8 hours.
3.4 Schedule mode:Timing function,shown as .
3.5 Time and temperature display:Display setting temperature and time,shown
as
3.6 Heating function:The heater is working,shown as
3
3.7 Child lock:Unable to operate any keys(except open and close),shown as .
3.8 Timeline:Timing time can be adjusted,adjusting range is 0~23H,shown as
3.9 Keys description:
open and close(upper left) function(lower left)
add(upper right) minus(lower right)
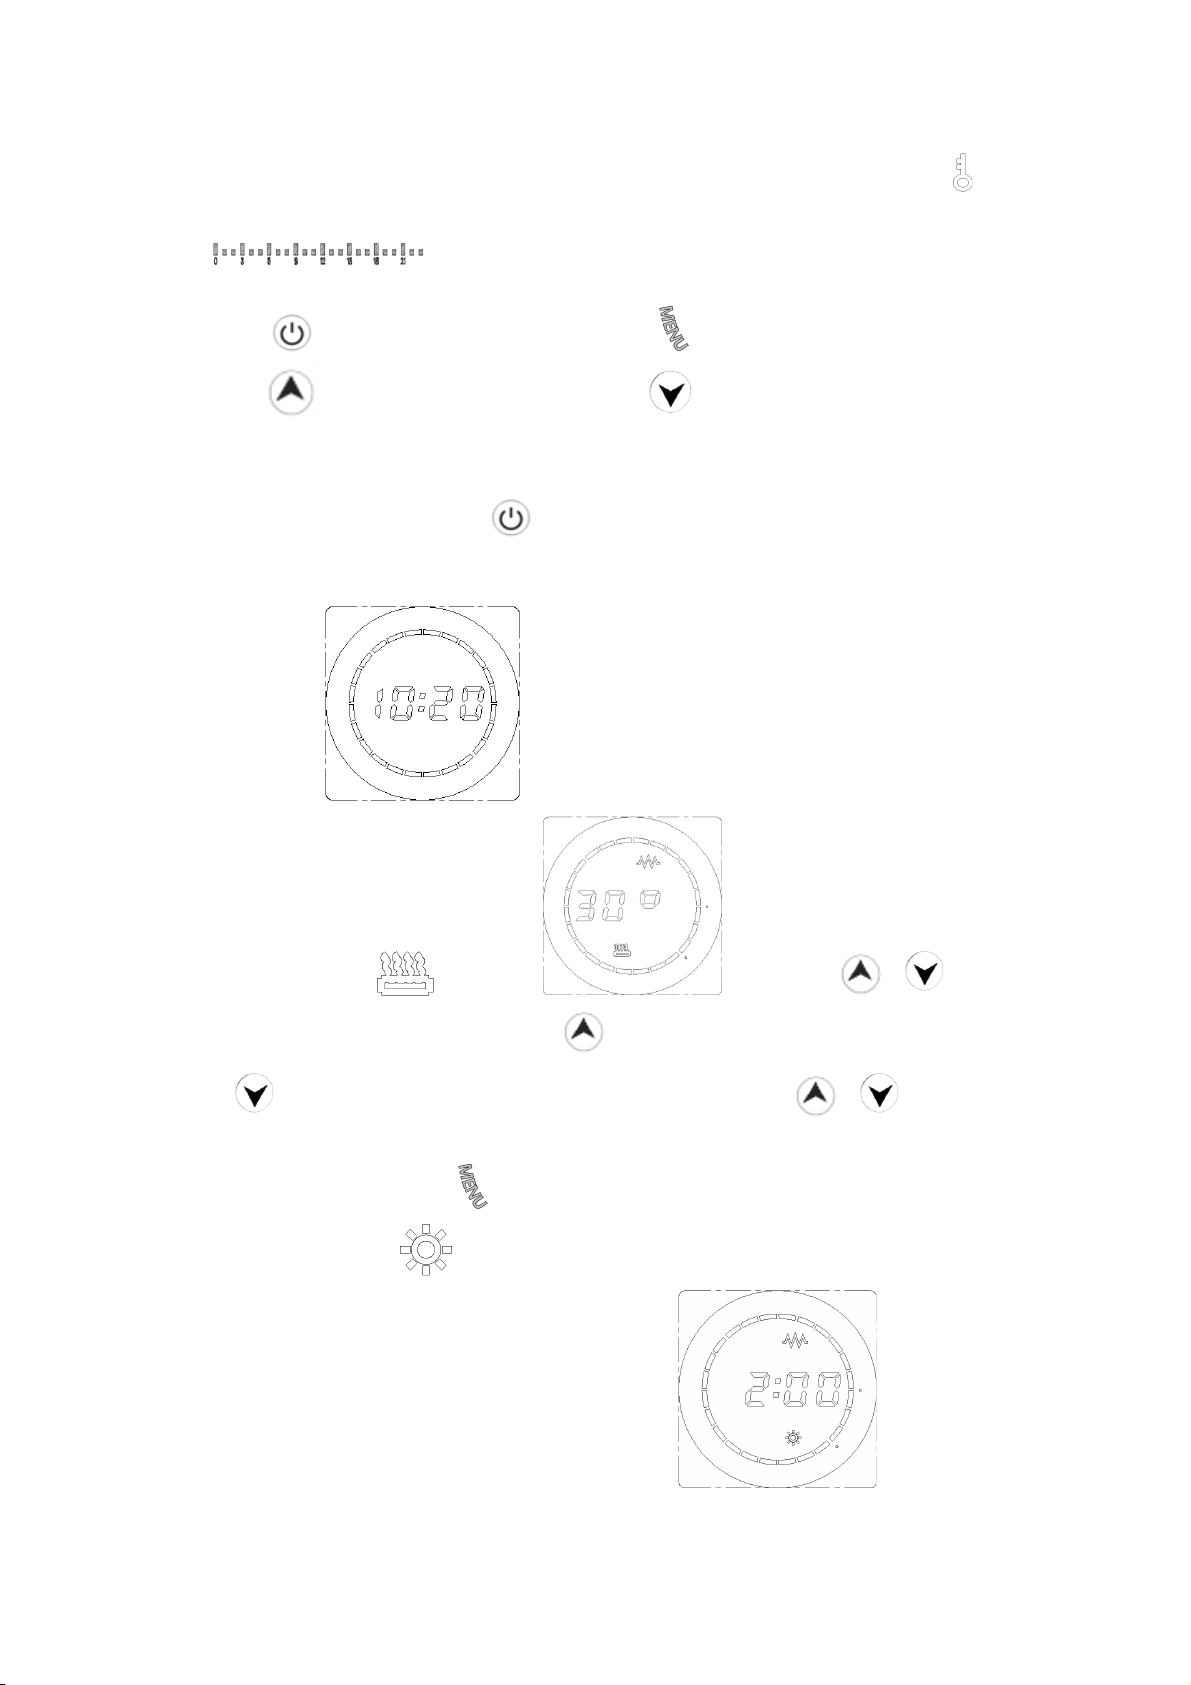
4.Mode operation instructions:
4.1 Boot up: Short press to enter from shutdown state to boot state(in the
shutdown state, short press any other button products will not react).Shutdown display
time,shown as
4.2 Free mode : shown as ,short press or to set
the temperature in free mode,short press to increase the temperature,short
press to decrease the temperature,1℃ by one step.long press or 1s will have
acceleration function.
In the free mode,if you press ,controller will be switched to timing mode .
4.3 Timing mode : The heating temperature is fixed at 65℃,the heating time
can be adjusted from 30 minutes to 8 hours.shown as

4
Short press or to set timing mode time,short press to increase time,short
press to decrease time,30 minutes by one step.Long press or 1s will have
acceleration function.After the timer expires, the device will enter standby mode.
In the timing mode,if you press ,controller will be switched to constant temperature
mode.
4.4 Constant temperature mode : The heating temperature is fixed at
50℃,shown as ,temperature cannot be changed in this mode.
In the constant temperature mode,if you press ,controller will be switched to schedule
mode.
4.5 Schedule mode : Schedule mode allows for time, week, and weekly
program Setting, in the first use of equipment (or in a power off status), you should set
time, week at first .shown as
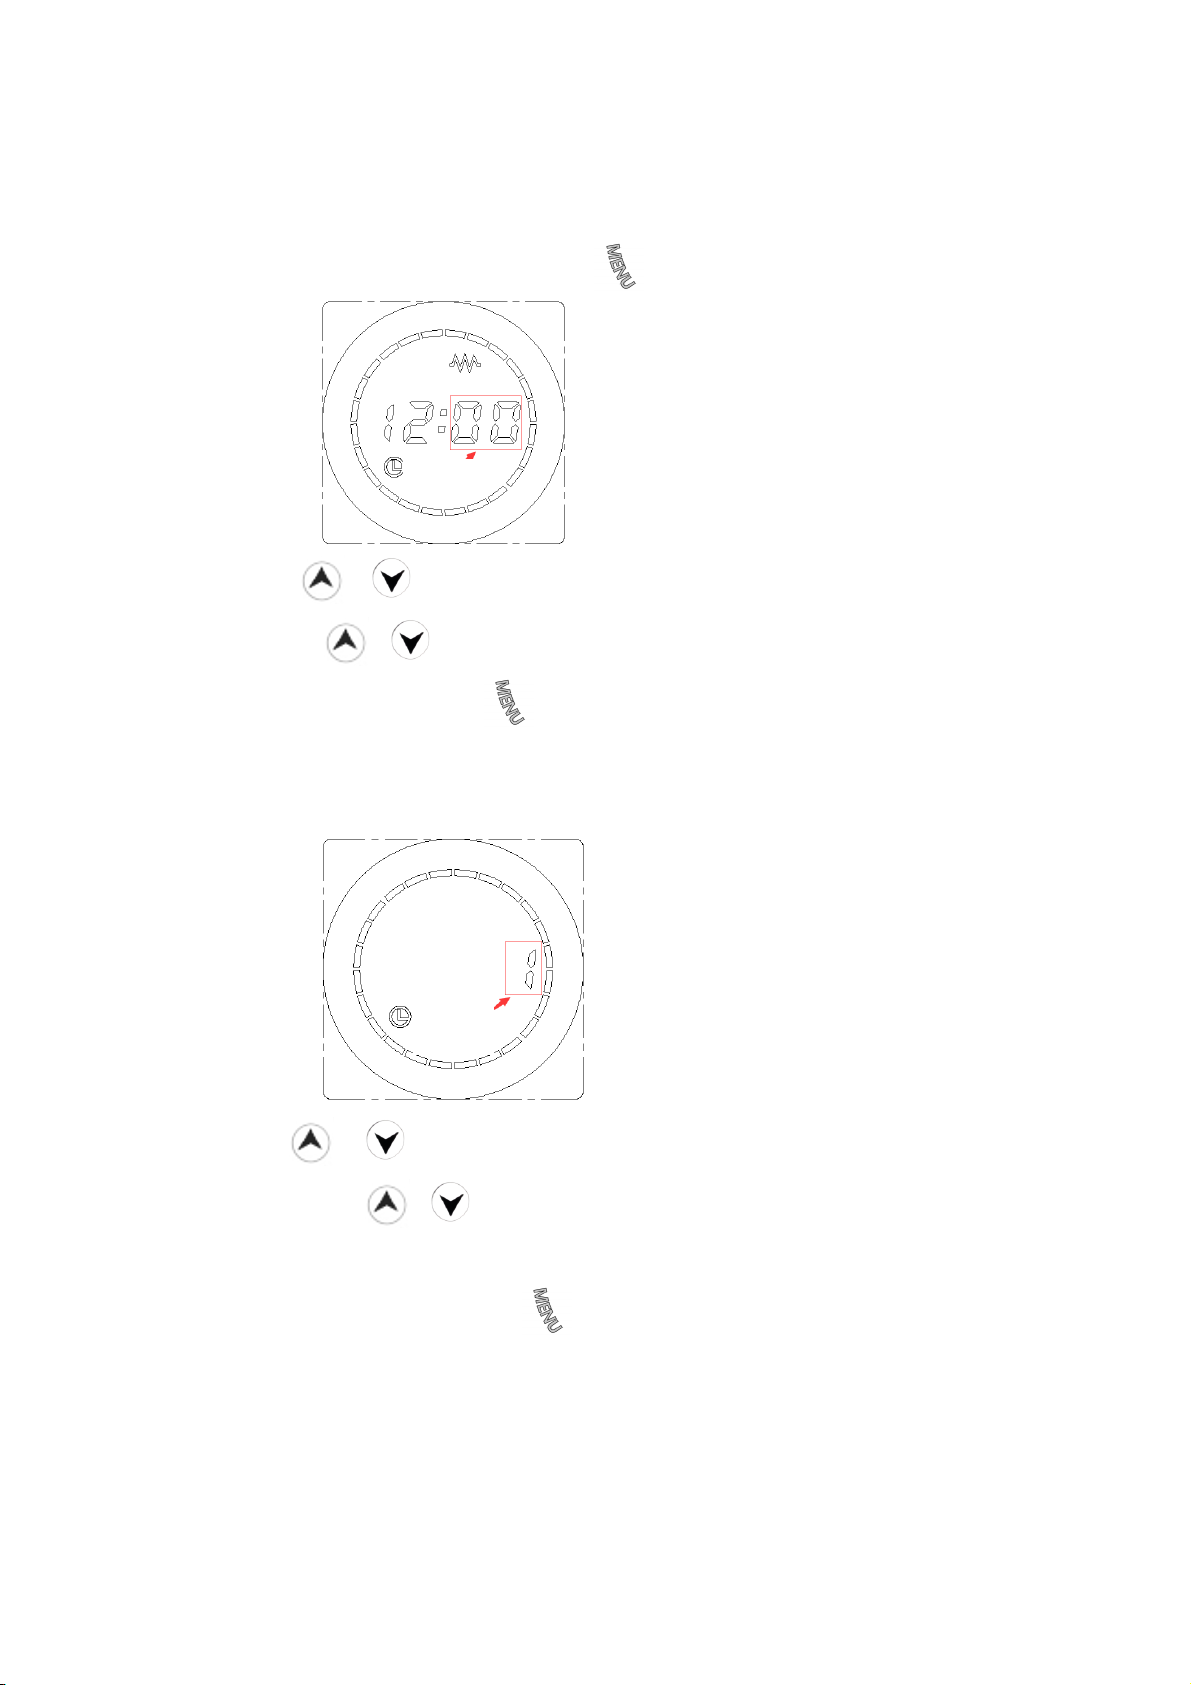
4.5.1 Time setting: Long press 3s to enter time setting,firstly set as an
hour,shown as ,short press or to adjust the clock
time,adjusting range is 0~23H,1 hour by one step,long press or 1s will have
Flash
5
acceleration function.(No operation within 30s will exit time setting and enter minute
setting).
After hour setting is completed,short press ,the minute time "00" flashes(flash by
0.5s),shown as
Short press or to adjust minute,adjusting range is 0~59 min,1min by one
step,long press or 1s will have acceleration function.
After setting the time,short press to enter week set(No operation within 30s will exit
time setting and enters week set).
4.5.2 Week setting: To ent e r w e ek set,the last number flashes (flash by
0.5s),shown as
Short press or to set the week,adjusting range is 1~7 day,1 day by
one step,long press or 1s will have acceleration function; 1=Monday,
2 =Tuesday, 3=Wednesday, 4=Thursday, 5=Friday, 6=Saturday, 7=Sunday.
After setting up the week,short press to enter weekly program Setting(No operation
within 30s will exit week setting and enters weekly program setting)
Flash
es
Flash

6
4.5.3 Weekly setting: To e nte r wee kl y pr o gr am, sh o wn as
Short press can view the Setting for the rest of the week,timeline shows( )indicates
that the current period is heating ,timeline shows (blank)indicates that the current
period is not heating.The following photo defaults the setting from Monday to Sunday.
Monday to Sunday:Heating status from 5:00- 23:59(Other times are not in the heating
state)
After setting Monday ,short press to enter Tuesday,until Sunday.
After setting day program,short press to enter running state(No operation within 30s
will exit day program and enter running state )
4.5.4 Weekly program modification: Long press 3s to enter weekly program
modification,short press or to set the weekly program,short press indicates
that the current period is heating, flash 3s,dark 1s;short press indicates that the
current period is not heating, dark 3s,flash 1s,increase 1H by one step,flashes in the
setting time,loop setting when rising to 23H.
For example:adjust Monday weekly program in the heating status from 07:00 to 23 :00(not
heating at other times).You should long press 3s when controller is in the Monday
On the heating state
Current week
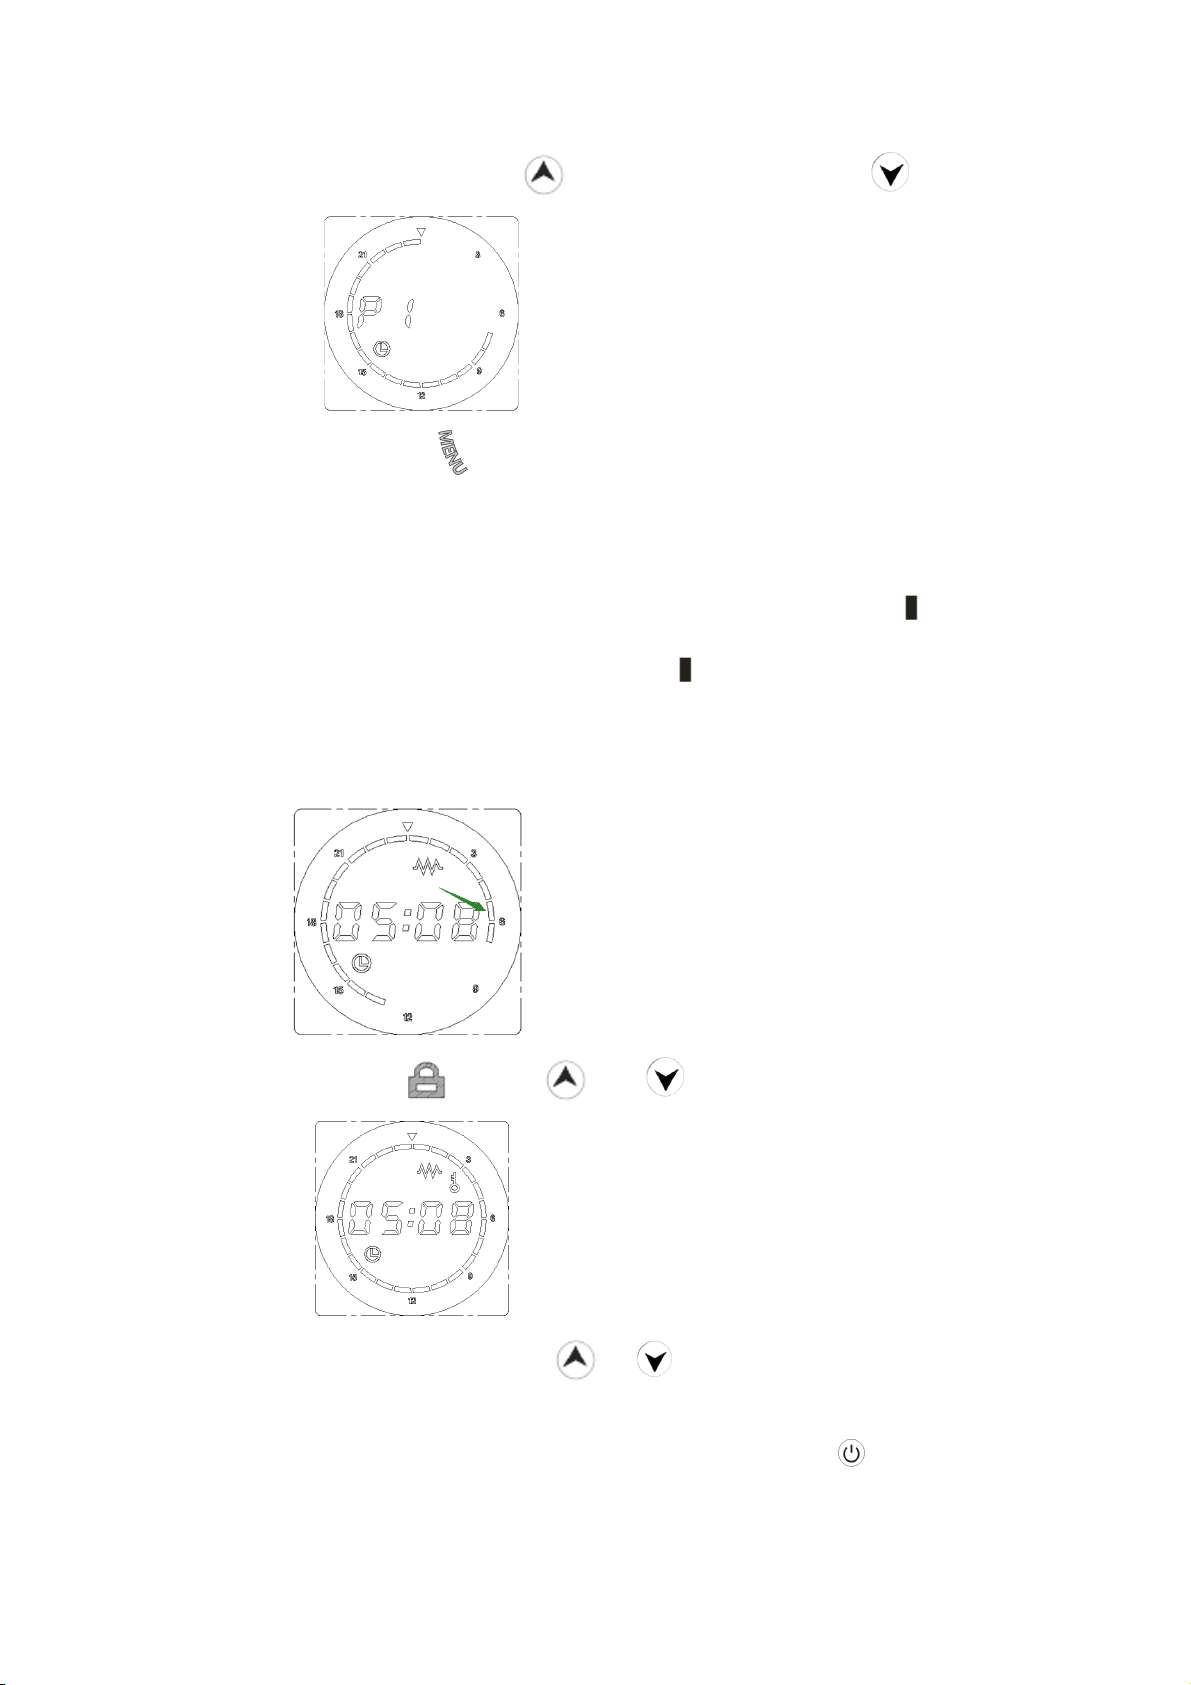
7
weekly program(P1) ,then press from 07 :00 to 23 :00,press for other
times,shown as
After adjusting,short press to exit setting and continue day program(No operation
within 30s will automatically exit weekly program modification)
4.5.5 Running state: Running state will show the setting time, timing mode shows
controller is in the weekly program .When the current time is in working state, will be on
for 3 seconds and off for 1 second;when not working, will be off for 3 seconds and on for
1 second.If the product is in working state, the heating icon lights up.
For example: the current time is 05:08,shown as
green arrow ,on for 3 seconds and off for 1 second.
4.5.6 Child lock : Press and in the boot state at the same
time,shown as ,unable to do any operation in child lock mode (except
open and close),under child lock,press and 3s at the same time can open the
lock.
4.5.7 Restore factory Setting: In the boot state,after long press 10s,system will
automatically starts to restore the factory Setting,full screen with 3s,then enter

8
shutdown,press to restart the system,the normal temperature in restore factory
Setting is 50℃, heating time is 2 hours,time shown as"12:00", week shown as"1".
Exception code description:
Screen display
Possible failure
Solution
Er
Temp e r a ture s e n sor o p e n
circuit or short circuit
Temp e r a ture s e n sor
failure,change the heating
elements or controller
This manual suits for next models
5
Table of contents
Popular Heater manuals by other brands

Chromalox
Chromalox PF490-5 Installation Instructions and RENEWAL PARTS IDENTIFICATION

TCP
TCP Smart SMAWHHEAT2000WHOR705 User instructions

Pelonis
Pelonis PSH700R owner's manual

Dell
Dell PowerEdge XR Series instructions

Sawo
Sawo NORDEX NR-45Ni2 manual

Optimus
Optimus H-8411 Instruction manual and owner's guide


