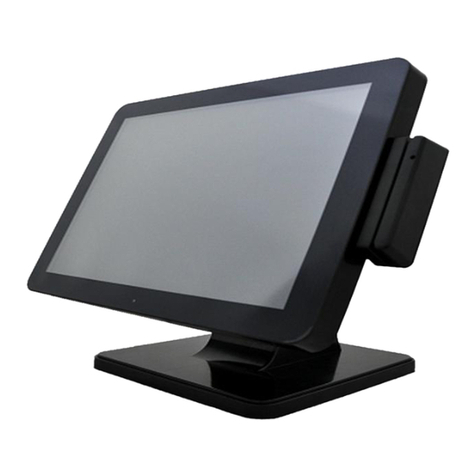
Bematech LE1100 User manual

LE1100 15”TouchScreen Monitor

2
Contents
Notice .................................................................................................. 3
SafetyInformation .............................................................................. 3
Precaution ........................................................................................... 3
PackageContents ................................................................................ 3
HardwareInstallation.......................................................................... 4
Input Connections....................................................................................4
ControlButtons................................................................................... 5
OSD(On-ScreenDisplay)Menu Mode................................................... 6
Screw Specification for VESA Plate Stand or Wall Mount .................... 7
Quick Installation Guide for Touch Panel Driver................................... 8
CalibrationGuideforTouchPanel........................................................ 9
Troubleshooting................................................................................... 11
SupportedTiming................................................................................. 12
Specification........................................................................................ 13
LimitedWarrantyPolicy....................................................................... 14

3
Notice
‧AllInformation in this manual may changewithoutprior notice.
‧Toensure safety operationof thisproduct,please readthe following menu
carefully before using thisproduct.
SafetyInformation
‧Do notplace anything wet on themonitor or the power cord.
‧Be sure to turn themonitor off before plugging the power cord into thesocket.
‧Be sure to check the power cord and other cordsto be connected correctly.
‧Do not attempt to open themonitor. Youmay be hurt by electric shock. For
service, call your place of purchase.
Precaution
‧Do notexpose themonitor todirect sunlight orheat.
‧Do notspillliquid onthe monitor.
‧Do notuseyour monitor when magnets orelectronicproductsare operating
nearby.
‧Do not use harsh chemicals or strong cleaning solvents to clean the monitor
screen. Wipe itclean with a soft terry cloth applied with amild solution.
‧Do notplace anything on your monitor. Bad ventilation may elevate temperature
inthe monitor.
‧Do not use your fingers to touch the LCD Screen directly. Fingerprint that
containsoil and maybe difficult to clean.
Package Contents
Our LCD monitorpackage contains thefollowingitems. Make sureyou get items
listed below,otherwise contact to yourdealer orstore.
1. 15.0”TFT LCDMonitor
2. PowerCord
3. VGA Cable
4. AudioCable
5. User’sManual
6. USBCable
7. TouchPanelCD Driver

4
Hardware Installation
Turn off LCD’s and PC’s power before you set it up. Followour installation step by
step.
Input Connections
【1】AC Input : This isfor connecting the power cable.
【2】VGA PORT : Thisfor connecting with the D-Sub 15 pin signal cableto PC.
【3】Audio In : Thiscanbeconnected tothe PCaudio-outconnector.
【4】Touch Panel Interface : USBconnection toPC for touch panel function.

5
Control Buttons
There are5 keys foruser to setup themonitor,including "Auto Adjust","OSD menu",
"Power", "Adjust <->","Adjust <+>". The followingdescriptions are the introduction of
theseKeys.
A
Auto Adjust (Function)--
Function Select Button:
Thisbutton allows you to select the control
functionsup inthe OSD.
Hotkey: Press this buttonto apply the monitor setting automatically.
M
Menu (Function)--
Function Select Button: Thisbutton allows you to select the control
functionsdown inthe OSD.
Hotkey: Press this buttonto get a pop-up OSD menu.
Adjust < + >: Increase the option value in the OSD menu.
Adjust < - >: Decrease theoption value in the OSD menu.
Power: Turn theLCD power onand off.When the power ison, the light
is showing green. Stand by will be orange.

6
OSD(On-Screen Display)Menu Mode
* Please adjust yourSpeaker Volume viayour PC computer Speaker Volume control
icon.
* Please note that Soundwill continue toplay when your monitor is off, to turn off
please turnoff your PC computer ormute the Speaker Volume control icon.
Press theOSD button to access menu, andpress Increase / Decrease buttonfor
adjustment.
BRIGHTNESS Adjust thebrightness of thedisplay
CONTRAST Adjustthedifference betweenlightanddarkarea.
AUTOADJUSTMENT Adjustthedisplaytooptimum
H-POSITION Adjust thehorizontal positionof thepicture.
V-POSITION Adjust the vertical position ofpicture.
CLOCK Adjust PLLclock frequency toreduce vertical lines onscreen
PHASE Adjust PLL phase to reducehorizontal linesonscreen.
COLORTEMPERATURE Adjust thecolor temperature.
RED Adjust the Red color temperature.
GREEN Adjust theGreen color temperature.
BLUE Adjust the Blue color temperature.
MUTE SelectMute/Sound
VOLUME Adjust thespeaker volume
LANGUAGE Select displaylanguage of the OSD menu
OSDTIMEOUT Select desired timefor OSD menu display
POWERSAVING Select desiredpower saving timervalue
RESET Recall the defaultsetting
EXITOSD Save and exitOSD.
MISCELLANEOUS
RETURN Returntomain menu.

7
Screw Specification for VESA Plate Stand or Wall Mount
Caution: Please followthe Screw Specification in diagram while assembling
VESA Plate stand or Wall Mount Plate into monitorback cover.
Otherwise, itmay cause amechanical damage.
1. (B)+5mm Screw Length (A) (B)+6mm
2. Mechanical Screw Φ4mm
(Safety Space)
(Safety Space)

8
Quick Installation Guide for Touch Panel Driver
The Driver supports a lot of operating systems, i.e. Windows 7, WindowsXP,
Windows XP Tablet PCEdition, Windows 2000, Windows 98,WindowsME, Windows
NT4, WindowsCE2.12/3.0/.NET, DOS, iMac, and RedHat /Mandrake Linux.
Follow these stepsto install TouchPanel Driver.
1. Putthe Driver CD toCD-ROM.
2. Change directory dependi ngon your operating system.
3. DoubleclicktheSetup.exe, then windowsstarts torun the installation program.
Notice thatdoes not plug the USB controller onthe system before the
installation has been finished.
4. Just click [Next >] button tocontinue installation.
5. Then check the check box if PS/2 touch controller is to be installed. The default is
unchecked.ThenPress[Next >] tocontinueinstallation.
6. Choose the setup type that best suits your needs. There are two accessory
utilities for choosing, Rotation Monitor Utility andShutdown Utility.Userscan
installthe utility they want by checking the box. Then Press [Next >] to continue
installation.
7. Selectthe appropriate folder where set-up files will be installed. Then clickon
[Next >] to continue installation.
8. Then type inthe name of program folder for thetouchpanel driver orclickon
[Next >] to continue. There will be adefault name for it.
9. Windows is copying filesto disk and the setup is complete. It willrequest re-boot
computer.Press[Yes>] tore-boot immediatelyor [No >] to re-boot later.The
installation willnot be finished until system re-boot.
10. Setup iscomplete. After thetouchpanel driver installation, the USBdevice will
be found automatically as soon as it was plugged into the computer. Then users
can see the new device onthe application program window. And, the program will
remove the USB Device automatically as soon as it was unplugged.

9
Calibration Guide for Touch Panel
4 points calibration
1. It needs calibration before the touchscreen can workaccurately.Whenever the
user feel the accuracy lost, user can do calibration againto get a more accuracy
touchfunction.
2. Pressing this button, anew window will be popped-up at thelocation when the
touchscreen was mapped to areafor this touch system toguide the user do4
pointscalibration.Screendisplaysasfollows.
3. User should follows theguide to touch and hold the blinking X symbol inthe
calibration window until it does not blink to make sure that theutility can gather
enoughdatafor computation. In addition, a time line baris shownin thebottom
of the window toindicate time elapsed. If the touchscreen was not touched
before the time line bar going toright end, the calibration task will be terminated
automatically.
Touchthe blinking symbol on panel until beep or stop blinking.
Linearization
1. Linearization( 25 or 9 points calibration ) function is used to compensate the
touchscreen linearity. After linearization completed, the linearity ofthe
touchscreen will be shown inthe Linearitycurve window.
2. Pressing thisbutton, a newwindow will be popped-up atthe locationwhen the
touchscreen was mapped to areafor this touch system toguide the user do25
pointscalibration. User should followsthe guide totouch and hold theblinking X

10
symbolin the calibrationwindow until it does notblink to make sure that the
utility can gather enough data for computation. In addition, atime linebar is
shownin the bottom of thewindow to indicate time elapsed. If thetouchscreen
was not touched before the time linebar goingto right end, the calibration task
willbe terminatedautomatically.
Draw Test
This function is used for accuracy and performance check. Press this button and a
new pop up window will be popped up in the location where the touchscreen was
mappedto thetouch system as below,
User canpress the Clear buttonto clear the window. PressQuitbutton to terminate
thisdraw test. In drawing testwindow, userscan verify the panel linearity,
calibration capability, anddrawing line quality.
Mouse Emulator
The touchpanel driver emulates mouse left and rightbutton function. After
installing the touch panel driver, amouse icon will show in thedesktop.
1.Change right / left button by clicking the upper smallrectangular box ofmouse
icon. Blue area expresses whatbutton hasbeen selected.
2. Touchpanel driver also provides anoption for advanced Mouse Emulation setting.
When user enables the“Auto Right Button”, itwill forcedriver toreport a right
click mouseevent to OSwhen users do acontinuing touch tilltime out.It no longer
needs to touch the right button in the Touchtray to activate a right click. This
feature makes userstodo right click more easily with touchscreen.

11
Troubleshooting
Make sure that your monitor is properly installed if you have encountered any
trouble using this product.
There is no picture on the screen.
Check:
1. Power saving mode. Press anykey and move the mouse to deactivate the
mode.
2. Signal cable connector pins. If there are bent or missingpins, consultyour
placeof purchase.
Characters look too dark or too light
Check: UsingOSD Menu to adjust theBrightness.
When your monitor shall be adjusted?
Check: Ifthe resolutionof frequencyisbeingchanged.
The text appears on the screen are unclear.
Check: Make surethe resolution orrefresh rate matchwith the Display Mode.
Touchpanelfunction without respondence.
Check: Make surethat touch screen controller driver mustbe installed into
your PCsystem and calibrate touch screen before you useit.

12
Supported Timing
Item Standards Resolution
Dot
Clock
(MHz)
Vertical
Scanning
Frequency
(Hz)
Horizontal
Scanning
Frequency
(KHz)
Sync
Polarity or
composite
sync(H/V)
Operating
Mode
1 VGA 640x480 25.18 59.94 31.47 -/- A
2 VESA 640x480 31.50 72.81 37.86 -/- A
3 VESA 640x480 31.50 75.00 37.50 -/- A
4 VESA 800x600 36.00 56.25 35.16 +/+ A
5 SVGA 800x600 40.00 60.32 37.88 +/+ A
6 VESA 800x600 50.00 72.19 48.08 +/+ A
7 VESA 800x600 49.50 75.00 46.88 +/+ A
8 VGA 720x400 28.32 70.09 31.47 -/+ A
9 XGA 1024x768 65.00 60.00 48.36 -/- A
10 VESA 1024x768 75.00 70.07 56.48 -/- A
11 VESA 1024x768 78.75 75.03 60.02 +/+ A
A =AnalogMode
If the inputtiming is closed to one ofthe above, generally itcan be displayedwellby
optimumadjusting.

13
Specification
Input Signals VGA
VGA compatibleanalog RGB
Compositesyncsupported
Compatibility PC Up to 1024X768@75Hz(Non-interlaced)
Touch Panel 5Wire ResistiveTouchPanel
Connector VGA
Audio*
Touch*
Power
D-sub 15-pins
StereoPhoneJack
USB*
A/CInput
Power Supply voltage
Consumption
Built-in universal power supply: 100-240 VAC, 50/60 Hz
Active<30WattMax.
Standby <1 Watt
Internal Speaker Speaker x 2 *
User Interface LED Indicator Active - Green
Standby - Orange
Operating Condition Temperature
Humidity
Operating:5to40
20% ~80% R.H.
Dimensions Physical 357mm(W) x342mm(H) x171mm(D)
Net Weight 4.2 Kg
DDC DDC2B
PowerManagement VESADPMS
Regulation (Certifications) FCC,CE
Notice:
Product specification is subject to changewithout notice.

14
Limited Warranty Policy
All LCD monitors feature a three-year-limited warrantywith freechange in thefirstyear
from thedate of purchase.If product isdetermined to bedefective,we will repair or
replace theproduct with refurbished orremanufactured partsor components during the
warranty period.
This warranty is valid only forthefirstconsumerpurchaser.
This warranty does not covercosmetic damage or damage due to acts of God,accident,
misuse, abuse, negligence, commercial use ormodifications of, orto any partof the
product.
This warranty doesnot coverdamage dueto improper operation or maintenance (see
manual), connectionof impropervoltage supply, or attempted repair by anyoneother
thana facility authorizedby us to service theproduct. Thiswarranty does notcover
irregularpixel performance on thescreen,and damages result due to delivery or
impropershipping. Thiswarrantydoes notcover product sold ASIS orWITH ALL FAULTS,
and failure tofollow instructionssuppliedwith the product.
This warranty is invalid if the factory-appliedserial number hasbeen altered or removed
for the productand broken security seal.
The customer must have modelnumber, serial number, and originalproof of purchase in
theform ofa bill of sales or receipt invoice,which is evidence thattheunit is withinthe
warranty period, must bepresented to obtain warranty service. Our helpful technical
support andcustomerservicestaff willattempt to correct anyminor issues that might
be causing theproduct failure.If the technicalservice or customer representative is
unable to fix the issueby phone, areturnmaterial authorization (RMA) numberwill be
issued. Alongwith the proof of purchase and theRMA number, thecustomer canship
thedefectiveunit back to us Once the defectiveunit is received,and tested,we willship
a replacementunit back to customer. It isthe responsibility of the customer to properly
package the monitor with plugs, powersupply, etc.
We shall not beliablefor the loss of theuse of the product, inconvenience, loss orany
other damages,direct or consequential, arising out of theuse of, inabilityto use, orany
claim againstthe customer by any other party. Someregions do not allow exclusion of
incidental orconsequential damages, so the abovelimitations and exclusions may not
applytoyou.

15
LE1100 15”Touch Screen Monitor
Table of contents
Other Bematech Touchscreen manuals
Popular Touchscreen manuals by other brands

Johnson Controls
Johnson Controls Advanced Graphic Touchscreen Display Installation and operation manual
Crestron
Crestron TSS-7 Supplemental guide

Eaton
Eaton iLIGHT TSE55 installation guide
Entron
Entron EN7000-TS user guide

Philips
Philips DTP170- NA installation instructions

BubblyNet
BubblyNet T4 installation instructions
EDRO
EDRO DYNATROL HMI manual
Critical Environment Technologies
Critical Environment Technologies Visio-3 General operation guide

Crestron
Crestron TSW-550 quick start guide
Tyco Electronics
Tyco Electronics Elo Entuitive Touchmonitor ET1925L Series user guide
Sam4s
Sam4s SPS-2000 Program reference manual
ALC
ALC AWS3155 quick start guide

