Bench Dog Tools PRO-WOODWORKER Series User manual

Thank you for purchasing our ProMAX Drawer Pack. This product comes with all the parts
necessary for making two drawers. These drawers will fit into any Bench Dog brand ProMAX
Professional Cabinet, as well as into any ProBench cabinet.
612.782.8205 main
612.788.2518 fax
800.786.8902 toll free
www.benchdog.com
Bench Dog, Inc.
3310 5th St. NE
Suite 100
Minneapolis, MN 55418 Be sure to check out our web site for all the
latest and greatest accessories and tools.
www.benchdog.com
1-800-786-8902
Read and understand the entire contents
of this manual before attempting assembly
or operation of this tool! Inspect contents
for shipping damage and shortages. Report
problems directly to Bench Dog, Inc.
QUESTIONS?
2006 Bench Dog, Inc.
82-0052-05 0706
Stock No. 40-083
Drawer Pack
Contents of Box
2 left side panel
2 right side panel
2 back panel
2 bottom panel
1 short front panel
1 tall front panel
2 drawer slides, pr
1 handle, nickel
2 washers, 1/2" OD
8 round head bolt, 1/4-20 x 2"
8 cross dowels, 1/4-20
24 pan head screw, #8 x 1/2"
8 pan head screw, #8 x 1-1/2"
1 hex wrench, 5/32"
p/n
20-0052-01
20-0053-01
20-0054-01
20-0055-01
20-0051-01
20-0050-01
17-0058-01
17-0052-01
12-0022-03
10-0006-50
17-0047-01
10-0068-08
10-0068-24
13-0001-05
Note: Rockler may not carry all products and/or sizes listed in this vendor's publication
(28102)
RTD10000487AA

1. Screw the side panels to back panels, as shown.
Use (8) #8 x 1-1/2" pan head screws. Both drawers use the
same left and right side panels, and back panels. Build both
drawers simultaneously to save time. All panels have a groove
to accept the bottom panels. Position these grooves to the
inside of the drawers, as shown.
2. Slide in the bottom panels, as shown.
Do not glue the panels, just slide them in.
3. Attach the drawer fronts.
Use the (8) round head bolts and cross dowels. Install the cross
dowels before inserting the bolts. You will fine adjust the drawer
front reveals after you install them into your cabinet. Just snug
the bolts for now.
4. Install the (2) drawer handles.
Use the hardware the comes with the metal drawer handles. Be
sure to place the (4) small flat washers under the handles.
Page 2
1
4
3
2
1/4-20"
steel cross dowel
1/4-20 x 2"
round head bolt
#8 x 1-1/2" pan head screw
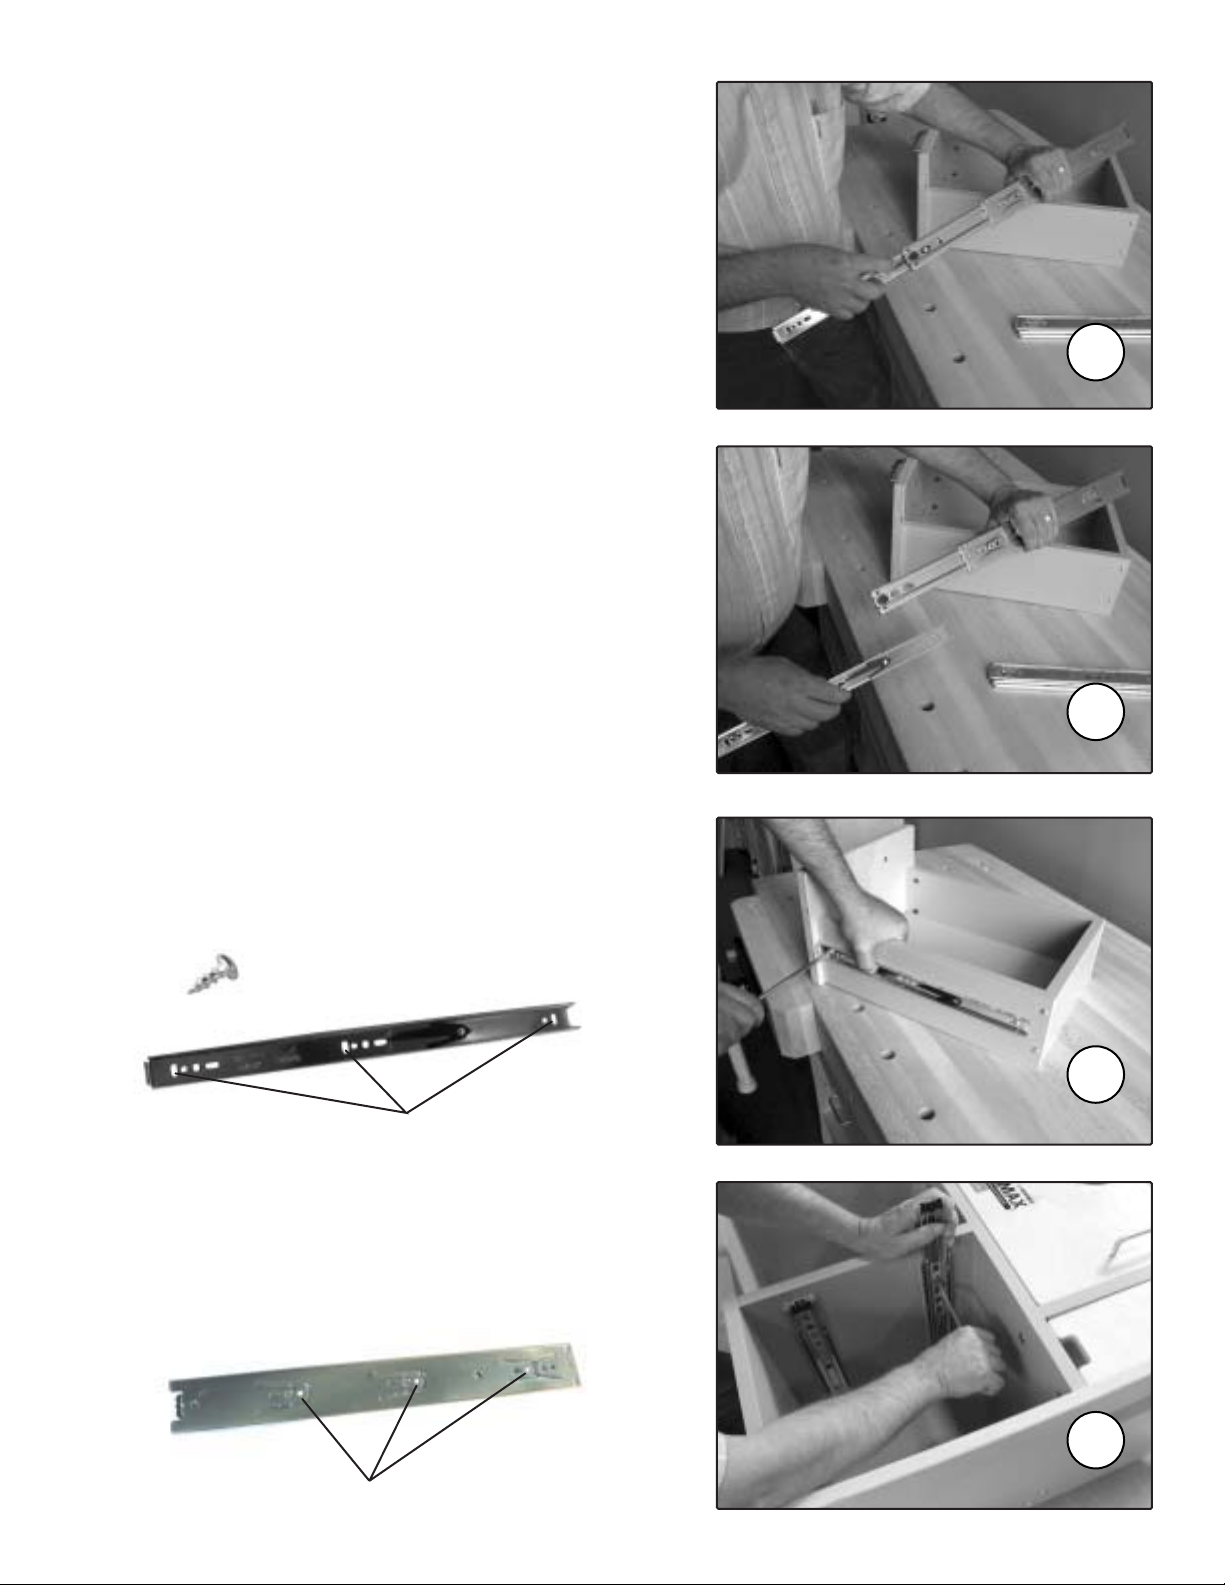
5. Separate the slides prior to attachment.
You can not attach the full extension ball bearing drawer slides
to the drawers or cabinet until you separate them into two
halves. As you pull them apart, push down on the little black
lever. In the photo to the right, the operator is pushing down on
the black lever with his right index finger.
6. Slides separated.
In this photo you can see what the slides look like separated.
The slide half in the operator's right hand attaches to the drawer.
The slide half in the operator's left hand attaches to the cabinet.
Do not mix this up! Note: there is no left or right orientation.
The slides work both to the left or right in the same way.
7. Attach the (4) slide halves to the drawers.
Use (3) #8 x 1/2" pan head screws for each slide half, as shown.
Repeat for the other three drawer slide halves. Center the
screws in the slots, as shown below. Be sure to position the
front of the slide halves to the front of the drawers! There is
no left or right orientation.
8. Attach the (4) slide halves to the cabinet.
Use (3) #8 x 1/2" pan head screws per slide half. It will be easier
to install the slides if you lay the cabinet down on its back, as
shown. Be sure to position the front of the slide halves to
the front of the cabinet! There is no left or right orientation.
Page 3
5
6
7
8
#8 x 1/2" pan head screw
Center screws in these slots only!
Put screws in these holes only!
rear
front
front
rear

9. Install the drawers into the cabinet.
Carefully align the two slide halves, and gently push the drawer
into the cabinet.
10. Keep pushing!
You will encounter a fair amount of resistance just before the
drawer is pushed all the way in for the first time. This is OK!
Keep pushing until fully closed. The next time you open and
close the drawer, you will not feel this resistance.
Note: To remove the drawers, be sure to push the little
black levers, as you did in Step 5. You will not be able to
slide off the drawers unless you do this!
11. Fine adjust the drawer front reveals, if necessary.
To align the drawer front reveals, simply loosen the four bolts
that hold the drawer front to the drawer body and reposition the
drawer front. Then, retighten the bolts.
12. Retighten all bolts.
After a few hours of use, and from time to time, retighten all
bolts, as necessary.
Page 4
9
10
11
This manual suits for next models
1
Popular Indoor Furnishing manuals by other brands

Regency
Regency LWMS3015 Assembly instructions

Furniture of America
Furniture of America CM7751C Assembly instructions

Safavieh Furniture
Safavieh Furniture Estella CNS5731 manual

PLACES OF STYLE
PLACES OF STYLE Ovalfuss Assembly instruction

Trasman
Trasman 1138 Bo1 Assembly manual

Costway
Costway JV10856 manual


