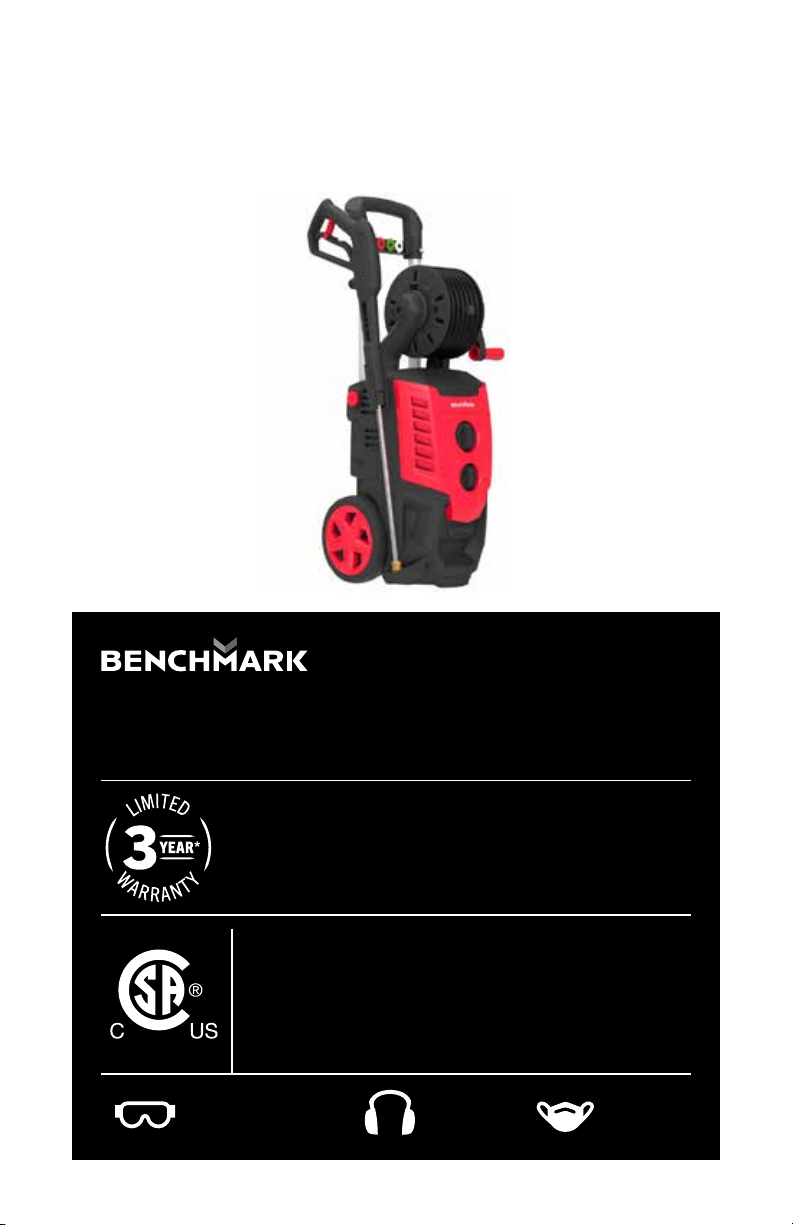
Benchmark 5044-035 User manual
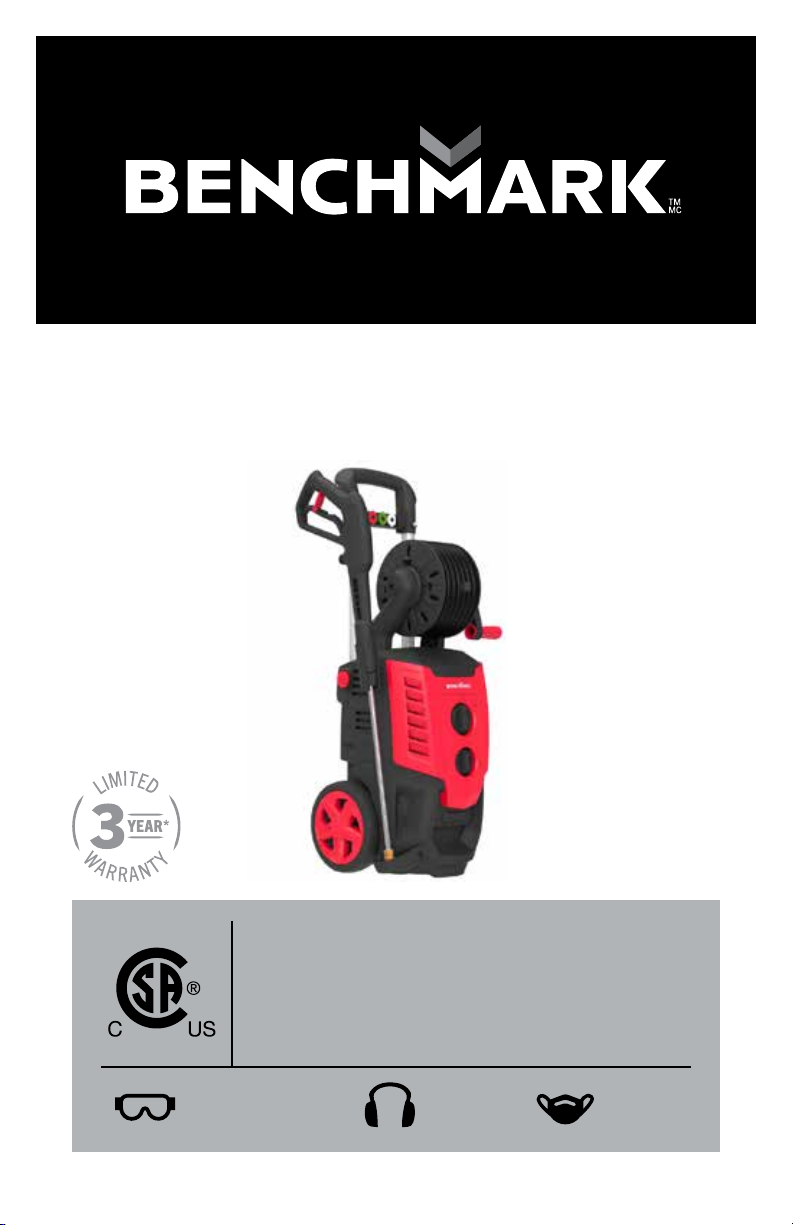
ELECTRIC PRESSURE WASHER
2100 PSI
READ ALL INSTRUCTIONS BEFORE FIRST USE.
KEEP THIS MANUAL FOR FUTURE REFERENCE.
KEEP AWAY FROM CHILDREN.
WEAR CSA APPROVED
EYE PROTECTION
WEAR EAR
PROTECTION
WEAR A
FACE MASK
3 Year Limited Warranty on tool

1
PRODUCT SPECIFICATIONS
ELECTRIC POWER WASHER
Model 5044-035
Rated voltage AC 120V
Rated frequency 60 Hz
Rated current 14A
Rated pressure 1600 psi
Maximum pressure 2100 psi
Maximum water inlet pressure 170 psi
Maximum water inlet temperature 122°F / 50°C
Rated flow 1.4 GPM
Max flow 1.6 GPM
Weight 28 lbs (12.7 kg)
NEED ASSISTANCE?
Call us on our toll-free customer support line:
1-866-206-0888 (Monday through Friday 9am - 5pm Eastern Standard Time)
• Technical questions
• Replacement parts
• Parts missing from package

5044-035
ELECTRIC PRESSURE WASHER 2100 PSI
2
TABLE OF CONTENTS
Product Specifications .................................................................................. 1
Table of Contents .......................................................................................... 2
General Safety Instructions ........................................................................ 3-7
Unpacking .................................................................................................... 8
Preparation before Operation ................................................................... 9-10
Operation ............................................................................................... 10-13
Maintenance .......................................................................................... 13-14
Troubleshooting and FAQs ...................................................................... 14-15
Exploded View ............................................................................................ 15
Parts List ............................................................................................... 16-18
Warranty ..................................................................................................... 18

3
GENERAL SAFETY INSTRUCTIONS
IMPORTANT SAFETY PRECAUTIONS
RETAIN FOR FUTURE REFERENCE AND READ CAREFULLY!
Do not attempt to install or operate this machine until you have read the safety
instructions in this manual. Safety items throughout this manual are labeled with a
Danger Warning, or Caution depending on the risk type.
DEFINITIONS
This is the safety alert symbol. It is used to alert you to potential
personal injury hazards. Obey all safety messages that follow this
symbol to avoid possible injury or death.
SYMBOL MEANING
DANGER
Indicates an imminently hazardous situation which, if not avoided,
will result in death or serious injury.
WARNING
Indicates a potentially hazardous situation which, if not avoided,
could result in death or serious injury.
CAUTION
Indicates a potentially hazardous situation which, if not avoided,
could result in minor or moderate injury.
IMPORTANT
Installation, operation, or maintenance information which is
important but not hazard-related.
IMPORTANT
Read the manual carefully before operation.
5044-035
ELECTRIC PRESSURE WASHER 2100 PSI
4
SYMBOL MEANING
DANGER
To reduce the risk of fire, electric shock, explosion or injury to
people, read the following:
• This product is intended for domestic outdoor use only.
• The water spray must never be directed towards any electric
wiring, devices, or directly towards the pressure washer itself,
or fatal electric shock may occur.
• The pressure washer should not be used in areas where gas
vapors may be present. An electric spark could cause an
explosion or fire.
• Risk of explosion. When a combustible liquid is sprayed, there
can be danger of fire or explosion, especially in a closed area.
Therefore, do not spray flammable liquids.
• Do not use acids or solvents with this product. These products
can cause physical injuries to the operator and irreversible
damage to the device.
• Risk of electric shock. Inspect the cord before using the
device. Do not use it if the cord is damaged.
• Risk of injury. Do not direct the water flow at people. The high-
pressure jet can be dangerous if misused, and therefore must
not be directed at people, animals, electrical devices or the
unit itself.
• This device is capable of producing high pressure as rated in
Technical Specifications. To avoid rupture and injury, do not
operate this machine with components rated less than the
unit itself (including but not limited to spray guns, hose, and
hose connections).
WARNING - INJECTION HAZARD
Equipment can cause serious injury if the spray penetrates the
skin. Do not point the gun at anyone or any part of the body. In case
of penetration, seek medical aid immediately.
CAUTION - DETERGENTS
This device has been designed for use with detergents that are
specifically approved for pressure washer use. The use of other
cleaning detergents may aect the operation of the device and void
the warranty.
CAUTION - SPRAY GUN
The spray gun kicks back, so hold it with both hands. The
trigger gun safety lock prevents the trigger from being engaged
accidentally. However, this safety feature DOES NOT lock the
trigger in the ON position.
5
SYMBOL MEANING
CAUTION - WATER CONNECTIONS
• For use with fresh and clean water only. Do not use this
product with other liquids.
• The water supply system must be protected against back flow.
• Never use this product with water contaminated with solvents
(e.g. paint thinners, gasoline, oil, etc.).
• Always prevent debris from being drawn into the product by
using a clean water source and an additional water filter, if
required.
• If this device is connected to a potable water system, the
system must be protected against back flow.
• Suitable water temperature: from 41
°
F to 104
°
F (5
°
C to 40
°
C)
CAUTION - USE
• Learn how to stop the device and release the pressure quickly.
Familiarize yourself with the controls.
• Keep all connections dry and o the ground.
• Avoid accidental starts. Shut power OFF before connecting or
disconnecting the power cord.
• Never carry the pressure washer by the cord.
• Do not pull on the cord to disconnect from the outlet.
• To allow for free air circulation, the pressure washer should not
be covered during operation.
• Do not operate the product when tired or under the influence
of alcohol or drugs.
• Do not stand on unstable surfaces. Stand with both feet
balanced at all times.
• Keep the operating area clear of people and pets.
IMPORTANT - MAINTENANCE
• Any assembly, use or maintenance of the product must be
carried out by adults only.
• Follow the maintenance instructions specified in the manual.
• If replacement of the power plug or cord is needed, use only
identical replacement parts.
• Repairing and replacing parts should be done by a certified
technician.
• Before servicing, cleaning or removal of any parts, shut the
power OFF and release the pressure.
5044-035
ELECTRIC PRESSURE WASHER 2100 PSI
6
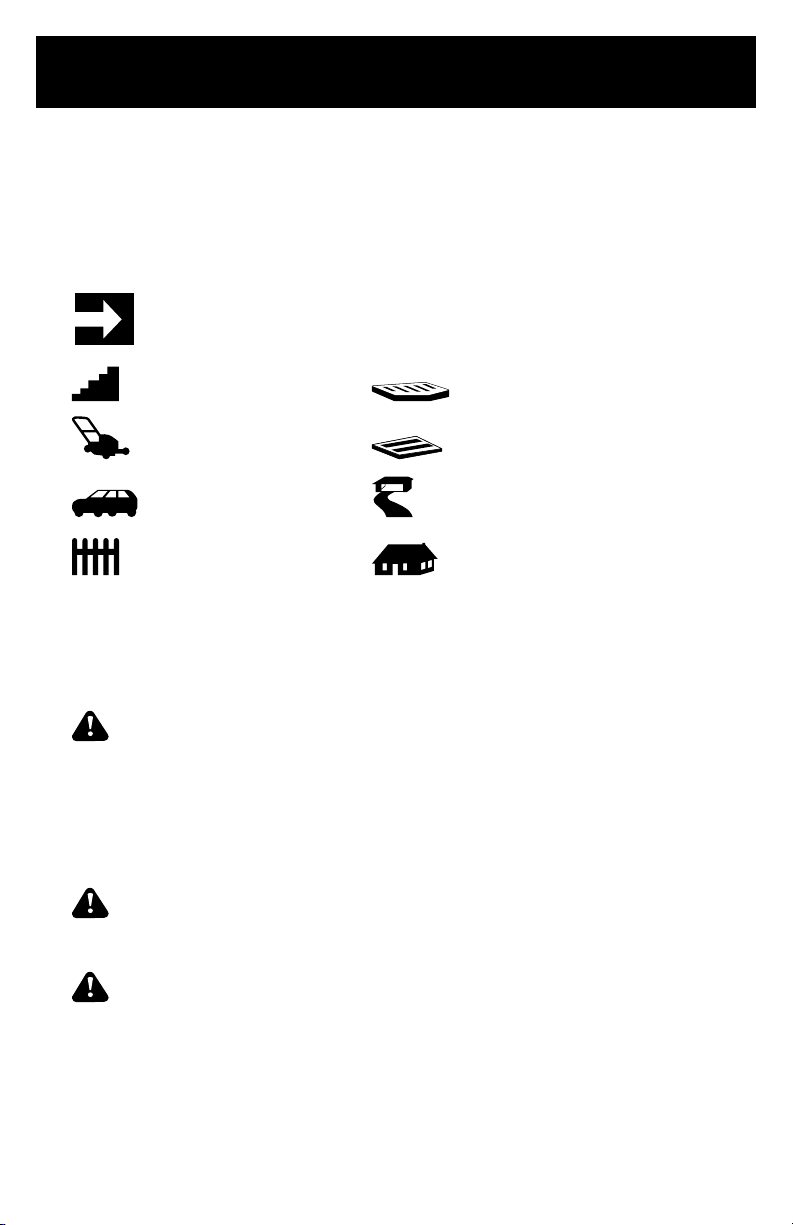
INTENDED APPLICATION
This product is designed for specific residential applications. Do not modify or
use this product for any application other than the one it was designed for. This
equipment was not designed for industrial use. Please refer to the icons below for
suggested applications. For questions regarding other uses, please call us at
1-866-206-0888
IMPORTANT - INTENDED USE
STAIRS DECK OR PATIO
LAWN EQUIPMENT GARAGE FLOOR
VEHICLE DRIVEWAY
FENCING SIDING
SAFETY WARNING & ELECTRICAL INFORMATION
The pressure washer is equipped with a stop device that senses when the trigger on
the spray gun is released. It will open the power circuit to the motor and cause the
pressure washer motor to stop. The motor will start again when the trigger is pulled.
WARNING The pressure washer is also equipped with a main power ON/OFF
switch. It should always be moved to the OFF position when the pressure washer is
not being used to prevent possible injury or damage.
EXTENSION CORDS
If possible, do not use extension cords with this product. However, if you must use
one, observe all warnings and instructions listed below:
WARNING Extension cords are not recommended unless they are plugged
into a ground fault circuit-interrupter (GFCI) found in circuit boxes or protected
receptacles.
CAUTION - USE A SUFFICIENT GAUGE
• Maximum cable length: 50’ (15 m). Only use 14 AWG rated extension cords.
• Only use extension cords that are intended for outdoor use. These extension
cords are identified by a marking that reads “Acceptable for use with outdoor
appliances; store indoors while not in use.”
• Only use extension cords that have an electrical rating not less than the rating

7
of the product (15 A).
• Do not use damaged extension cords. Examine the extension cord before using
and replace it if damaged. Do not abuse extension cords and do not pull on any
cord to disconnect the device.
• Keep cord away from heat and sharp edges.
• Always disconnect the extension cord from the power outlet before
disconnecting the extension cord from the product.
• To reduce the risk of electric shock, keep all connections dry and o the
ground. Do not touch the plug with wet hands.
SERVICING OF A DOUBLE INSULTATED APPLIANCE
In a double insulated product, two systems of insulation are provided instead of
grounding. Grounding means are not provided for a double insulated product, nor
should grounding means be added to the product. Servicing a double insulated
product requires extreme care and knowledge of the system and should only be
done by qualified service personnel. Replacement parts for a double insulated
product must be identical to the original parts. A double insulated product is
marked with the words "Double Insulation" or "Double Insulated". Product may also
be marked with symbol shown below.

5044-035
ELECTRIC PRESSURE WASHER 2100 PSI
8
UNPACKING
When unpacking this product, check to make sure parts listed below are included
and carefully inspect for any damage that may have occurred during transit. If any
part is missing and damaged, do not attempt to assemble or use the product.
1. Hose reel
2. Gun holder
3. Telescopic handle release button
4 . On/O Switch
5. Detergent switch knob
6. Gun saddle
7. Screw (ST4.8x20)
8. Manual
9. Extension Wand
10. Cleaning pin (tapped on the manual)
11. Turbo nozzle
12. Water inlet connector
13. Gun
14. Power cord hook
15. Hose reel crank
16. Hoseclip
17. High pressure hose
18. 0° Quick-Connect nozzle (red)
19. 25°Quick-Connect nozzle (green)
20. 40°Quick-Connect nozzle (white)
21. Soap nozzle (black)
22. Telescopic handle
9
PREPARATION BEFORE OPERATION
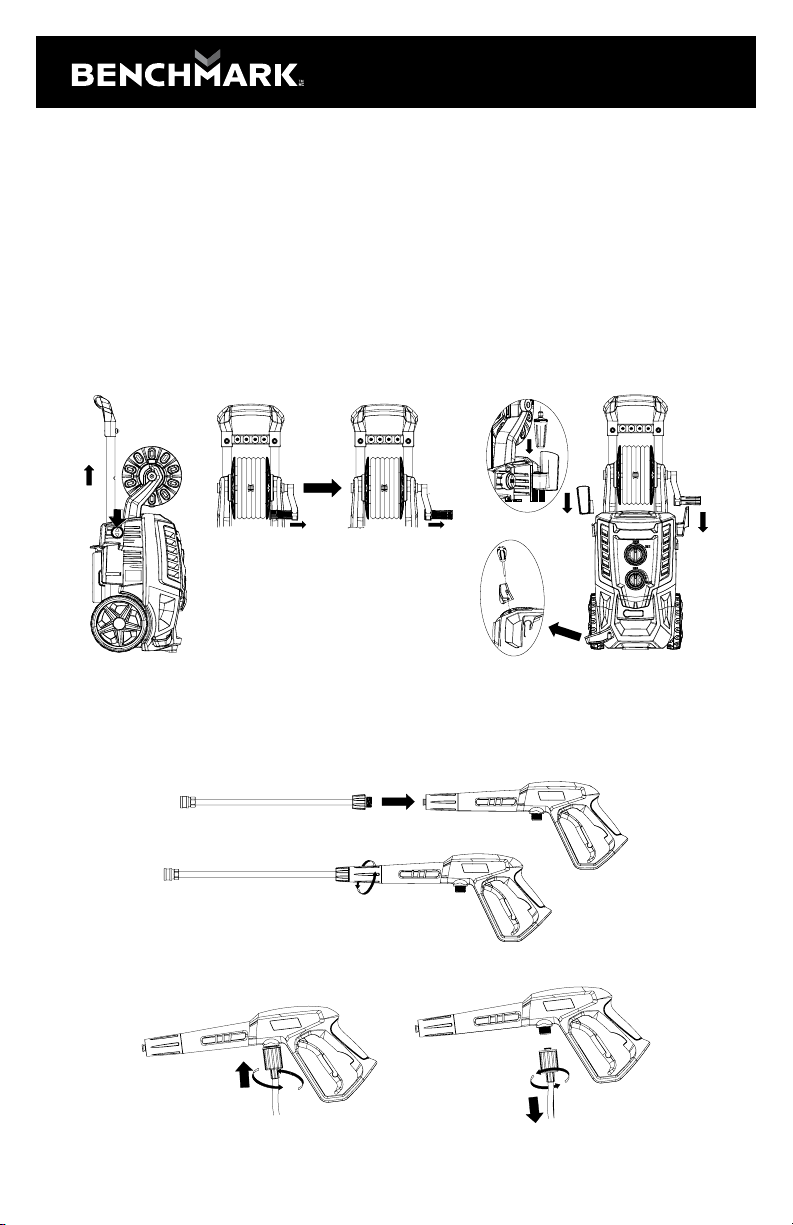
HOW TO SET UP YOUR UNIT
1. Push and press the telescopic handle release button, then pull upward the
telescopic handle for moving the machine easily.
2. Push out the hose reel crank from the left to the right for easily rewinding and
winding the hose to proper use or storage.
3. Install gun holder and power cable hook, vertically screwing the gun saddle tight
to the main body as seen in the illustration. The screws will be packed together with
the main body, check for them when you unpack the unit.
PUSH
4. Insert the lance into the gun. Push and turn the adjustable nozzle clockwise onto
the gun until hand tight to lock it in place. When the piecesare joined properly,
you cannot separate the two components by pulling straight out on the lance. All
attachments must be inserted into the gun for proper use.
5. Attach spray gun to high pressure hose.

5044-035
ELECTRIC PRESSURE WASHER 2100 PSI
10
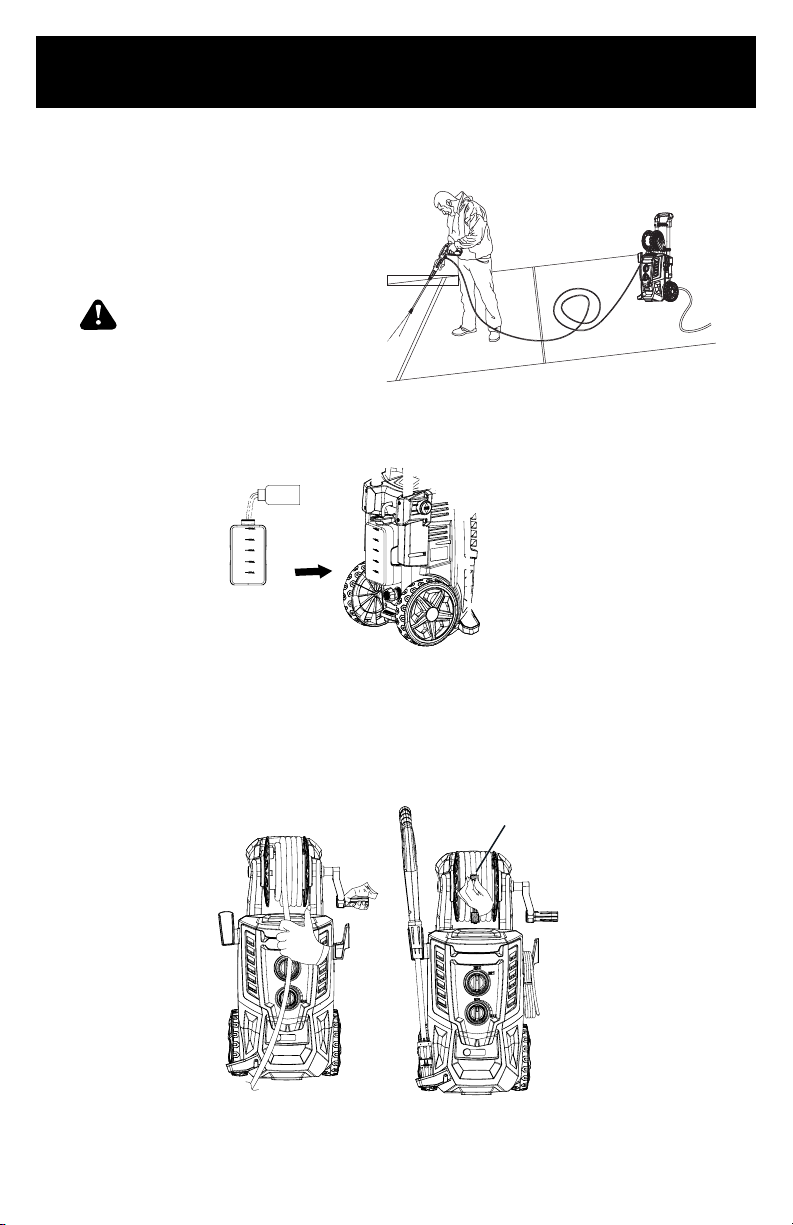
6. Attach the garden hose - Connect one end of the home garden hose (not
supplied) to the water inlet connector and another end to water source.
WARNING The appliance is INTENDED to be used at a temperature above
32°F (0°C).
7. Connect to the power supply, plug the pressure washer into the power outlet.
OPERATION
TO WASH WITH WATER
1. TURN ON THE WATER SUPPLY TAP
Connect the washer to the power supply and turn the switch to “ON/I” position.
Then press trigger.
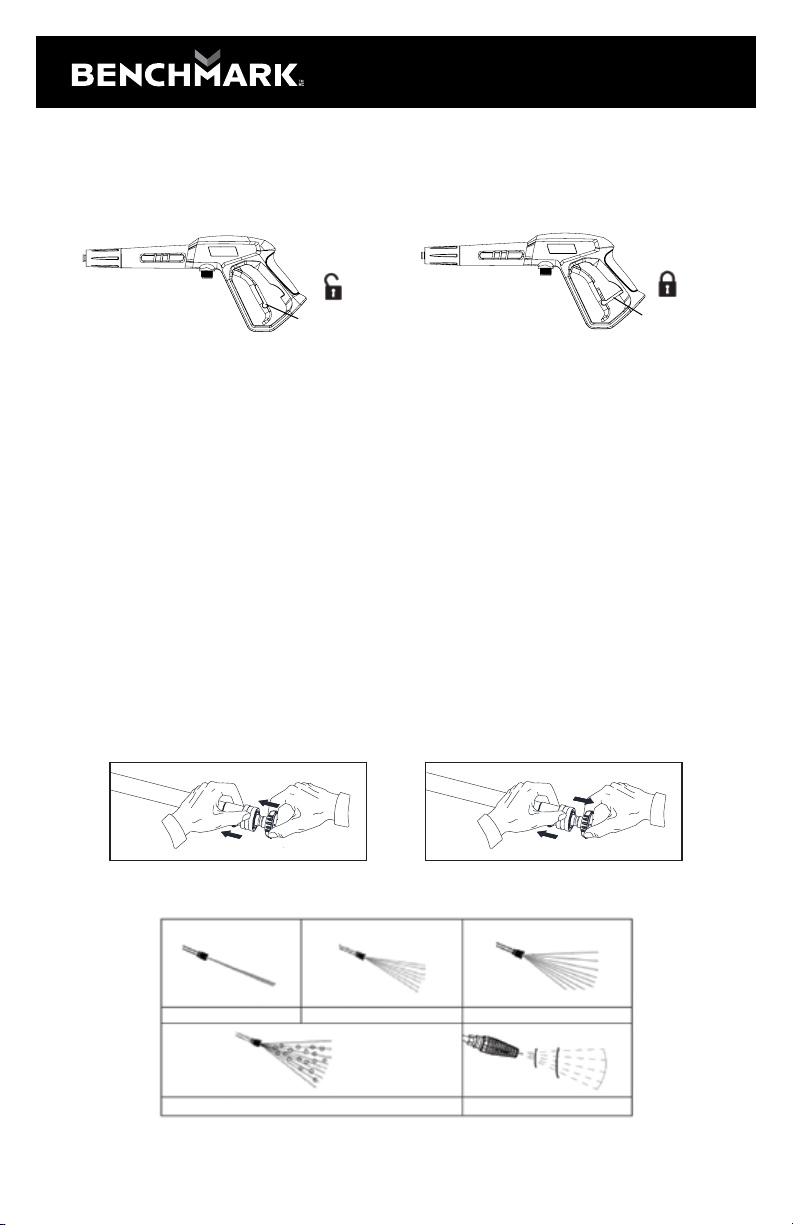
NOTE: Before pressing trigger, make sure lock-o switch is in “unlock” position.
WARNING Do not start the machine without connecting and turning on the
water supply because it may cause damage to high pressure seals and reduce the
service life of the pump.
11
2. RELEASE THE TRIGGER AND TURN THE SWITCH TO “OFF/0” POSITION
Turn o the water supply tap.
NOTE: When not in use, make sure Lock-o switch is in “Lock” position.
UNLOCK LOCK
3. SELECT THE RIGHT NOZZLES
Attach nozzle into the end of the lance by pressing selected nozzle into place, it will
make a click sound when firmly in place. To remove nozzle, pull back on the collar
on the lance and pull out the nozzle.
0° nozzle-red : This type of nozzle produces a vertical, stratified, high-pressure jet
for surface cleaning with particularly severe dirt.
25° nozzle-green, 40° nozzle -white: These types of nozzles can produce the
corresponding angle fan-shaped high-pressure jet, cleaning power, for large-scale
dirt surface cleaning.
Soap nozzle - black: This nozzle is used to apply chemicals or cleaning solutions. It
has the least power steam.
Turbo nozzle features a 0° pencil jet which rotates 360° for maximum dirt cutting
action, eectively increasing cleaning performance up to 50%, this nozzle combines
the clean ing performance of a 0° pencil jet with the surface coverage of a wide
angle nozzle.
WARNING! Remember to change the nozzle when the gun is o, to ensure that
they do not accidentally eject with force during removal.
PUSH IN THE NOZZLE PULL OUT THE NOZZLE
0° nozzle - RED
Soap nozzle - BLACK Turbo nozzle
25° nozzle - GREEN 40° nozzle - WHITE
5044-035
ELECTRIC PRESSURE WASHER 2100 PSI
12
4. CLEANING
Begin with the nozzle 1-2ft
(0.3m-0.6m) away from the surface
and approach with caution until it
reaches the - desired position for
overly close spray may do harm to
surface.
WARNING Do not connect
the machine to water supplies that
are dirty, rusty, muddy, or corrosive.
(Including window cleaning liquids,
plant foods, or fertilizers etc.)
5. ADD AND USE DETERGENT
Unscrew the soap tank cap and add appropriate detergent. Then screw the soap
tank cap back on. Install the soap nozzle, turn soap adjusting knob left and right to
NOTE: If necessary, use a funnel (not supplied) to prevent accidental overflow of
detergent outside of the tank.
6. USING THE HOSE REEL
HOSE CLIP
13
This machine is equipped with live hose reel. To unwind the hose, turn hose reel
handle counterclockwise. To wind the hose, turn hose reel handle clockwise. There
is a hose clip on the end of hose which is used to clamp onto the winded hose for
storage.
NOTE: Pull the hose reel handle out and uncoil hose from the hose reel before use.
7. When you are finished turn the switch to “OFF/O” position.
8. Unplug the power cord from the power outlet.
9. Turn o water supply.
10. After motor and water supply are turned o, trigger gun to depressurize system.
MAINTENANCE
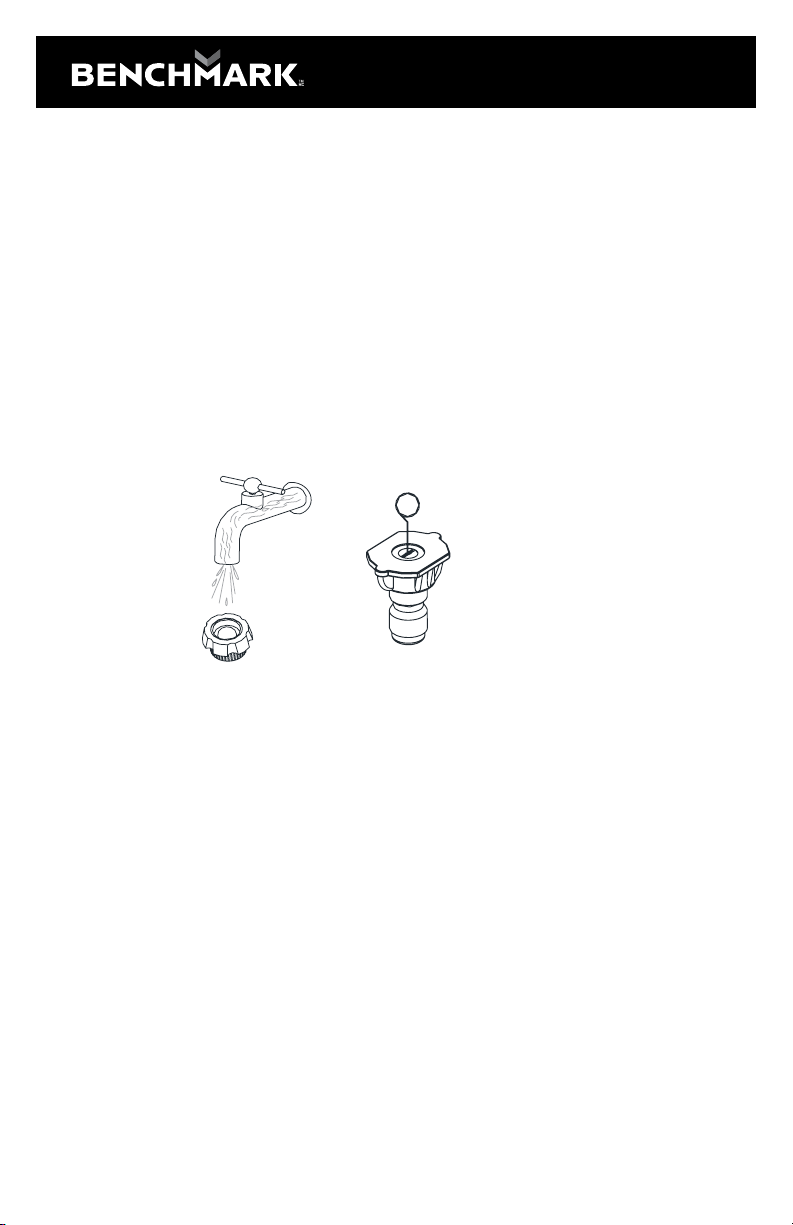
WATER FILTER AND NOZZLE CLEANING INSTRUCTIONS
A clogged or partially clogged water filter or nozzle can cause significant reduction
of water pressure coming out of the nozzle and/or cause the unit to pulsate while
spraying.
1. The water filter was installed inside the water inlet quick connector, should be
cleaned periodically. Rinse it with clean tap water, and then place it back into the
water inlet quick connector.
2. Using the nozzle tip cleaner provided (or an unfolded paper clip), insert the wire
into the nozzle hole and move back and forth until debris is dislodged. Back flush
water through the nozzles using garden hose and highest pressure available (either
standard water nozzle or use your thumb over the nozzle to create water pressure
for back flush).
STORAGE
Do not store pressure washer outdoors and store the pressure cleaner, parts, and-
accessories in an area with a temperature above 32°F (0°C).
Do not store pressure washer where it might freeze while there's water inside the
machine.
Serious damage will occur to the water system, pump and / or motor.

5044-035
ELECTRIC PRESSURE WASHER 2100 PSI
14
TIPS FOR EXTENDING THE LIFE OF YOUR PRESSURE WASHER
1. Never operate machine without water.
2. Pressure washer is not meant to pump hot water. Never connect to hot water
supply this will significantly reduce life of the pump.
3. Using detergent other than those formulated for pressure washers may cause
damage to pump components (o-rings,etc.).This also applies to chemicals such as
bleach, dish soap, etc.
4. Never operate unit for more than one minute without spraying water. Resulting
heat buildup will damage pump.
TROUBLESHOOTING
PROBLEM SOLUTION
Unit will not turn on. Make sure the power washer is in the “OFF” position. Plug in the electrical
cord to a grounded 120 volt outlet (no electrical extension cord should be
used). If the electrical cord will not plug into your outlet, your electrical
outlet is not properly grounded and should not be used. Use another
electrical outlet. Press the reset button on GFCI power box. If the colour of
red is not visible in the little window on the GFCI, unplug and plug in again.
Press reset, and look for the red colour in the window, this should remain
red in colour. If the colour is staying red, turn the power switch on the power
washer to “ON”. Squeeze the trigger on the spray gun and try again. If this
did not correct the problem, try plugging into another electrical outlet and
repeat the above procedure.
The high pressure (HP)
hose will not connect/
stay connected to the
spray gun. Is this a spray
gun problem?
In most cases, the spray gun is not the problem. The problem is the rubber
sleeve covering the fitting at the end of the high pressure hose. It has likely
slipped up toward the metal tip. The fix: wiggle, twist and/or pull the rubber
sleeve down until the entire tip is visible plus an 1/8” of the metal fitting
below the tip. Now try to insert the hose tip into the spray gun. It should
“click”into place and will not come out until the hose is released by pushing
in the lever on the underside of the gun. You may cut away the end of the
sleeve with a sharp knife if unable to move the sleeve down. Be careful not
to cut or puncture the hose.
The unit is running but
there is no water flow.
Check the water source. Unclog the nozzle on the lance (See nozzle
cleaning instructions under “Cleaning nozzles”). Or take o the lance and
just spray out of the spray gun. This will indicate what the problem is with
the lance.
Why is water leaking
where the high pressure
hose connects to the
spray gun?
Make sure there is an O-ring at the end of the metal tip of the high pressure
hose. If no O-ring is present, the connection between the hose and spray
gun will leak.
I can’t remove the lance
from the spray gun.
What should I do?
All lances and detergent tank are attached and removed from the spray
gun in the same manner. Insert the quick-release end of the lance together
(about a 1/8”) and turn clockwise. The lance will lock in place. Remove the
lance by reversing this procedure. Press the spray gun and lance together
and turn counterclockwise. The lance will slide out. Or, hold the spray gun
and lance in an upright position with the nozzle end on the floor. Push the
whole assembly straight down to loosen the connection, and then follow the
removal process again. You may also spray soapy water or a lubricant in the
area where the lance connects to the spray gun.

15
The power washer turns
on for 2 seconds, shuts
o,and will not turn
back on. Do I have a
defective unit?
It sounds like your power washer is working just fine. When the water is
connected, the accessories are assembled properly, and the power switch
is turned on, the power washer may turn on for 1-2 seconds to prime the
pump. It automatically shuts o and waits for the spray gun trigger to be
pressed. When the trigger is pressed, water starts flowing through the
pump. The water sensor in the pump “senses” the moving water and
automatically turns the power washer on. Or, turn the power switch to o,
hold in the trigger on the spray gun, so that you have a steady stream of
water. While you are holding the trigger open on the spray gun, at the same
time, turn the power switch on.
EXPLODED VIEW

5044-035
ELECTRIC PRESSURE WASHER 2100 PSI
16
PARTS LIST
Key # Part Code Part Name Quantity
1 BUAK031001 Rear Housing 1
2 BUAK031002 Tire 2
3 BUAK031003 Wheel Hub 2
4 BUAK031004 Axle 1
5 BUAK031005 Flat Ring 2
6 BUAK031006 Axis Elastic Ring 2
7 BUAK031007 Wheel Cover 2
8 BUAK031008 Cord Hook 1
9 BUAK031009 Power Cord Cover 1
10 BUAK031010 Power Cord 1
11 BUAK031011 Detergent Tube Tip 1
12 BUAK031012 Detergent Tube 1
13 BUAK031013 Detergent Tank 1
14 BUAK031014 Detergent Tank Cap 1
15 BUAK031015 Screw St4.8*20 46
16 BUAK031016 Accessory Holder 1
17 BUAK031017 High Pressure Hose 1
18 BUAK031018 Nozzle Pin 1
19 BUAK031019 Trolley Lock Plate 1
20 BUAK031020 Trolley Lock Plate Spring 1
21 BUAK031021 Trolley Button 1
22 BUAK031022 Trolley 2
23 BUAK031023 Right Trolley Pipe 1
24 BUAK031024 Left Trolley Pipe 1
25 BUAK031025 Screw M6*42 2
26 BUAK031026 Screw Nut M6 2
27 BUAK031027 Handle Cover 1
28 BUAK031028 Handle 1
29 BUAK031029 Nozzle Cover 4
30 BUAK031030 0° Nozzle 1
30-1 BUAK031031 25° Nozzle 1
30-2 BUAK031032 40° Nozzle 1
30-3 BUAK031033 Low Pressure Nozzle 1
31 BUAK031034 Right Hose Frame 1
32 BUAK031035 Crank Handle Cover 1

17
33 BUAK031036 Crank Handle 1
34 BUAK031037 Right Hose Reel 1
35 BUAK031038 Left Hose Reel 1
36 BUAK031039 Left Hose Frame 1
37 BUAK031040 Screw M6*8 1
38 BUAK031041 Shaft Connector 1
39 BUAK031042 Bayonet 2
40 BUAK031043 O-Ring 7.5x2 1
41 BUAK031044 O-Ring 6.3x1.8 1
42 BUAK031045 Detergent Tank Sleeve Connector 1
43 BUAK031046 Open Retaining Ring 1
44 BUAK031047 Screw M6*10 1
45 BUAK031048 High Pressure Hose Clip 1
46 BUAK031049 Gun Part 1
47 BUAK031050 Gun Holder 1
48 BUAK031051 Motor Fan Housing Cover 1
49 BUAK031052 Motor Fan Housing 1
50 BUAK031053 Main Switch 1
51 BUAK031054 Switch Cover 1
52 BUAK031055 Screw St3.5*16 9
53 BUAK031056 Long Pole 1
54 BUAK031057 O-Ring 8x2 1
55 BUAK031058 Lance 1
56 BUAK031059 Built-In High Pressure Hose 1
57 BUAK031060 Front Housing 1
58 BUAK031061 Front Housing Ornamental 1
59 BUAK031062 Knob 1
60 BUAK031063 Knob Ornamental 2
61 BUAK031064 Liquid Adjustment Knob 1
62 BUAK031065 Gunstock 1
64 BUAK031066 Water Outlet Hole Cover 1
65 BUAK031067 Liquid Mixing Turntable 1
66 BUAK031068 Liquid Regulating Valve Cover 1
67 BUAK031069 O-Ring 26.5x1.8 1
68 BUAK031070 Adjusting Valve Needle 1
69 BUAK031071 O-Ring 5x2 1
70 BUAK031072 Valve Needle Spring 1

5044-035
ELECTRIC PRESSURE WASHER 2100 PSI
18
71 BUAK031073 Screw St3.5*12 1
72 BUAK031074 Built-In Straw 1
73 BUAK031075 Liquid Adjusting Valve Holder 1
74 BUAK031076 Motor Upper Clamp 1
75 BUAK031077 Motor Pump Holder 1
76 BUAK031078 Motor Pump Kit 1
77 BUAK031079 Wind Outlet Filter 1
78 BUAK031080 Water Inlet Screw 1
79 BUAK031081 Motor Bottom Clamp 1
80 BUAK031082 Wind Inlet Filter 1
WARRANTY
BENCHMARK HIGH PRESSURE CLEANER WARRANTY
If this Benchmark tool fails due to a defect in material or workmanship within three
years from the date of purchase, it has a 3-year repair warranty with the original bill
of sale. This warranty does not include expendable parts including but not limited
to blades, brushes, belts, light bulbs and/or batteries. This warranty covers defects
in material or workmanship only. It does not cover normal wear and tear, failure
due to abuse/misuse, or defects caused by careless or accidental mishandling. If
this Benchmark product is used for commercial or rental purposes, this warranty
does not apply. For use at the consumer level. The warranty is not for industrial or
commercial applications.
3 Year Limited Warranty on tool
ELECTRIC PRESSURE WASHER
2100 PSI
READ ALL INSTRUCTIONS BEFORE FIRST USE.
KEEP THIS MANUAL FOR FUTURE REFERENCE.
KEEP AWAY FROM CHILDREN.
WEAR CSA APPROVED
EYE PROTECTION
WEAR EAR
PROTECTION
WEAR A
FACE MASK
Made in China
5044-035
BENCHMARK TOOLS CANADA
ST. JACOBS, ONTARIO N0B 2N0
© 2021 Home Hardware Stores Limited
TM
MC
CUSTOMER SERVICE/TECH SUPPORT
1-866-206-0888
* This BenchmarkTM product carries a three (3) year LIMITED warranty against
defects in workmanship and materials. See Owner’s Manual for full details.
Table of contents
Other Benchmark Pressure Washer manuals


Popular Pressure Washer manuals by other brands

Nilfisk-Advance
Nilfisk-Advance C 120.3 user manual

Mi-T-M
Mi-T-M HLP-SERIES operating instructions

Briggs & Stratton
Briggs & Stratton SpeedClean 020212-0 owner's manual

cecotec
cecotec HYDROBOOST 1500 EASYMOVE instruction manual

Kärcher
Kärcher HDS 9/20-4 M Classic manual

ANLU
ANLU APW-VAP-110P Operator's manual

Kärcher
Kärcher KB 1010 operating instructions

GreenWorks
GreenWorks 51142 Operator's manual

EMAK
EMAK Oleo-Mac PW 115C Operators instruction book

Kärcher
Kärcher 207 plus operating instructions

Rockwood
Rockwood RWHPPW instruction manual

Pacific hydrostar
Pacific hydrostar 98439 Set up, operating, and servicing instructions


