EMAK Oleo-Mac PW 115C Manual
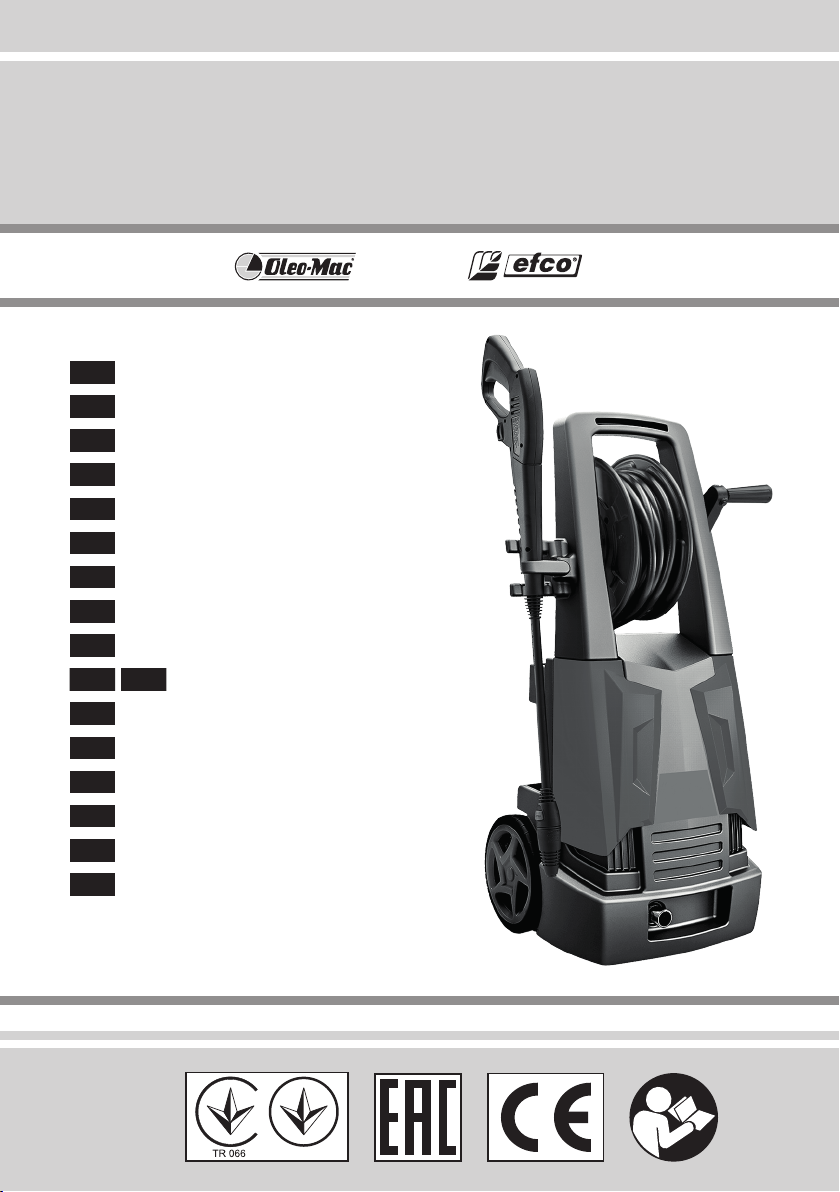
PW 115C - IP 1150S
IMANUALE DI USO E MANUTENZIONE
GB OPERATOR’S INSTRUCTION BOOK
FMANUEL D’UTILISATION ET D’ENTRETIEN
DBEDIENUNGSANLEITUNG
EMANUAL DE INSTRUCCIONES
NL GEBRUIKSAANWIJZING
PMANUAL DE INSTRUÇÕES
GR ΕΓΧΕΙΡΙ∆ΙΟ ΧΡΗΣΗΣ ΚΑΙ ΣΥΝΤΗΡΗΣΗΣ
CZ NÁVOD K POUŽITÍ A ÚDRŽBĚ
RUS UK PУKOBOДCTBO ПO ЭКCПЛУAТAЦИИ
PL INSTRUKCJA OBSŁUGI I KONSERWACJI
HHASZNÁLATI ÉS KARBANTARTÁSI UTASĺTÁSOK
SK NÁVOD NA POUŽITIE A ÚDRŽBU
LV LIETOŠANAS PAMĀCĪBA UN TEHNISKĀ APKOPE
EST KASUTUSJUHEND
LT OPERATORIAUS INSTRUKCIJŲ KNYGELĖ


Italiano
English
Français
Deutsch
Español
Nederlands
Português
Ελληνικά
Česky
Русский
Polski
Magyar
Slovensky
Latviešu
Eesti
Lietuvių
14
18
22
26
30
34
38
42
46
50
54
58
62
66
70
74
CERTIFICATO DI GARANZIA 78
WARRANTY CERTIFICATE 78
CERTIFICAT DE GARANTIE 79
GARANTIE-ZERTIFICAT 79
CERTIFICADO DE GARANTÍA 80
GARANTIEBEWIJS 80
CERTIFICADO DE GARANTIA 81
ΠΙΣΤΟΠΟΙΗΤΙΚΟ ΕΓΓΥΗΣΗΣ 81
ZÁRUČNÍ LIST 82
ГАРАНТИЙНЫЙ СЕРТИФИКАТ 82
KARTA GWARANCYJNA 83
GARANCIALEVÉL 83
ZÁRUČNÝ LIST 84
GARANTIJAS SERTIFIKĀTS 84
GARANTIISERTIFIKAAT 85
GARANTINIS SERTIFIKATAS 85


5
OPTIONAL
2x
2x
click
click
I
ISTRUZIONI DI MONTAGGIO
CZ
NÁVOD K MONTÁŽI
GB
ASSEMBLY INSTRUCTIONS
RUS UK
РУКОВОДСТВО ПО МОНТАЖУ
F
INSTRUCTION DE MONTAGE
PL
INSTRUKCJE MONTAŻU
D
MONTAGEANLEITUNG
H
SZERELÉSI UTASÍTÁS
E
INSTRUCCIONES DE MONTAJE
SK
POKYNY NA MONTÁŽ
NL
MONTAGE-INSTRUCTIES
LV
MONTĀŽAS INSTRUKCIJAS
P
INSTRUÇÃO DE MONTAGEM
EST
KOKKUPANEMISE JUHISED
GR
ΟΔΗΓΙΕΣ ΣΥΝΑΡΜΟΛΟΓΗΣΗΣ
LT
SURINKIMO INSTRUKCIJOS
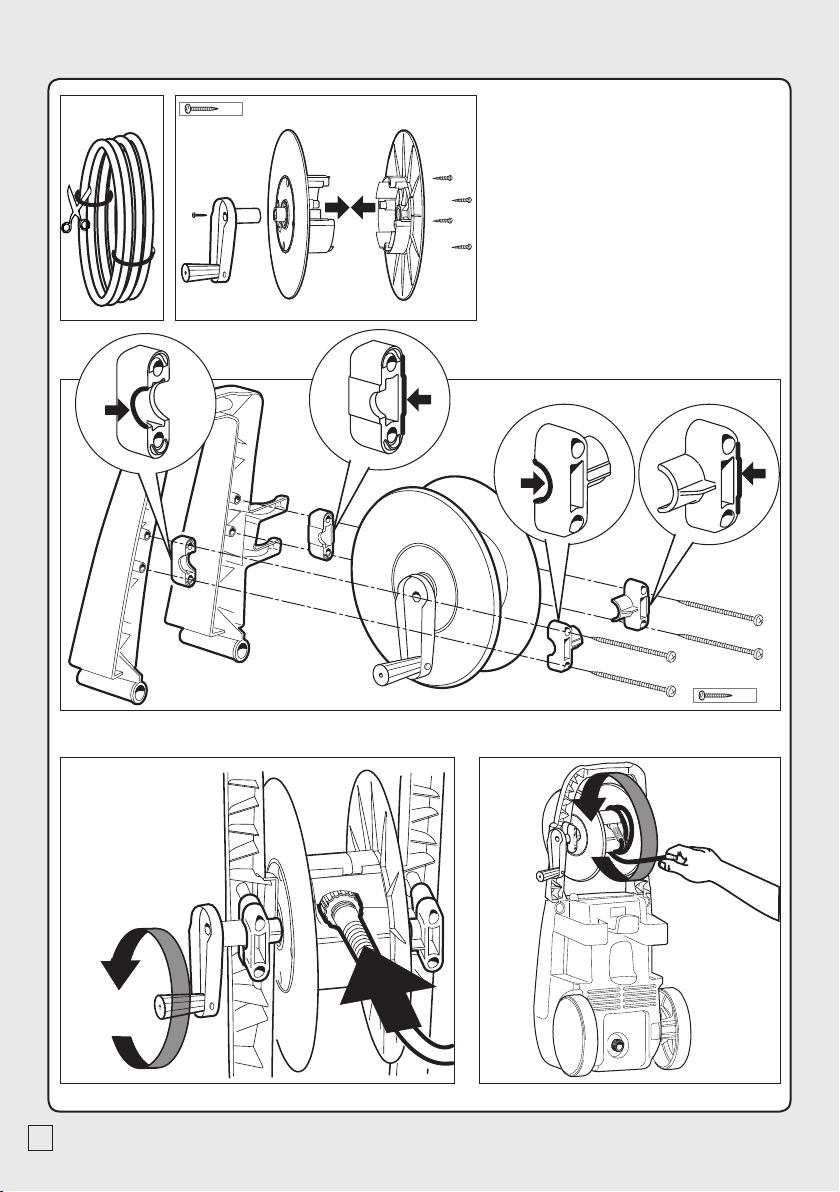
6
1•
4•
2•
5•
3•
5x
4x

7
9
6 7 8a
8b
8c
5
3
4
2
1
10
11
I
DESCRIZIONE DELL’APPARECCHIO
CZ
STANDARDNÍ PŘÍSLUŠENSTVÍ
GB
DESCRIPTION OF THE MACHINE
RUS UK
БАЗОВАЯ КОМПЛЕКТАЦИЯ
F
DESCRIPTION DU L’APPAREIL
PL
WYPOSAŻENIE SERYJNE
D
BESCHREIBUNG DES GERÄTS
H
ALAPFELSZERELTSÉG
E
PROSPECTO DEL APARATO
SK
ŠTANDARDNÉ PRÍSLUŠENSTVO
NL
TOESTEL UITZICHT
LV
STANDARTA APRĪKOJUMS
P
COMPONENTES DO APARELHO
EST
STANDARDVARUSTUS
GR
ΣΤΆΝΤΑΡ ΕΞΟΠΛΙΣΜΌΣ
LT
STANDARTINĖ ĮRANGA

8
1
Manico
2
Interruttore
3Serbatoio detergente
4
Uscita
5
Tubo ad alta pressione
6
Pistola
7
Lancia
8a
Ugello: alta pressione
8b
Ugello: turbo
8c
Ugello: detergente
9
Cavo elettrico con spina
10
Entrata + ltro
11
Spazzola ssa
1
Handle
2
ON/OFF switch
3Detergent tank
4
Water outlet
5
High pressure hose
6
Gun
7
Lance
8a
Nozzle
8b
Turbo nozzle
8c
Detergent nozzle
9
Electric cable
10
Water inlet + lter
11
Fixed brush
1
Manche
2
Interrupteur
3Réservoir de détergent
4
Sortie H.P.
5
Flexible haute pression
6
Pistolet
7
Lance
8a
Buse
8b
Buse Turbo
8c
Buse du détergent
9
Cable electrique avec prise
10
Entrée d’eau + ltre
11
Brosse
1
Gri
2
Ein-Ausschalter
3Reinigungsmittelbehälter
4
Auslauf
5
Hochdruckschlauch
6
Pistole
7
Lanze
8a
Düse
8b
Düse Turbo
8c
Düse des reinigungsmittels
9
Anschlusskabel mit Stecker
10
Einlauf + Filter
11
Bürste
1
Mango
2
Interruptor
3Depósito detergente
4
Salida
5
Manguera de alta presión
6
Pistola
7
Lanza
8a
Boquilla
8b
Boquilla Turbo
8c
Boquilla
9
Cable eléctrico con enchufe
10
Entrada + ltro
11
Cepillo
1
Handvat
2
AAN/UIT schakelaar
3Reinigingsmiddeltank
4
Wateruitgang
5
Hogedrukslang
6
Pistool
7
Lans
8a
Spuitdop
8b
Turbo Spuitdop
8c
Schoonmaakmiddel Spuitdop
9
Eelectrische kabel
10
Wateringang + lter
11
Borstel
1
Alça
2
Interruptor de ligar/desligar
3Reservatório detergente
4
Saida
5
Tubo exível de alta pressão
6
Pistola
7
Lança
8a
Bico injector
8b
Bico injectorTurbo
8c
Bico injector do detergente
9
Cabo elétrico com cha
10
Entrada + ltro
11
Escova estacionário
1
λαβή
2
Διακόπτης
3Ρεζερβουάρ απορρυπαντικό
4
Εζοδος
5
Σωλήνας υψηλής πίεσης
6
Πιστόλι
7
Προέκταση
8a
Ακροφυσίου
8b
ΑκροφυσίουTurbo
8c
Ακροφυσίου του απορρυπαντικου
9
Ηλεκτρικό καλώδιο με φις
10
Είσοδος + φίλτρο
11
Σταθερός βούρτσα
1
Rukojeť
2
Vypínač
3Nádrž se saponátem
4
Výstup
5
Vysokotlaká hadice
6
Pistole
7
Trubka
8a
Tryska
8b
Výkonná tryska Turbo
8c
tryska mycího
9
Elektrická přívodní šňůra se zástrčkou
10
Vstup + ltr
11
Mycí kartáč
I
GB
F
D
E
NL
P
GR
CZ

9
1
Pучка
2
Выключатель
3Бачок для моющего средства
4
Выход
5
Напорный шланг
6
Пистолет
7
Трубка-рукоятка, Удлинитель
8a
головка форсунки
8b
головка форсунки, турбо
8c
головка форсунки, моющим
9
Соединительный кабель с вилкой
10
Устройство для заполнения + фильтр
11
Щетка
1
Uchwyt
2
Wyłącznik
3Pojemnik detergentu
4
Wylot
5
Wąż wysokociśnieniowy
6
Pistolet
7
Lanca
8a
dysza rozpylająca
8b
dysza rozpylającaTurbo
8c
dysza rozpylająca do płynny detergenty
9
Kabel elektryczny z wtyczką
10
Wlot + ltr
11
Paikallaan harja
1
fogantyú
2
Kapcsoló
3Mosószertartály
4
Kimenet
5
Nagynyomású tömlő
6
Pisztoly
7
Lándzsa,Toldócső
8a
Fúvóka locsoló
8b
TURBO Forgó szennymaró fúvóka
8c
Fúvóka mosószer
9
Elektromos vezeték villásdugóval
10
Bemenet + szűrő
11
Mosókefe
1
Rukoväť
2
Vypínač
3Nádržka umývacieho prostriedku
4
Výstup
5
Vysokotlaková hadica
6
Pištoľ
7
Prúdnica
8a
Trysku
8b
Trysku ,Turbo
8c
Trysku , umývacieho prostriedku
9
Prívodný elektrický kábel so zástrčkou
10
Prívod + lter
11
Umýacia kefa
1
Rokturis
2
Slēdzis
3Mazgāšanas līdzekļa tvertne
4
Izplūdes atvere
5
Augstspiediena šļūtene
6
Pistole
7
Stobrs
8a
Uzgalis smidzinātājs
8b
Uzgalis smidzinātājsTurbo
8c
Uzgalis smidzinātājs mazgāšanas līdzekļu
9
Barošanas kabelis ar kontaktdakšu
10
Ievade ar ltru
11
Mazgāšanas suka
1
käepide
2
Lüliti
3Pesuvahendi paak
4
Väljalase
5
Kõrgsurve voolik
6
Veepüstol
7
Püstolitoru pikendus
8a
Pihusti otsik
8b
Pihusti otsik,TURBO
8c
Pihusti otsik, Pesuvahendi
9
Voolukaabel pistikuga
10
Sissevõtt + lter
11
Pesuhari
1
Rankena
2
Įjungimo / išjungimo jungiklis
3Valymo priemonės bakelis
4
Vandens išleidimo anga
5
Aukšto spaudimo žarna
6
Pistoletinis purkštuvas
7
Tiesus antgalis - Strypas
8a
Purškimo purkštukas
8b
Purškimo purkštukasTurbo
8c
Purškimo purkštukas, valymo
priemonės detergentams
9
Elektros laidas su kištuku
10
Vandens įleidimo anga + ltras
11
Plovimo šepetys
9
Voolukaabel pistikuga
10
Sissevõtt + lter
11
Pesuhari
RUS UK
PL
H
SK
LV
EST
LT

10
5÷40°C
OFF
min 15 l/min
max 1 MPa 1 min
A
Optional
IN
IN
OUT
1. 2.
3. 4.
5.
6. 7.
9.
8.
Optional
1/2 inch 13 mm
CLICK!
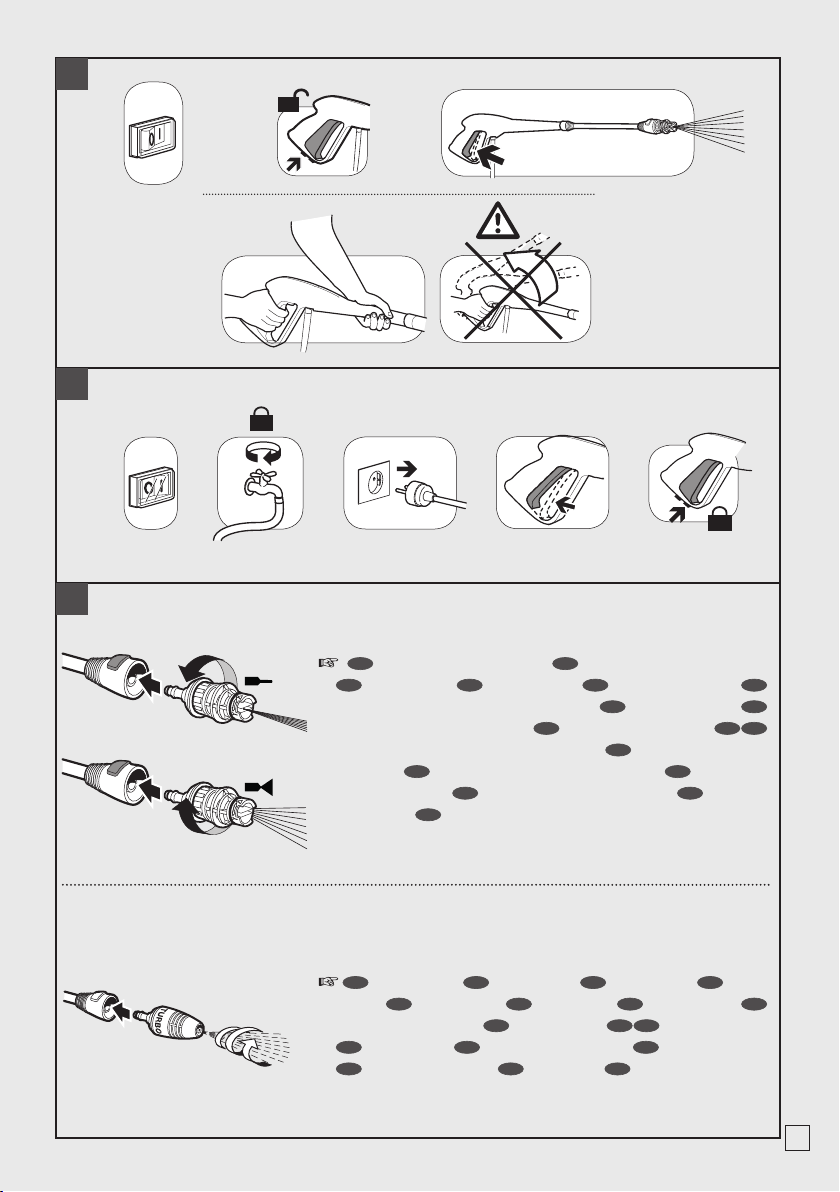
11
ON
OFF
5.
1. 2. 3. 4.
2. 3.
4.
1.
Click!
Click!
B
C
D
I
lancia turbo
GB
turbo lance
F
lance turbo
D
Turbo
Lanze
E
lanza turbo
NL
turbo lans
P
jturbo lança
GR
εκτοξευτηρας turbo
CZ
tryska turbo
RUS UK
насадка турбо
PL
lanca turbo
H
szennymaró lándzsa
SK
turbo prúdnica
LV
turbo smidzinātājs
EST
turbootsik
LT
turbo antgalis
TURBO
I
getto spillo/ventaglio
GB
spread pattern/pencil jet
F
jet variable
D
vario Duese
E
chorro regulable
NL
dunne straal/waaiervormige straal
P
jato variavel
GR
πιδακας καρφιτσα/βενταλια
CZ
vějířová/přímá tryska
RUS UK
точечная/ веерообразная струя.
PL
strumień szpilka/
wachlarz
H
egyenes / legyező alakú vízsugár
SK
vejárovitá/
priama prúdnica
LV
parasta / vēdekļveida strūkla
EST
peenjoa/
lehvikotsik
LT
tiesios/ vėduoklinės čiurkšlės
12
.1
Optional
2A. 3A.
2B. 3B.
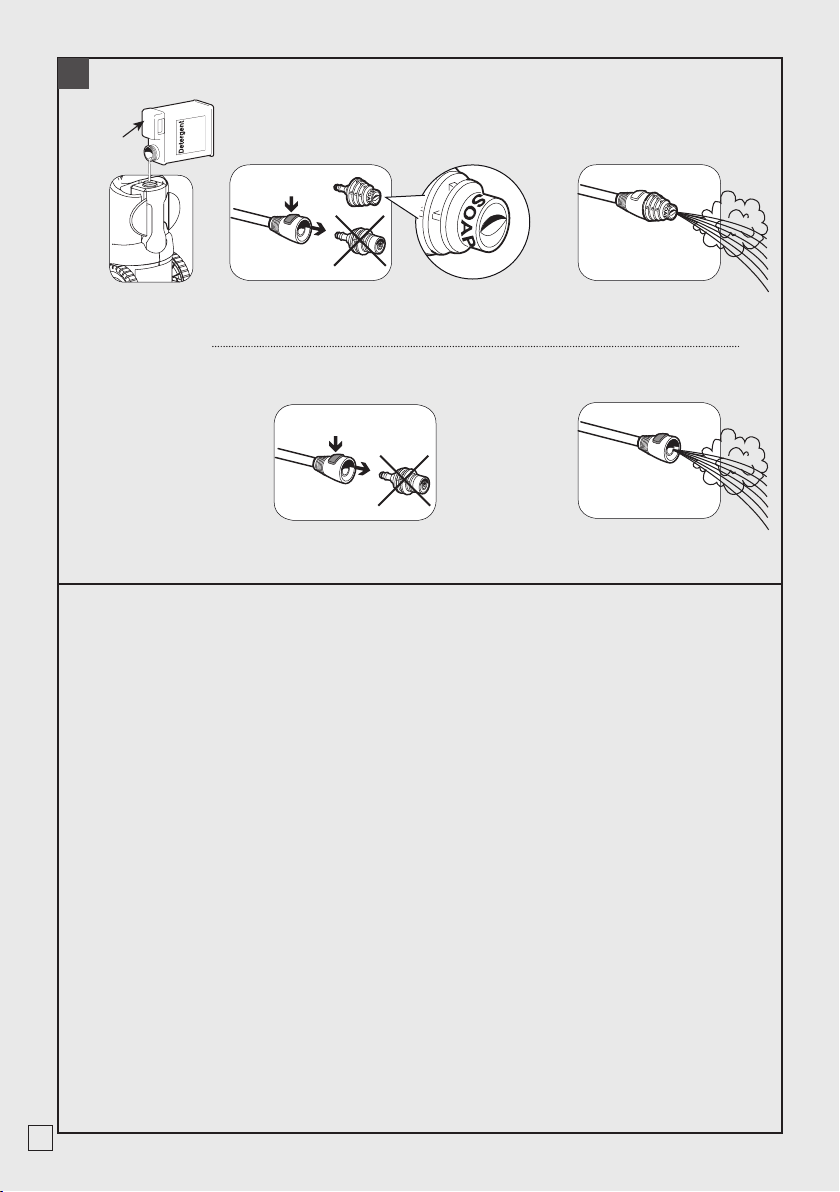
E
13
1.
2. 3. 4.
Optional
F
G
I
TUBO AD ALTA PRESSIONE
GB
HIGH PRESSURE HOSE
F
TUYAU HAUTE PRESSION
D
HOCHDRUCKSCHLAUCH
E
TUBO DE ALTA PRESIÓN
NL
HOGEDRUKSLANG
P
TUBO DE
ALTA PRESSÃO
GR
ΣΩΛΗΝΑΣ ΥΨΗΛΗΣ ΠΙΕΣΗΣ
CZ
VYSOKOTLAKÁ HADICE
RUS UK
ШЛАНГ
ВЫСОКОГО ДАВЛЕНИЯ
PL
PRZEWÓD WYSOKIEGO CIŚNIENIA
H
NAGYNYOMÁSÚ TÖMLŐ
SK
VYSOKOTLAKOVÁ HADICA
LV
AUGSTSPIEDIENA ŠĻŪTENE
EST
SURVEVOOLIK
LT
AUKŠTO
SLĖGIO ŽARNA
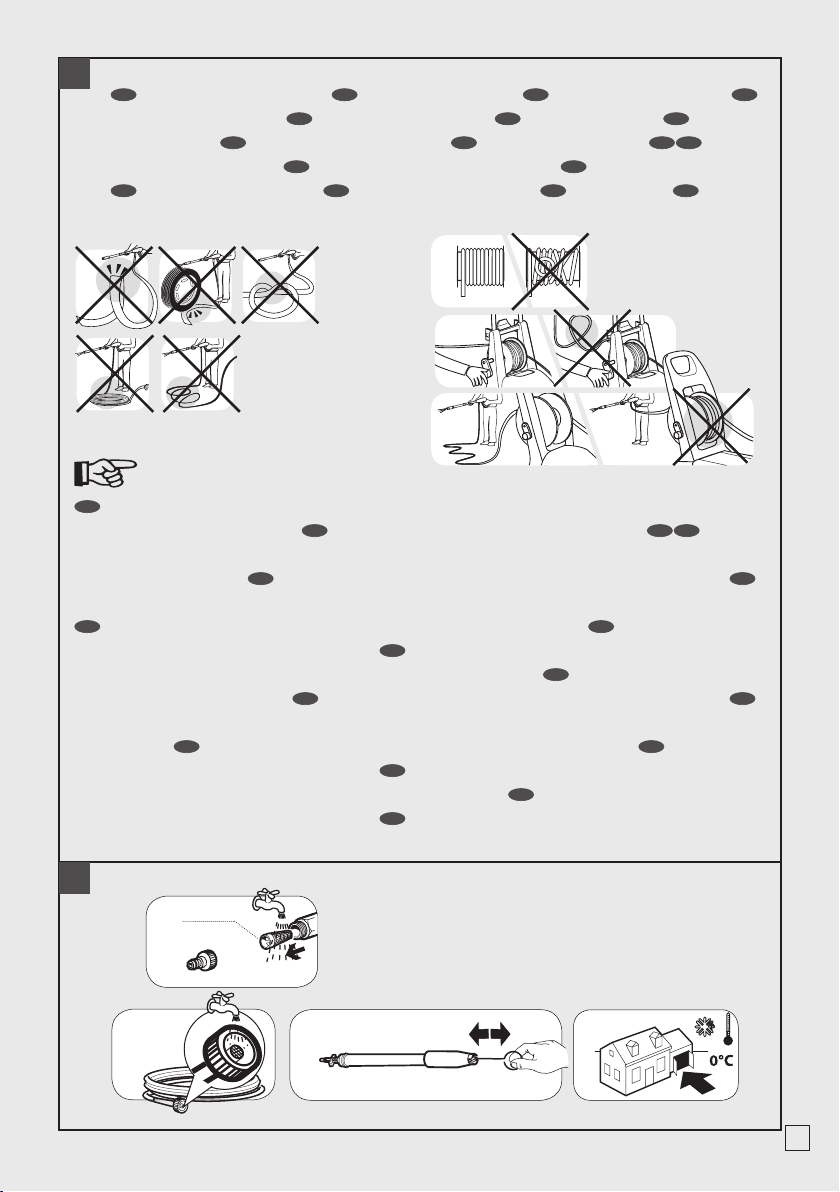
I
Usare l’idropulitrice solo se il tubo
è completamente disteso.
GB
Use the
hydrocleaner only if the hose is completely
uncoiled and extended.
F
Utiliser la machine
seulement si le tuyau est entièrement dèroulè.
D
Den Hochdruckreiniger nur benutzen
wenn der Schlauch komplett ausgerollt ist.
E
Usar la idrolimpiadora solo si la manguera es
completamente desarrollada.
NL
Gebruik de
hogedrukreiniger alleen als de slang helemaal
uitgerold is.
P
Use a idrolavadora so’ se a
mangueira è totalmente desenrolada.
GR
Χρησιμοποιείτε την πλυστική μηχανή μόνο αν
ο σωλήνας είναι τελείως ξετυλιγμένος.
CZ
Používejte vodní čistič pouze v případě, že
je trubka zcela rozmotaná.
RUS UK
Мойку
высокого давления использовать только
при полностью развернутом шланге
PL
Używać hydroczyszczarkę tylko, gdy wąż jest
całkowicie rozwinięty.
H
Csak akkor használja
a magasnyomású tisztítót, ha a tömlő teljesen
le van tekerve.
SK
Vodný čistič používajte len
v prípade, že je hadica celkom odmotaná.
LV
Augstspiediena mazgātāja lietošanas laikā
šļūtenei jābūt pilnīgi attītai.
EST
Survepesurit
tohib kasutada ainult täielikult lahtirullitud
voolikuga.
LT
Naudokite aukšto slėgio plovyklą
tik kai įrenginio žarna visiškai ištiesinta.
14
INTRODUZIONE
> UTILIZZO PREVISTO
· L’apparecchio può essere usato per il lavaggio
di superci in ambienti esterni, ogni qualvolta si
richieda l’uso di acqua in pressione per eliminare
lo sporco.
· Con opportuni accessori opzionali si possono
svolgere lavori di schiumatura, sabbiatura e
lavaggi con spazzola rotativa da applicare alla
pistola.
· Le prestazioni e la semplicità d’uso
dell’apparecchio sono idonee ad un utilizzo NON
PROFESSIONALE.
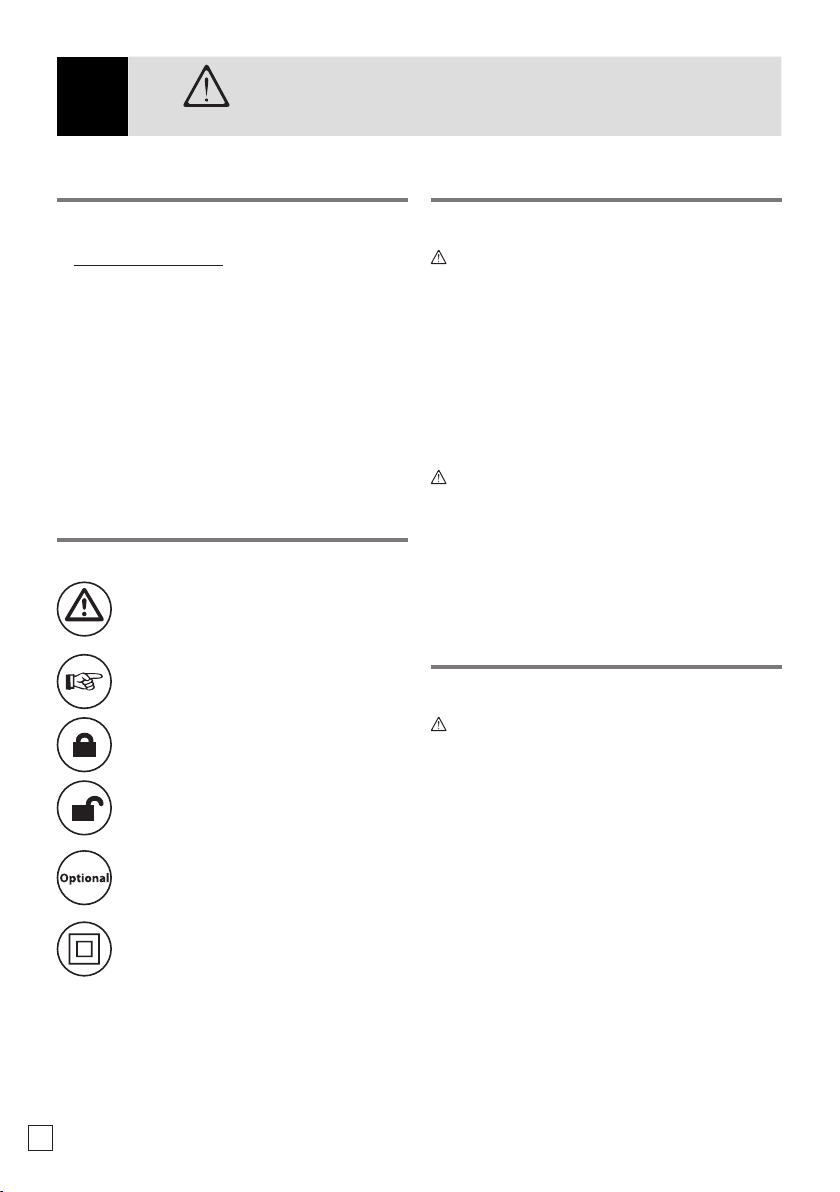
SIMBOLI
ATTENZIONE! Prestare attenzione
per motivi di sicurezza.
IMPORTANTE
BLOCCATO
APERTO
SE PRESENTE (vedi imballo)
Doppio isolamento (SE PRESENTE):è
una protezione supplementare dell’isola-
mento elettrico.
DISPOSITIVI DI SICUREZZA
ATTENZIONE:
La pistola è munita di un fermo
di sicurezza. Il pulsante di sicurezza della pistola
non serve al bloccaggio della leva durante
il funzionamento, ma per evitarne aperture
accidentali. Ogni qualvolta si interrompe l’uso
della macchina è importante azionare il fermo di
sicurezza per evitare aperture accidentali.
L'apparecchio è provvisto di un dispositivo di
protezione motore termico e di pompa dotata di
valvola di by-pass.
ATTENZIONE:
L'apparecchio è dotato
di un dispositivo di protezione motore: in
caso di intervento del dispositivo attendere
qualche minuto o in alternativa scollegare e
ricollegare l'apparecchio alla rete elettrica. In
caso del ripetersi del problema o della mancata
riaccensione, portare l'apparecchio presso il più
vicino Centro Assistenza.
STABILITÀ
ATTENZIONE:
La macchina deve essere sempre
mantenuta su una base orizzontale, in modo
sicuro e stabile.
I
ATTENZIONE
ISTRUZIONI ORIGINALI
Leggere e tener presente quanto riportato nel
MANUALE
D’ISTRUZIONE AVVERTENZE DI SICUREZZA.

15
I
USO
ATTENZIONE:
Leggere prima le AVVERENZE DI
SICUREZZA e poi questo Manuale Specico.
> INSTALLAZIONE
Vedere g.
A
> AVVIAMENTO
Vedere g.
B
> LANCE ALTA PRESSIONE
Vedere g.
D
> ASPIRAZIONE DETERGENTE
Vedere g.
E
> TUBO ALTA PRESSIONE
Vedere g.
F
> ALIMENTAZIONE IDRICA
Collegamento idrico
ATTENZIONE (simbolo):
apparecchio non
adatto al collegamento alla rete dell'acqua po-
tabile.
L’idropulitrice può essere collegata diretta-
mente alla rete di distribuzione dell’acqua
POTABILE solamente se nella tubazione di
alimentazione è installato un dispositivo
antiriusso con svuotamento conforme alle
normative vigenti.
Assicurarsi che il tubo sia almeno Ø 13mm -
1/2 inch e che sia rinforzato.
EFCO IP 1150 S
OLEO-MAC PW 115 C
COLLEGAMENTO ELETTRICO
Rete di alimentazione 220 - 240 V - 1 ~ 50/60 Hz
Potenza assorbita 1,75 kW
Fusibile 16 A
COLLEGAMENTO IDRAULICO
Massima temperatura acqua di alimentazione 40 °C - 98 °F
Minima temperatura acqua di alimentazione 5 °C - 41 °F
Minima portata acqua di alimentazione 900 l/h - 15 l/min - 172 US gph
Massima pressione acqua di alimentazione 1 MPa - 10 bar - 145 psi
Minima pressione acqua di alimentazione 0,1 MPa - 1 bar - 14,5 psi
PRESTAZIONI
Portata 360 l/h - 6 l/min - 95 US gph
Pressione massima 12,5 MPa - 125 bar - 1813 psi
Forza di reazione sull'idropistola 10 N
Livello di pressione sonora - Incertezza (*) 81 dB(A) - 0,7 dB(A)
Livello di potenza sonora 96 dB(A)
Vibrazione braccio operatore - Incertezza (*) 1,5 m/s² - 0,5 m/ s²
MASSA E DIMENSIONI
Lunghezza x larghezza x altezza 310 x 280 x 650 mm - 12,2 x 11 x 25,6 in
Massa 7 kg - 15,4 lb
Serbatoio detergente 0,7 l - 0,18 US gal
(*) Misure eseguite in accordo ad EN 60335-2-79
Caratteristiche e dati sono indicativi. Il Costruttore si riserva il diritto di apportare all'apparecchio tutte le modiche ritenute
opportune.
CARATTERISTICHE E DATI TECNICI
16
I
ATTENZIONE:
L'acqua che è passata attra-
verso i dispositivi antiriusso è considerata non
potabile.
IMPORTANTE: Aspirare solamente acqua ltrata
o pulita. Il rubinetto di prelievo acqua deve
garantire una erogazione pari al doppio della
portata massima della pompa.
Collocare l’idropulitrice il più vicino possibile
alla rete idrica di approvvigionamento.
La non osservanza delle suddette condizioni
provoca gravi danni meccanici alla pompa
nonché il decadimento della garanzia.
Alimentazione dalla conduttura dell’acqua
· Collegare un tubo essibile di alimentazione
(non compreso nella fornitura) al raccordo per
l’acqua dell’apparecchio ed all’alimentazione
dell’acqua.
· Aprire il rubinetto.
Alimentazione dell’acqua da un serbatoio
aperto
· Svitare il raccordo per l’alimentazione dell’acqua.
· Avvitare il tubo di aspirazione con ltro (non
compreso nella fornitura) al raccordo per l’acqua
dell’apparecchio.
· Immergere il ltro nel serbatoio.
· Satare l’apparecchio prima dell’uso.
· Svitare il tubo essibile ad alta pressione dal
raccordo dell’alta pressione dell’apparecchio.
· Accendere l’apparecchio e farlo funzionare nché
l’acqua esce priva di bolle dal raccordo ad alta
pressione.
· Spegnere l’apparecchio e riavvitare il tubo essi-
bile ad alta pressione.
> ALIMENTAZIONE ELETTRICA
- Il collegamento elettrico dell’apparecchio deve
essere eettuato da un ELETTRICISTA QUALIFICA-
TO ed essere conforme alla norma IEC 60364-1.
ATTENZIONE:
Prima di collegare l’apparecchio,
accertarsi che i dati di targa siano corrispondenti
a quelli della rete elettrica e che la presa sia
protetta con un interruttore magnetotermico dif-
ferenziale con sensibilità di intervento inferiore a
0,03 A - 30ms.
- In casi di incompatibilità tra la presa e la spina
dell’apparecchio, fare sostituire la presa con altra
di tipo adatto da personale professionalmente
qualicato.
- Non utilizzare l’apparecchio in caso di tempera-
tura ambiente inferiore a 0°C, se esso è equipag-
giato con cavo in PVC (H VV-F).
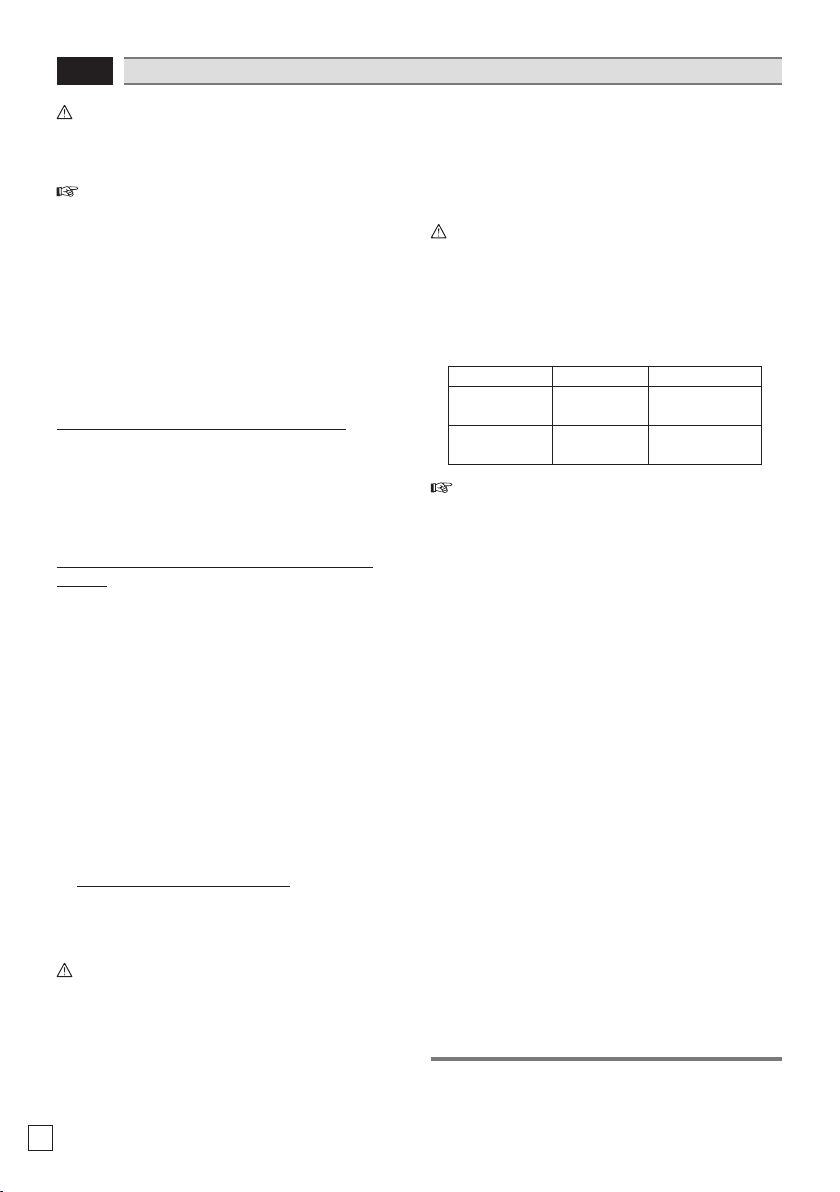
ATTENZIONE:
Prolunghe inadeguate possono
essere pericolose. Se si usa una prolunga, deve
essere adatta per l’uso esterno e i collegamenti
devono essere asciutti lontani dal terreno. Si
raccomanda di utilizzare un avvolgicavo che
tenga la presa ad una distanza di almeno 60 mm
dal terreno.
<16 A <25 A
<20 m ø 1,5 mm2
14 AWG
ø 2,5 mm2
12 AWG
20 m - 50 m ø 2,5 mm2
12 AWG
ø 4,0 mm2
10 AWG
IMPORTANTE:Il dispositivo Total Stop,
provvede a spegnere l’idropulitrice durante la
fase di by-pass. Per avviare l’idropulitrice è perciò
necessario posizionare l’interruttore su (I)“ON”
quindi premere la leva della pistola.
Il dispositivo Total Stop provvederà ad avviare
l’apparecchio rispegnendolo automaticamente
qualora venga rilasciata la leva. Si consiglia
perciò di inserire la sicura posta sulla leva della
pistola ogni qualvolta si fermi la macchina, per
evitare accensioni accidentali
· Spontanei avviamenti della macchina
senza intervenire sulla pistola sono
imputabili a fenomeni quali bolle d’aria
nell’acqua o altro e non a difettosità del
prodotto.
· Non lasciare la macchina in stand-by senza
sorveglianza per più di 5 minuti. In caso
contrario è necessario, per la protezione
della macchina, riportare l’interruttore in
posizione (0)“OFF”.
· Vericare che l’accoppiamento del tubo
alta pressione con la macchina e con la
pistola in dotazione sia correttamente
eseguito, vale a dire senza perdita d’acqua.
FINE LAVORO
Vedere g.
C

17
I
CURA E MANUTENZIONE
Vedere g.
G
ATTENZIONE: Scollegare l'apparecchio dalla
rete elettrica, staccando la spina dalla presa
elettrica, prima di eettuare qualsiasi intervento
di manutenzione e pulizia.
ATTENZIONE Non spruzzare la macchina
con acqua e non usare detergenti o solventi
aggressivi. La macchina si potrebbe danneggiare.
· Pulire la parte esterna della macchina con uno
straccio asciutto.
STOCCAGGIO
Vedere g.
G
· Spostare l'apparecchio solo aerrando la
maniglia di trasporto
· Conservare l'apparecchio e gli accessori in un
luogo asciutto e sicuro, fuori dalla portata dei
bambini.
RIMEDI IN CASO DI
MALFUNZIONAMENTO
L'apparecchio non funziona
· Controllare la tensione di rete.
· Accertare eventuali danni al cavo di
alimentazione.
L'apparecchio non va in pressione
· Satare l'apparecchio: fare funzionare la pompa
senza il tubo ad alta pressione, nché l'acqua
esce senza bolle dall'uscita dell'alta pressione.
Riattaccare poi il tubo ad alta pressione.
· Pulire il ltro nell'attacco dell'acqua.
· Pulire il ltro nell'attacco del tubo alta pressione
(se presente).
· Controllare la quantità di alimentazione
dell'acqua.
· Accertare la tenuta o eventuali intasamenti in
tutti i tubi di alimentazione della pompa.
Forti oscillazioni di pressione
· Pulite l'ugello ad alta pressione. Con uno spillo,
togliete la sporcizia dal foro dell'ugello e lavatelo
dalla parte anteriore con acqua.
La pompa perde
· Sono ammesse no a 10 gocce al minuto. In
caso di perdita maggiore rivolgersi al servizio
assistenza autorizzato.
RICAMBI
· Utilizzare esclusivamente ricambi originali
oppure ricambi approvati dal costruttore.
SMALTIMENTO
Quale proprietario di un apparecchio
elettrico o elettronico, la legge (conforme-
mente alla direttiva EU 2012/19/EU sui riuti
da apparecchiature elettriche ed elettroni-
che e alle legislazioni nazionali degli Stati membri
UE che hanno messo in atto tale direttiva) le vieta di
smaltire questo prodotto o i suoi accessori elettrici /
elettronici come riuto domestico solido urbano e
le impone invece di smaltirlo negli appositi centri di
raccolta. E’ possibile smaltire il prodotto diretta-
mente dal distributore mediante l’acquisto di un
prodotto nuovo, equivalente a quello da smaltire.
Abbandonando il prodotto nell’ambiente si
potrebbero creare gravi danni all’ambiente stesso e
alla salute umana.
Il simbolo in gura rappresenta il bidone dei riuti
urbani ed è tassativamente vietato riporre l’appa-
recchio in questi contenitori. La non ottemperanza
alle indicazioni della direttiva 2012/19/EU e ai decreti
attuativi dei vari Stati comunitari è sanzionabile am-
ministrativamente.

18
GENERAL INFORMATION
> INTENDED USE
· The appliance can be used for washing surfaces
outdoors, whenever pressurised water is required
to remove dirt.
· With special optional accessories, it can be used
for foaming and sandingblasting, and for washing
with a rotary brush for application to the gun.
· This appliance’s performance and userfriendliness
make it suitable for NON PROFESSIONAL use.
SYMBOLS
WARNING: It is important to be
careful of the following items.
IMPORTANT
LOCKED
OPEN
IF PRESENT
Double insulated (IF PRESENT):supple-
mentary insulation is applied to the basic
insulation to protect against electricshock
in the event of failure of the basic insula-
tion.
SAFETY DEVICE
WARNING:
the gun is tted with a safety catch.
The safety button on the gun is not there to
lock the lever during operation, but to prevent
its accidental operation. Whenever use of the
machine is interrupted it is important to operate
the safety catch to prevent accidental activation
of the jet. The appliance is equipped with a motor
thermal protection device and a pump equipped
with bypass valve.
WARNING:
The appliance is equipped with
a motor protection device: in case of device
intervention, wait some minutes or, in alternative,
disconnect and re-connect the prod uct to the
electric system. In case this problem repeats
again or if the product does not start again, take
the product to the nearest After Sales Service
Point
STABILITY
WARNING:
The machine must be always kept
on horizontal bases, in a safe and stable way.
GB
WARNING
TRANSLATION OF THE ORIGINAL INSTRUCTIONS
Read and keep in mind that indicated in the INSTRUCTION
MANUAL - SAFETY WARNINGS
.

19
GB
USAGE
WARNING: First of all read the General Sec-
tion and then this Specic Manual
.
> PUT INTO SERVICE
See g.
A
> STARTING UP
See g.
B
> HIGH PRESSURE LANCE
See g.
D
> DETERGENT SUCTION
See g.
E
> HIGH PRESSURE HOSE
See g.
F
> WATER SUPPLY
Water supply collection
WARNING (symbol):
machine not suitable
for connection to the potable water mains.
The cleaner can only be connected to the
water mains if the water mains is separated by
a backow preventer.
Make sure that the hose is at least Ø 13mm-1/2
inch and that it is reinforced.
WARNING: Water that has own through
backow preventers is considered to be non-
potable
.
EFCO IP 1150 S
OLEO-MAC PW 115 C
ELECTRICAL CONNECTION
Mains power supply 220 - 240 V - 1 ~ 50/60 Hz
Absorbed power 1,75 kW
Fuse 16 A
HYDRAULIC CONNECTION
Maximum inlet water temperature 40 °C - 98 °F
Minimum inlet water temperature 5 °C - 41 °F
Minimum inlet water ow 900 l/h - 15 l/min - 172 US gph
Maximum inlet water pressure 1 MPa - 10 bar - 145 psi
Minimum inlet water pressure 0,1 MPa - 1 bar - 14,5 psi
PERFORMANCE
Water ow 360 l/h - 6 l/min - 95 US gph
Maximum pressure 12,5 MPa - 125 bar - 1813 psi
Recoil of cleaner gun 10 N
Sound pressure level - Uncertainty (*) 81 dB(A) - 0,7 dB(A)
Sound power level 96 dB(A)
Operator arm vibrations - Uncertainty (*) 1,5 m/s² - 0,5 m/ s²
WEIGHT AND DIMENSION
Lenght x width x height 310 x 280 x 650 mm - 12,2 x 11 x 25,6 in
Weight 7 kg - 15,4 lb
Detergent bottle capacity 0,7 l - 0,18 US gal
(*) Measurements taken in compliance with EN 60335-2-79
All features and technical specications are only indications. The Manufacturer reserves the right to modify the appliance as it
deems necessary.
FEATURES AND TECHNICAL
SPECIFICATIONS
20
GB
IMPORTANT: Only clean or ltered water should
be used for intake. The delivery of the water
intake tap should be equal to the double of the
maximum pump range.
Place the cleaner as close to the water supply
system as possible.
Failure to comply with the above conditions
causes serious mechanical damage to the
pump and the loss of warranty cover.
Water supply from the potable water mains
· Connect a supply hose (not included) to the
water inlet of the unit and to the water supply.
· Open the tap.
Water supply from an open container
· Unscrew the coupling part for the water inlet.
· Screw the suction hose with lter (not included)
onto the water connection of the unit.
· Hang the lter in the container.
· Vent the unit before operation.
· Unscrew the high-pressure line at the high pres-
sure outlet of the unit.
· Switch on the unit and let it run until water free
of bubbles emerges at the high-pressure outlet.
· Switch o the unit and screw on the highpressu-
re hose again.
> ELECTRICITY SUPPLY
- The electrical connection of the appliance must
be carried out by a QUALIFIED
ELECTRICIST and conform to the norm IEC 60364-
1.
WARNING:
Before connecting the appliance,
make sure that the nameplate data are the same
as those of the electrical mains and that the so-
cket is protected by a dierential security breaker
with tripping sensitivity below
0.03 A - 30 ms.
- If the appliance’s plug is not compatible with the
socket, have the socket replaced with another of
suitable type by professionally qualied sta.
- Never use the appliance in ambient temperatu-
res below 0° C if it is equipped with a PVC
(H VV-F) cable.
WARNING:
Inadequate extension cords can be
dangerous. If an extension cord is used, it must
be suitable for outdoor use connections must be
dry, away from the ground and a cable reel must
be used so that the socket is at a distance of at
least 60 mm from the ground.
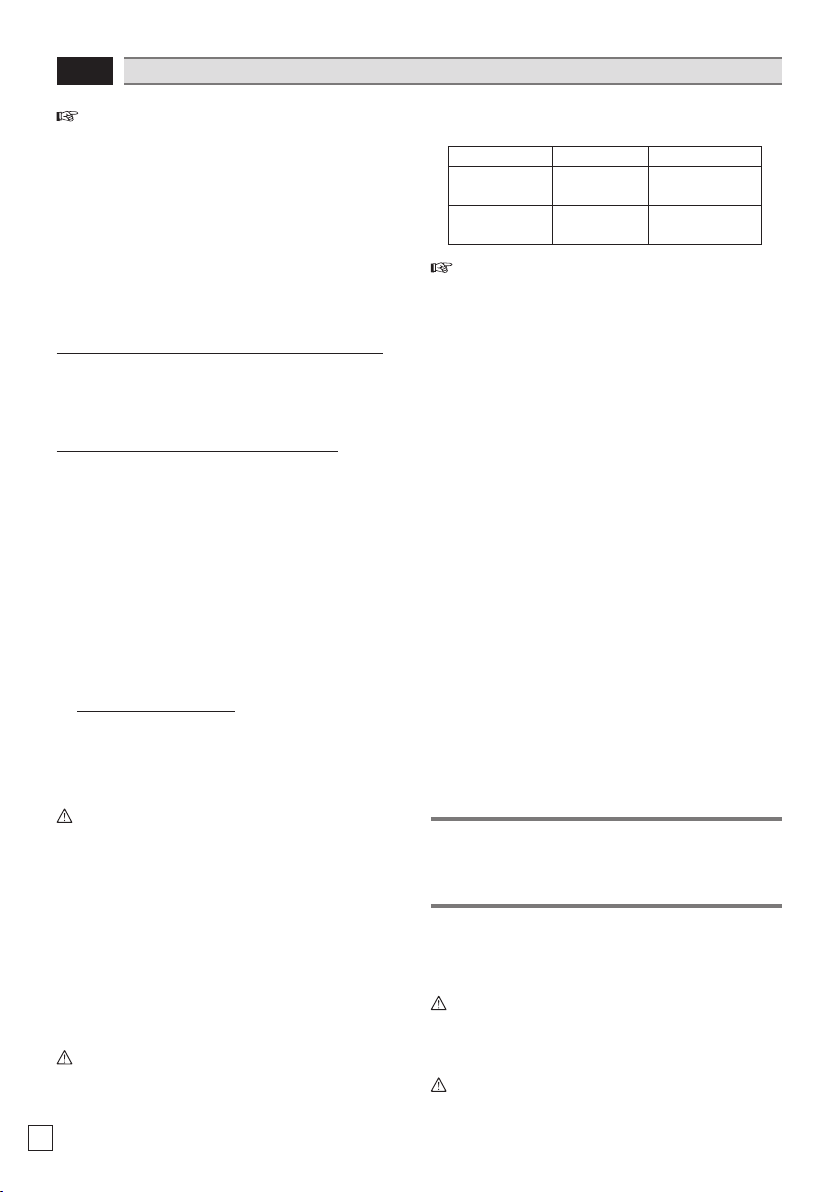
<16 A <25 A
<20 m ø 1,5 mm2
14 AWG
ø 2,5 mm2
12 AWG
20 m - 50 m ø 2,5 mm2
12 AWG
ø 4,0 mm2
10 AWG
IMPORTANT:The Total Stop device, which stops
the machine during the bypass phase. To start
the water cleaner, it is therefore necessary to set
the switch on position (I)“ON”; after that press the
pistol trigger. The Total Stop System will start the
machine and will stop it automatically when the
trigger is released. It is advisable to put on the
safety of the pistol trigger whenever the machine
is stopped, in order to avoid unintentional
starting.
· Any automatic start of the machine
without pressing the gun trigger is
attributable to air bubbles in the water
or other similar phenomena which do not
imply the existence of any defects in the
machine.
· Do not leave the appliance unattended
during the standby for more than 5
minutes. Contrarily, for the safety of the
appliance it is necessary to re-turn the
switch into the (0) OFF position.
· Please check that the coupling of the high
pressure hose with the appliance and the
gun supplied as standard equipment made
correctly, that is to say without any water
leak.
SWITCHING OFF
See g.
C
CARE AND MAINTENANCE
See g.
G
WARNING:
machine shall be disconnected from
its power source, by removing the plug from the
socket-outlet, after nishing work and during
cleaning.
WARNING:
Do not spray the appliance with
water and do not use detergents or aggressive
solvents. Machine could be damaged.
This manual suits for next models
1
Table of contents
Languages:
Other EMAK Pressure Washer manuals


Popular Pressure Washer manuals by other brands

MALTEC
MALTEC ML2.240 operating manual

Kärcher
Kärcher K 6.300 Original instructions

Lavor
Lavor Vertigo Assembly instructions

Pacific hydrostar
Pacific hydrostar 1650 PSI Owner's manual and safety instructions

Kärcher
Kärcher HD 5/11 E Classic manual

STERWINS
STERWINS 110C EPW.3 Assembly, Use, Maintenance Manual


AR Blue Clean
AR Blue Clean AR383SS instruction manual

DeVilbiss Air Power Company
DeVilbiss Air Power Company EXHA2425-WK Operator's manual

Kärcher
Kärcher K 2.010 manual

SNOWJOE
SNOWJOE Martha Stewart MTS-1450PW Operator's manual

Parkside
Parkside PHD 135 D3 Translation of the original instructions

Shark
Shark SGP-3020 Operator's manual