Benchmark 5044-026 User manual
READ ALL INSTRUCTIONS BEFORE FIRST USE.
KEEP THIS MANUAL FOR FUTURE REFERENCE.
KEEP AWAY FROM CHILDREN.
Maximum initial battery voltage (measured without a load)
is 20 volts. Nominal voltage is 18 volts.
WEAR CSA APPROVED
EYE PROTECTION
WEAR EAR
PROTECTION
WEAR A
FACE MASK
5019277
CDSH20
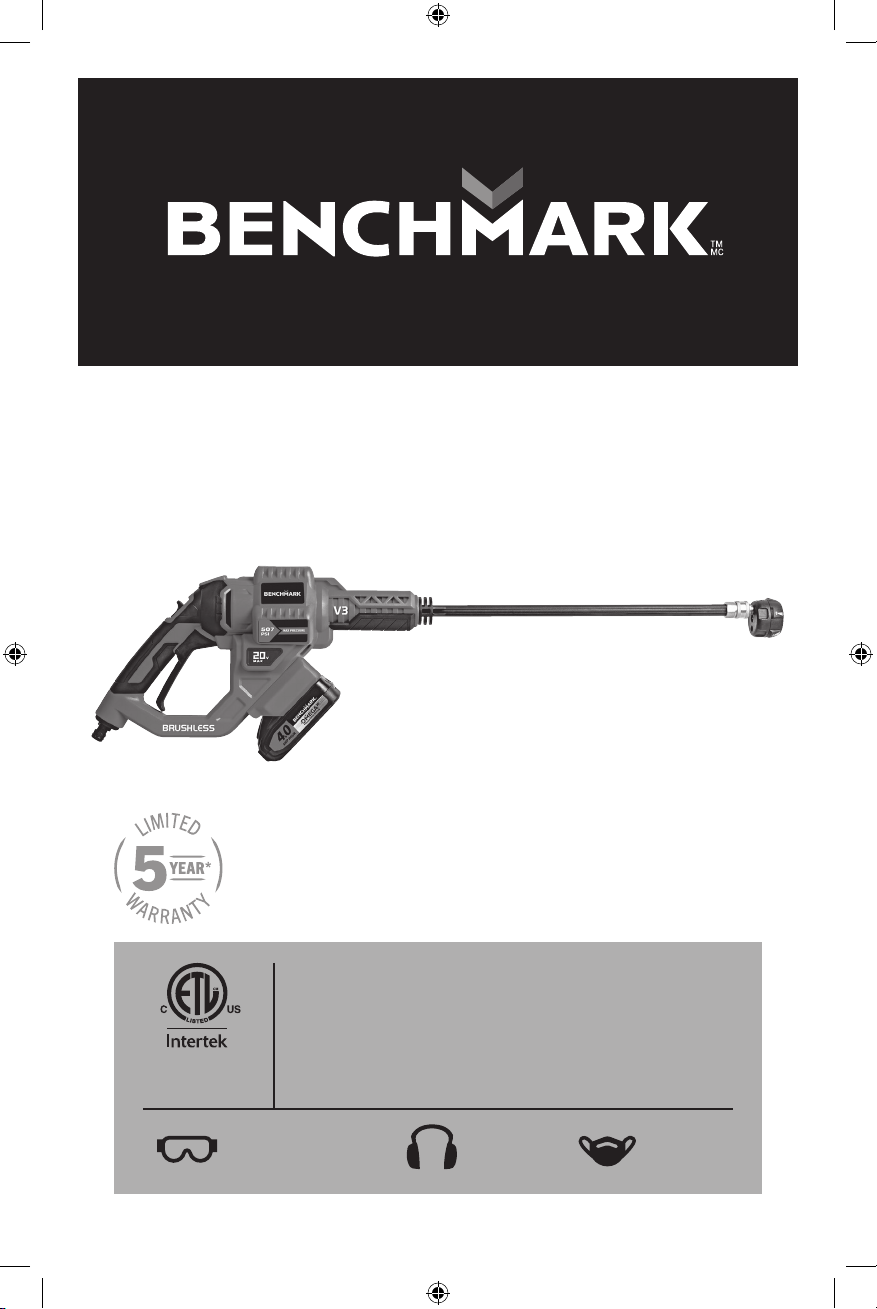
Includes 1 battery & 1 charger
5 year limited warranty on tool
3 year limited warranty on battery and charger
20V MAX BRUSHLESS
2 SPEED POWER WASHER
5044-026f EnProdMaunal P_.indd 1 2020-12-17 2:00 PM
1
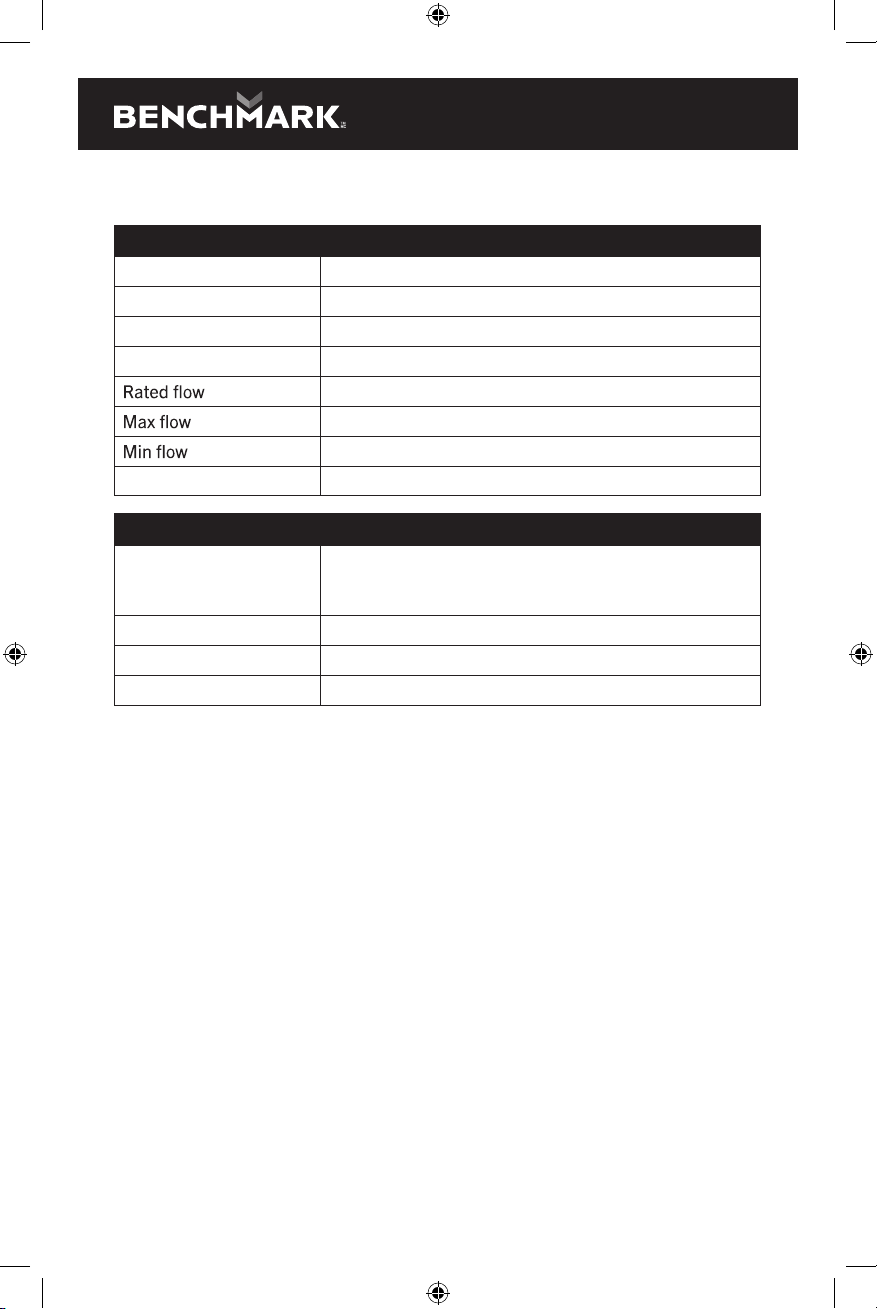
PRODUCT SPECIFICATIONS
BRUSHLESS POWER WASHER
Voltage 20V
Rated pressure 355PSI (24.5 Bar)
Max pressure 507PSI (25 Bar)
Min pressure 319PSI (22 Bar)
2.2l/min (0.58 US gallons / min)
2.4l/min (0.64 US gallons / min)
2.0l/min (0.53 US gallons / min)
Weight 4.4 lbs (2 kg) (without battery pack)
BATTERY AND CHARGER
Battery voltage 20v 4.0Ah Li-ion
(Maximum charger battery voltage, measured
without load, is 20v with a nominal value of 18v)
Charger Up to 2 hours
Replacement battery 5350-011
Replacement charger 5350-010
NEED ASSISTANCE?
Call us on our toll-free customer support line:
1-866-349-8665 (Monday through Friday 9am – 5pm Eastern Standard Time)
• Technical questions
• Replacement parts
• Parts missing from package
5044-026f EnProdMaunal P_.indd 1 2020-12-17 2:00 PM
1
PRODUCT SPECIFICATIONS
BRUSHLESS POWER WASHER
Voltage 20V
Rated pressure 355PSI (24.5 Bar)
Max pressure 507PSI (25 Bar)
Min pressure 319PSI (22 Bar)
2.2l/min (0.58 US gallons / min)
2.4l/min (0.64 US gallons / min)
2.0l/min (0.53 US gallons / min)
Weight 4.4 lbs (2 kg) (without battery pack)
BATTERY AND CHARGER
Battery voltage 20v 4.0Ah Li-ion
(Maximum charger battery voltage, measured
without load, is 20v with a nominal value of 18v)
Charger Up to 2 hours
Replacement battery 5350-011
Replacement charger 5350-010
NEED ASSISTANCE?
Call us on our toll-free customer support line:
1-866-349-8665 (Monday through Friday 9am – 5pm Eastern Standard Time)
• Technical questions
• Replacement parts
• Parts missing from package
5044-026f EnProdMaunal P_.indd 1 2020-12-17 2:00 PM

5044-026
20V MAX BRUSHLESS 2 SPEED POWER WASHER
2
TABLE OF CONTENTS
.................................................................................. 1
Table of Contents .......................................................................................... 2
General Safety Warnings ............................................................................... 3
Electric Gardening Tool Safety ....................................................................... 5
Battery Use and Care .................................................................................... 7
..................................................................................... 7
Battery Pack Recycling ................................................................................. 9
Symbols ........................................................................................................ 9
Know Your Cordless 2 Speed Power Washer ................................................. 10
Assembly .................................................................................................... 11
Operation .................................................................................................... 15
Maintenance ............................................................................................... 17
Exploded View ............................................................................................ 18
Parts List .................................................................................................... 20
Warranty ..................................................................................................... 22
5044-026f EnProdMaunal P_.indd 2 2020-12-17 2:00 PM
3
GENERAL SAFETY WARNINGS
IMPORTANT SAFETY INSTRUCTIONS
Read and understand all safety and operational instructions. Failure to follow the
safety rules listed below and other basic safety precautions may result in serious
personal injury. Keep this manual, sales receipts, and applicable warranty forms
for future reference.
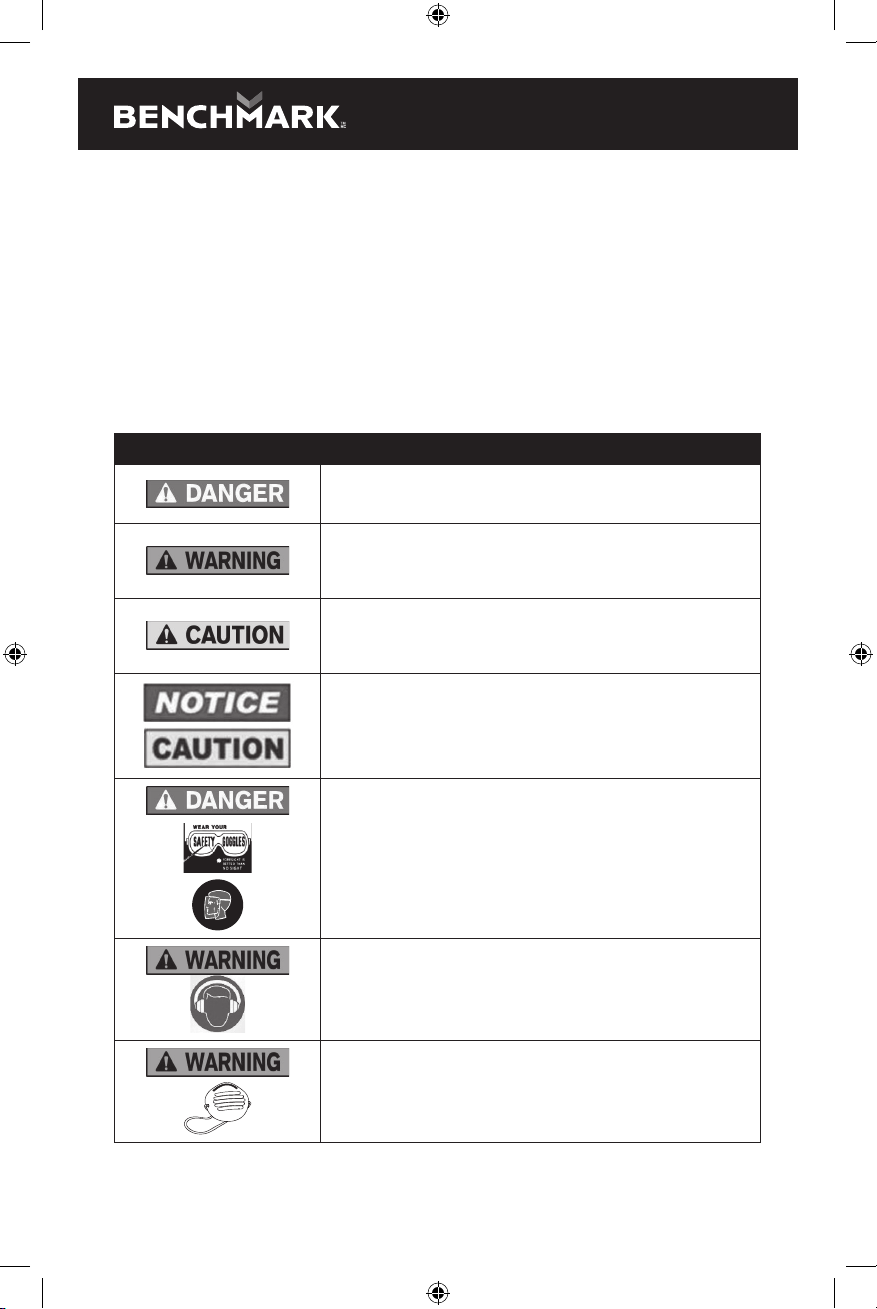
SAFETY SYMBOLS
The purpose of safety symbols is to alert you of the potential safety RISKS.
Recognize and understand them. Follow the instructions provided.
SYMBOL MEANING
Failure to obey a DANGER safety alert WILL result in serious personal
injury or death to you or to others. Always obey all messages following
this symbol to reduce the risk of serious personal injury or death.
Failure to obey a WARNING safety alert MAY result in serious personal
injury or death to you or to others. Always obey all messages following
this symbol to reduce the risk of potential serious personal injury or
death.
Failure to obey a CAUTION safety alert MAY result in personal injury
or property damage to you or to others. Always obey all messages
following this symbol to reduce the risk of personal injury or property
damage.
Failure to obey a NOTICE or a CAUTION (without a safety alert)
MAY result in property damage to you or to others. Always obey all
messages following this symbol to reduce the risk of property damage.
ALWAYS WEAR EYE PROTECTION THAT CONFORMS WITH CSA
Z94.3 or ANSI SAFETY STANDARD Z87.1
FLYING DEBRIS can cause permanent eye damage. Prescription eye-
glasses ARE NOT a replacement for proper eye protection. The usage
of a safety standard compliant face shield placed over proper safety
glasses or goggles can reduce the risk of facial injury.
Non-compliant eyewear can cause serious injury if broken during
the operation of a power tool.
Use hearing protection, particularly during extended periods
of operation of the tool, or if the operation is noisy.
WEAR A DUST MASK THAT IS DESIGNED TO BE USED WHEN
OPERATING A POWER TOOL IN A DUSTY ENVIRONMENT.
Refer to Page 7 of this manual for California Prop 65 warnings
relating to hazardous dust particles.
5044-026f EnProdMaunal P_.indd 3 2020-12-17 2:00 PM

5044-026
20V MAX BRUSHLESS 2 SPEED POWER WASHER
4
SYMBOL MEANING
and to help you grip the tool.
Always wear sturdy clothing with long sleeves and long pants.
Never operate the tool while wearing shorts, short sleeve shirt
or while shirtless.
Always wear non-slip safety boots to prevent foot injuries
and slipping that could cause loss of control of the tool.
use proper circuit protection.
This tool is wired at the factory for 120 V AC operations.
It must be connected to a 120 V AC, 15 A circuit that is protected by
power cord immediately if it is worn, cut or damaged in any way.
WARNING: Ventilation openings in batteries and chargers must
always be open to allow cooling air to circulate freely. Air vents that
are blocked, restricted or covered may result in the battery or charger
overheating. Overheating may lead to damage to the tool or cause a
5044-026f EnProdMaunal P_.indd 4 2020-12-17 2:00 PM

5
ELECTRIC GARDENING TOOL SAFETY
GENERAL SAFETY WARNINGS
WARNING: Read all safety warnings and all instructions. Failure to follow the
Save all warnings and instructions for future reference.
General Electric Gardening Tool Safety Warnings – Work Area Safety
Do not operate power tools in explosive atmospheres, such as in the presence
Power tools create sparks which may ignite
the liquids, fumes or dust.
Keep children and bystanders away while operating a power tool.
Distractions can cause you to lose control.
GENERAL ELECTRIC GARDENING TOOL SAFETY WARNINGS
– ELECTRICAL SAFETY
Battery charger plugs must match the outlet. Never modify the plug in any way.
Do not use any adapter plugs with earthed (grounded) chargers.
plugs and matching outlets will reduce risk of electric shock.
Avoid body contact with earthed or grounded surfaces such as water pipes.
There is an increased risk of electrical shock if your body is earthed or grounded.
Do not expose power tools, battery chargers or batteries to rain or wet
conditions. Water entering the tool, chargers or batteries will increase the risk
of electric shock.
Do not abuse the cord. Never use the power cord for carrying, pulling or
unplugging the charger. Keep the power cord away from heat, oil, sharp edges,
and moving parts. Damaged or entangled cords increase the risk of electric shock.
When operating the charger outdoors, use an extension cord suitable for
outdoor use. Use of a cord suitable for outdoor use reduces the risk of electric shock.
Never operate a power tool in the rain.
If operating a charger in a damp location is unavoidable, use a residual current
device (RCD) protected supply. An RCD is also known as a ground fault circuit
interrupter (GFCI) or earth leakage circuit breaker (ELCB). Use of an RCD
reduces the risk of electric shock.
GENERAL ELECTRIC GARDENING TOOL SAFETY WARNINGS
– PERSONAL SAFETY
Stay alert, be aware of your surroundings, watch what you are doing and use
common sense when operating a power tool. Do not use a power tool while you
A moment of
inattention while operating a power tool may result in serious personal injury.
Protective
equipment such as dust mask, non-skid safety shoes or boots, sturdy gloves,
durable long pants, long sleeve shirt and hearing protection will reduce the risk
of personal injuries.
5044-026f EnProdMaunal P_.indd 5 2020-12-17 2:00 PM
5044-026
20V MAX BRUSHLESS 2 SPEED POWER WASHER
6
before connecting the battery to the power tool or plugging it into the power
switch.
tools that have the switch on invites accidents.
Remove any adjustment key or wrench before turning the power tool on.
A wrench or a key left attached to a rotating part of the power tool may result
in personal injury.
Do not overreach. Keep proper footing and balance at all times.
This enables better control of the power tool in unexpected situations.
Dress properly. Do not wear loose clothing or jewellery. Keep your hair,
clothing and gloves away from moving parts. Loose clothing, jewellery or long
hair can be caught in moving parts.
Do not force the tool. Use the correct tool for the application. The correct power
tool will do the job better and safer when used at the rate for which it was designed.
Any power tool
that cannot be controlled using the switch is dangerous and must be repaired.
Remove the battery from the power tool or the plug from the power source
before making any adjustments, replacing or repairing parts, cleaning the
tool, leaving the tool idle or unattended, transporting or storing the tool. Such
preventive safety measures reduce the risk of starting the power tool accidentally.
Store idle power tools out of the reach of children and do not allow persons
unfamiliar with the power tool or these instructions to operate the power tool.
Power tools are dangerous in the hands of untrained users.
Maintain power tools. Check for misalignment or binding of moving parts,
tool’s operation. If damaged, have the power tool repaired before use.
Many accidents are caused by poorly maintained power tools.
Use the power tool and accessories in accordance with these instructions,
taking into account the working conditions and the work to be performed.
in a hazardous situation.
GENERAL ELECTRIC GARDENING TOOL SAFETY WARNINGS – SERVICE
only identical replacement parts. This will ensure that the safety of the power
tool or charger is maintained.
5044-026f EnProdMaunal P_.indd 6 2020-12-17 2:00 PM

7
BATTERY USE AND CARE
another battery pack.
c) When battery pack is not in use, keep it away from other metal objects, like
paper clips, coins, keys, nails, screws, or other small metal objects, that can
make a connection from one terminal to another. Shorting the battery terminals
d) Under abusive conditions, liquid may be ejected from the battery: avoid contact.
additionally seek medical help. Liquid ejected from the battery may cause
irritation or burns.
SPECIFIC SAFETY RULES
WARNING: This product contains chemicals known to the State of
California to cause cancer and birth defects or other reproductive harm.
WARNING: Some dust created by power sanding, sawing, grinding, drilling,
and other construction activities contain chemicals known to cause cancer,
birth defects, or other reproductive harm. Some samples of these chemicals are:
• lead from lead-based paints,
• crystalline silica from bricks and cement and other masonry products, and
• arsenic and chromium from chemically treated lumber.
Your risk from these exposures varies, depending on how often you do this type
of work. To reduce your exposure to these chemicals: work in a well-ventilated
area, and work with approved safety equipment, such as those dust masks that
• Never direct a water stream toward people or pets, or any electrical device.
• Before starting any cleaning operation, close doors and windows.
• Clear the area to be cleaned of debris, toys, outdoor furniture, or other objects
that could create a hazard.
• Never attempt to use the power cleaner if ice has formed in any part
of the equipment.
• Always store indoors to prevent from freezing.
grade solutions in this product. These products can cause physical injuries to the
operator and irreversible damage to the machine.
WARNING: High pressure jets can be dangerous if subject to misuse.
The jet must not be directed at people, animals, electrical devices,
or the machine itself.
5044-026f EnProdMaunal P_.indd 7 2020-12-17 2:00 PM
5044-026
20V MAX BRUSHLESS 2 SPEED POWER WASHER
8
• Hold the power cleaner securely with both hands. Expect the trigger handle to
move when the trigger is pulled due to reaction forces. Failure to do so could
cause loss of control and injury to yourself and others.
• Never attempt to make any adjustments while the motor is running
• Protective covers must always cover rotating parts when the motor is running.
• Check bolts and nuts for looseness before each use. A loose bolt or nut may
cause serious motor problems.
• When servicing use only recommended or equivalent replacement parts.
Use of any other parts may create a hazard or cause product damage.
• ONLY use cold or warm water. Never use water more than 43°C / 110°F.
• Never spray close to the surface to be cleaned as you can damage the surface.
expose the product to rain. Store indoors in a dry area. Corrosive liquids, water,
and chemicals can enter the product’s electronic components and/or battery
compartment and damage electronic components and/or the battery pack,
injury. Remove any buildup of dirt and debris by wiping the product clean with
a dry cloth occasionally.
• For outdoor use only.
SERVICE
replacement parts. This will ensure that the safety of the power tool is maintained.
5044-026f EnProdMaunal P_.indd 8 2020-12-17 2:00 PM

9
BATTERY PACK RECYCLING
To preserve our natural resources, please recycle or dispose of batteries
properly. The batteries charged by this charger may contain chemicals and metals
that are harmful to the environment. Never dispose of rechargeable batteries in
of the environment.
SYMBOLS
The rating plate on your tool may show these symbols. These represent important
information about the product or instructions on its use.
Conforms to relevant
safety standards
Read the instruction manual.
Thrown objects can ricochet
and result in personal injury
or property damage.
For protection against injury, wear
ear defenders and safety goggles.
Keep bystanders and pets clear
of the machine when in use.
Warning!
Contains Lithium ion
Dress properly, do not wear loose
clothing or jewellery that could be
drawn into the air intake
Remove battery from machine
before maintenance, adjusting,
or cleaning
Waste electrical products
should not be disposed of with
household waste. Please recycle
where facilities exist. Check with
your Local Authority or retailer
for recycling advice.
Caution: Wear protective gloves
when using the machine and
handling debris.
Caution: Wear safety boots
Do not expose the machine to
rain. Store the machine in a dry
place.
NPMï `
Thermal link with operating
temperature
Warning. Moving blades. Keep
hands and feet away when the
machine is operated.
This symbol designates that this tool is listed with Canadian and U.S.
requirements by ETL Testing Laboratories, Inc.
UL1776 CSA C22.2 No. 68
5044-026f EnProdMaunal P_.indd 9 2020-12-17 2:00 PM
5044-026
20V MAX BRUSHLESS 2 SPEED POWER WASHER
10
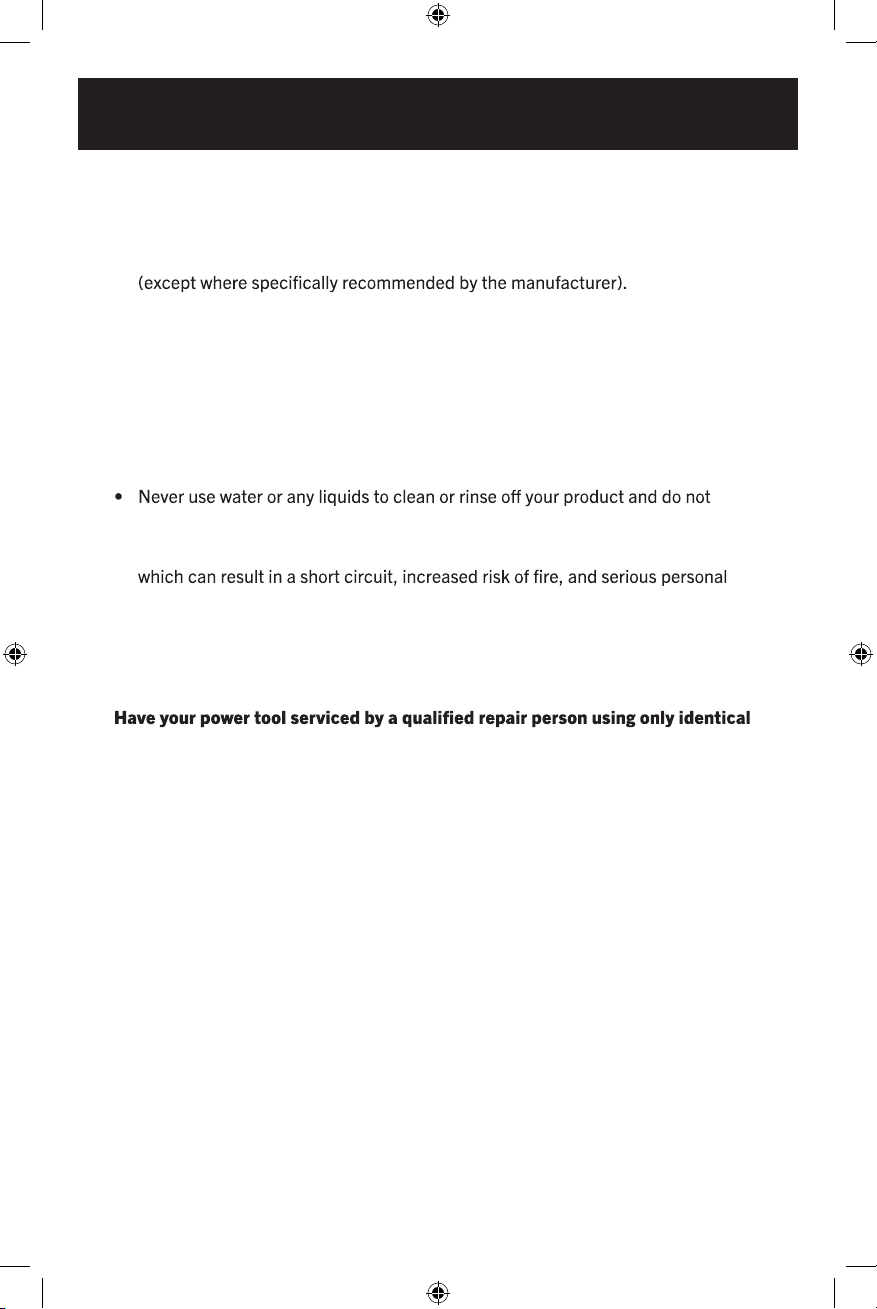
KNOW YOUR CORDLESS
2 SPEED POWER WASHER
1. 5-position rotating nozzle
2. Quick connect nozzle coupler
3. 20'' high pressure wand
4. 2 position speed (pressure)
selection switch
5. Indicator
7. Trigger switch
8. Battery pack
9. Hose quick connect adapter
10. Charger 5350-010
Battery 5350-011
Battery Charger
5350-010
Air vents
Red LED
Green LED
5044-026f EnProdMaunal P_.indd 10 2020-12-17 2:00 PM
11
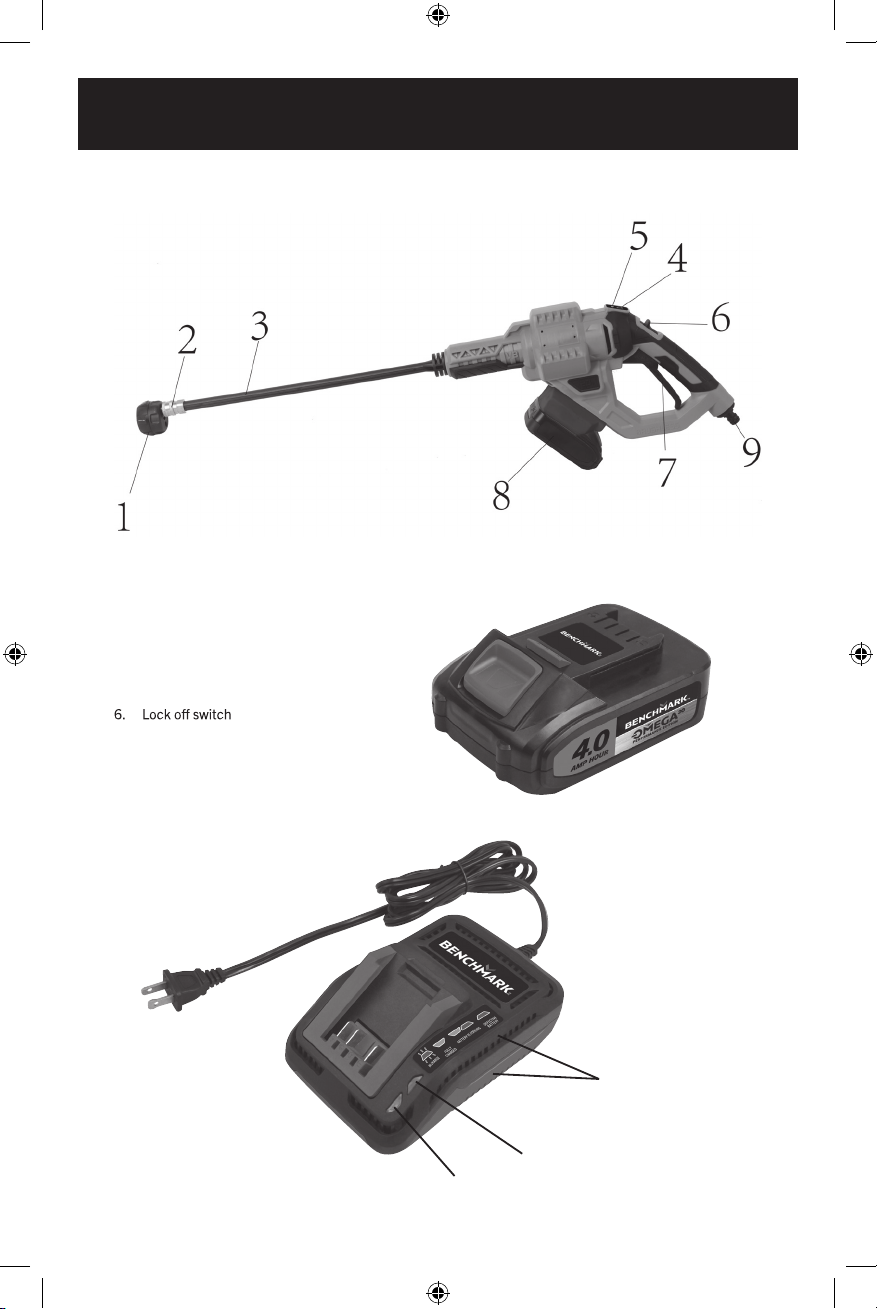
CHECKING THE BATTERY CHARGE STATUS
The level of charge remaining in the battery can be checked by using the battery
LED power indicator that is contained on the end of the battery.
NOTE: The battery charge remaining may be checked while the battery is installed
in the tool with the ON/OFF switch turned OFF. It may also be checked while the
battery is removed from the tool. DO NOT check the battery charge remaining while
the battery is in the charger.You will get a false reading
and you may also damage the battery status system.
1. Press and hold the battery status button
located on the end of the battery
2. One or more of the four LED lights in the LED
window will come ON to indicate the amount of
charge that is remaining in the battery as follows:
Charge level
indicator
Amount of charge
remaining 10-25% 25-50% 50-75% 75-100%
3. Release the battery status button to turn the LEDs OFF.
ASSEMBLY
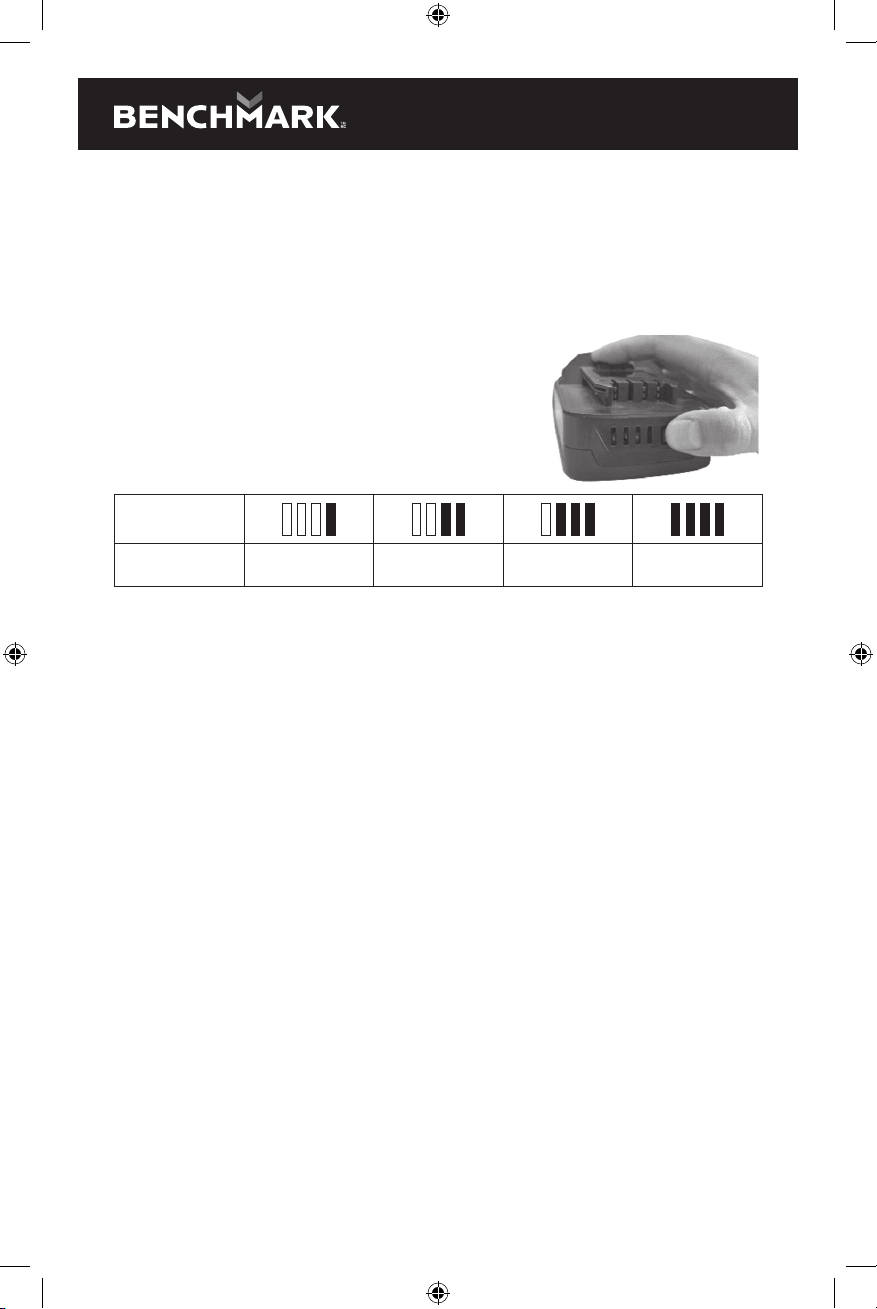
CHARGING THE BATTERY PACK
1. Place the battery charger (1) in a dry location near a 110–120V 60 Hz
electrical outlet (Fig. 2).
2. Plug the battery charger into the outlet and make sure the green LED
indicator light (5) comes ON. If it does not, refer to the chart (Fig. 3)
to identify the problem.
3. Turn the battery (2) upside down and slide it onto the charger.
NOTE: Make sure the grooves (3) in the sides of the battery slide over the
matching tabs on the charger (4) until the battery latch “clicks” into place.
NOTES:
1. When the charger is plugged into the wall receptacle and NO battery
is on the charger, the green indicator light (5) will turn ON indicating the
charger is “live”.
2. When a discharged battery is installed on the charger, the green indicator light
will turn OFF and the red indicator light (6) will turn ON. The red indicator light
indicates the battery is being charged.
3. If the red indicator light does not come ON, check to make sure battery pack
is slid fully onto the charger and the electrical outlet is working properly.
4. See Fig. 3 below for other indicator light functions.
5. A discharged battery pack should be fully charged in approximately 2 hrs.
5044-026f EnProdMaunal P_.indd 11 2020-12-17 2:00 PM
5044-026
20V MAX BRUSHLESS 2 SPEED POWER WASHER
12
6. It is normal for the battery charger to hum and be warm to the touch
during operation.
7. If the battery pack does not charge properly, check to make sure the electrical
outlet is “live”.
8. Do NOT charge batteries when the work area or the battery temperature
is at or below 5°C / 41° F or above 40.5°C / 105° F.
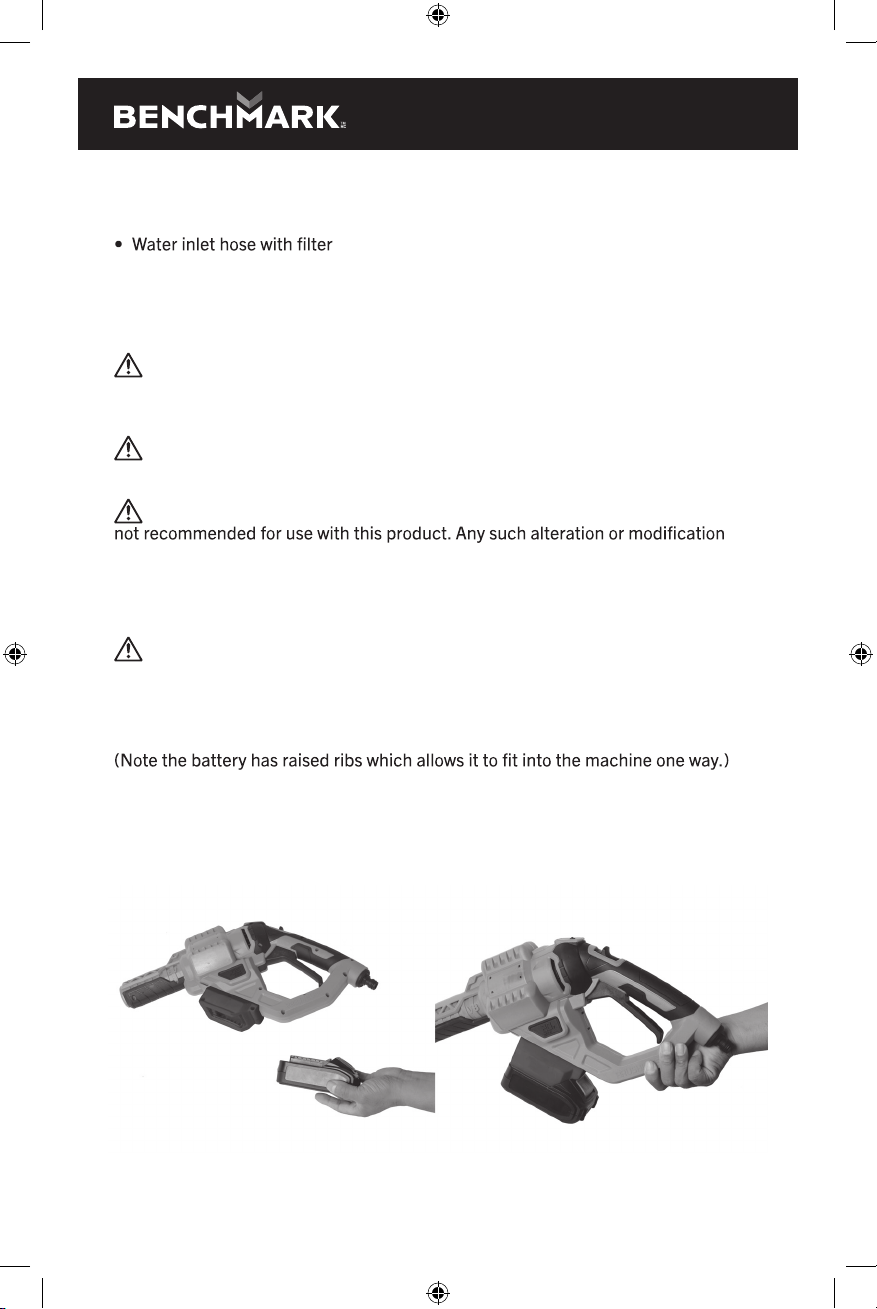
INSTALLING A BATTERY ON CORDLESS POWER WASHER
1. Remove the discharged battery (1) from the cordless power washer by pressing
downward on the battery release button (2) and sliding the battery backward
until it is removed from the cordless pressure washer (3) (Fig. 4).
2. Slide the fully charged battery onto the matching keys (4) in the cordless
power washer (3) where the discharged battery has been removed.
GREEN
LIGHT
RED
LIGHT
BATTERY
INSERTED
INTO CHARGER
CHARGING STATUS
ON OFF NO Charger connected
to power supply
OFF Blink YES Battery being
charged
ON OFF YES Battery fully charged
OFF ON YES Battery is charged
but not operational
on tool. This may
indicate defective /
bad contact
on battery.
ON ON YES Charging conditions
are either too hot
or too cold
FIG. 2 FIG. 3
FIG. 4
NOTE:
You must connect the water
to the sprayer before installing the battery
to avoid water entering and damaging the
battery.
IMPORTANT:
Make sure the slots in the
battery are fully engaged with the
mounting keys in the cordless power
washer (3). The battery release button
will “click” into place when the battery
is fully installed.
WARNING: Do not immerse the battery
pack in water. Sudden cooling could
cause a hot battery to explode or leak.
5044-026f EnProdMaunal P_.indd 12 2020-12-17 2:00 PM
IMPORTANT:
You must remove the battery before disconnecting the hose to
avoid water entering and damaging the battery.
13
PACKAGING CONTENTS
• 20v brushless 2 speed power washer
• 20" high pressure wand
• 20v lithium ion battery & charger
• 5-position rotating nozzle
• Owner’s manual
WARNING! If any parts are damaged or missing, do not operate this product
until the parts are replaced. Use of this product with damaged or missing parts
could result in serious personal injury.
WARNING! Do not install the batteries until assembly is complete. Failure to
comply could result in accidental starting and possible serious personal injury.
WARNING! Do not attempt to modify this product or create accessories
is misuse and could result in a hazardous condition leading to possible serious
personal injury.
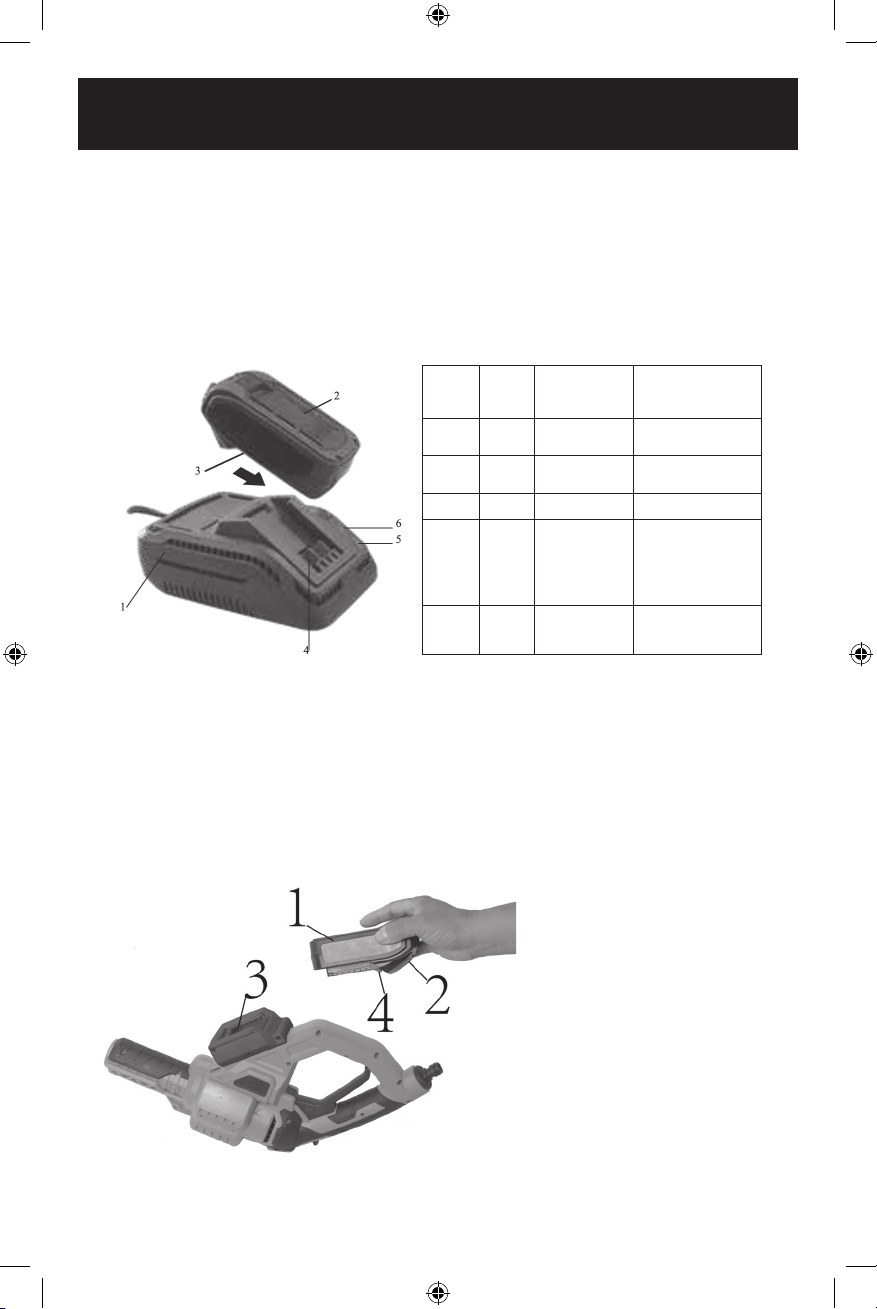
INSTALLING AND REMOVING BATTERY PACK
WARNING! Always remove the battery pack from your tool when you are
assembling parts, making adjustments, cleaning, carrying, transporting or when
not in use. Removing the battery pack will prevent accidental starting that could
cause serious personal injury.
Slide a battery pack into the slots until it clicks into place, Fig.5.
To remove the battery, press the battery release button, and pull the battery
pack out of the slot.
FIG. 5
5044-026f EnProdMaunal P_.indd 13 2020-12-17 2:00 PM
5044-026
20V MAX BRUSHLESS 2 SPEED POWER WASHER
14
ATTACHING THE 20" HIGH PRESSURE WAND
1. Insert the end of the 20" high pressure wand into the front opening
of the power washer.
2. Ensure when inserting, both the large tab and the small tab located on the
end of the 20" high pressure wand are both aligned with the large and small
notches located inside the front opening of the power washer.
3. Turn clockwise to lock wand into power washer.
4. To remove wand from the power washer, press in and turn wand half
a turn counter-clockwise and pull out (Fig 6 and 7).
ATTACHING THE 5-POSITION ROTATING NOZZLE
1. Push the locking sleeve on the quick connect nozzle coupler on the end
of the wand back.
2. While holding locking sleeve back, insert the end of the 5-position rotating
nozzle into the coupler.
3. Release the locking sleeve on the quick connect coupler
to lock the 5-position rotating nozzle in.
4. Pull on the nozzle to ensure it is locked into the quick connect nozzle
coupler on the wand before use (Fig. 8).
FIG. 6
FIG. 8
FIG. 7
5044-026f EnProdMaunal P_.indd 14 2020-12-17 2:00 PM
15
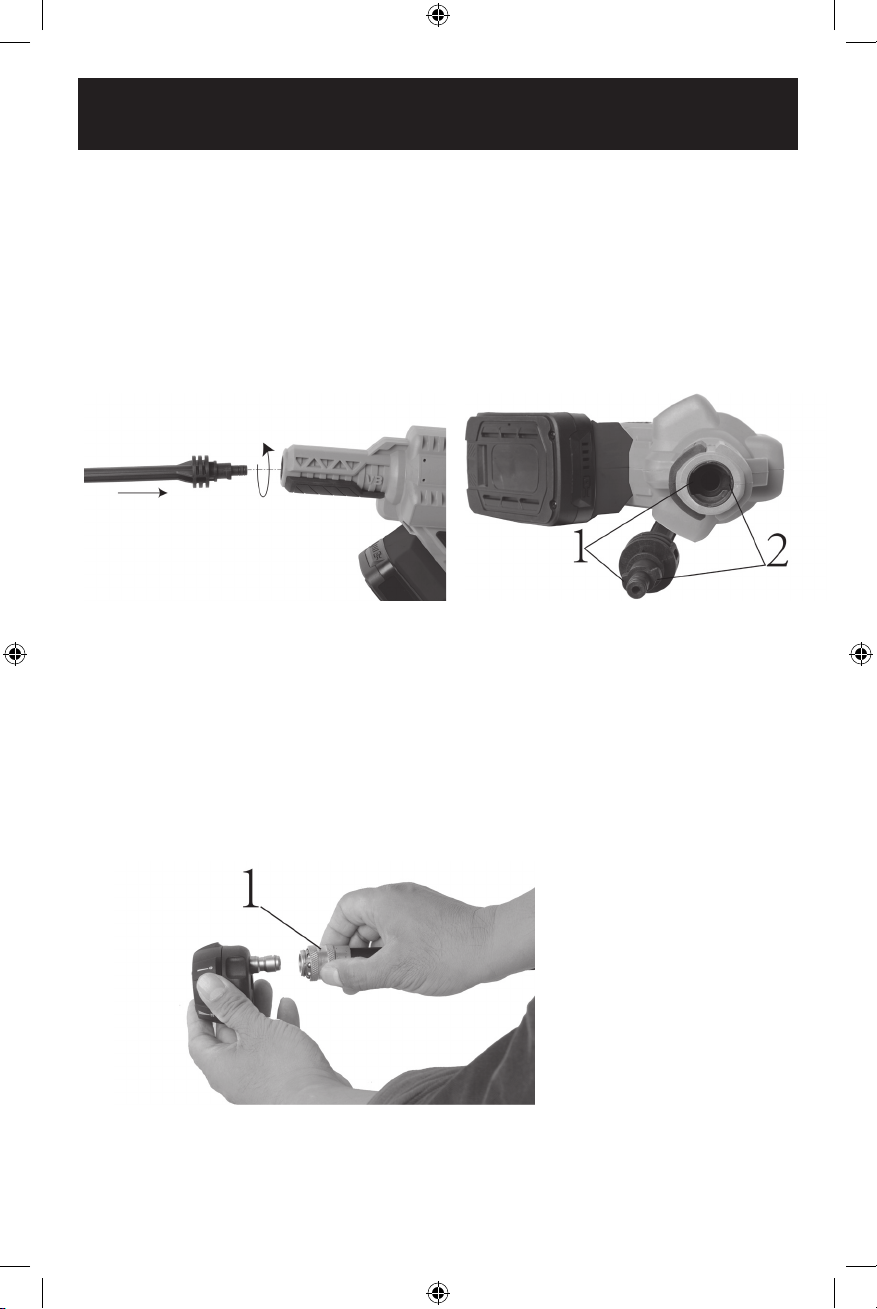
ATTACHING A GARDEN HOSE OR THE WATER INLET HOSE
1. Push the locking sleeve (1) of the garden hose/water inlet hose back and then
insert the connecting head into the hose quick connect adapter located on the
bottom rear of the power washer.
2. Release the locking sleeve on the garden hose/water inlet hose to lock in.
3. Pull on the garden hose/water inlet hose to ensure it is locked into the
power washer before use.
4. Select water source when using the water inlet hose supplied
with the power washer.
5. To remove garden hose/water inlet hose from the power washer, pull locking
sleeve on hose back and pull hose connecting head out of the hose quick
connecting adapter (Fig. 9).
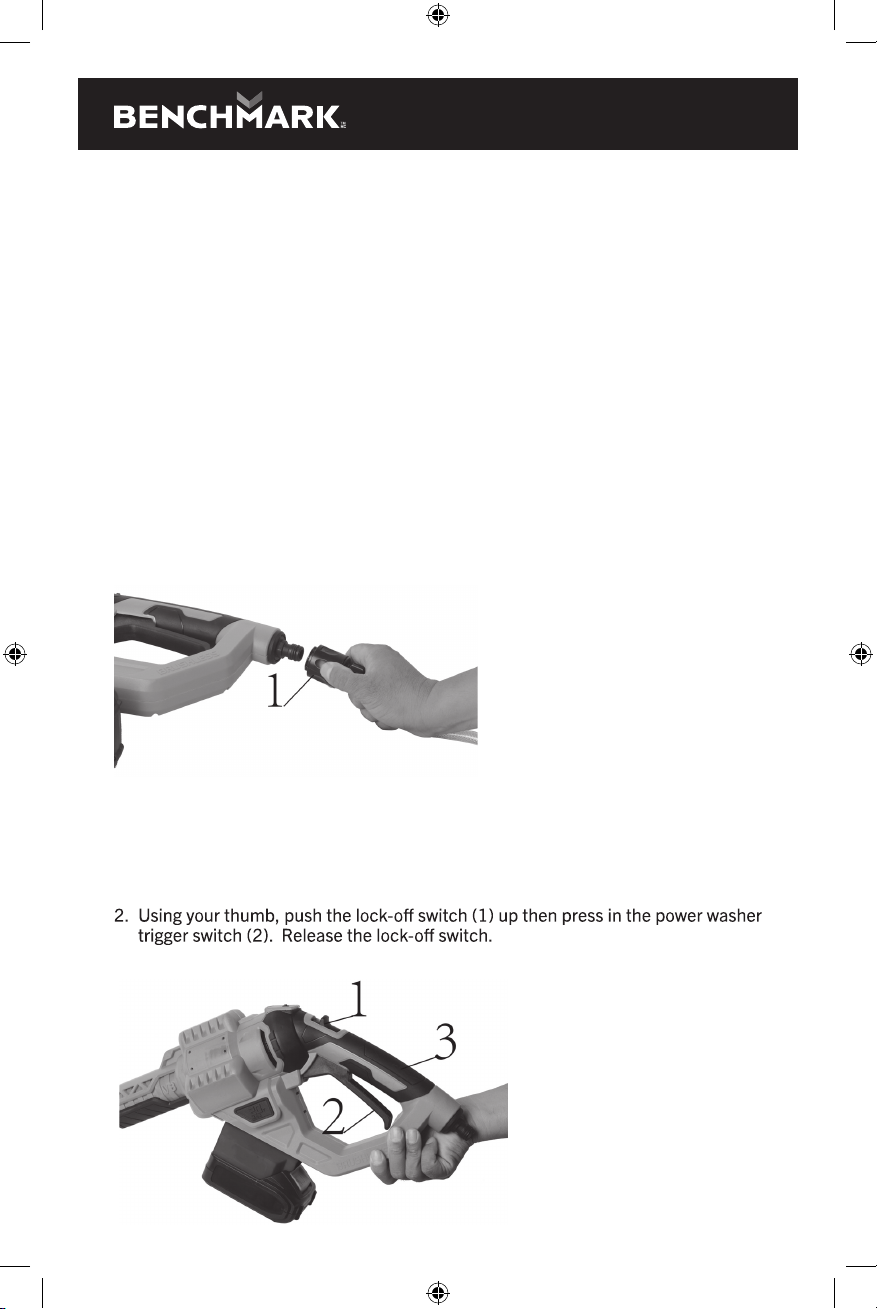
OPERATION
STARTING/STOPPING THE POWER WASHER
1. Grip the power washer by the handle (3) in your preferred hand while balancing
the front of the tool with your other hand.
3. To stop the pressure washer, release the trigger switch (2) Fig. 10.
FIG. 9
FIG. 10
5044-026f EnProdMaunal P_.indd 15 2020-12-17 2:00 PM
IMPORTANT:
You must connect the water to the sprayer before installing the battery
to avoid water entering and damaging the battery.
IMPORTANT:
You must remove the battery before disconnecting the hose to avoid
water entering and damaging the battery.
5044-026
20V MAX BRUSHLESS 2 SPEED POWER WASHER
16
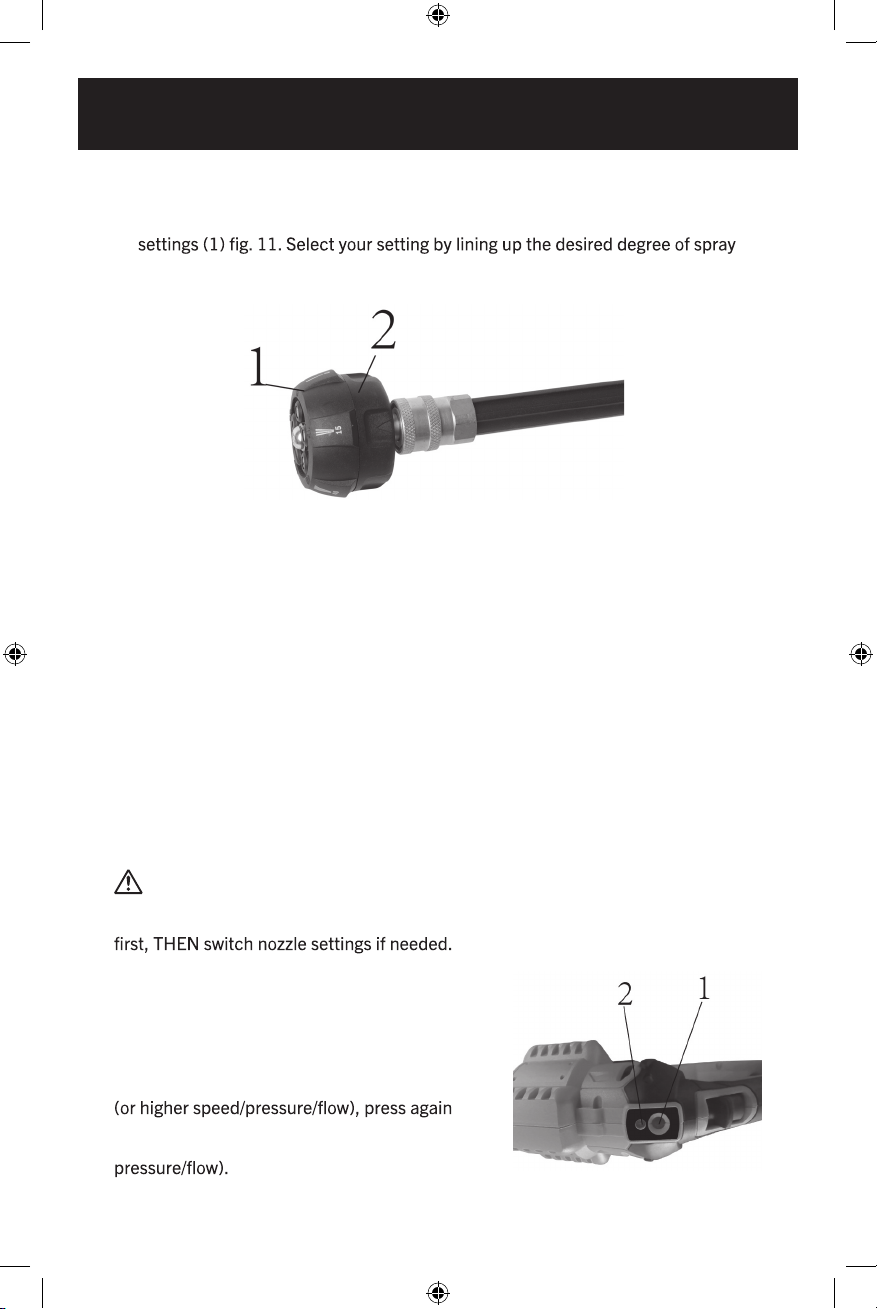
5-POSITION ROTATING NOZZLE ADJUSTMENT
1. The 5-position rotating nozzle can be rotated to select 1 of 5 spray angle
0° to 40°+ with the arrow printed on the rear portion of the nozzle (2) Fig. 11.
2. Please see list below of recommended settings for various cleaning applications.
Setting 1 0°: This delivers a pinpoint stream of pressurized water and is extremely
powerful. It covers a very targeted area. This nozzle should only be
directed at surfaces that can withstand high pressure such as metal
or concrete. Do not use this nozzle to clean wood.
Setting 2 15°: This position is for intense cleaning or stripping of small areas and
surface preparation such as removing dirt, mildew, or paint. This should
only be used on areas and materials that can withstand high pressure
Setting 3 0°+: This position delivers the narrowest degree of spray and should
only be used on areas that can withstand high pressure such
as metal or concrete.
Setting 4 40°: This nozzle delivers a 40-degree spray pattern and a less powerful
stream of water. This nozzle can cover a wide area and can be used for
most general cleaning jobs.
Setting 5 40+°: This nozzle delivers the widest degree spray pattern and can
be used for most general cleaning jobs.
WARNING: To avoid injury and damage ensure you are using the correct
nozzle setting for the job. To minimize surface damage, always use the lowest-
pressure nozzle that will do the job. If you need a stronger spray, adjust distance
SPEED (PRESSURE) ADJUSTMENT
The speed (pressure) adjustment button is located
on the top of the machine (1) Fig.12. To select
desired speed (pressure), press the button (1)
and the indicator (2) will change color depending
on the setting selected. Red is the higher setting
and the indicator will change to green which
is the regular setting (lower speed,
FIG. 11
FIG. 12
5044-026f EnProdMaunal P_.indd 16 2020-12-17 2:00 PM

17
MAINTENANCE
WARNING: When servicing, use only identical replacement parts.
Use of any other parts may create a hazard or cause product damage.
WARNING: Always wear safety goggles or safety glasses with side shields
during power tool operation or when blowing dust. If operation is dusty, also
wear a dust mask.
WARNING: To avoid serious personal injury, always remove the battery
pack from the product when cleaning or performing any maintenance.
Avoid using solvents when cleaning plastic parts. Most plastics are susceptible
to damage from various types of commercial solvents and may be damaged by
their use. Use clean clothes to remove dirt, dust, oil, grease, etc.
WARNING:
products, penetrating oils, etc., come in contact with plastic parts. Chemicals
can damage, weaken or destroy plastic which may result in serious personal injury.
STORAGE
Clean all foreign material from the brushless power washer.
IMPORTANT
Store indoors in a place that is inaccessible to children.
Keep away from corrosive agents such as garden chemicals and de-icing salts.
5044-026f EnProdMaunal P_.indd 17 2020-12-17 2:00 PM

1
2
3
4
5
6
7
8
9
10
11
12
13
15
16
14
19
18 17
20
21
24
26
27
28
22
23
25
31
30
30
32
33
34
34
29
5044-026
20V MAX BRUSHLESS 2 SPEED POWER WASHER
18
EXPLODED VIEW
5044-026f EnProdMaunal P_.indd 18 2020-12-17 2:00 PM

19
EXPLODED VIEW
21-1
21-2
21-3
21-4
21-5
21-6
21-7
21-8
21-9
21-10
21-11
21-12
21-13
21-14
21-15
21-16
21-17
21-18
21-19
21-20
21-21
21-20
21-20
5044-026f EnProdMaunal P_.indd 19 2020-12-17 2:00 PM
Table of contents
Other Benchmark Pressure Washer manuals


