Beper 90.506 Quick guide

• ESSICCATORE - MANUALE DI ISTRUZIONI
• FRUIT DRYER - USE INSTRUCTIONS
• DÉSHYDRATEUR DE FRUITS - MANUEL D’INSTRUCTIONS
• OBST-DÖRR-AUTOMAT - BETRIEBSANLEITUNG
• DESHIDRATADOR DE FRUTAS - MANUAL DE INSTRUCCIONES
Cod.: 90.506

ITALIANO
ENGLISH
FRANÇAIS
DEUTSCH
ESPAÑOL
pag. 3
pag. 8
pag. 13
pag. 18
pag. 23
For further information and/or for instructions for use in other languages, please visit:
beper.com

3
Essiccatore Manuale di istruzioni
Gentile Cliente,
Prima di utilizzare l’apparecchio, legga attentamente le seguenti istruzioni.
Collegamento alla rete
Assicuratevi che la tensione d’alimentazione corrisponda alla tensione indicata sulla targhetta porta
dati dell’apparecchio. Questo prodotto è conforme alle direttive vincolanti per l’etichettatura CE.
Descrizione
1. Motore
2. Cavo di alimentazione con spina
3. Rastrelliere d’essiccazione
4. Coperchio
5. Interruttore
6. Termostato
Importanti cenni di sicurezza
● Ricordatevi che le superci dell’alloggiamento si riscaldano durante l’uso.
● Evitate sempre che il cavo di alimentazione tocchi le superci calde.
● Questo apparecchio non è previsto per l’utilizzo da parte di persone (bambini compresi) con
ridotte capacità siche, sensoriali o mentali, o con scarsa esperienza o conoscenza, a meno che
non siano adeguatamente sorvegliate o istruite sull’uso dell’apparecchio dalla persona responsabile
della loro sicurezza.
● È necessario sorvegliare che i bambini non giochino con l’apparecchio.
● Per evitare di danneggiare l’alloggiamento, non ponete l’apparecchio sopra o vicino a superci
scottanti, amme nude o vapori inammabili.
● Non tirate mai sul cavo di alimentazione quando disinserite la spina dalla presa di corrente.
● Il livello di rumorosità non supera i 70dB (A).
● Per soddisfare le norme di sicurezza ed evitare ogni pericolo, ogni riparazione di un apparecchio
elettrico - compresa la sostituzione del cavo di alimentazione - dev’essere compiuta da personale
specializzato. Nel caso in cui l’apparecchio richieda una riparazione, rinviatelo ad uno dei nostri
Centri Assistenza Clientela. Ne troverete gli indirizzi in appendice al presente manuale.
● Questo apparecchio è destinato ad uso esclusivamente domestico e non è inteso per uso com-
merciale.
Primo utilizzo
Potrebbe succedere, quando l’apparecchio viene acceso per la prima volta, che esali un leggero
odore. Tale fenomeno è normale e durerà poco tempo. Sarebbe utile lasciar riscaldare vuoto per
30 minuti, prevedendo una sufciente ventilazione. Pulite poi accuratamente l’apparecchio (vedi
Pulizia e manutenzione in generale qui sotto).
Rastrelliere d’essiccazione
Secondo la quantità di cibo da essiccare, è possibile utilizzare no a cinque rastrelliere alla volta.
Informazioni generali:
Gli alimenti od ortaggi da essiccare dovrebbero essere maturi, freschi, sani e puliti.
Gli alimenti secchi conservano il loro sapore e il loro valore nutritivo e non perdono il loro contenuto
minerale.

4
Essiccatore Manuale di istruzioni
Una volta essiccati si possono facilmente conservare per parecchi anni, comunque è essenziale
utilizzare esclusivamente frutti od ortaggi, ecc. maturi, freschi, sani e puliti.
Dovendo essiccare frutti, toglietene sempre l’intero torsolo, il gambo e il nocciolo (tranne per le cilie-
gie). Non sbucciate il frutto prima di essiccarlo. L’utilizzo del succo di limone prima del processo di
essiccazione impedirà l’ossidazione (cioè il diventare marrone) del frutto.
Funzionamento
- La temperatura è regolabile, la temperatura massima raggiunta durante il funzionamento è di circa
70°C.
- I frutti od ortaggi da essiccare dovrebbero essere tagliati a pezzettini sottili, di taglia e spessore
uniformi.
- Spargete uniformemente gli alimenti da essiccare sopra ad ogni rastrelliera d’essiccazione. Per
assicurare un’adeguata circolazione dell’aria, badate che i pezzi non si tocchino.
- Quando sono in uso parecchie rastrelliere d’essiccazione, la temperatura di funzionamento viene
abbassata, dalla base verso la cima dell’apparecchio e, di conseguenza, viene aumentato il tempo
d’essiccazione sulle rastrelliere superiori.
- Riponete il coperchio sull’apparecchio, inserite la spina in una presa di corrente idonea e accen-
dete l’apparecchio (segnate l’ora al momento dell’accensione).
- Una volta sufcientemente essiccati gli alimenti posti sopra alle rastrelliere inferiori, occorrerà
togliere le rastrelliere inferiori. Per riempire di nuovo con alimenti freschi una rastrelliera, occorrerà
inserire la stessa nella posizione superiore. La posizione delle rastrelliere d’essiccazione si può
modicare in qualsiasi momento.
NON METTERE FRUTTA E/O VERDURA SOPRA IL FORO CENTRALE DELLA RASTRELLIERA
Conservazione degli alimenti secchi
Prima di mettere da parte gli alimenti essiccati, vericate che gli stessi siano assolutamente secchi
e completamente raffreddati dopo il processo di essiccazione: ciò è essenziale per una buona con-
servazione.
E’ anche importantissimo impedire che gli alimenti secchi assorbano umidità durante la loro con-
servazione. Le lattine, bottiglie di vetro o sacchetti di plastica dovrebbero essere ermeticamente
chiusi. Il metodo migliore sarebbe l’utilizzo d’un sigilla sacchetti termoelettrico per saldare i sacchetti
contenenti alimenti secchi. Non esponete gli alimenti secchi alla luce; conservateli piuttosto al buio.
Quando vengono usati gli alimenti secchi
I frutti od ortaggi secchi dovrebbero essere lasciati in acqua tiepida (badate che siano interamente
ricoperti dall’acqua) e lasciati a bagno per una notte. Alle zuppe o salse si possono aggiungere or-
taggi o erbette secchi, senza preliminarmente reidratarli.
Frutti, ortaggi o erbette secchi si possono utilizzare in vari modi nella preparazione di cibo. Ne tro-
verete i dettagli riferendovi alle informazioni contenute nei libri di cucina.
Manutenzione generale e pulizia
● Assicuratevi , prima di pulirlo, che l’apparecchio sia disinserito dalla presa di corrente e comple-
tamente freddo.

5
Essiccatore Manuale di istruzioni
● Non pulite l’apparecchio con acqua né immergetelo in acqua; pulitelo con un panno non lanugi-
noso, leggermente umido.
- Le rastrelliere d’essiccazione e il coperchio si potranno pulire con un panno umido, usando even-
tualmente un detergente leggero. Le rastrelliere d’essiccazione sono lavabili in lavastoviglie.
Tempi di essicazione
I tempi d’essiccazione elencati qui sotto sono approssimativi e dipendono dalla taglia, la consisten-
za e la quantità di carico.

6
Essiccatore Manuale di istruzioni
Dati tecnici
Potenza 245W
Alimentazione 220-240V – 50/60Hz
In un’ ottica di miglioramento continuo Beper si riserva la facoltà di apportare modiche e
migliorie al prodotto in oggetto senza previo preavviso.
Il simbolo del cestino barrato riportato sull’apparecchio indica che il prodotto, alla ne
della propria vita utile, dovendo essere trattato separatamente dai riuti domestici, deve
essere conferito in un centro di raccolta differenziata per apparecchiature elettriche ed
elettroniche oppure riconsegnato al rivenditore al momento dell’acquisto di una nuova ap-
parecchiatura equivalente.
L’adeguata raccolta differenziata per l’avvio successivo dell’apparecchio al riciclaggio, al trattamen-
to e allo smaltimento ambientalmente compatibile contribuisce ad evitare possibili effetti negativi
sull’ambiente e sulla salute e favorisce il recupero dei materiali di cui è composto.
L’utente è responsabile del conferimento dell’apparecchio a ne vita alle appropriate strutture di
raccolta. Per informazioni più dettagliate inerenti i sistemi di raccolta disponibili, rivolgersi al servizio
locale di smaltimento riuti, o al negozio dove è stato effettuato l’acquisto.
Chiunque abbandona o cestina questo apparecchio e non lo riporta in un centro di raccolta differen-
ziata per riuti elettrici-elettronici è punito con la sanzione amministrativa pecuniaria prevista dalla
normativa vigente in materia di smaltimento abusivo di riuti

CERTIFICATO DI GARANZIA
Questo apparecchio è stato controllato in fabbrica. La garanzia di applicazione è valida 24 mesi
dalla data di acquisto per difetti di materiale o di fabbricazione.
La garanzia è valida unicamente presentando il certicato di garanzia e il documento di
acquisto (scontrino scale) che certichi la data di acquisto e il nome del modello dell’appa-
recchio acquistato.
Se l’apparecchio dovesse richiedere assistenza tecnica rivolgersi al venditore o presso la nostra
sede. Questo per conservare inalterata l’efcienza del vostro apparecchio e per NON invalidare la
garanzia. Eventuali manomissioni dell’apparecchio da parte di personale non autorizzato invalide-
ranno automaticamente la garanzia.
Condizioni di garanzia
Se ci sono guasti a causa di difetti di materiale e/o fabbricazione durante il periodo di garanzia,
garantiamo la riparazione del prodotto gratuitamente, a patto che:
- l’apparecchio sia stato usato in modo corretto ed ai ni per cui è stato costruito;
- l’apparecchio non sia stato manomesso: il prodotto non è manutenzionabile.
- venga presentato lo scontrino;
- non rientrano in garanzia le parti che dimostrano un normale logoramento.
Sono quindi escluse tutte le parti che hanno subito rotture accidentali o che sono soggette ad usura
(tra le quali lampade, batterie, resistenze) le parti estetiche e difetti derivanti da un utilizzo non do-
mestico dell’apparecchio, negligenza nell’uso, incuria, istallazione errata o impropria o nella manu-
tenzione, danni da trasporto e tutti quei danni non imputabili direttamente al produttore.
Se entro il periodo di garanzia emerge un difetto che non può essere riparato, l’apparecchio viene
cambiato gratuitamente.
In ogni caso, se la parte da sostituire per difetto, rottura o malfunzionamento è un accessorio e/o
una parte staccabile del prodotto, Beper si riserva la facoltà di sostituire solo il pezzo interessato e
non l’intero prodotto.
Assistenza tecnica
Anche dopo il periodo di garanzia prestiamo molta attenzione alle riparazioni.
Per l’assistenza tecnica e/o riparazioni fuori dal periodo di garanzia ci si può rivolgere direttamente
all’indirizzo sottostante.
BEPER SRL
Via Salieri, 30
37050 - Vallese di Oppeano - Verona
Tel. 045/7134674 – Fax 045/6984019
e-mail: assistenza@beper.com

Fruit dryer Use instructions
8
Before using the appliance, please read the following instructions carefully.
Connection to the mains supply
Make sure that the supply voltage corresponds to the voltage marked on the rating label. This pro-
duct complies with all binding CE labelling directives.
Product description
1. Housing
2. Power cord with plug
3. Drying-racks
4. Lid
5. On/Off switch
6.Termostat
Important safety instructions
● Remember that the surfaces of the housing become hot during use.
● Do not allow the power cord to touch hot surfaces.
● This appliance is not intended for use by any person (including children) with reduced physical,
sensory or mental capabilities, or lacking experience and knowledge, unless they have been given
supervision or instruction concerning the use of the appliance by a person responsible for their
safety.
● Children should be supervised to ensure that they do not play with the appliance.
● To prevent the housing from being damaged, do not position the appliance on or near hot surfaces,
open ames or inammable vapours.
● When removing the plug from the wall socket, never pull on the power cord.
● The noise level does not exceed 70dB(A).
● In order to comply with safety regulations and to avoid hazards, repairs of electrical appliances
must be carried out by qualied personnel, including the replacement of the power cord. If repairs
are needed, please send the appliance to one of our customer service departments. The addresses
can be found in the appendix to this manual.
● The fruit dryer is intended for domestic use only and not for commercial applications.
Before using the appliance for the rst time
When the appliance is switched on for the rst time, a slight smell may be emitted. This is normal
and will only last for a very short time. It will help to let the empty appliance heat up for 30 minutes,
ensuring sufcient ventilation. Afterwards clean the unit thoroughly (see General Care and Cleaning
below).
Drying-racks
Depending on the quantity of food to be dried, up to ve racks can be used at the same time.

ENGLISH
Fruit dryer Use instructions
9
General information:
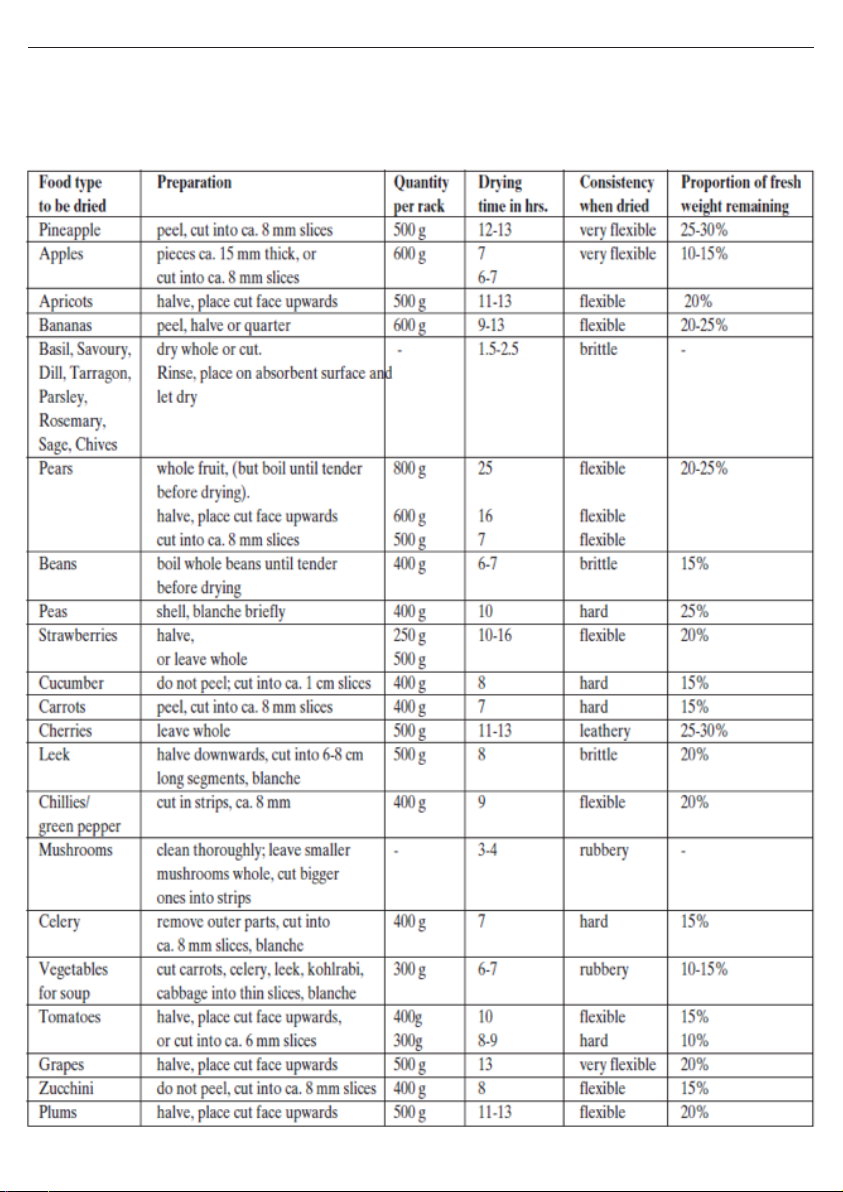
The food or vegetables to be dried should be ripe, fresh, healthy and clean.
Dried foods keep their avour and nutritional value, and they do not lose their mineral
content. Once dried, they can be stored easily for many years, but it is imperative to use
only ripe, fresh, healthy and clean fruit or vegetables etc.
When drying fruit, always remove the entire core, stems and stones (with the exception
of cherries). Do not peel the fruit before drying. The use of lemon juice prior to the drying
process prevents the fruit from discolouring (i.e. turning brown).
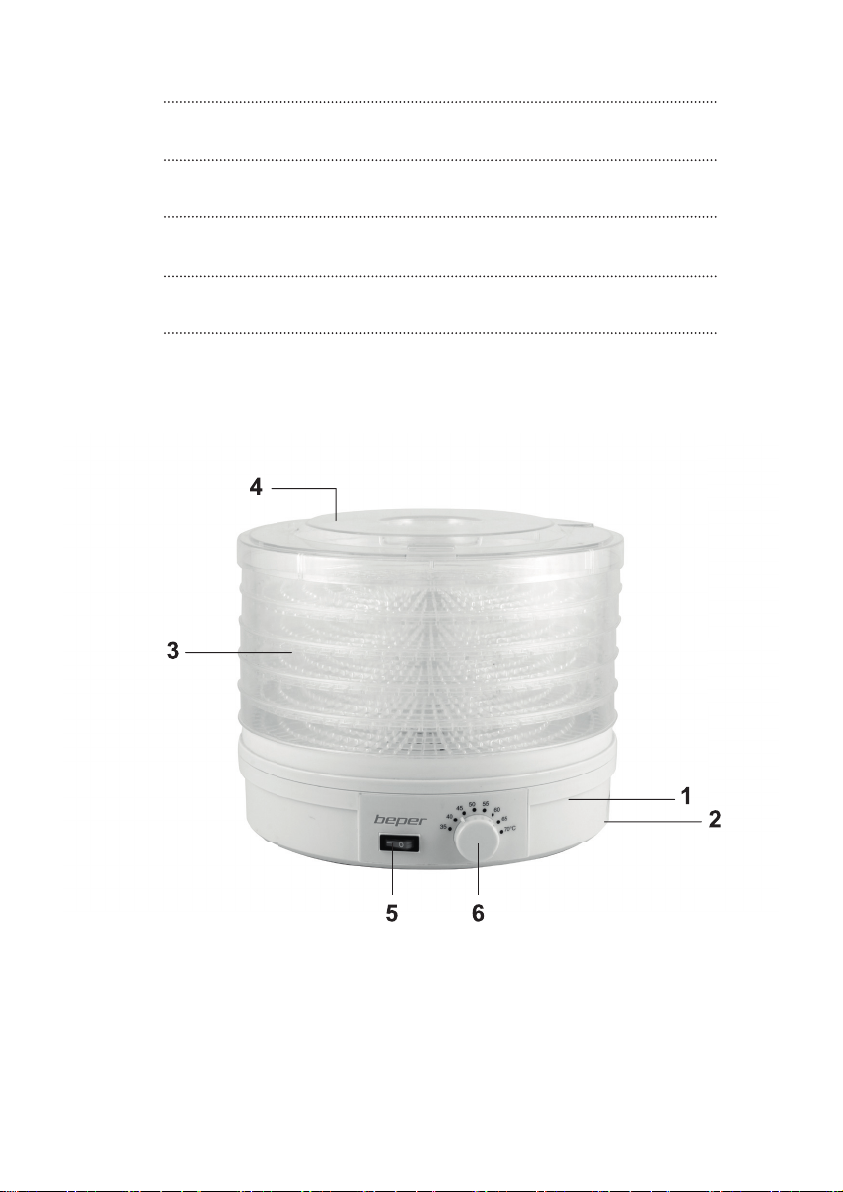
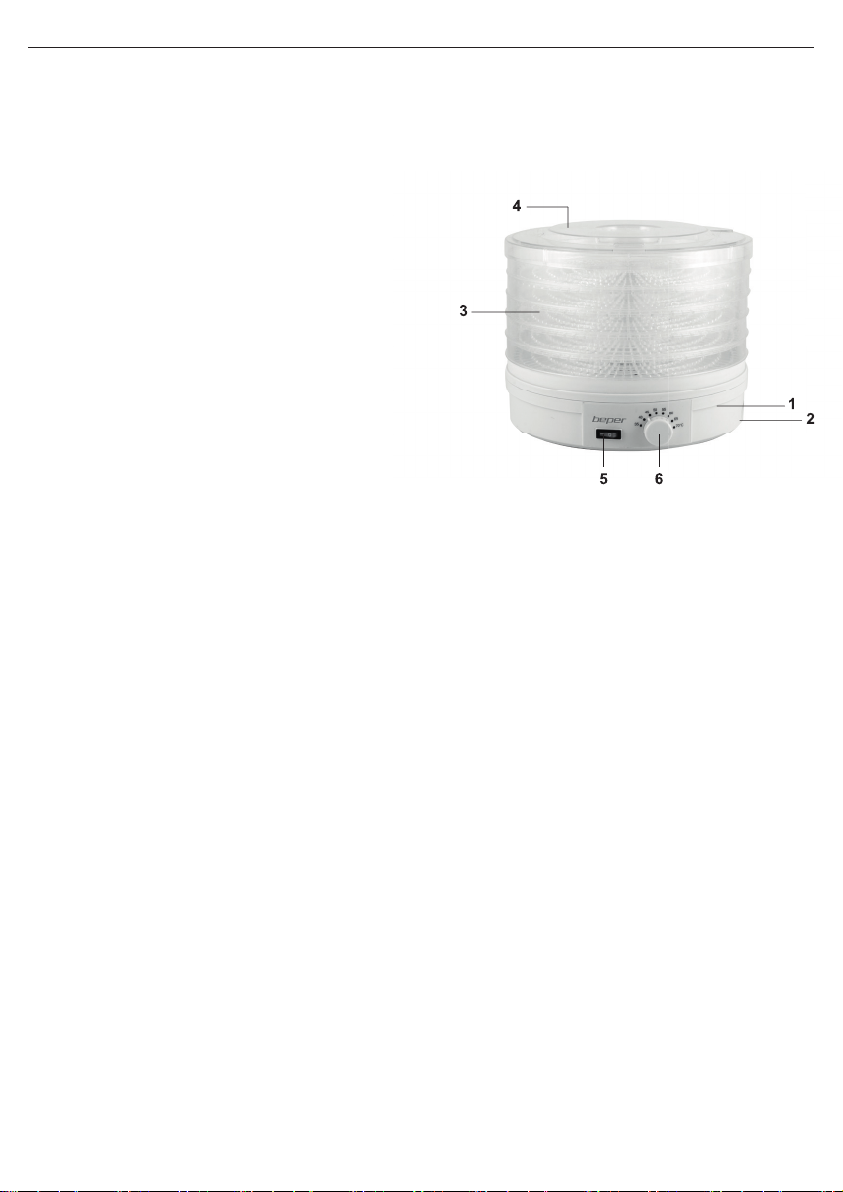
Operation
Temperature is adjustable, the maximum temperature reached during operation is around 70°C.
- The fruit or vegetables to be dried should be cut into thin pieces of regular size and thickness.
- Spread the items to be dried evenly across each drying-rack. To ensure proper air circulation, make
sure that the pieces do not touch each other.
- When using several drying-racks, the operating temperature decreases from the bottom to the top
of the appliance;
accordingly, the drying time on the upper racks will increase.
- Replace the lid on the unit, insert the plug into a suitable wall socket and switch the unit on (note
the time when switching on).
- Once the food items on the lower racks are sufciently dried, the lower racks should be removed.
Should you wish to re-ll an emptied rack with fresh items, the rack should be inserted in the top
position. The position of the drying-racks may be changed at any time.
DO NOT COVER THE HOLE OF THE RACK WITH FRUIT AND/OR VEGETABLES.
Storing dried food
Before the dried food items are stored, make sure that they are absolutely dry, and that they have
cooled down completely after the drying process: this is essential for proper storage.
It is also of great importance that dried food is prevented from absorbing humidity during storage.
Any storage tins, glasses or plastic bags should be sealed airtight. The preferred method is the use
of an electric heat bag sealer to seal the bags containing the dried food. Do not expose dried food
to light, but keep them in a dark location.
When the dried food items come to be used
Dried fruit and vegetables should be left in lukewarm water (make sure they are entirely covered
by water) and oaked overnight. For soups or sauces, dried vegetables and herbs may be added
without soaking them rst.
Dried fruit, vegetables and herbs may be used in various ways when preparing food.
For details, please refer to the information available in cook books.
General Care and Cleaning
● Before cleaning the appliance, ensure it is disconnected from the power supply and has cooled
down completely.
● Do not clean the appliance with water, and do not immerse it in water, but clean it with a slightly
damp, lint-free cloth.
- The drying-racks and the lid may be cleaned with a damp cloth, using a mild detergent if necessary.
The drying-racks are dish-washer safe.

10
Fruit dryer Use instructions
Drying times
The drying times listed below are approximate times and depend on the size, consistency and load
quantity.

11
Fruit dryer Use instructions
Technical data
Power 245W
Power supply: 220-240V ~50/60Hz
For any improvement reasons, Beper reserves the right to modify or improve the product
without any notice.
The European directive 2011/65/EU on Waste Electrical and Electronic Equipment (WEEE),
requires that old household electrical appliances must not be disposed of in the normal
unsorted municipal waste stream. Old appliances must be collected separately in order to
optimize the recovery and recycling of the materials they contain, and reduce the impact on
human health and the environment. The crossed out “wheeled bin” symbol on the product
reminds you of your obligation, that when you dispose of the appliance, it must be separa-
tely collected.

CONTACT YOUR DISTRIBUTOR IN YOUR COUNTRY OR AFTER SALES DEPARTMENT
BEPER. E-MAIL assistenza@beper.com
WHICH WILL FORWARD YOUR ENQUIRIES TO YOUR DISTRIBUTOR.
GUARANTEE CERTIFICATE
This appliance has been checked in the factory. From the date of original purchase a 24 month
guarantee applies to material and production defects. The purchase receipt and the guarantee cer-
ticate must be submitted together in case of claim to guarantee.
The guarantee is valid only with a guaranty certicate and proof of purchase (scal receipt)
indicating the date of purchase and the model of the appliance
For any technical assistance, please contact directly the seller or our head ofce in order to preserve
the appliance’s efciency and NOT TO void the guarantee. Any intervention on this appliance by
non-authorized persons will automatically void the guarantee.
Guarantee conditions
If the appliance shows defects as a result of faulty material and/or production during the period of
guarantee, we guarantee repair free of charge on condition that:
- The appliance has been used properly and for the purpose for which it has been intended.
- The appliance has not been tampered with, otherwise it is not maintainable.
- The purchase receipt shall be presented.
- The appliance showing a fair wear and tear shall not be covered by this guarantee.
Therefore, any part that could be accidentally broken or having visible signs of use in consumable
products (such as lamps, batteries, heating elements…) the aesthetic parts are excluded from the
guarantee, and any defect whatsoever resulting from non-respect of the rules for use, negligence in
usage and/or maintenance of the appliance, carelessness, wrong or improper installation, damage
during transport and any other damage not attributable the supplier.
For every defect that could not be repaired within the guarantee period, the appliance will be repla-
ced free of charge.
In any case, if the part to be replaced for defect, breakage or malfunction is an accessory and/or a
detachable part of the product, Beper reserves the right to replace only the very part in question and
not the entire product
Technical assistance
Even after the guarantee period we will always pay attention to repairs for defected appliances.
For technical assistance and/or repairs after the guarantee period you can directly contact the below
address:

FRANÇAIS
Déshydrateur de fruits Manuel d’instructions
13
Chère cliente, Cher client,
Veuillez lire le mode d’emploi attentivement.
Branchement sur la prise secteur
Vériez que votre installation électrique correspond bien à celle indiquée sur la che signalétique de
l’appareil. Ce produit est conforme à toutes les directives relatives au marquage “CE”.
Familiarisez-vous avec votre appareil
1. Boîtier
2. Câble d’alimentation avec che
3. Râteliers de déshydratation
4. Couvercle
5. Interrupteur
6. Thermostat
Importantes consignes de sécurité
● Souvenez-vous que les surfaces du boîtier chauffent pendant l’emploi.
● Ne laissez pas le câble toucher les surfaces chaudes de l’appareil.
● Cet appareil ne doit pas être utilisé par une personne (y compris un enfant) souffrant d’une dé-
cience physique, sensorielle ou mentale, ou manquant d’expérience ou de connaissances, sauf si
cette personne a été formée à l’utilisation de l’appareil par une personne responsable de sa sécu-
rité, ou est surveillée par celle-ci.
● Les enfants doivent être surveillés an qu’ils ne jouent pas avec l’appareil.
● Pour éviter d’endommager le boîtier, abstenez-vous d’installer l’appareil sur ou à proximité de
toute surface brûlante, amme nue ou vapeur inammable.
● Pour retirer le câble de la prise murale, ne tirez jamais dessus mais servez-vous de la che.
● Le niveau sonore est inférieur à 70 dB(A).
● An de se conformer aux règlements et d’éviter des risques, seul un personnel qualié doit ef-
fectuer des réparations d’appareils électriques, y compris le remplacement du câble électrique. En
cas de panne, envoyez l’appareil à un de nos services clients. Vous trouverez les adresses dans
l’annexe de ce manuel.
● Ce déshydrateur de fruits a été conçu exclusivement pour l’usage ménager et n’est pas destiné
à un usage professionnel.
Avant la première utilisation l’appareil
Il est possible, lorsque l’appareil est utilisé pour la première fois, qu’une légère odeur s’en dégage.
Ce phénomène est normal et sera de courte durée. Il serait utile de laisser l’appareil se refroidir à
vide pendant 30 minutes, en prévoyant une aération sufsante. Nettoyez ensuite soigneusement
l’appareil (voir Nettoyage et entretien en général ci-dessous).
Râteliers de déshydratation
Selon la quantité d’aliments à sécher, il est possible d’utiliser jusqu’à cinq râteliers en même temps.

14
Déshydrateur de fruits Manuel d’instructions
Généralités :
Les aliments ou légumes destinés à la déshydratation doivent impérativement être mûrs, frais, sains
et propres.
Les aliments secs conservent leur saveur et leur valeur nutritive et ne perdent pas leur contenu
minéral. Une fois secs, ils peuvent aisément se conserver pendant plusieurs années.
Lorsque vous séchez des fruits, retirez-en toujours le trognon entier, la queue et le noyau (sauf pour
les cerises). N’épluchez pas le fruit avant de le sécher. L’emploi de jus de citron ajouté au processus
de déshydratation empêchera toute altération (c.-à-d. brunissement) du fruit.
Fonctionnement
- La température maximale atteinte pendant le fonctionnement est d’environ 70°C.
- Les fruits ou légumes doivent être coupés en ns morceaux, de taille et d’épaisseur uniformes.
- Disposez uniformément les aliments à sécher sur chacun des râteliers de déshydratation. Pour
assurer la circulation d’air appropriée, ne permettez pas aux morceaux de se toucher.
- L’utilisation de plusieurs râteliers de déshydratation entraînera une baisse de la température de
service, de la base vers le sommet de l’appareil et, prolongera le délai de déshydratation sur les
râteliers supérieurs.
- Reposez le couvercle sur l’appareil, insérez la che dans une prise de courant appropriée et allu-
mez l’appareil (notez l’heure de mise en circuit).
- Une fois que les aliments disposés sur les râteliers inférieurs seront sufsamment secs, il convien-
dra de retirer les râteliers inférieurs. Pour remplir de nouveau d’aliments frais un râtelier, il convien-
dra d’insérer ce dernier dans la position supérieure. La position des râteliers de déshydratation peut
être à tout moment modiée.
NE METTEZ PAS DE FRUIT OU DE LÈGUME AU-DESSUS DE LE TROU CENTRAL DES PLATS
EN PLASTIQUE
Entreposage des aliments secs
Avant d’entreposer les aliments secs, vériez que ceux-ci sont absolument secs et ont complète-
ment refroidi après le processus de déshydratation : ceci est indispensable pour assurer leur bon
entreposage.
Il est également très important d’empêcher les aliments secs d’absorber de l’humidité pendant
l’entreposage. Les boîtes en fer blanc, acons en verre ou sachets en plastique devraient être
hermétiquement scellés. La méthode la plus appropriée consisterait à utiliser un soude-sac ther-
moélectrique pour souder les sachets contenant des aliments secs. N’exposez pas les aliments
secs à la lumière ; entreposez-les plutôt dans un endroit obscur.
Utilisation des aliments secs
Les fruits ou légumes secs doivent être laissés dans de l’eau tiède (veillez à ce qu’ils soient intégra-
lement immergés) et macérés pendant une nuit. Des nes herbes ou légumes secs peuvent être
ajoutés aux potages ou sauces sans qu’il soit nécessaire de les faire préalablement macérer.
Les fruits, nes herbes ou légumes secs peuvent être utilisés de plusieurs façons dans les prépa-
rations alimentaires. Les explications détaillées gurent parmi les informations contenues dans vos
livres de recettes.

15
Déshydrateur de fruits Manuel d’instructions
Entretien et nettoyage en général
● Assurez-vous, avant tout nettoyage, que l’appareil soit débranché de la source d’alimentation et
qu’il soit complètement refroidi.
● Abstenez-vous de laver l’appareil avec de l’eau ou de l’immerger dans l’eau; nettoyez-le à l’aide
d’un chiffon non pelucheux, légèrement humide.
Les râteliers de déshydratation et le couvercle pourront être nettoyés à l’aide d’un chiffon humide
et, éventuellement, d’un léger détergent. Les râteliers de déshydratation sont étudiés pour le lave-
vaisselle.
Délais de déshydratation
Les délais de déshydratation énumérés ci-dessous sont approximatifs et dépendent de la taille, la
consistance et la quantité de la charge.

16
Déshydrateur de fruits Manuel d’instructions
DONNEES TECHNIQUES
Puissance 245W
Alimentation 220-240V ~ 50/60Hz
Dans un soucis d’amélioration permanent Beper se réserve le droit d’apporter des modica-
tions et améliorations au produit sans aucun préavis.
Le symbole indique que le produit répond aux normes requises par les nouvelles
directives introduites en faveur de l’environnement (2011/65/EU) et que le produit doit être
détruit de façon appropriée au terme du cycle de vie.
Si besoin, informez-vous auprès des autorités locales compétentes en matière d’élimina-
tion des déchets de votre commune.
Toute personne qui ne tiendra pas compte de ces règles d’élimination des déchets indi-
quées dans ce paragraphe en répondra selon la loi en vigueur.

LE SERVICE APRÈS-VENTE EST EFFECTUÉ PAR VOTRE REVENDEUR OU PAR
L’IMPORTATEUR/DISTRIBUTEUR DES PRODUITS BEPER.
ÉCRIVEZ UN E-MAIL AU assistenza@beper.com POUR CONNAITRE LE CENTRE SERVICE
AGRÉE BEPER LE PLUS PROCHE DE CHEZ VOUS.
CERTIFICAT DE GARANTIE
Cet appareil a été contrôlé en usine. La garantie est valable 24 mois à partir de la date d’achat pour
tout défaut de matériel ou de fabrication. En cas de réclamation, le ticket de caisse et la garantie
devront être présentés ensemble.
La garantie est valide seulement si vous montrez le certicat de garantie et la récépissé
d’achat qui doit demontrer la date de l’achat et le nom du model acheté.
En cas de besoin et pour toute assistance technique, veuillez contacter votre revendeur ou vous
adresser à notre siège. Cela vous permettra de conserver votre appareil dans de meilleures con-
ditions et de NE PAS invalider la garantie. Toute manipulation de l’appareil par une personne non
autorisée ou non qualiée annulera automatiquement la garantie.
Conditions de garantie
Pendant la durée de garantie, si des pannes provenant d’un défaut de materiel et/ou de fabrication
apparaissent, nous assurons gratuitement la réparation aux conditions énoncées ci-dessous :
- l’appareil a été correctement utilisé et ce uniquement à l’usage pour lequel il a été fabriqué ;
- L’appareil ne doit pas être etait altéré: on ne peux pas remédier l’appareil.
- la présentation du ticket de caisse est obligatoire;
- les pièces présentant les signes évidents d’usure ne sont pas pris en compte dans la garantie.
En conséquence, sont exclus de la garantie toutes les pièces qui auraient subi des dommages
accidentels ou présentant des signes d’usure normale (parmi lesquelles, ampoules, batteries, pi-
les, résistances), les accessoires esthétiques, toutes les pièces comportant des défauts dus à la
non utilisation domestique, la négligence dans la manipulation, insouciance, incorrecte ou impropre
installation et l’entretien, les dommages lors du transport et tous les dommages non imputables
directement au producteur.
Si un défaut survient lors de la période de garantie et ne peut être réparé, l’appareil sera remplacé
gratuitement.
Si la partie qui doit être remplacer parce que ne marche pas bien ou puor défaut ou rupture est
une pièce détachée ou un accessoire, Beper remplacera seulement l’accessoire/la pièce mais non
l’appareil entier.
Assistance technique
Même après la n de la garantie, nous accordons toujours une grande importance à la reparation.
Pour toute assistance technique et/ou reparations en dehors de la garantie, veuillez vous adresser
directement à l’adresse ci-desous :

18
Obst-Dörr-Automat Betriebsanleitung
Liebe Kundin, lieber Kunde,
bitte lesen Sie die Gebrauchsanweisung aufmerksam durch.
Anschluss
Die Netzspannung muss der auf dem Typenschild des Gerätes angegebenen Spannung entspre-
chen. Das Gerät entspricht den Richtlinien, die für die CEKennzeichnung verbindlich sind.
Aufbau
1. Gehäuse
2. Anschlussleitung
3. Auageroste
4. Deckel
5. Ein/Aus-Schalter
6. Thermostat
Sicherheitshinweise
● Die Gehäuseoberächen sind bei Betrieb heiß.
● Die Anschlussleitung darf heiße Geräteteile nicht berühren
● Personen (einschließlich Kinder), die aufgrund ihrer physischen, sensorischen oder geistigen
Fähigkeiten oder ihrer Unerfahrenheit oder Unkenntnis nicht in der Lage sind, das Gerät sicher
zu benutzen, sollten dieses Gerät nicht ohne Aufsicht oder Anweisung durch eine verantwortliche
Person benutzen.
● Kinder sollten beaufsichtigt werden, um sicherzustellen, dass sie nicht mit dem Gerät spielen.
● Das Gerät nicht auf heiße Oberächen (z.B. Herdplatte o.ä.) oder in der Nähe von offenen Ga-
sammen abstellen oder benutzen, damit das Gehäuse nicht beschädigt wird.
● Den Netzstecker nicht an der Anschlussleitung aus der Steckdose ziehen.
● Der Schalldruckpegel ist kleiner als 70dB(A).
● Reparaturen an Elektrogeräten müssen von Fachkräften durchgeführt werden, da Sicherheitsbe-
stimmungen zu beachten sind und um Gefährdungen zu vermeiden. Dies gilt auch für den Au-
stausch der Anschlussleitung. Schicken Sie daher im Reparaturfall das Gerät zu unserem Kunden-
dienst. Die Anschrift nden Sie im Anhang der Anweisung.
● Der Obst-Dörr-Automat ist ein Haushaltsgerät und daher nicht für den gewerblichen Betrieb geei-
gnet.
Vor der ersten Inbetriebnahme
Beim ersten Gebrauch kann ein leichter Geruch entstehen, deshalb betreiben Sie das Gerät ca 30
Min. ohne Inhalt. Anschließend das Gerät reinigen (siehe Reinigung und Pege).
Auageroste
Je nach Menge des Dörrgutes können zwischen 1 bis 5 Rosten einsetzt werden.

19
DEUTSCH
Obst-Dörr-Automat Betriebsanleitung
Allgemein:
Verwenden Sie nur reifes, frisches, gesundes und sauberes Dörrgut.
Dörrgut behält seinen guten Geschmack, seinen Nährwert und seine Mineralien. Gedörrtes ist jah-
relang auf einfache Art lagerbar. Verwenden Sie aber nur reifes, frisches, gesundes und sauberes
Dörrgut. Bei Früchten: Bitte Kerngehäuse, Stiele und Kerne entfernen (ausgenommen Kirschen).
Früchte nicht schälen. Früchte vor dem Dörren mit Zitronensaft bestreichen, damit sie nicht braun
werden.
Bedienung
- Die Temperaturbegrenzung bei eingeschaltetem Gerät liegt bei 70°C.
- Schneiden Sie das Dörrgut in gleichmäßig große und dünne Stücke.
- Jedes Auagerost möglichst gleichmäßig mit Dörrgut belegen, ohne das sich das Dörrgut berührt,
damit die Luftzirkulation gewährleistet wird.
- Bei Verwendung von mehreren Auagerosten, vermindert sich die Temperatur nach oben hin (Die
Dörrzeit auf diesen Rosten verlängert sich entsprechend).
- Deckel auegen, den Netzstecker in die Steckdose stecken und das Gerät einschalten (Uhrzeit
notieren).
- Sobald das Dörrgut auf dem unteren Auagerost genügend gedörrt ist, bitte dieses Auagerost
entfernen. Falls gewünscht das Auagerost mit frischen Dörrgut erneut belegen und als oberstes
Auagerost wieder aufsetzen. Es können auch die Auageroste nach Belieben gewechselt werden.
STELLEN SIE KEIN OBST UND KEINE GEMÜSE ÜBER DEM LOCH DER KUNSTSTOFFPLAT-
TE
Aufbewahrung:
Für eine einwandfreie Lagerung ist absolut trockenes und ausgekühltes Dörrgut Vorraus-
setzung.
Dörrgut darf bei Lagerung keine Feuchtigkeit aufnehmen. Bitte luftdichte Vorratsdosen,
Gläser und Kunststoffbeutel verwenden, oder das Dörrgut wird eingeschweißt. Dörrgut
muss vor Licht geschützt werden.
Verwendung:
Dörrfrüchte und Dörrgemüse vor der Verwendung mit lauwarmen Wasser bedecken
und über Nacht einweichen lassen. Bei Suppen oder Saucen das Dörrgemüse und die
Dörrkräuter gleich mitkochen.
Wie und auf welche vielfältige Art Sie Gedörrtes verwenden können, entnehmen Sie bitte
Ihren Kochbüchern.
Reinigung und Pege
● Vor der Reinigung den Netzstecker ziehen und das Gerät abkühlen lassen.
● Das Gerät nicht ins Wasser tauchen, nur mit feuchtem Tuch reinigen.
- Auageroste und Deckel des Gerätes mit angefeuchtetem Tuch (evtl. Unter Beigabe
eines Spülmittels) reinigen. Die Auageroste sind spülmaschinenfest.

20
Obst-Dörr-Automat Betriebsanleitung
Dörrzeiten
Die angegebenen Dörrzeiten sind Richtwerte. Je nach Größe, Beschaffenheit der Stücke und
verwendeten Menge, können sich die Dörrzeiten verändern.
Table of contents
Languages:
Other Beper Dryer manuals