Berkey Filters Berkey Water Filter User manual

WARNING: Read all instructions supplied by the manufacturer prior to
assembling and using your Berkey water lter. This booklet is a supplemental
document only and is not meant to replace the manufacturer’s instructions.
Your Berkey® Water Purier
This booklet contains important
information. Please do not discard.

Copyright © 2015 James Enterprise. All rights reserved. No part of this booklet,
including the interior and cover design, may be reproduced or transmitted in any
form, by any means (electronic, photocopying, recording, or otherwise) without the
prior written permission of the publisher.
Version 2-2: June 2015

Table of Contents
Assembly Instructions...................................................................... 1 – 5
Black Berkey Purification Elements
Priming Tips........................................................................................... 6
Troubleshooting......................................................................................8
Storing the Elements...............................................................................8
Testing the Elements...............................................................................9
Other Tips...............................................................................................9
PF-2 Fluoride and Arsenic Reduction Elements
Priming Tips......................................................................................... 10
Installation Tips................................................................................. .. .11
Troubleshooting.................................................................................... 11
Storing the Elements.............................................................................12
Additional Information
Routine Cleaning and Maintenance................................................ 12-13
Frequently Asked Questions (FAQS)..............................................13-14
Guarantee/Warranty.........................................................................14-16
Returning Your Berkey Water Filter System...................................17-18
Parts and Accessories...................................................................... 19-22
Contact Information..............................................................................23
For further assistance please contact Customer Service:
• 1-800-350-4170
• Live Chat on www.berkeyfilters.com
• Please provide the order/invoice number for prompt service.
Customer Service hours:
Monday through Friday - 7:00AM to 5:00PM (MST)
Saturday - 8:30AM to 5:00PM (MST)
Additional information about the Berkey Water Purifiers is also available
online at http://www.berkeyfilters.com.
My Order/Invoice Number:
23

3
Assembly Instructions
Diagram 1
Berkey Light Model Variation: The Berkey Light includes the Fabric Lid,
Elevated Base (LED Lighted Base is optional), and its own spigot. See the
table on page 4 for spigot assembly instructions.
*Prices are subject to change without notice. *
Upper Chamber for Berkey
Lightt
Lower Chamber for Berkey
Light
Standard Base for Berkey
Light
LED Base for Berkey Light
$65.00
$65.00
$25.00
$91.00
1 22

4
Diagram 3
1. Lid Knob 10. PF-2 Fluoride Element (oponal)
2. Lid 11. Lower Chamber
3. Knob Washer 12. Spigot
4. Knob Screw 13. Spigot Washer (beveled)**
5.Upper Chamber 14. Spigot Washer (flat)**
6. Black Berkey Elements 15. Spigot Hex Nut
7. Element Washer 16. Rubber Base Ring
8. Element Wing Nut
9. Hole Plug*
Do ed line indicates assembly direcon
Diagram 2
*Hole plugs are not included with the Travel Berkey.
**Factory issued spigot washers that are included with all stainless steel
systems.
*Prices are subject to change without notice. *
Sport Berkey Water Bottle
Thinksport Stainless Steel
Water Bottle
Available in 350mL,
500mL, and 750mL.
Berkey Maintenance Kit
Includes 2 scrubbing pads,
1 spigot, 2 wing nuts and
washers, 1 priming button,
2 hole plugs, 1 knob, red
food dye, and instruction
booklet.
Sport Berkey Water Bottle
Replacement Filter
$28.00
$13.00
$15.00 to $19.00
$28.00
221

***If at any time you experience an issue with your system leaking water,
discontinue use, empty the water from both the upper and lower cham-
bers, and contact Customer Service. ***
Note: If you intend on storing your Berkey system for any length of time
instead of using it immediately, test the Black Berkey Elements prior to storing
them. See “Storing the Black Berkey Purification Elements” on page 8 as
well as “Testing the Black Berkey Purification Elements” on page 9 for more
information.
Extreme cleanliness is important. To ensure that contamination of the com-
ponents does not take place during assembly, wash hands and components (but
not the elements) before proceeding.
Step 1—Lid Assembly:
A. Remove the knob washer (3) and knob screw (4) from inside
the lid knob (1).
B. Fit the knob onto the lid (2) by inserting the knob screw (4),
with the knob washer (3), up through the hole in the lid and
screwing on the knob. (Hand tighten only)
Step 2—Spigot/ Lower Chamber Assembly:
Note: Washers vary with spigot type. See the table on page 4 for the factory
issued spigots that are included with the stainless steel systems and the Berkey
Light system. Upgraded spigots, like the Water View Spigot and the Stainless
Steel Spigot, will have their own assembly instructions.
A. Place the outer washer (13) onto the threaded stem of the spigot
(12). The beveled side of the washer should face the lower chamber.
B. Insert stem of the spigot (12) through the hole in the side of the
lower chamber (11).
C. Place the inner washer (14) onto the stem of the spigot within
the chamber.
D. Position the spigot upside down with the outlet facing up.
E. Thread the hex nut (15) onto the stem of the spigot and tighten
securely by hand. Do not use a wrench or other tool to tighten
the hex nut as this may damage the nut or chamber.
*Prices are subject to change without notice. *
$10.00
$10.00
$24.00
$39.00
$64.00
$44.00
Replacement Spigot for
Stainless Steel Systems
Fits all stainless steel
systems
Berkey Light Replacement
Spigot Fits Berkey Light
systems only
Stainless Steel Spigot
Fits all stainless steel
systems
Water View Spigot
Spigot with glass sight
tube. Fits all stainless
steel systems. Sizes vary
based on system model.
Berkey Shower Filter
Shower Filter Replacement
3 20

F. While holding the hex nut (15) firmly in place, finish tightening
by slowly turning the spigot (12) clockwise to the upright position.
Step 3—Prime the Black Berkey Purification Elements.
• Follow the printed instructions provided within element box.
• See also the “Black Berkey Purification Elements Priming Tips”
on page 6 of this booklet.
Step 4—Prime the PF-2 Fluoride and Arsenic Reduction Elements
(optional elements)
• Follow the printed instructions provided with the elements.
• See also the “PF-2 Fluoride and Arsenic Reduction Elements Priming
Tips” on page 10 of this booklet.
• If you have not purchased the optional PF-2 Fluoride and
Arsenic Reduction Elements, proceed to Step 5.
Step 5—Upper Chamber Assembly:
A. Place an element washer (7) onto the stem of a primed Black
Berkey Element (6).
B. Insert the stem of the Black Berkey Element (6) into a hole
within the upper chamber (5).
C. Thread the element wing nut (8) onto the stem of the Black
Berkey Element (6) below the upper chamber and tighten
securely by hand.
D. Repeat steps A - C until all Black Berkey Elements have been
installed.
E. Insert the hole plugs (9) into the remaining holes within the
upper chamber. Note: The optional hole plug (see “Parts and
Accessories” page 19) has two washers and a wing nut. To install,
*Prices are subject to change without notice. *
$107.00
$4.00
$25.00
$54.00
$4.00
$34.00 to $50.00
Black Berkey Replacement
Elements (Set of 2)
Set of 2 Wing Nuts with
Washers for Black Berkey
Elements
Black Berkey Primer
PF-2 Fluoride and Arsenic
Reduction Elements
Optional Hole Plug
Stainless Steel Stand
Elevates stainless steel system 5
inches. Rubberized feet for
extra stability. Fits all stainless
steel systems.
Parts and Accessories
Spigot Type Outer Washer Inner Washer
Standard Spigot (included
with Stainless Steel
System)
Berkey Light Spigot
Beveled Black - Beveled
side toward chamber wall
Beveled White - Beveled
side toward chamber wall
Flat Black
Beveled White - Beveled
side toward chamber wall
419

place one washer on the threaded hole plug stem. Insert the
stem into the upper chamber hole. Place the second washer and
then the wing nut onto the hole plug stem below the upper
chamber and tighten securely by hand.
F. Install the primed PF-2 Fluoride and Arsenic Reduction
Elements (optional) (10) by screwing them onto the threaded
stems of the purification elements, beneath the
element wing nuts (8). Note: Do not turn them more than eight
revolutions as this can damage the elements. See the instruction
sheet provided with the PF-2 elements and also page 11 of
this booklet for installation tips.
G. Place the upper chamber (5) onto the lower chamber (11) and
place the lid (2) in position. (Berkey Light model variation:
The small tabs on the bottom of the upper chamber will fit
under the rim of the lower chamber. Often, an audible “snap”
is heard when the two chambers are put together.)
First Time Operation & After Each Re-Priming:
1. Ensure that the spigot (12) is in the closed position.
2. Fill the upper chamber (5) completely with cold or room tem
perature water and cover with the lid (2).
3. Allow water to filter into the lower chamber (11). A small
amount of water may remain in the upper chamber (5) after
filtration. Please see the “Frequently Asked Questions” section
on page 13 of this booklet for more information.
4. Discard the first batch of filtered water which may contain fine
manufacturing dust that was flushed from the inner core of the
Black Berkey Elements.
5. Refill the upper chamber. (5)
6. Test your system to ensure it is working properly. See “Testing
the Black Berkey Purification Elements” on page 9.
7. Your Berkey system is now ready to use.
Note: The Black Berkey Elements may take up to 15 minutes to begin
dripping. Maximum flow rate will be achieved after the initial 12-24 hours of
use as micro air pockets within the purification elements are replaced with
water.
B. Remove the hex nut (15) and the spigot from the inside of
the lower chamber (11) and screw the hex nut back onto the
spigot (12) with the washers (13, 14) attached.
C. Leave the rubber base ring (16) attached to the bottom of the
lower chamber (11).
D. Set all pieces aside.
Step 4 – Packing the System for Return Shipping
A. Place the purification elements (6), which have been allowed
to dry for 24 hours, in a re-sealable zipper storage bag. Then
place them in their original box. Place the optional PF-2
elements (10) in a re-sealable zipper storage bag as well.
B. Bag all parts, such as the knob (1), spigot (12), and hole
plugs (9), in their original bag or in a re-sealable zipper
storage bag.
C. Take the upper chamber (5) and set it upright.
D. Place the filtration elements and the parts inside the upper
chamber (5). Please add packing material to the inside of
the upper chamber to properly secure all items.
E. Turn the lower chamber (11) upside down and place it over
the upper chamber (5). It should fit over the outside of the
upper chamber. The lower chamber will stop before touching
the rim of the upper chamber.
F. Flip the entire system so that the rubber base ring (16) is on
the bottom and the bottom of the upper chamber (5) is facing
up (the bottom of the upper chamber has the holes for the
purification elements.)
G. Place the lid (2) on the bottom of the upper chamber (5).
H. Place the system inside the original product box if available,
and seal it with tape for shipping.Do not apply the shipping
label directly onto the product box. Instead, please place the
product box, along with sufficient packing material, into
another larger box for shipping.
Please return the Berkey system to:
James Enterprise Inc. / Berkey Filters
1976 Aspen Circle
Pueblo, CO 81006
5 18

Continuous Operation:
• Your system will continue to filter water even when the lower
chamber is full. This can cause the system to overflow. It is
recommended to empty the lower chamber completely prior
to refilling the upper chamber.
• Purified water can remain in the lower chamber for three
days. If any water still remains after three days, dispense into
a clean secondary container and refrigerate until use.
• If you plan to leave your system unused for more than three
days, empty both the upper and lower chambers, remove all
filtration elements, and allow the components to dry. The
Black Berkey Elements should be allowed to air dry. See
“Storing the Black Berkey Purification Elements” on page 8
and “Storing the PF-2 Elements” on page 12.
Source Water—General Precautions:
• While this system can effectively purify raw untreated pond,
lake, and river water, always use the cleanest, clearest water
whenever possible.
• This system is not intended for use with saltwater or softened
water.
• If the source water contains large amounts of particulate
matter, pre-filter it using material such as a coffee filter or
cheesecloth. In emergency situations, a T-shirt or similar
material will serve the same purpose.
• If you suspect a water source contains viral and bacteriological
contamination, add 16-drops of plain bleach or iodine to
each 1-gallon of water and wait 30 minutes in order to
pre-treat the water before purifying in this system. The disinfectant
will be removed from the water during the purification
process, leaving no odor or taste.
Black Berkey Purification Elements
Priming Tips
1. To create a useful finger-hold for priming, screw the wing nut
onto the end of the threaded stem of the Black Berkey Element
just until only two or three threads are exposed from the tip.
Returning Your Berkey Water Filter System
Please follow the disassembly and packing instructions carefully. Fees may
apply if the product is not returned in its entirety with original packaging, or
if it is damaged during return shipment.
Disassembly (Please refer to the Assembly Diagram on page 1)
Step 1 –Disassemble the Lid
A. Unscrew the knob (1) from the lid (2).
B. Remove the screw (4) from the lid and then screw it back into
the knob with the washer (3) attached.
C. Set both pieces aside.
Step 2 – Disassemble the Upper Chamber
A. Separate the upper chamber (5) from the lower chamber (11)
and set it on its side.
B. Unscrew all Black Berkey Element wing nuts (8) and optional
PF-2 Fluoride and Arsenic Reduction Elements (10) from the
purification elements. If the optional hole plugs are used,
unscrew the hex nuts as well.
C. Remove the purification elements (6), element washers (7), and
any hole plugs (9) from the inside of the upper chamber (5).
D. Screw the element wing nuts (8) back onto the purification
elements (6) with the element washers attached. Also screw any
hex nuts onto the optional hole plugs with the washers attached.
E. Set all pieces aside.
F. Allow the purification elements (6) and optional PF-2 elements
(10) to air dry for at least 24 hours prior to packing.
Step 3 – Disassemble the Spigot/Lower Chamber
A. Unscrew the spigot (12) by holding the spigot hex nut (15)
inside of the lower chamber (11) and turning the spigot.
617

2. Press the rubber priming button (tan or black colored)
onto the stem of the element.
3. Place the threaded stem of the element between your
index and middle fingers and press the priming button against
the faucet while placing your thumb on top of the faucet to
create a tight seal.
4. While holding the priming button against the faucet, turn
on the cold water slowly, allowing water to fill the inside of the
element.
5. Allow the exterior wall of the element to sweat beads of
water for about 10 seconds.
6. Rinse the manufacturing dust from the exterior of the
element. The element has now been successfully primed.
7. Repeat steps 1 – 6 for each additional element.
Note:
• Do not discard the priming button as you may need it in the
future to re-prime the elements after cleaning or when the
elements have been allowed to dry for a prolonged period of
time.
• For priming in the field or in areas with no water pressure:
o It is recommended to use the Black Berkey Primer, a
hand-powered priming pump that does not require
faucets or hose connections. See “Parts and
Accessories” on page 19 of this booklet.
o If you do not have the Black Berkey Primer, soak the
elements. Fill a clean container, such as the lower
chamber of your Berkey system, with water and place
the elements in the water upside down with the stems
facing upward and out of the water. Place an object
(such as a ceramic coffee cup) on each stem to force
the element body under the water. Allow the elements
to soak for several hours to fully saturate them.
New Millennium Concepts, Ltd. shall not be held liable for incidental or
consequential damage to personal property from, but not limited to, a defec-
tive unit, improper use, abuse, accident, or neglect, etc. It is the customer’s
responsibility to prevent misuse of the system and to replace parts, when, due
to the natural course of wear and tear, they must be replaced.
This warranty will not apply to units which have been used for purposes not
intended, which have been altered so as, in the manufacturers judgment, to
adversely affect its performance. This warranty is for the original retail
purchaser only, and cannot be transferred.
The laws of the state of Texas, USA will govern any disputes regarding this
warranty or claim made. This warranty, which is given expressly in lieu of all
warranties, expressed or implied, or merchantability and fitness for a particu-
lar purpose, constitutes the only warranty made by New Millennium Con-
cepts, Ltd.
The Black Berkey®Purification™ Elements are covered under a two year
limited prorated warranty, calculated in six month intervals. This warranty
applies only to products manufactured or exclusively distributed by New
Millennium Concepts, Ltd. and its authorized Berkey dealers. To obtain
warranty service, you must provide a dated receipt for the product and pay
for any shipping charges incurred to return the product to New Millennium
Concepts, Ltd.
7 16

Troubleshooting - Slow Initial Flow Rate
Note: If your Berkey system also contains the optional PF-2 Fluoride and
Arsenic Reduction Elements, the flow rate will typically be reduced by 15 to
20% under normal conditions.
1. To determine if the Black Berkey Elements have been
successfully primed, remove them from the system and
submerge them in a tall container of clean water, such as the lower
chamber of your Berkey system. If they sink to the bottom, they are
fully saturated. If they float, the micro pores still contain trapped
air and the elements will need to be re-primed.
2. Re-prime the elements. Follow the instructions provided
within the element box or use the “Black Berkey Purification
Elements Priming Tips” on page 6 of this booklet.
3. If re-priming the elements does not improve the flow rate,
soak the elements using the instructions provided on page 7 in
the “Note” section of “Black Berkey Purification Elements
Priming Tips”.
4. If the elements continue to have a slow flow rate contact
Customer Service.
Troubleshooting - Flow Rate Decreasing After Extended Use
• Small particulate matter can become trapped on the outside of
the elements causing the flow rate to decrease. Follow the
instructions in the “Routine Cleaning and Maintenance”
section on page 12 to clean the elements.
• If the elements have been allowed to sit dry for several days,
air may be trapped in the micro pores and the elements will
need to be re-primed. Follow the “Priming Tips” for the
elements on page 6.
Storing the Black Berkey Purification Elements
• UNUSED: The elements can be stored indefinitely in their
original packaging.
• USED: Clean the elements following the cleaning instructions on
page 12 and then allow them to dry completely. The drying process
can vary from one day to one week depending on the humidity level
in the air. When dry, store the elements in their original packaging.
Be sure to re-prime the filters before using them again.
100% Satisfaction Guarantee
Within 30 days of the purchase date, if you are not completely satisfied
with your purchase, you may call Customer Service for a Return Mer-
chandise Authorization (RMA) number. You may then, at your cost, return
the items to us in their original packaging with all included parts and
literature. When received, you will be issued a refund of the purchase
price less any shipping costs incurred by us. Returns will not be accepted
without an RMA number.
Our Warranty - Past 30 days
All products, including units, filters, parts, and accessories are warranted
to be free from defects in materials and workmanship for six months from
the purchase date. The purification elements and unit housings only are
warranted for a two-year period, prorated in six month intervals. Please
call Customer Service for more information and to receive a Return
Merchandise Authorization (RMA) number. Returns will not be accepted
without an RMA number.
Manufacturer’s General Warranty Information
New Millennium Concepts, Ltd. warrants their product against defects in
materials or workmanship during ordinary consumer use. This limited
warranty does not cover product issues caused by any other reason, for the
time periods and conditions set forth below when purchased directly from
New Millennium Concepts, Ltd. or from an authorized Berkey® dealer.
For a period not to exceed 12 months from the original date of purchase of
the product, New Millennium Concepts, Ltd. will, solely at its discretion,
replace a system or component that it deems is not functioning properly
during the stated warranty period.
815

Testing the Black Berkey Purification Elements
To determine whether the Black Berkey Elements are working properly,
perform the following test using red food coloring.
Note: Due to its specific composition, only food coloring that is red in color
can be used. Natural dyes that are red in color, such as vegetable juices,
cannot be used in place of red food coloring.
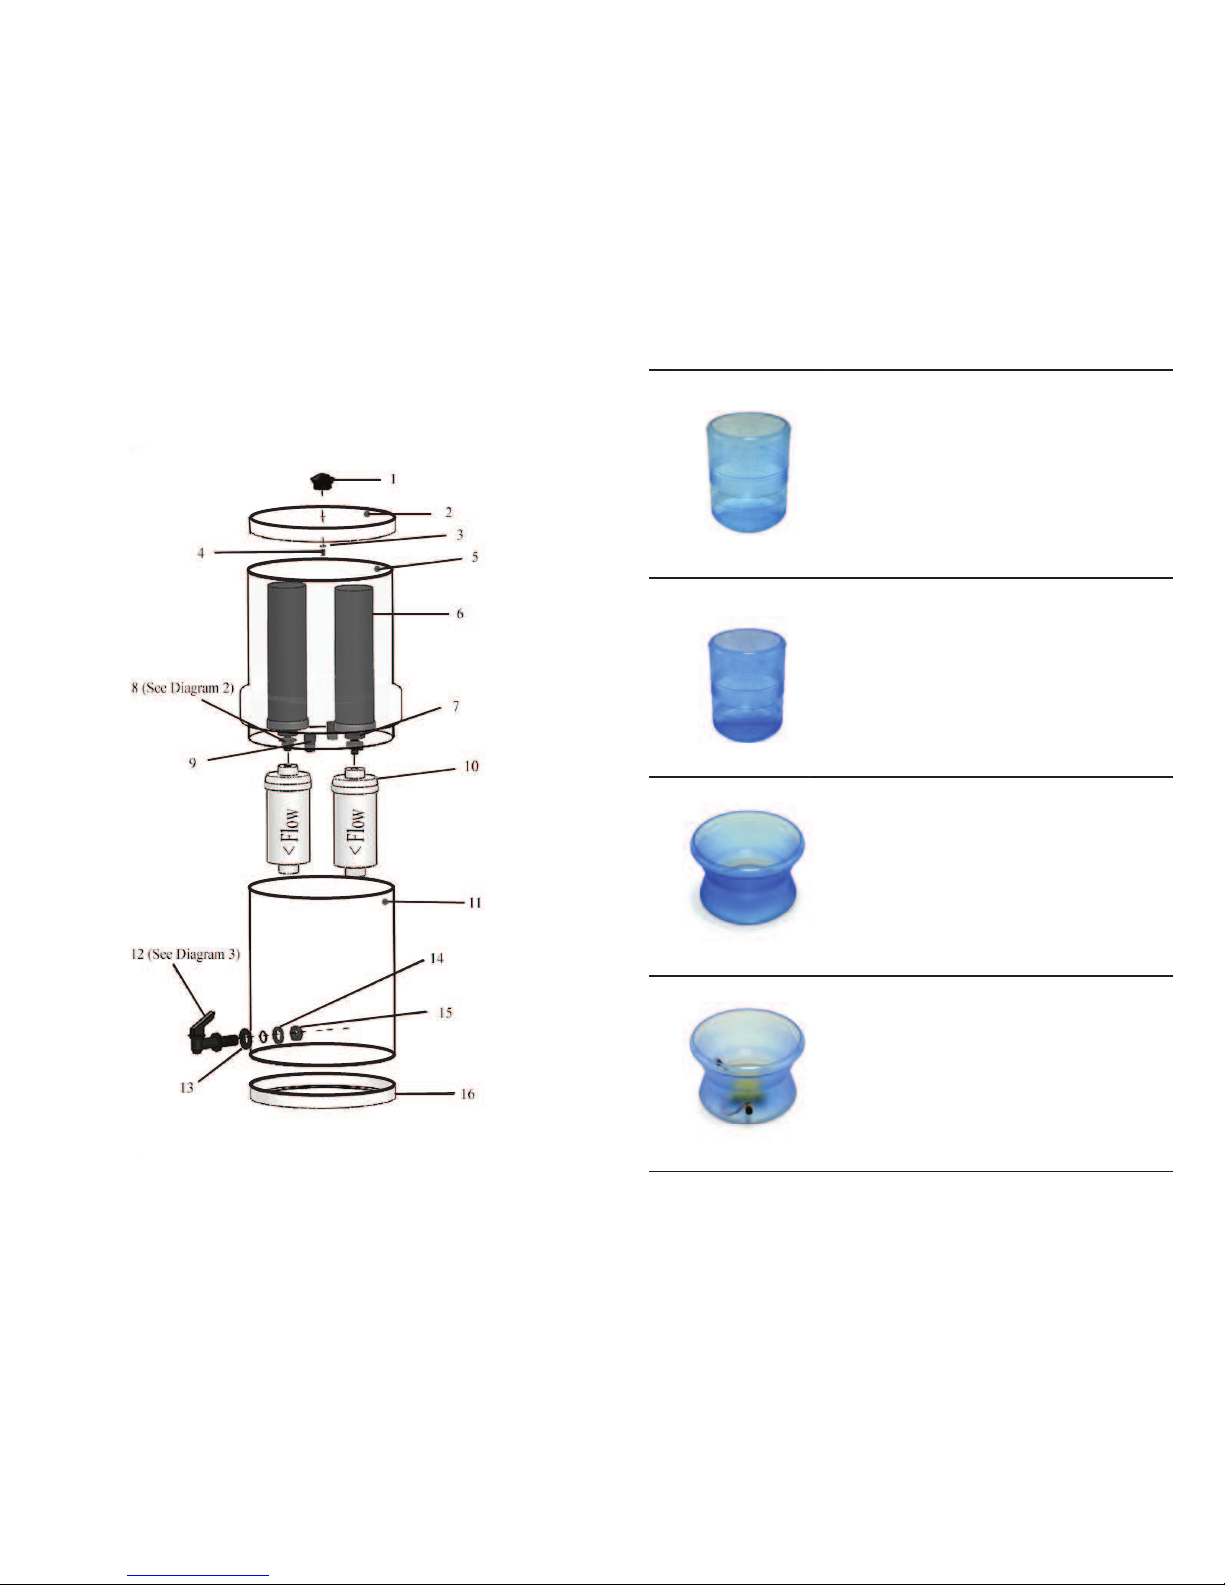
1. Confirm that the placement of the element washer and wing nut
are correct. The washer should be inside the upper chamber and
the wing nut should be on the underside of the upper chamber.
2. If your Berkey system contains the optional PF-2 Fluoride and
Arsenic Reduction Elements in addition to the Black Berkey
Elements, remove the PF-2 elements prior to the test.
3. Place a glass under each element to catch the filtered water.
4. Fill the upper chamber with water so that the Black Berkey
Elements are completely submerged.
5. Add one teaspoon of red food coloring for every gallon of water
that is in the upper chamber of the system. The water in the
upper chamber should have a red tint.
6. Allow the water to filter into the glasses.
7. If the filtered water has a pink or red tint, contact Customer
Service.
Note: Test your system upon first use, every three to six months, before you
take your system out of the country, or any time you use your system after
drying and storing the elements for an extended period of time.
Other Tips:
• Do not allow wet purification elements to freeze.
• Do not place purification elements in dishwasher.
• Do not place purification elements in microwave oven.
• Do not boil purification elements.
• Do not clean purification elements with detergents or soaps.
• Do not store purification elements until completely dry.
• Do not allow purification elements to sit in the direct sun
for extended periods of time.
• Do not place Berkey system near a heat source or in direct
sunlight.
• Do not use elements to filter sea water or softened water.
Why is the Filtered Water Cloudy?
• Cloudy filtered water may indicate the PF-2 elements still
contain some residual manufacturing dust. Re-prime the PF-2
elements again following the “Priming Tips” for the PF-2
elements found on page 10.
Why is there a Residue in the Chambers and Cookware?
• Naturally-occurring minerals such as calcium and magnesium
carbonates, bicarbonates, chlorides, and sulfates can leave
deposits in the Berkey chambers as well as cookware that have
contained the filtered water. These deposits can be removed by
thoroughly cleaning the chambers and cookware. For cleaning
instructions, see “Cleaning the Chambers of the Berkey
System” found on page 12.
What can be done if the Filtered Water has an Unexpected Taste?
• Test the Black Berkey Elements. To ensure the elements are
properly filtering the water, perform the red food coloring test
using the instructions found on page 9.
• Re-prime the PF-2 elements. If your Berkey system contains
the optional PF-2 elements, the taste may be due to residual
manufacturing dust that was not removed during the priming
process. See the “Priming Tips” for the PF-2 elements that are
provided on page 10 as well as the PF-2 element “Trouble
shooting” on page 11.
• Clean your Berkey system. Follow the “Routine Cleaning and
Maintenance” instructions that are provided on page 12.
Guarantee/Warranty
We at Berkey Filters pride ourselves on customer satisfaction. If you are
experiencing a problem with one of our products, we will work with you to
correct the issue. If it becomes necessary for you original order, allowing for
faster processing of your return. Please allow 7 to 10 business days to
process your return once we receive it at our facility. At that time, we will
either ship out a replacement part, or issue you a refund per your instruc-
tions. The amount of the refund will be determined based on the terms of
your warranty.
9 14

PF-2 Fluoride and Arsenic Reduction Elements
Priming Tips
1. With the blue caps in place, wash the exterior of each PF-2
element with water and dishwashing soap.
2. With clean hands, remove one blue cap from the end of a PF-2
element. It does not matter which blue cap is removed.
3. While holding the PF-2 element under your sink faucet,
slowly turn on the cold water and fill the PF-2 element with
water (about ½ cup is needed). Then turn off the water.
4. Replace the blue cap on the PF-2 element and shake it vigorously
to help loosen any manufacturing dust that may be trapped within
the element. Gently tapping the PF-2 element on the counter a few
times will also help to loosen any excess manufacturing dust.
5. Remove both blue caps from the ends of the PF-2 element and
empty out any residual water.
6. Place the tan rubber priming button onto one end of the PF-2
element and align the hole of the element with the hole of the
priming button.
7. Press the priming button up against the sink faucet so the priming
button creates a seal between the faucet and the PF-2
element. Place your thumb on top of the faucet to apply more
pressure, creating a better seal.
8. Turn on the cold water slowly, allowing water to fill the cavity
of the PF-2 element and discharge from the opposite end.
Allow water to flow for one to two minutes or until the water
runs clear.
9. To determine if more priming is necessary, run additional
water through the element and using a clear glass, collect the
water discharging from the opposite end. If the collected
water still appears cloudy, continue priming until the water is
clear.
The priming process may need to be repeated more
than once to completely remove any residual manufacturing
dust.
10. Turn the PF-2 element over to prime the other end, repeating
steps 6 through 9.
11. Repeat steps 2 through 10 for each additional PF-2 element.
Note: Do not discard the priming button or blue caps as you may need
them in the future to re-prime the elements.
chambers can also be cleaned in the dishwasher but remove all parts and
attachments first. If you have a Berkey Light system, do not place any of
its components in the dishwasher.
Note: If your Berkey system is filtering hard water, which is water with a
high dissolved mineral content, scale from naturally-occurring minerals
such as calcium may develop in the spigot and chambers after prolonged
use. These deposits can be removed by soaking the affected components in
a 50-50% vinegar and water mixture for about 15 minutes. Then wash
with water and mild dish soap. Do not soak the Black Berkey Elements or
optional PF-2 elements in the vinegar mixture.
Frequently Asked Questions (FAQS)
Why does my Berkey system leak where the upper and lower cham-
bers fit together?
• There is no water-tight seal between the upper and lower
chambers of the system because this type of seal would
prevent gravity filtration. Therefore water will leak from
where the two chambers fit together if both the upper and
lower chambers are full or nearly full of water. To prevent
overflow, it is recommended to empty the lower chamber
completely prior to refilling the upper chamber.
• If at any time you experie nce an issue with your system
leaking water, discontinue use, empty the water from both the
upper and lower chambers, and contact Customer Service.
Why Does the Upper Chamber Still Contain Water After the Filtering
Process?
• The Berkey systems are gravity filters and as the water level
in the upper chamber decreases the filtering process will
naturally slow down because there is less water pressure
available to force water through the elements. It is normal for
one to two inches of water to remain in the upper chamber.
1013

Installation Tips
1. Remove the upper chamber of the system and place it upside
down so that the threaded stems of the Black Berkey Elements
are facing upwards.
2. With the water flow arrow pointing away from the upper
chamber, screw the PF-2 elements onto the stems of each
Black Berkey Element eight full revolutions. Do not screw the
PF-2 elements more than eight revolutions in an attempt to
tighten them further as this may damage the internal
media screen.
3. Return the upper chamber to the system by placing it onto the lower
chamber. The PF-2 elements should now hang down into
the lower chamber. The PF-2 elements will hang loosely but
are secure.
4. Fill the upper chamber with water and let it drain into the
lower chamber. When the lower chamber is full, discard the
first batch of water as it may contain residual manufacturing
dust. The system is now ready for use.
Troubleshooting – Filtered Water in Lower Chamber is Cloudy
Cloudy water may indicate that the PF-2 elements still contain some manu-
facturing dust and will require additional flushing with water.
1. Fill a clean container with clean water and soak the PF-2
elements in the water for at least 30 minutes. Tilt the
elements, while under water, so that any air bubbles can escape
from both ends.
2. Remove the PF-2 elements from the water. Cover the holes
with either your fingers or the blue caps that came with the
elements, and shake the elements vigorously. Then tap them
lightly on the counter to loosen any residual manufacturing
dust.
3. Re-prime the PF-2 elements using steps 6 through 9 of “PF-2
Fluoride and Arsenic Reduction Elements Priming Tips” on
page 10.
4. If the water filtering though the PF-2 elements continues to be
cloudy in appearance, contact Customer Service.
Storing the PF-2 Elements
• UNUSED: The PF-2 elements can be stored indefinitely in their
original packaging.
• USED: Place the PF-2 elements in a re-sealable zipper storage
bag and store them in the refrigerator for up to two weeks.
Note:
o Do not store used PF-2 elements for longer than two weeks.
o Do not store the PF-2 elements in the freezer.
o Remember to re-prime the PF-2 elements before using them
again. See “PF-2 Fluoride and Arsenic Reduction Elements
Priming Tips” steps 6 through 9 on page 10.
Routine Cleaning and Maintenance
Cleaning the Black Berkey Purification Elements
1. To prevent contamination, wash hands before proceeding.
2. Remove the upper chamber and place it on its side on a solid surface.
3. Unscrew the optional PF-2 elements and unscrew all wing nuts
that secure the Black Berkey Elements in the system.
4. Remove the Black Berkey Elements from the inside of the upper
chamber.
5. Hold one element under the faucet with the exit hole pointed up.
6. Using a clean 3M Scotch-Brite™ pad, scrub the surface of the element
for several minutes. The goal is to remove the outermost layer of the
element, exposing a new layer of open micro pores.
7. Rinse the element with water but place a finger over the hole of
the threaded stem to prevent any potentially contaminated water
from entering the core of the element.
8. Re-prime the element using the “Priming Tips” on page 6.
9. Repeat steps 4 to 7 for each additional Black Berkey Element.
10. Reassemble the system.
Cleaning the Chambers of the Berkey System
The chambers, particularly the lower chamber, should be cleaned at least
once per month.
1. Remove the Black Berkey Elements, optional PF-2 elements,
spigot, and any other attached components.
2. Clean the chambers using water and a mild dish soap. If the water used
for cleaning is suspected to contain viruses or bacteria, add 16 drops of
bleach per gallon of water. The stainless steel Berkey
11 12
Other manuals for Berkey Water Filter
1
Table of contents
Other Berkey Filters Water Filtration System manuals
Popular Water Filtration System manuals by other brands

Express Water
Express Water 300GPD installation manual

APS Chlorinators
APS Chlorinators Surechlor 2500 quick start guide

HoMedics
HoMedics AP-T10FL Replacement

Schmalz
Schmalz STF Series Operating instruction

Neptun
Neptun Classic NCTF-O 4000 operating instructions

Pentair
Pentair FLECK 2910 NXT Installer manual

Jandy
Jandy SFTM PRO Series Installation and operating data

Sundstrom
Sundstrom SR 99-1 Instructions for use

CALEFFI
CALEFFI DIRTMAGCLEAN 579 Series Programming manual

Antunes
Antunes VZN T5 Series owner's manual

Aquasafe
Aquasafe Maximus II installation instructions

OptiPure
OptiPure SRO70 installation manual