Best Choice Products SKY2856 User manual

SKY2856 + SKY2857 + SKY2858 + SKY5164 + SKY5165 + SKY5166
Ver. 8
INSTRUCTION
MANUAL
Ride-On Truck with Remote

bestchoiceproducts.com
Charge for 12 hrs
before initial use.
After initial charge,
follow the normal
recommended
charging time.

Before assembly,
remove the rear axle
from under the
ride-on.
This is step 1 of
the instructions.
bestchoiceproducts.com

Please retain these instructions for future reference.
SAFETY
BATTERY WARNINGS
This vehicle must be assembled by an adult who has read and understood the instructions in this manual.
Keep the packaging and bags away from children and dispose of all packaging before use. Always use
common sense and safe practices when operating this vehicle. This product contains or emits chemicals
known in the state of California to cause cancer or birth defects or other reproductive harm.
NOTE: For best performance, only use this vehicle on flat and hard surfaces.
Age Range: 3 to 8 years old
Weight Capacity: 65 lbs.
The following safety hazards may result in serious injury or death:
• This product contains small parts. Keep children away during assembly. Make sure to remove all
packaging material and parts from underneath the vehicle body.
•Never open the battery. Batteries contain lead and lead compounds (acids) that are toxic and corrosive,
and known to the state of California to cause cancer and reproductive harm.
•Limbs, hair, and clothing can get caught in moving parts. Always wear shoes, keep limbs away from
moving parts, and do not wear loose clothing while operating this vehicle.
•This vehicle does not have brakes or braking capability. Do not leave a child unattended during
operation. Do not use this in a location that may require braking capability, as this could result in loss of
control, which may cause serious injury or death.
•Use of this vehicle near streets, motor vehicles, steps, bodies of water, sloped surfaces, hills, wet areas,
flammable vapors, in alleys, at night, or in the dark could result in an unexpected accident.
•Use of this vehicle in unsafe conditions such as snow, rain, loose dirt, mud, sand, or gravel may result in
an unexpected accident such as tipping over, and could damage the electrical system or battery.
•Do not operate this vehicle in an unsafe manner. Examples include but are not limited to:
- Pulling the vehicle with another vehicle or similar device
- Allowing more than one rider
- Pushing the user
- Traveling at an unsafe speed
The following safety hazards may result in serious injury or death:
•Use of a battery or charger other than the supplied 12V rechargeable battery and charger may cause a
fire or explosion. Only use the supplied battery and charger.
•Use of the 12V rechargeable battery and charger for any other product may result in overheating, fire, or
explosion. Never use the supplied rechargeable battery and charger with another product.
•Explosive gases are created during charging. Charge the battery in a well-ventilated area. Do not charge
the battery near heat or flammable materials.
•Contact between the positive and negative terminals may result in fire or explosion. Avoid direct contact
between the terminals. Picking up the battery by the wires or charger can cause damage to the battery
and may result in a fire. Always pick up the battery by its case or handles.
•Liquids on the battery may cause fire or electric shock. Always keep all liquids away from the battery and
keep the battery dry. Contact or exposure to battery leakage (lead acid) may cause serious injury. If
contact or exposure occurs immediately call your physician. If the chemical is on the skin or in the eyes,
flush with cool water for 15 minutes. If the chemical was swallowed, immediately give the person water or
milk. Do not give water or milk if the patient is vomiting or has a decreased level of alertness. Do not
induce vomiting.
•Battery posts, terminals, and related accessories contain lead and lead compounds (acid) – chemicals
known to the State of California to cause cancer, reproductive harm, and are toxic and corrosive. Never
open the battery.
•Tampering or modifying the electric circuit system may cause a shock, fire or explosion and permanently
damage the system. Exposed wiring and circuitry in the charger may cause electric shock. Always keep
the charger housing closed.
4|

SPECIFICATIONS
• Never leave a child unattended.
• Always sit in the seat when using this vehicle.
• Keep your hands, hair, and clothes away from moving parts.
• Children under 3 years of age cannot use the vehicle.
• Only drive on level ground.
• Do not drive the vehicle into loose dirt, mud, sand, fine gravel, or on wet surfaces.
Overall Dimensions
Weight
Weight Capacity
Age Range
Max Speed
Charging Time
Run Time
Battery Type
Electric Motor
Charger
Material
45"(L) x 31"(H) x 31"(H)
45 lbs.
65 lbs.
3 – 8 years old
3.75 mph.
8 – 12 hours
Initial Charge Time 12 hours
1 - 2 hours
1 - Rechargeable SLA - 12V 7AH
Double Drive
Output: DV12v 1000MA
PP plastic, metal
|5
To reduce the risk of injury, adult supervision is required. Never use on roadways, near motor vehicles, on
or near steep inclines or steps, swimming pools or other bodies of water; always wear shoes, and never
allow more than one rider.
WARNING

65 LBS
CAPACITY
LBS
APPROXIMATELY
1 HR.
ASSEMBLY
1 PERSON
ASSEMBLY
TOOLS REQUIRED
PARTS
HARDWARE
1
12 PCS
M4 x 12mm
SCREW
M3 x 12mm
SCREW
2
2 PCS
A
D
B C
1 PC
4 PCS
2 PCS 2 PCS
REAR AXLE
E
2 PC
FRAME F
1 PC
BAR LIGHT
REAR WHEEL FRONT WHEEL
PHILLIPS
SCREWDRIVER
HUB CAP
6|
2 PLASTIC
WRENCH
(PROVIDED)

|7
PARTS
G
J
H I
1 PC
1 PC
1 PC 2 PCS
HOOK
SEAT K
1 PC
FRONT AXLE L
1 PC
STEERING WHEEL
WINDSHIELD SIDE MIRROR
N
1 PC
REMOTE CONTROL O
1 PC
CHARGER
M
2 PCS
FRONT REFLECTOR
P S
CALIFORNIA PROPOSITION 65
WARNING: Battery posts, terminals, and related accessories can expose you to chemicals including
lead and lead compounds, which are known to the State of California to cause cancer and birth defects or
other reproductive harm, and are toxic and corrosive. Wash hands after handling. For more information go
to www.P65Warnings.ca.gov

8|
2
1
PRODUCT ASSEMBLY
Flip the vehicle over and lay it on a level surface. Remove nuts and washers from the part A rear axle
underneath the vehicle, then remove the axle.
FRONT REAR
STABILIZER
GEAR BOX
A
REAR VIEW
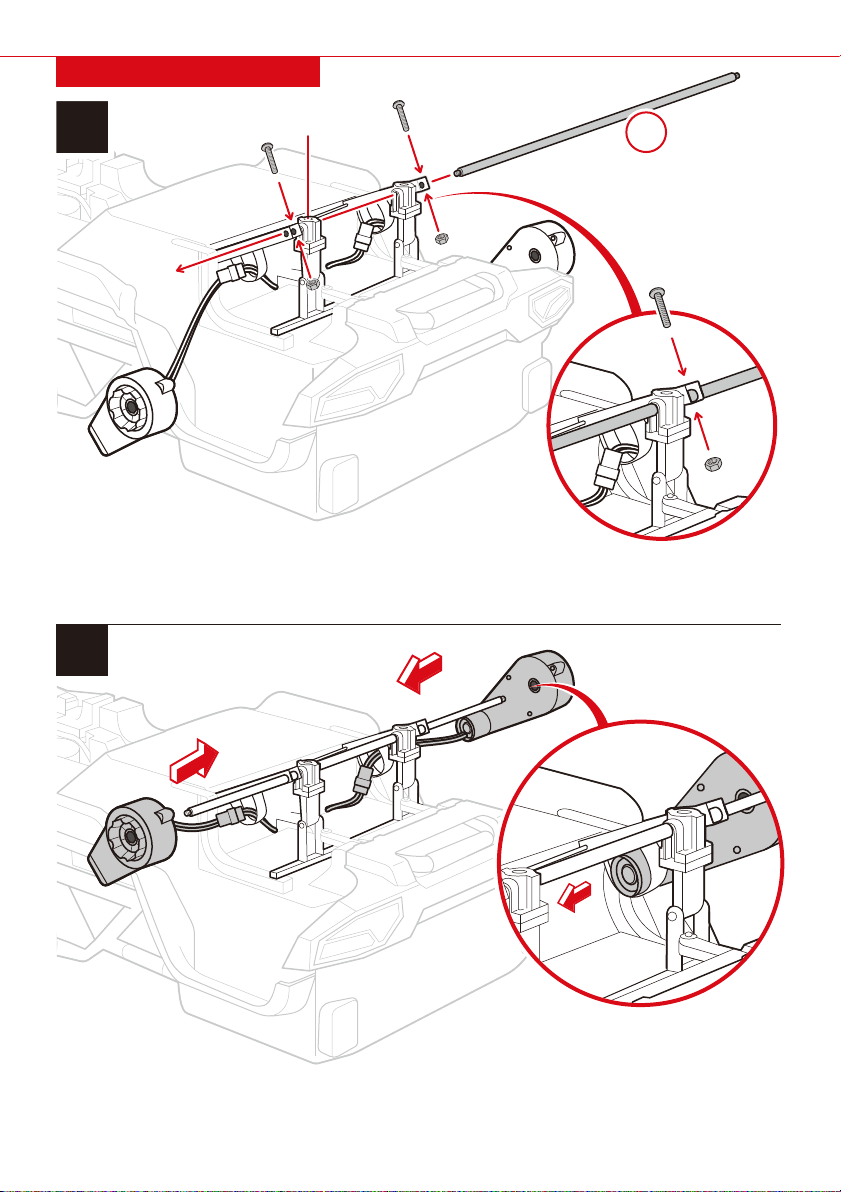
Remove packaging from gear boxes
and place them in position. Remove
two bolts/nuts from the stabilizer.
REAR VIEW
Remove packaging from gear boxes
and place them in position. Remove
two bolts/nuts from the stabilizer.
4
PRODUCT ASSEMBLY
A
3
Line up the holes on the stabilizer with the shocks, then slide the part A rear
axle through. Replace the two bolts/nuts on the stabilizer to secure the axle.
Slide the gear boxes onto the rear axle. Insert the
ends of the gear boxes into the designated slots.
SHOCK
|9

5
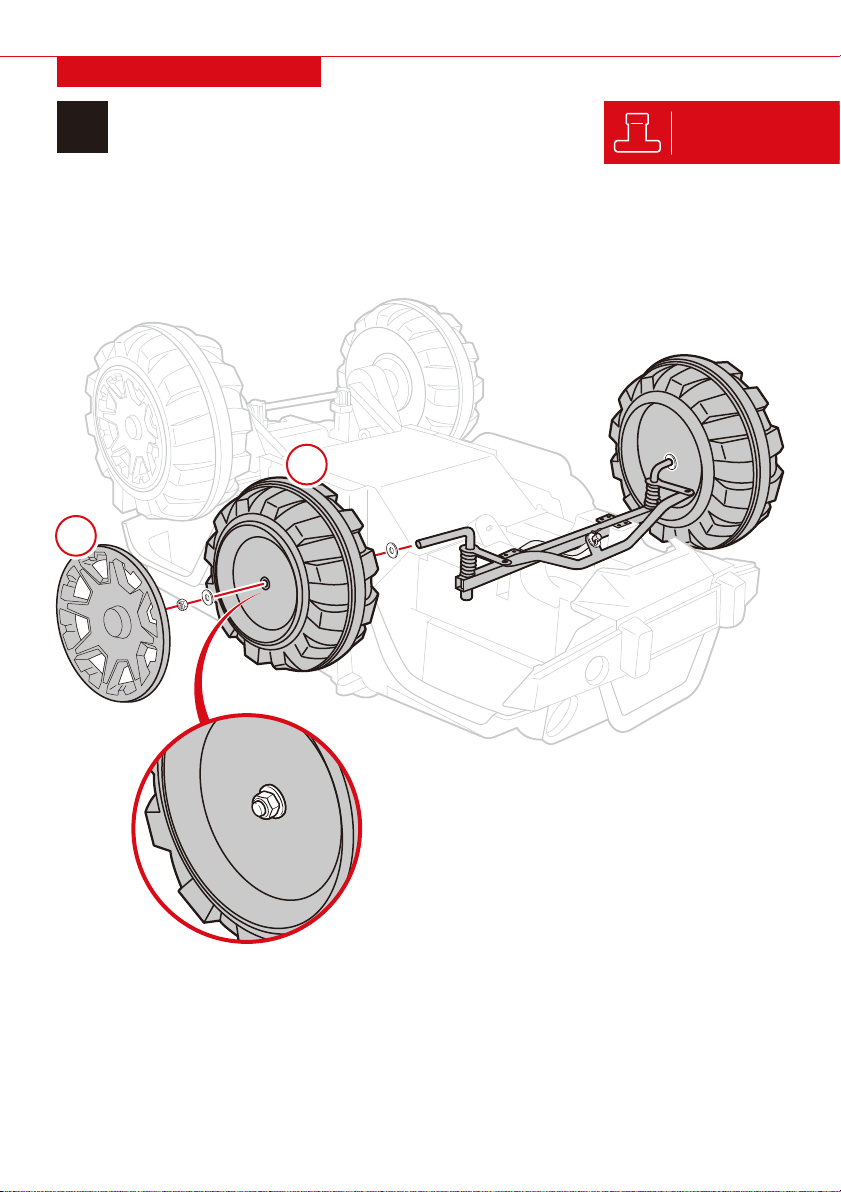
Snap a part D hub cap onto each wheel.
PRODUCT ASSEMBLY
Remove the nut and washer from the steering column. Slide the part K front axle into the steering column
and secure it by replacing the nut and washer.
Place the front axle into the designated slots and secure it with eight part 1 screws, four on each side.
Slide a part B rear wheel onto the
axle and replace a nut and washer
to secure the wheel. Repeat on the
other side.
B
K
D
1
x2
x8
x2
6
FRONT VIEW
10 |
Use the provided
plastic wrench to
attach the nuts.
Slide a part C front wheel onto the axle and replace a nut
and washer to secure the wheel. Repeat on the other side.
Snap a part D hub cap onto each wheel.
Remove a nut and washer from each side of the
front axle (leave a washer on each side).
x2
TOOLS REQUIREDPRODUCT ASSEMBLY
7
D
Cx2
|11
Use the provided
plastic wrench to
attach the nuts.

PRODUCT ASSEMBLY
9
8
Join the connector from the part L steering wheel to
the connector from the steering mount, then snap
the steering wheel into place.
Secure the part G hook to the rear of the vehicle
with two part 1 screws.
L
G
1x2
12 |

10
11
Slide the part F bar light into the
holes located on the frame pieces
and secure it with two part 2 screws.
PRODUCT ASSEMBLY
Insert the two part E frame pieces
into the designated holes on the rear
of the vehicle.
E
F
x2
x2
2
F
x2
4
|13
14 |
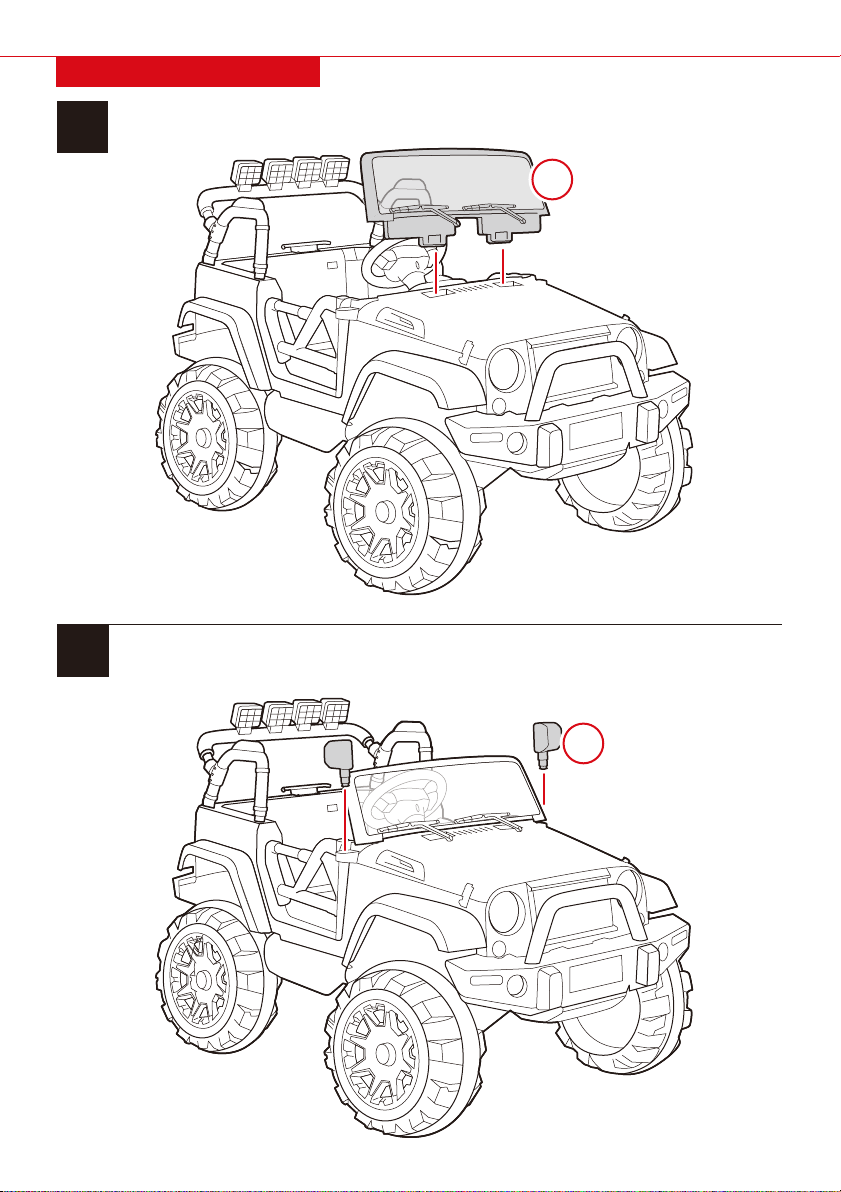
Snap on two part I side mirrors.
12
13
PRODUCT ASSEMBLY
Snap on the part H windshield.
H
Ix2
|15
14
TOOLS REQUIREDPRODUCT ASSEMBLY
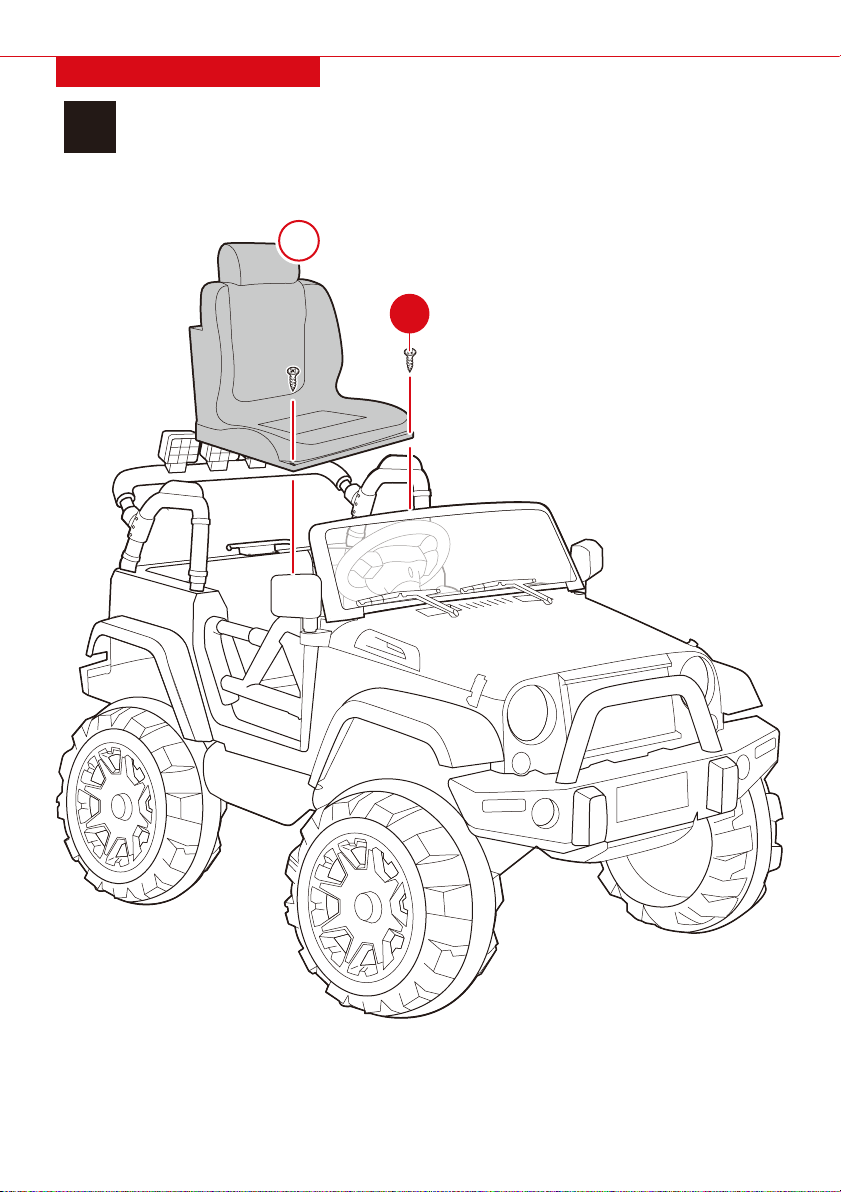
Attach the part J seat with two part 1 screws.
J
1x2
16 |
15
TOOLS REQUIREDPRODUCT ASSEMBLY
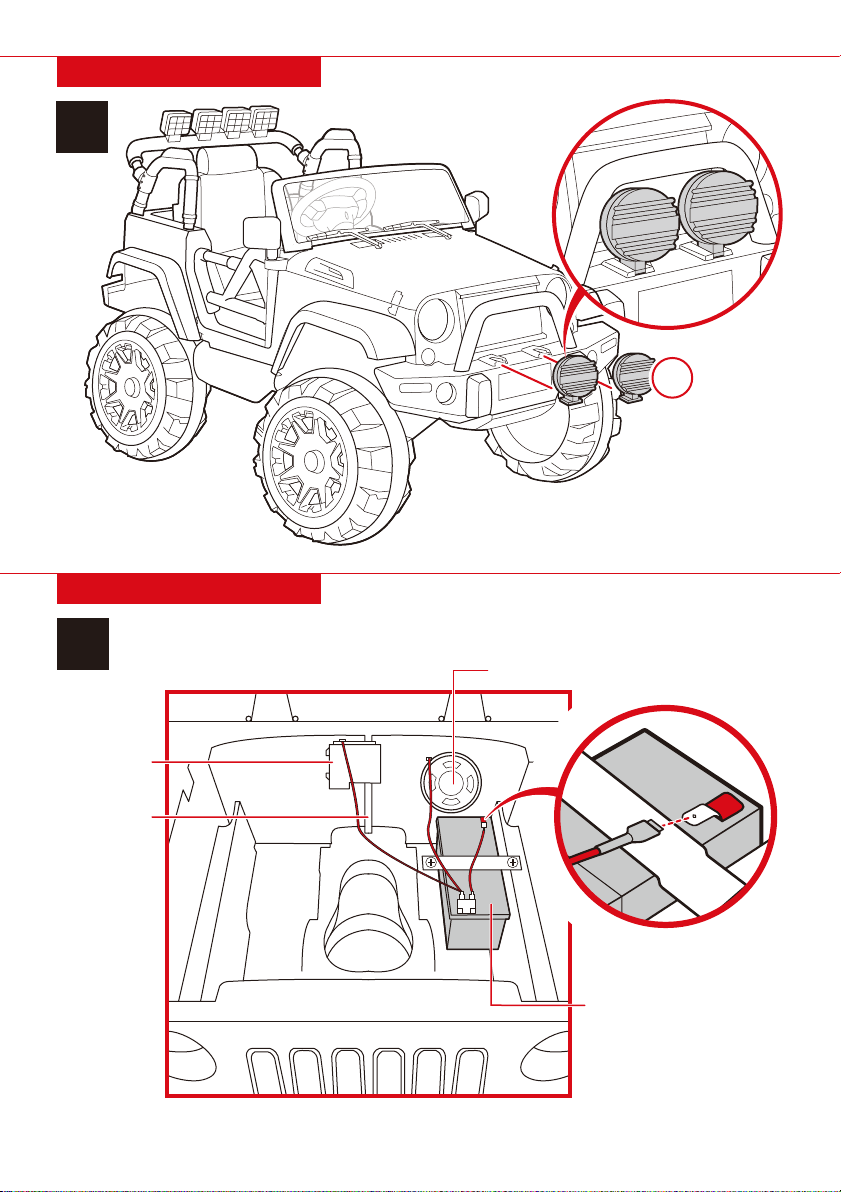
16 Under the hood, connect the red wire to the red terminal on the battery
TOOLS REQUIREDPRODUCT ASSEMBLY
SPEAKER
BATTERY
CONTROL
MODULE
STEERING
SHAFT
R
e
m
o
v
e
c
o
v
e
r
o
n
t
e
r
m
i
n
a
l
Slide the two part M front reflectors onto the front
of the vehicle and they will snap in place.
Mx2
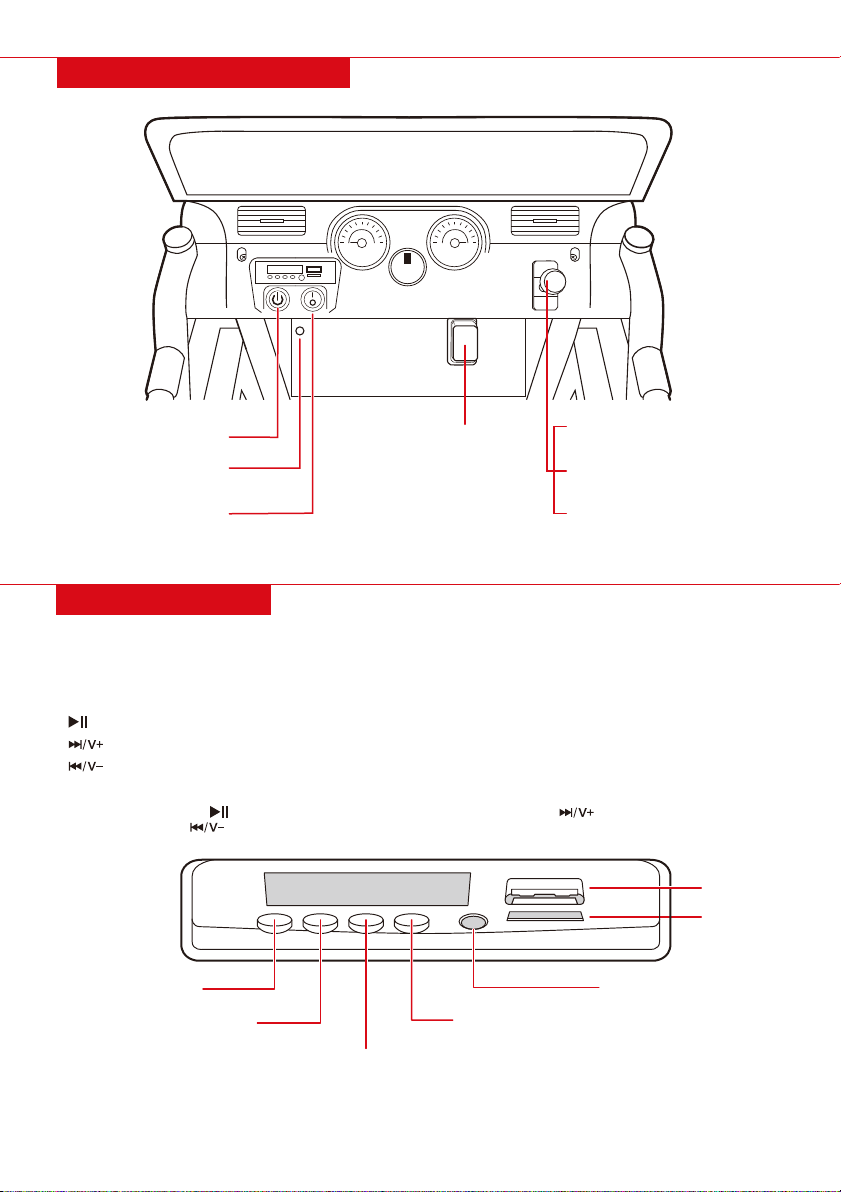
MP3 FUNCTIONS
• USB port: play music from a USB drive
• AUX input: plug in a music player to play music
• TF (MicroSD) port: play music from a MicroSD card
• : play/pause music
• : short press to play to the next song, long press to increase volume
• : short press to play the previous song, long press to decrease volume
• MODE: press to toggle between USB, MicroSD, FM radio, and AUX input
• FM Radio: press the to automatically seek a radio station. Press the to seek the next radio
station. Press the to return to the previous radio station
TF
(MICROSD)
PORT
USB PORT
AUX INPUT
PREVIOUS/VOLUME –
PLAY/PAUSE
NEXT/VOLUME +
MODE
DASHBOARD DIAGRAM
PEDAL
LIGHT SWITCH
BATTERY CHARGING
SOCKET
POWER SWITCH
REVERSE: DRIVE IN REVERSE
PARK: PARK VEHICLE
(PEDAL IS DISABLED)
FORWARD: DRIVE FORWARD
Push down on the pedal to drive forward/reverse. Release the pedal to slow down and stop.
|17

FREQUENCY KEY
TURN LEFT
TURN RIGHT
EMERGENCY
BRAKE
REVERSE
FORWARD
SPEED
HIGH-SPEED LED
MEDIUM-SPEED LED
LOW-SPEED LED
P S
REMOTE CONTROL DIAGRAM
•Insert 2 AAA batteries into the remote control
•After 10 seconds of non-operation, the indicator light will turn o and the remote will go into
power-saving mode.
Linking the remote control:
1. Press and hold the frequency key for 2 to 4 seconds. The low speed LED lights will flash.
2. Turn the vehicle on. The low speed LED lights will stop flashing and remain on to indicate a
successful link.
3. If the low speed LED lights continue to flash (indicating an unsuccessful link), remove the battery on the
remote and repeat steps 1 and 2.
18 |
CARING FOR YOUR RIDE-ON
•Park the vehicle indoors or cover it with a tarp to protect it from wet weather.
•Do not leave the vehicle in the sun for long periods of time or fading may occur. Store in shade or cover
with tarp.
•Do not wash the vehicle with a hose.
•Do not wash the vehicle with soap.
CHARGING INSTRUCTIONS AND WARNINGS
•Charging socket is located under the dashboard on the left side. Insert one end of the part O charger into the
charging socket and plug the other end into a wall outlet (see Dashboard Diagram).
•Charge the battery at least 12 hours before initial use.
•On average, you will need to charge the battery between 8 and 12 hours. Do not charge the battery for more
than 20 hours. Failure to charge the battery as directed could cause permanent damage to the battery and
void the warranty.
•Damage to the battery may occur if it is allowed to drain completely. Do not allow the battery to drain
completely.
•Check the battery and charger (supply cord, connector) for wear and damage before charging.
•Do not charge the battery if damage has occurred.
•Only an adult who has read and understood the safety warnings should handle, charge and recharge
the battery.

|19
TROUBLESHOOTING
Reason
Low battery
Electrical protection
Switch not in the correct position
Battery connectors disconnected
Low battery
Overloaded vehicle
Uneven or sloped road
Loose connection to motor
Steering wheel is not properly
connected
Battery connectors disconnected
Charger not connected to socket
or outlet
Battery does not have a full charge
Normal
Problem
Battery is warm and
makes a slight noise while
charging
Slow speed
Vehicles shakes while
driving
Vehicle is silent
Battery does not last
Battery does not recharge
Vehicle does not move
Solution
Fully charge the battery
Stop use for several minutes and restart
Completely press in switches
Plug in battery connectors
Fully charge the battery
Reduce the weight on the vehicle
Drive on flat pavement
Ensure the motor is properly connected to
the battery
Properly connect the steering wheel
connector
Plug in battery connectors
Completely plug in the charger
Fully charge the battery
Normal
This device complies with part 15 of the FCC rules. Operation is subject to the following two conditions: (1)
This product may not cause harmful interference, and (2) this device must accept any interference
received, including interference that may cause undesired operation.
NOTE: This equipment has been tested and found to comply with the limits for a Class B digital device,
pursuant to part 15 of the FCC Rules. These limits are designed to provide reasonable protection against
harmful interference in a residential installation.
This equipment generates, uses, and can radiate radio frequency energy and, if not installed and used in
accordance with the instructions, may cause harmful interference to radio communications. However, there
is no guarantee that interference will not occur in a particular installation.
If this equipment does cause harmful interference to radio or television reception, which can be determined
by turning the equipment o and on, the user is encouraged to try to correct the interference by one or
more of the following measures:
• Reorient or relocate the receiving antenna.
• Increase the separation between the equipment and receiver.
• Connect the equipment to an outlet on a circuit dierent from that to which the receiver is connected.
• Consult the dealer or an experienced radio/TV technician for help.
WARNING: Any changes or modifications to this unit not expressly approved by the party responsible for
compliance could void the user's authority to operate the equipment.
Responsible party (contact for FCC matters only):
Quality Control Dept.
5642 Ontario Mills Parkway
Ontario, CA 91764
FCC COMPLIANCE STATEMENT

All items can be returned for any reason within 60 days of the receipt and will receive a full refund as long
as the item is returned in its original product packaging and all accessories from its original shipment are
included. All returned items will receive a full refund back to the original payment method. All returned
items will not be charged a re-stocking fee.
All returned items require an RA (Return Authorization) number, which can only be provided by a Best
Choice Products Customer Service Representative when the return request is submitted. Items received
without an RA may not be accepted or may increase your return processing time. Once an item has been
received by Best Choice Products, refunds or replacements will be processed within 5 business days.
All returns must be shipped back to the Best Choice Products Return Center at the customer’s expense. If
the reason for return is a result of an error by Best Choice Products then Best Choice Products will provide
a pre-paid shipping label via email. Boxes for return shipping will not be provided by Best Choice Products,
and is the customer’s responsibility to either use the original shipping boxes or purchase new boxes.
Pictures may be required for some returns to ensure an item is not damaged prior to its return. Items
returned are not considered undamaged until they are received by Best Choice Products and verified as
such. All damages to items are the customer’s responsibility until the item has been received by and
acknowledge by Best Choice Products as undamaged.
PRODUCT WARRANTY INFORMATION
Manufacturer and seller expressly disclaim any and all liability for personal injury, property damage or
loss, whether direct, indirect, or incidental, resulting from the incorrect attachment, improper use,
inadequate maintenance, or neglect of this product.
HELP CENTER
Product Assembly
Product InquiryChat Support Returns & Refunds
Orders FAQ
WARNING
Question about your product? We're here to help. Visit us at:
help.bestchoiceproducts.com
CHAT
US!
This manual suits for next models
5
Table of contents
Other Best Choice Products Motorized Toy Car manuals

Popular Motorized Toy Car manuals by other brands


Helion
Helion Intrusion XLR HLNA0684 quick start guide

Team Losi
Team Losi Audi R8 LMS Ultra FIA-GT3 AWD RTR owner's manual

Associated Electrics
Associated Electrics RC8B4 manual

REVELL
REVELL KIT 2035 Assembly manual

Power Wheels
Power Wheels HGD19 owner's manual

Horizon Hobby
Horizon Hobby Losi Super BAJA REY 2.0 RTR instruction manual