Electrix RC Circuit User manual
INSTRUCTION MANUAL
BEDIENUNGSANLEITUNG
MANUEL D'UTILISATION
MANUALE
1/10 ELECTRIC STADIUMTRUCK
Congratulations on your purchase of the Electrix RCTM
CircuitTM Stadium Truck. This 1/10 scale model introduces
you to the sport of RC driving.
Herzlichen Glückwunsch zum Kauf des RCTM CircuitTM
Stadium Truck. Dieses 1/10 Scale Model öffnet Ihnen die
Welt des RC Car Sports.
Nous vous félicitons pour l'achat du Electrix RCTM CircuitTM
Stadium Truck. Ce modèle 1/10 vous introduit au sport de
la conduite RC.
Congratulazioni per l’acquisto di questo RC Circuit Stadium
Truck Electrix. Questa vettura in scala 1/10 vi introdurrà nel
mondo dei modelli RC.
11/10 ELECTRIC STADIUM
TRUCK
EN
NOTICE
All instructions, warranties and other collateral documents are subject to change at the sole discretion of Horizon Hobby, Inc. For up-to-date
product literature, visit http://www.horizonhobby.com and click on the support tab for this product.
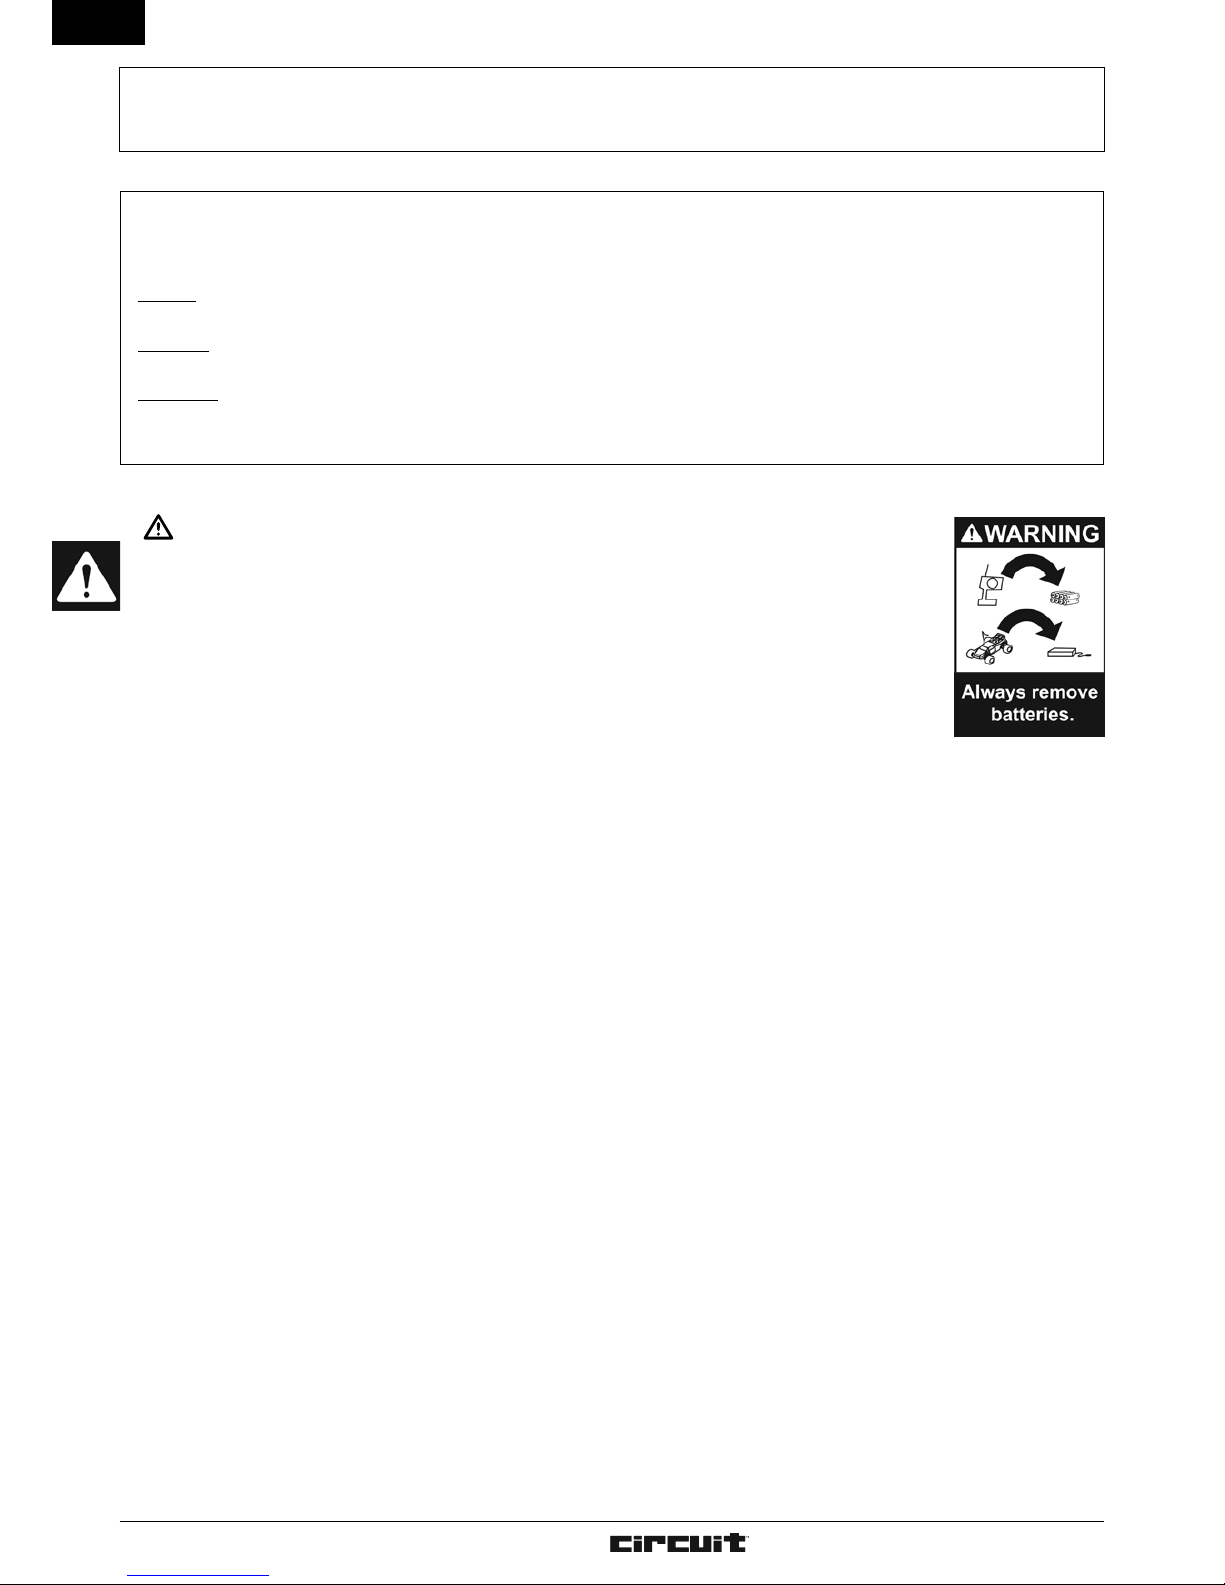
Safety Precautions and Warnings
As the user of this product, you are solely responsible for
operating in a manner that does not endanger yourself and
others or result in damage to the product or the property of
others.
This model is controlled by a radio signal subject to interference
from many sources outside your control. This interference can
cause momentary loss of control so it is advisable to always
keep a safe distance in all directions around your model, as this
margin will help avoid collisions or injury.
Age Recommendation: 14 years or over. This is not a toy. This
product is not intended for use by children without direct adult
supervision.
• Neveroperateyourmodelwithlowtransmitterbatteries.
• Alwaysoperateyourmodelinanopenareaawayfromcars,
traffic or people.
• Neveroperatethemodelinthestreetorinpopulatedareas
for any reason.
• Carefullyfollowthedirectionsandwarningsforthisandany
optional support equipment (chargers, rechargeable battery
packs, etc.) you use.
• Keepallchemicals,smallpartsandanythingelectricalout
of the reach of children.
• Moisture causes damage to electronics. Avoid water
exposure to all equipment not specifically designed and
protected for this purpose.
• Neverlickorplaceanyportionofyourmodelinyourmouth
as it could cause serious injury or even death.
• First-time builders should seek advice from people with
building experience to operate the model correctly and meet
its performance potential.
• Exercisecautionwhenusingtoolsandsharpinstruments.
• Take care when building, as some parts may have sharp
edges.
• Immediatelyafterusingyourmodel,doNOTtouchequipment
on the model such as the motor, electronic speed control
and battery, because they generate high temperatures. You
may burn yourself seriously touching them.
• Donotputfingersoranyobjectsinsiderotatingandmoving
parts, as this may cause damage or serious injury.
• Be sure that your operating frequency is clear before
turning on or running your model, and never share the same
frequency with somebody else at the same time.
• Ensurethatothersareawareoftheoperatingfrequencyyou
are using and when you are using it.
• Always turn on your transmitter before you turn on the
receiver in the car. Always turn off the receiver before
turning your transmitter off.
• Keepthewheelsofthemodeloffthegroundwhenchecking
the operation of the radio equipment.
WARNING: Read the ENTIRE instruction manual to become familiar with the features of the product before
operating. Failure to operate the product correctly can result in damage to the product, personal property and cause
serious injury.
ThisisasophisticatedhobbyproductandNOTatoy.Itmustbeoperatedwithcautionandcommonsenseandrequires
some basic mechanical ability. Failure to operate this Product in a safe and responsible manner could result in injury
or damage to the product or other property. This product is not intended for use by children without direct adult
supervision. Do not attempt disassemble, use with incompatible components or augment product in any way without
the approval of Horizon Hobby, Inc. This manual contains instructions for safety, operation and maintenance. It is
essential to read and follow all the instructions and warnings in the manual, prior to assembly, setup or use, in order
to operate correctly and avoid damage or serious injury.
Meaning of Special Language:
The following terms are used throughout the product literature to indicate various levels of potential harm when operating this
product:
NOTICE: Procedures, which if not properly followed, create a possibility of physical property damage AND little or no possibility
of injury.
CAUTION: Procedures, which if not properly followed, create the probability of physical property damage AND a possibility of
serious injury.
WARNING: Procedures, which if not properly followed, create the probability of property damage, collateral damage, and serious
injuryORcreateahighprobabilityofsupercialinjury.

2
INSTRUCTION MANUAL
EN
Safety Precautions and Warnings............................................................................................................................................................................ 1
Specifications.............................................................................................................................................................................................................2
Operation
Components........................................................................................................................................................................................................3
InstallingVehicleBattery,AntennaTube,andBody.......................................................................................................................................... 3
Transmitter Controls .......................................................................................................................................................................................... 4
ChargingtheBattery........................................................................................................................................................................................... 5
InstallingTransmitterBattery............................................................................................................................................................................. 5
Getting Started ................................................................................................................................................................................................... 6
Finishing.............................................................................................................................................................................................................. 6
Operation ............................................................................................................................................................................................................7
Maintenance
Setting the Gear Mesh ....................................................................................................................................................................................... 8
Shock Cleaning/Maintenance............................................................................................................................................................................. 8
Parts Diagram...................................................................................................................................................................................................... 9
Wheel Assembly ............................................................................................................................................................................................... 11
Electrical Layout................................................................................................................................................................................................ 11
Fasteners........................................................................................................................................................................................................... 11
Electronic Speed Control (ESC)......................................................................................................................................................................... 12
Troubleshooting Guide ...................................................................................................................................................................................... 12
Warranty Information........................................................................................................................................................................................ 13
Contact Information .......................................................................................................................................................................................... 14
table of contents
Transmitter
Frequency 27 MHz
Modulation Pulse Proportional
Modulation (PPM)
Battery AA x 8
Current Consumption 200 mAh
Size 17 x 23.5 x 7.5 mm
Weight 382 g
Servo
Power Supply 4.8V~6V (shared with
receiver)
OutputTorque 3 kg-cm
OperatingSpeed 0.23sec/60 degrees of
travel
Size 40.5 x 20 x 36.8 mm
Receiver
Frequency 27 MHz
Intermediate Frequency 445 KHz
Range 20 KHz
Current Consumption 18 mAh
Size 27 x 36 x 16 mm
Weight 15g
Electronic Speed Control (ESC)
Input Voltage 7.2–8.4V
Electric Capacity (FET) Forward 80 A/240 A
Electric Capacity (FET) Reverse 60 A/160 A
PWM Frequency 1KHz
BECVoltage 5 V/1 A
Size 27 x 35 x 17.3 mm
Weight 34 g - 36 g
specifications
icon key
Safety maintenance
operation

31/10 ELECTRIC STADIUM
TRUCK
EN
components
Transmitter
Electrix RC Circuit
1/10 Stadium Truck
ECX1000
Antenna Tube
ECX1087
included items
7.2V NiMh battery
(DYN1050)
Note: Charger power outlet
terminals not shown.
ECX1075BatteryCharger
ECX1075AUBatteryCharger(AU)
ECX1075EUBatteryCharger(EU)
ECX1075UKBatteryCharger(UK)
AA (8)
installing Vehicle battery,
antennatube and body
ECX1048BodyClips(8)
• Turnthethumbnutsonthechassistoremovethebatterystrap
holding the battery. Remove or install a battery and replace the
battery strap, locking the strap in place by turning the thumb
nuts.
• Thefoamblock(ECX1053)canbeputinfrontofthebatteryso
the weight of the battery increases rear traction or in back of the
battery to increase steering.
Antenna Tube
4
INSTRUCTION MANUAL
EN
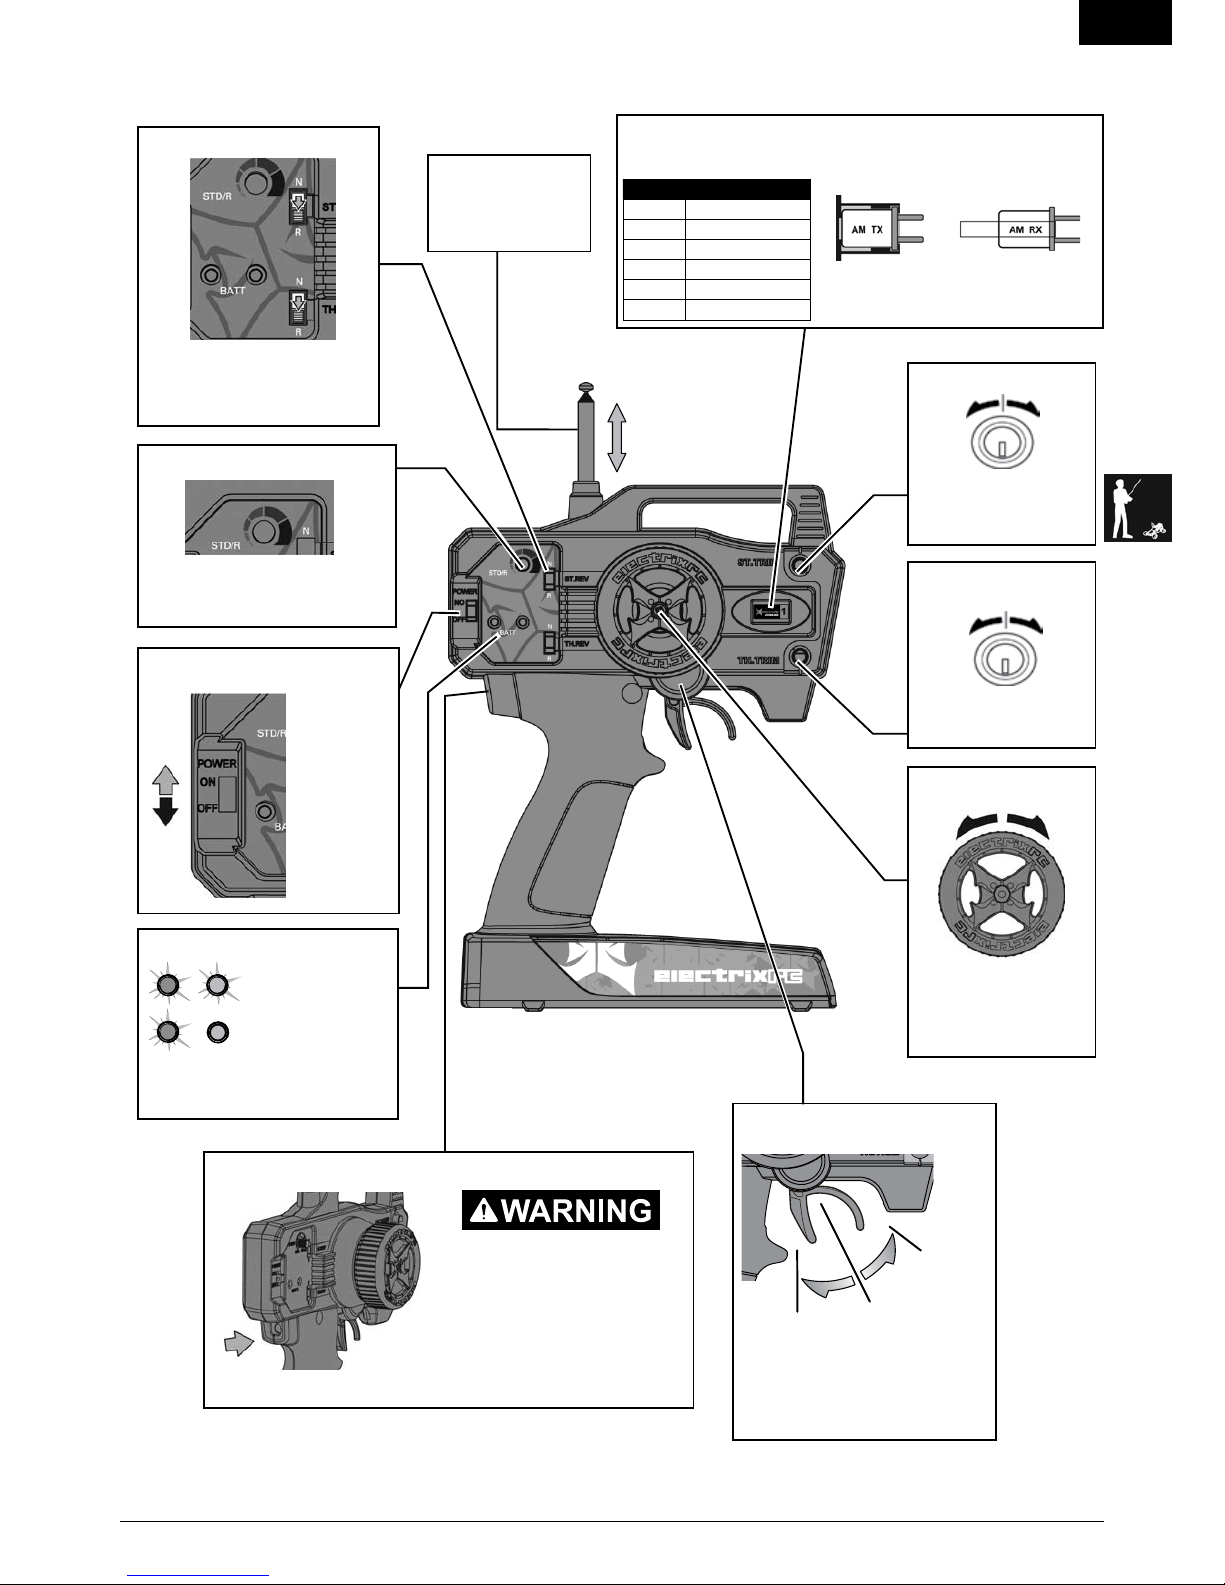
POWER SWITCH
REVERSE SWITCH
THROTTLE TRIM
STEERING TRIM
STEERING WHEEL
ANTENNA
Pull antenna out to its
full length for best results
(ECX1067AntennaOnly)
Adjusts the neutral point of
the electronic speed control
Adjust top make the vehicle
drive straight with no input
at the steering wheel
transmitter controls
Control steering. Right and
Left steering with ST. REV
Switch on N (See ST. REV
switch)
Allows you to change the
direction of steering (ST. REV)
and throttle (TH. REV) controls.
(Default settings are “N”)
Power on
or off the
transmitter
BATTERY LEVEL INDICATOR
Note: Red light will flash with an
audible signal (beep) when batteries
are low
Good battery power
Low battery power
THROTTLE TRIGGER
Controls power to motor for forward
or reverse (See TH. REV switch)
Stop
Reverse
(when TH.
REV switch
on N)
Forward (when
TH. REV switch
on N)
AM 27 MHZ TRANSMITTER CRYSTAL
AM Transmitter Crystal
(RX) AM Receiver Crystal
(RX)
Note: Paired AM crystals must be
replacedto changecontrolfrequencies.
DoNOTuseFMCrystals.
ST. D/R
Adjusts the amount the front wheels
move when turned left or right
(Steering Dual Rate)
CHARGER PORT
Read instructions before charging.
Charge only rechargeable batter-
ies. Non-rechargeable batteries
may burst causing injury to persons
and/or damage to property.
Note: The center pin on the charge jack is positive.
Part # Description
ECX1081 Crystal Set 1 26.995
ECX1082 Crystal Set 2 27.045
ECX1083 Crystal Set 3 27.095
ECX1084 Crystal Set 4 27.145
ECX1085 Crystal Set 5 27.195
ECX1086 Crystal Set 6 27.255

51/10 ELECTRIC STADIUM
TRUCK
EN
Note: Charger
power outlet
terminals not
shown.
Compatible
Battery
Charger
Attach battery connector to
the charger correctly. 7.2V NiMh battery
ALWAYS use fully charged batteries in the transmitter.
Low battery power can result in loss of control of the
R/C vehicle.
NEVER install damaged batteries, batteries of mixed
types or batteries of different ages in the transmitter.
Remove exhausted batteries.
NEVER store transmitter with batteries installed.
1. Slide panel open on
bottom of transmitter.
2.Obeybatteryplus(+)
and minus (-) diagram
in transmitter to install
eight (8) AA batteries.
3. Slide panel closed on
transmitter.
installingtransmitter batteries
• Read all safety precautions and literature prior to use of this
product.
• Never allow minors to charge battery packs without adult
supervision.
• Neverattempttochargedeadordamagedbatteries.
• Never charge a battery if the cable has been pinched or
shorted.
• Never allow batteries or charger to come into contact with
moisture at any time.
• Never charge batteries in extremely hot or cold places
(recommended between 50–80 degrees Fahrenheit) or place in
direct sunlight.
• Always use only NiMH rechargeable batteries. This charger
cannot charge batteries such as “heavy duty,” “alkaline battery,”
or “mercury battery.”
• Alwaysconnectthepositiveredlead(+)andnegativeblacklead
(-) terminals of the battery to the charger terminals correctly.
• Alwaysdisconnectthebatteryandchargeraftercharging,and
let them cool between charges.
• Alwaysinspectthebatterybeforecharging.
• AlwaysterminateallprocessesandcontactHorizonHobbyifthe
product malfunctions.
• Alwaysmakesureyouknowthespecificationsofthebatteryto
be charged or discharged to ensure it meets the requirements of
this charger.
• Neverconnectmorethanonebatterypacktothischargerata
time.
• Alwaysconstantlymonitorthetemperatureofthebatterypack
while charging.
• Always end the charging process if the charger or battery
becomes hot to the touch or starts to change form during the
charge process.
chargingthe battery
Always charge
Batteries away from
flammable materials.
Never leave
charging Batteries
unattended.
Never charge
Batteries outside
recommended levels.
Never charge
damaged Batteries.
Note: The vehicle battery charger
produces 300 milliAmps per hour.
Divide the mAh capacity on the
label of a battery by 300 to know
how long battery charging will
require. For example, an 1800
mAh battery requires six (6) hours
to charge.
Note: Alkaline AA size batteries are recommended.
Note:OptionalAANiMhbatterychargerDYN1970is
available. Use only batteries approved for use with
that charger. DYN1970 2300mAh Tx NiMH Conversion
Kit:FUT, ECX

6
INSTRUCTION MANUAL
EN
finishing
3. Disconnect Battery 4. Remove Battery from vehicle
1. Power off Electronic Speed Control (ESC) 2. Power off the Transmitter and Lower Antenna
Note: To prevent
damage to antenna,
collapse the antenna
by pulling the lower
sections in first.
getting started
1. Extend Antenna and Power on Transmitter
3. Do a Test of Transmitter’s control of vehicle
with vehicle wheels off ground
4. Start driving slowly and if the vehicle does not
go straight, adjust steering trim dial on Transmitter
Note: Seat motor brushes by driving smoothly on a flat surface during use of the first battery charge.
2. Connect battery (page 3) to Electronic Speed Con-
trol (ESC) and power on the ESC

71/10 ELECTRIC STADIUM
TRUCK
EN
operation
Always turn on your transmitter before you turn
on the receiver in the car. Always turn off the
receiver before turning your transmitter off.
ALWAYSoperatevehicleinawideopenarea.Operatingthevehicleinasmallspaceorindoorscancauseoverheatingatlowspeeds.Operating
atlowspeedmakesheatintheelectronicspeedcontrol(ESC).Overheatingcandamagethevehicleandfailuremayresult.
Motor Care
•Seatmotorbrushesbydrivingsmoothlyonaflatsurfaceduringuseofthefirstbatterycharge.
•Prolongmotorlifebypreventingoverheatconditions.Unduemotorwearresultsfromfrequentturns,stopsandstarts,pushingobjects,
driving in deep sand and tall grass and driving continuously up hill.
•OvertemperatureprotectionisinstalledontheESCtopreventcircuitdamage,butcannotprotectthemotorfromdrivingagainstheavy
resistance.

8
INSTRUCTION MANUAL
EN
settingthe gear mesh
shock cleaning/maintenance
•Oilfilledshockswillrequireregularmaintenanceduetotheoilbreaking
down or gets dirty. This maintenance should be performed after about
every 3 to 5 hours of use depending on conditions that the vehicle is used
in.
•Remove the shock from the vehicle.
•Remove the cap from the shock body and dispose of fluid.
•Disassemble the shock. Clean thoroughly with DYN5505. Dry parts before
assembly.
•Assemble the shock and refill the shock body with silicone fluid (30 weight
recommended).
•Slowlymovetheshaftandpistonupanddowntoremoveairbubbles.
•Movethepistontothemidwaypointofthebodyandinstallthecap.
•Wipe off any overflowing fluid.
•Whenproperlyfilled,thepistonshouldreboundabout3/8in(9.5mm)after
being pushed in fully.
•Install shock on vehicle.
Front Shock
ECX1043
ECX1037
ECX1037
ECX1041
ECX1037
ECX1043
Rear Shock
ECX1036
ECX1038
ECX1038
ECX1043
ECX1037
ECX1037
ECX1038
ECX1042
ECX1040
ECX1057
ECX1037
ECX1043
ECX1038
ECX1039
ECX1036
ECX1038
ECX1038
ECX1037
ECX1057
REAR SHOCK FRONT SHOCK
•Loosenthetwo(2)motorscrews.
•Putasmallpieceofpaperbetweenthepinionand
spur gears.
•Pushthegearstogetherwhiletighteningthemotor
screws.
•Removethe paperandthegears shouldmovea
small amount.
•Reinstallgearcover.
Proper gear mesh (how gear teeth meet) is important to the
performance of the vehicle. When gear mesh is too loose, the
spur gear could be damaged by the pinion gear of the motor. If the
mesh is too tight, speed could be limited and the motor and ESC
will overheat.
Note: You must remove the
vehicle’s gear cover to do
this adjustment.
Ride Height Adjustment
Ride height is an adjustment that affects the way the vehicle jumps, turns and goes
over bumps. Drop one end of the vehicle from approximately 6 inches (152.4 mm) in
height onto a flat surface. When dropping the front of the vehicle, after the vehicle
settles make sure the front arms are equal and parallel to the flat surface. Do the
same with the rear and look at the rear to make sure both arms are parallel with
the flat surface.
Lower the front ride height to increase steering. Lower the rear ride height to
increase traction but decrease steering.
Gear mesh has already been set at the factory, and setting it is
only necessary when changing motors or gears.
Part # Description
ECX1036 ShockBodySet
ECX1037 Shock Caps, Pistons
ECX1038 Shock Parts Set
ECX1039 Front Shock Shaft (2)
ECX1040 Rear Shock Shaft (2)
ECX1041 Front Shock Springs (2)
ECX1042 Rear Shock Springs (2)
ECX1043 ShockO-RingSet
91/10 ELECTRIC STADIUM
TRUCK
EN
M3x12
M3x18
M4.3x13
M4.3x13
M3x8
M3x18
M3x10
M3x10
M3x12
M3x25
M3x25
M3x10
ECX1069
ECX1017
ECX1068
ECX1088
ECX1053
ECX1058 ECX1050
ECX1058
ECX1058
ECX1065
ECX1056
ECX1065
ECX1028
ECX1029
ECX1028
ECX1028
ECX1046
ECX1028
ECX1029
ECX1091
ECX1092
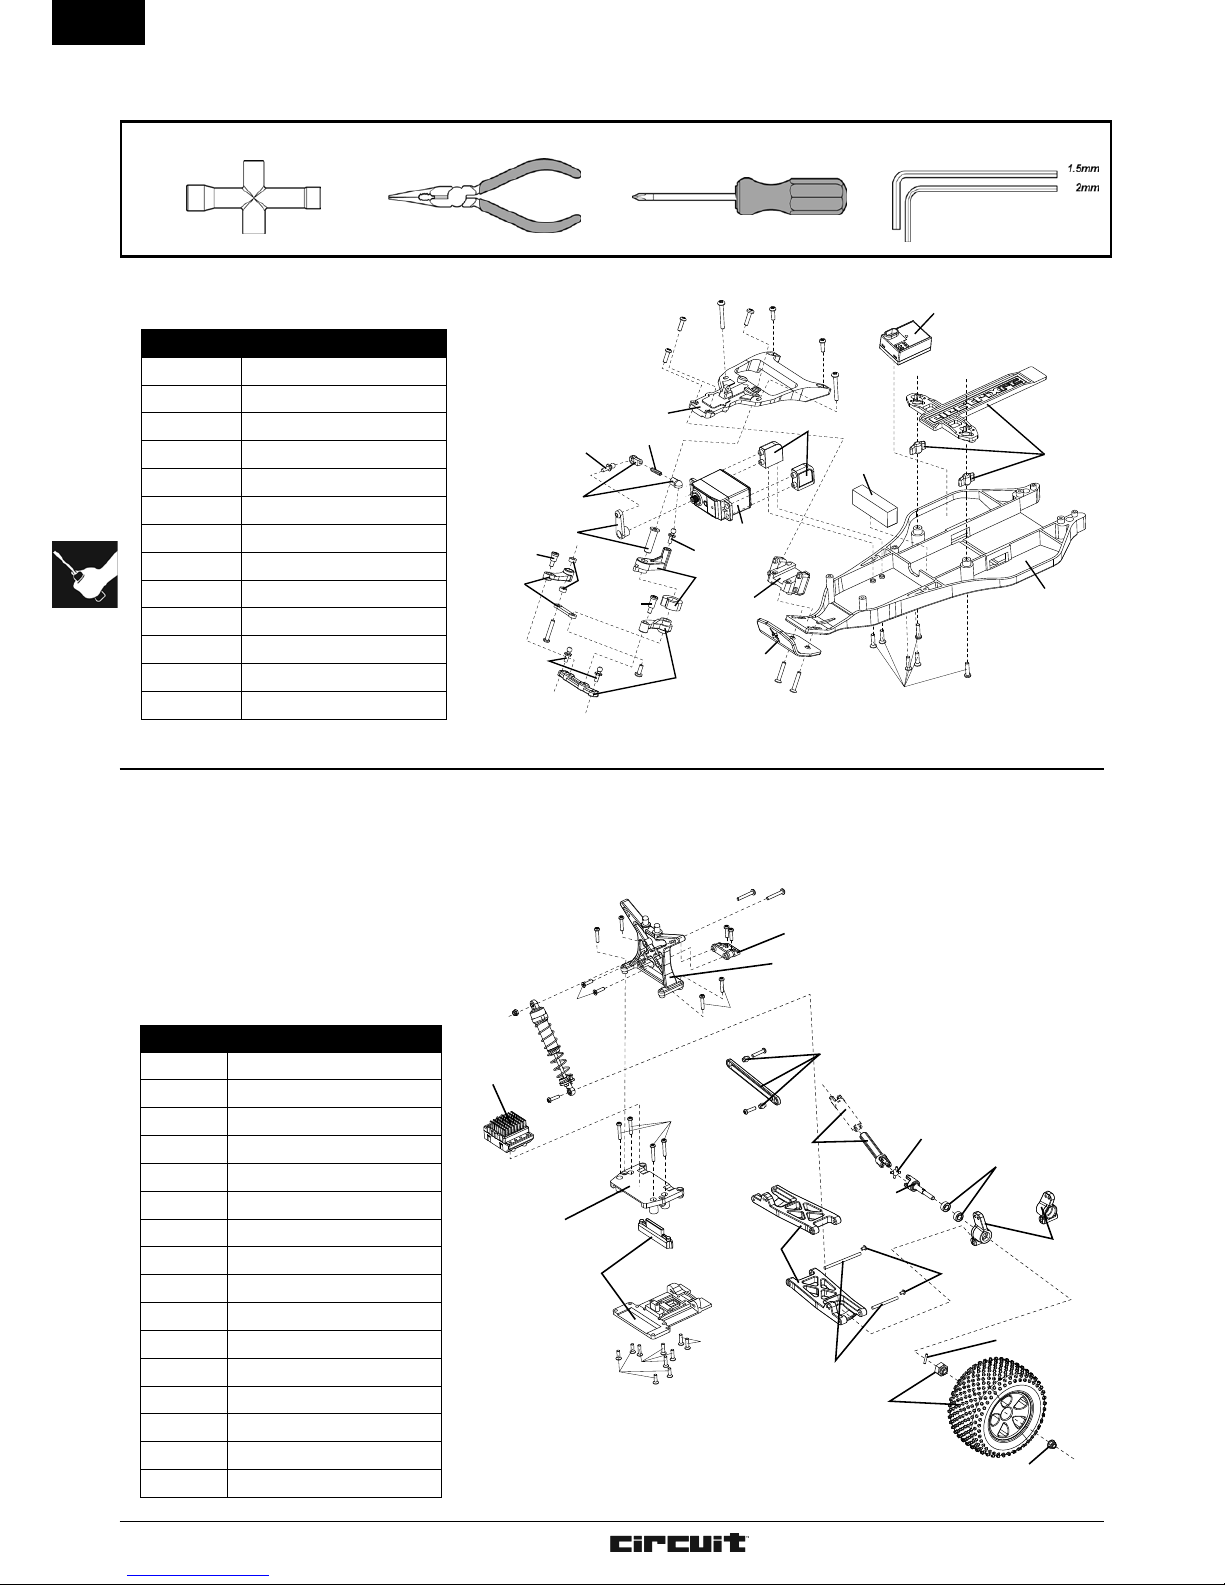
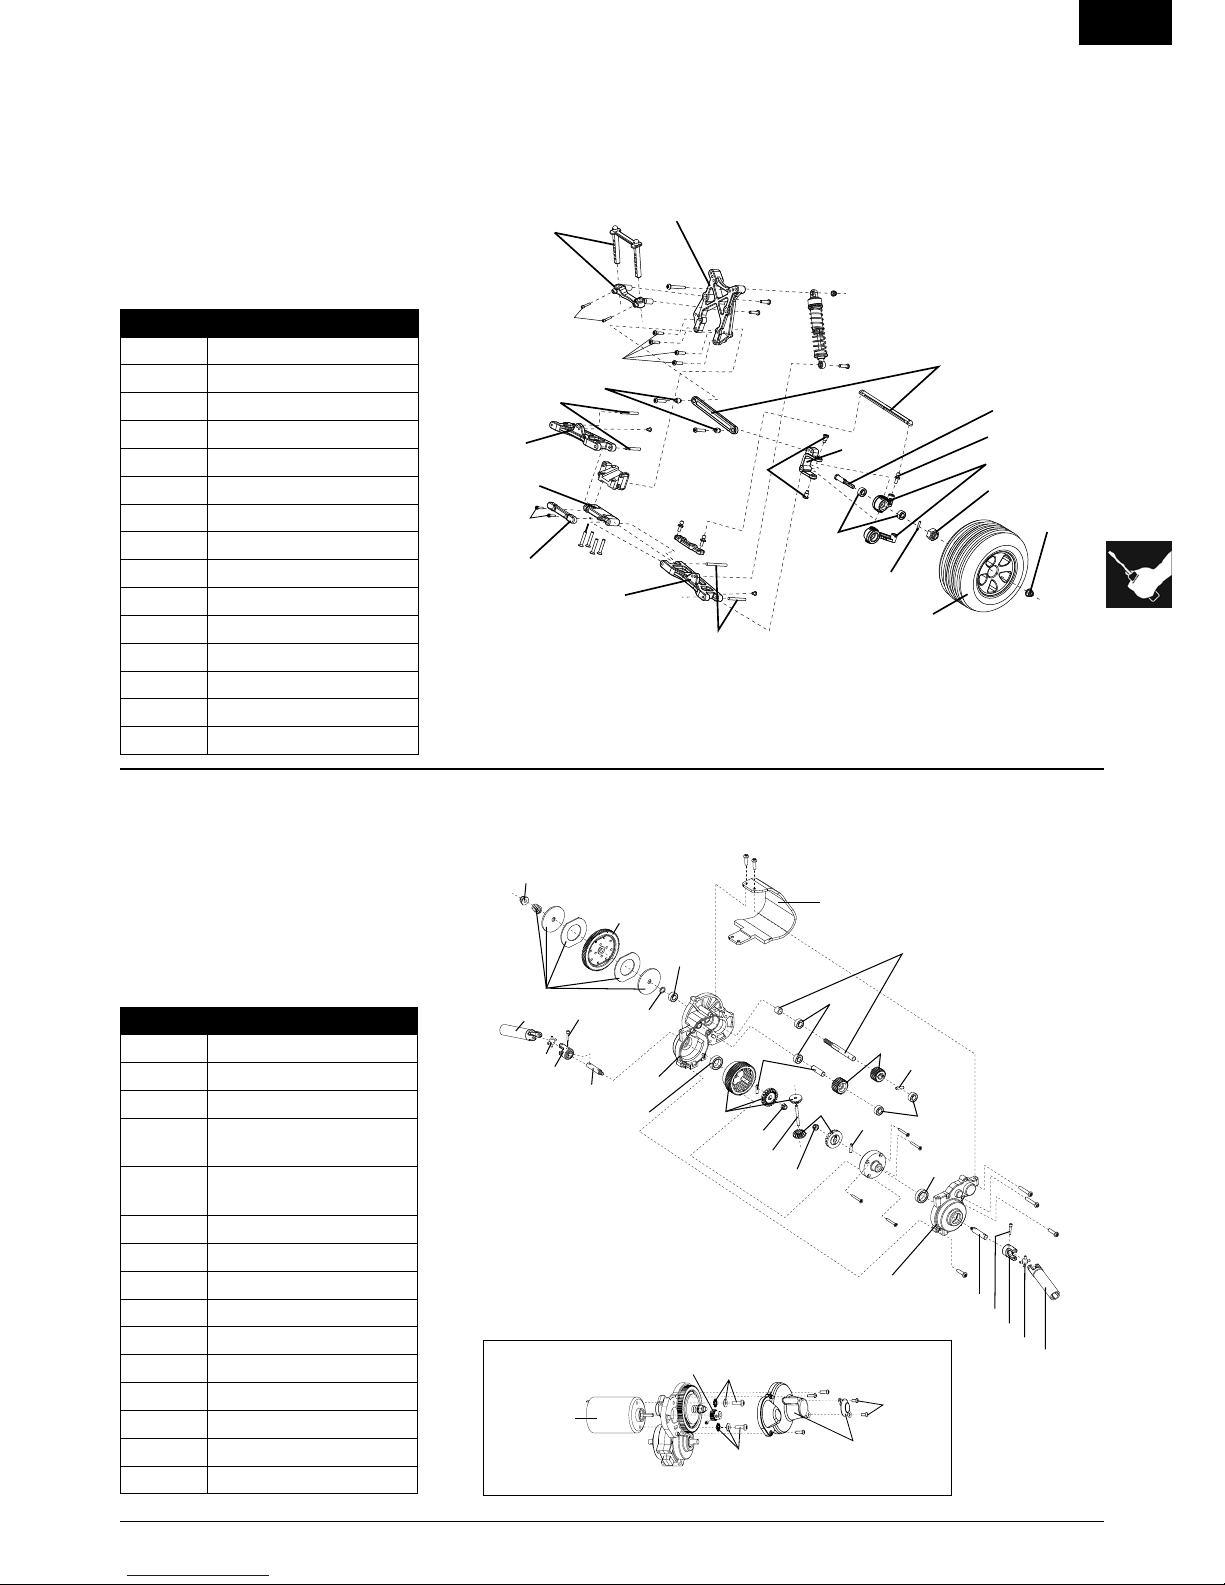
parts diagram
MAIN CHASSIS
REAR SUSPENSION
M3x12
M3x16
M2.5x4
M2.5x4
M3x12
M3x12
M3x12
M3x10
M3x10
M3x20
M3x16
M3x16
M3x20
M3x12
M3x12
ECX1019
ECX1092
ECX1088
ECX1020
ECX1021
ECX1032
ECX1031
ECX1034
ECX1015
ECX1090
ECX1049
ECX1006
ECX1044
ECX1045
ECX1060
M3x18
ECX1070
ECX1046
Hex wrench
Screwdriver (small)
Cross wrench Long nose pliers
recommended items
Note: Not all parts shown. Wiring shown on diagram on page 12. Illustrations are not to scale.
Part # Description
ECX1017 Main Chassis
ECX1028 Servo Saver Set
ECX1029 Top Plate
ECX1050 Set Screw M3x12 (4)
ECX1053 FoamBlock
ECX1056 Bushing3x6x2.8mm(2)
ECX1058 BallStud(6)
ECX1065 Shoulder Screw Set (6)
ECX1068 Receiver
ECX1069 Servo
ECX1088 BatteryHoldDown
ECX1091 Front/RearBumperSet
ECX1092
Rear Suspension Mount Set
Part # Description
ECX1006 Chrome wheel spiked tire (2)
ECX1015 WheelBearingSet
ECX1019 Rear Suspension Arm Set
ECX1020 Shock Tower Set
ECX1021 Transmission Case Set
ECX1031 Driveshaft Set
ECX1032 DriveshaftPivotBall(4)
ECX1034 Rear Axle (2)
ECX1044 Hinge Pin Set
ECX1045 Hinge Pin Screws (8)
ECX1049 Wheel Pins (4)
ECX1060 M4 Locknut (4)
ECX1070
ESC
ECX1088 BatteryHoldDown
ECX1090
Rear Hub Carrier Set
ECX1092 Rear Suspension Mount Set
10
INSTRUCTION MANUAL
EN
TRANSMISSION
M3x12
M3x12
M3x18
M2x16
M2x16
M2x16
M3x13
M3x10
M3x10
M3x13
ECX1091
ECX1021
ECX1015
ECX1023
ECX1022
ECX1025
ECX1025
ECX1025
ECX1021
ECX1022
ECX1025
ECX1022
ECX1034
ECX1033 ECX1052
ECX1015
ECX1032
ECX1031
ECX1031
ECX1024
ECX1034
ECX1026
ECX1026
ECX1059
ECX1059
ECX1033
ECX1060
ECX1032
ECX1076 or
in ECX1022
ECX1015
ECX1055
ECX1055
parts diagram
FRONT SUSPENSION
M4.3x13
M3x12
M3x25
M4.3x13
M4.3x13
M3x18
M2x8
M3x16
M3x16
M2.5x4
M3x12
M3x12
M3x13
M3x12
M2.5x4
ECX1015
ECX1049
ECX1089
ECX1090
ECX1090
ECX1065
ECX1018
ECX1018
ECX1046
ECX1060
ECX1005
ECX1044
ECX1046
ECX1058
ECX1035
ECX1020
ECX1028
ECX1092
ECX1044
ECX1093
M2.5x4
M2.5x8
M2.5x8
M3x10
M3x10
ECX1071
ECX1072 ECX1098
ECX1098
ECX1045
ECX1027
Note: Use a small amount of grease
when assembling gears. Keep grease off
ECX1024, ECX1072, EXC1076.
Part # Description
ECX1005 Chrome wheel ribbed tire (2)
ECX1015 WheelBearingSet
ECX1018 Front Suspension Arm Set
ECX1020 Shock Tower Set
ECX1035 Front Axle (2)
ECX1044 Hinge Pin Set
ECX1046 Camber, Toe Link Set
ECX1049 Wheel Pins (4)
ECX1058 BallStud(6)
ECX1060 M4 Locknut (4)
ECX1065
Shoulder Screw Set (6)
ECX1089 SteeringBlockSet
ECX1090 Rear Hub Carrier Set
ECX1092 Rear Suspension Mount Set
ECX1093
FrontBodyMountSet
Part # Description
ECX1015 WheelBearingSet
ECX1021 Transmission Case Set
ECX1022 Transmission Gear Set
ECX1024 Slipper Clutch Plates, Pads,
Spring
ECX1025 Transmission Idler Shaft,
Drive Pins
ECX1026 Transmission Drive Shaft (2)
ECX1031 Driveshaft Set
ECX1032 DriveshaftPivotBall(4)
ECX1033 Screw (4)
ECX1034 Rear Axle (2)
ECX1052 Washer Set
ECX1055 Bearings10x15x4(2)
ECX1059 M3 Locknut (4)
ECX1076 Spur Gear
ECX1091 Front/RearBumperSet
Note: The slipper clutch can be adjusted using
this locknut (ECX1060). Fully tighten the locknut.
Then loosen the nut three full turns.
11 1/10 ELECTRIC STADIUM
TRUCK
EN
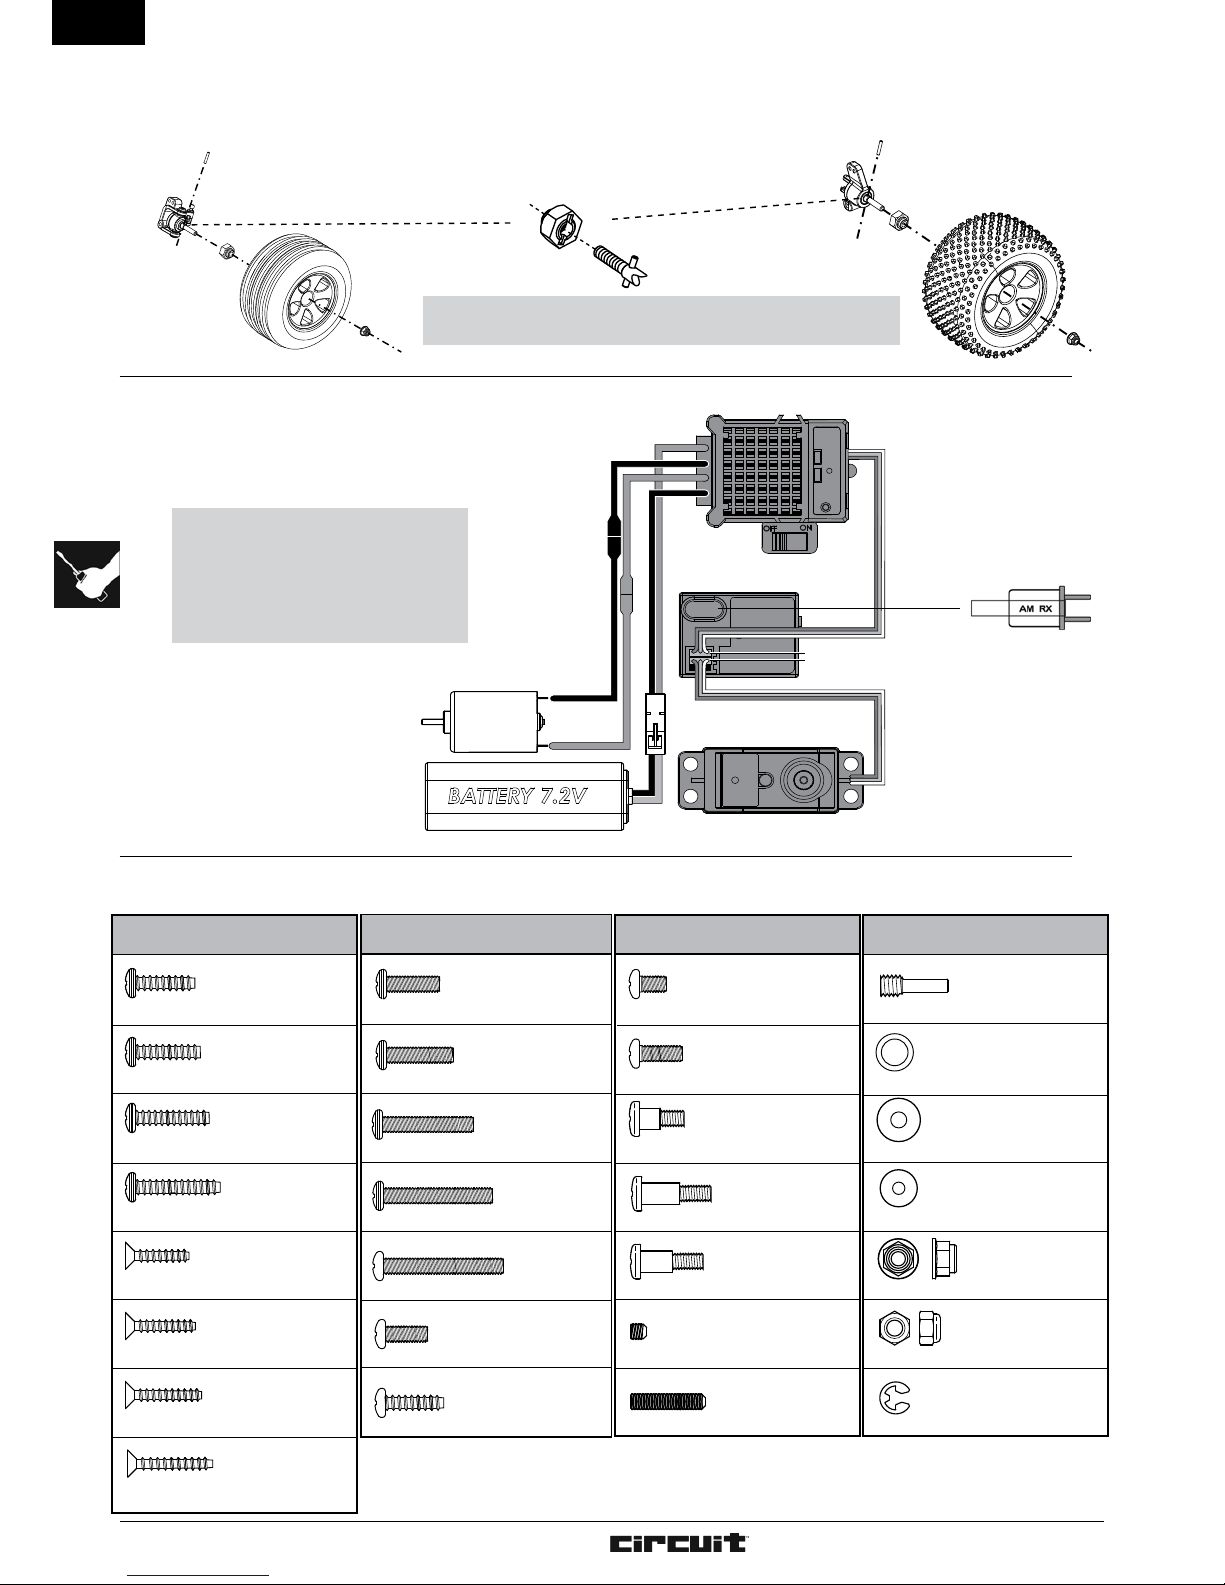
fasteners
Note: For correct operation, Channels 1
and 2 must be used as shown in wiring
diagram.
The motor can be disconnected from the
ESC at the connectors in the wiring.
wheel assembly
FRONT WHEEL
DETAIL OF DRIVE HEX
REAR WHEEL
Speed Controller
Receiver
Battery 7.2V
Motor
Steering Servo
CH.2
CH.1
ECX1069
ECX1068
ECX1070
ECX1071
DYN1050
Channel 2
Channel 1
Note: When installing wheel, make sure drive hex is aligned with the drive
pin. When the drive hex is removed, the drive pin can fall out of the axle.
No. Description
TAPPING BINDER HEAD M3x10mm
TAPPING BINDER HEAD M3x12mm
TAPPING FLAT HEAD M3x15mm
TAPPING FLAT HEAD M3x12mm
TAPPING FLAT HEAD M3x10mm
TAPPING BINDER HEAD M3x18mm
TAPPING FLAT HEAD M2x16mm
TAPPING BINDER HEAD M3x16mm
No. Description
WASHER 5x7x0.5mm
E-CLIP E2.5
FLANGED LOCK NUT M4
WASHER 3x8x0.5mm
LOCK NUT M3
WASHER 2x7x0.5mm
SET SHAFT SCREW M3x13mm
No. Description
BUTTON HEX M2.5x4mm
SET SCREW M3x3mm
SET SCREW M3x12mm
STEP SCREW M3x0.5x13.4mm
STEP SCREW M3x0.5x10.5mm
BUTTON HEX M2.5x8mm
STEP SCREW M3x0.5x7.4mm
No. Description
BINDER HEAD M3x8mm
BINDER HEAD M3x12mm
BINDER HEAD M3x20mm
BINDER HEAD M3x25mm
BUTTON HEAD M3x30mm
BUTTON HEAD M2x6mm
TAPPING BUTTON HEAD M3x10mm
AM Receiver
Crystal (RX)
electrical layout
12
INSTRUCTION MANUAL
EN
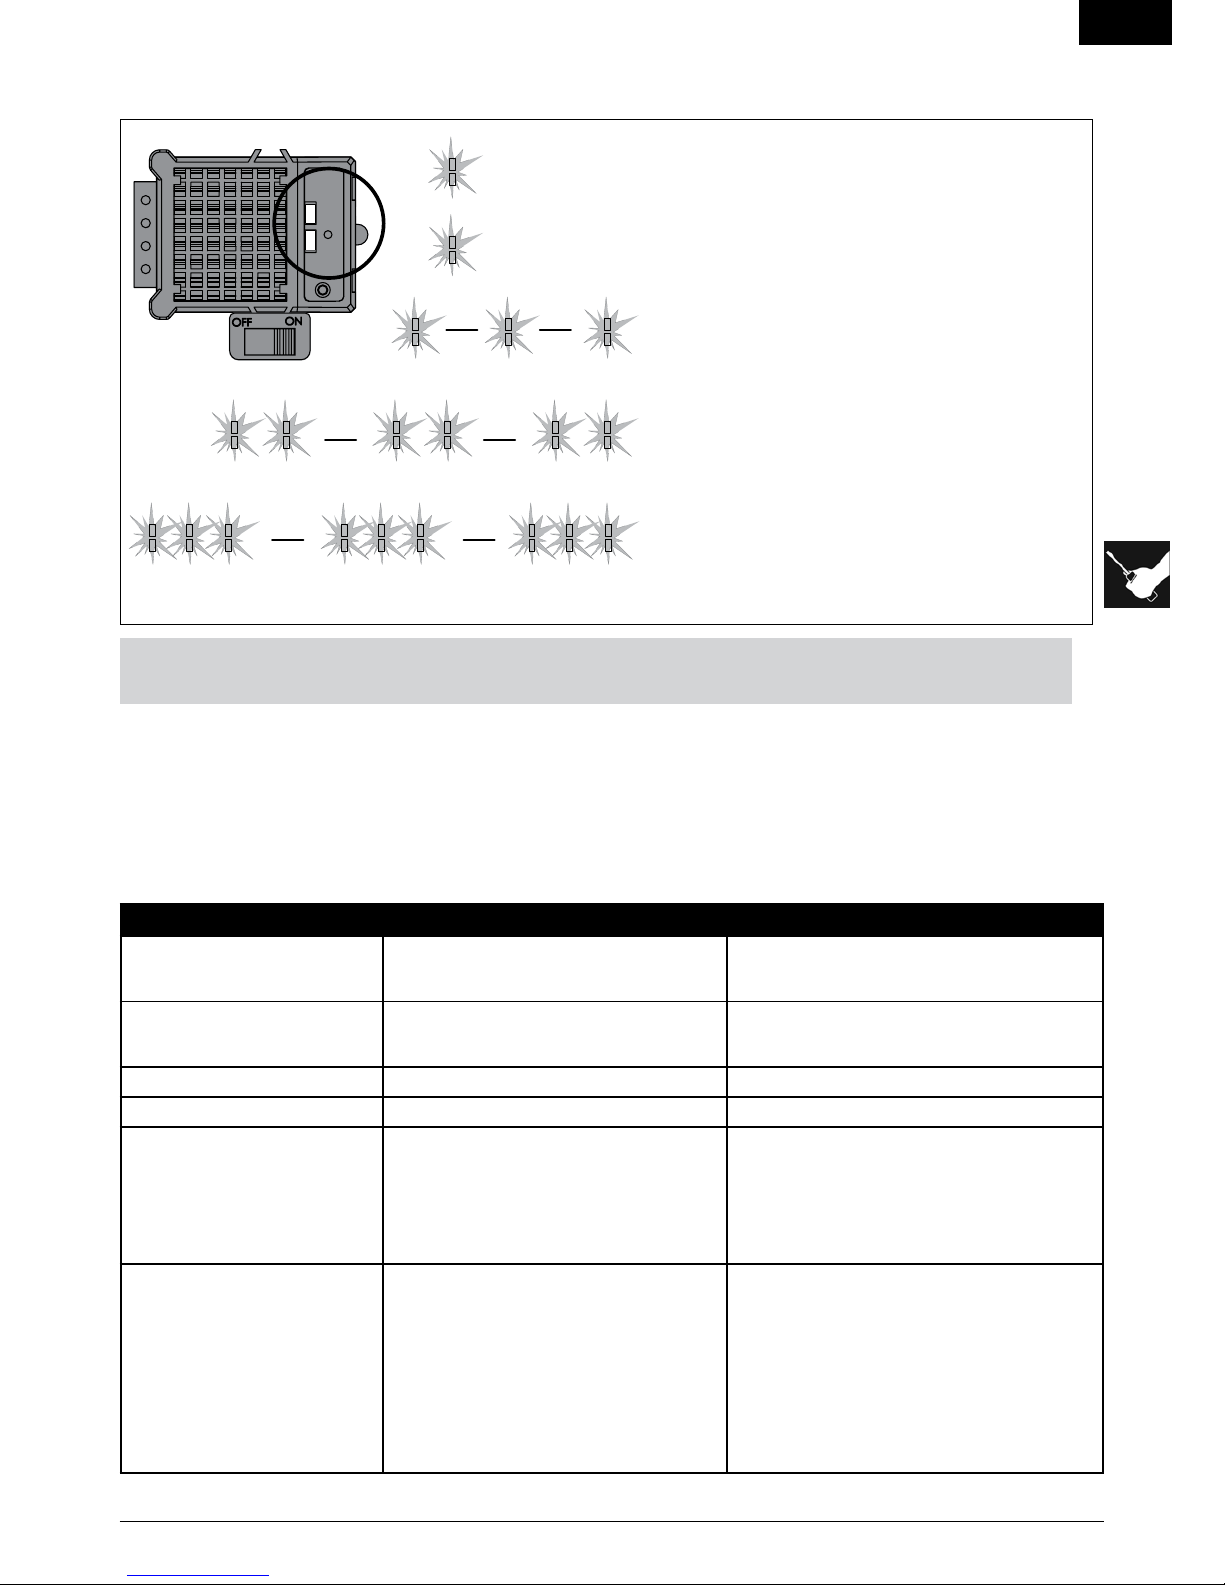
electronic speed control (esc)
Continuous green light Green light is signal for Forward.
Continuous red light Red light is signal for Reverse.
beepbeep beep
Red light flashing with beep is signal that a
transmitter is not being received.
beepbeep beepbeep beepbeep
Red light flashing twice with beeps is signal
that vehicle battery is low.
beepbeep beep beepbeep beep beepbeep beep
Red light flashing three times with beeps
is signal that motor is
overloaded or temperature of ESC is high.
Problem Possible Cause Solution
Short Runtime Batterydamaged/notcharged
Motor dirty or brushes worn
Check/change battery
Check/clean/replace
Sluggish Action Motor dirty or brushes worn
Bindindrivetrain
Check/clean/replace
Clean/adjust
Controls Reversed ST. REV or TH. REV Change switch position
Motor/ESC overheat Over-geared Install smaller pinion
Doesn’tOperate Transmitter batteries low
Transmitter powered off
ESC powered off
VehicleBattery
Replace/recharge
PowerOn
PowerOn
Replace/recharge
Poor Range/Fail TransmitterBatterieslow
Transmitter antenna
VehicleBattery
Vehicle antenna
Motor dirty or brushes worn
Loose connectors/wires
Replace/recharge
Check/tighten
Replace/recharge
Check/repiar/replace
Check/clean/replace
Loose connectors/wires
troubleshooting guide
Note: Low voltage cutoff (LVC) will stop the vehicle when the battery gets low. The ESC will reset after
approximately ten (10) seconds. The vehicle can then be driven slowly back to the driver for battery recharge.
Note: When motor disconnected or damaged, beep may not be heard.

13 1/10 ELECTRIC STADIUM
TRUCK
EN
Warranty Period
Exclusive Warranty- Horizon Hobby, Inc., (Horizon) warranties
that the Products purchased (the “Product”) will be free from
defects in materials and workmanship at the date of purchase
by the Purchaser.
Limited Warranty
Horizon reserves the right to change or modify this
warranty without notice and disclaims all other
warranties, express or implied.
(a)This warranty islimited to theoriginal Purchaser (“Purchaser”)
andisnottransferable.REPAIRORREPLACEMENTASPROVIDED
UNDER THIS WARRANTY IS THE EXCLUSIVE REMEDY OF
THE PURCHASER. This warranty covers only those Products
purchased from an authorized Horizon dealer. Third party
transactions are not covered by this warranty. Proof of purchase
is required for all warranty claims.
(b) Limitations- HORIZON MAKES NO WARRANTY OR
REPRESENTATION, EXPRESS OR IMPLIED, ABOUT NON-
INFRINGEMENT, MERCHANTABILITY OR FITNESS FOR A
PARTICULAR PURPOSE OF THE PRODUCT. THE PURCHASER
ACKNOWLEDGESTHATTHEYALONEHAVEDETERMINEDTHAT
THEPRODUCTWILLSUITABLYMEETTHEREQUIREMENTSOF
THE PURCHASER’S INTENDED USE.
(c) Purchaser Remedy- Horizon’s sole obligation hereunder shall
be that Horizon will, at its option, (i) repair or (ii) replace, any
Product determined by Horizon to be defective. In the event of
a defect, these are the Purchaser’s exclusive remedies. Horizon
reserves the right to inspect any and all equipment involved
in a warranty claim. Repair or replacement decisions are at
the sole discretion of Horizon. This warranty does not cover
cosmetic damage or damage due to acts of God, accident,
misuse, abuse, negligence, commercial use, or modification
of or to any part of the Product. This warranty does not cover
damage due to improper installation, operation, maintenance,
or attempted repair by anyone other than Horizon. Return of any
Product by Purchaser must be approved in writing by Horizon
before shipment.
Damage Limits
HORIZONSHALLNOTBELIABLEFORSPECIAL,INDIRECTOR
CONSEQUENTIALDAMAGES,LOSSOFPROFITSORPRODUCTION
ORCOMMERCIALLOSSINANYWAYCONNECTEDWITHTHE
PRODUCT,WHETHERSUCH CLAIM ISBASEDIN CONTRACT,
WARRANTY,NEGLIGENCE,ORSTRICTLIABILITY.Further,inno
event shall the liability of Horizon exceed the individual price
of the Product on which liability is asserted. As Horizon has no
control over use, setup, final assembly, modification or misuse,
no liability shall be assumed nor accepted for any resulting
damageorinjury.Bytheactofuse,setuporassembly,theuser
accepts all resulting liability.
If you as the Purchaser or user are not prepared to accept the
liability associated with the use of this Product, you are advised
to return this Product immediately in new and unused condition
to the place of purchase.
Law: These Terms are governed by Illinois law (without regard
to conflict of law principals).
WARRANTY SERVICES
Questions, Assistance, and Repairs
Your local hobby store and/or place of purchase cannot provide
warrantysupportorrepair.Onceassembly,setuporuseofthe
Product has been started, you must contact Horizon directly.
This will enable Horizon to better answer your questions and
service you in the event that you may need any assistance.
For questions or assistance, please direct your email to
productsupport@horizonhobby.com, or call 877.504.0233 toll
free to speak to a Product Support representative. You may also
find information on our website at www.horizonhobby.com.
Inspection or Repairs
If this Product needs to be inspected or repaired, please use
theHorizon Online RepairRequest submission processfound
on our website or call Horizon to obtain a Return Merchandise
Authorization (RMA) number. Pack the Product securely using
a shipping carton. Please note that original boxes may be
included, but are not designed to withstand the rigors of
shipping without additional protection. Ship via a carrier that
provides tracking and insurance for lost or damaged parcels,
as Horizon is not responsible for merchandise until it arrives
and is accepted at our facility. An Online Repair Request is
available at www.horizonhobby.com http://www.horizonhobby.
com under the Repairs tab. If you do not have internet access,
please contact Horizon Product Support to obtain a RMA
number along with instructions for submitting your product
for repair. When calling Horizon, you will be asked to provide
your complete name, street address, email address and phone
number where you can be reached during business hours.
When sending product into Horizon, please include your RMA
number, a list of the included items, and a brief summary of the
problem. A copy of your original sales receipt must be included
for warranty consideration. Be sure your name, address, and
RMA number are clearly written on the outside of the shipping
carton.
Notice: Do not ship batteries to Horizon. If you have any issue
with a battery, please contact the appropriate Horizon Product
Support office.
Warranty Inspection and Repairs
To receive warranty service, you must include your
original sales receipt verifying the proof-of-purchase date.
Provided warranty conditions have been met, your Product will
be repaired or replaced free of charge. Repair or replacement
decisions are at the sole discretion of Horizon.
Non-Warranty Repairs
Should your repair not be covered by warranty the
repair will be completed and payment will be required
without notification or estimate of the expense unless
the expense exceeds 50% of the retail purchase cost.By
submitting the item for repair you are agreeing to payment of
therepairwithoutnotication.Repairestimatesareavailable
upon request. You must include this request with your repair.
Non-warranty repair estimates will be billed a minimum of ½
hour of labor. In addition you will be billed for return freight.
Horizon accepts money orders and cashiers checks, as well
as Visa, MasterCard, American Express, and Discover cards.
BysubmittinganyitemtoHorizonforinspectionorrepair,you
are agreeing to Horizon’s Terms and Conditions found on our
website under the Repairs tab.
Notice: Electronics and engines requiring inspection or repair
should be shipped to the following address:
Horizon Service Center4105 Fieldstone Road Champaign, Illinois
61822, USA
All other Products requiring warranty inspection or repair should
be shipped to the following address:
Horizon Product Support4105 Fieldstone Road Champaign,
Illinois 61822, USA
Please call 877-504-0233 with any questions or concerns
regarding this product or warranty.
warranty and repair policy
14
INSTRUCTION MANUAL
EN
contact information
declaration of conformity
(inaccordancewithISO/IEC17050-1)
No. HH2010060707
Product(s): NYA CIRCUIT 1/10TH STADIUM TRUCK
Item Number(s): ECX1000UK, ECX1000EU, ECX1100EU, ECX1100UK
Equipment class: 1
The object of declaration described above is in conformity with the requirements of the specifications listed below, following the
provisions of the European R&TTE directive 1999/5/EC:
EN 300-220 Technical requirements for Radio equipment.
EN 301 489-1, 301 489-3 General EMC requirements for Radio equipment
EN 60950 Safety
Signed for and on behalf of:
Horizon Hobby, Inc.
Champaign, IL USA
June 07, 2010
Steven A. Hall
Vice President
InternationalOperationsandRisk
Management
Horizon Hobby, Inc.
Instructions for disposal of WEEE by users in the European Union
This product must not be disposed of with other waste. Instead, it is the user’s responsibility to dispose of their waste
equipment by handing it over to a designated collections point for the recycling of waste electrical and electronic
equipment. The separate collection and recycling of your waste equipment at the time of disposal will help to conserve
natural resources and ensure that it is recycled in a manner that protects human health and the environment. For more
information about where you can drop off your waste equipment for recycling, please contact your local city office, your
household waste disposal service or where you purchased the product.
Country of
Purchase Horizon Hobby Address Phone Number / Email Address
United States of
America Horizon Service Center
4105 Fieldstone Rd
Champaign, Illinois
61822 USA
877-504-0233
productsupport@horizonhobby.com
United Kingdom Horizon Hobby Limited
Units 1-4 Ployters Rd
Staple Tye
Harlow, Essex
CM18 7NS
United Kingdom
+44(0)1279641097
sales@horizonhobby.co.uk
Germany Horizon Technischer
Service
Hamburger Str. 10
25335 Elmshorn
Germany
+4941214619966
service@horizonhobby.de
France Horizon Hobby SAS
14 Rue Gustave Eiffel
Zoned’ActivitéduRéveilMatin
91230 Montgeron
+33(0)160474470

Created 5/10 18212 © 2010 Horizon Hobby, Inc.
ECX1000UK, ECX1000EU, ECX1100EU, ECX1100UK
Table of contents
Other Electrix RC Motorized Toy Car manuals


Popular Motorized Toy Car manuals by other brands

Fisher-Price
Fisher-Price Power Wheels TrailBeast 74527 Owner's manual with assembly instructions

Jamara
Jamara Mercedes-Benz Arocs Instruction

Associated Electrics
Associated Electrics REEDY POWER RC10 T6.4 TEAM KIT instruction manual

Moni
Moni HP2 instruction manual

Jamara
Jamara BMW i4 Concept 2,4GHz instructions

Tameo Kits
Tameo Kits TMK 201 Assembly manual


