manuals.online logo
Brands
  1. Home
  2. •
  3. Brands
  4. •
  5. New Bright
  6. •
  7. Motorized Toy Car
  8. •
  9. New Bright 81410 User manual

New Bright 81410 User manual

Other New Bright Motorized Toy Car manuals

New Bright 614VR User manual

New Bright

New Bright 614VR User manual

New Bright Radio Control Vehicle User manual

New Bright

New Bright Radio Control Vehicle User manual

New Bright 6689 User manual

New Bright

New Bright 6689 User manual

New Bright 2435 User manual

New Bright

New Bright 2435 User manual

New Bright 61072UEP User manual

New Bright

New Bright 61072UEP User manual

New Bright 61088 User manual

New Bright

New Bright 61088 User manual

Popular Motorized Toy Car manuals by other brands

Eduard Humber Scout Car Mk.I exterior quick start guide

Eduard

Eduard Humber Scout Car Mk.I exterior quick start guide

Traxxas 4995X instructions

Traxxas

Traxxas 4995X instructions

Jamara VW T1 Bus Instruction

Jamara

Jamara VW T1 Bus Instruction

REVELL 68 CHEVY CHEVELLE SS 396 manual

REVELL

REVELL 68 CHEVY CHEVELLE SS 396 manual

Schumacher Pro Cat instruction manual

Schumacher

Schumacher Pro Cat instruction manual

Tamiya TT-01 TYPE E instruction manual

Tamiya

Tamiya TT-01 TYPE E instruction manual

Eduard Krupp Protze 6x4 1/48 quick start guide

Eduard

Eduard Krupp Protze 6x4 1/48 quick start guide

Team Durango DEX410v5 manual

Team Durango

Team Durango DEX410v5 manual

Jamara Mercedes Actros Muldenkipper 2,4 GHz Instruction

Jamara

Jamara Mercedes Actros Muldenkipper 2,4 GHz Instruction

PLAYMOBIL 9536 manual

PLAYMOBIL

PLAYMOBIL 9536 manual

Atomic BZ3 instruction manual

Atomic

Atomic BZ3 instruction manual

Aiyaplay 370-290V00 user manual

Aiyaplay

Aiyaplay 370-290V00 user manual

Power Wheels GRJ53 owner's manual

Power Wheels

Power Wheels GRJ53 owner's manual

ZEROTRIBE Zetricks ZT1144 instruction manual

ZEROTRIBE

ZEROTRIBE Zetricks ZT1144 instruction manual

INJUSA 412 Assembly instructions

INJUSA

INJUSA 412 Assembly instructions

Maverick MSC-30BR-WP instruction manual

Maverick

Maverick MSC-30BR-WP instruction manual

Land of B. Rollin' Riders quick start guide

Land of B.

Land of B. Rollin' Riders quick start guide

TLR 22SCT 2.0 user manual

TLR

TLR 22SCT 2.0 user manual

manuals.online logo
manuals.online logoBrands
  • About & Mission
  • Contact us
  • Privacy Policy
  • Terms and Conditions

Copyright 2025 Manuals.Online. All Rights Reserved.

Thank you for choosing a premium New Bright product.
OWNER’S MANUAL
Please read and understand all precautions prior to use.
USA & Canada
30-Day Limited Warranty
New Bright Industries warrants to the original purchaser that this product will be free of defects in materials and
workmanship for thirty (30) days from the date of purchase. In the event of such defect within the warranty period,
New Bright will repair or replace the product at our sole discretion. This warranty does not cover damage resulting from
unauthorized modications, accident, misuse or abuse.
Should your item have a defect covered under this warranty, rst call the toll free number listed below. Most problems
can be resolved in this manner. If necessary, you will be issued a Return Authorization (RA) number and instructions on
how to obtain a Product Return Form. The Product Return Form is to be used when returning a product to us (postage
pre-paid and insured by the consumer).
When returning a defective product, please package the product, the Product Return Form and a copy of the dated sales
receipt as proof of purchase. Be sure to mark the RA number on the Product Return Form. If the product is returned
without a dated sales receipt, it will be excluded from coverage under this warranty. Please allow 4 to 6 weeks for
delivery of repaired or replacement vehicles (depending on your location).
New Bright Industries’ liability for defects in materials and workmanship under this warranty shall be limited to repair or
replacement at our sole discretion. In no event shall we be responsible for incidental, consequential or contingent
damages (except in those states that do not allow this exclusion or limitation).
Valid only in the USA & Canada.
Contact New Bright Industries Customer Service Toll Free at:
1-877-NBI-TOYS
(1-877-624-8697)
Monday through Friday, 8:00 AM to 5:00 PM Eastern Time
L620104507/JN193-15
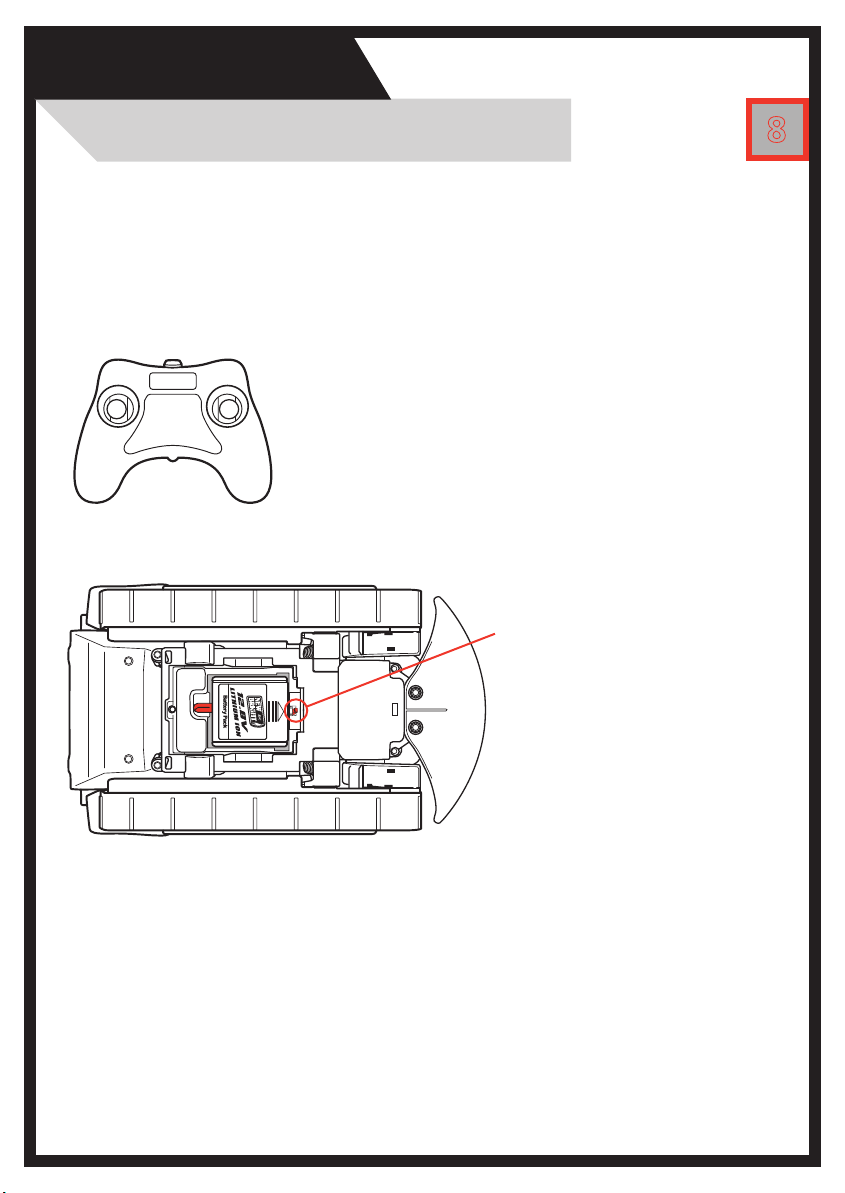
INPUT: 120V AC 60Hz 250mA. OUTPUT: 14.4V DC 500mA.
Section 1: Table of Contents
Section 2: Component Checklist
Section 3: Charging the Battery
Section 4: Battery Installation in Vehicle
Section 5: Vehicle Features and Functions
Removing the Vehicle Body Shell
Section 6: Battery Installation in Transmitter
Section 7: How to Drive
Section 8: Pairing Vehicle & Transmitter
Section 9: Proper Use
Precautions and Care
Section 10: Trouble Shooting and Support
Section 11: Cautions
New Bright
Table of Contents 1
REF-12018.22505102
1 1 2
4 1
New Bright
Component Checklist 2
AA AA
1
1. Plug the Charger into a standard indoor electrical outlet.
2. Insert the 12.8V rechargeable battery pack securely into the charging cradle (as shown
above). Be sure the arrows are properly matched.
3. When battery pack is properly inserted and charging unit is plugged into the outlet, the
charging status light will turn on, indicating the battery is charging. After approximately
one hour of charging the light will turn off, indicating that the battery is fully charged.
4. Charge will last approximately 15-20 minutes depending on terrain and driving style.
IMPORTANT: It is normal for the battery pack to become warm after charging and/or use. Be
sure to allow the battery pack to cool before using or recharging. Recharging a warm battery
pack will greatly reduce the battery life.
ATTENTION PARENTS:
• The Battery Charger & Battery Pack need to be periodically examined for potential
hazards. Any potentially hazardous parts need to be repaired or replaced.
IMPORTANT!
The included 12.8V Lithium Ion battery pack is only PARTIALLY CHARGED prior
to shipment and it is recommended the battery be fully charged before rst use.
12.8V Lithium
Ion Battery Pack
Charging
Status Light
3
Battery Pack
Charging the Battery
Battery Charger
Push and Hold Button
To Remove Battery
Locate and align arrow on battery pack with arrow inside battery compartment.
Place battery pack in battery compartment and slide battery forward in direction of arrow.
Once in place, turn locking tab to keep battery pack secure.
If battery pack is not completely in place locking tab will not fully turn.
4
Vehicle
Battery Installation
5
Vehicle
Features and Functions
ON/OFF
Switch
Body Shell Removal
Locate the body pins on top of vehicle body.
Pull pins as shown and set aside.
Lift and remove body shell.
6
Transmitter
Battery Installation
This transmitter is equipped with 2.4GHz technology which allows up to 12
vehicles to be raced at the same time.
Note: When replacing Transmitter batteries:
Do not mix old and new batteries.
Do not mix alkaline, standard or rechargeable batteries.
Use alkaline batteries only.
Firmly press TAB in the direction of the ARROW and pull back to open
battery compartment cover.
Close battery compartment cover.
Cover should click when locked in
place.
Install 2 “AA” batteries as shown, making
sure (+) and (-) markings on batteries line
up with the (+) and (-) markings in the
battery compartment.
Using the Transmitter 7
How to Drive
Push BOTH joysticks forward
for Forward Driving.
FORWARD DRIVING
Pull BOTH joysticks backward
for Reverse Driving.
REVERSE DRIVING
360º SPINS - Clockwise
Push joysticks as shown for
Clockwise Spinning.
360º SPINS - Counter-Clockwise
Push joysticks as shown for
Counter-Clockwise Spinning.
SPINS
TURNING
FORWARD AND REVERSE DRIVING
Push LEFT joystick forward
to turn left while driving
forward. Pull LEFT joystick
back to turn left in reverse.
RIGHT TURNING
Push RIGHT joystick forward
to turn right while driving
forward. Pull RIGHT joystick
back to turn right in reverse.
LEFT TURNING
Pair Vehicle & Transmitter
Pairing
8
1. Properly install batteries into the transmitter.
(Section 6).
2. Be certain vehicle ON/OFF Switch is in the OFF
position. Properly install battery into vehicle
(Section 4).
3. Keep transmitter near vehicle.
4. Switch vehicle ON/OFF
Switch to ON position.
5. Vehicle and transmitter
will automatically sync.
Your vehicle is now ready for play.
Note: After removing and replacing batteries in either the transmitter or
vehicle, you will need to pair the vehicle and transmitter once again.
How to pair your vehicle and transmitter
9
Proper Use
Precautions and Care
AUTO-PAIRINGBUTTONS