BestGuarder NV-900 User manual

Digital Night Vision
wide dynamic range with 4” Display
4.5-22.5x40mm
Model:NV-900
INSTRUCTION MANUAL
Thank you very much for purchasing our product. To be familar with the operation
of the instrument,please reading this manuel carefully before operating it.
Version_1.0 09/2018
- 0 -

CONTENTS
I. Appearance and component interfaces…………………………………….1-2
II. Product overview………………………………………………………………2-5
III. Operation………………………………………………………………….…...5-9
IV. MENU Settings…………………………………….………..………............9-13
V. User Tips ..........……..……………………..................………..…………...13-14
Appendix I: Technical Specification.................…..…..………….………...14-15
Appendix II: Parts List……………………………………………………..….…...15
Appendix III: Warranty and Cautions…………………………………….…...15-17
- 0 -

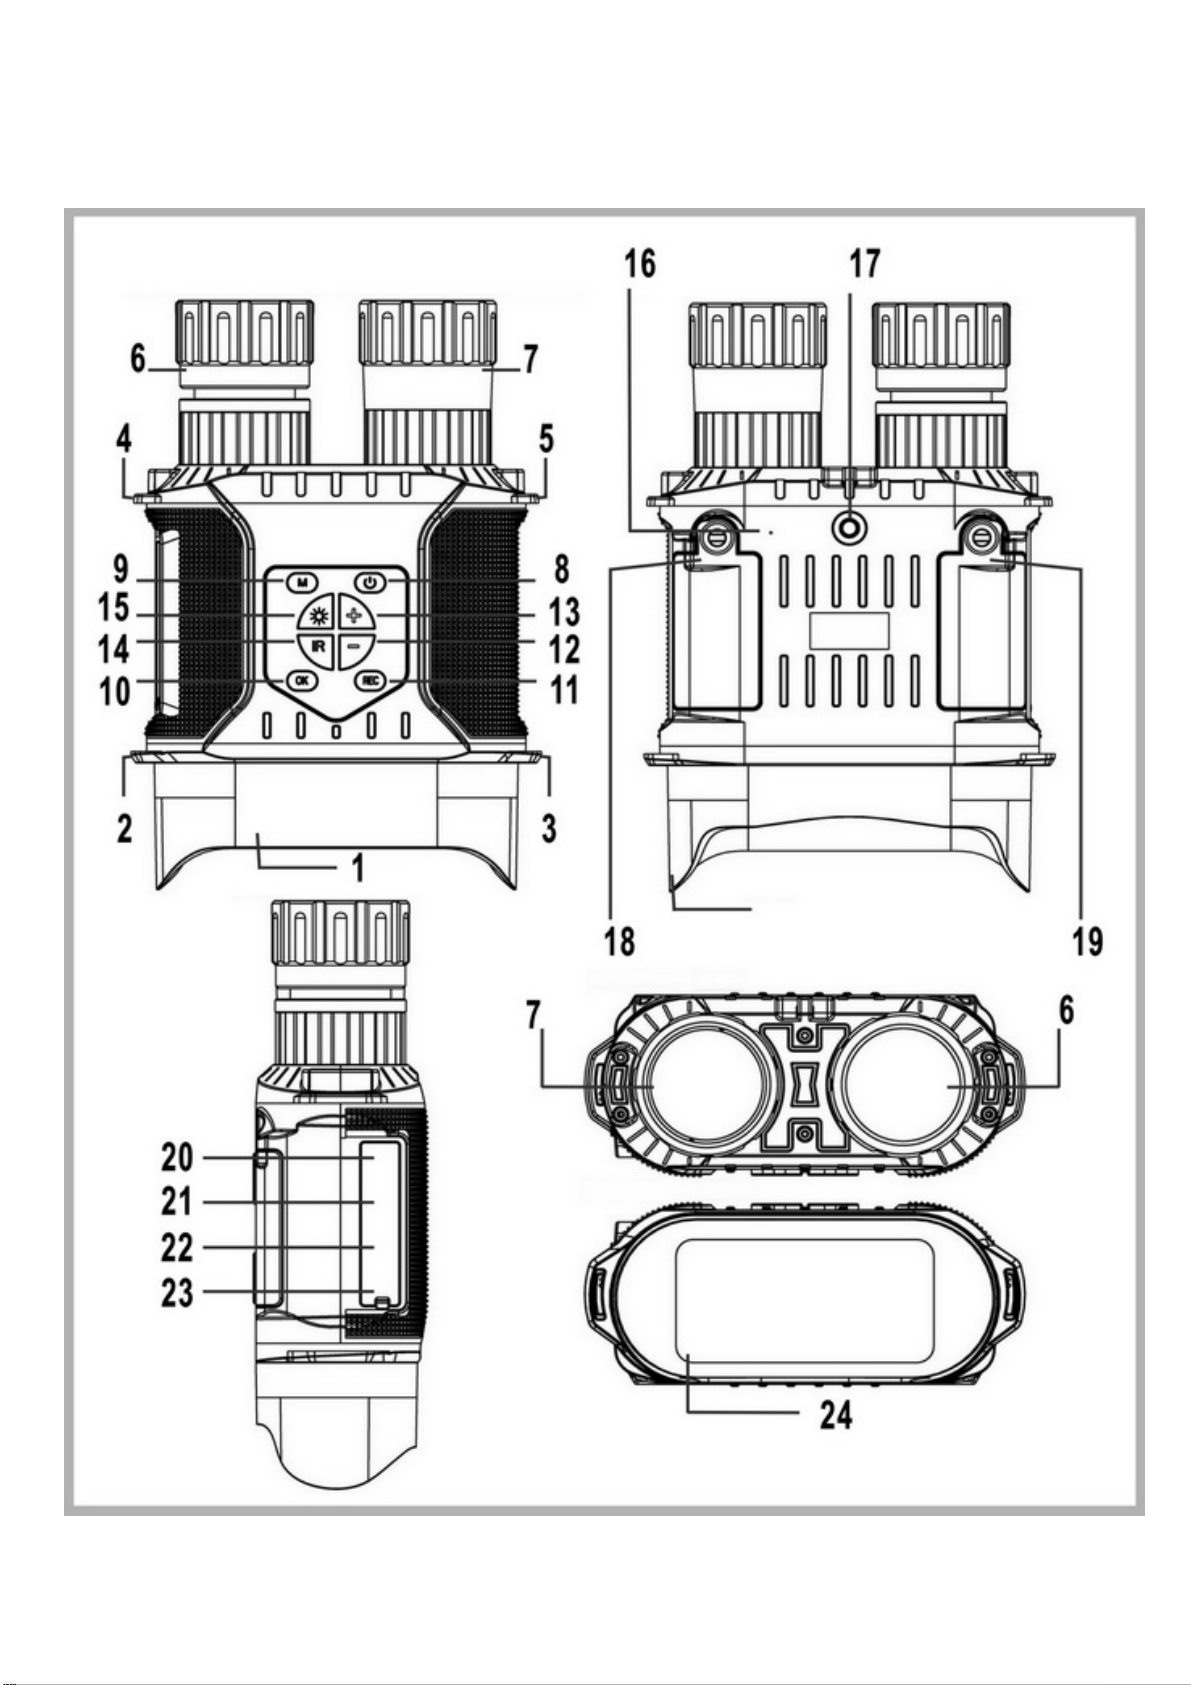
I Appearance and component interfaces
- 1 -

Function Table:
1 Shade 13 +Zoom/Up key
2 Hand belt hole 14 IR button
3 Hand belt hole 15 Brightness button
4 Hand belt hole 16 MIC
5 Hand belt hole 17 Tripod interface
6 Focus wheel of objective lens 18 Battery compartment 1(AA x 4pcs)
7 Infrared light 19 Battery compartment 2(AA x 4pcs)
On/Off power key Photo/Video switch
8 20
MENU button/Back sub-Menu/playback (long USB interface/power bank supply
9 21
Press 3seconds)
10 OK button 22 TV OUT
11 REC button 23 Micro-SD card slot
-Zoom/Down key Wide dynamic screen(real-time view,
playback & setup menu )
12 24
The right figure:
Photo/Video switch, USB
interface, TV OUT
interface and Micro SD
card slot (Up to 32GB
maximum)
II Product overview
1. Product features
Patent No:004596146-0001(Europe)201830003244.4(China)patent in America is
applying
Binoculars are equipped, in which one is the objective lens of the viewfinder and the other is
the infrared night vision light of fill-in light. It is equipped with 2-inch color display, featuring
high-definition camera, video and easy shooting of long-range target, time lapse function,
stamp GPS information on picture and video. It can connect an external TV or monitor for
real-time monitoring and synchronization. Black lightless observation distance is 400 meters,
and it supports 32G Micro SD card.
- 2 -

2. Product advantages
In the civilian area, the product can replace the traditional low-light night vision device, and has
a particularly significant advantage: It can be used day and night . It can take color
photos/videos at daytime and black and white photos/videos at night. The image brightness
is regulated through the circuit with good infrared ability. In the black conditions, it can be up to
400 meters effective observation distance. It can record the pictures, the video time is accurate,
and it has long-range real-time infrared monitoring and a long service life.
Ordinary low-light night vision device can’t be used during the daytime; otherwise the night
vision tube will burn. The effect is poor with low resolution, the effective resolution is only 24
line pairs, it is not sensitive to infrared, and plus infrared it is maximally up to 40-50 meters.
Internal high voltage boosted circuit is prone to failure, and its reliability is poor and glass tube
is fragile. Low light tube is not high temperature resistant and so the life is short, and the
magnification is small.
3. Applicable and use
(The illegal use is prohibited; otherwise, you must bear your own responsibilities.) Hunting
and animal observation enthusiasts should take the pictures at a long distance. Security patrol,
reconnaissance inspection tour and law enforcement evidence
For nature reserves, forestry, wildlife protection, research institutes, forest farms, wetlands,
forest parks and other wildlife surveillance, field observation rescue, mountain cave tourism
adventure enthusiasts and outdoor tourism, they should take pictures at the high places.
Journalists and other remote observation shooting evidence
Long-distance shooting of the emergency relief, electricity, railways and other risky industries.
- 3 -

★Precautions
The left figure indicates that the Micro SD card is not inserted. Please shut down
before the card is inserted.
1. Correctly insert Micro SD card (TF card). Micro SD card can support up to 32G. When
operating the instrument, do not arbitrarily remove the TF card and battery!
(Before using the Micro SD card, format the card firstly to ensure that the card is not locked,
and according to the card slot icon of the machine body, pay attention to the positive and
negative sides. "Click" sound indicates the correct installation. Press the card when the car is
taken out. Do not pull it out directly!
2. Use big brand and high-quality 4 or 8 AA batteries, i.e. No. 5 alkaline batteries or
rechargeable batteries. Do not use the old and new batteries together or different brands of
batteries, pay attention to the positive and negative electrodes, and remove the batteries when
they are not used for a long time to prevent the liquid corrodes the battery compartment. If the
battery compartment is corroded due to leakage, no warranty is provided. You can use mobile
power supply 5V1A ~2A as the power supply instead of the battery.
Power consumption(Test based on new Energizer Battery, Battery life is different
according to battery capacity and surrounding of use, etc)
Timelapse Mode, Interval: 30s; Photo:1P; Video Length:30s; AA *8pcs
IR type IR3 IR2 IR1 IR Off
Video type
HD Video(720P) 14h 16m 17h 11m 21h 13m 26h 11m
Photo(2592*1944) 1349images 1645 images 2337 images 2946images
3. For the all-optical glass lenses with multi-layer coating, prevent oil fouling. Please use a soft
cloth to wipe it from the middle to two sides!
4. Water resistance: IPX4. It cannot be immersed in water so as to prevent any damage
against instrument circuit. When upgrading the software, ensure that the power is on in the
upgrade process!
- 4 -

5. When you do not see the shooting target clearly, slowly fine-tune the body interface number
corresponding to the table 2 (focus wheel of objective lens) until the target is clear.
III Operation
Button Button
Replay picture or video Power On/Off
(long press 3seconds)
Infrared light Zoom In
“1.0X~5.0X”
/ Delete picture/video
Infrared light Zoom out
“5.0X~1.0X”
IR1/IR2/IR3
RecordingOK/play & stop video
- 5 -

Replay/Delete Picture & Video
Long press 3 seconds MENU key to enter playback mode
zReplay Picture/Video:
zDelete Picture/Video:
Long press 3seconds
Delete this file?
One
Yes / No
Delete all file?
Delete All
Yes / No
- 6 -

DISPLAYICONS
The
p
hoto count
,
remain record time
,
and SD card status will be dis
p
la
y
ed here
Photo Count
SETUP AND BASIC OPERATION
1) LOAD BATTERIES OR CONNECT POWER BANK
Turn the battery compartment cover in a counter-clockwise direction to remove it, and insert 4 AA batteries as
indicated inside the battery compartment. Lithium AA batteries are recommended for maximum running time,
but alkaline or rechargeable NiMh AA batteries may be used as well. DO NOT MIX BATTERY TYPES, OR
NEW AND OLD BATTERIES. Remove the batteries if the unit will be stored for a month or longer between
uses.
Connect a USB cable between USB port and power bank( 5V-6V)
2) REMOVE THE LENS COVER, ADJUST DISPLAY (EYEPIECE) FOCUS FOR YOUR VISION
Press the Power button to turn on the unit. A battery level icon is displayed at the top right corner of the screen.
While looking through the eyepiece at the LCD display screen, rotate the eyepiece (eye-cup) until the
display icons or edges of the display screen appear sharp to your eye. Adjust the eyepiece spacing by
Date & Time Display
Brightness Setting
Battery Level
This icon indicates
the remaining battery
power level.
Zoom Factor
The Digital Zoom magnification factor
is displayed here. (1.0x – 5.0x)
IR Setting
The IR LED light status is
displayed here.
When the device is in
photo mode, the number
of photos remaining
(memory available) will be
displayed(5 digits)
Remaining Recording Time Elapsed Recording Time No SD Card
# # # # #
When the device is in video
mode and not recording, the
remaining time will be
displayed(hrs/min/sec)
00:00:00
When an SD card is not
present in the card slot,
the “NO CARD” message
will be displayed.
When the device is in
video mode and
recording, the elapsed
recording time will be
displayed(hrs/min/sec)
00:00:00 NO CARD
Record Indicator
When recording in Video
mode, the Record
indicator is displayed
here. This icon indicates
the remaining battery
power level.
- 7 -

sliding the eyepieces closer together or farther apart. Remove the lens cover from the front of the objective
lens. Remove the lens cover from the front of the objective lens. Note: since the device uses digital night
vision technology (not analog “Gen 1”, etc.), the unit cannot be damaged by exposure to normal indoor or
outdoor light levels-however, you should avoid pointing it directly at the sun or other very bright light
sources to avoid overloading the sensor.
3) TURN ON IR LIGHT (IF NEEDED), ADJUST OBJECTIVE LENS FOCUS FOR SUBJECT DISTANCE
If the image is too dark to easily view (in most building interiors, and outdoors when away from artificial lighting),
press the IR button to turn on the Infrared LED light. If the image is too bright after turning on the IR light (when
viewing at close range), press the IR button again to reduce the IR light level. If the image is still too dark after
turning on the IR light, try pressing the Image Brightness button once or twice to lower the frame rate of the
digital sensor. If the image is not sharp, rotate the center Focus knob to change the focus until the subject
appears sharp. Do not re-adjust the Display (Eyepiece) Focus (as set in Step 2), unless the display icons are
un-sharp.
OTHER OPERATIONS
zAUTO POWER OFF
If a button has not been pressed for 10 minutes, the display screen will drop to 50% brightness level. If no
button is pressed within one minute after that, the unit will power off to extend battery life. Pressing any button
quickly any time before the unit turns off will return the screen to full brightness level and reset the auto off
countdown process, without changing any other settings
zICON OVERLAY ON/OFF
The user has the option to control how the icons are displayed on the LCD screen. Normally, when any button
is first pressed, ALL icons are displayed for 5 seconds, but no change to the unit’s settings is made (the
Record and IR buttons is an exception-image capture begins immediately the first time “Record” is pressed,
and the IR light turns on at the first press of “IR”). If the same button is pressed again, the button performs its
function, and the display icons remain visible for 10 seconds after the last press, before turning off
automatically. To display all icons constantly, press and hold the IR button for 3 seconds. Repeat to switch
back to auto icon overlay (only visible for 10 sec. max following the use of a button)
zUSING THE DIGITAL ZOOM
Press the “+” button (B) to zoom in. Press the “-” button (B) to zoom out. Hold the button down to zoom in/out
rapidly. The Digital Zoom icon at the lower left corner of the display will indicate the magnification factor, from
1.0x to 5.0x (in 0.1x increments).
zSELECTING PAL OR NTSC VIDEO OUTPUT
The Video Output jack is set to NTSC format (30fps TV standard in the USA, Canada, Mexico, etc.) by default.
To select PAL video output (25fps) format as used in other countries, connect the unit to your video device
first, then hold both the IR button and Image Brightness buttons down for 5 seconds while viewing the display
through the eyepiece. When the display changes to “PAL”, release buttons. To switch back to NTSC video
output format, hold both buttons for 5 seconds until the display indicates “NTSC”, then release the buttons.
Note: The “Auto Off” feature is disabled when using the Video Output jack.
zTROUBLESHOOTING
Unit does not turn on
- 8 -

1. Re-install the batteries, making sure of the correct polarity (+/- terminals) orientation (refer to the Parts and
Controls Guide page).
2. Replace all batteries.
3. Clean the battery compartment, especially the contact points.
Observed image is too bright
The ambient light level is too high, and/or the IR light is at 100% level.
1. If you are using the IR light, press the IR button to select a lower illumination level.
2. Turn off the unit or place the objective lens cover over the lens.
Observed image is too dark
The ambient light level is too low.
1. Press the IR button to activate the Infrared Light.
2. Press the Image Brightness button to select a lower frame rate from the digital sensor.
Image is blurry
1. Re-focus by adjusting the center focus knob. Adjust the diopter setting if necessary by rotating the
eyepiece until the edges of the LCD display appear sharp (see “Focusing” in this instruction manual).
2. Check the condition of the objective lens surface and eyepiece and clean if necessary.
3. Replace the batteries.
4. In low light conditions, activate the IR illumination.
Image disappears or its quality is reduced
Bright light sources (e. g. street lights at night time) may cause decreased visibility or reduced contrast.
Turn the night vision unit away from the light source; visibility will return momentarily.
IV MENU Settings
MENU Mode
Button Button
MENU mode No function
/Back sub-Menu
No function Up/
Daytime/Night time
LCD brightness Down/
No functionOK
/Play & Stop video in
replay mode
- 9 -

- 10 -

yŸ "Time lapse Start time" , "Time Lapse End time", "Interval time", "Video Length" only work under
"Time lapse" is "ON".
1, USB
Select MSDC/PCCAM
MSDC: Device could be used as a disk while connecting with USB cable
PCCAM: Device could be used as a WEB camera while connecting USB cable with computer
(The unit is able to install Driver used as a WEB camera while computer system is under Windows2000, And
The unit is compatible with kinds of WEB camera software on line and usage is same as computer camera
after installing driver successfully), such as: SPCA1628 PC Driver.exe
- 11 -

- 12 -

V User Tips:
1. Camera mode: Press the "REC" key to start immediately
taking pictures" (Note: Camera and video switch as below)
2. Video mode: Press "REC" key once to start the "Video record" immediately.
There is a red dot in the upper left corner of the screen to prompt it is video
recording and shooting time, and press "REC" again to stop shooting, and the
- 13 -

remaining recording is displayed in the upper left corner of the screen! (Note:
Camera and video switch as below)
3. Night vision mode: In the use of monitoring, use the "IR" key to
adjust according to the need.
4. Optical zoom mode: Turn manually to left and right to adjust the big lens
the left side of the front until the scope of observation of the reference object
becomes clear. To enlarge the local target of the scope, please use the digital
zoom mode!
5. Digital zoom mode: In the use of surveillance, you can use the "ZOOM in"
key and “Zoom out” key to select the digital zoom of “1.0X ~5.0X” times.
Appendix I: Technical Specification
1/3CMOS vs image-intensifier tube
Built-in 2” TFT , View Large LCD Screen UP TO 4” display
Resolution of Screen:640*480
TF card: up to 32G(no included)
Adjustable eyepiece
Powerful infrared spotlight
Magnification(optical): 4.5
Objective Aperture:φ40mm
Exit Pupil Distance:46.2mm
Digital Zoom:5
Field of View: 9°
F for Objective lens:F=1.3
- 14 -

Infrared Illuminator: 850NM 3W infrared LED
JPEG: 2592*1944,1600*1200,640*480
Video:1280*720,640*480@30FPS with sound
Observing Distance(Low Light Environment):2m~∞
Time stamp: Date and time,
Time lapse Function
GPS ID stamp on the picture and video
Language: English, French,German,Italian,Japanese,Russian,Spanish,Czech,Polish
Working Power Voltage:4.5-6V or 6V Power bank
Rechargeable Battery: 8 *AA, lithium, alkaline or NI-MH Battery
Built-in 1 tripod mountable: 1/4 Tripod interface
USB: Micro USB2.0
TV Out, AV support: NTSC/PAL
Water Resistance Standard:IPX4
Operating Temperature Range:-30°C -55°C (Storage temperature: -40°C - 70°C)
*Without battery, Micro SD card
Appendix II: Parts List
Lens
wiping
cloth
Packin
g box
Night
vision
Neck
Strap
Wrist
Strap
Manual
Shockproof
bag
USB
cable
TV
cable
1 1 1 2 1 1 1 1 1
Appendix III: Warranty and Cautions
Warranty
Your device is covered by warranty on parts and labor from the date of original purchase, and purchases
must be made through the authorized dealer. Warranty period is complying with dealers’ legal requirement. The
warranty covers defects in workmanship and materials. The warranty does not apply to units, which have been
damaged or abused intentionally or unintentionally. A purchase from individuals or unauthorized internet sites
such as eBay voids the warranty.
Tampering with or altering the unit will void the warranty. Any unauthorized service will void warranty. A copy of
- 15 -

your original sales receipt must be produced for any warranty service.
WARNING:
Reading User’s manual before using it.
Changes or modification to this unit not expressly approved by the party
responsible for compliance could void the user’s authority to operate the
equipment.
Cautions:
zPlease install batteries according to shown polarity.
zPlease use good quality AA batteries and take out batteries when device will not be used for longer then
a few weeks.
zIt is recommended to format the Micro SD-card by the camera when used at the first time.
zKeep the device away from any heating and air conditioning vents or other heating devices, direct
sunlight, and moisture.
zAlways store the unit in its carrying case in a dry well ventilated space in temperature above
+15°C(60°F). Do not store near heating devices. Do not store in direct sunlight or high humidity
conditions (higher than 70%)
NOTE: This camera is a precision electronic device. Do not attempt to service his camera yourself, as
opening or removing covers may expose you to dangerous voltage points or other risks.
FCC NOTE
This equipment has been tested and found to comply with the limits for a Class B digital device, pursuant
to Part 15 of the FCC Rules. These limits are designed to provide reasonable protection against harmful
interference in a residential installation. This equipment generates, uses and can radiate radio frequency
energy and, if not installed and used in accordance with the instructions, may cause harmful interference
to radio communications. However, there is no guarantee that interference will not occur in a particular
installation. If this equipment does cause harmful interference to radio or television reception, which can
be determined by turning the equipment off and on, the user is encouraged to try to correct the
interference by one or more of the following measures:
• Reorient or relocate the receiving antenna.
• Increase the separation between the equipment and receiver.
• Connect the equipment into an outlet on a circuit different from that to which the receiver is connected.
• Consult the dealer or an experienced radio/TV technician for help.
Shielded interface cable must be used with the equipment in order to comply with the limits for a digital
device pursuant to Subpart B of Part 15 of FCC Rules.
Specifications and designs are subject to change without any notice or obligation on the part of the
- 16 -

manufacturer.
Disposal of Electric and Electronic Equipment
(Applicable in the EU and other European countries with separate collection systems)
This equipment contains electric and/or electronic parts and must therefore not be
disposed of as normal household waste. Instead, it should be disposed at the respective
collection points for recycling provided by the communities. For you, this is free of
charge.
If the equipment contains exchangeable (rechargeable) batteries, these too must be
removed before and, if necessary, in turn be disposed of according to the relevant
regulations (see also the respective comments in this unit’s instructions). Further
information about the subject is available at your community administration, your local
waste collection company, or in the store where you purchased this equipment.
- 17 -

Digital Nachtsichtgerät
4.5-22.5x40mm
Modell:NV-900
Bedienungsanleitung
Willkommen zu kaufen! Um mit den Operationen des Geräts vertrauter zu
sein, bitte lesen Sie diese Bedienungsanleitung sorgfältig! !
Version_1.0 09/2018
- 18 -
Table of contents
Languages:
Popular Binoculars manuals by other brands

Kite Optics
Kite Optics BINO APC STABILIZED 42 Manual and warranty

Bushnell
Bushnell BINOCULARS-MULTIPLE LANGUAGES instruction manual

Minolta
Minolta MINOLTA BINOCULARS ACTIVA 9222-8588-16... instruction manual

Yukon
Yukon Futurus 22038 manual

Meopta
Meopta H75 30x WA-R brochure

Pentax
Pentax 8.40 PCF WP II owner's manual