Beta industries BetaColor S2 XPress User manual
Instruction Manual
78910 11
Y/M Y/C M/C
1
2
3
5
99
98
97
95
RES 50%50%
50%
Ver 01.03b
BetaColor S2 XPressBetaColor S2 XPress
S2XPRESS
S2XPRESS
UPGRADEABLE
DENSITY
DENSITY DOT AREA
DOT AREA
DOT GAIN
DOT GAIN

3
Table of Contents ...............Version01.03b
ComponentsandControls..........................4
Getting Started, Touchmatic Memory . . . . . . . . . . . . . . . . . 5
Red, Green Traffic Lights. Zero to Paper. . . . . . . . . . . . . . . 6
MeasureDensity..................................7
MeasureaDotGainTarget..........................7
Factory Settings. Customizing the Settings . . . . . . . . . . . . . 8
EditDensityandTolerances.........................9
Edit Dot % Dot Gain Targets and Tolerances . . . . . . . . . . . 10
Automatically Enter Dot Gains . . . . . . . . . . . . . . . . . . . . . . 11
Beta Color Viewer for Subjective Evaluation . . . . . . . . . . 12
Automatic Mode Settings, Auto Paper Zero Modes . . . . . 13
Absolute Density, Dot Gain, Color Select. . . . . . . . . . . . . . 14
MeasureDotArea1%to99%......................15
ManualColorSelect..............................16
Special Functions, Slope Control . . . . . . . . . . . . . . . . . . . . 17
SlopeControlCalibrations.........................18
SettingAbsoluteZero.............................19
ChangingBatteries...............................20
TechnicalSpecifications...........................20
Warranty.......................................21
PressKits......................................22
EyeScanXPress................................23
Print Characterization Chart . . . . . . . . . . . . . . . . . . . . . . . . 24

Components and Controls
Traffic
Lights
Target
Sight
Release
Latch
Battery
Compartment
Display
Reset Button
Underneath
Up Key
Enter Key
Down Key
USB Port
4
S2XPRESS
S2XPRESS
UPGRADEABLE TO S4 XPRESS
Getting Started With “Touchmatic Memory”
RED
Getting Started With “Touchmatic Memory”
The S2 XPress is always ready to use. There is no need to
charge it, plug it in, or connect cables. It will produce more
than 500,000 measurements with 2-AA alkaline batteries,
and turn itself off after the last measurement.
The top Icon in the Vertical Tool Bar indicates you can
automatically perform the following functions.
1.Zero to the paper.
2.Measure Density of the primary colors, yellow, magenta,
cyan, and black.
3.Measure 2 Dot Gain values in each primary color.
2.Density 3. Dot Gain 4. Dot Area
Density, and Dot Gain targets can be readily memorized
for each new print run from the opening screen by
measuring a target, then framing the Bulls Eye with
the up or down keys and storing it in the “Touchmatic
Memory” by pressing ENTER with the middle key. For
example, the first CYAN [C] ink 1.30 Density was measured
and memorized. The next CYAN measurement 1.39 Density
is indicated by the large numbers. The pointer
indicates that the first Cyan 1.30 Density will serve as a
reminder for all subsequent CYAN measurements until it is
changed if necessary. Up to 4 previous measurement
appear in the history stack as indicated by the pointer.
The down pointing icon indicates the 1.39 Density is high.
5
BLUE
Flashing or Traffic Lights indicate when the
Density, and Dot Gains, are in or out of tolerance. This
feature allows the fastest and most accurate measurements
possible without the need to constantly look at the numerical
display.
Note: A color bar with targets of Density, Dot Gain,
Gray Balance, and Trap Colors is essential.
We highly recommend the Beta Custom Gray Balance
Color Bar for accuracy, speed and features.
Zero to Paper in RELATIVE or ABSOLUTE Density
Place the aperture on white paper and press the head down.
Rezero on paper any time if in doubt of the zero value or
when changing paper.
Measurements can be done in RELATIVE DENSITY that
produces a 0.000D with paper for any density up to 0.14D,
or in ABSOLUTE DENSITY that will show an average white
paper range between 0.04 to 0.09D. For example, the
display shows a Black Density of 0.053. On the left side of
the display is the Abs symbol as a reminder.
RELATIVE ABSOLUTE
Getting Started
Red Green
6
Getting Started
Measure Density
Place the aperture on a solid color of cyan, magenta, yellow,
or black and press the head down. The large Cin this
example shows you’ve measured a Cyan target. Continue
with the other colors in any order.
Up to 4 previous measurements are saved in a history
stack beneath the current measurement. ( )
The last measurement as illustrated was the Cyan target.
After measuring any solid color patch the DOT GAIN targets
of the same color can be automatically measured. The S2
XPress is pre loaded with Dot Gain Targets of 75%, and
50%, to correlate with the Beta Custom Color Bar. The Dot
Gain targets can be changed to other values if needed.
If the last solid color measurement is Cyan, we can now
measure Cyan Dot Gain Targets. Place the aperture on the
Dot Gain Target and press the head down. In this example
the C indicates you’ve measured the Cyan Dot Gain Target.
The 75% indicates which of the three Dot Gain Targets
you’ve measured. The 9?% is the result of the Dot Gain
Calculation. [Murray/Davies equation, which calculates the
actual dot size plus optical dot gain]
?% means CHANGE IN PERCENT. The 75% Target is
actually 84% total Dot Area. In this example the Cyan Dot
Gain Target has 9 points of dot gain. Continue measuring the
2 other Cyan Dot Gain Targets.
The Dot Gain values can be memorized by framing the
Target icon and pressing Enter.
7
Blue Arrow
Measure Dot Gain Targets
C
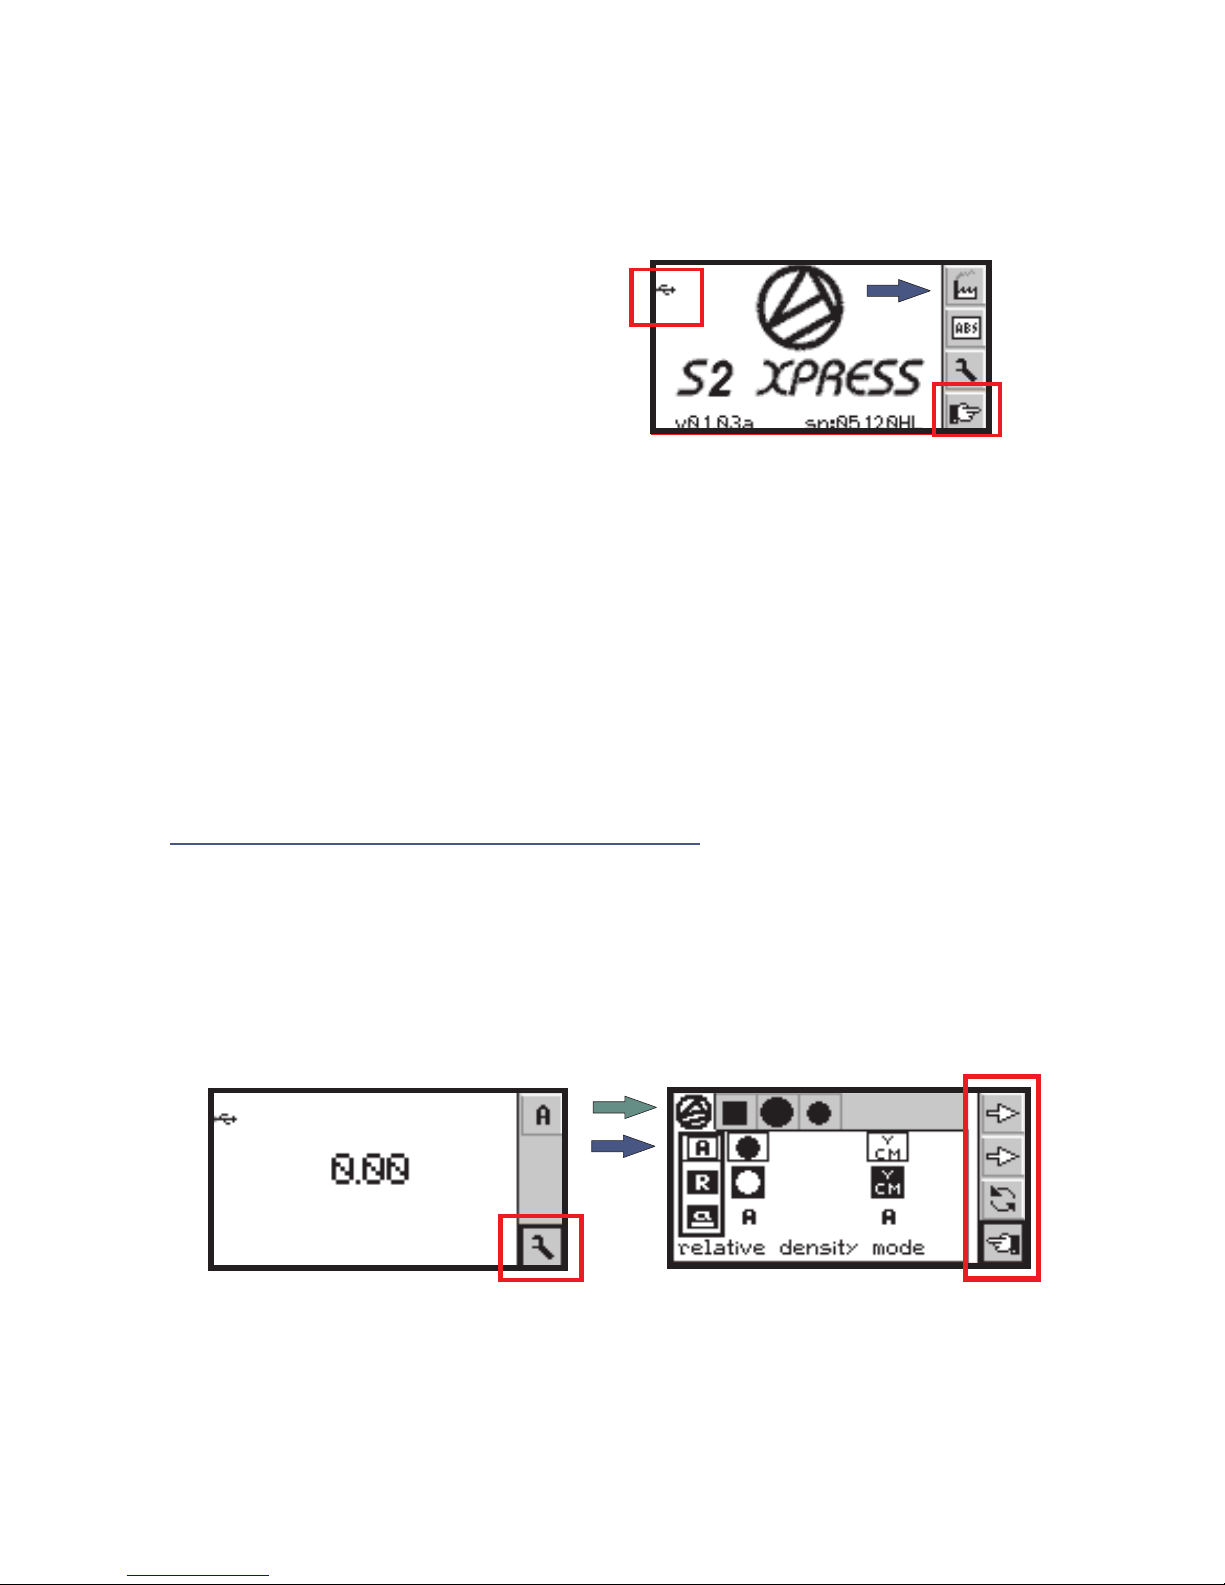
Note: To restore Factory Settings, press the button
on the bottom of the S2 XPress. Select the Factory Tool
[ ] on the top of the Vertical Tool Bar and press
ENTER to restore the original Factory Settings.
Caution: Restoring Factory
Settings will remove your
custom settings.
To return to programs without
making any changes, frame the
symbol and press Enter or Zero to paper.
The USB symbol appears when the densitometer is
connected to your computer.
References are accessed by framing any Reference icon
and then Framing the Change Tool and pressing ENTER.
Each Reference can memorize its own set of DENSITY,
DOT GAINS, and TOLERANCES values.
The BetaColor S2 XPress is extremely flexible and easily
adapted to your shop standards.
Icons are used to navigate through the groups of setting and
adjustments.
Frame the Tool Icon on the VERTICAL TOOL BAR to open
the References and Tolerances.
8
RED
Go Back
1.Vertical Tool Bar Settings. [In red rectangle]
blue pointer
3.Automatic Mode Settings. [Blue arrow]
Customizing the Settings
2.References and Tolerances Settings. [Green arrow]
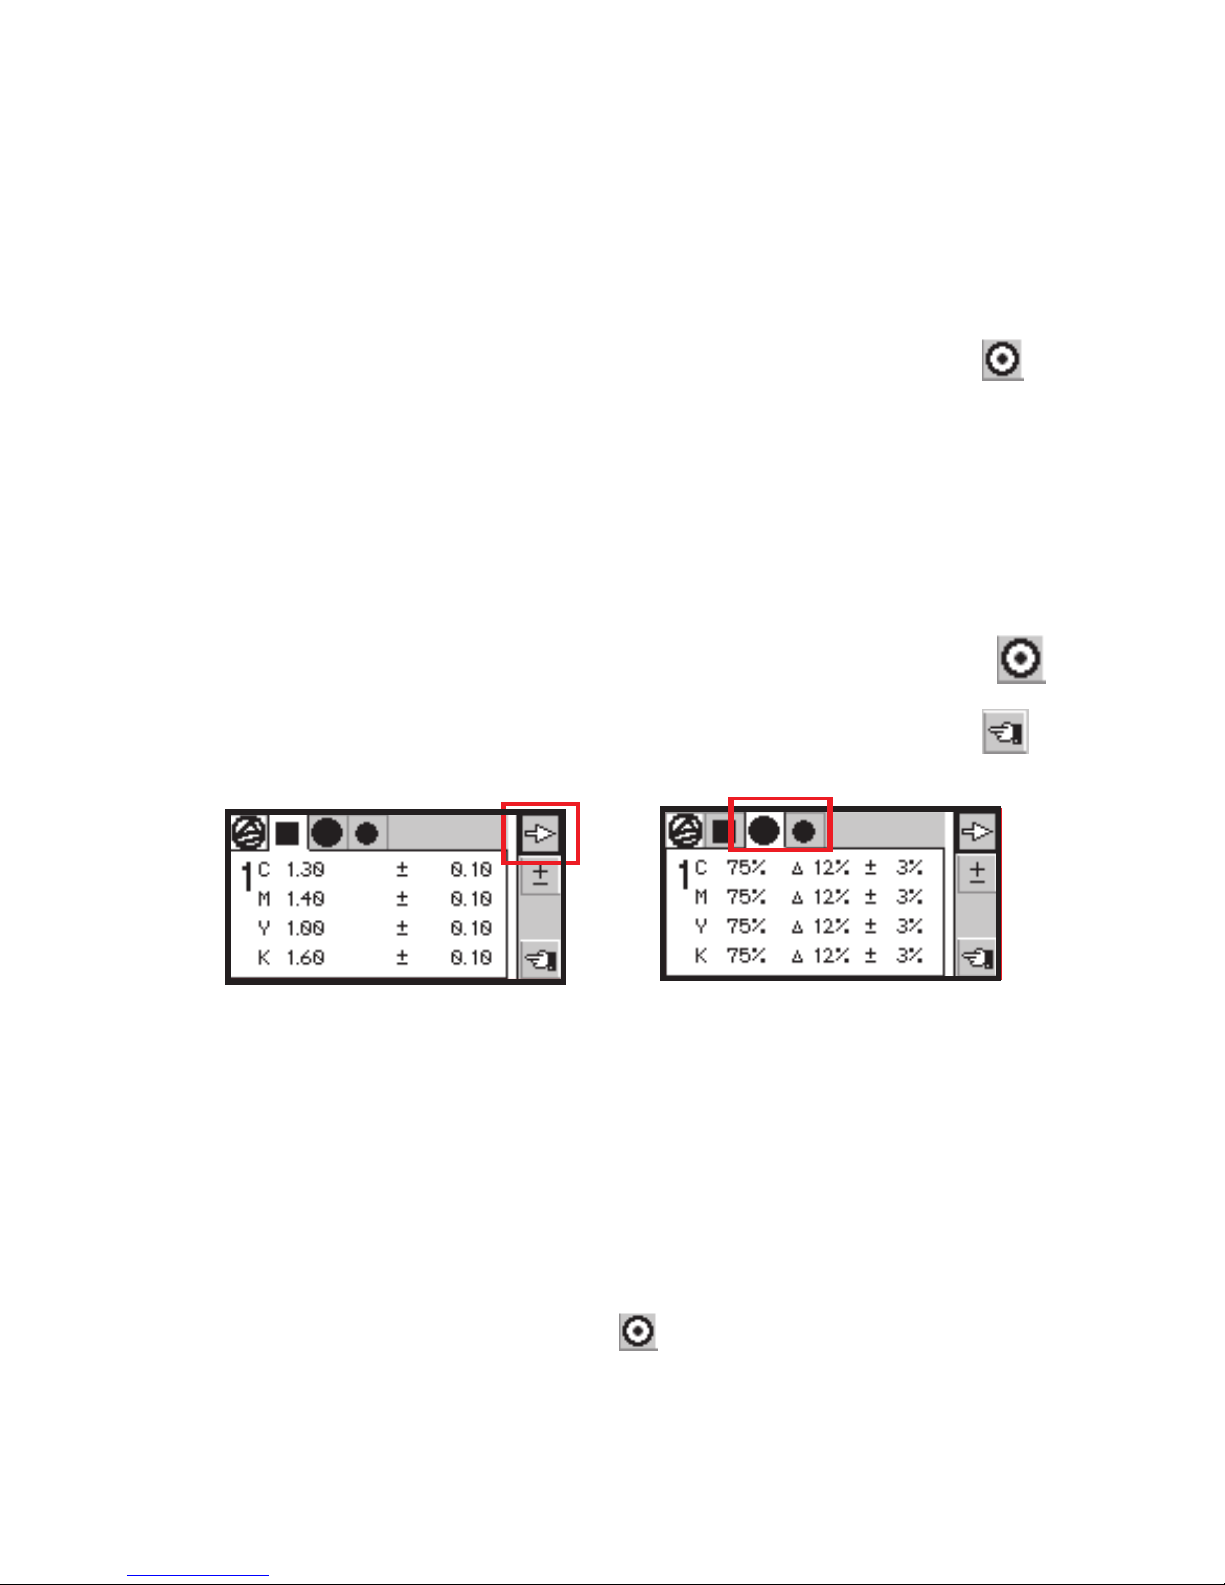
Edit Density and Tolerances
Edit the Dot Gain and Tolerances
Press the up or down Keys to frame the top arrow .
Press ENTER to open the Solid Density Reference and
Tolerance field. The DENSITY values displayed will be
either the installed pre loaded values, or new values that
were measured and memorized using the BULLS EYE
function. Framing the top arrow and pressing ENTER will
open the edit program for DENSITY values and the +/-
tolerances. To change any other Density values and
Tolerances, frame the top arrow and press ENTER to
proceed to each value and repeat as necessary.
Note: The DENSITY values will change each time you enter
new values in any of the 4 References using the BULLS
EYE function. To proceed to the next editable values it is
necessary to exit the program by framing the RETURN
KEY and press ENTER.
Press the up or down Keys to frame the top arrow and press
ENTER. The DOT GAIN EDIT screen will appear. There are
2 DOT GAIN values that can be programmed.
The S2 XPress is generally set at 75%, and 50%, to agree
with the Beta Custom Color Bar.
In the example above, the first Dot percent is 75%. The Dot
Gain increase is set at 12% or can be actually measured and
memorized with the Bulls Eye. The +/- Tolerance is set at
3%. Measurements within Tolerance will flash .GREEN
9
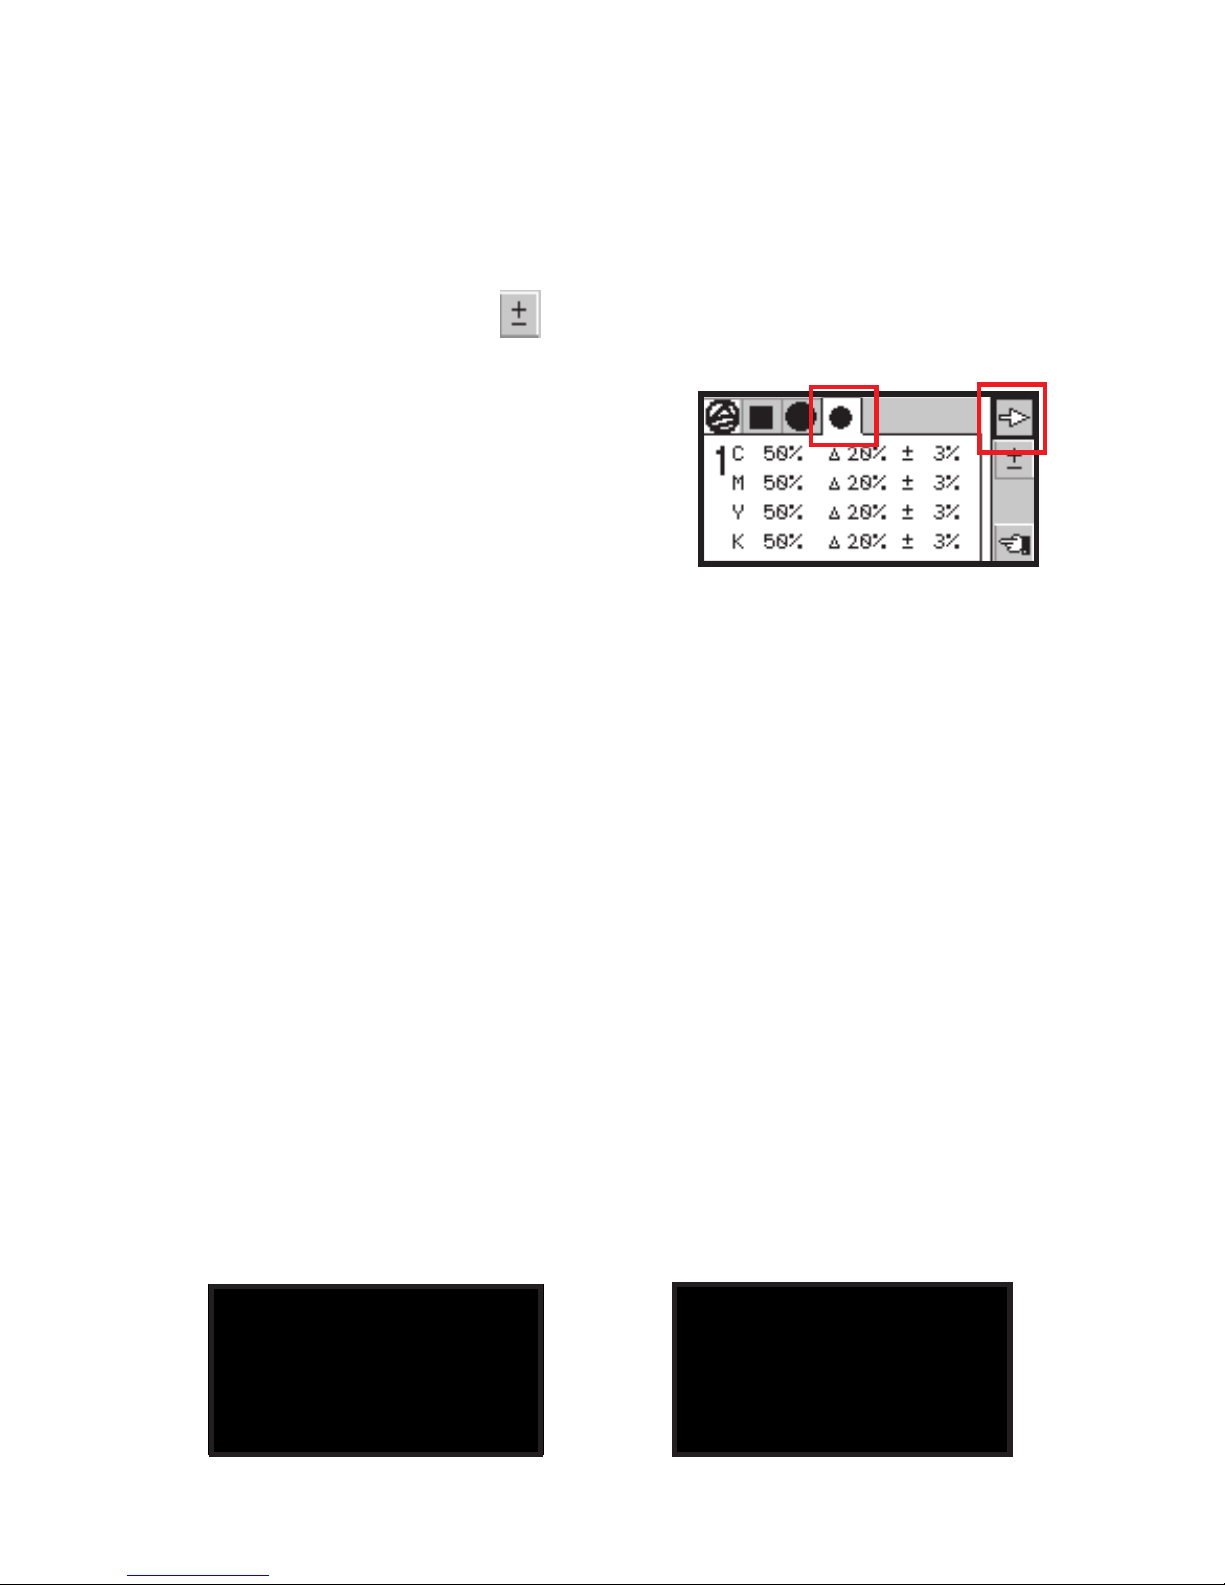
Edit Dot %, Dot Gain Targets & Tolerances
DOT PERCENTAGES from 80% to 25%, plus DOT GAINS
and TOLERANCES can be changed by framing the top
arrow on the vertical tool bar and pressing ENTER. Press
ENTER again to frame the appropriate DOT icon for
adjusting. Frame the and press ENTER. The DOT % for
CYAN will enlarge and a separate + and - symbol will show.
10
The magenta, yellow and black values can be similarly
adjusted. To proceed to the next set of editable values it is
necessary to frame the RETURN KEY and press ENTER.
The automatic DOT GAIN function relies on the
principle that measuring a solid ink patch results in a density
measurement which then can compare it to a 3/4, ½ or 1/4
tone tint value. Under ordinary press conditions a logical
DOT GAIN value is displayed. If an illogical result is
displayed, it is the result of the solid or tint values beyond
normal tolerance values. This may happen when the first
measured solid density patch is significantly higher in density
than subsequent measurements causing a false 3/4 tone
DOT GAIN result in error. In this event, re-zero to paper
and measure the solid again. All DOT GAIN measurements
should be made as close as possible to a solid of the same
color tint to minimize errors. To change the 3/4 tone value to
OFF press the icon beyond 85% to show Density only.
NOTE:
Frame the + or - symbol to change
the DOT % value if necessary.
To continue editing, frame the top
arrow and adjust the DOT GAIN if
necessary. Repeat the procedure
for the TOLERANCE +/- values.
+
GRAY BALANCE
Dot Gains for 3/4tone, midtone, and
1/4 tone can be entered automatically
by measuring a solid and then a tint
value of the same color. The Dot Gain
can be memorized by framing the
BULLS EYE then press ENTER.
The new Dot Gain values will replace the previous ones.
An accurately printed three-color Gray Balance target has
the same visual appearance as a black tint of the same
value.
Because Density, Dot Gain, Trapping, and Pearl Factor
affect Gray Balance targets, they are a good early warning
sign for detecting changes in print conditions. When Gray
Balance targets are located adjacent to a black tint, very
accurate visual judgments can be made with just a glance.
Beta Eye Scan Custom Gray Balance Color Bars have
Gray Balance targets in every ink key zone, and black tints
adjacent to them in every fourth zone, allowing both visual
and densitometer press control. The Balance Symbol
below the Beta Color Bar quickly identifies the 50% black tint
and adjacent 3-color Gray Balance target.
11
Automatically Enter Dot Gains
The Beta Color Viewer lll is the ideal companion to the
S2 XPress and Beta Custom Color Bar
See the nearly invisible yellow and defects on plates,
proofs, and print.
Slur and Doubling will affect Dot Gains and Gray Balance
without having any change in Density measurements.
Similarly, when viewing a printed sheet under a different
lighting condition the Gray Balance will also change. Inks
and paper have varying amounts of U.V. brighteners that will
also change Gray Balance and the appearance of a printed
sheet. The Beta Color Viewer lll is a useful tool that features
a U.V. light source that will visually detect the fluorescence
and metameric influence.
See UV
Influence I On
Ink and Paper
FLUORESCENCE
Y
SEE IT MEASURE IT CONTROL IT
INK/WATER BAL.
REGISTRATION
0 18
02 04 06 08 10 12 14 16
FILM
SEE YELLOW
STOCHASTIC
RESOLUTION
DOUBLING
SLUR
99%
2%
1%
3%
5%
95%
98%
97%
PLATES
12

Automatic Mode Settings
To access, go to
settings display
and press Enter.
The screen shows icons in row 2 framed in ,
( ) Each individual icon that is framed in black
indicates that it is active and has an Aunderneath.
The other icons are reversed on a black field and are not
active. A black frame outlines the column that is active
( ) and moves by framing the arrow then Enter
Auto Paper Zero Mode
Automatically zeros [0.00] to any paper density up to 0.14
Density. This is the preferred setting for most measurements
Relative Density Mode
Allows zeroing [0.00] on tinted paper or to any
density for null comparison measurements.
Frame the Relative Density Mode and activate
the Go Back icon. to return to the Starting
Screen. On top of the Vertical Tool Bat there
will be a Density icon and then a Relative Paper icon
Frame the Paper icon and measure any Density to (0.00).
Then measure another density for +/- deviations.
The mode will automatically change to Density.
Subsequent measurements will show +/- differences to the
Zeroed or NULLED value. This is useful for measuring
densities across the width of a sheet without having to
remember the original density.
All Automatic
Function Details
Are Displayed:
RED
red arrow
1
blue arrow
1 2 3
A
R
13

Automatic Mode Settings
Blue Arrow
Absolute Density Mode
Allows measurements in the
Status T mode. Measuring
white paper generally
produces a value between
0.04 and 0.09 Density. Measurements in Relative Density
( ) allow the S2 XPress to NULL (0.00) on any
Density for +/- measurements in any color.
Dot Gain. The S2 XPress is programmed to
automatically measure 2 dot gain percentages, generally
75% and 50%. Measure a solid 100% of a K,C,M,Y and
then measure a tint percentage on the color bar of the same
color. Adding the dot gain to the starting percent is the
equivalent of dot area.
The Dot Gain range can be set from 25% to 85%
Color Select in Aallows the S2 XPress to
automatically recognize a process color. Changing A to M
(Manual) will show the Density values of C,M,or Y in any
color.
The S2 XPress can be upgraded at any time to provide
additional features of 3 Dot Gain Levels, Auto Gray Balance,
Trapping, Pearl Factor, and Color Match
1
2
3
Optional Upgrade to S4 XPress
1 2 3
Y
C M
a
14
K
K
C
C
M
M
Y
Y
DOT GAIN
DOT GAIN
C/M
C/M
Y/M
Y/M Y/C
Y/C Color Match
Color Match
Gray Balance
Gray Balance

Manual Mode Settings
1
2
3
4
5
Measure Dot Area 1% to 99%
. Move the black frame to
column 2.
Frame the Change
Tool and press Enter to
change to Manual Dot Area.
The Relative Density Mode
will automatically frame.
. Frame the go back icon and press Enter.
. Frame the paper icon and zero to paper.
. Frame the Density icon and measure a solid primary.
. Frame the Dot icon and measure dot areas of that
primary color.
15
3
4
5

Manual Mode Settings
2
3
4
5
6
Manual Color Select
. Move the black frame to
column 3.
. Frame the Change icon
and press Enter for Manual
Color Select.
. Frame the Go Back icon
and press Enter.
. Frame a C,M,Y, or K icon
on the vertical Tool Bar.
. Zero to paper by framing
the Bulls Eye and press Enter.
. Measure any color and the display will show the density of
that specific color in the sample being measured. For
example, if Magenta is selected, then the Magenta
component in any CMYK or special color can be measured
without the influence of other colors.
1
16
Optional EyeScan XPress Software
Measure and record vital data for total control and recall.
Ace Printing 101 Gray Balance
GRAY BALANCE
Automatic Data Entry
Statistical Library
COLOR MATCHCOLOR MATCH
DENSITYDENSITY
Ace Printing 101 Gray Balance
GRAY BALANCE
GRACoL G7TM
GRACoL G7TM
Match PantoneTM Colors
17
Special Functions
Right Hand / Left Hand
functions can be activated by
pressing the
on the underside.
Frame the Change Tool
and press ENTER. Frame the
pointer on row 2 and press Enter. Then frame the
Change Tool and press ENTER. The display will invert
for left handed users.
Numerical Resolution
To change the numerical
display to either two 0.00 or
three 0.000 places after the
decimal point, Frame the
pointer on row 2 and
press Enter to move the triangle icon to below the
numerical display. Then Frame the Change Tool and
press Enter.
Fluorescence
The presence of fluorescence
in inks can be detected by
changing the normally OFF to
ON. The influence of Fluor-
essence is generally greater
in yellow ink and Hexachrome
Return to the opening screen
Changing the SLOPE value
allows the S2 XPress to agree
with densitometers using other
standards for density values.
Press the on the underside.
Frame the Settings Display and press ENTER to open
SLOPE CONTROL.
RED BUTTON
RED BUTTON
.000
Slope Control
.000
.000 Fluor
OFF
Then frame the Top Arrow
and press ENTER for C M Y K
adjustments. The S2 XPress
is pre set with C M Y K SLOPE
values of 1000 for each color
and the Densities in the right column are set at 0.00 for
Paper Relative Density.
In Absolute Density, other minimum Density values are
shown. These values generally range from 0.05 to 0.10.
The SLOPE adjustment range is 750 to 1250.
In the left column are Density
Slope values for C, M, Y, K.
Frame the icon on the
opening screen and press
ENTER. For example, the
Cyan slope value can be
raised or lowered.
Use the PLUS + or MINUS - icons framed in to raise
or lower the slope values for each channel as needed.
NOTE: The slope values can
also be adjusted interactively
by measuring a sample with
a known density for each color.
The samples can be measured
in any order and the corresponding values will be updated
automatically.
Pressing the on the underside will reset to
original 0.00 values and the change Slope will remain.
BLUE
RED BUTTON
Slope Control Calibrations
18
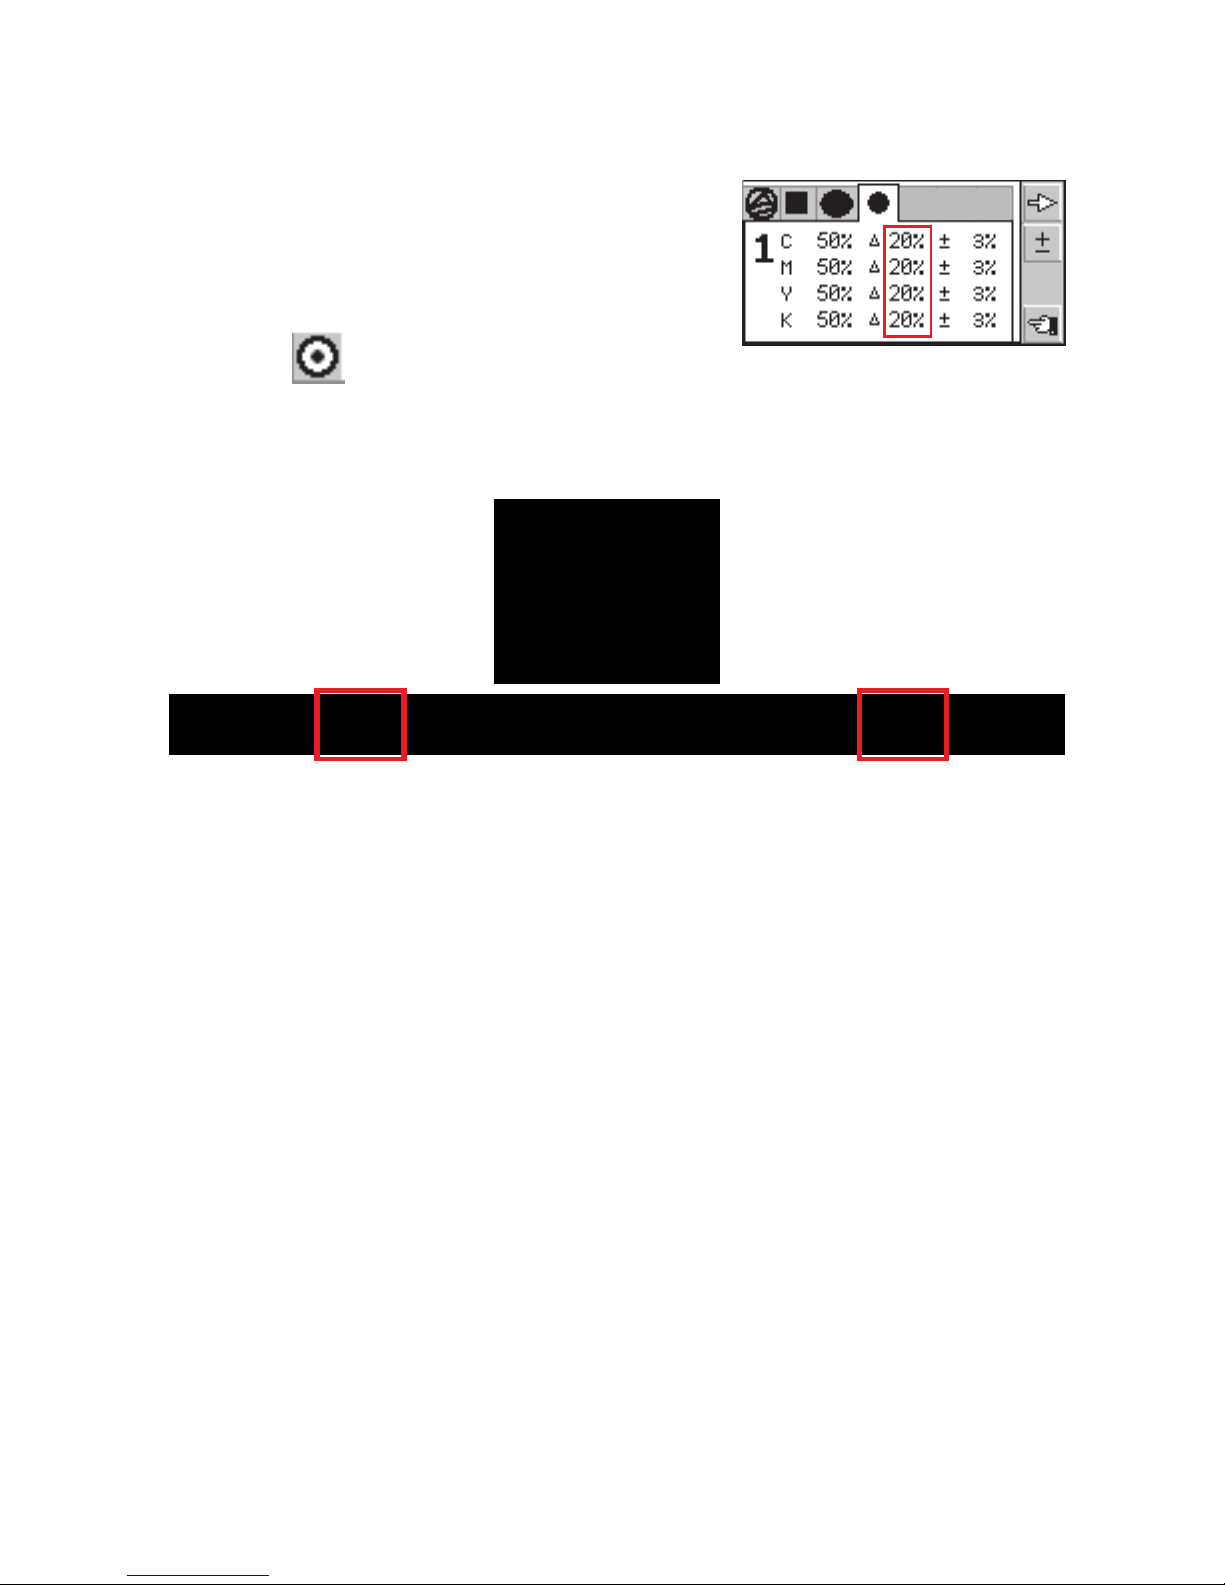
Setting Absolute Zero
Special Features
Press the on
the underside. Frame the ABS
Icon and press ENTER to
open the screen.
Measure white paper to display
CMYK and corresponding minimum density values.
Measure the supplied White Calibration Cap. Frame the
top arrow and press ENTER to enlarge any minimum
density number to be changed to agree with the values as
marked. Press the + or – Icon accordingly. Press the
RETURN icon and continue to the next function.
The Guide Pointer marked by
a blue circle indicates that the
density of the last measure-
ment must be increased.
The operator must increase the ink feed to that zone.
Subsequent density measurements are placed in the history
stack as shown below.
Out of tolerance density values in the stack are surrounded
by a gray rectangle as marked by red pointers.
Dot gain measurements are marked in the same manner
during measurement and when they are placed in the history
stack.
RED BUTTON
19

Changing Batteries
The S2 XPress is powered by 2- alkaline AA batteries.
There are no cables or chargers or Ni-Cad batteries. As the
batteries approach the end of their usable life span a low
battery warning will appear.
The S2 XPress will continue to produce many accurate
measurements, but the batteries should be replaced when
convenient. Remove the bottom plate to access the battery
compartment.
Note: Notice the polarity and replace as indicated. The
customized settings will be unchanged.
Technical Specifications
Illumination LightEmittingDiodes,45°/0°geometry
Aperture 3mm(Optional 2mmor1mm)
DensityRange D0.00–2.50
Percent %0–100
Measuringtime 0.5seconds
GraphicalDisplay 160x80Pixel,4grayscales
RepeatabilityD +/-0.01D,0.2DE
Linearity% +/-1%
SerialInterface USB
Measurementsperbatteryset Over500,000
Batteries 2AAAlkaline1.5V
Filters StatusT [StatusI/E/TSpecialOrder]
Polarizationfilter Optional
Dimensions 6.75x3x1.75in. 175x75x47mm
Operatingcondition 10°Cto40°C
10%to80%relativehumiditynon-
condensing
Storageconditions -20°Cto60°C
10%to90%relativehumiditynon-
condensing
20

Warranty and Contact Information
Warranty
The complete instrument is covered for THREE YEARS
against manufacturing defects for Parts and Labor.
The light source and filters are covered for SEVEN YEARS
against failure and fading.
Warranty repairs or replacement will be performed on
instruments shipped freight prepaid to our office.
Unlimited technical support is provided for the life of the
instrument. Support calls are toll-free in the US and parts of
Canada.
Contact Information
Beta Industries
707 Commercial Ave.,
Carlstadt, NJ 07072 USA
Toll Free 800-272-7336
Tel 201-939-2400
Fax 201-939-7656
Email [email protected]
www.betascreen.com
21
Table of contents
Other Beta industries Measuring Instrument manuals

Popular Measuring Instrument manuals by other brands


Brooks Instrument
Brooks Instrument Sho-Rate Series Installation & operation manual

GOK
GOK ODR Assembly and operating manual

ABB
ABB NGC Series quick start guide

Niagara
Niagara 6600 Series Installation, operation & maintenance manual

Mecmesin
Mecmesin 172100 operating manual

BRIGHT
BRIGHT BlueEye Ex-D operating manual


