BETOPPER LED Moving Beam Wash Light User manual

REV: 1.02
LED Moving Beam Wash Light
Users Manual
Please read this manual carefully before operating
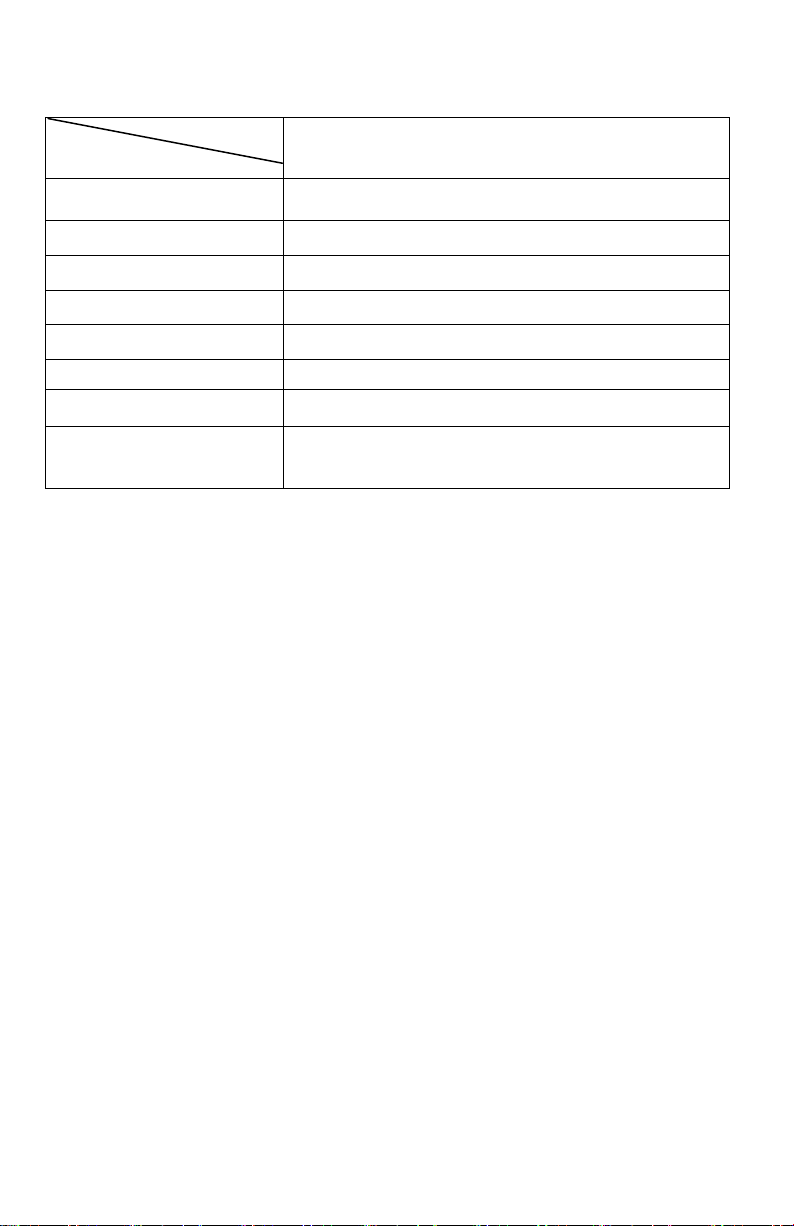
Technical Specification
Model
Specification A
Light Source 36*3W (R8 G10 B10 W8)
Power Supply 100-240V/50-60HZ
Rated Power 150W
Control Mode Auto/Sound/DMX/Master-slave
DMX Channel 9/16
Size
260*165*265mm
N.W./G.W. 4.8/5.6KGS
Spare parts
including Power Cable x1,Handle x1,Screw x2
,
User Manual x1
LED Moving Beam Wash light User Manual
Attention
1、Please read these operating instructions carefully to familiarize
you with basic operations of this unit BEFORE USE.
2、Without permitted, it is prohibited to spread the contents of this
manual to others.
3、This manual is only to provide related information, and the
contents of this manual will be changed at any time without notice.
4、Unless the instructions have already stated, please do not freely
modified the unit.
Page 1

Control Panel Instruction:
[MODE/ESC] Used to initially access the control panel system, and also
navigate to the previous higher-level menu item.
[UP] Scrolls through menu items and numbers in ascending order.
[DOWN] Scrolls through menu items and numbers in descending order.
[ENTER] Used to select and confirm/store the current selection.
Button operatoin-Display Instruction
1. For first use, should be restored to factory settings :
Sound Sensitivity : 80 ;Color Maximum(Red: 200,Green: 255 ,
Blue:255,White:255);DMX Address:1;16 CH;Default Mode:DMX
2. Current Menu is “Show Mode”、“Sound Sense” etc. primary menu,
press “UP”/ “DOWN” for shift, now the function of “MODE” Button
equals “UP”function. For other conditions, “MODE” is for return to
previous menu.
3. The system is in DMX mode and DMX signal is available, the DMX
indicator can flash.
4. After the system starts or resumes from stand-by state.(when blank
screen, press any key), will display the current menu mode, may be
one of “DmxMode”,“FastMode”, “SlowMode”and “SondMode” ,
it depends on what the current mode is.
Page 2
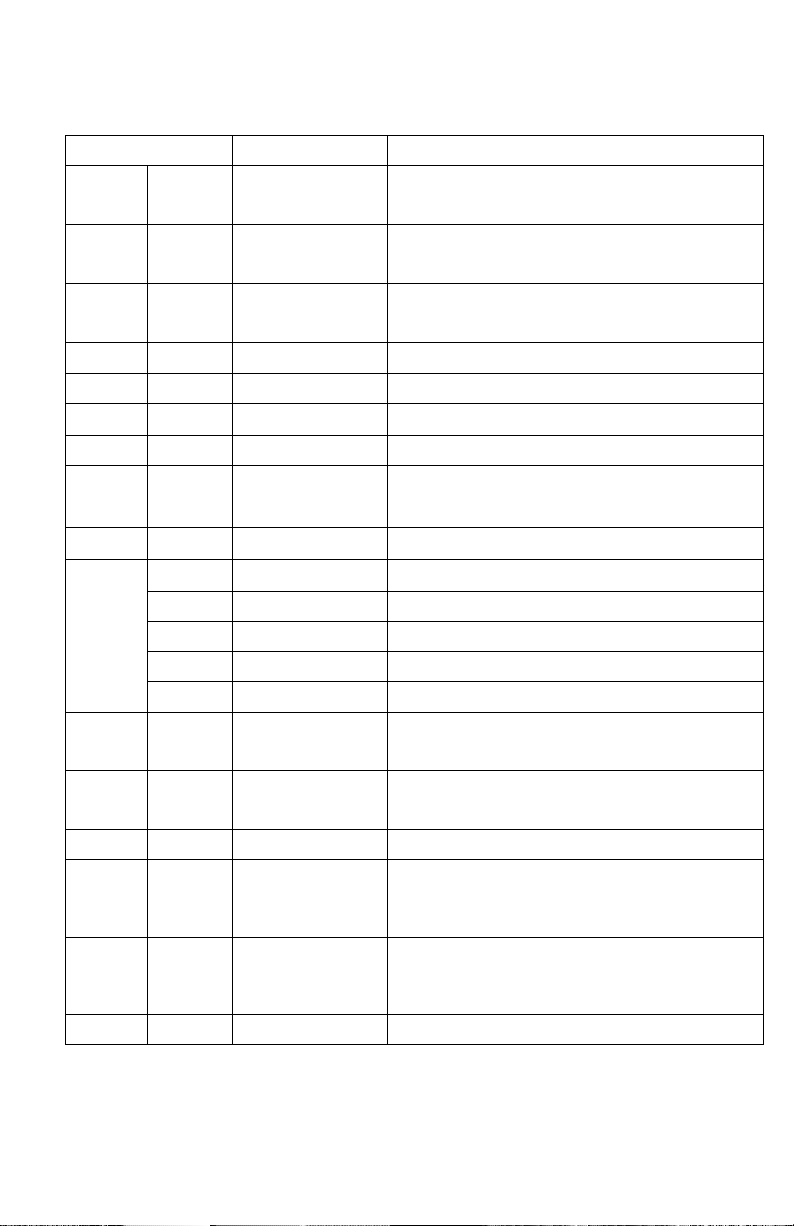
16-Channel Mode
Channel Function Description
CH1 0-255 PAN
Up for adjusting positive turn,
Down for inversion
CH2 0-255 TILT Up for adjusting positive turn,
Down for inversion
CH3 0-255
General
Dimming
Adjusting Brightness
CH4 0-255 R Dimming Red Brightness Adjustment
CH5 0-255 G Dimming Green Brightness Adjustment
CH6
0-255
B Dimming
Blue Brightness Adjustment
CH7 0-255 W Dimming White Brightness Adjustment
CH8 0-255 Flashstrobe
Stroboflash Adjustment
,
from
slow to fast
CH9 0-255 Speed PAN/Tilt Motor Running Speed
CH10
0-10 Other Channels work
11-127
Color Combination Change
128-160
Color saltus step
161-200
Color gradual change 1
201-255
Color gradual change 2
CH11
Speed
Adjustment
For the 10th Channel
CH12
Built-in
Effect
Built-in Effect
CH13 Built in Effect Speed Adjustment
CH14 Fine Adjusting
for PAN
Running
0-255 Up for adjusting positive
turn, Down for inversion
CH15 Fine Adjusting
for TILT
Running
0-255 Up for adjusting positive
turn, Down for inversion
CH16 Reset 150-200 Reset
Page 7
Control Panel Instruction:
[MODE/ESC] Used to initially access the control panel system, and also
navigate to the previous higher-level menu item.
[UP] Scrolls through menu items and numbers in ascending order.
[DOWN] Scrolls through menu items and numbers in descending order.
[ENTER] Used to select and confirm/store the current selection.
Button operatoin-Display Instruction
1. For first use, should be restored to factory settings :
Sound Sensitivity : 80 ;Color Maximum(Red: 200,Green: 255 ,
Blue:255,White:255);DMX Address:1;16 CH;Default Mode:DMX
2. Current Menu is “Show Mode”、“Sound Sense” etc. primary menu,
press “UP”/ “DOWN” for shift, now the function of “MODE” Button
equals “UP”function. For other conditions, “MODE” is for return to
previous menu.
3. The system is in DMX mode and DMX signal is available, the DMX
indicator can flash.
4. After the system starts or resumes from stand-by state.(when blank
screen, press any key), will display the current menu mode, may be
one of “DmxMode”,“FastMode”, “SlowMode”and “SondMode” ,
it depends on what the current mode is.
Page 2
16-Channel Mode
Channel Function Description
CH1 0-255 PAN
Up for adjusting positive turn,
Down for inversion
CH2 0-255 TILT Up for adjusting positive turn,
Down for inversion
CH3 0-255
General
Dimming
Adjusting Brightness
CH4 0-255 R Dimming Red Brightness Adjustment
CH5 0-255 G Dimming Green Brightness Adjustment
CH6
0-255
B Dimming
Blue Brightness Adjustment
CH7 0-255 W Dimming White Brightness Adjustment
CH8 0-255 Flashstrobe
Stroboflash Adjustment
,
from
slow to fast
CH9 0-255 Speed PAN/Tilt Motor Running Speed
CH10
0-10 Other Channels work
11-127
Color Combination Change
128-160
Color saltus step
161-200
Color gradual change 1
201-255
Color gradual change 2
CH11
Speed
Adjustment
For the 10th Channel
CH12
Built-in
Effect
Built-in Effect
CH13 Built in Effect Speed Adjustment
CH14 Fine Adjusting
for PAN
Running
0-255 Up for adjusting positive
turn, Down for inversion
CH15 Fine Adjusting
for TILT
Running
0-255 Up for adjusting positive
turn, Down for inversion
CH16 Reset 150-200 Reset
Page 7
5). Press “ENTER” to confirm. For the other colors setting, please refer
to above.
7. Factory Default Settings
1). Press “MODE” button until to “Defaults Confirm” menu.
2). Press “ENTER” into submenu “Yes”.
3). Press “ENTER” to confirm.
8. System Reset
1). Press “MODE” button until to “Fixture Rest” menu.
2). Press “ENTER” into the submenu “Yes”.
3). Press “ENTER” to confirm.
9-Channel Mode
Channel
Function
CH1 0-255 PAN
Up for adjusting positive turn,
Down for inversion
CH2 0-255 TILT
Up for adjusting positive turn,
Down for inversion
CH3 0-255 General
Dimming Adjusting Brightness
CH4 0-255 R Dimming Red Brightness Adjustment
CH5 0-255 G Dimming Green Brightness Adjustment
CH6
0-255 B Dimming
Blue Brightness Adjustment
CH7
0-255 W Dimming
White Brightness Adjustment
CH8 0-255 Flashstrobe Stroboflash Adjustment,from
slow to fast
CH 9 0-255 Speed PAN/Tilt Motor Running Speed
Page 6
Operation Instruction
Controller Setting
Operation Mode Setup
Motor Rotation Setting
Color Setting
Page 3
DMX Set
Address
001-512
512 Address Setup
Show
Mode
Dmx Mode
Controller Operation
Fast Mode
Fast Running Mode
Soud Mode
Running by Sound
0-99 Sound Sensitivity
Adjustment
Slow Mode
Slow Running Mode
Pan
Inverse
OFF
X Motor Turn
ON
OFF
Y Motor Turn
ON
Y Motor Inversion
X Motor Inversion
While
balance
R 0-255
Red Dimming
G 0-255
Green Dimming
B 0-255
Blue Dimming
W 0-255
White Dimming
Title
Inverse
Sound
Sense

Channel Mode Setting
Reset Setting
Initialization Setting
Remark: When the operation mode is chosen, press the Enter button to
run.
Operating Instructions
1. Mode Settings
1). Press “MODE” button, shift to “Show Mode”
2). Press “ENTER” to enter into submenu
3). Press “UP” or “DOWN” to shift among all the modes. “DmxMode”
indicates DMX mode; “FastMode” indicates fast running mode;
“SlowMode” indicates slow running mode; “SondMode” indicates
running by sound mode.
4). Shifting until to your wanted mode, then press “ENTER” button to
confirm.
2. DMX Channel Settings
1). Press “MODE” button until to “Channel Set” menu.
2). Press “ENTER” button to enter into submenu.
3). Press “UP” or “DOWN” button,to choose 9CH or 16CH.
Page 4
4). Press “ENTER” to confirm.
3. DMX Address Settings
1). Press “MODE” button until to “DMX Set Address” menu.
2). Press “ENTER” button into submenu.
3). Press “UP” or “DOWN” button for plus or minus the DMX number.
4). Press “ENTER” button to confirm above.
4. Sound Sensitivity Settings
1). Press “MODE” button until to “Sound Sense” menu.
2). Press “ENTER” to submenu.
3). Press “UP” or “DOWN” button to plus or minus the digit.
4). Press “enter” to confirm.
5. Motor Positive & Negative Rotation Settings
1). Press “MODE” button until to “Pan Inverse” menu(If for the
Y-Motor setting, will be “Tile Inverse” menu).
2). Press “ENTER” button into the submemu.
3). Shift “UP” and “DOWN” button to set positive rotation or negative
rotation.
4). Press “ENTER” to confirm.
6. Color Maximum Settings
1). Press “MODE” button until to “White Balance” menu.
2). Press the “ENTER” button into submenu “Red”.
3). Press “ENTER” again into “Red 200” menu to set the color
maximum.
4). Press “UP” or “DOWN” to plus or minus the maximum of Red.
Page 5
Channel
Set
9
9 Channel Mode
16
16 Channel Mode
Default confirm
Yes
Factory Default
Fixture Rest
System Reset
Yes
Table of contents
Popular Projector manuals by other brands

Sony
Sony VPL-HS1 - Cineza™ Lcd Front Projector operating instructions

Epson
Epson PowerLite 600p Product support bulletin

Sanyo
Sanyo PLC-XU31 owner's manual

Sony
Sony CPJ-7 Operating Instructions / Manual de instrucciones / Mode... operating instructions

Sharp
Sharp Notevision XG-NV7XU Manual de operación

3M
3M X31 Operator's guide

Digital Projection
Digital Projection HIGHlite 730 Series Installation and quick start guide

Sony
Sony VPL-EX145 specification

eMachines
eMachines V700 Series user guide

Zebronics
Zebronics ZEB-PixaPlay 26 user manual

Eiki
Eiki LC-X3/X3L Owner's instruction manual

Panasonic
Panasonic Easy Wireless Stick Operation manual


