Better Packages BP555e User manual
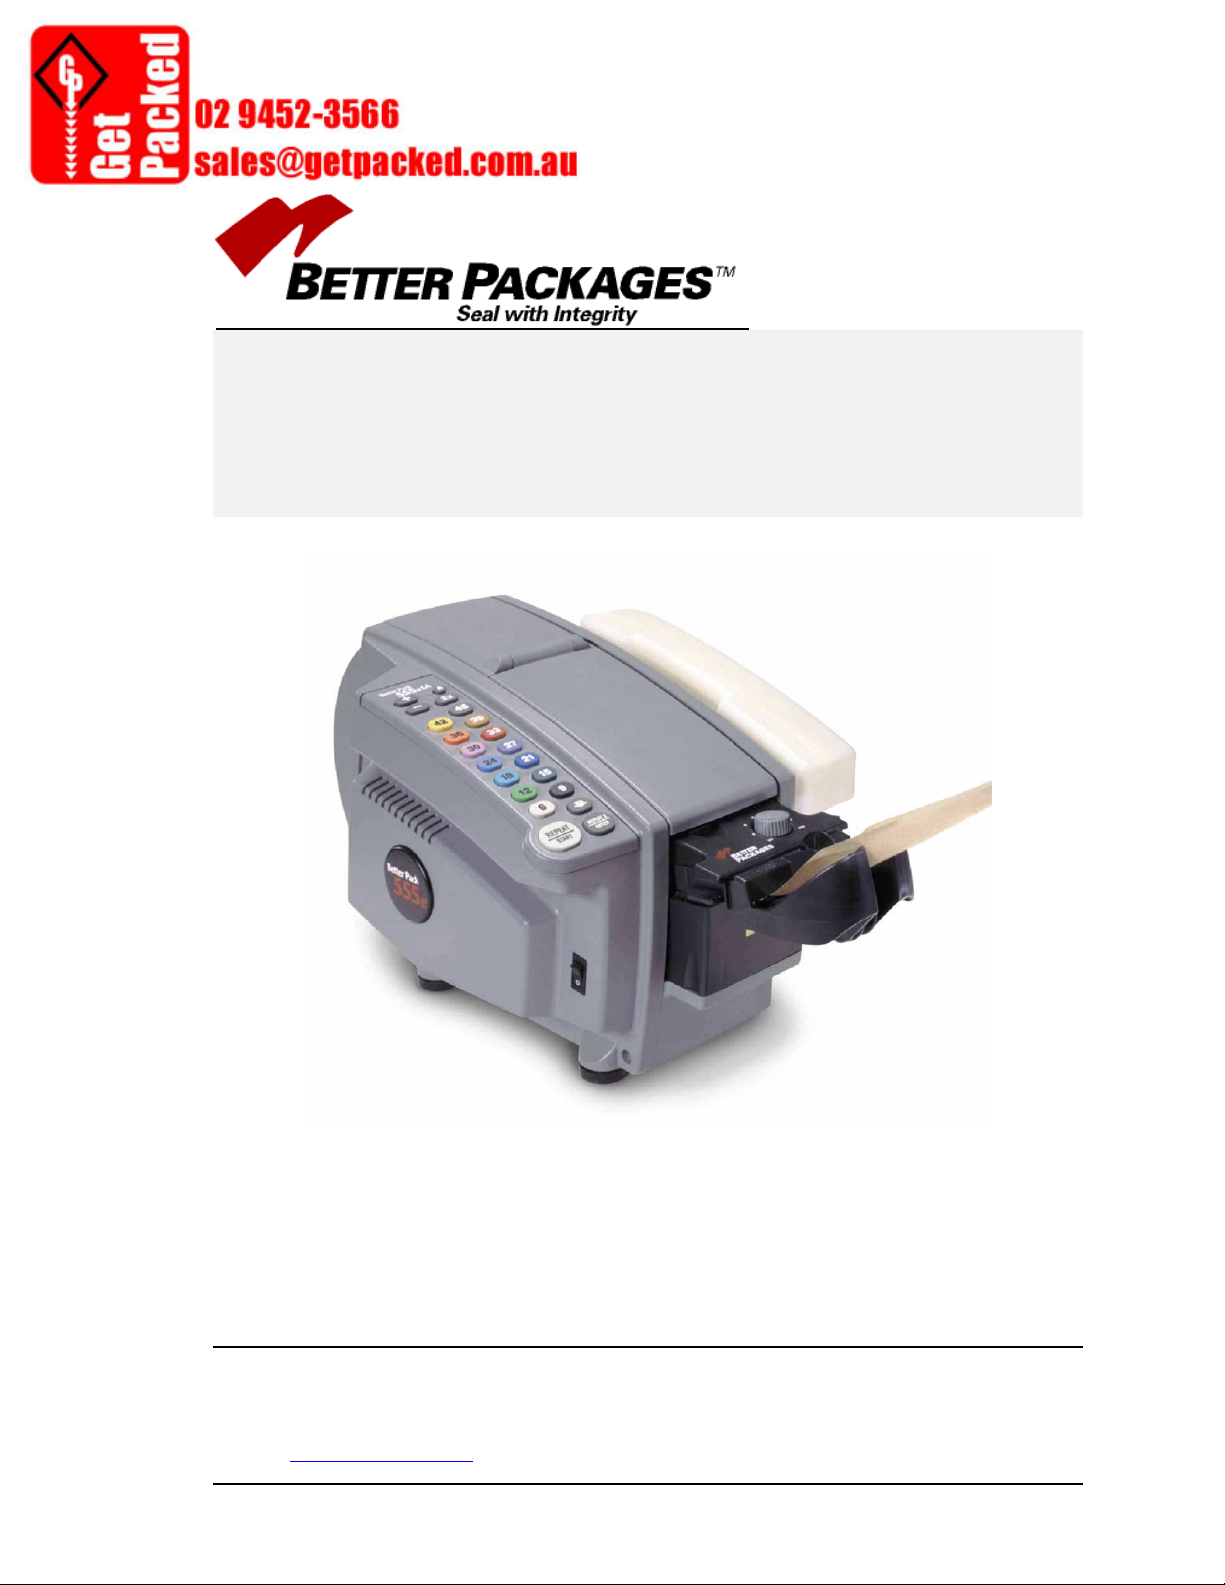
Model BP555e
Tape Dispenser
BP555eSERVICE MANUAL
B
BB
B
ETTER
ETTER ETTER
ETTER
P
PP
P
ACKAGES
ACKAGESACKAGES
ACKAGES
®
255 Canal Street Shelton, CT 06484
Web Site: www.betterpackages.com
File Name: BP555e Service Manual Rev06.doc

Better Packages Inc. 2
This manual is a non-controlled document.
Information in this manual does not constitute a warranty of performance. Futhermore Better
Packages reserves the right to revise this publication and make changes from time to time, in its
content.
Better Packages ASSUMES NO LIABILITY WHAT SO EVER FOR ANY LOSSES OR
DAMAGES INCURRED AS A RESULT OF INFORMATION CONTAINED IN THIS MANUAL
Proprietary Notice
This publication contains information proprietary and confidential to Better Packages. Any
reproduction, disclosure, or use of this publication is expressly prohibited except as Better
Packages may otherwise authorize in writing.
Better Packages
255 Canal Street
Shelton, CT 06484
Telephone: 800/237-9151
Web Site: http://www.betterpackages.com

Better Packages Inc. 3
TABLE OF CONTENTS
Safety Precautions
Technical Data
Maintenance and Repair
Recommended Periodic Maintenance
Brush Cleaning
Blade Oiling
Cleaning
Heater Replacement.
Motor Brush Replacement
Motor Replacement
Shear Blade Replacement
Feed Wheel / Blade Height Adjustment
Keypad and membrane Replacement
Key pad only
Connector plate
Motor Chain Adjustment
Circuit Board
Front and Rear Cover
Length Sensor
Water Tank Adjustment
Tape Sensor
Feed Wheel
Fuses
Solenoid
Blade Oiler

Better Packages Inc. 4
Troubleshooting Tape Feed Problems
Tape Jams
Tape Strips too short
Constant Feed or Extremely Long Tape Piece
Tape Feeds too slowly
No Tape Feed
Tape Hits Blade or Left Hand Corner of Tape Folded
Tape Strips not Correct Lengths
Wiring Diagrams
Spare Parts List

Better Packages Inc. 5
SAFETY PRECAUTIONS
Must read before servicing equipment.
Always
unplug the machine
before performing any maintenance or
repair. Line voltages may be present even with power switch in Off
position.
This machine is designed for sealing cartons with water activated tape. Any other use will
void all warranties and any responsibility or liability of Better Packages, Inc.
Read all Safety Precautions and Operating Instructions before powering on and using the
machine.
Any operator of this machine must be fully trained in the operation and safety.
In the event of a malfunction or breakdown, grounding provides a low resistance path for
electric current to reduce the risk of electric shock. This machine is equipped with an electric
cord having an equipment-grounding conductor and a grounding plug. The plug must be
plugged into a matching outlet that is properly installed and grounded in accordance with all
local codes and ordinances.
Before connecting the machine to the power mains verify that the electrical ratings of the
machine match the electrical supply intended for connection, otherwise do not connect. If the
correct power is not available contact the reseller.
Before maintenance or repair, disconnect the power cords from the electrical supply and
protect the cables from any possible accidental connection carried out by unauthorised
personnel.
Keep the machine away from children and from personnel who are not authorised or
adequately instructed in the use of it.

Better Packages Inc. 6
TECHNICAL DATA
Size: 20”Lx12.5”Wx12”H (51 x 32 x 30 cm)
.
Dispensing Speed: Up to 45” (114 cm) per second
Water Bottle Capacity: 2 pints 2 oz. (1 liter)
Shipping Weight: 32 lbs. (15 kg)
Power Requirements: 555es, eSA, eL, eLA – 115 volts, 60 Hz, 4 Amps
555eMA, eFA – 220/240v, 50 Hz, 2 Amps
555eJA – 100V, 50/60 Hz, 4 Amps
Tape Width: 1-1/2” to 3” (3.8 to 7.7 cm) wide
Maximum Roll Size: Up to 1000 ft. of tape
Up to 10” diameter roll(25 cm)
All specifications subject to change without notice

Better Packages Inc. 7
MAINTENANCE AND REPAIR
The machine is designed for easy maintenance. Regular maintenance will insure a long
dependable machine life.
Recommended Preventative Maintenance
Clean Brushes and Tank - Weekly
Clean the brushes on a weekly basis or when glue build up effects proper moistening of
the tape. The glue can prevent sufficient and even water flow to the tape causing poor
moistening of the tape. Regular cleaning will extend the life of the brushes and insure that
glue build up will not cause tape jams or poor tape moistening.
Procedure:
1.
Unplug power from the machine!
Remove the water bottle and water tank.
Twist the tank up over the lip on the tank shelf that prevents it from sliding out of the
machine.
Caution: Heater may stay hot for a period after machine is off.
Remove the brushes from the tank to remove any dried adhesive. You will need to tilt
the brushes to clear the retaining bracket. Notice how the brushes are positioned in
the tank because the must be replace correctly.
2. Wash the brushes and tank with warm water and soap.
3. Place the brushes back into the water tank. It is extremely important that they are
positioned correctly. Brushes must be sloped toward the front of the dispenser in
order to work properly. The top of the brushes are cut at an angle. Shorter brushes
go in the back. The longer length bristles must be toward the front of the machine
(tank).
Notice: Installing the brushes backwards will cause excessive tape jams.
Never cut the brush tips to remove glue as they are cut at a specific angled
and flagged to facilitate proper moistening and cutting will most likely cause
tape jams.

Better Packages Inc. 8
Lubricating the Felt Blade Oiler - Monthly
The blade oiler is a felt pad soaked with oil that presses lightly on the back of the shear blade.
The oil will keep your shear blades lubricated for clean, fast cutting and prolong the life of the
blades. It also extends the time between blade cleanings.
1. Unplug power from the machine!
2. Pull back gently on the blade oiler to move it away from the shear blade.
3. Keep the felt pad slighly moist by adding several drops of light machine oil,e.g. 3-in-1 oil,
at weekly or monthly intervals depending on use. Do not over oil.
Notice: If the felt pad is missing, contact you Better Pack representative for a new oiler Better
Pack P/N SA10XX
Cleaning the Shear Blades
When using reinforced tapes laminated with glue or resin, this material can accumulate on the
blades and interfere with cutting the tape. Even paper tape with no reinforcement can cause an
accumulation of dust and glue on the blades.
Use a small brush and a suitable solvent to remove accumulation.
Never scrap the cutting edge with a hard object because the blade may become dull and need
replacement.
Warning:
Be sure the dispenser is UNPLUGGED
before performing any cleaning
procedures.
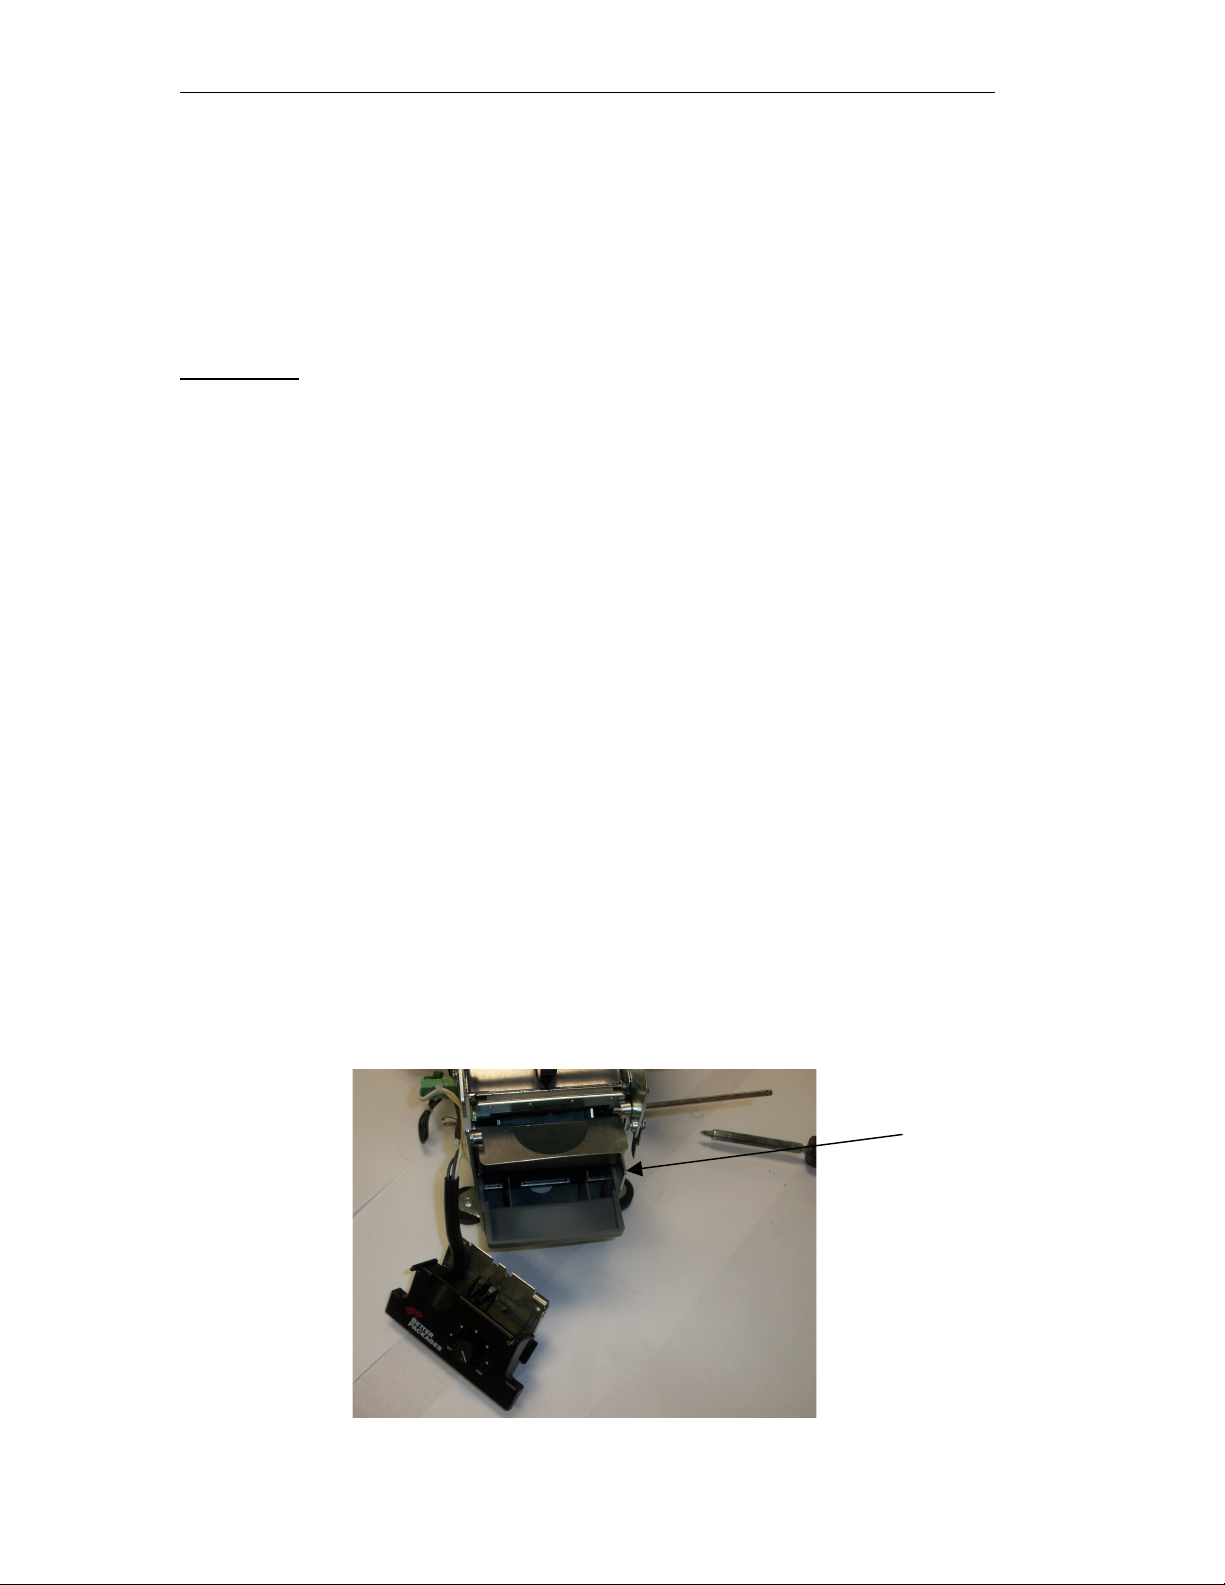
General Machine Cleaning
The feed wheel pushes tape through the machine. Obstructions such as dirt or dried glue can
divert the tape and cause it to jam. Periodical cleaning the tape path will mitigate tape jams.
1. Remove the upper tape plate that sets on the tape next to the feed wheel. Pull tape off
from the lower tape plate if it hasn’t already been removed. Clean any dirt and glue from
the upper and lower tape plates.
2. Lift the heater up and clean the bottom of it.
Better Packages Inc. 9
Heater
It is recommended that the Heater be replaced by a Better Packages supplied
Heater to maintain safety compliance.
(Note: Always unplug machine when performing service to machine)
Procedure
1. Remove the water bottle and tank and brushes.
2. Remove the right side cover from the machine by the (5) screws that
fasten cover to the side frame.
3. Remove left side cover from machine by removing (5) screws that fasten
cover to frame. When removing this cover lift gently and remove the
membrane switch from the pc board.
4. On the right side frame loosen the screw that locks the bracket onto the
shaft that goes through the heater assembly.
5. Cut the tie-rap that fastens heater to frame. Remove heater plug from pc
board.
6. From the right side remove the shaft holding the heater in place. Remove
your old heater and take off the lower heater plate.
7. Place the lower plate on your new heater and reinstall your heater back
onto machine. Be sure to lock the bracket back into the groove in the shaft
and tighten screw on bracket.
8. Plug your heater back into the pc board and tie-rap the heater back onto
frame.
9. Replace membrane switch back onto pc board and fasten left cover back
onto frame with (5) screws.
10.Replace right side cover back onto frame with (5) screws.
11.Replace tank, water bottle and plug machine back in.
Loosen retainer

Better Packages Inc. 10
Motor Brush
The motor brushes will last a long time but usually not as long as the rest of the machine.
If the motor stops working or runs excessively slow, the motor brushes may need
replacing.
(Note: Always unplug machine when performing service to machine)
Procedure
1. Remove the water bottle, tank and brushes
2. Remove the right side cover from the machine by removing the (5)
screws that fasten the cover to the frame.
3. The motor should now be visible. Locate the (2) black slotted brush
caps on the top and bottom of the motor. Remove them with a flat
screwdriver by turning them counterclockwise.
4. Pull the brushes out of the motor. Attached to the cover is a spring,
which is attached to a small rectangular shaped carbon brush. Make
sure the brush comes out before inserting the new brush in. Usually the
brush will come right out, but if it doesn’t, insert a small object, e.g. a
paper clip into the hole to free it up. If necessary tip the machine up so
that the brush will fall out. If you have compressed air now is a good
time to blow the residual carbon dust out of the motor. If air is not
available, just tap on the motor with it positioned so the dust can fall
out of the brush holder.
5. If either brush is less than ¼” long, both brushes should be replaced.
Insert the brush into the brush holder being sure to match the concave
of the brush with the motor. Screw the brush caps back onto the motor.
Remove caps to
Change brushes
Better Packages Inc. 11
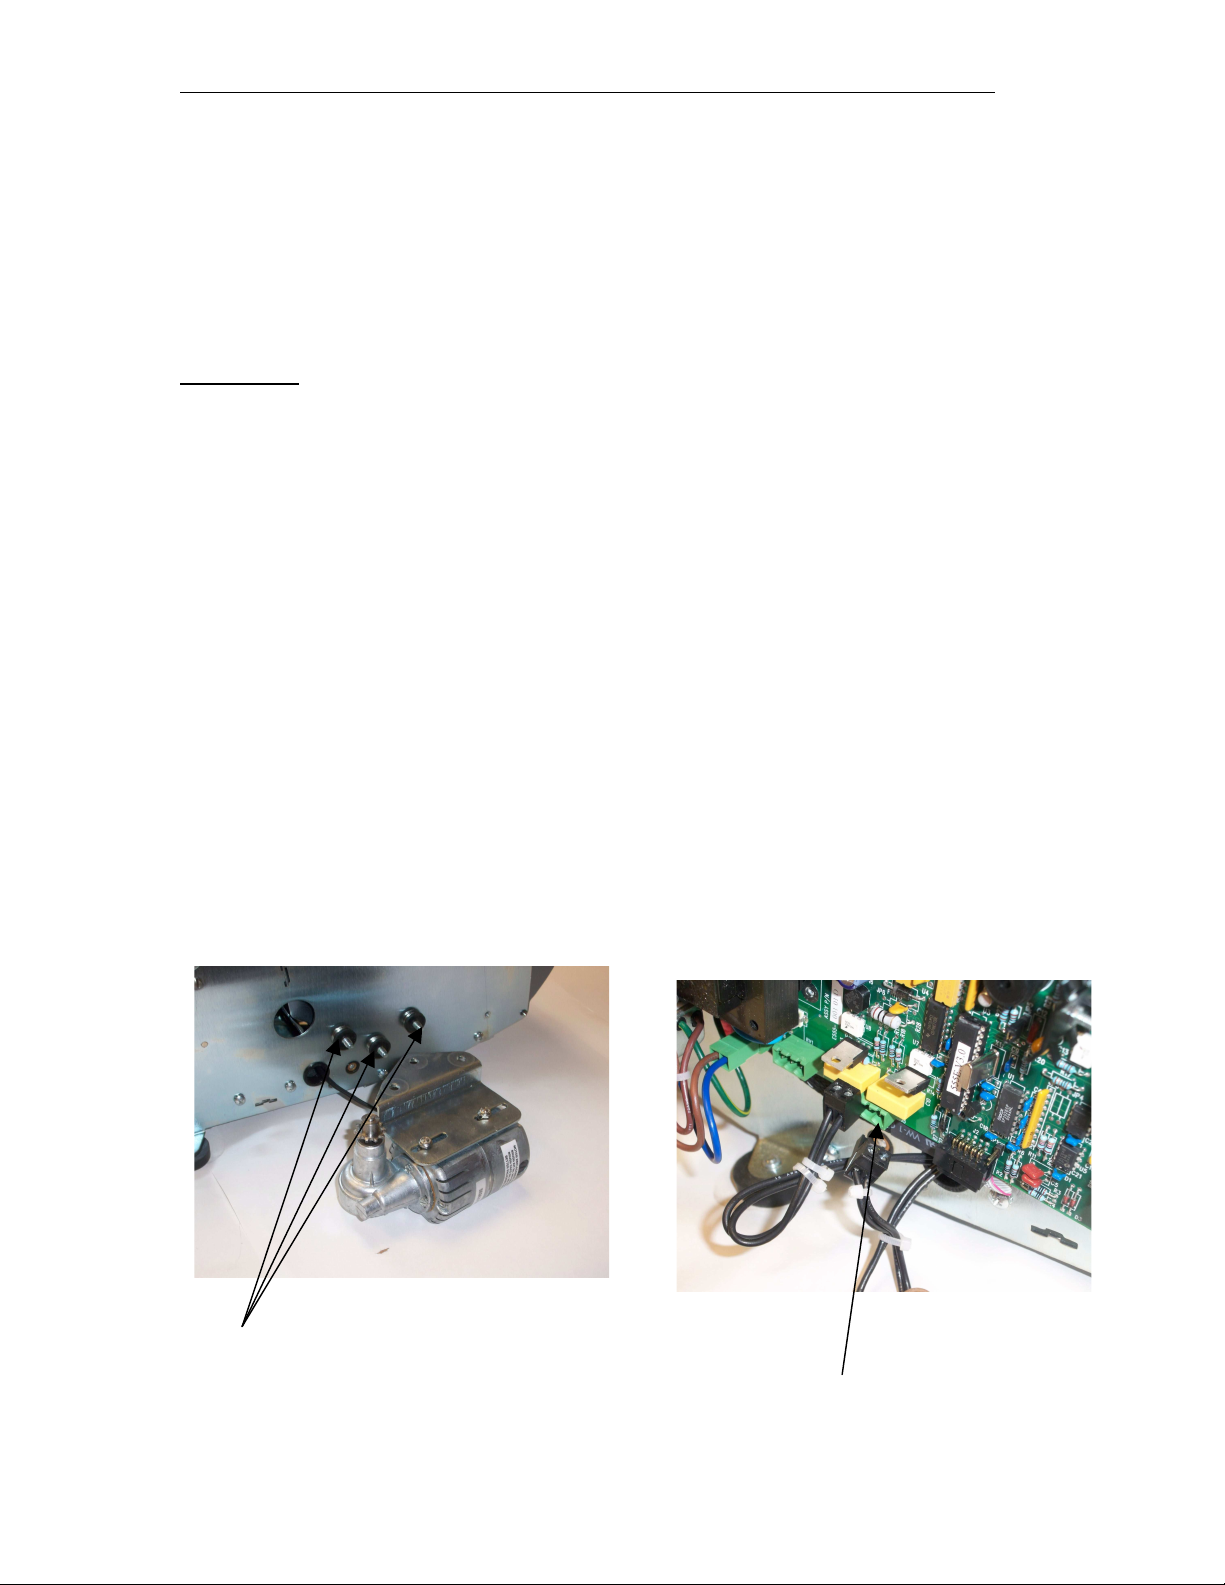
Motor
(Note: Always unplug machine when performing service to machine)
Procedure
1. Remove the water bottle, tank and brushes
2. Remove the right side cover from the machine by removing
the (5) screws that fasten the cover to the frame.
3. The motor should now be visible. Loosen the 3 nuts that are
fastening the motor to the frame.
4. Remove the 5 screws from the left side cover. Be sure not to
let the cover fall off because the keypad cable will break off.
Once the cover is off, take the keypad cable off the board
and remove the connector from the board that is marked mtr.
Now run the new motor wire through the machine and
connect it to the board. Fasten the motor chain to the
sprocket and fasten the motor to the frame.
5. Get the motor snug and tighten the 2 screws on the motor
bracket.
6. Connect the keypad cables and put left side cover back on.
7. Put right side cover back on .
8. Add tank, water bottle and plug cord back into machine.
Remove nuts remove right connector

Better Packages Inc. 12
Shear Blade
(Note: Always unplug machine when performing service to machine)
Procedure
1. Remove the water bottle, tank and brushes
2. Remove the right side cover from the machine by removing the (5) screws
that fasten the cover to the frame
3. Remove the left side cover from the machine by removing the (5) screws
that fasten the cover onto the machine. Gently lift the cover and remove
the membrane switch from the pc board.
4. Remove the (2) screws that hold the baffle plate onto the machine. Take
the baffle plate out.
5. Loosen the screw on the right side frame that locks in the shaft holding the
heater and blade oilier in place.
6. Remove the heater and blade oiler by pulling out the shaft from the right
side.
7. Remove tank shelf by inserting flathead screwdriver in-between tank shelf
and frame.
8. Remove the spring that is fastened to the cutter yoke.
9. Loosen the pin that holds the blade in place by turning it counter clockwise
with a flathead screwdriver. If the pin doesn’t turn loosen the pin with a
pair of vise grip pliers. Once the pin is loose remove it and remove the
blade.
10.Remove the spring from the upper blade by unhooking the springs from
the pins. Remove the blade.
11.Replace the upper blade and hook the springs back onto the pins.
12.Replace the lower blade with the new shaft.
13.Replace spring back onto yoke assembly.
14.Replace tank shelf back onto machine.
15.Replace baffle plate back onto machine and fasten with (2) screws.
16.Replace heater assembly and blade oiler and lock pins back on right side
frame.
17.Replace membrane switch back into pc board.
18.Replace left side cover with (5) screws.
19.Replace right side cover with (5) screws
20.Replace tank, water bottle and plug in machine

Better Packages Inc. 13
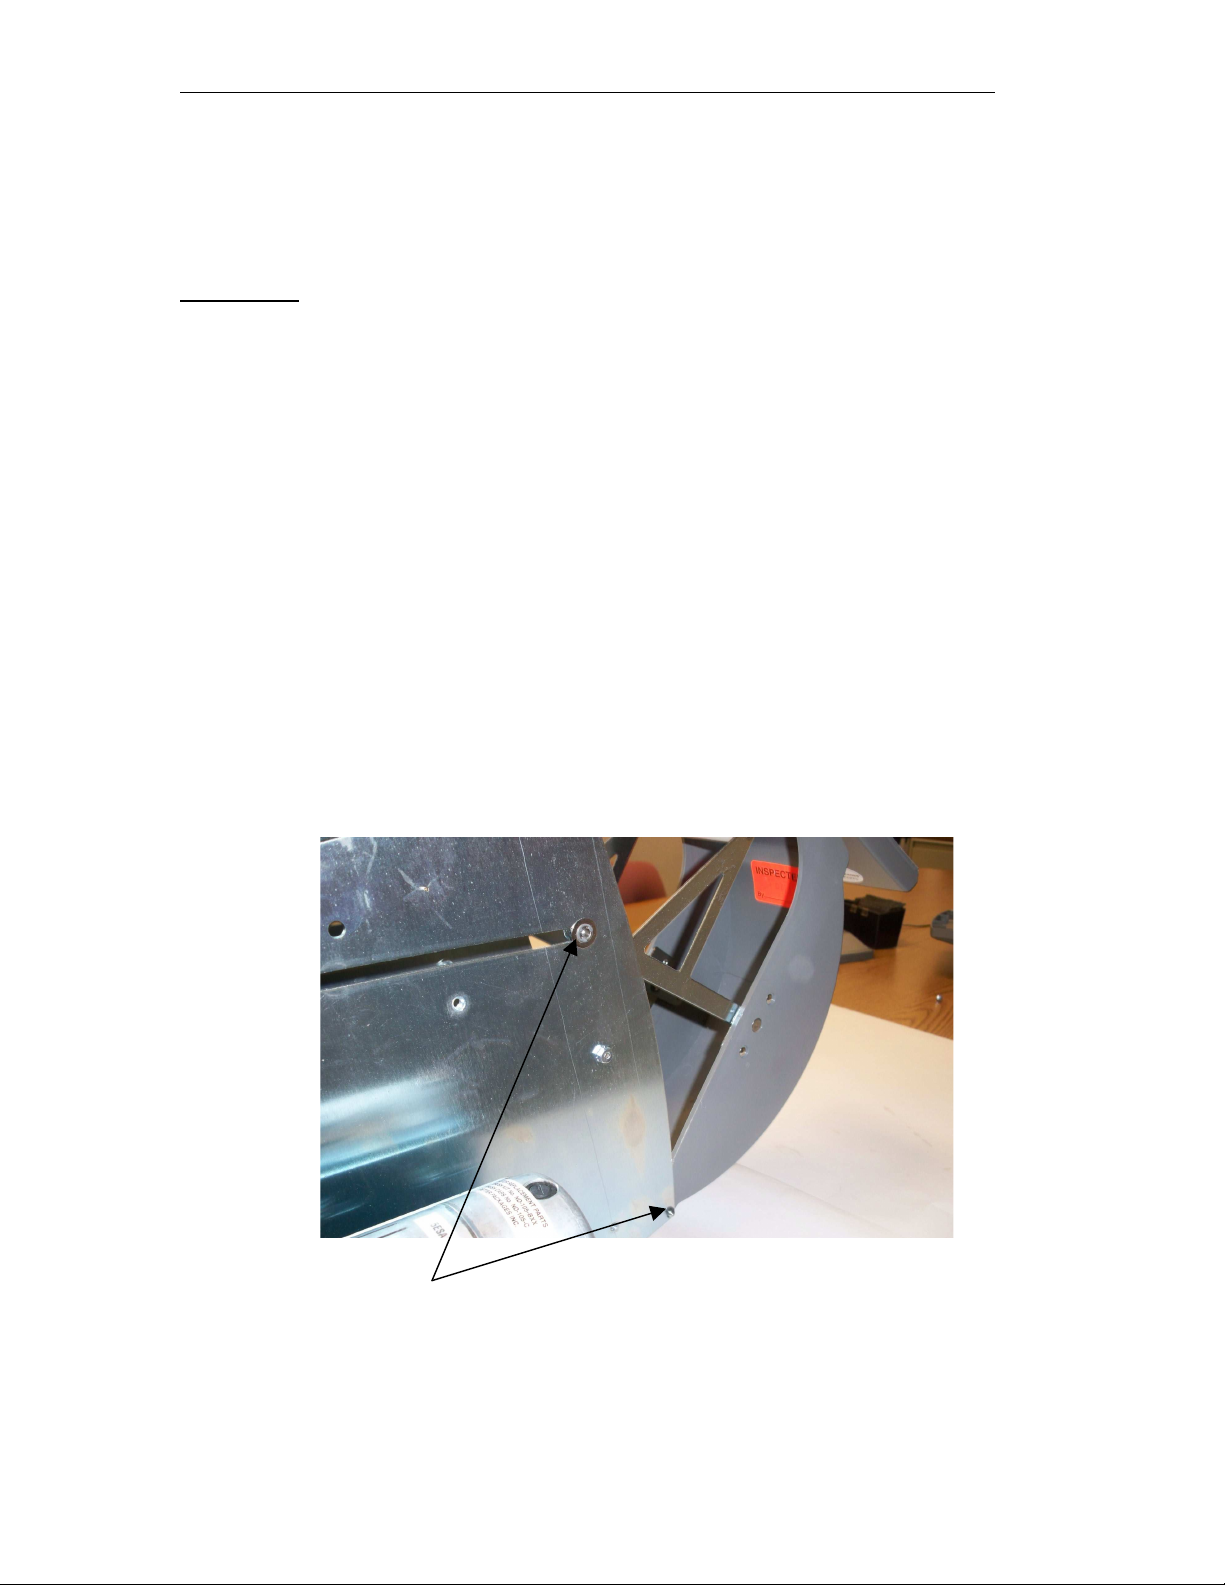
Feed Wheel / Blade Height Adjustment
When a dispense key is pressed the tape cutter blade and the lower feed wheel
lift up.
The machine has an adjustment set screw that sets the height of the blade and
lower feed wheel. The adjustment sets the amount of pinch force between the
upper and lower feed wheels. If the feed wheel does not grip the tape sufficiently,
the tape can slip. When the tape slips an inaccurate measurement of the tape
length occurs, resulting in a shorter than normal tape piece. If short or erratic
tape lengths occur, the adjustment described below may need to be performed to
correct the problem.
Procedure
1. Unplug! the power cord from the back of the machine.
2. Open the top cover then remove the roll of tape and tape guides.
3. Insert a 3/32” Allen wrench through the access hole in the in the plate
(Vertical Tie Plate) at the front of the tape basket area and into the adjustment
set screw.
Note: The set screw is located about 2-1/4” in front of the access hole and
can be hard to locate. The set screw can be partially seen by viewing through
the slots from back of the tape machine between the rear cover and the side
of the machine.
4. Turn the set screw clockwise ½ turn to tighten the feed wheel.
5. Reassemble and test machine, repeat if still slips.
3/32” Allen Wrench in
Access Hole
Better Packages Inc. 14
Keypad and Membrane Switch
(Note: Always unplug machine when performing service to machine)
Procedure
1. Remove the water bottle ,tank and brushes
2. Remove the (5) screws that fasten the left side cover
onto the frame. Gently lift the cover and remove the
membrane switch from the pc board.
3. Remove the keypad bezel by inserting a thin flathead
screwdriver in-between the keypad bezel and the cover.
Lift the bezel up and remove it from the cover. Remove
the keypad and membrane switch.
4. Place new membrane switch assembly and keypad back
in and replace bezel back on cover.
5. Connect the membrane switch back into the pc board
and replace left side cover back onto the frame using the
(5) screws.
6. Replace tank, water bottle and plug machine back in.
Remove keypad membrane
From board

Better Packages Inc. 15
Replace Keypad Only
1. Unplug machine and remove water bottle.
2. Insert a thin flathead screwdriver in-between the keypad
bezel and the cover . Lift the bezel up with your fingers and
remove the old keypad and replace it with the new keypad.
3. Place the bezel back onto the cover and lock it in
replace tank, water bottle and plug machine back in
Connector Plate Assembly
(Note: Always unplug machine when performing service to machine)
Procedure
1. Remove the 5 screws holding the left side cover on
2. Remove keypad membrane and remove the 2 screws holding
the connector to the frame
3. Remove the connectors from the board
4. Place new assembly back onto the frame and fasten with the 2
screws
5. Replace the wire connectors back onto the board
6. Replace the keypad membrane back onto the board
7. Replace the cover back onto machine with the 5 screws
8. Plug machine back in
Better Packages Inc. 16
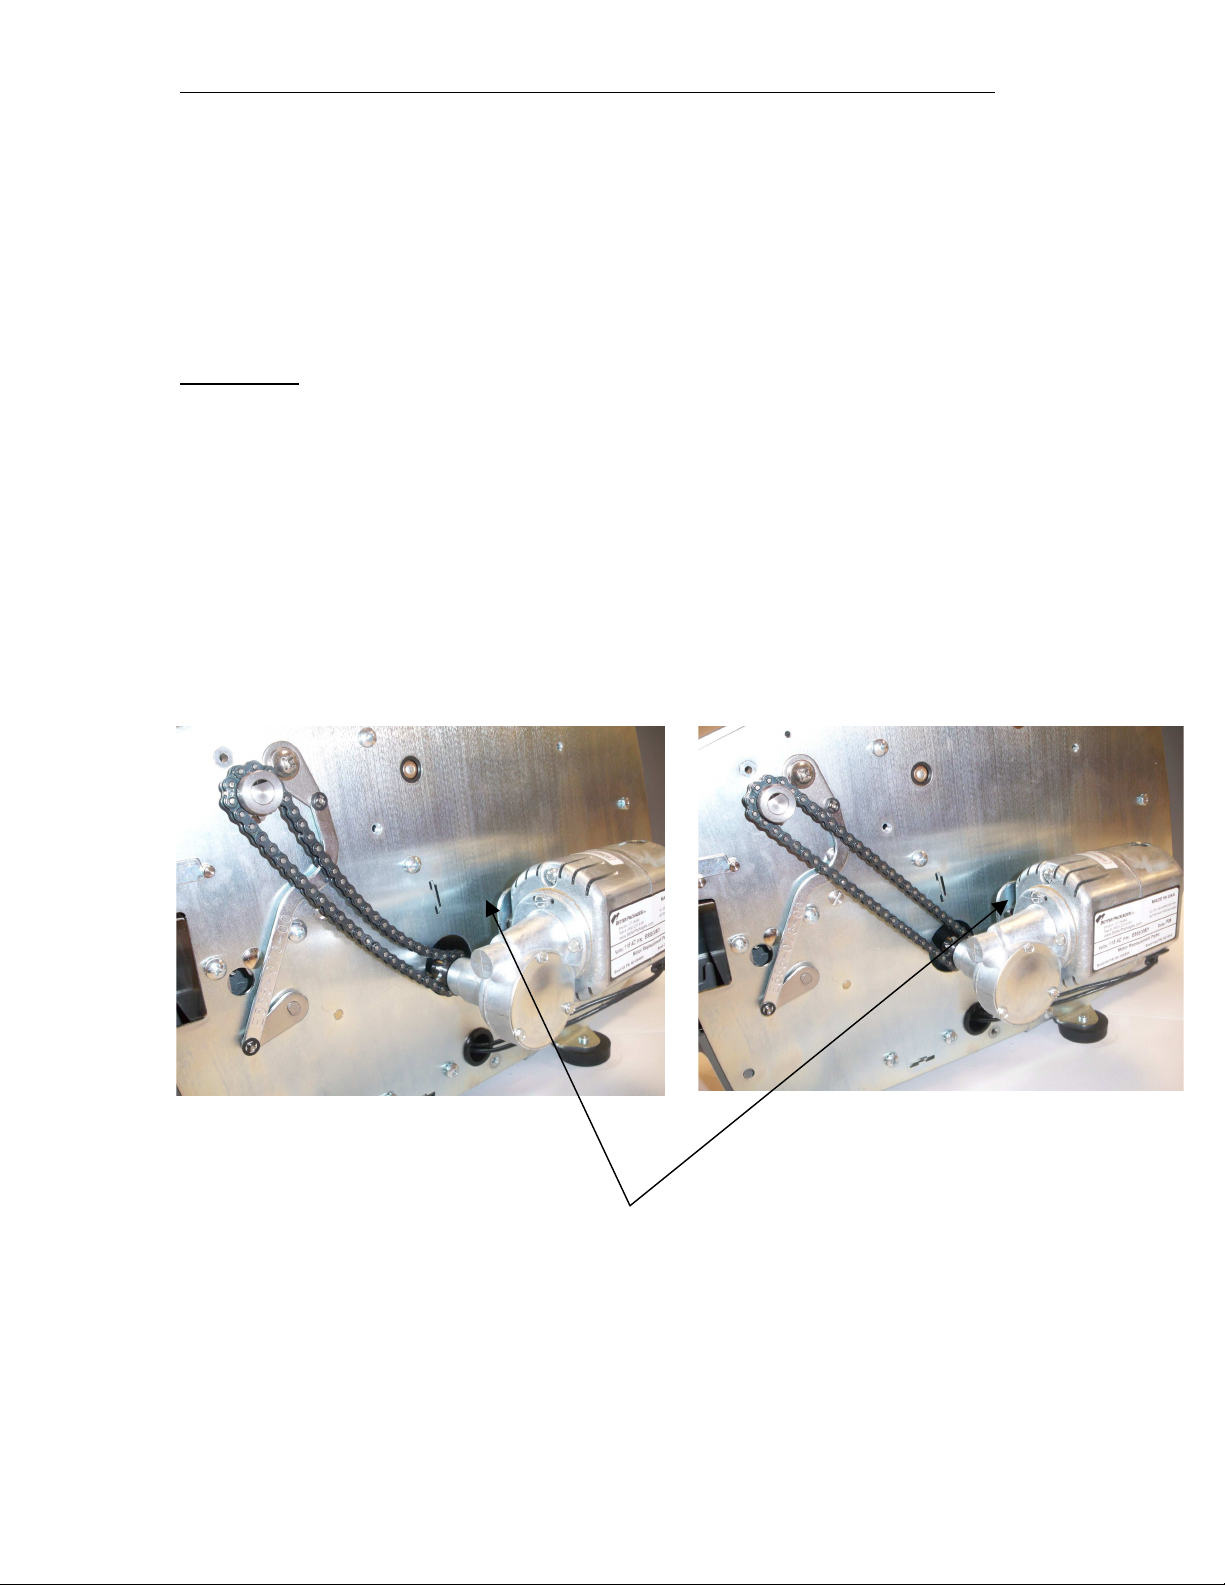
Motor Chain Adjustment
( Note: Always unplug machine when performing service to machine)
Procedure
1. Remove water bottle and water tank assembly
2. Remove the left side cover
3. Loosen the 2 nuts that hold the motor onto the motor bracket
(Be sure not to remove the nut completely)
4. Push the motor towards the rear of the bracket until there is no
more slack on the motor chain
5. Tighten the nuts on the motor chain bracket until snug. Do not
over tighten
6. Replace cover, tank and water bottle.
Loosen nuts behind bracket
To adjust

Better Packages Inc. 17
Control Board
( Note: Always unplug machine when performing service to machine)
Procedure
1. Remove bottle, tank and brushes
2. Lay machine onto right side
3. Remove the 5 screws from the left side cover, lift the cover and
remove the keypad membrane from the board
4. Lay the cover down and remove all the connectors from the board
5. Remove the 5 screws holding the board to the frame and place the
new board in its place and fasten with the 5 screws
6. Replace the connectors back onto the board (the solenoid and motor
both have black wires so when replacing these back on the shinier wire
connected to the motor)
7. Connect the keypad membrane and close the cover. Be sure that no
wires are being pinched
8. Fasten cover with the 5 screws
9. Replace the water tank and brushes and the water bottle
10.Plug in machine
REMOVE 5 SCREWS
Better Packages Inc. 18
Front and Rear Cover Assembly
(Note: Always unplug machine when performing service to machine)
Procedure
1. Remove bottle, tank and brushes
2. Remove right cover. Remove left cover and remove keypad membrane
from board
3. Remove the 2 retaining rings holding the bracket assembly to the right
and left frame. Be sure not to lose the washers and retaining rings
4. Remove the retaining ring from the pin holding the rear cover in place.
Slide the pin to the left and remove from machine.
5. Remove the spring from the cover and put it on the new cover
6. Replace the new cover on machine and push the pin through the frame
and cover until it gets through to the other side and than fasten the
retaining ring back onto pin
7. Attach the brackets back onto the side frames using the washers and
retaining ring that were taken off
8. Replace the keypad membrane onto the pc board
9. Replace the right and left side covers
10.Replace the tank, brushes and water bottle
Remove retaining ring
For upper ring remove from both side frames

Better Packages Inc. 19
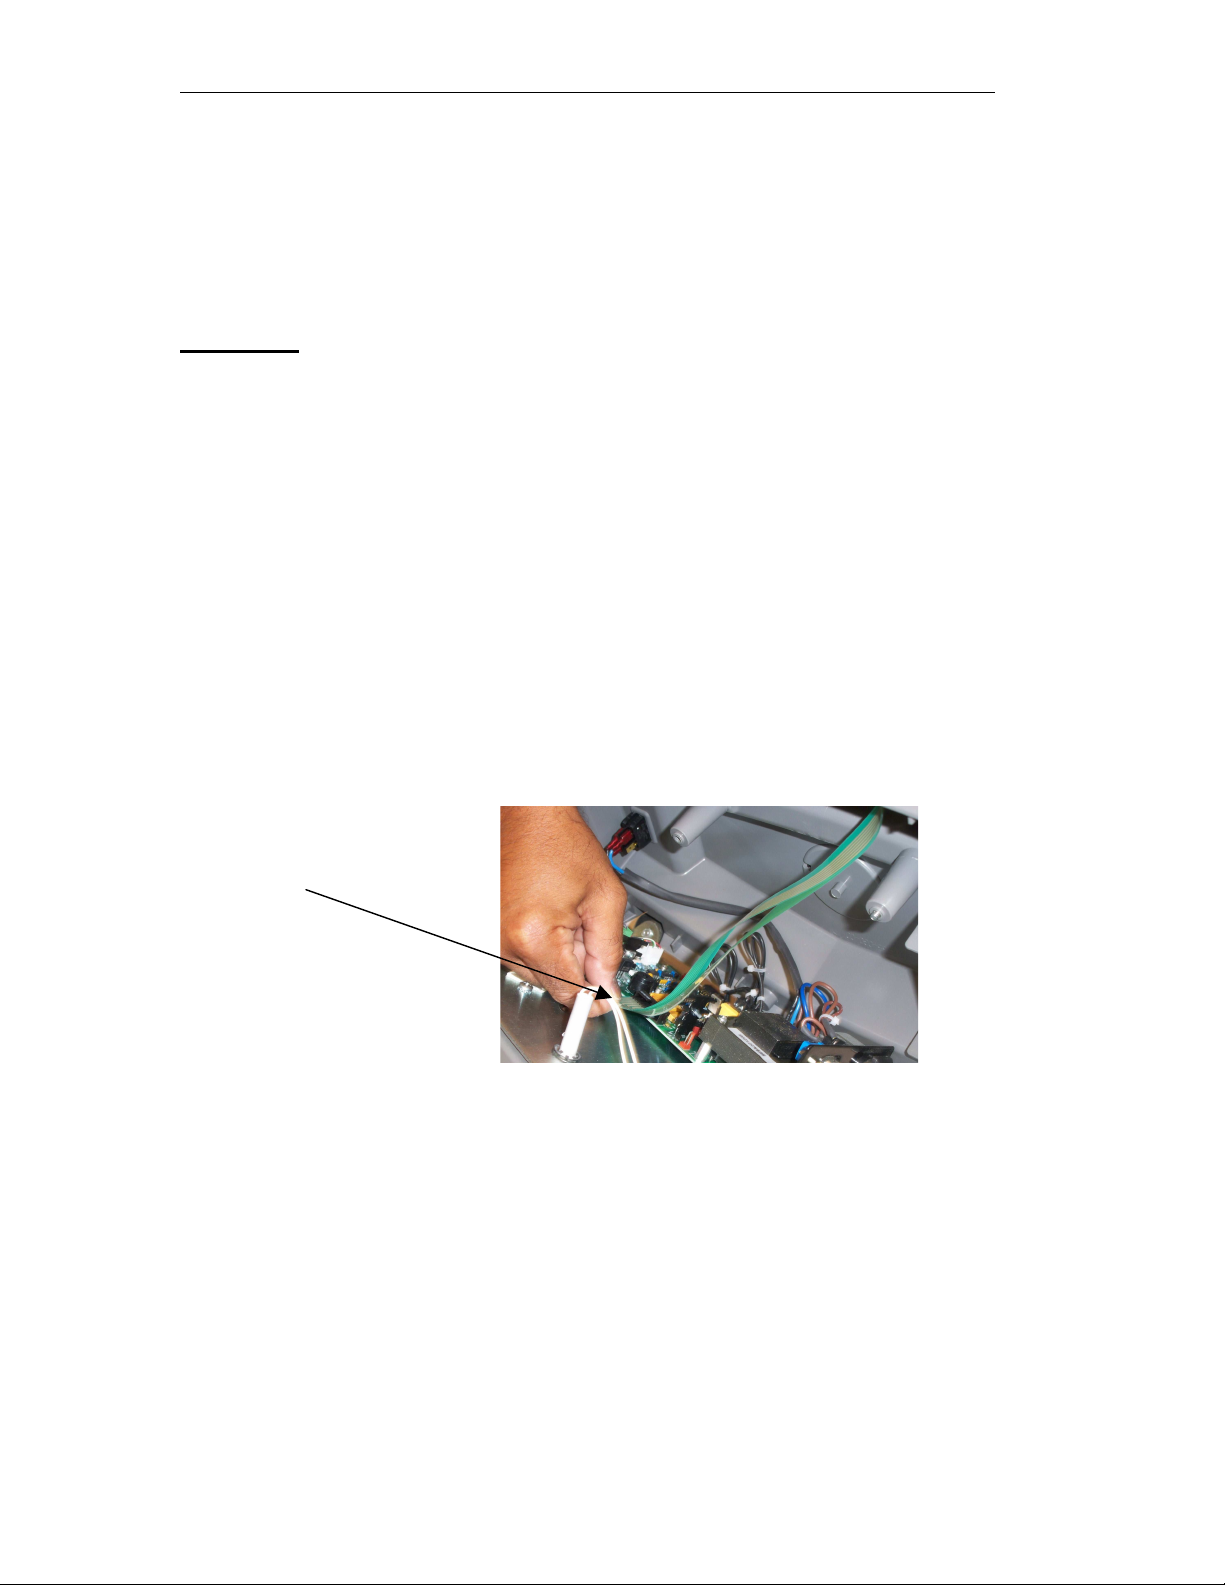
Length Sensor
(Note: Always unplug machine when performing service to machine)
Procedure
1. Remove left side cover. Remove the keypad membrane from the
control board and lay the cover on the bench
2. Remove the 2 screws holding the sensor in place and remove
connector from board
3. Place new sensor on machine and fasten with the screws and replace
the connector to the board
4. Replace the keypad membrane back onto the board
5. Replace the cover back onto machine
2 SCREWS
Water Level Adjustment
To adjust the water in the tank to the desired level slide the water level adjuster
to the left to decrease the water level and slide adjuster to the right to increase
the water level in the water tank.
adjuster

Better Packages Inc. 20
Tape Sensor
(Note: Always unplug machine when performing service to machine)
Procedure
1. Remove left side cover
2. Remove sensor from back of heater assembly and remove connector
from board
3. Replace sensor onto the back of the heater assembly
4. Replace connector back onto board
5. And fasten with a cable tie
6. Replace cover back onto machine
PUSH OUT
Table of contents
Other Better Packages Dispenser manuals

Better Packages
Better Packages BP500 User manual

Better Packages
Better Packages Better Pack 755eMA User manual

Better Packages
Better Packages Better Pack 755eS User manual

Better Packages
Better Packages PS2A User manual

Better Packages
Better Packages 555e User manual

Better Packages
Better Packages Better Pack 755e Series User manual
Popular Dispenser manuals by other brands


Cornelius
Cornelius IntelliBlue R134 Kuwait Series operating instructions

BOWMAN
BOWMAN KS123-0529 quick start guide

Silver King
Silver King SK1IMP Technical manual & replacement parts list

Perlick
Perlick Draft Arm installation instructions

Star
Star HPDE1 Installation and operation instructions

ESINO
ESINO Z88 user manual


