Polar Air CF760 User manual

Gekoelde drankdispenser
Handleiding
Distributeur de boissons réfrigérées
Mode d'emploi
Dispenser für gekühlte Saftgetränke
Bedienungsanleitung
Erogatore di bevande fredde
Manuale di istruzioni
Dispensador de bebidas frías
Manual de instrucciones
Dispensador refrigerado de bebi-
das
Manual de instruções
NL
FR
DE
IT
ES
PT
Chilled
Drinks Dispenser
Instruction manual
Model •Modèle •Modell •Modello •Modelo •Malli:
CF760/CF761

Table of Contents
Safety Tips . . . . . . . . . . . . . . . . . . . . . . . . . . . . . . . . . . . . . . . . . . . . . . . . . . . . . . . . . . 1
Product Description . . . . . . . . . . . . . . . . . . . . . . . . . . . . . . . . . . . . . . . . . . . . . . . . . . 1
Introduction . . . . . . . . . . . . . . . . . . . . . . . . . . . . . . . . . . . . . . . . . . . . . . . . . . . . . . . . 1
Pack Contents . . . . . . . . . . . . . . . . . . . . . . . . . . . . . . . . . . . . . . . . . . . . . . . . . . . . . . 1
Installation . . . . . . . . . . . . . . . . . . . . . . . . . . . . . . . . . . . . . . . . . . . . . . . . . . . . . . . . . . 2
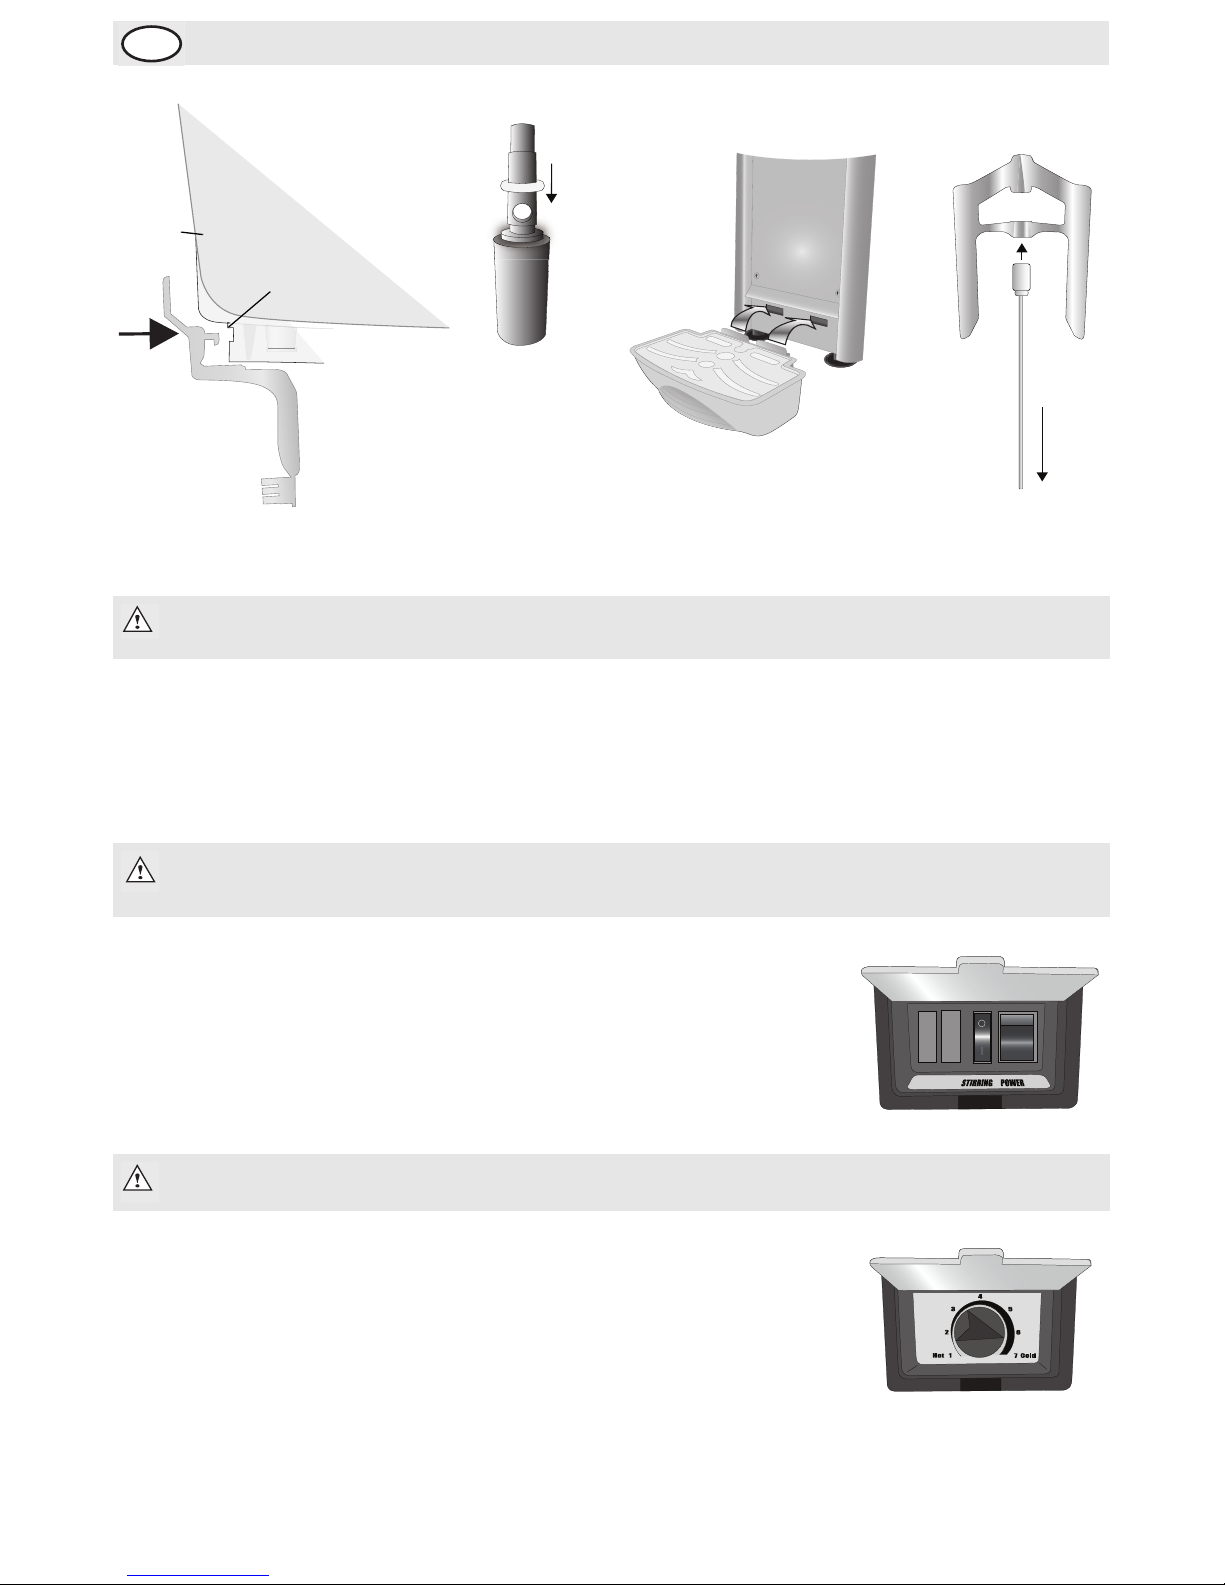
Assembly/Disassembly . . . . . . . . . . . . . . . . . . . . . . . . . . . . . . . . . . . . . . . . . . 2
Operation . . . . . . . . . . . . . . . . . . . . . . . . . . . . . . . . . . . . . . . . . . . . . . . . . . . . . . . . . . 3
Filling . . . . . . . . . . . . . . . . . . . . . . . . . . . . . . . . . . . . . . . . . . . . . . . . . . . . . . . . 3
Using the Dispenser . . . . . . . . . . . . . . . . . . . . . . . . . . . . . . . . . . . . . . . . . . . . 3
Adjusting the Temperature . . . . . . . . . . . . . . . . . . . . . . . . . . . . . . . . . . . . . . . 3
Emptying the Dispenser . . . . . . . . . . . . . . . . . . . . . . . . . . . . . . . . . . . . . . . . . 4
Cleaning, Care & Maintenance . . . . . . . . . . . . . . . . . . . . . . . . . . . . . . . . . . . . . . . . . . 4
Cleaning the Condenser . . . . . . . . . . . . . . . . . . . . . . . . . . . . . . . . . . . . . . . . . 4
Troubleshooting . . . . . . . . . . . . . . . . . . . . . . . . . . . . . . . . . . . . . . . . . . . . . . . . . . . . . 5
Technical Specifications . . . . . . . . . . . . . . . . . . . . . . . . . . . . . . . . . . . . . . . . . . . . . . . 5
Electrical Wiring . . . . . . . . . . . . . . . . . . . . . . . . . . . . . . . . . . . . . . . . . . . . . . . . . . . . . 5
Disposal . . . . . . . . . . . . . . . . . . . . . . . . . . . . . . . . . . . . . . . . . . . . . . . . . . . . . . . . . . . 6
Compliance . . . . . . . . . . . . . . . . . . . . . . . . . . . . . . . . . . . . . . . . . . . . . . . . . . . . . . . . . 6
Inhoudsopgave
Veiligheidstips . . . . . . . . . . . . . . . . . . . . . . . . . . . . . . . . . . . . . . . . . . . . . . . . . . . . . . . 7
Productbeschrijving . . . . . . . . . . . . . . . . . . . . . . . . . . . . . . . . . . . . . . . . . . . . . . . . . . 7
Inleiding . . . . . . . . . . . . . . . . . . . . . . . . . . . . . . . . . . . . . . . . . . . . . . . . . . . . . . . . . . . . 7
Verpakkingsinhoud . . . . . . . . . . . . . . . . . . . . . . . . . . . . . . . . . . . . . . . . . . . . . . . . . . . 7
Installatie . . . . . . . . . . . . . . . . . . . . . . . . . . . . . . . . . . . . . . . . . . . . . . . . . . . . . . . . . . . 8
Montage/demontage . . . . . . . . . . . . . . . . . . . . . . . . . . . . . . . . . . . . . . . . . . . . 8
Bediening . . . . . . . . . . . . . . . . . . . . . . . . . . . . . . . . . . . . . . . . . . . . . . . . . . . . . . . . . . . 9
Vullen . . . . . . . . . . . . . . . . . . . . . . . . . . . . . . . . . . . . . . . . . . . . . . . . . . . . . . . . 9
De dispenser gebruiken . . . . . . . . . . . . . . . . . . . . . . . . . . . . . . . . . . . . . . . . . . 9
Temperatuur aanpassen. . . . . . . . . . . . . . . . . . . . . . . . . . . . . . . . . . . . . . . . . . 9
Dispenser legen . . . . . . . . . . . . . . . . . . . . . . . . . . . . . . . . . . . . . . . . . . . . . . . . 9
Reiniging, zorg & onderhoud . . . . . . . . . . . . . . . . . . . . . . . . . . . . . . . . . . . . . . . . . . . 10
Reiniging van de condensor . . . . . . . . . . . . . . . . . . . . . . . . . . . . . . . . . . . . . . 10
Oplossen van problemen . . . . . . . . . . . . . . . . . . . . . . . . . . . . . . . . . . . . . . . . . . . . . . 11
Technische specificaties. . . . . . . . . . . . . . . . . . . . . . . . . . . . . . . . . . . . . . . . . . . . . . . . 11
Elektrische bedrading . . . . . . . . . . . . . . . . . . . . . . . . . . . . . . . . . . . . . . . . . . . . . . . . . 12
Afvalverwerking . . . . . . . . . . . . . . . . . . . . . . . . . . . . . . . . . . . . . . . . . . . . . . . . . . . . . 12
Productconformiteit . . . . . . . . . . . . . . . . . . . . . . . . . . . . . . . . . . . . . . . . . . . . . . . . . . 12
UK
NL

Sommaire
Conseils de sécurité . . . . . . . . . . . . . . . . . . . . . . . . . . . . . . . . . . . . . . . . . . . . . . . . . . 13
Description du Produit . . . . . . . . . . . . . . . . . . . . . . . . . . . . . . . . . . . . . . . . . . . . . . . . 13
Introduction . . . . . . . . . . . . . . . . . . . . . . . . . . . . . . . . . . . . . . . . . . . . . . . . . . . . . . . . 13
Contenu de l'emballage . . . . . . . . . . . . . . . . . . . . . . . . . . . . . . . . . . . . . . . . . . . . . . . 13
Installation . . . . . . . . . . . . . . . . . . . . . . . . . . . . . . . . . . . . . . . . . . . . . . . . . . . . . . . . . . 14
Montage / démontage . . . . . . . . . . . . . . . . . . . . . . . . . . . . . . . . . . . . . . . . . . . 14
Functionnement. . . . . . . . . . . . . . . . . . . . . . . . . . . . . . . . . . . . . . . . . . . . . . . . . . . . . . 15
Remplissage . . . . . . . . . . . . . . . . . . . . . . . . . . . . . . . . . . . . . . . . . . . . . . . . . . . 15
Utilisation du distributeur . . . . . . . . . . . . . . . . . . . . . . . . . . . . . . . . . . . . . . . . 15
Réglage de la température . . . . . . . . . . . . . . . . . . . . . . . . . . . . . . . . . . . . . . . 15
Vidange du distributeur . . . . . . . . . . . . . . . . . . . . . . . . . . . . . . . . . . . . . . . . . . 16
Nettoyage, entretien et Maintenance . . . . . . . . . . . . . . . . . . . . . . . . . . . . . . . . . . . . 16
Nettoyage du condensateur . . . . . . . . . . . . . . . . . . . . . . . . . . . . . . . . . . . . . . 16
Dépannage . . . . . . . . . . . . . . . . . . . . . . . . . . . . . . . . . . . . . . . . . . . . . . . . . . . . . . . . . 17
Spécifications techniques . . . . . . . . . . . . . . . . . . . . . . . . . . . . . . . . . . . . . . . . . . . . . . 17
Raccordement électrique . . . . . . . . . . . . . . . . . . . . . . . . . . . . . . . . . . . . . . . . . . . . . . 17
Mise au rebut . . . . . . . . . . . . . . . . . . . . . . . . . . . . . . . . . . . . . . . . . . . . . . . . . . . . . . . 18
Conformité . . . . . . . . . . . . . . . . . . . . . . . . . . . . . . . . . . . . . . . . . . . . . . . . . . . . . . . . . 18
Inhalt
Sicherheitshinweise . . . . . . . . . . . . . . . . . . . . . . . . . . . . . . . . . . . . . . . . . . . . . . . . . . 19
Produktbeschreibung. . . . . . . . . . . . . . . . . . . . . . . . . . . . . . . . . . . . . . . . . . . . . . . . . . 19
Einführung . . . . . . . . . . . . . . . . . . . . . . . . . . . . . . . . . . . . . . . . . . . . . . . . . . . . . . . . . . 19
Lieferumfang . . . . . . . . . . . . . . . . . . . . . . . . . . . . . . . . . . . . . . . . . . . . . . . . . . . . . . . . 19
Montage . . . . . . . . . . . . . . . . . . . . . . . . . . . . . . . . . . . . . . . . . . . . . . . . . . . . . . . . . . . 20
Aufstellen/Abbau des Geräts . . . . . . . . . . . . . . . . . . . . . . . . . . . . . . . . . . . . . 20
Betrieb . . . . . . . . . . . . . . . . . . . . . . . . . . . . . . . . . . . . . . . . . . . . . . . . . . . . . . . . . . . . 21
Füllen . . . . . . . . . . . . . . . . . . . . . . . . . . . . . . . . . . . . . . . . . . . . . . . . . . . . . . . . 21
Einsatz des Dispensers . . . . . . . . . . . . . . . . . . . . . . . . . . . . . . . . . . . . . . . . . . 21
Temperatur regulieren . . . . . . . . . . . . . . . . . . . . . . . . . . . . . . . . . . . . . . . . . . 21
Dispenser entleeren . . . . . . . . . . . . . . . . . . . . . . . . . . . . . . . . . . . . . . . . . . . . 22
Reinigung, Pflege und Wartung . . . . . . . . . . . . . . . . . . . . . . . . . . . . . . . . . . . . . . . . . . 22
Kondensator reinigen . . . . . . . . . . . . . . . . . . . . . . . . . . . . . . . . . . . . . . . . . . . 22
Störungssuche . . . . . . . . . . . . . . . . . . . . . . . . . . . . . . . . . . . . . . . . . . . . . . . . . . . . . . . 23
Technische Spezifikationen . . . . . . . . . . . . . . . . . . . . . . . . . . . . . . . . . . . . . . . . . . . . . 23
Elektroanschlüsse . . . . . . . . . . . . . . . . . . . . . . . . . . . . . . . . . . . . . . . . . . . . . . . . . . . . 24
Entsorgung . . . . . . . . . . . . . . . . . . . . . . . . . . . . . . . . . . . . . . . . . . . . . . . . . . . . . . . . . 24
Konformität . . . . . . . . . . . . . . . . . . . . . . . . . . . . . . . . . . . . . . . . . . . . . . . . . . . . . . . . . 24
FR
DE

Indice
Suggerimenti per la sicurezza . . . . . . . . . . . . . . . . . . . . . . . . . . . . . . . . . . . . . . . . . . . 25
Introduzione . . . . . . . . . . . . . . . . . . . . . . . . . . . . . . . . . . . . . . . . . . . . . . . . . . . . . . . . 25
Descrizione del prodotto . . . . . . . . . . . . . . . . . . . . . . . . . . . . . . . . . . . . . . . . . . . . . . 25
Contenuto dell'imballaggio . . . . . . . . . . . . . . . . . . . . . . . . . . . . . . . . . . . . . . . . . . . . . 25
Installazione . . . . . . . . . . . . . . . . . . . . . . . . . . . . . . . . . . . . . . . . . . . . . . . . . . . . . . . . . 26
Montaggio/Smontaggio . . . . . . . . . . . . . . . . . . . . . . . . . . . . . . . . . . . . . . . . . . 26
Funzionamento . . . . . . . . . . . . . . . . . . . . . . . . . . . . . . . . . . . . . . . . . . . . . . . . . . . . . . 27
Riempimento . . . . . . . . . . . . . . . . . . . . . . . . . . . . . . . . . . . . . . . . . . . . . . . . . . 27
Utilizzo dell'erogatore . . . . . . . . . . . . . . . . . . . . . . . . . . . . . . . . . . . . . . . . . . . 27
Regolazione della temperatura . . . . . . . . . . . . . . . . . . . . . . . . . . . . . . . . . . . . 27
Svuotamento dell'erogatore . . . . . . . . . . . . . . . . . . . . . . . . . . . . . . . . . . . . . . 28
Pulizia e manutenzione . . . . . . . . . . . . . . . . . . . . . . . . . . . . . . . . . . . . . . . . . . . . . . . . 28
Pulizia del condensatore . . . . . . . . . . . . . . . . . . . . . . . . . . . . . . . . . . . . . . . . . 28
Risoluzione dei problemi . . . . . . . . . . . . . . . . . . . . . . . . . . . . . . . . . . . . . . . . . . . . . . 28
Specifiche tecniche . . . . . . . . . . . . . . . . . . . . . . . . . . . . . . . . . . . . . . . . . . . . . . . . . . . 29
Cablaggi elettrici . . . . . . . . . . . . . . . . . . . . . . . . . . . . . . . . . . . . . . . . . . . . . . . . . . . . . 29
Smaltimento . . . . . . . . . . . . . . . . . . . . . . . . . . . . . . . . . . . . . . . . . . . . . . . . . . . . . . . . 29
Conformità . . . . . . . . . . . . . . . . . . . . . . . . . . . . . . . . . . . . . . . . . . . . . . . . . . . . . . . . . 29
Índice
Consejos de Seguridad . . . . . . . . . . . . . . . . . . . . . . . . . . . . . . . . . . . . . . . . . . . . . . . . 30
Descripción del Producto . . . . . . . . . . . . . . . . . . . . . . . . . . . . . . . . . . . . . . . . . . . . . 30
Introducción . . . . . . . . . . . . . . . . . . . . . . . . . . . . . . . . . . . . . . . . . . . . . . . . . . . . . . . . 30
Contenido del Conjunto . . . . . . . . . . . . . . . . . . . . . . . . . . . . . . . . . . . . . . . . . . . . . . 30
Instalación . . . . . . . . . . . . . . . . . . . . . . . . . . . . . . . . . . . . . . . . . . . . . . . . . . . . . . . . . . 31
Montaje / desmontaje . . . . . . . . . . . . . . . . . . . . . . . . . . . . . . . . . . . . . . . . . . . 31
Funcionamiento . . . . . . . . . . . . . . . . . . . . . . . . . . . . . . . . . . . . . . . . . . . . . . . . . . . . . . 32
Llenado . . . . . . . . . . . . . . . . . . . . . . . . . . . . . . . . . . . . . . . . . . . . . . . . . . . . . . 32
Uso del dispensador . . . . . . . . . . . . . . . . . . . . . . . . . . . . . . . . . . . . . . . . . . . . 32
Ajuste de la temperatura . . . . . . . . . . . . . . . . . . . . . . . . . . . . . . . . . . . . . . . . . 32
Vaciado del dispensador . . . . . . . . . . . . . . . . . . . . . . . . . . . . . . . . . . . . . . . . . 32
Limpieza, cuidados y mantenimiento . . . . . . . . . . . . . . . . . . . . . . . . . . . . . . . . . . . . . 33
Limpieza del condensador . . . . . . . . . . . . . . . . . . . . . . . . . . . . . . . . . . . . . . . 33
Resolución de problemas . . . . . . . . . . . . . . . . . . . . . . . . . . . . . . . . . . . . . . . . . . . . . . 34
Especificaciones Técnicas . . . . . . . . . . . . . . . . . . . . . . . . . . . . . . . . . . . . . . . . . . . . . . 34
Cableado Eléctrico . . . . . . . . . . . . . . . . . . . . . . . . . . . . . . . . . . . . . . . . . . . . . . . . . . . 35
Desecho . . . . . . . . . . . . . . . . . . . . . . . . . . . . . . . . . . . . . . . . . . . . . . . . . . . . . . . . . . . 35
Cumplimiento . . . . . . . . . . . . . . . . . . . . . . . . . . . . . . . . . . . . . . . . . . . . . . . . . . . . . . . 35
IT
ES

Índice
Conselhos de segurança . . . . . . . . . . . . . . . . . . . . . . . . . . . . . . . . . . . . . . . . . . . . . . . 36
Descrição do produto . . . . . . . . . . . . . . . . . . . . . . . . . . . . . . . . . . . . . . . . . . . . . . . . 36
Introdução . . . . . . . . . . . . . . . . . . . . . . . . . . . . . . . . . . . . . . . . . . . . . . . . . . . . . . . . . 36
Conteúdo da embalagem . . . . . . . . . . . . . . . . . . . . . . . . . . . . . . . . . . . . . . . . . . . . . . 36
Instalação . . . . . . . . . . . . . . . . . . . . . . . . . . . . . . . . . . . . . . . . . . . . . . . . . . . . . . . . . . . 37
Montagem/desmontagem . . . . . . . . . . . . . . . . . . . . . . . . . . . . . . . . . . . . . . . . 37
Funcionamento . . . . . . . . . . . . . . . . . . . . . . . . . . . . . . . . . . . . . . . . . . . . . . . . . . . . . . 38
Encher . . . . . . . . . . . . . . . . . . . . . . . . . . . . . . . . . . . . . . . . . . . . . . . . . . . . . . . 38
Utilizar o dispensador . . . . . . . . . . . . . . . . . . . . . . . . . . . . . . . . . . . . . . . . . . . 38
Ajustar a temperatura . . . . . . . . . . . . . . . . . . . . . . . . . . . . . . . . . . . . . . . . . . . 38
Esvaziar o dispensador . . . . . . . . . . . . . . . . . . . . . . . . . . . . . . . . . . . . . . . . . . 38
Limpeza, cuidados & manutenção . . . . . . . . . . . . . . . . . . . . . . . . . . . . . . . . . . . . . . . 39
Limpar o condensador . . . . . . . . . . . . . . . . . . . . . . . . . . . . . . . . . . . . . . . . . . 39
Resolução de problemas . . . . . . . . . . . . . . . . . . . . . . . . . . . . . . . . . . . . . . . . . . . . . . 40
Especificações técnicas . . . . . . . . . . . . . . . . . . . . . . . . . . . . . . . . . . . . . . . . . . . . . . . . 40
Cablagem eléctrica . . . . . . . . . . . . . . . . . . . . . . . . . . . . . . . . . . . . . . . . . . . . . . . . . . . 40
Tratamento de lixo e resíduos . . . . . . . . . . . . . . . . . . . . . . . . . . . . . . . . . . . . . . . . . . 40
Conformidade . . . . . . . . . . . . . . . . . . . . . . . . . . . . . . . . . . . . . . . . . . . . . . . . . . . . . . . 40
I
PT

1
UK
Safety Tips
• Position on a flat, stable surface.
• Install the appliance where it can be overseen by trained personnel.
• Always carry, store and handle the appliance in a vertical position.
• A service agent/qualified technician should carry out installation and any repairs if required. Do not
remove any components or service panels on this product.
• Consult Local and National Standards to comply with the following:
• Health and Safety at Work Legislation
• BS EN Codes of Practice
• Fire Precautions
• IEE Wiring Regulations
• Building Regulations
• DO NOT immerse in water, or use jet/pressure washers to clean the appliance.
• Not suitable for outdoor use.
• Always switch off and disconnect the power supply to the appliance before cleaning.
• This appliance is not intended for use by persons (including children) with reduced physical, sensory
or mental capabilities, or lack of experience and knowledge, unless they have been given supervision
or instruction concerning use of the apliance by a person reponsible for their safety.
• Keep all packaging away from children. Dispose of the packaging in accordance to the regulations of
local authorities.
• If the power cord is damaged, it must be replaced by an POLAR agent or a recommended qualified
technician in order to avoid a hazard.
Product Description
CF760 - Single Chilled Drinks Dispenser
CF761 - Double Chilled Drinks Dispenser
Introduction
Please take a few moments to carefully read through this manual. Correct maintenance and operation of
this machine will provide the best possible performance from your POLAR product.
Pack Contents
The following is included:
CF760
• Polar Chilled Drinks Dispenser
• Tank, Tank Gasket & Lid
•TapAssembly
• Spare Tank Gasket and O-ring
• Instruction Manual
• Mixing Paddle & Mixing Rod
•DripTray
CF761
• Polar Chilled Drinks Dispenser
• Tank, Tank Gasket & Lid x 2
•TapAssemblyx2
• Spare Tank Gasket and O-ring x 2
• Instruction Manual
• Mixing Paddle & Mixing Rod x 2
•DripTrayx2

2
UK
Telephone Helpline: 0845 146 2887 (United Kingdom)
POLAR prides itself on quality and service, ensuring that at the time of packaging the contents are supplied
fully functional and free of damage.
Should you find any damage as a result of transit, please contact your POLAR dealer immediately.
Installation
1. Remove the appliance from the packaging and remove the protective film from all surfaces.
2. When positioning the dispenser, maintain a distance of 20cm (7 inches) between the appliance and
walls or other objects for ventilation. Increase this distance if the obstacle is a heat source.
3. If necessary, adjust the screw legs of the dispenser to stabilise it.
Assembly/Disassembly
1. Insert the large rubber gasket into the bottom of the tank
[Fig. 1].
2. Holding the top and bottom of the tap lever, gently bend
the lever in the middle [Fig. 2].
3. Push the two hooks at the back of the tap lever into the
slot in the front of the tank and drop into place [Fig. 3].
4. Lower the tank on to the cooling column. Locate the four
feet on the bottom of the tank to the mounts on top of the
cooling unit.
5. Roll the O-ring down the tap shaft [Fig. 4] and insert thin end
first into the hole in the tank.
6. Ensure the bottom of the tap slots into the gap in the tap
lever.
7. Hang the drip tray from the slots on the front of dispenser
[Fig. 5].
8. Insert the mixing paddle rod into the mixing paddle [Fig. 6],
and lower the rod into the cooling column.
9. Securely fix the lid to the tank.
Note: If the appliance has been stored or moved in a non-vertical position, stand it in an
upright position for approximately 12 hours before operation. If in doubt allow to stand.
Note: Lubricate the gasket with a small amount of water if the gasket is too tight.
Fig. 1
Fig. 2
Hooks

3
UK
Operation
Filling
1. Switch Off the dispenser.
2. Remove the lid and pour the liquid into the tank.
3. Replace the lid.
Using the Dispenser
1. Turn On the Power switch on the side of the dispenser.
2. Switch the stirring switch to the ‘On’ position [I].
3. Once the liquid is sufficiently cooled, push the receptacle against the tap
lever to dispense the liquid.
Adjusting the Temperature
Adjust the temperature setting of the dispenser with the Temperature
Control Knob fitted to the side of the Dispenser.
The temperature varies from level 1 (12°C) to 7 (6°C).
Note: CF761 Only - If only one tank is to be filled it must be the tank on the side of the
temperature control knob.
WARNING: Do not fill the tank with hot liquid.
Do not let the level exceed the ‘MA’ level line displayed on the front of the tank.
Note: Should the paddle encounter any resistance in the liquid, it will reverse direction.
Tank
Front
Lever
Slot
Fig. 3
Fig. 4
Fig. 5
Fig. 6
Cooling
Column

4
UK
Telephone Helpline: 0845 146 2887 (United Kingdom)
Emptying the Dispenser
Drain the dispenser by using the tap lever(s) to empty the tank(s).
Cleaning, Care & Maintenance
• Always switch off and disconnect the power supply before cleaning.
• Warm, soapy water is recommended for cleaning. Cleaning agents may leave harmful residues. DO
NOT wash the base unit, instead wipe the exterior with a damp cloth.
• Empty and clean the drip trays regularly.
• A POLAR agent or qualified technician should carry out repairs if required.
• Unit should be de-scaled regularly. Note that scale may cause premature failure of the machine and it
could invalidate your warranty.
Cleaning the Condenser
POLAR recommend the condenser is cleaned at least once a month.
To clean the condenser:
1. Unscrew the two screws from beneath the Temperature Control Knob side panel.
2. Lift the side panel up and over the control knob to remove.
3. Clean the condenser with a soft cloth or brush.
4. Replace the panel and two screws.
Note: Do not drain the dispenser by tipping the appliance.
Note: The condenser is the black (CF760) or silver (CF761) metal grid behind the side
panel.
WARNING: Take care when cleaning the condenser; sharp edges may cut.

5
UK
Troubleshooting
If your Drinks Dispenser develops a fault, please check the following points before making a call to the
Helpline.
Technical Specifications
Electrical Wiring
This appliance is supplied with a 3 pin, moulded, BS1363 plug and lead, with a 3 amp fuse as standard.
The plug must be connected to a suitable mains socket.
This appliance is wired as follows:
• Live wire (coloured brown) to terminal marked L
• Neutral wire (coloured blue) to terminal marked N
• Earth wire (coloured green/yellow) to terminal marked E
This appliance must be earthed, using a dedicated earthing circuit.
If in doubt consult a qualified electrician.
Electrical isolation points must be kept clear of any obstructions. In the event of any emergency
disconnection being required they must be readily accessible.
Fault Probable Cause Action
The appliance is
not working
The appliance is not
switched on
Check the appliance is plugged in correctly and
switched on
Plug and lead are damaged Call POLAR agent or qualified technician
Fuse in the plug has blown Replace the plug fuse
Power supply Check power supply
Internal wiring fault Call POLAR agent or qualified technician
The dispenser is
not cooling
Coolant leak Call POLAR agent or qualified technician
Fan motor failed Call POLAR agent or qualified technician
Airflow obstructed to the
condenser
Increase the gap between appliance and obstacles/
heat source
Condenser is clogged Remove side panels and clean condenser
The mixing paddles
are not working
Mixing motor has failed Call POLAR agent or qualified technician
The tank is leaking Gasket problem Check the gaskets and replace if necessary
Model Voltage Power Current Tanks Capacity
(litres) Refrigerant Dimensions
L x W x H mm
Weight
(kg)
CF760 230V 50Hz 260W 1.2A 1 12 R134a 60g 635 x 220 x 450 19
CF761 230V 50Hz 355W 1.6A 2 24 R134a 170g 635 x 420 x 450 26.5

6
UK
Telephone Helpline: 0845 146 2887 (United Kingdom)
Disposal
EU regulations require refrigeration products to be disposed of by specialist companies
who remove or recycle all gasses, metal and plastic components.
Consult your local waste collection authority regarding disposal of your appliance.
Local authorities are not obliged to dispose of commercial refrigeration equipment but
may be able to offer advice on how to dispose of the equipment locally.
Alternatively call the POLAR helpline for details of national disposal companies within
the EU.
Compliance
POLAR parts have undergone strict product testing in order to comply
with regulatory standards and specifications set by international,
independent, and federal authorities.
POLAR products have been approved to carry the following symbol:
All rights reserved. No part of these instructions may be produced or transmitted in any form or by any means,
electronic, mechanical, photocopying, recording or otherwise, without the prior written permission of POLAR.
Every effort is made to ensure all details are correct at the time of going to press, however, POLAR reserve the right
to change specifications without notice.

7
NL Klantenondersteuning: 050 – 609999 (België)
Veiligheidstips
• Plaatsen op een vlakke en stabiele ondergrond.
• De installatie en eventuele reparaties zijn door een servicetechnicus/vaktechnicus uit te voeren.
Verwijder geen componenten of servicepanelen van dit product.
• Raadpleeg en volg de plaatselijke en nationale regelgeving op m.b.t. tot het volgende:
• Wetgeving van gezondheid en veiligheid op de werkplaats
• Werkregels
• Brandpreventie
• IEE bekabelingsnormen
• Bouwverordeningen
• NIET in water onderdompelen of druk-/spuitreinigers gebruiken voor de reiniging van het apparaat.
• Niet geschikt voor gebruik buitenshuis.
• Alvorens dit apparaat te reinigen dient men altijd de stroomvoorziening uit te schakelen.
• Dit apparaat mag uitsluitend in overeenstemming met deze instructies en door competente personen
worden gebruikt.
• Laat verpakkingsmateriaal niet binnen handbereik van kinderen. Verpakkingsmateriaal in
overeenstemming met de regelgeving van de plaatselijke overheden als afval laten verwerken.
• Indien de stroomkabel beschadigd raakt, dient men deze door een POLAR technicus of aanbevolen
vaktechnicus te laten vervangen om gevaarlijke situaties te verhinderen.
Productbeschrijving
•CF760 - Gekoelde drankdispenser
•CF761 - Gekoelde dubbele drankdispenser
Inleiding
Neem de tijd en lees deze handleiding aandachtig door. Een correct gebruik en onderhoud van deze
machine waarborgt de beste prestatie van uw POLAR product.

8
NL
Klantenondersteuning: 040 – 2628080 (Nederland)
Verpakkingsinhoud
De verpakking bevat een
POLAR is trots op de haar productkwaliteit en dienstverlening en controleer de inhoud van de verpakkingen,
tijdens de verpakkingsfase, op functionaliteit en schade.
Mocht u product door transport zijn beschadigd, neem dan onmiddellijk contact op met uw POLAR dealer.
Installatie
1. Haal het apparaat uit de verpakking en verwijder de beschermingsfolie van alle oppervlakken.
2. Voor een adequate ventilatie dient men bij het plaatsen van de dispenser een afstand, tussen het
apparaat en de muren of andere objecten, aan te houden van 20 cm. Vergroot deze afstand indien het
object een warmtebron is.
3. Indien nodig, gebruik de stelvoetjes om het apparaat te stabiliseren.
Montage/demontage
1. Plaats de grote rubberen pakking op de bodem van de tank
[afb. 1].
2. Terwijl u de bovenzijde en de onderzijde van de taphendel
vasthoudt, buigt u voorzichtig de hendel naar het midden
[afb. 2].
3. Duw de twee haakjes aan de achterzijde van de taphendel
in de opening aan de voorzijde van de tank zodat deze vast
komt te zitten [afb. 3].
4. Laat de tank in de koelkolom zakken. Plaats de vier poten
aan de onderzijde van de tank in de steunstukken aan de bovenzijde van de koelunit.
Opmerking: indien het apparaat niet in een rechtopstaande positie is opgeslagen of
vervoerd, dient men het product 12 uur vóór gebruik in de rechtopstaande positie te
plaatsen. Bij twijfel dient men het product in een rechtopstaande positie te plaatsen.
Opmerking: indien de pakking te vast zit, smeer dan de pakking in met een kleine
hoeveelheid water.
CF760
• Polar Gekoelde drankdispenser
• Tank, tankdichting & deksel
• Tapsysteem
• Reserve tankdichting en O-ring
• Handleiding
• Mengblad & mengstang
• Druppellade
CF761
• Polar Gekoelde drankdispenser
• Tank, tankdichting & deksel x 2
• Tapsysteem x 2
• Reserve tankdichting en O-ring x 2
•Handleiding
• Mengblad & mengstang x 2
• Druppellade x 2
afb. 1

9
NL Klantenondersteuning: 050 – 609999 (België)
5. Laat de O-ring over de as van de tap [afb. 4] zakken en plaats
het dunne uiteinde als eerst in de opening van de tank.
6. Zorg ervoor dat de onderkant van de tap in de opening van de
taphendel zit.
7. Hang de druppellade in de openingen aan de voorzijde van de
dispenser [afb. 5].
8. Plaats de mengstaaf in het mengblad [afb. 6] en laat de stang
in de koelkolom zakken.
9. Maak de deksel goed vast aan de tank.
Bediening
Vullen
1. Zet de dispenser uit.
2. Verwijder de deksel en vul de tank met de vloeistof.
3. Plaats opnieuw de deksel op de tank.
Opmerking: Uitsluitend voor de CF761 - bij het vullen van slechts één tank dient men
altijd de tank aan de zijde van de temperatuurregelaar te gebruiken.
WAARSCHUWING: de tank niet met warme vloeistof vullen.
De hoeveelheid vloeistof mag de 'MA' niveaulijn aan de voorzijde van de tank niet
overschrijden.
afb. 2
Haken
Voorzijde
tank
Hendelslot
afb. 3
afb. 4
afb. 5
afb. 6
Koelkolom

10
NL
Klantenondersteuning: 040 – 2628080 (Nederland)
De dispenser gebruiken
1. Zet de stroomschakelaar aan de zijkant van de dispenser aan.
2. Zet de draaischakelaar op de 'On' (Aan) positie [I].
3. Is de vloeistof ver genoeg afgekoeld, plaats dan een opvangmiddel
tegen de taphendel om de vloeistof af te tappen.
Temperatuur aanpassen
Met de temperatuurregelaar aan de zijkant van de dispenser kan men de
temperatuurinstelling van de dispenser veranderen.
Het temperatuurbereik gaat van niveau 1 (12°C) tot 7 (6°C).
Dispenser legen
Gebruik de taphendel(s) om de tank(s) van de dispenser te legen.
Reiniging, zorg & onderhoud
• Alvorens het apparaat te reinigen dient men altijd de stroomvoorziening uit te schakelen.
• Voor het reinigen van het apparaat wordt warm zeepwater aanbevolen. Reinigingsmiddelen kunnen
schadelijke resten achter laten. Basiseenheid NIET wassen, buitenzijde van de eenheid met een
vochtige doek afvegen.
• Druppellades regelmatig legen en reinigen.
• Eventuele reparaties moeten door een POLAR technicus of een vaktechnicus worden uitgevoerd.
• Het artikel moet regelmatig ontkalkt en gereinigd worden. De frequentie van het ontkalken hangt af
van de waterhardheid. Let op: kalkaanslag kan ervoor zorgen dat uw apparaat niet meer correct
functioneert of defect raakt. Dit kan uw garantie beïnvloeden.
Reiniging van de condensor
Het is de aanbeveling van POLAR om de condensor minimaal één keer per maand te reinigen.
Om de condensor te reinigen:
1. schroeft u de twee schroeven los, onder de temperatuurregelaar van het zijpaneel.
2. Schuif het zijpaneel omhoog en over de bedieningsknop om deze te verwijderen.
3. Reinig de condensor met een zachte doek of borstel.
4. Plaats het paneel en schroef de twee schroeven vast.
Opmerking: indien het blad enige weerstand in de vloeistof ondervindt, wordt de
richting veranderd.
Opmerking: dispenser niet legen door het apparaat te kantelen.
Opmerking: de condensor is het zwarte (CF760) of zilveren (CF761) metalen rooster
achter het zijpaneel.
WAARSCHUWING: wees voorzichtig tijdens het reinigen van de condensor, scherpe
randen kunnen snijwonden veroorzaken.

11
NL Klantenondersteuning: 050 – 609999 (België)
Oplossen van problemen
Indien er een storing aan uw drankdispenser optreedt, dient u de onderstaande tabel te raadplegen
alvorens de hulplijn te bellen.
Technische specificaties
Probleem Mogelijke oorzaak Handeling
Het apparaat werkt
niet
Het apparaat staat uit Controleer of de stroomkabel van het apparaat is
aangesloten en of het apparaat is ingeschakeld
Steker en kabel zijn
beschadigd
Laat een POLAR technicus of een vaktechnicus komen
De zekering in de steker is
gesprongen
Vervang de zekering in de steker
Stroomvoorziening Controleer de stroomvoorziening
Storing interne bedrading Laat een POLAR technicus of een vaktechnicus komen
De dispenser koelt
niet
Koelmiddel lekt Laat een POLAR technicus of een vaktechnicus komen
Ventilatiemotor defect Laat een POLAR technicus of een vaktechnicus komen
Luchtstroom naar de
condensor wordt
geblokkeerd
Vergroot de afstand van het apparaat en andere
obstakels/warmtebronnen
Condensor zit verstopt Verwijder de zijpanelen en reinig de condensors
Het mengblad
werken niet
De mengmotor is defect Laat een POLAR technicus of een vaktechnicus komen
De tank lekt Er is een probleem met de
afdichting
Controleer de afdichtingen en vervang indien nodig
Model Voltage Vermoge
nStroom Tanks Inhoud
(liters) Koelmiddel Afmetingen
h x b x d mm Gewicht
CF760 230V 50Hz 260W 1,2A 1 12 R134a 60g 635 x 220 x 450 19
CF761 230V 50Hz 355W 1,6A 2 24 R134a 170g 635 x 420 x 450 26,5

12
NL
Klantenondersteuning: 040 – 2628080 (Nederland)
Elektrische bedrading
Men dient de steker op een geschikt stopcontact aan te sluiten.
De bedrading van dit apparaat is als volgt:
• Stroomkabel (bruin) naar de aansluitklem gemarkeerd met L
• Neutraalkabel (blauw) naar de aansluitklem gemarkeerd met N
• Aardekabel (groen/geel) naar de aansluitklem gemarkeerd met E
Dit apparaat moet worden geaard met behulp van een adequaat aardingscircuit.
Bij twijfels raadpleeg een vakkundige elektricien.
De elektrische isolatiepunten mogen niet worden geblokkeerd. In geval van een nooduitschakeling moeten
de isolatiepunten direct toegankelijk zijn.
Afvalverwerking
De EU-richtlijnen vereisen dat koelproducten door gespecialiseerde bedrijven wordt
verwerkt die gassen, metalen en plastic componenten verwijderen of recyclen.
Raadpleeg uw plaatselijke afvalverwerkingsbedrijf voor informatie over de
afvalverwerking van uw apparaat. De plaatselijke overheden zijn niet verplicht om
koelingsproducten van bedrijven als afval te verwerken maar kunnen uw
informeren waar u het apparaat kunt afgeven.
U kunt ook de POLAR helplijn bellen voor informatie over landelijke
afvalverwerkingsbedrijven in de EU.
Productconformiteit
De onderdelen van POLAR producten hebben strenge producttesten ondergaan om
te voldoen aan wettelijke regels en specificaties die door internationale,
onafhankelijke en landelijke overheden worden voorgeschreven.
POLAR producten zijn goedgekeurd en voorzien van het volgende symbool:
Alle rechten voorbehouden. Het is verboden om deze handleiding, hetzij volledig of gedeeltelijk, elektronisch of
mechanisch te reproduceren, kopiëren, op opslagmedia op te slaan of op enigerlei wijze over te dragen, zonder
voorafgaande goedkeuring van POLAR.
Wij hebben er alles aan gedaan om er zeker van te zijn dat op publicatiedatum van de handleiding alle details correct
zijn, desondanks, behoudt POLAR het recht voor om specificaties zonder aankondiging te wijzigen.

13
FR Standard d'assistance téléphonique: 050 – 600006 (Belgique)
Conseils de sécurité
• Placez l'appareil sur une surface plane, stable.
• L'installation et les éventuelles réparations doivent être confiées à un dépanneur / technicien qualifié.
Ne retirez aucun composant ou cache de ce produit.
• Consultez les normes locales et nationales pour vous conformer aux :
• lois sur l'hygiène et la sécurité au travail ;
• codes de bonnes pratiques BS EN ;
• précautions contre le risque d'incendie ;
• réglementations sur les branchements électriques IEE ;
• règlements sur la construction.
• NE PAS immerger l'appareil ou le nettoyer à l'aide d'un nettoyeur à jet / haute pression.
• Cet appareil est réservé exclusivement à une utilisation à l'intérieur.
• Veillez à toujours éteindre l'appareil et à le débrancher de la prise d'alimentation secteur avant de le
nettoyer.
• Gardez les emballages hors de portée des enfants. Débarrassez-vous des emballages conformément
aux règlements des autorités locales.
• L'utilisation de cet appareil est exclusivement réservée aux personnes formées en la matière et doit se
conformer à ces instructions.
• Un cordon d'alimentation endommagé doit être remplacé par un agent POLAR ou un technicien
qualifié recommandé, pour éviter tout danger.
Description du Produit
CF760 - Distributeur de boissons réfrigérées simple
CF761 - Double distributeur de boissons réfrigérées
Introduction
Nous vous invitons à consacrer quelques instants à la lecture attentive de ce manuel. L'entretien et
l'utilisation appropriés de cet appareil vous permettront de tirer le meilleur de votre produit POLAR.
Contenu de l'emballage
Eléments fournis de série :
POLAR attache une grande importance à la qualité et au service et veille à fournir des produits en parfait
état opérationnel, parfaitement intacts au moment de l'emballage.
CF760
• Distributeur de boissons réfrigérées Polar
• Réservoir, joint de réservoir et couvercle
• Ensemble robinet
• Joint de réservoir et joint torique de rechange
• Mode d'emploi
• Mélangeur et tige de mélangeur
•Égouttoir
CF761
• Distributeur de boissons réfrigérées Polar
• Réservoir, joint de réservoir et couvercle x 2
• Ensemble robinet x 2
• Joint de réservoir et joint torique de rechange x
2
• Mode d'emploi
• Mélangeur et tige de mélangeur x 2
•Égouttoirx2

14
FR
Standard d'assistance téléphonique: 01 64 89 73 61 (Français)
Nous vous prions de contacter votre revendeur POLAR immédiatement si vous constatez un dommage
quelconque survenu pendant le transport du produit.
Installation
1. Sortez l'appareil de l'emballage et décollez la pellicule de protection de toutes ses surfaces.
1. Pour positionner le distributeur, veillez à prévoir une distance de 20 cm entre l'appareil et les murs ou
autres objets, pour laisser l'air circuler. Augmentez cette distance en cas d'obstacle générateur d'une
source de chaleur.
1. Si nécessaire, réglez les pieds à vis de l'appareil pour le stabiliser.
Montage / démontage
1. Insérez le gros joint en caoutchouc au fond du réservoir
[Fig. 1].
2. Tout en tenant le haut et le bas du levier du robinet, faites
lentement pivoter le centre du levier [Fig. 2].
3. Repoussez les deux crochets situés à l'arrière du levier du
robinet dans les fentes prévues à l'avant du réservoir,
jusqu'à ce qu'ils se calent [Fig. 3].
4. Faites descendre le réservoir sur la colonne de
refroidissement. Situez les quatre pieds du fond du
réservoir dans les fixations du dessus du refroidisseur.
5. Déroulez le joint torique le long de l'axe du robinet [Fig. 4] et
insérez la partie la plus fine dans le trou du réservoir.
6. Veillez à ce que le bas du robinet s'insère dans l'intervalle du
levier de robinet.
7. Accrochez l'égouttoir aux fentes prévues à l'avant du
distributeur [Fig. 5].
8. Insérez la tige du mélangeur dans le mélangeur [Fig. 6] et
faites descendre la tige dans la colonne de refroidissement.
9. Calez le couvercle sur le réservoir.
Opmerking: indien het apparaat niet in een rechtopstaande positie is opgeslagen of
vervoerd, dient men het product 12 uur vóór gebruik in de rechtopstaande positie te
plaatsen. Bij twijfel dient men het product in een rechtopstaande positie te plaatsen.
Remarque : Si le joint est trop serré, lubrifiez-le en appliquant une petite quantité d'eau.
Fig. 1
Fig. 2
Crochet

15
FR Standard d'assistance téléphonique: 050 – 600006 (Belgique)
Functionnement
Remplissage
1. Mettez le distributeur hors tension.
2. Retirez le couvercle et versez le liquide dans le réservoir.
3. Reposez le couvercle sur le réservoir.
Utilisation du distributeur
1. Mettez sur On (marche) le bouton situé sur le côté du distributeur.
2. Mettez l'interrupteur de mélangeage en position 'On' (marche) [I].
3. Une fois le liquide suffisamment refroidi, poussez le receveur contre le
levier du robinet pour en extraire le liquide.
Réglage de la température
Le réglage de la température du distributeur s'effectue à l'aide de la molette
de réglage de température située sur le côté du distributeur.
La température est réglable de 1 (12°C) à 7 (6°C).
Remarque : CF761 uniquement - si vous comptez ne remplir qu'un réservoir, remplissez
le réservoir situé du côté de la molette de réglage de température.
AVERTISSEMENT : le réservoir ne doit pas être rempli de liquide chaud.
Ne laissez pas le niveau de liquide dépasser le repère de niveau 'MA' situé à l'avant du
réservoir.
Remarque : Si le mélangeur se bloque dans le liquide, il change de sens de rotation.
Avant du
réservoir
Fente de
levier
Fig. 3
Fig. 4
Fig. 5
Fig. 6
Colonne de refroidissement
This manual suits for next models
1
Table of contents
Languages:
Popular Dispenser manuals by other brands

Narvon
Narvon 378RBD2G1S user manual

CWS
CWS Paradise Paper Slim Installation and operating instructions

jbc
jbc DPM instruction manual

Orbegozo
Orbegozo DA 2000 instruction manual

FILL-RITE
FILL-RITE 305RU Owner's operation & safety manual

Coastwide Professional
Coastwide Professional J Series Instruction guide