BETTY & BERTIE LUPIN User manual

LUPIN
LUPIN
PRODUCT MANUAL
PRODUCT MANUAL

CONTENTS
We hope you love the scooter as much as we do. To get your relationship off to
the best start we’ve compiled all the information you’ll need in this manual. As
well as containing all operation guides we have also listed all safety checks and
instructions. We advise all users to read and familiarise themselves with this
information before operating the scooter. We also have online videos to help
you familiarise yourself with Lupin.
Thank you for choosing me, my name’s Lupin and I’m here to take care of
all of your mobility needs!
Important Safety Measures
Dimensions
Repairs
Environment Protection
Front Draw Bar
Rear Draw Bar
Product Features
Operating Instructions - Getting Started
Setting the Brake
Operating Instructions - Driving
Battery & Charging Information
Folding & Unfolding Guide
Inspection & Maintenance
Troubleshooting
T
Warranty Exclusions
Technical Specification
1.
2.
3.
4.
5.
6.
7.
8.
9.
10.
11.
12.
13.
14.
15.
16.
17.

1. IMPORTANT SAFETY MEASURES
WARNING: DO NOT TRY TO OPERATE THE SCOOTER BEFORE READING THROUGH THE SAFETY MEASURES.
The scooter is designed for one person use only.
The product is equipped with a lithium-ion battery. Do not disassemble internal parts of the battery.
This scooter is intended for use on pavements only. Do not use on roads.
Speeds for driving on the pavement are capped by UK law at 6 km/h
(4 mph). This is the pre-set maximum speed of the ‘Slow’ setting of your scooter Do not use the other speed settings
(medium / fast) unless on private property.
Do not drive up very sharp slopes. Do not drive over 300m on slopes with an incline above 9 degrees.
The control system will cut off the power if the limited angle has been exceeded. If this happens restart the power.
Do not operate when drinking alcohol. Avoid driving the scooter when fatigued or at night time
Switch off the power when not in use. Do not use the scooter as a seat on a moving vehicle.
The scooter can be safely used in parks and on grass, but avoid driving on ground that is so uneven as to destabilise
the scooter.
Avoid driving on pebbles, stones, soil and gravel surfaces. If you are unsure about the condition of the ground then
we recommend you do not drive on it
Electric scooters can go over obstacles up to the ground clearance of that scooter. Reduce speed when going over
obstacles (such as speed bumps)
Slow down when turning, going up a slope, over an obstacle and driving over rugged rock or soft ground.
2. ITEM DIMENSIONS
85cm
12cm
101cm
31cm
73cm
LENGTH
WIDTH
GROUND
CLEARANCE
BACK HEIGHT
HEIGHT
(UNFOLDED)
HEIGHT
(FOLDED)
101 CM / 40 IN
56 CM / 22 IN
12 CM / 4.7 IN
78 CM / 30.7 IN
87.5 CM / 34 IN
54 CM / 21 IN
SEAT HEIGHT
(OFF GROUND)
SEAT HEIGHT
(OFF FOOTREST)
FOOTREST
LENGTH
FOOTREST
WIDTH
HANDLEBAR
LENGTH
TYRE DIAMETER
51 CM / 20 IN
37 CM / 15 IN
29 CM / 11.4 IN
37 CM / 14.5 IN
55 CM / 21.6 IN
25 CM / 10 IN
SEAT WIDTH
SEAT LENGTH
MAX SPEED
LOAD CAPACITY
WEIGHT
RANGE
31 CM / 12.2 IN
32 CM / 12.5 IN
8 MPH
100KG / 15.7
STONE
23 KG
(3.62 ST)
35 KM
(14.9 MILES)
3. REPAIRS
If your scooter needs a repair then please contact our office who will be able to help you. In order for your warranty to
be valid all repairs must go via our Betty and Bertie office.
Call Us: 0800 999 6606 OR Email Us: [email protected]
4. ENVIRONMENT PROTECTION
Please do not abandon an unwanted scooter and/or battery. Dispose of all such items responsibly with due regard for
the environment. Your local authority will be able to advise if this is necessary.
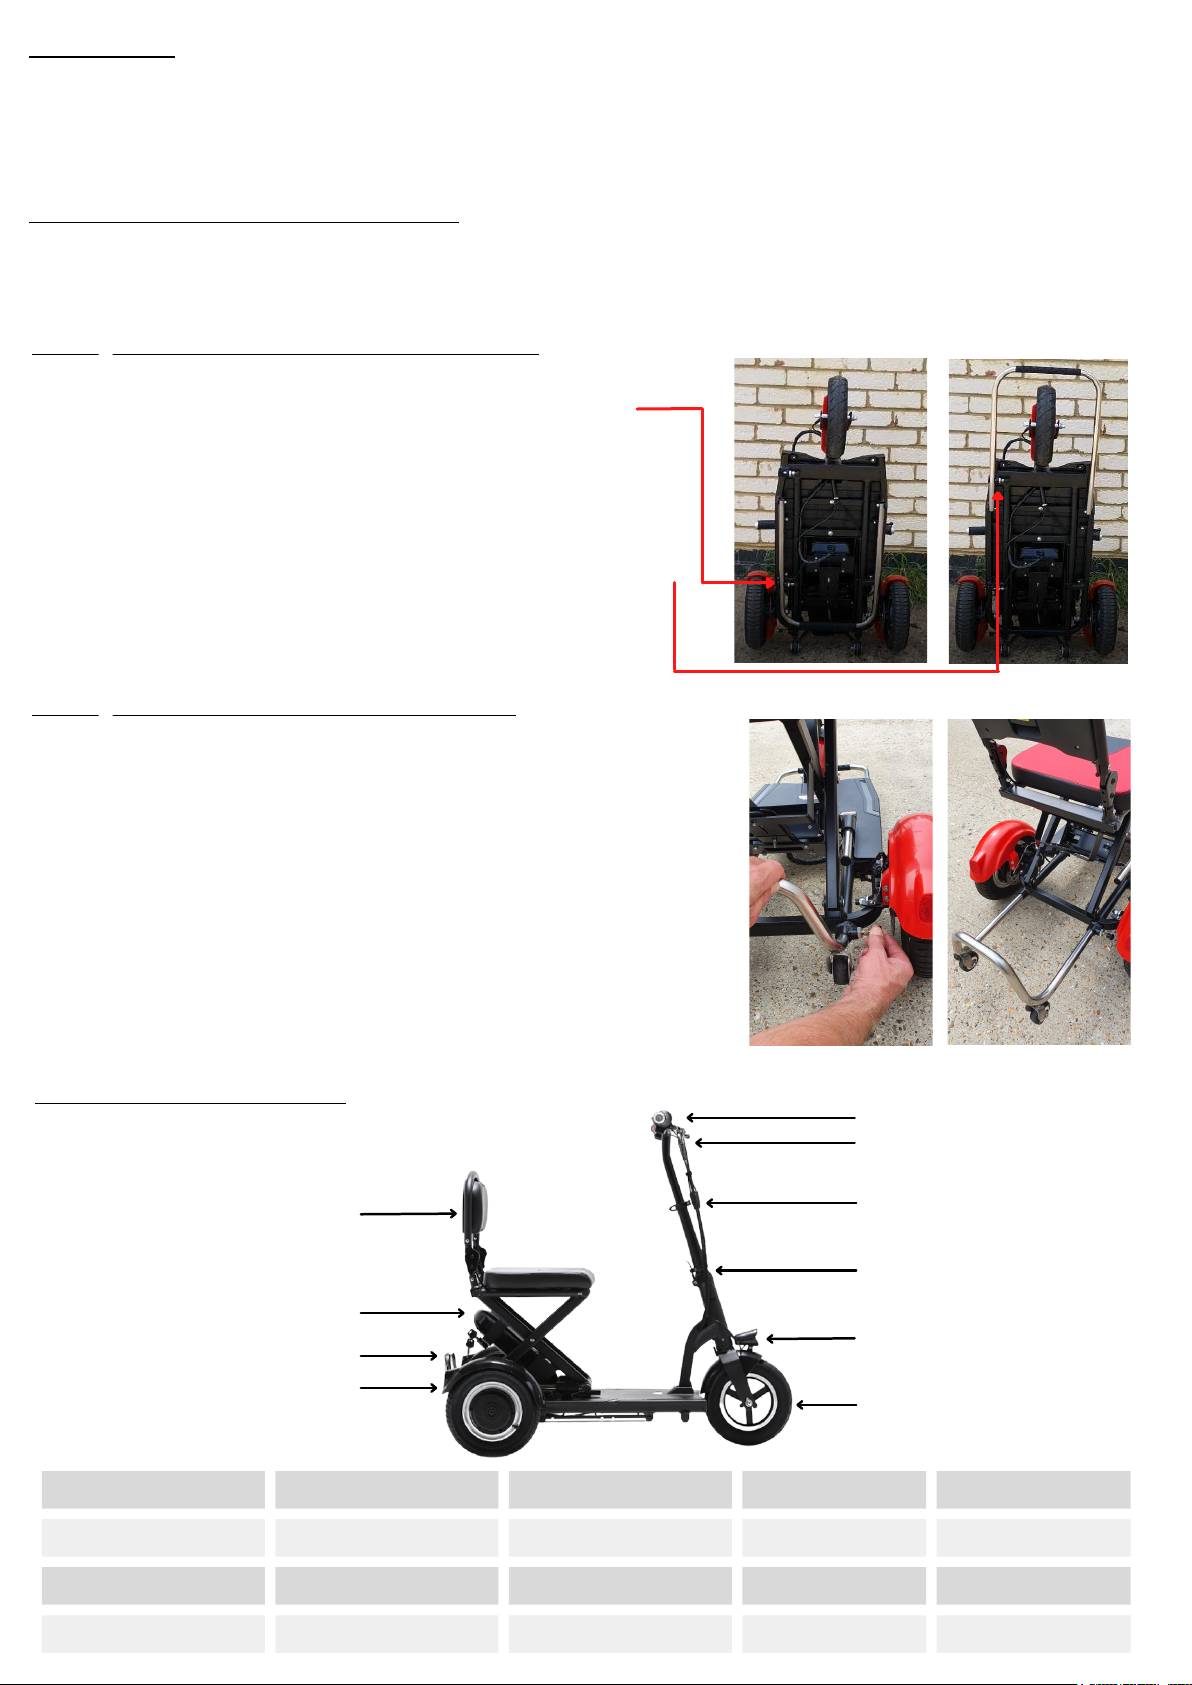
5. ADJUSTING THE FRONT DRAW BAR
Bring scooter up onto its back wheels
Locate the locking pin
Hold the pin out and pull out the metal bar
Release the locking pin and bring out the front draw bar
The bar will click into place with the 2nd locking pin
1.
2.
3.
4.
5.
OR
You can locate this locking pin and pull it out to click in
the bar manually
6. ADJUSTING THE REAR DRAW BAR
Always extend the rear safety bar when driving the scooter. This
provides extra stability and prevents tipping of the scooter when
reversing or braking on an incline.
Stage 1
Pull out locater pin
Stage 2
Extend safety bar to be the first or
second hole and allow the locater pin to locate in the desired hole.
1
2
3
4
5
6
8
7
9
10
7. PRODUCT FEATURES
1
2
3
4
5
COLLAPSIBLE SEAT
REMOVABLE BATTERY
REAR DRAW BAR
MUD GUARDS
CONTROL PANEL
6
7
8
9
10
HANDBRAKE SYSTEM
HEIGHT ADJUSTMENT
SAFETY LOCK
SAFETY LIGHT
INFLATABLE TYRES

11
12
13
14
15
CONTROL PANEL FUNCTIONS:
11
12
13
ON/OFF BUTTON
MODE SELECTION
SAFETY HORN
14
15
SAFETY LIGHT
BATTERY
INDICATOR
8. OPERATING INSTRUCTIONS – GETTING STARTED
When the scooter is on the battery light will display up to 4 red lights. The
number of lights will reduce as the battery level decreases.
To power-on your scooter simply press the on button
on the control panel.
Hold down the button to turn off the scooter
1.
2.
ON/OFF – POWER SWITCH
BATTERY INDICATOR
The MODE button starts with the default gear at 0 (no gear indicator light).
The corresponding indicator light will be on when the 1st (LOW), 2nd (MED) and 3rd
(HIGH) gear is on.
When pressing the MODE button, the gear shifts in the following pattern: 0-1-2-3-2-1-0.
The speed range of the ‘Slow’ setting is from 0.2 – 6.0 km/h.
SPEED SETTINGS
NOTICE
The slow speed setting is the only setting that can legally be used when riding you scooter in public. If you
plan on using the faster speed settings, this can only be done on private property.
FORWARD/REVERSE
Set the directional switch to:
D: Forward drive
R: Reverse
NOTICE: Lupin does not emit a warning sound when reversing.
We advise that you only use it when needed to prevent an accident or injury.
NOTICE: The Horn does not disable when turned off. Ensure nothing is
touching the horn when folded.
The built-in 36V 8AH lithium-ion battery is to supply strong power for the
running of the scooter.
It rests in a tray with a ‘track’ down the middle, that slots into the battery.
Make sure these are aligned when inserting the battery, or you will be
unable to lock the battery in place, and the connection between the battery
and scooter may be inconsistent, leading to power failures.
HORN BUTTON
BATTERY HOLDER

When setting the handbrake lock, you may need to squeeze the brake lever tighter
to apply to the lock.
Handbrake Lock
Handbrake Lever
TIP: You may find it easier to squeeze with one hand and use the other hand to set
the lock
Do not turn the power off while driving.
When driving indoors, drive at a low speed.
Be careful when driving in places with crowds of people and
heavy traffic.
Please pay attention to pedestrians and other obstacles
when reversing.
CAUTION
Make sure the power is OFF when you get on or off of the
scooter.
9. SETTING THE BRAKE
10. OPERATING INSTRUCTIONS – DRIVING
Ensure the seat has been lifted and locked into position, the steering column is unfolded and secured, and that
the battery is locked in place. Press the power button. The power indicator light will be on.
Check the remaining battery power before operating and charge if needed.
Ensure that the rear safety bar is extended and the locator pin correctly positioned as this provides anti-tip safety
(see ‘IMORTANT SAFETY MEASURES’ section).
Adjust the speed setting to the ‘Slow’ setting. (The speed settings sets the maximum speed the scooter will move
at. The speed from standing still up to that maximum speed is controlled by increasing the pressure on the right-
hand crank.
Ensure you are comfortable with the speed controls and how to move backwards and forwards.
Check the surrounding environment and road conditions are safe before driving.
Twist the right-hand crank to move and adjust the speed as necessary.
To stop simply release the right-hand crank, allowing it to return to its neutral position and squeeze the left-hand
brake lever. If you wish to apply the handbrake, squeeze the brake lever, then pull the handbrake switch towards
you.
To turn off, press and hold the On/Off button, and the power indicator light will turn off. Leave your scooter in a
secure place and keep the key with you in a safe place.
1.
2.
3.
4.
5.
6.
7.
8.
9.
The scooter will not move until you press the MODE button to put the scooter into 1st gear after turning it on.
11. BATTERY AND CHARGING INFORMATION
This product uses a 36V 8AH high-performance lithium-ion battery. Fully charge the battery
before first time use.
Turn the scooter power off.
Use the keys provided to unlock the battery tray at the back of the scooter, under the seat.
Remove the battery by sliding towards you
Plug the charging cable into the power adapter and plug in to the mains supply.
Insert the charger’s power plug into a mains power supply.
When charging, the red charging light goes on. The charging time will vary depending on the battery age and
temperature but in general it will take 3-6 hours to be fully charged. The indicator light will turn green when fully
charged.
1.
2.
3.
4.
5.
6.
LITHIUM-ION BATTERY
CHARGER
This product uses a AC100-240V/2A charger.
REMOVE AND CHARGE THE BATTERY DIRECTLY
Note: The braking distance will vary depending on the driving conditions.

BATTERY WARNINGS
Do not disassemble the battery.
Only use the charger provided and do not charge the battery for over 12 hours.
Ensure the battery is fully charged before removing from the mains supply. Removing the charger too soon can damage
the battery over time.
Do not disassemble or modify the charger.
Charge in a well ventilated area, out of direct sunlight.
If the scooter is not going to be used for some time we recommend it be charged every month.
Keep all electronic components away from moisture. When cleaning, use a soft cloth to clean the dirt from the scooter
body, if necessary dampening with water to remove dirt.
12. FOLDING AND UNFOLDING GUIDE CAUTION
To fold the scooter, repeat the steps below in reverse. To unfold the dragging handle, position the scooter upright,
loosen the limit pin, and swing the handle towards you and upwards. Once fully extended, push away from you until
it clicks into place.
Unfold and set
the handlebar
1. 2. Unfold the seat and use the clatch
on the back of the seat to open
3. Lock State
5.Open State
4. Open and lift
6. Open the backrest
and lift to its highest
position. It is locked
when you hear the click
of the latch
After the backrests
latch returns to its
position, the backrest
is locked
7. Pull out the
Locator Pin
and extend
the Safety Bar
allowing the
Locator Pin to
slot back into
either of the
two holes
provided.
13.INSPECTION AND MAINTENANCE
Before driving, inspect your scooter using the following checklist. In the event that there is an issue, assess whether
you can resolve it yourself or if you require an inspection by a more qualified individual.
WHAT TO INSPECT
WHAT TO CHECK FOR?
Handle
Is it loose? Are you able to turn it left and right? Can the height be altered?
Speed Setting Button
Does it light up normally? Is the speed as expected?
Directional Control Switch
Does the forward, and reverse work correctly?
Brake Lever
Does it slow the scooter smoothly?
Battery Indicator
Are the lights working as expected? Is the scooter fully charged?
CAUTION
If there is a mechanical problem, please obtain professional advice.

WHAT TO DO IF YOU GET A PUNCTURE
We do suggest that you use a tyre inflator and sealer before using the scooter to protect your tyres from puncture.
If you are unsure on what this is, please contact us and we will recommend a suitable product.
We also sell inner tubes which can be kept as spares. If you do get a puncture, you can change the inner tube so
that you are never caught out.
We recommend the tyre pressure to be between 24 and 32 PSI, depending on your preference of riding. For
example, if you require more support and a smoother ride then inflate to a higher PSI.
HOW TO MEASURE
Put the pressure gauge onto the tyre valve stem.
Press down the gauge evenly on the valve stem to ensure you get an accurate reading.
Check the reading on the pressure gauge to determine if you'll need to deflate or inflate your tyres.
Tyre pressure can be measured with a standard pressure gauge:
1.
2.
3.
A standard bike pump can be used to inflate the tyres if they need it.
TYRE PRESSURE
14. TYRE CARE
15. SECURE STRAP
We have included a strap in your delivery that will keep Lupin secure when it is folded and being transported.
Feed the strap through the handle at the top of the backrest and through the bar across the footrest. Make
sure the grippy side of the strap is on the inside and against the scooter.
Loop the end through the hook and fold it back on itself, securing it to the strap.
1.
2.
Head to our YouTube to see the demonstration on how to use the strap to secure your Lupin -
https://www.youtube.com/watch?v=YN4crQeezvg&t=2s

The following key below indicates some errors that can be assessed through observation. If the problem persists,
despite our advised resolution, consult a qualified individual.
16.TROUBLESHOOTING
TROUBLE DESCRIPTION:
POSSIBLE CAUSE:
Low battery voltage or battery connection problem
Check the battery connection, if there is no problem with
the connection, try charging the battery
Problems with the motor connection
Check all connections between motor and controller
No movement when right-hand crank turned
Make sure you have pressed the MODE button before
attempting to drive the scooter, as this puts it in first gear
Brake lever failure
Check the connection of the brake lever and the motor to
ensure that the controller is connected securely
SCOPE OF WARRANTY DESCRIPTION
Betty & Bertie will repair or replace the scooter or component when there is quality problem caused by manufacture
under normal use if the problem is reported to them during the warranty period.
THE WARRANTY DOES NOT COVER YOUR SCOOTER IF ANY OF THE FOLLOWING
APPLY:
1. Failure to use and maintain in accordance with the correct operation methods in the instruction manual.
2. If spare parts are used from an unauthorised manufacturer.
3. Spare parts damage caused by accidents or incidents outside the control of Betty & Bertie.
4. Consumable parts such as tyres, bearings etc.
5. If the scooter is modified.
Manufacturer and importer: NSI (HQ) LTD,
Address:
Unit H, The Courtyard Business Centre,
Lonesome Lane,
Reigate, Surrey
RH2 7QT
Tel: 0800 999 6606
Email: [email protected]
15.WARRANTY EXCLUSIONS

17.TECHNICAL SPECIFICATION
ITEM
PARAMETERS
Dimensions (L x W x H)
(Unfolded): H: 85cm W: 31cm L: 101cm
(Folded): H: 73cm W: 31cm L: 101cm
Handle bar height
71 - 82.5 cm
Controller: Under-voltage protection value (V)
30 +/- 0.5
Controller: Over-current protection value (A)
14 +/- 0.5
Net Weight (with batteries)
23kg
Gross Weight
21kg
Wheel Base
710mm
Wheel Diameter
F:10 / R:10
Speed (1st Gear)
0-8 km (Adjustable)
Endurance
39 km
Braking mode
Rear-wheel drive, disc brake
Load Capacity
100 kg
Height from the ground
85cm
Seat off-ground height
51cm
Maximum incline
8°±1°
Motor
36 V 300 W
Charger
DC24V/2A
Battery
36V /8AH lithium battery
Colour
Red/Black, Black/Grey
Other manuals for LUPIN
2
Table of contents
Other BETTY & BERTIE Scooter manuals


