BIDELI BD-06WT/NT User manual

Instruction manual
Model: BD-06WT/NT
Name:6KG Coffee Roaster
GAS
P1

Thank you for choosing Guangzhou Bide General Equipment
Co., Ltd.! and we thank you for the trust and openness that has
shown us.
Before starting the machine, we recommend you read carefully
the instruction that explain how the use, clean and maintain the
machine. We remain at your disposal for any information.
IMPORTANT : The warranty is one year from the day you
purchase the roster. During the warranty, if the roster breaks
down during normal operation, our company will response for
repairs of the roster for free.
Under the circumstances below, we don’t offer free repair
during warranty.
1.The damage by fire, earthquake, flood, typhoon, lightning,
other natural disasters, Abnormal voltage, pollution,
and .chemical erosion.
2.The damage by using the roster under rugged environment
( Fumes, dust, moisture, outdoor, etc), or unfollowing the
instruction.
3.The damage by improper installation of power and gas.
4.The damage by falling, transformation, collision, self
dismantling repair, etc.
5.The damage by replacement of counterfeited parts and
components, or cleaning machine in a wrong way.
P2
Warranty Instruction

Model NO.
BD-06WT/NT(Gas)
Roasting Type
Semi-hot blast &Half Direct Fire
Heating Type
LPG or Natural Gas
Power
1600W
Roasting Time
10-15mins
Weight
615KG
Votage&Frequency
Single phase AC 220V 50-60Hz
Outside Dimension
2200*1300*2200mm
Roasting Capacity
3-6kg / Batch
Drum Rotation Speed
55-65 circles (61circles/min)-standard
Drum Power
0.37KW
Cooling Mix Rate
10.8 circles/min
Cooling Mix Power
0.12KW
Exhaust Motor Power
0.55KW
Exhaust Pipe Diameter
Φ100mm
Cooling Motor Power
1.1KW
Cooling Pipe Diameter
Φ102mm
Package Dimension
2020 * 1120 * 1830 mm
Package Weight
720KG
P3

Catalog
1. Device Information
(1)The purpose of the equipment
(2)The features of the equipment
2. Safety matters
(1)General safety information
(2)Safety tags
(3)Safety device
3. installation
(1)transportation
(2)Check before installation
(3)The installation
4. equipment usage profile
(1)General requirements
(2)Equipment structure
(3)Operation method
(4)Baking method
5. Cleaning and maintenance
(1)Clean up the parts
(2)Daily maintenance
6.remedy of the trouble
P4

1.Device Information
(1)Device Uses
uThis device is specialized in batch green coffee bean.
uindoor Use
(If use at outdoor , it could cause failure baking, machine failure, accident)
uCan not be used in batch other thing except green coffee bean.
(2)Device feature
uSemi-direct fire and semi-blast coffee roasting machines utilized the design of
Double drum, double insulation shell and stable radiant heat and rich hot to
puffed the coffee bean.
u High thermal efficiency utilized could made deep roaster within 15 minutes as
well as keep the inherent taste and aroma.
uUsing an exhaust valve to control the displacement, you can bake their own
unique flavor.
uUsing high-power fan for fast cooling, cooling time is about 2 minutes.
uEquip with a safety control system, if the machine reaches the set
temperature the machine automatically stop heating. After the temperature
dropped 10 ℃ (could change according to the customer requirements), continue
automatic heating . It allows devices to maintain a constant temperature.
P5

2.Safety Precautions
(1)General safety information
uWhen using the device with a good protection gloves
uWhen a device fails, turn off the power and gas supply equipment, do not
use.
uEquipment must be used with single-phase 220V power supply ground wire,
Do not turn on the power if there is no ground wire
uBefore release the coffee beans, remember to start cooling stirring, open
cooling damper then cooked beans could be putted out, in order to avoid
making the stainless steel of the cooling tray damage variants.
uIn the cooling coil mixing process, can not put your hand on the position of
stirring blade rotation .
uWithin the drum during rotation, can not put hand inner of the drum after
the release coffee bean’s door opened.
uAfter the device is heated, the body shell, the surrounding of perspective
window, the hopper base, semi-cylindrical part of the dust, and all of the
exhaust pipe has a high temperature, can not touch or use a cloth to clean,
to avoid burns.
uWhen checking or cleaning the equipment, you must cut off the power and
gas supply.
uInside and around the machine Do not store flammable.
uPower lines and gas pipes do not touch the hot surface of the machine.
P6
(2) Security tag
1)Be careful of electric shock
This label indicates electrical shock caution.
We must cut off the power if there exists any
hazard of fire injury or electric shock or fire injury
hazard exists before use.
2)Drive parts
This label indicates Note Drive site.
It will occur injuries at the part of drive. Please
add the safety device when using it and turn on
the power switch
3) Caution burns
This is a careful burns flag.
Due to surface hot, do not touch.
4)Note Fire
This is the note that fire signs.
Attention of electric safty and gas leak.
Do not store combustible materials around here.
P7

(3) Safety devices
1) Driving wheel cover
uEquipt the protective cover on the drive wheel configured at the place of
drum and Distribution Box
uthe protective cover can not be opened when the machine using
2) Prevent overheating device (factory set to 250 ° C)
uWhen the drum temperature reaches the set temperature, the machine
automatically stops heating, gas type baking will stop gas supply. Drop by 10
℃, it will automatically resume heating, gas type baking opportunity to
restore the gas supply and automatic ignition.
3) Prevent electric leakage devices
uThe machine cut off the power automatically when the short circuit and
leakage and other electrical anomalies
3. Installation
(1) Transport
1) Package
u The use of wooden packaging, after removed the packaging, in accordance
with local state regulations, recycling or disposal.
uconfirm roaster dust collector, simple chimney, manual, random tools
2) Transport
uWeight about 615kg
uusing trolleys on the ground.
P8

(2)Pre-installation check
1)Check Item
uPower supply and plug
Using ordinary GB three-pin plug.
u Gas Pressure
Using the household low-pressure liquefied petroleum gas
u Exhaust conditions
Selecting the location of the exhaust pipe where less bends. ,if not use the existing
ventilation facilities, according to the size of the exhaust pipe to decide the
location of the hole
3) Preparation before installation roaster
1) Equipment Placement
uBaking machine placed on the flat ground.
2) Exhaust duct
uThis baking equipment must be placed in a dry, well-ventilated place away
from short exhaust, ventilation ducts should not be shared with other food
machines, if used central ventilation facilities, it will cause the exhaust changes
baked
uMust have ventilation or window within one meter radius of the machine, if
ventilation is not good, it will happen worker poisoning, suffocation and other
accidents
uThis device uses the exhaust pipe at Φ102mm.
P9
P10

3)Connection method
uInsert the three-pin plug in household tripod socket with ground.
uGas hose connection: use dedicated gas hose(diameter Ø9mm), one end links
to roasting machine on the back of the trachea joints, air supply valve at the
other end, joint with pipe hoop banding. Gas hose mustn’t place on the
machine, skim the shell or through the bottom of the machine. Rigid bending
is not allowed either.
uLiquified petroleum gas pot must be with qualified pressure reducing
valve(rated pressure: 2800KPA), the distance between roaster and gas pot
shouldn’t less than 100cm, and the advisable hose length is 100 cm to 150
cm.
uConnected with natural gas, maximum is less than 1.2KPA), the distance
btween roaster and gas should not less than 100cm.
uLeak test: Use soap coated in the pipe joint, open the air supply valve, if
there are air bubbles, it means leak; Close the air supply valve, moderate
tone tight coupling (or nut) to try again, until the rear can be used without
any leakage.
P11

P12

(2)Equipment structure
P13
LED Lamp
Hopper
Hopper Valve
Electrical
Control Box
Vewing Window
Front
Bearing
Adjust
Claff
Collector
Cyclone
Bean
Release
Lever
Cooling Tray
Discharged Bean Switch
Sample Spoon
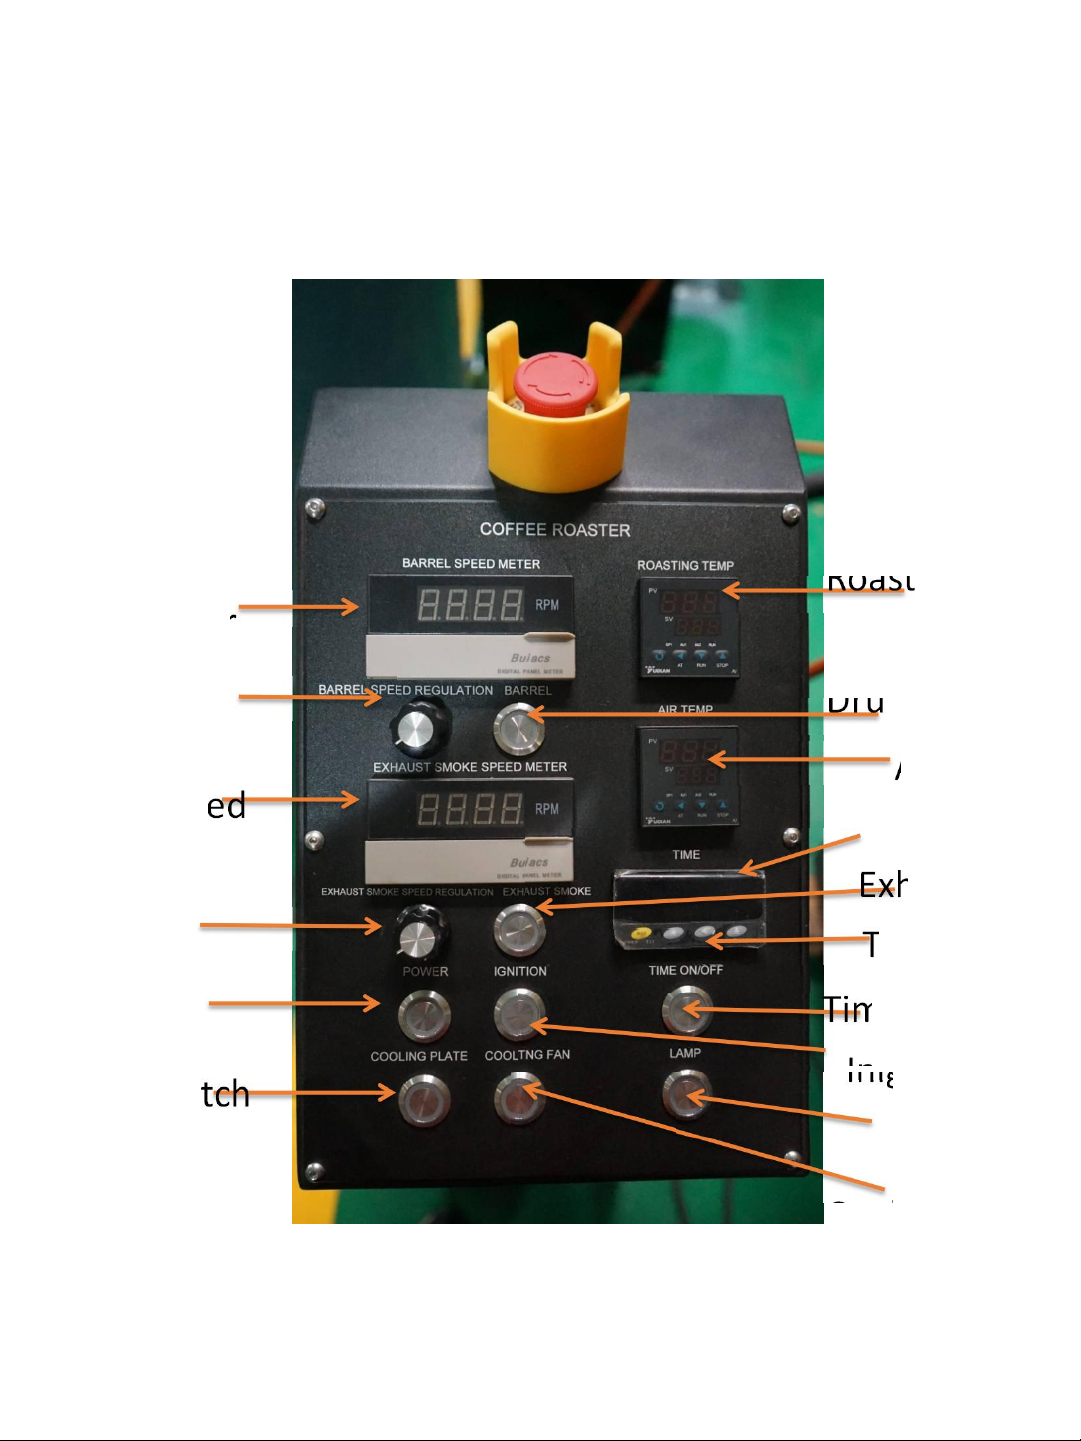
Control Panel
P14
Exhaust speed
meter
Exhaust speed
controller
Drum speed
control meter
Power
Roasting time
Drum Switch
Air Tempe
Timer
Cooling fan
switch
Drum Speed
controller
Cooling Switch
Exhast switch
Timer setting
Timer switch
Inigtion
Lamp

A: Power
Turn on it,the machine will be under the working,the drum will move ,and the
exhaust motor too.
B: Cooling
Turn on the stirring arms will start to stir.
C: Timer
Turn on it,it will start computing time until reach the setting time,the buzzer will
ding ding ding ~~
D: Roasting time
Press the setting key,using shift key and ascending key to preset roasting
time ,press the setting key again, the setting is done.The roasting time will be zero
after pressing the RST .
E: Roasting temperature
Showing the temperature in the drum,it will automatically stop supplying gas
when the temperature reaches setting one,when the temperature reduce 10c,the
machine will supply the gas and fire automatically.
Pressing shift key, down key and up key can set the temperature.
(NOTE:In genera,please do not use the Mode Key,due to the machine has set the
proper parameter .)
F: Hot blast temperature
Showing the hot air temperature before the hot air into the drum.Setting it will
not influence the machine to work.
G: Ignition
Press to turn on “igniter”,and after 5’ ,
electromagnetic valve will connect the gas supply to fire ,and the indicator light
will be lighted.
Press to turn off “stop”,the electromagnetic valve will stop connecting the gas
supply and extinguish, the indicator light will turn off .If firing is unusual , the
igniter buzzer will ding ding ~~.
H:Drum Motor Switch
Turn on it ,then the Drum moves
I:Exhaust Motor Switch
Turn on it ,then the Exhaust Motor works
P15

P16
② Gas Power adjustment guidance
uGas Pressure Adjustment Knob
To left : turn down pressure,
heating power low
To right: turn up pressure,heating
power strong

(4)Roasting operation
1.Making sure the machine is clean and under the normal situation.Turn on
the main power (back of the electric cabinet)
2.Setting the highest roasting temperature on the roasting
thermometer,and the roasting time
(Note:If all of the setting is done when you received machine,and that
setting meets your request on roasting,then no need to do these
steps before every starting on.)
3.Turn on the “operation” switch
Turn on the “start “switch to preheating
(NOTE:”Start”switch Can Not be turn on if the operation switch don’t
be turned on firstly.Or the Drum will be deformed,and the residual
gas will cause the potential danger.)
4.Adjust the exhaust flow at 5 or 6 scale,turn up the power,during the
temperature up to 180℃-190℃,preheating within15-20 minutes,turn
down the power,when the temperature down to 150℃,then start to
roast.
P17

5.Many different ways of roasting,low temperature roasting,high temperature
roasting,the second roasting(Same batch,same beans) ,all of them are up to
the operators.
Such as:Roasting from low to high temperature environment ,this kind way of
roasting.
When the preheated temperature down to150℃,dump the
green beans into drum,adjust the power into half,starting
the low temperature roasting,almost 7-10 minutes to
evaporate the moisture in the green beans slowly and
fully. When you observe the color of beans changed,turn up
the power to rise temperature soon.
(This machine quite works,only can hear the sound of the
beans touch the drum)
when you hear the first crack,observe the beans’ color
through the glass,and take out the beans by samplers to
observe (If you also find there are same chaff and smoke
out from the sample hole,you need to turn up the exhaust
air flow to control that issue),after finishing the first crack,
turn down the power to reduce the speed of rise temperature,
making the beans finish the second crack completely. Then
open the cooling air flow,make sure it is fully open,adjust the
exhaust air flow at 1 scale,turn on the cooling tray arms,
let the roasted beans out,within 3-5minutes cooling,one batch
is done.
6.During the cooling process,you can dump another batch green
beans into the next roasting,just like before what you did to roasting
consecutively.After first roasting,the temperature is high in the drum,the next
roasting process will be finished in the shorter time than first batch.
7.If you keep roasting into 24KG green beans,please turn off the
chaff collector cyclone switch,clean the drawer and put it back
where is should be,then keep enjoy roasting process.
8.If you wanna finish roasting,please DO NOT turn off the main power
of the roasting machine firstly .For the electric type one,firstly turn off
the heating switch,for Gas type one,firstly turn off the gas open
switch,after the temperature down to 80℃,then turn off the power
which is back of the back of the electric cabinet.Then do the clean
job to prepare for next roasting when you want.
P18

5.Cleaning and maintain
a、The roasting total capacity up to 24kg,turn off the chaff collector cyclone
switch,pull out the drawer,clean up the chaff,then put it back to the original
place.Turn on the switch,keep roasting.
b、Clean the chaff collector cyclone when you finish and stop the roasting .
c、Clean the area under the cooling tray,there will collect some coffee beans’
residue,or it will influence the cooling system.Besides that the conveyer belt
and cooling motor also should be clean and adjusted.
d、If the machine working hour up to one month,please loose the screws
which are used to fix exhaust pipe by Allen key ,dismantle the exhaust pipe to
clean,making sure the pipe is clear in side (For exhaust smoke and chaff,keep
the roasted beans flavors)
1)Clean the parts
P19
Broken Beans
and Chaff
Drawer
Cooling Tray
Chaff Collector
Exhaust pipe

a、when the machine working hour up to 150 hours, the bearing (Back or
Front of the roaster )should be added the food grade grease resistant to high
temperatures .Making sure to lubricate the bearing completely,to be durable.
NOTE:When you add the grease,please make sure you have turned off the
power ,and the machine is under the room temperature,do this operation
to avoid harm .
b 、 Loose three screws of the front pedestal cap by Allen key before adding
the grease.Taking out the cap,adding the grease on bearing balls ,making
sure grease is smeared evenly.
2)Daily maintain
P20
hree screws on the
front pedestal cap
Adding the food grade
grease resistant to high
temp.
Table of contents


