BIELMEIER BHG 206 User manual
BHG 206
D Bedienungsanleitung Heißluftofen
GB Instruction Manual convection oven
CZ Návod k použití horkovzdušnou troubu

32
INHALT
Teile Ihres Heißluftofens................... 4
Eine Kochgeschichte ...................... 6
Eine neue Generation des Kochens
Ein gesünderer Lebensstil
Wichtige Sicherheitshinweise ............. 7
Technische Daten ......................... 8
Vor der ersten Inbetriebnahme............ 9
Inbetriebnahme........................... 9
Funktionen der Zubehörteile.............. 10
Auftau-Funktion .......................... 10
Reinigung und
Selbstreinigungsfunktion ................. 10
Kochzeiten-Tabelle ........................ 11
Rezepte ................................... 12
Garantie................................... 16
INHALT
Know your convection oven............... 4
Cooking story ............................. 17
A new generation of cooking
A healthier lifestyle
Important safety instructions.............. 18
Technical data............................. 19
Before the initial operation ................ 20
Operation ................................. 20
Features of the accessories ................ 21
Thawing function ......................... 21
Cleaning and
self-cleaning function ..................... 21
Cooking time table........................ 22
Recipes.................................... 23
Guarantee................................. 27
OBSAH
Části horkovzdušné trouby ................ 4
Historie vaření............................. 28
Nová generace ve vaření
Zdravější způsob vaření
Důležitá bezpečnostní opatření ........... 29
Technické údaje ........................... 30
Před prvním uvedením do provozu ....... 31
První uvedení do provozu ................. 31
Funkce příslušenství....................... 32
Rozmrazování – funkce.................... 32
Čištění a
funkce samočištění........................ 32
Tabulka – doba přípravy................... 33
Recepty ................................... 34
Záruka .................................... 38
D
CZ
GB
D
54
GB
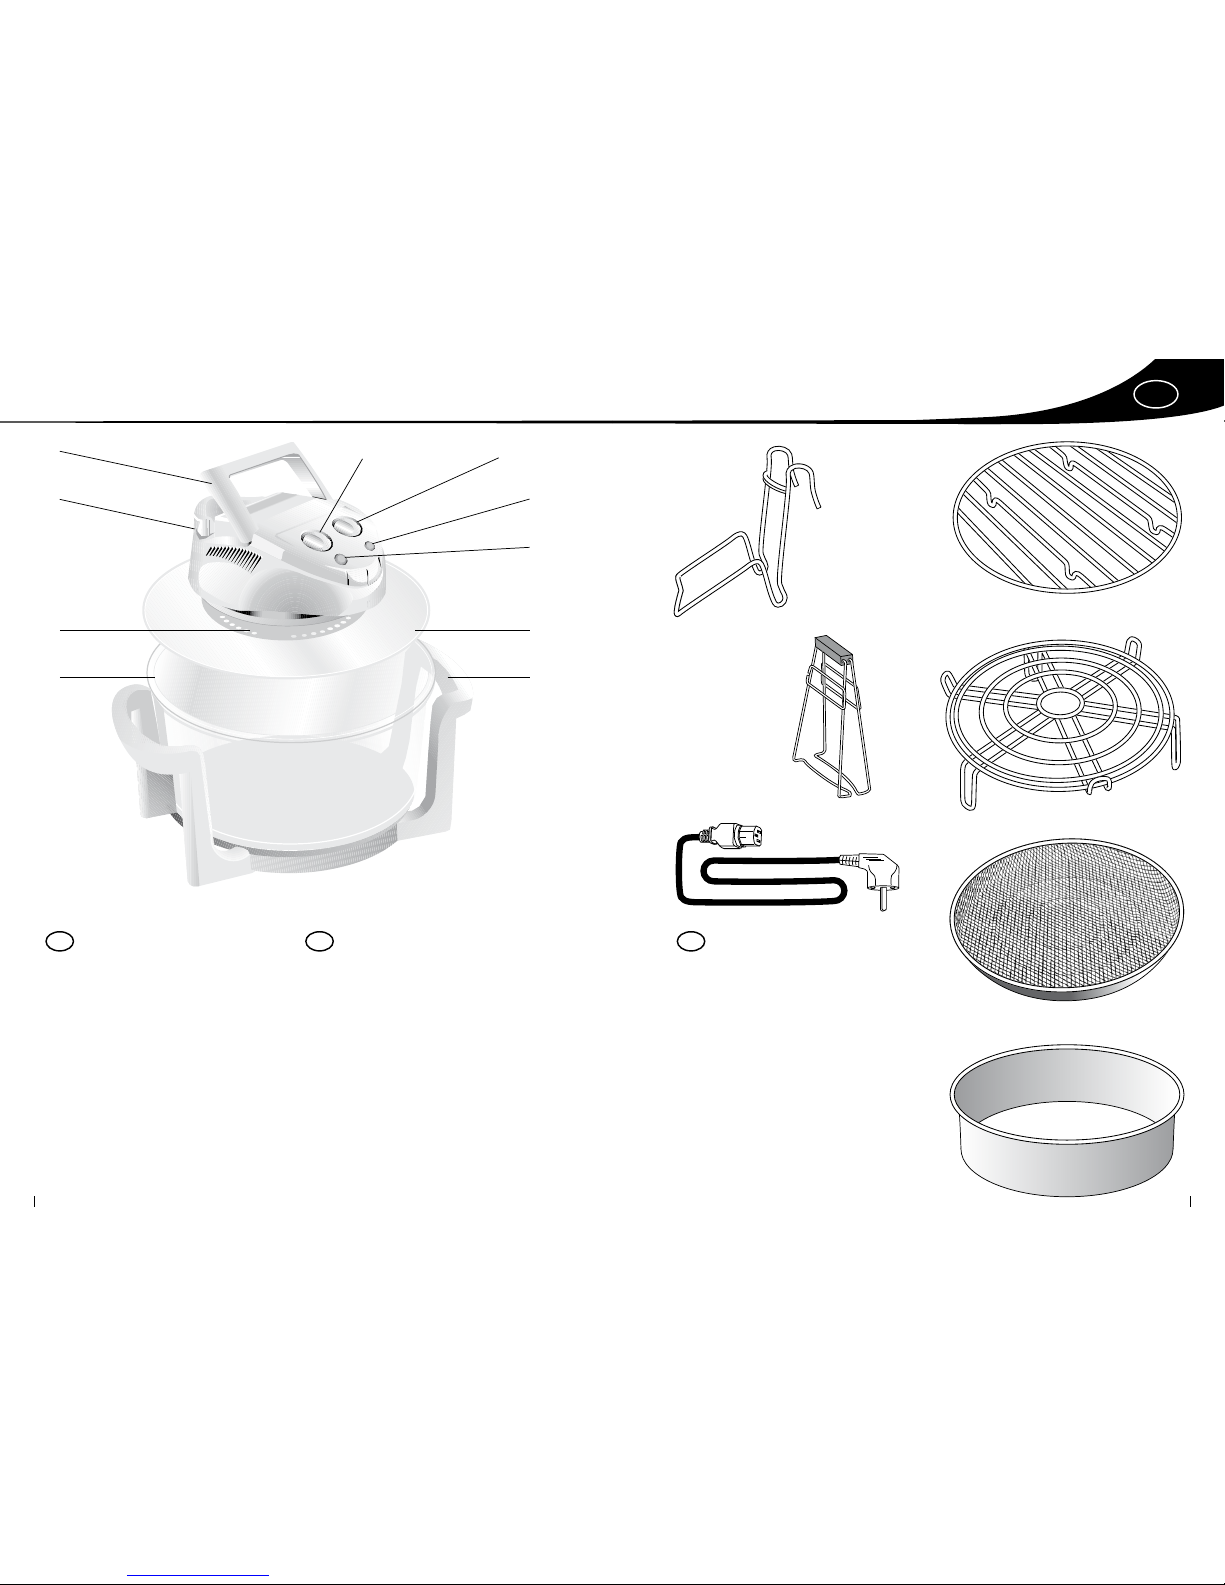
1 Safety grip
2 Mains supply socket
3 Heating element
4 Glass bowl
5 Bowl holding device
6 Glass lid
7 Operating indication (BETRIEB)
8 Temperature indication (HEIZUNG)
9 Temperature switch (TEMPERATUR)
10 Time switch (ZEIT)
11 Lid rack
12 Multipurpose tongs
13 Mains supply cable and power plug
14 Bottom rack
15 Top rack
16 Steaming rack
17 Extension ring
1
2
3
4
8
7
6
5
10 9
1 Sicherheitsgri
2 Netzanschlussbuchse
3 Heizelement
4 Glasschüssel
5 Schüsselhalter
6 Glasdeckel
7 Betriebsanzeige (BETRIEB)
8 Temperaturanzeige (HEIZUNG)
9 Temperaturregler (TEMPERATUR)
10 Zeitwahlschalter (ZEIT)
11 Deckelhalter
12 Vielzweckzange
13 Netzkabel mit Netzstecker
14 niedriger Aufsatz
15 hoher Aufsatz
16 Dämpfaufsatz
17 Erweiterungsring
D CZ
1 Bezpečnostní rukojeť
2 Zdířka na připojení k síti
3 Topné těleso
4 Skleněná miska
5 Stojánek na misku
6 Skleněné víko
7 Ukazatel provozního stavu (BETRIEB)
8 Ukazatel teploty (HEIZUNG)
9 Regulátor teploty (TEMPERATUR)
10 Regulátor času (ZEIT)
11 Stojánek na víko
12 Víceúčelové kleště
13 Síťový kabel se zástrčkou
14 Nižší rošt
15 Vyšší rošt
16 Parní miska
17 Rozšiřovací nástavec
11 14
15
16
17
13
12

D
76
EINE KOCHGESCHICHTE...
EINE NEUE GENERATION DES KOCHENS
Mit dem BIELMEIER Heißluftofen können Sie köst-
liches, gesundes Essen in weniger als der halben
Zeit der traditionellen Methoden zubereiten.
Unser revolutionärer Angri auf bestimmte zeit-
raubende Kochmethoden ermöglicht hervor-
ragende Ergebnisse.
Berufsmäßige Köche haben lange erkannt,
dass sie den traditionellen Backofen verbessern
könnten, da dieser mithilfe eines Lüfters gart, um
die Zirkulation der heißen Luft im Backofen zu
beschleunigen. Dieser Lüfter ist in der Regel auf
einer Seite des Metallgehäuses eingebaut.
Der BIELMEIER Heißluftofen verbessert den
traditionellen Backofen in folgender Weise:
Der BIELMEIER Heißtluftofen ist aus Glas und
nicht aus Metall hergestellt. Somit haben Sie
die Möglichkeit den Garprozess von allen
Seiten zu beobachten.
Der BIELMEIER Heißluftofen ist eine runde
Schüssel, kombiniert mit einem Lüfter, der in
den Deckel eingebaut ist. Somit zirkulieren
heiße Luftströmungen über die Speisen, an
den Schüsselseiten und dann zurück zum
Lüfter. Diese ständig zirkulierende, kontrol-
liert erhitzte Luft gart und bräunt die Speisen
schnell und gründlich.
Wenn Fleisch, Geügel oder Fisch auf dem nied-
rigen Aufsatz gegart werden, können Fette und
Öle von den Speisen abgeschieden und in der
Glasschüssel aufgefangen werden. Ihre Speisen
werden dadurch leichter und nahrhafter.
Weitere Vorteile
des BIELMEIER Heißluftofens sind:
Sie können mit dem BIELMEIER Heißluftofen
braten, kochen und dämpfen.
Das Garen auf zwei Ebenen gestattet Ihnen,
eine ganze Mahlzeit gleichzeitig zu zubereiten.
Fleisch und Geügel wird von allen Seiten
braun und knusprig, innen bleibt es aber zart
und saftig. Knusprige und goldbraune Brat-
kartoeln erhalten Sie, wenn Sie Kartoelschei-
ben unter Zugabe von etwas Öl „luftbraten“.
Leicht zu bedienen: Sie müssen einfach nur
Zeit und Temperatur einstellen.
Heiße Luft zirkuliert um die Speisen, deshalb
werden sie gleichmäßig gegart.
Umluftgebackener Teig geht höher auf.
Dieser Heißluftofen benötigt bis zu 60% weni-
ger Energie als Ihr konventioneller Backofen.
Der BIELMEIER Heißluftofen taut Tiefkühlkost
schneller auf.
Der BIELMEIER Heißluftofen hat einen einge-
bauten Reinigungskreislauf.
All diese Vorteile – und es wird zwei bis dreimal
schneller gekocht als in einem Standardbackofen!
Das ist es, warum der BIELMEIER Heißluftofen „eine
neue Kochgeneration“ darstellt.
EIN GESÜNDERER LEBENSSTIL
Mit dem BIELMEIER Heißluftofen kochen Sie im-
mer mit heißer Luft (trockenes Braten). Da die
Speisen dabei auf einem Aufsatz liegen, kann
überüssiges Fett abgeschieden werden. Dies
führt zu weniger Kalorien, Fett und Cholesterin.
Sie werden feststellen, dass es mit dem BIEL-
MEIER Heißluftofen nicht notwendig ist Fett, Öl,
Butter oder Margarine bei den meisten Rezepten
hinzuzufügen. Jedoch können Sie dies tun, falls
Sie es wünschen.
Wir empfehlen für Ihre Gesundheit:
eine ausgewogene Ernährung,
weniger Fette, Soßen, Zucker und Süßes,
viel frisches Obst und Gemüse,
jeden Tag viel Wasser trinken – kaum Alkohol,
weniger Fertiggerichte, bevorzugen Sie
stattdessen mehr frische Lebensmittel,
weniger auf einmal, aber regelmäßig essen,
Salz sparsam benutzen,
Ihre Speisen so oft wie möglich
mit Heißluft garen.
WICHTIGE SICHERHEITSHINWEISE
Bewahren Sie die Bedienungsanleitung sorg-
fältig auf und geben Sie diese gegebenenfalls
an den Nachbesitzer weiter.
Dieses Gerät entspricht den Richtlinien
89/336/EWG für elektromagnetische Verträg-
lichkeit und 76/23/EWG für die Sicherheit.
Beachten Sie sämtliche in dieser Bedienungs-
anleitung erwähnten Sicherheitshinweise.
Prüfen Sie vor Anschluss des Gerätes, ob
Stromart und Netzspannung mit den Anga-
ben auf dem Typenschild am Gerät überein-
stimmen.
Reparaturen an Elektrogeräten sind nur von
Fachkräften durchzuführen. Durch unsach-
gemäße Reparaturen können erhebliche
Gefahren für den Benutzer entstehen. Der
Hersteller haftet nicht für eventuelle Schä-
den, die durch nicht bestimmungsgemäßen
Gebrauch oder falsche Bedienung verursacht
werden.
Ziehen Sie vor dem Anbringen bzw. Abneh-
men von Zubehörteilen, vor dem Bewegen so-
wie vor jeder Reinigung den Netzstecker (13).
Ziehen Sie stets am Netzstecker (13) – niemals
am Kabel.
Ziehen Sie den Netzstecker (13) auch bei län-
gerer Abwesenheit und während eines Gewit-
ters, um Schäden durch Blitzschlag zu vermei-
den. Einen zusätzlichen Schutz bietet der Einbau
einer Fehlerstrom-Schutzeinrichtung mit einem
Nennauslösestrom von nicht mehr als 30 mA
in der Hausinstallation. Ihr Elektroinstallateur
kann Ihnen hierzu nähere Auskünfte erteilen.
Wenn das Gerät nicht benutzt wird, schalten
Sie es aus und ziehen Sie den Netzstecker (13).
Tauchen Sie das Heizelement (3) nicht in Was-
ser
oder andere Flüssigkeiten – Stromschlag-
gefahr!
Fassen Sie das Gerät und den Netzstecker
(13)
nicht mit feuchten oder nassen Händen an.
Lassen Sie Ihr Gerät nicht unbeaufsichtigt in
der Nähe von Kindern – Unfallgefahr!
Benutzen Sie das Gerät nicht, wenn das Netz-
kabel
(13)
oder der Netzstecker
(13)
beschä-
digt ist, oder wenn das Gerät anderweitig
beschädigt sein sollte. Lassen Sie ein beschä-
digtes Netzkabel bzw. einen beschädigten
Netzstecker nur von einem qualizierten
Fachmann austauschen.
Das Gerät eignet sich nur für den Gebrauch
im privaten Haushalt und nur für den in
dieser Bedienungsanleitung beschriebenen
Zweck.
Platzieren Sie das Gerät auf einer ebenen,
wärmebeständigen Fläche, nicht in die Nähe
von Wärmequellen (z.B. Ofen) und Gasam-
men.
Falls Sie ein Verlängerungskabel verwenden,
stellen Sie sicher, dass dieses für die entspre-
chende Leistung geeignet ist.
Verlegen Sie das Netzkabel
(13)
und ein
eventuell verwendetes Verlängerungskabel
so, dass niemand darüber stolpern bzw. un-
beabsichtigt daran ziehen kann. Vermeiden
Sie Beschädigungen des Kabels, indem Sie es
von heißen Oberächen und scharfen Gegen-
ständen fernhalten.
Verwenden Sie ausschließlich Original- bzw.
vom Hersteller empfohlene Zubehörteile.
Das Gerät wird während der Benutzung sehr
heiß! Fassen Sie es nur mit Kochhandschuhen
und nur am Schüsselhalter
(5)
bzw. Sicher-
heitsgri
(1)
an.
Benutzen Sie das Gerät nicht im Freien und
bewahren Sie es an einem trockenen Ort auf.
Halten Sie den Glasdeckel
(6)
und andere hei-
ße Teile des Gerätes von hitzeempndlichen
bzw. entzündlichen Materialien (z.B. Papier,
Holz oder Vorhänge/ Gardienen) fern. Legen
Sie den Glasdeckel (6) im Deckelhalter (11) ab.
BITTE LESEN SIE DIESE BEDIENUNGSANLEITUNG AUFMERKSAM DURCH, SIE ENTHÄLT WICHTIGE
HINWEISE FÜR DIE SICHERHEIT, DEN GEBRAUCH UND DIE WARTUNG DES GERÄTES.

D
98
Platzieren Sie das Gerät in einem Sicherheits-
abstand von mindestens 10 cm zu anderen
Geräten.
Vorsicht! Aus den Lüftungsönungen am
Gerät tritt während des Betriebes heißer Was-
serdampf aus.
Gehen Sie beim Önen des Gerätes mit
äußerster Vorsicht vor.
Vermeiden Sie rasche Temperaturänderun-
gen, z.B. durch Abspülen der heißen Glas-
schüssel
(4)
mit kaltem Wasser. Es besteht
Glasbruchgefahr!
TECHNISCHE DATEN
Netzspannung 230 V ~ 50 Hz
Ausgangsleistung 1350 Watt
Gewicht (netto/ brutto) 7,5 kg / 9,5 kg
Abmessung (H x B x T) ca. 32 x 33 x 42 cm
Durchmesser Schüssel ca. 30,5 cm
Tiefe der Schüssel ca. 16,7 cm
(mit Erweiterungsring) ca. 25,7 cm
Fassungsvermögen ca. 11,5 Liter
(mit Erweiterungsring) ca. 15 Liter
Kochtemperaturen 65°C bis 250 °C
VOR DER ERSTEN INBETRIEBNAHME
Entfernen Sie alle Verpackungsmaterialien.
Stellen Sie sicher, dass das Gerät ausgeschaltet
und der Netzstecker
(13)
gezogen ist und reini-
gen Sie das Gerät und alle Zubehörteile gründlich
(siehe „Reinigung“).
Setzen Sie den Glasdeckel (6) auf die Glasschüssel
(4) und klappen Sie den Sicherheitsgri herunter.
Verbinden Sie das Netzkabel
(13)
mit der Netz-
anschlussbuchse
(2)
am Glasdeckel
(6)
und einer
entsprechenden Steckdose.
Wählen Sie mit dem Temperaturwahlschalter
TEMPERATUR
(9)
die höchste Temperatur (250°C)
und stellen Sie den Zeitwahlschalter ZEIT
(10)
auf
eine Betriebszeit von 5 Minuten ein.
Lassen Sie das Gerät nach Ablauf der 5 Minuten
Betriebszeit für mindestens 15 Minuten abkühlen
und nehmen Sie dann den Glasdeckel
(6)
von der
Glasschüssel
(4)
ab.
Reinigen Sie das Innere der Glasschüssel
(4)
noch-
mals mit einem feuchten Tuch. Das Gerät ist nun
betriebsbereit.
niedrigen Aufsatz (14). Später beim Koch-
vorgang setzen Sie den hohen Aufsatz (15)
in die Schüssel ein und geben das nächste
Gargut darauf.
Achten Sie beim Einlegen der Speisen bitte
darauf, dass zwischen den Speisen zum Rand
der Glasschüssel (4) ein Mindestabstand von
ca. 1,5 cm verbleibt, damit eine ausreichende
Luftzirkulation gewährleistet ist. Nur so kön-
nen Ihre Speisen gleichmäßig gegart werden.
Setzen Sie den Glasdeckel (6) auf die Glas-
schüssel (4) auf und klappen Sie den Sicher-
heitsgri (1) herunter. Ist der Sicherheitsgri (1)
oben, lässt sich das Gerät nicht einschalten.
Wählen Sie nun mit dem Temperaturwahl-
schalter TEMPERATUR (9) die gewünschte
Temperatur (max. 250 °C) und stellen Sie den
Zeitwahlschalter ZEIT (10) auf die gewünschte
Betriebsdauer (max. 60 Minuten) ein. Die grü-
ne Betriebsanzeige BETRIEB (7) und die gelbe
Temperaturanzeige HEIZUNG (8) leuchten
auf.
Bei Erreichen der gewählten Temperatur
erlischt die Temperaturanzeige HEIZUNG
(8)
– ebenso das Halogenheizelement (3) und
somit die Innenbeleuchtung.
Hinweis: Entnehmen Sie die vom Hersteller
empfohlene Garzeit und Temperatur bitte
den nachfolgenden Rezepten und der Koch-
zeiten-Tabelle. Die angegebenen Zeiten und
Temperaturen dienen jedoch lediglich als Ori-
entierungshilfe. Sie können Betriebszeit und
Temperatur auch noch während des Garvor-
gangs verändern.
Achtung! Nehmen Sie den Glasdeckel
(6)
nicht unnötig während des Garvorgangs ab,
da hierdurch unnötig Energie verloren geht.
Nach Ablauf der eingestellten Betriebszeit er-
tönt ein Signalton und das Gerät schaltet sich
automatisch ab. Die Betriebsanzeige BETRIEB
(7)
erlischt. Nehmen Sie unter Zuhilfenahme
von Kochhandschuhen den Glasdeckel
(6)
von
der Glasschüssel
(4)
ab und platzieren Sie ihn
im Deckelhalter
(11)
. Entnehmen Sie die Auf-
sätze
(14 – 16)
mit den Speisen mithilfe der
Vielzweckzange
(12)
.
Wollen Sie Ihre Mahlzeit warm halten, drehen
Sie den Temperaturregler TEMPERATUR
(9)
herunter und stellen die Dauer ein.
INBETRIEBNAHME
Verbinden Sie das Netzkabel (13) mit der
Netzanschlussbuchse (2) und einer entspre-
chenden Steckdose.
Setzen Sie – falls nicht anders in den nachfol-
genden Kochrezepten oder der Tabelle an-
gegeben – den niedrigen Aufsatz (14) in die
Glasschüssel (4) ein und legen Sie das Gargut
auf den Aufsatz.
Hinweis: Wenn Sie eine komplette Mahlzeit
kochen möchten, können Sie mit 2 Ebenen
arbeiten: Einen Teil der Mahlzeit (z.B. das Ge-
müse) geben Sie auf den Dämpf- (16) bzw.
niedrigen Aufsatz (14), den anderen Teil der
Mahlzeit (z.B. Fleisch) auf den hohen Auf-
satz (15).
Bitte beachten Sie, dass verschiedene Le-
bensmittel unterschiedlich lange Garzeiten
haben. Geben Sie zuerst die Speisen mit der
längsten Garzeit in die Glasschüssel auf den

D
1110
FUNKTIONEN DER ZUBEHÖRTEILE
Hoher
(15)
/ niedriger
(14)
Gitteraufsatz: Stan-
dardaufsätze zum Braten, Grillen und Backen.
Beide Aufsätze können auch gleichzeitig verwen-
det werden. So kann auf 2 Ebenen eine gesamte
Mahlzeit zur gleichen Zeit gegart werden.
Dämpfaufsatz
(16)
:Zum Dämpfen von Gemüse,
Fisch und anderen Lebensmitteln.
Erweiterungsring
(17)
: Vergrößert den Garraum
um ein Drittel. So können Sie auch größere
Fleischstücke problemlos garen.
Vielzweckzange
(12)
: Zum einfachen Heraushe-
ben der verschiedenen Aufsätze inklusive der da-
rauf liegenden Speisen. Zudem kann die Zange
zum Wenden des Garguts verwendet werden.
Deckelhalter
(11)
: Hängen Sie die beiden starkge-
bogenen Halterungen an einem der Handgrie
des Gerätes ein. Am Ende des Kochvorgangs kön-
nen Sie nun den Glasdeckel bequem in den De-
ckelhalter einsetzen. Achten Sie auf Tropfwasser!
REINIGUNG UND
SELBSTREINIGUNGSFUNKTION
REINIGUNG
Ziehen Sie den Netzstecker
(13)
aus der Steck-
dose und lassen Sie das Gerät abkühlen.
Reinigen Sie den Glasdeckel
(6)
, das Gehäuse und
die Glasschüssel
(4)
mit einem weichen, feuch-
ten Tuch und etwas mildem Reinigungsmittel
– ebenso alle Aufsätze
(14 – 16)
. Trocknen Sie an-
schließend alle Teile sorgfältig ab.
Die Glasschüssel (4) und alle Aufsätze (14 – 16)
können auch in der Spülmaschine gereinigt
werden.
Achtung! Tauchen Sie das Heizelement
(3)
nie-
mals in Wasser oder andere Flüssigkeiten!
Achtung! Säubern Sie das Gerät nie mit ag-
gressiven Reinigungsmitteln oder scheuernden
Reinigungsutensilien. Entfernen Sie hartnäckige
Lebensmittelrückstände gegebenenfalls mit
einem Nylon- oder Polyesterschwamm.
Achtung!
Reinigen Sie das Motorgehäuse bitte
nur schonend mit einem feuchten Tuch, da
sich durch scharfe oder aggressive Reiniger die
Skalenbeschriftung lösen kann.
Das Ablösen der Skalenbeschriftung ist von der
Garantie ausgeschlossen!
SELBSTREINIGUNGSFUNKTION
Die Glasschüssel
(4)
kann auch mit dem Selbstrei-
nigungsverfahren gereinigt werden:
Füllen Sie dazu die Glasschüssel (4) bis zur Mar-
kierung am Schüsselhalter (5) (ca. 3,5 cm Höhe)
mit warmen Wasser. Bitte überschreiten Sie die
Füllhöhe nicht! Fügen Sie dem Wasser anschlie-
ßend etwas mildes Reinigungsmittel bei. Setzen
Sie den Glasdeckel (6) auf die Glasschüssel (4)
und klappen Sie den Sicherheitsgri (1) herun-
ter.
Stellen Sie den Temperaturregler TEMPERATUR
(9)
auf die Position (Reinigung) und den Zeit-
wahlschalter ZEIT
(10)
auf 10 Minuten. Lassen Sie
das Gerät anschließend abkühlen. Entleeren Sie
anschließend die Glasschüssel
(4)
, spülen Sie sie
mit warmen Wasser nach und trocknen Sie diese
sorgfältig ab.
AUFTAUFUNKTION ❆
Wollen Sie tiefgefrorene Lebensmittel auftauen?
Dann stellen Sie den Temperaturwahlschalter
TEMPERATUR
(9)
auf die Position ❆. Stellen Sie je
nach Art und Masse des Lebensmittels die Zeit
ein. Wir können Ihnen hierzu keine Richtwerte
nennen.
Hinweis: Durch Beobachten des Lebensmit-
tels während des Auftau-Vorgangs verhindern
Sie dessen Austrocknung. Stoppen Sie gege-
benenfalls den Auftauvorgang, nehmen den
Deckel (6) ab und testen das Lebensmittel mit
den Händen.
Gargut Garzeit (ca.) Temp. Aufsatz Tipps & Tricks
Fleisch
Hackbraten 40–60 Min. 200 °C niedrig mit Tomatensauce
bestreichen
Frikadellen (4 x 125 g) 10 Min. 250°C niedrig
Schweinekeule 30–40 Min. pro 500 g 200°C niedrig
Lammkeule 30– 40 Min. pro 500g 200°C niedrig
während der ersten
15 Min. bei 250°C garen
Fisch
Garnelen 5–10 Min. 200 °C niedrig vor der Zubereitung
schälen und reinigen,
jeweils 6–8 Garnelen
auf 1 Spieß garen
Forellen (300 g) 15–20 Min. 180 °C niedrig/
hoch vorher mit Salz und
Zitrone würzen
Lachslet (250 g) 15–20 Min. 180 °C niedrig/
hoch
Geügel
¼ Hähnchen (250 g) 20 Min. 180 °C niedrig
falls gewünscht in den
letzten 10 Min. der
Garzeit mit Honig/
Marmelade bestreichen
½ Hähnchen (500 g) 30 Min. 180 °C niedrig
1 Hähnchen (1000 g) 50 Min. 180 °C niedrig
Hähnchenbrust mit Knochen 20–25 Min. 200 °C niedrig
vor dem Braten würzen
Putenbrust 35–50 Min. 200°C niedrig
Backwaren
Gebäckstücke 8 Min. 200 °C niedrig Backpapier auf den
Aufsatz legen und
Gebäckstücke ggf.
einmal wenden
Kekse 8 Min. 240 °C niedrig
Brötchen 10 Min. 180 °C niedrig
Tacos (gefroren) 5– 7 Min. 240 °C niedrig
Biskuit 15–20 Min. 170 °C niedrig Erweiterungsring
verwenden
Gemüse
Geviertelte Kartoeln,
gebacken
30 Min. 200°C niedrig mit Olivenöl bestrei-
chen, mit Rosmarin
und Salz würzen
Maiskolben (3–4 Stück) 15–20 Min. 200 °C niedrig vor der Zubereitung
Fasern entfernen, ca.
15 Min. in Wasser legen
Zucchinischeiben 20 Min. 200 °C niedrig /
hoch
nach 10 Min. oben/
unten vertauschen
KOCHZEITENTABELLE

D
1312
FORELLE IM KRÄUTERMANTEL
Zutaten:
50g frische Kräuter
(z.B. Kerbel, Petersilie und Sauerampfer)
1 Zweig frischer Estragon
10g Petersilie
Salz und Pfeer
Saft von einer Zitrone
60g Butter
1 Ei
1 TL scharfer Senf
2 EL Paniermehl
500g Forelle (entspricht 2 Forellen),
ganz – ohne Kopf und Schwanz
Das benötigen Sie noch:
Alufolie
Und so geht’s:
Verlesen, waschen und trocknen Sie die Kräu-
ter. Hacken Sie die 50g-Mischung anschließend
fein. Schlagen Sie Butter, Ei und Senf zusammen
schaumig. Mischen Sie nun die gehackten Kräu-
ter und das Paniermehl unter. Würzen Sie mit Salz
und Pfeer ja nach Ihrem Geschmack.
Waschen Sie die Forellen und tupfen Sie sie tro-
cken. Reiben Sie die Fische nun mit Salz innen und
außen ein und legen jeweils Estragon und Peter-
silie in die Bauchhöhlen. Schneiden Sie anschlie-
ßend die Fischhaut in Abständen von ca. 2 cm
schräg ein und träufeln den Zitronensaft hinein.
Legen Sie etwas Alufolie auf den hohen Aufsatz
(15) und geben Sie die Forellen darauf. Bestrei-
chen Sie sie nun gleichmäßig mit der Kräuter-
buttermasse.
Stellen Sie den Temperaturregler TEMPERATUR
(9) auf 180°C und den Zeitwahlschalter ZEIT (10)
auf 20– 25 Minuten.
Passend dazu:
Ofenkartoeln: Wickeln Sie halbgar gekochte
Kartoeln in Alufolie und geben Sie sie auf den
Dämpfaufsatz (16) unter die Forelle.
REZEPTE (Alle Zutatenmengen sind für 2 Personen ausgelegt)
GEFÜLLTE ZUCCHINISCHIFFCHEN
Zutaten:
2 Zucchini (á ca. 180g)
1 rote Peperoni
1 Schalotte
2 Scheiben luftgetrockneter Schinken
1 EL Olivenöl
2 Zweige Rosmarin
2 Zweige Petersilie
Salz
Pfeer
180g Schafskäse
Das benötigen Sie noch:
1 Kugelstecher
1 Pfanne
Und so geht’s:
Brausen Sie die Zucchini ab, halbieren sie, lösen
das Fruchteisch mit einem Kugelstecher heraus
und würfeln es. Brausen Sie nun die Peperoni ab,
halbieren sie längs, entkernen und würfeln sie.
Schneiden Sie den Schinken sowie die Schalotten
in dünne Streifen und hacken Sie die Kräuter.
Dünsten Sie nun die Schalotten, Peperoni, Schin-
ken und Zucchiniwürfel in einer Pfanne mit 1 EL
Olivenöl ca. 3 –4 Minuten an. Heben Sie anschlie-
ßend die Kräuter unter und stellen die Pfanne zur
Seite.
Lassen Sie den Käse abtropfen, teilen ihn in Wür-
fel und heben ihn unter das Gemüse. Salzen und
Pfeern Sie nun die Zucchinihälften und füllen
Sie sie mit der Gemüse-Käse-Mischung.
Geben Sie die gefüllten Zucchinihälften auf den
niedrigen Aufsatz (14) in die Glasschüssel.
Stellen Sie den Temperaturregler TEMPERATUR
(9) auf 180°C und den Zeitwahlschalter ZEIT (10)
auf 25 Minuten.
Passend dazu:
Weißbrot oder Reis.
GEMÜSEBURGER
Zutaten:
Für die Gemüse-Bratlinge:
250g Gemüse (Zucchini, Karotten, usw.)
1 Kartoel
½ Zwiebel
3 EL Paniermehl
Salz und Pfeer
2 TL scharfer Senf
Burger mit Belag:
4 kleine Vollkornbrötchen bzw.
2 große Vollkornbrötchen
1 Tomate
¼ Salatgurke
etwas Salat
Das benötigen Sie noch:
ggf. Backpapier (vermeidet Ankleben)
Und so geht’s:
Schälen / putzen Sie das Gemüse und die Kar-
toel und raspeln Sie alles grob. Hacken Sie die
Zwiebel fein. Mischen Sie nun alles mit Panier-
mehl und würzen es mit Salz, Pfeer und 2 TL
scharfem Senf. Formen Sie 4 kleine bzw. 2 große
Bratlinge und streichen Sie die Ränder glatt.
Setzen Sie die Bratlinge auf den hohen Aufsatz
(15) – legen Sie vorher ggf. etwas Backpapier
unter, damit diese nicht am Aufsatz ankleben.
Stellen Sie den Temperaturregler TEMPERATUR
(9) auf 200°C und den Zeitwahlschalter ZEIT (10)
auf 25 Minuten.
Wenden Sie die Bratlinge einmal während des
Garvorgangs.
Waschen Sie die Tomate und Gurke und schnei-
den Sie diese in Scheiben. Belegen Sie den
Brötchen-Boden mit einem gewaschenen Sa-
latblatt, dem Gemüsebratling, Tomaten- sowie
Gurkenscheiben und decken dann alles mit dem
Brötchendeckel ab.
Je nach Geschmack können Sie Ihren Burger mit
Senf, Tomatensauce oder Pesto verfeinern.
SCHWALBENNESTER
Zutaten:
2 Eier
1 Eiweiß
150g Hackeisch
2 EL gehackte Kräuter
1 kleine rote Zwiebel
1 Prise Salz
1 Prise Pfeer
50g Paniermehl
Das benötigen Sie noch:
Kochtopf mit Wasser oder Eierkocher
Backpapier
Und so geht’s:
Kochen Sie die Eier (hart), schrecken und schälen
Sie sie ab.
Schneiden Sie die Zwiebel in kleine Würfel
und vermengen Sie sie mit dem Hack, frischen
Kräutern, Eiweiß, Salz und Pfeer. Teilen Sie die
Mischung in 2 Portionen und formen Sie jede Por-
tion mit der Hand zu einer achen Scheibe. Legen
Sie nun je 1 Ei darauf und umschließen Sie es kom-
plett mit der Hackeischmischung. Rollen Sie zum
Schluss die Ei-Bällchen durch das Paniermehl,
sodass die Oberäche komplett bedeckt ist.
Legen Sie auf den niedrigen Aufsatz (14) etwas
Backpapier und setzen Sie die Ei-Bällchen darauf.
Stellen Sie den Temperaturregler TEMPERATUR
(9) auf 190 °C und den Zeitwahlschalter ZEIT (10)
auf 20– 25 Minuten.
Drehen Sie die Bällchen einmal während des Gar-
vorgangs um.
Passend dazu:
Salat mit Jogurtdressing: Waschen und schnei-
den Sie Salat, Gurken, Tomaten usw. nach Ihrem
Geschmack.
Für das Jogurtdressing mischen Sie 50 g Jogurt
mit dem Saft ½ –1 Zitrone (je nach Geschmack),
1 EL gehackten Kräutern sowie Salz und Pfeer.
Ist Ihnen das Dressing zu dicküssig, geben Sie
etwas Milch hinzu.

D
1514
SÜSSER REISAUFLAUF
Zutaten:
250 ml Milch
100 ml Wasser
3 EL Zucker
1 TL Butter oder Margarine
1 Prise Salz
Schale von 1 Zitrone
80g Milchreis
3 Eier
½ Päckchen Vanillezucker
2 EL Paniermehl
1 Apfel
50g Rosinen
Das benötigen Sie noch:
Auauorm
etwas Fett und Mehl für die Form
Und so geht’s:
Bringen Sie die Milch mit Butter (bzw. Margarine),
Salz und Zitronenschale zum Kochen. Lassen Sie
darin den Reis ca. 30 Minuten aufquellen.
Schälen Sie den Apfel und entfernen das Kernge-
häuse. Schneiden Sie ihn anschließend in kleine
Stücke. Trennen Sie die Eier und schlagen Sie
das Eiweiß mit 1 EL Zucker schaumig. Das Eigelb
mischen Sie mit 2 EL Zucker sowie dem Vanille-
zucker und geben die Mischung mit dem Panier-
mehl, den Apfelstückchen und Rosinen in den
etwas abgekühlten Reis. Rühren Sie alles gut um
und heben Sie anschließend den Eischnee unter.
Geben Sie die Masse in eine gefettete und be-
mehlte Form und stellen diese dann auf den
niedrigen Aufsatz (14).
Stellen Sie den Temperaturregler TEMPERATUR
(19) auf 180°C und den Zeitwahlschalter ZEIT (10)
auf 30– 35 Minuten.
Servier-Tipp:
Geben Sie etwas Zimt auf den fertigen Auauf.
Das gibt ihm noch eine besonders leckere Note.
SCHNELLE SPARGELTORTE
Zutaten:
300 g grüner Spargel
150 ml Salzwasser
100g Vollkorn-Toast (ca. 6 Scheiben)
1 hartgekochtes Ei
50g Kerbel
100 ml Milch
50 ml Schlagsahne
2 Eier
Salz und Pfeer
50g geriebener Käse
Das benötigen Sie noch:
1 Topf
2 ache Auauormen (alternativ: Alufolie)
Und so geht’s:
Putzen / schälen Sie den Spargel und kochen ihn
im Salzwasser ca. 10 Minuten bissfest. Lassen Sie
den Spargel nun gut abtropfen. Wenn Sie sich
das Spargelkochen ersparen möchten, dann
können Sie als Alternative auch eingelegten
Spargel verwenden – lassen Sie diesen ebenfalls
gut abtropfen.
Legen Sie die Auauormen mit den Vollkorn-
Toast-Scheiben aus. Falls Sie keine achen Auf-
lauormen haben, dann können Sie passende
Formen aus Alufolie mit ca. 1,5 cm hohem Rand
selbst formen.
Halbieren Sie nun den Spargel und verteilen ihn
auf den Toast-Scheiben. Hacken Sie das hartge-
kochte Ei sowie den Kerbel und verteilen es zwi-
schen und über dem Spargel.
Verquirlen Sie die Milch und Schlagsahne mit den
Eiern und würzen es mit Salz und Pfeer. Gießen
Sie diese Masse nun über den Spargel und streu-
en anschließend den Käse darüber.
Geben Sie eine Auauorm auf den niedrigen
Aufsatz (14), die andere auf den hohen Aufsatz
(15) in die Glasschüssel. Bedecken Sie die jeweils
obere Auauorm mit Alufolie, um ein Verbren-
nen des Käses zu verhindern. Stellen Sie den Tem-
peraturregler TEMPERATUR (9) auf 200°C und den
Zeitwahlschalter ZEIT (10) auf 30 Minuten. Wech-
seln Sie nach ca. 12 Minuten die Auauormen.
alternativ:
eingelegter Spargel
QUARKTORTE MIT KIWI UND BLUTORANGE
Zutaten:
Für den Biskuit:
2 Eier
2 EL warmes Wasser
50g Zucker
1 Messerspitze Zitronenschale
1 Prise Salz
50g Mehl
25g Speisestärke
Creme mit Belag:
2 Eier
½ Vanilleschote
7 Blatt Gelantine
500g Magerquark
Saft und Schale 1 Zitrone
20g Zucker
2 EL Mineralwasser
1 Prise Salz
2 Kiwis
1 Blutorange
Das benötigen Sie noch:
Springform (ø 24–26 cm)
Backpapier
Tortenring und -platte
Und so geht’s:
Biskuit: Trennen Sie die Eier für den Biskuit.
Schlagen Sie die Eigelbe mit 2 EL warmen Was-
ser schaumig, lassen Sie dabei Zucker und Zitro-
nenschale einrieseln. Schlagen Sie alles zu einer
dickschaumigen Masse auf. Sieben Sie Mehl und
Stärke darüber und mischen es unter. Schlagen
Sie nun das Eiweiß mit Salz auf und geben es auf
die Eigelb-Masse. Heben Sie den Eischnee vor-
sichtig unter.
Geben Sie nun die Masse in die mit Backpapier
ausgelegte Springform und stellen Sie diese auf
den niedrigen Aufsatz (14). Platzieren Sie den Er-
weiterungsring (17) auf der Glasschüssel (4) uns
setzen den Deckel (6) darauf.
Stellen Sie den Temperaturregler TEMPERATUR
(9) auf 170°C und den Zeitwahlschalter ZEIT (10)
auf 15– 20 Minuten.
Nehmen Sie nach dem Backvorgang den Biskuit
heraus und lassen ihn auskühlen. Setzen Sie den
Biskuit auf eine Tortenplatte und schließen Sie
einen Tortenring darum.
Creme: Trennen Sie die Eier für die Creme und
weichen Sie die Gelantine ein. Rühren Sie Quark
mit Eigelben, dem Mark der Vanilleschote, Zitro-
nensaft, -schale, Zucker und Mineralwasser ca.
3 Minuten lang cremig. Drücken Sie die Gelan-
tine aus und erwärmen diese anschließend im
Wasserbad. Rühren Sie die aufgelöste Gelantine
langsam unter die Creme. Lassen Sie nun die
Creme 20 Minuten ziehen.
Schlagen Sie das Eiweiß mit Salz steif und ziehen
es unter die Creme. Streichen Sie die Masse jetzt
auf den Biskuit und stellen Sie alles 4 Stunden
kühl.
Schälen Sie die Kiwis und schneiden Sie sie in
Scheiben. Schälen Sie ebenfalls die Blutorange
und letieren Sie diese. Belegen Sie die Torte erst
kurz vor dem Servieren – so haben die Früchte
den besten Geschmack.
Tipps & Tricks
Kuchen backen im BHG 206
Wenn Sie Ihre Kuchen und Torten nach Ihren
eigenen Rezepten im BIELMEIER Heißluftofen
backen wollen, dann beachten Sie bitte fol-
gende Punkte:
Setzen Sie den Erweiterungsring (17) auf
die Glasschüssel (4).
Wählen Sie die Temperatur (9) um ca. 5 %
geringer, als in Ihrem normalen Ofen, z.B.
anstatt 170°C nur 160°C.
Trotz geringerer Temperatur wird Ihre Back-
ware schneller gar.
Beim ersten Back-Versuch können Sie mit
einem Holzstäbchen testen, ob Ihr Kuchen
durchgebacken ist. Stechen Sie hierfür mit
dem Stäbchen mittig in den Kuchen. Klebt
kein Teig an dem Holzstäbchen, ist Ihr Kuchen
fertig!

1716
GB
GARANTIE
Für die am Verkaufstag beginnende Garantie gelten innerhalb der Bundesrepublik Deutschland,
Österreich und der Schweiz folgende Bestimmungen:
1. Garantiedauer: 2 Jahre
2. Garantieleistungen:
a) Nach unserer Wahl Reparatur oder Austausch
von Teilen, die nach unserer Überprüfung
Material- oder Fertigungsfehler aufweisen.
b) Die Garantie wird nur bei Vorzeigen dieser
Garantiekarte und der Verkaufsrechnung
geleistet. Die Karte ist nur gültig, wenn
sie am Verkaufstag vollständig ausgefüllt
wurde.
c) Die Garantieleistung gilt nur gegenüber dem
Erstverbraucher.
d) Durch die Reparatur oder den Austausch von
Teilen innerhalb der Garantiedauer wird die
ursprüngliche Garantiezeit weder verlängert
noch erneuert.
e) Transportkosten gehen zu Lasten des Käufers
(gilt nicht für die ersten 6 Monate der Garan-
tiezeit).
f) Sofern der Schaden oder Mangel nicht be-
seitigt werden kann oder die Nachbesserung
von uns abgelehnt oder unzumutbar verzö-
gert wird, wird innerhalb von 6 Monaten ab
Kauf-/Lieferdatum auf Wunsch des Endab-
nehmers entweder kostenfrei Ersatz geliefert
oder der Minderwert vergütet oder das Gerät
gegen Erstattung des Kaufpreises, jedoch
nicht über den marktüblichen Preis hinaus,
zurückgenommen.
3. Die Garantie gilt nicht:
für Kratzer und Flecken am Gerät.
für Beleuchtungs- und Kontrolllampen.
für Motorbürsten.
für leicht zerbrechliche Teile aus Bakelit, Glas,
Plastik und so weiter, es sei denn, es handelt
sich um Materialfehler, die von uns als solche
anerkannt werden.
für Beschädigungen, die durch falsche Instal-
lation oder Befestigung verursacht wurden.
wenn das Gerät an ein Stromnetz mit höherer
Spannung, als auf dem Gerät angegeben, an-
geschlossen wird.
bei falscher oder unsachgemäßer Bedienung.
bei mangelnder Sorgfalt.
bei ungenügender oder falscher Wartung.
bei Fallenlassen des Gerätes oder einzelner
Teile.
bei unsachgemäßem Transport oder unsach-
gemäßer Verpackung für den Transport.
4. Die Garantie erlischt:
wenn das Gerät für andere als für Haushalts-
zwecke eingesetzt wird.
wenn Personen, die nicht von unserer Firma
dazu ermächtigt sind, Reparaturen oder Än-
derungen durchführen.
Stempel und Unterschrift des Verkäufers Verkaufsdatum
Wichtig! Bitte notieren Sie hier den auf
dem Typenschild am Gerät befindlichen
FD-Code:
Modell:
Für dieses Gerät leisten wir 2 Jahre Garantie für Mängel, die auf Fertigungs- oder Materialfehler
zurückzuführen sind. Die Garantiezeit beginnt mit dem Tag der Übergabe und wird nur bei Vorlage
der Garantiekarte und der Verkaufsrechnung gewährt. Weitergehende Ansprüche bestehen nicht.
COOKING STORY...
A NEW GENERATION OF COOKING
With the BIELMEIER convection oven, you pre-
pare a delicious, healthy meal in less than half
the time needed using the conventional method.
Our revolutionary approach towards elimina-
ting certain, time-consuming cooking processes,
allows excellent results.
Long time ago professional chefs have recognized
how the traditional oven can be improved. They
utilize ovens with a fanning device, which accel-
erates the circulation of hot air within the baking
chamber. In a conventional oven, the ventilator
is mounted to one side of the metal casing.
The BIELMEIER convection oven improves the
traditional oven in the following manner:
The BIELMEIER convection oven is made of
glass instead of metal, so you can observe
your meal throughout the cooking process
from all sides.
The BIELMEIER convection oven consists of
a bowl and a lid with an integrated fan. This
means, that streams of hot air can freely cir-
culate about the food towards the sides of the
bowl and backwards to the fan. The air, heat-
controlled to your specic cooking needs,
cooks your food quickly and thoroughly while
giving it an attractive, crispy tan.
When preparing meat, poultry or sh on the
low tray, the surplus of fat and grease is blown
away through the frame. This enables you to
cook meals, which are lighter and more nutri-
tious than usual.
Further advantages
of the BIELMEIER convection oven:
The BIELMEIER convection oven allows you
to cook, roast, boil and steam – all with one
singular device.
Cooking on two levels allows for simultaneous
preparation of several meals at a time.
Meat and poultry gets tanned and crispy on
all sides – still, it stays supple and juicy inside.
Potato slices “air fried” with a little oil will turn
to cross and golden baked potatoes
.
The device is easy to use – simply set time and
temperature. That’s all.
The circulation of hot air around your meal pro-
vides consistent, even and through cooking.
Dough baked in hot air will rise better than
when baked with conventional oven.
This convection oven consumes up to 60%
less energy than your conventional devices.
The BIELMEIER convection oven will defrost
frozen foods faster.
The BIELMEIER convection oven is supplied
with a built-in self-cleaning circuit.
All these clear advantages – plus your meal is
cooked up to tree times faster than in a standard
oven! That‘s exactly why BIELMEIER convection oven
heralds a new generation in cooking!
A HEALTHIER LIFESTYLE
With the BIELMEIER convection oven you always
cook with hot air (“dry roasting“), while your food
is placed on metal racks. Therefore extra fat and
grease are removed, which means fewer calories,
less cholesterol and less fat.
It will occur to you that no fat is needed for most
meals with the BIELMEIER convection oven. You
may however add some butter, margarine or oil
– just the way you like it!
Please stay healthy! We recommend:
a balanced nutrition,
less butter, oil, fat, sauces, sugar and sweets,
plenty of fresh fruit and vegetables,
drink large quantities of uid, but only small
amounts of alcohol,
reduce your share of instant meal, preferably
consume fresh food,
eat less at a time, but enjoy meals regularly,
reduce your consumption of salt,
prepare your meals air-fried
as often as possible.

1918
GBGB
IMPORTANT SAFETY INSTRUCTIONS
Keep these instructions in a safe place. Pass
them on to an eventual further owner of your
device.
This device is built in accordance to the guide-
line 89/336/ EEC concerning electromagnetic
compatibility and 73/23/ EEC concerning
safety.
Strictly follow all safety advice given in these
instructions.
Before connecting the device, make sure that
current and voltage match the specications
on the product classication (see rating label
on device).
Maintenance may only be performed by
trained personnel. Improper handling may
be hazardous for the user. The manufac-
turer/distributor does not take liability for
damage resulting from wrong handling or
improper use of the device.
Always unplug the device before removing
or changing trays, as well as before moving or
cleaning the device. Always pull the plug (13) to
unplug, never the cable
.
Also unplug the device in case you are out of
reach for a longer time span, as well as in case
of thunderstorm in order to prevent damage
caused by lightning. Additional protection
may be attained by installing a residual-cur-
rent-operated protective device (RCD) with a
nominal trigger current not exceeding 30 mA.
For further information, please contact your
local electrician.
Turn o the device when not in use and pull
the power plug
(13)
.
Never immerse the ring heater
(3)
into water
or other liquids – danger of electric shock
!
Never touch the device or the power plug
(13)
with wet or moist hands – danger of electric
shock!
Never leave children unattended near the de-
vice – danger of accidents and serious injury!
Do not use the device if power plug
(13)
or
supply cable
(13)
are damaged, nor if any oth-
er part of the device appears to be damaged.
Have a qualied expert change the damaged
parts for new ones.
The device is only provided for use in private
households and for the purposes described in
these operating instructions.
Always place the device on a plane, heat-
resistant surface. Keep the device in safe
distance of heat resources (e.g. ovens) and
gas ames.
When using an extension cord, make sure
that it is suitable for the impressed voltage
When laying extension cord and power sup-
ply cable
(13)
, make sure that nobody will
unintendedly pull them or trip over them.
Avoid damage of cables by keeping them
in safe distance from hot surfaces and sharp
edges.
Only use original accessories and such recom-
mended by manufacturer.
The device gets very hot when in use! Always
use potholders when touching the device.
Only touch the bowl handle
(5)
and safety
handle
(1)
.
Do not use the device outdoors. Keep it in a
dry place.
Keep the glass lid
(6)
and other hot parts of
the device in safe distance of ammable,
heat-sensitive and combustible materials,
such as paper, wood, curtains etc.
When hot, always place the glass lid
(6)
in the
lid rack
(11)
.
Place the device in a safety distance of at least
10 cm of other objects.
PLEASE READ THESE OPERATING INSTRUCTIONS CAREFULLY, AS THEY CONTAIN IMPORTANT
ADVICE CONCERNING SAFETY, OPERATION AND MAINTENANCE.
Caution! When in use, hot steam emerges
from the top of housing.
When opening the device, be very careful to
avoid injury.
Avoid abrupt changes in temperature. When
hot, do not rinse the glass bowl
(4)
with cold
water – danger of breaking glass!
TECHNICAL DATA
System voltage 230 V ~ 50 Hz
Power output 1350 Watt
Weight (net/ gross) 7,5 kg / 9,5 kg
Measures (H x W x D) ca. 32 x 33 x 42 cm
Bowl diameter ca. 30,5 cm
Bowl depth ca. 16,7 cm
(incl. Extension Ring) ca. 25,7 cm
Bowl capacity ca. 11,5 litre
(incl. extension ring) ca. 15 litre
Cook temperature range 65°C to 250 °C

2120
GBGB
BEFORE THE INITIAL OPERATION
Dispose o all package material.
Make sure that the device is turned o and the
power plug
(13)
is pulled. Then thoroughly
clean the device and all accessory parts (see
„Cleaning“).
Put the glass lid
(6)
on the bowl
(4)
and put down
the safety handle.
Connect the mains supply cable
(13)
to the
mains jack
(2)
at the glass lid
(6)
and insert the
power plug
(13)
to a corresponding power out-
let.
Turn the temperature switch TEMPERATUR
(9)
to the hottest value (250°C) and set time switch
ZEIT
(10)
to an operating time of 5 minutes.
After process let the device cool down for at
least 15 minutes and take o the glass lid (6)
from the bowl (4).
Clean the interior of glass bowl
(4)
with a soft,
damp cloth once more. Your convection oven is
now ready for use.
that a gap of at least 1,5 cm is left between
the foods and the bowl‘s
(4)
walls. That’s
the only way your meal can be cooked tho-
roughly.
Put the glass lid
(6)
on top of the bowl
(4)
and
put down the safety handle
(1)
. The device will
not function unless the safety handle
(1)
is put
down.
Now set the desired temperature (up to
250°C) with the temperature switch TEMPE-
RATUR (9) and set the time switch ZEIT (10) to
the desired cooking duration (up to 60 minu-
tes). Now both lamps are lit, the green one
markes BETRIEB (7) for operation and the
yellow one markes HEIZUNG (8) for heating.
When the desired temperature has been
reached, the heating indication HEIZUNG
(8) will turn o – also the halogen heat-
ing element (3) and therefore the inside
light.
Tip: Cooking times and temperatures as re-
commended by manufacturer are listed below
in the cooking table and recipes. The listed
temperatures and times are only for orienta-
tion. You also can modify temperature and
time during cooking.
Caution! Do not take o the glass lid needless
while the device is in use, as this may cause
higher energy consumption.
The end of the desired cooking time is indi-
cated by a sound signal. The device turns o
automatically, the green lamp indicating op-
eration (BETRIEB)
(7)
turnes o. Take o the
glass lid
(6)
from the bowl
(4)
, wearing pot-
holders and place it on the lid rack
(11)
. Use
the multipurpose tongs
(12)
for taking out the
food racks
(14 – 16)
.
If you want to keep your meal warm, turn the
temperature switch TEMPERATUR
(9)
down
and adjust the time.
OPERATION
Connect the mains supply cable
(13)
to the
mains jack
(2)
at the glass lid
(6)
and insert the
power plug to a corresponding power outlet.
If not described dierently in the recipe, lace
the low rack
(14)
in the glass bowl
(4)
and put
your food onto the rack.
Tip: If you want to cook a complete meal,
you can use 2 levels: Place a part of it (e.g.
vegetables) on the bottom
(14)
or steaming
rack
(16)
, while cooking the rest of the meal
(e.g. meat) on the top rack
(15)
.
Please note that dierent foods need a dif-
ferent period of cooking time. So place at
rst the food on the bottom rack (14) into
the glass bowl (4), which needs the longest
time. Later of cooking process place the top
rack (15) with the other food into the glass
bowl (4).
For sucient air circulation, please ensure
FEATURES
OF THE ACCESSORIES
Top rack (15) / bottom rack (14): Standard racks
for cooking, broiling and baking.
Both racks also can be used simultaneously. So
you can cook your whole meal on 2 levels at the
same time.
Steaming rack (16):For steaming vegetables, sh
and other foods.
Extension ring (17):It enlarges the cooking val-
ue of one third. So you also can cook large meat
pieces without any diculty.
Multipurpose tongs (12):With this tongs you
can take out the food racks out of the glass bowl
simply. You also can use the tongs for turning
the food.
Lid rack (11): Insert the curved brackets in one
of the device‘s handles. After the cooking pro-
cess, you can comfortably place the glass lid in
the lid rack. Please pay attention to dropping
water!
CLEANING AND
SELFCLEANING FUNCTION
CLEANING
Pull the power plug (13) from the socket and
leave the device cool down.
Clean glass lid (6), housing and glass bowl (4)
using a soft damp cloth and a mild detergent
– also all racks (14 – 16). Then thoroughly dry all
parts.
Glass bowl (4) and racks (14 – 16) are dishwasher-
proof.
Caution! Never immerge the halogen heating
element (3) into water or other liquids!
Caution! Do not use aggressive or abrasive
detergents or utilities. Persistent food remains
can be removed by using nylon or polyester
sponges.
Caution! Please clean the housing only gentle
by using a soft damp cloth. By using sharp or
abrasive cleaners, the marking label could be
removed.
Removing of the marking label is debarred of
guarantee.
SELFCLEANING FUNCTION
You can clean the glass bowl (4) by activating the
self-cleaning circuit.
Fill the bowl (4) with warm water up to a level
marked on the bowl holding device (5) (approxi-
mately 3,5 cm height). Please do not exceed the
lling level! Add some mild detergent. Put the
glass lid (6) on top of the bowl (4) and put down
the safety handle (1).
Set the time switch ZEIT (10) to 10 minutes and
the temperature switch TEMPERATUR (9) to po-
sition (Cleaning). After the cleaning process
leave the device to cool down thoroughly. Then
empty the bowl (4) and rinse it with warm water.
Dry with care.
THAWING FUNCTION ❆
Do you want to defrost frozen foods? Then ad-
just the temperature switch TEMPERATUR
(9)
to
❆. Then adjust the operation time depending on
dimensions of food.
Unfortunately we cannot tell you approximately
times for this.
Tip: By watching the food during the defrost
operation you can avoid drying-out of the
food. If need be, stop the defrost function, take
o the glass lid
(6)
and test the food with your
hands.

2322
GBGB
Food Cooking time (ca.) Temp. Rack Tips & Tricks
Meat
meat loaf 40–60 min. 200 °C bottom spread with tomato
sauce
meatballs (4 x 125g) 10 min. 250°C bottom
porc leg 30– 40 min. per 500g 200°C bottom
lamb leg 30– 40 min. per 500g 200°C bottom
cook at 250°C for the
rst 15 minutes
Fish
prawns 5– 10 min. 200°C bottom clean, hull and put on
a skewer (6–8 prawns
per skewer) before
cooking
trout (300 g) 15–20 min. 180 °C bottom/
top avour with salt and
lemon before cooking
salmon let (250 g) 15–20 min. 180 °C bottom/
top
Poultry
¼ chicken (250 g) 20 min. 180 °C bottom marinate as desired
10 minutes with
honey/ marmalade
½ chicken (500 g) 30 min. 180 °C bottom
1 chicken (1000 g) 50 min. 180 °C bottom
chicken breast with bones 20–25 min. 200°C bottom season before cooking
turkey breast 35– 50 min. 200 °C bottom
Bakery Products
pastries 8 min. 200°C bottom put baking paper
onto rack and turn the
pastry if need be
cookies 8 min. 240 °C bottom
rolls 10 min. 180 °C bottom
tacos (frozen) 5– 7 min. 240 °C bottom
sponge cake 15–20 min. 170 °C bottom use extension ring
Vegetables
diced potatoes, baked 30 min. 200 °C bottom brush with olive oil,
and season with
rosemary and salt
corncob (3– 4 pieces) 15–20 min. 200 °C bottom before cooking,
remove bres and
add into water for
15 minutes
Zucchini slices 20 min. 200°C bottom/
top
swap bottom and top
rack after 10 minutes
COOKING TIME TABLE
TROUT IN A HERB CRUST
Ingredients:
50g fresh herbs
(e.g. chervil, parsley and sorrel)
1 sprig fresh tarragon
10g parsley
Salt and pepper
Juice of 1 lemon
60g butter
1 egg
1 tsp hot mustard
2 tbsp breadcrumbs
500g trout (equivalent to two whole trout),
topped and tailed
You will also need:
Aluminium foil
To prepare:
Sort, wash and dry the herbs. Next, nely chop
the 50g herb mixture. Beat and froth the butter,
egg and mustard. Mix in the chopped herbs and
the breadcrumbs. Season to taste with salt and
pepper.
Wash the trout and pat dry. Rub the sh with
salt, inside and out, and stu the stomach cavi-
ties with tarragon and parsley. Then make a
series of diagonal cuts into the sh skin at in-
tervals of approximately 2 cm and drizzle with
lemon juice.
Place some aluminium foil on the top rack (15)
and place the trout on this. Coat evenly with the
herb butter mixture.
Set the temperature switch (TEMPERATUR) (9)
to 180°C and the time switch (ZEIT) (10) to
20–25 minutes.
Tastes great with:
Baked potatoes: Wrap parboiled potatoes in alu-
minium foil and place on the steaming rack (16)
below the trout.
RECIPES (All recipes make 2 servings)
FILLED ZUCCHINI BOATS
Ingredients:
2 zucchinis
(each weighing approximately 180g)
1 red pepper
1 shallot
2 slices prosciutto
1 tbsp olive oil
2 sprigs rosemary
2 sprigs parsley
Salt
Pepper
180g feta cheese
You will also need:
1 fruit scoop
1 frying pan
To prepare:
Rinse and halve the zucchinis, remove the esh
with a fruit scoop and dice. Next, rinse the pep-
per, halve it lengthwise, remove the core and
dice. Cut the ham and the shallots into thin strips
and chop the herbs.
Then steam the shallots, pepper, ham and diced
zucchinis in a pan with 1 tbsp olive oil for approxi-
mately 3 –4 minutes. Stir in the herbs and set the
pan to one side.
Drain and dice the cheese and fold it into the
vegetables. Next, season the halved zucchinis
and ll them with the vegetable-cheese mix-
ture.
Place the lled zucchini halves on the bottom
rack in the glass bowl (14).
Set the temperature switch (TEMPERATUR) (9) to
200°C and the time switch (ZEIT) (10) to 15 min-
utes.
Tastes great with:
White bread or rice.

2524
GBGB
VEGETARIAN BURGERS
Ingredients:
For the vegetarian burger patty:
250g mixed vegetables
(zucchinis, carrots etc.)
1 potato
½ onion
3 tbsp breadcrumbs
Salt and pepper
2 tsp hot mustard
For burger sandwiches with a salad dressing:
4 small wholegrain burger buns or
2 large wholegrain burger buns
1 tomato
¼ cucumber
A little lettuce
You will also need:
Baking paper (optional, to prevent sticking)
To prepare:
Peel / clean the vegetables and the potato, and
grate them using a coarse grater. Finely chop
the onion. Mix with the breadcrumbs, and sea-
son with salt, pepper and 2 tsp. of hot mustard.
Form 4 small or 2 large burger patties and round
the edges.
Place the patties on the top rack (15) – to prevent
the patties from sticking to the rack, we recom-
mend putting some baking paper on the rack.
Set the temperature switch (TEMPERATUR) (9)
to 200°C and the time switch (ZEIT) (10) to 25
minutes.
Turn the patties once during the cooking process.
Wash and slice the tomato and the cucumber. Put
a washed lettuce leaf on the veggie burger patty,
as well as tomato and cucumber slices, and put
the top half of the burger bun on top.
Depending on your taste, you can add mustard,
tomato sauce or pesto.
"SWALLOWS' NESTS"
TRADITIONAL BAVARIAN RECIPE
Ingredients:
2 eggs
White of 1 egg
150g minced meat
2 tbsp chopped herbs
1 small red onion
1 pinch of salt
1 pinch of pepper
50g breadcrumbs
You will also need:
Saucepan lled with water or an egg boiler
Baking paper
To prepare:
(Hard-)boil the eggs, cool in cold water and re-
move the shells.
Dice the onion and blend with the minced meat,
fresh herbs, egg white, salt and pepper. Divide the
mixture into 2 portions and manually shape each
portion into a at disk. Place 1 egg on each disk
and enfold it in the minced meat mixture. Finally,
roll the balls containing the eggs in breadcrumbs
until completely covered.
Place the egg balls on some baking paper on the
bottom rack (14).
Set the temperature switch (TEMPERATUR) (9)
to 190°C and the time switch (ZEIT) (10) to
20–25 minutes.
Turn the balls once during cooking.
Tastes great with:
Salad with yoghurt dressing: Wash and chop
the lettuce, cucumbers, tomatoes and any other
salad ingredients you like.
To make the yoghurt dressing, mix 50 g yoghurt
with the juice of ½– 1 lemon (to suit your taste),
1 tbsp chopped herbs, salt and pepper. Add a
dash of milk if the dressing is too thick for your
liking.
SWEET RICE PUDDING
Ingredients:
250 ml milk
100 ml water
3 tbsp sugar
1 tsp butter or margarine
1 pinch of salt
Zest of 1 lemon
80g short-grain rice
3 eggs
½ packet vanilla sugar
2 tbsp breadcrumbs
1 apple
50g raisins
You will also need:
A casserole dish
A little grease and our for the casserole dish
To prepare:
Bring the milk, butter (or margarine), salt and
lemon zest to the boil. Add the rice and leave to
simmer for approximately 30 minutes.
Peel and core the apple and cut into small piec-
es. Separate the eggs and beat and froth the
egg white together with 1 tablespoon of sugar.
Mix together the egg yolk, 2 tbsp sugar and the
vanilla sugar and add the mixture to the rice,
together with the breadcrumbs, apple pieces
and raisins once the rice has cooled down. Mix
well and then fold in the beaten egg whites.
Pour the mixture into a greased and oured cas-
serole dish and place on the bottom rack (14).
Set the temperature switch (TEMPERATUR) (19)
to 180°C and the time switch (ZEIT) (10) to
30– 35 minutes.
Serving suggestion:
Add a little cinnamon to your rice pudding be-
fore serving to give it a delicious note of added
sweetness.
QUICK ASPARAGUS TART
Ingredients:
300 g green asparagus
150 ml salt water
100g wholegrain toast
(approximately 6 slices)
1 hard-boiled egg
50g chervil
100 ml milk
50 ml whipped cream
2 eggs
Salt and pepper
50g grated cheese
You will also need:
1 saucepan
2 at casserole dishes (or aluminium foil)
To prepare:
Clean / peel the asparagus and boil in salt wa-
ter for approx. 10 minutes until rm to the bite.
Drain well. To save time, you can also use pick-
led asparagus instead – just make sure it is well
drained.
Place the whole grain toast slices in a at cas-
serole dish. If you don’t have any at casserole
dishes, you can use aluminum foil and shape it
yourself with a lip of approx. 1.5 cm.
Halve the asparagus, and spread it evenly over
the toast slices. Chop the hard-boiled egg and
the herbs, and spread between and over the
asparagus.
Whisk the milk and whipped cream with the
eggs, and season with salt and pepper. Now
pour this mixture over the asparagus, and sprin-
kle with cheese. Place one casserole dish on the
bottom rack (14) and the other on the top rack
(15) in the glass bowl. Cover the casserole dish
on the top rack with aluminum foil to prevent
the cheese from burning. Set the temperature
switch (TEMPERATUR) (9) to 200°C and the time
switch (ZEIT) (10) to 30 minutes. Swap the cas-
serole dishes after approx. 12 minutes.
or:
pickled asparagus

2726
GBGB
Ingredients:
For the sponge base
2 eggs
2 tbsp warm water
50g sugar
1 dash of lemon zest
1 pinch of salt
50g our
25g cornour
Cream topping with fruit garnish:
2 eggs
½ vanilla pod
7 sheets gelatin
500g low-fat quark
(ricotta cheese could also be used
as a substitute)
Juice and zest of 1 lemon
20g sugar
2 tbsp mineral water
1 pinch of salt
2 kiwis
1 blood orange
You will also need:
A springform cake pan (ø 24– 26 cm)
Baking paper
A cake ring and cake plate
To prepare:
For the sponge: Separate the eggs for the
sponge. Beat and froth the egg yoke together
with 2 tbsp warm water, gradually adding the
sugar and lemon zest to the mixture. Continue
beating the mixture until thick and frothy. Sieve
in the our and cornour and mix well. Next, beat
the egg white with salt and pour into the egg-yolk
mixture. Carefully fold in the beaten egg whites.
Now pour the mixture into a springform cake
pan lined with baking paper and place on the
bottom rack (14). Place the extension ring (17) on
the glass bowl (4) and cover with the lid (6).
Set the temperature switch (TEMPERATUR)
(9) to 170°C and the time switch (ZEIT) (10) to
15–20 minutes.
After baking, take out the sponge and allow to
cool. Place the sponge on a cake plate and en-
close in a cake ring.
For the cream topping: Separate the eggs for
the cream topping and soak the gelatin in water
to soften. Stir the quark together with the egg
yolks, the seeds from the vanilla pod, lemon juice,
lemon zest, sugar and mineral water for approxi-
mately 3 minutes until creamy. Take the gelatin
out of the water and heat in a hot water bath.
Slowly stir the dissolved gelatin into the mix-
ture. Leave the mixture to stand for 20 minutes.
Beat the egg white and salt into sti peaks and
fold into the cream mixture. Spread the mix-
ture evenly over the sponge base and chill for
4 hours.
Peel and slice the kiwis. Peel and llet the blood
orange. Add the fruit garnish right before serving
so that the fruit retains all of its taste.
Tips & Tricks
Baking cakes in the BHG 206
Please note the following pointers when bak-
ing cakes and ans in the BIELMEIER convec-
tion oven following your own recipes:
Place the extension ring (17) on the glass
bowl (4).
Set the temperature (9) approximately 5%
lower than the temperature you would use
in a conventional oven, e. g. 160°C instead
of 170°C.
The convection oven bakes in less time at
lower temperatures.
The rst time you use the oven for baking, you
can use a wooden skewer to test whether your
cake is baked through. Push the skewer down
through the middle of your cake. If no cake
mixture sticks to the skewer when you pull it
back out, then your cake is done!
QUARK CAKE WITH KIWI AND BLOOD ORANGE GUARANTEE
For the warranty, which begins as of the date of sale of the product, the following conditions
shall apply in Great Britain:
A 2-years warranty is provided for damage caused by defects in material or workmanship.
The warranty period shall begin on the hand-over day and warranty is only granted on pre-
sentation of the warranty card and the purchase receipt. No further claims shall be granted.
1. Warranty period: 2 years
2. Conditions of warranty:
a) Parts, which exhibit defects in material and/ or
workmanship after our inspection, will either
be repaired or replaced according to our de-
cision.
b) Warranty is only provided on presentation of
this warranty card and purchase receipt. This
warranty is only valid if it is lled out on date
of sale and in a complete and appropriate
manner.
c) This warranty is only valid for the rst owner
of the device.
d) No change or repair of parts performed within
the warranty period shall provide grounds for
any extension of the original warranty period.
e) Any transportation costs shall be borne by the
purchaser (this shall not apply during the rst
6 months of the warranty).
f) If the damage or defect cannot be elimina-
ted or if we refuse to repair the defect or in
the event of a delay in our repairing of the
device, then within the rst 6 months after
purchase /delivery of the device, and according
to the wish of the end user, the device will be
replaced free of charge or its value will be reim-
bursed or the device will be taken back with
a refund of the original purchase price which
shall not exceed the usual market price.
3. The warranty shall not apply to:
spots and scratches on the device.
control lamps and lights.
motor brushes.
easily breakable parts (e.g. bakelite, plastic,
glass), even in case of defects in material
recognized by us.
damage due to improper installation or im-
proper xing.
damage caused by an unsuitable voltage
supply or an unsuitable electricity network.
improper or inappropriate use of the equip-
ment.
unsatisfactory care.
damage caused by incompetent or insucient
maintenance.
damage caused by dropping the equipment
or part thereof.
improper transportation or inappropriate
packaging during the transportation.
4. The warranty shall be deemed void:
in case of use or application of the device other
than its intended use for household purposes.
in case of any servicing or repairing of the device
performed by third parties that have not been
authorized for such purpose by our company.
Stamp and signature of salesperson Date of sale
Important! Please write down the FD-code
located on the rating plate here:
Model:

2928
CZCZ
HISTORIE VAŘENÍ.. .
NOVÁ GENERACE VE VAŘENÍ
S horkovzdušnou troubou BIELMEIER může-
te připravit chutné a zdravé jídlo za kratší než
poloviční dobu tradiční metody. Náš revoluční
útok na určité zdlouhavé způsoby vaření umožní
vynikající výsledky.
Profesionální kuchaři už dlouho přemýšleli o
tom, jak by mohli zlepšit tradiční pečicí troubu a
jak by se urychlila cirkulace horkého vzduchu v
troubě, protože ta pracovala pomocí ventiláto-
ru. Tento ventilátor bývá vestavěný zpravidla na
straně kovového pláště.
Horkovzdušná trouba BIELMEIER vylepšuje
tradiční troubu následujícím způsobem:
Horkovzdušná trouba BIELMEIER je vyrobená
ze skla a ne z kovu. Proto máte možnost kont-
rolovat vaření ze všech stran.
Horkovzdušná trouba BIELMEIER je kulatá
mísa kombinovaná s ventilátorem, který
je zabudovaný do víka. Tím cirkulují horké
proudy vzduchu přes jídlo ke stěnám mísy a
potom zpět k ventilátoru. Tento vzduch, který
nepřetržitě cirkuluje a pravidelně se zahřívá,
vaří a peče pokrmy rychle a důkladně.
Když se na nižším roštu peče maso, drůbež
nebo ryby, mohou se z pokrmů oddělit tuky a
oleje a pak se zachytit ve skleněné míse. Vaše
jídlo je pak lehčí a výživnější.
Další přednosti horkovzdušné trouby
BIELMEIER jsou:
S horkovzdušnou troubou BIELMEIER můžete
péct, vařit i dusit (vařit v páře).
Vaření na dvou úrovních vám umožní najed-
nou připravit celý oběd nebo večeři.
Maso a drůbež bude ze všech stran dozlatova
upečená a křupavá, uvnitř ale zůstane měkká
a šťavnatá. Křupavých a dozlatova propeče-
ných brambor dosáhnete tak, když plátky
brambor trochu potřete olejem.
Snadná obsluha: jednoduše nastavíte pouze
čas a teplotu.
Horký vzduch cirkuluje kolem pokrmů, proto
jsou stejnoměrně uvařeny.
Těsto pečené cirkulujícím vzduchem lépe vy-
kyne.
Tato horkovzdušná trouba spotřebuje až o
60% méně energie než vaše běžná trouba.
Horkovzdušná trouba BIELMEIER rozmrazuje
potraviny rychleji.
Horkovzdušná trouba BIELMEIER má zabudo-
vanou funkci samočištění.
Všechny tyto výhody – a to se vaří dvakrát až třikrát
rychleji než ve standardní troubě – to je to, proč hor-
kovzdušná trouba BIELMEIER představuje „novou
generaci vaření“!
ZDRAVĚJŠÍ ŽIVOTNÍ STYL
S horkovzdušnou troubou BIELMEIER vaříte vždy
pomocí horkého vzduchu (suché pečení). Pro-
tože pokrmy leží vždy na roštu, může se přeby-
tečný tuk lehce vyloučit. To přináší méně kalorií,
tuku i cholesterolu.
Zjistíte, že s horkovzdušnou troubou BIELMEIER
není nutné ve většině receptů přidávat tuk, olej,
máslo nebo margarín. Ale pokud si to přejete,
můžete samozřejmě tuk použít.
Pro vaše zdraví vám doporučujeme:
vyváženou stravu,
méně tuků, omáček, cukru a sladkostí,
mnoho ovoce a zeleniny,
každý den pít hodně vody,
ale žádný alkohol,
méně hotových jídel (polotovarů), místo toho
dávejte přednost čerstvým potravinám,
jíst pravidelně, ne najednou,
přiměřeně solit,
připravovat vaše pokrmy pomocí horkého
vzduchu tak často, jak jen to je možné.
DŮLEŽITÉ BEZPEČNOSTNÍ POKYNY
Pečlivě si uschovejte tento návod k použití a
popřípadě ho dejte dalšímu majiteli přístroje.
Tento přístroj odpovídá směrnicím 89/336/
EWG pro elektromagnetickou kompatibilitu
a 76/23/EWG pro bezpečnost.
Respektujte veškerá bezpečnostní opatření
uvedená v tomto návodu k použití.
Před připojením do sítě zkontrolujte, zda druh
proudu a síťové napětí souhlasí s údaji na ty-
povém štítku na přístroji.
Opravy elektrospotřebičů provádí výhradně
odborní pracovníci. Prováděním neodbor-
ných oprav se mohou uživatelé dostat do
závažného nebezpečí. Výrobce neručí za
eventuální škody, které byly zapříčiněny ne-
správným používáním nebo špatnou obslu-
hou.
Přístroj vytáhněte ze zásuvky vždy při nasa-
zování, popř. při odebírání jeho částí, před
přemisťováním nebo před každým čištěním.
Vždy ho vytahujte za zástrčku (13), nikdy ne
za kabel!
Přístroj vytáhněte ze zásuvky také při del-
ší nepřítomnosti a během bouřky, tím za-
bráníte škodám vzniklým zásahem blesku.
Instalace ochrany v domácích rozvodech
musí být provedena podle ČSN. Váš elek-
troinstalatér vám k tomu může podat bližší
informace.
Když přístroj nepoužíváte, vypněte jej a vy-
táhněte ze zásuvky.
Topné těleso (3) nikdy neponořujte do vody
nebo jiných tekutin – nebezpečí úderu elek-
trickým proudem!
Přístroje nebo zástrčky (13) se nedotýkejte
vlhkýma nebo mokrýma rukama!
Nenechávejte přístroj bez dozoru v blízkosti
dětí – nebezpečí úrazu!
Přístroj nepoužívejte, pokud je síťový kabel
(13) nebo zástrčka (13) poškozená a nebo
pokud by měl být přístroj poškozen jiným
způsobem. Poškozený kabel nebo zástrčku
nechávejte vyměnit pouze kvalikovaným
odborníkem.
Přístroj je určen výhradně pro používání v
domácnosti a pro účely uvedené v tomto ná-
vodu k použití.
Umístěte přístroj na rovné žáruvzdorné pod-
ložce, ne v blízkosti zdrojů tepla (např. kamen)
a plamenů plynu.
Pokud používáte prodlužovací kabel, ujistěte
se, že je určen odpovídajícím úkonům.
Síťový kabel (13), eventuelně i prodlužovací
kabel položte tak, aby o něj nikdo nezakopl,
popř. aby za něj nikdo nemohl neúmyslně
tahat. Poškození kabelu předejdete také tím,
že je nebudete mít v blízkosti horkých ploch
nebo ostrých předmětů.
Používejte výhradně originální, popř. od vý-
robce doporučené příslušenství.
Přístroj je během provozu velmi horký! Berte
ho do rukou jen pomocí ochranných rukavic,
a to jen za stojánek na mísu (5), popř.za bez-
pečnostní rukojeť (1).
Nepoužívejte přístroj ve volné přírodě a ucho-
vávejte ho na suchém místě.
Skleněné víko (6) a ostatní horké díly přístroje
nenechávejte v blízkosti materiálů citlivých na
horko nebo materiálů vznětlivých (např.papír,
dřevo nebo závěsy/záclony).
Skleněné víko (6) odkládejte do stojánku
(11).
PŘEČTĚTE SI PROSÍM VELMI POZORNĚ TENTO NÁVOD K POUŽITÍ, OBSAHUJE DŮLEŽITÉ POKYNY
PRO BEZPEČNOST, POUŽÍVÁNÍ A ÚDRŽBU PŘÍSTROJE.

3130
CZCZ
Přístroj umístěte v bezpečné vzdálenosti ale-
spoň 10 cm od ostatních přístrojů.
Pozor! Z větracích otvorů vychází během
provozu horká pára. Nepřibližujte se příliš k
větracím otvorům.
Přístroj otevírejte s největší opatrností.
Vyvarujte se náhlých změn teploty, např. při
mytí horké skleněné misky (4) studenou vo-
dou. Vzniká nebezpeční prasknutí skla!
TECHNICKÉ ÚDAJE
Síťové napětí 230 V ~ 50 Hz
Výstupní výkon 1350 W
Hmotnost (netto / brutto) 7,5kg/ 9,5kg
Rozměry ca. 32 x 33 x 42 cm
Průměr misky ca. 30,5cm
Hloubka misky ca. 16,7 cm
(s rozšiřovacím nástavcem) ca. 25,7 cm
Objem ca. 11,5 l
(s rozšiřovacím nástavcem) ca. 15 l
Teplota vaření 65°C – 250°C
PŘED PRVNÍM UVEDENÍM
DO PROVOZU
Odstraňte veškerý obalový materiál.
Ujistěte se, že je přístroj vypnutý a zástrčka (13)
vytažená ze zásuvky, a důkladně přístroj i všech-
ny jeho součásti vyčistěte (viz. čištění).
Nasaďte skleněné víko (6) na skleněnou mísu (4)
a zaklapněte rukojeť směrem dolů.
Spojte síťový kabel (13) se zdířkou na připojení
k síti (2) na skleněném víku (6) a odpovídající
zásuvkou.
Regulátorem teploty TEMPERATUR (9) nastavte
nejvyšší teplotu (250ºC) a přepínač času ZEIT
(10) nastavte na provozní teplotu 5 minut.
Po uplynutí pěti minut nechte přístroj alespoň
15minut vychladnout a potom sejměte skleněné
víko (6) ze skleněné mísy (4).
Vyčistěte ještě jednou vnitřek skleněné mísy
(4) vlhkým hadrem. Nyní je přístroj provozu-
schopný.
Při vkládání jídla dávejte pozor na to, že me-
zi jídlem a okrajem skleněné mísy (4) musí
zůstat minimální vzdálenost ca. 1,5cm, aby
mohl vzduch dostatečně cirkulovat. Jen tak
se může vaše jídlo stejnoměrně uvařit.
Nasaďte skleněné víko (6) na skleněnou mísu
(4) a zaklapněte rukojeť směrem dolů. Pokud
rukojeť zůstane nahoře, nedá se přístroj za-
pnout.
Regulátorem teploty TEMPERATUR (9) na-
stavte požadovanou teplotu (max. 250°C) a
regulátor času ZEIT (10) nastavte na požado-
vanou provozní dobu (max. 60 minut). Zelený
ukazatel provozu BETRIEB (7) a žlutý ukazatel
teploty HEIZUNG (8) se rozsvítí.
Po dosažení zvolené teploty zhasne ukaza-
tel teploty HEIZUNG (8) i halogenové topné
těleso (3) a tím i vnitřní osvětlení.
Upozornění: vyberte si dobu vaření a teplo-
tu doporučenou výrobcem v následujících
receptech a v tabulce (doba přípravy). Ale
udané hodnoty času a teplot slouží pouze
pro orientaci a jako pomocné údaje. Pro-
vozní dobu i teplotu můžete měnit i během
vaření.
Pozor! Zbytečně nesundávejte skleněné víko
(6) během vaření, protože tak uniká energie
ven.
Po uplynutí nastaveného času zazní signál
a přístroj se automaticky vypne. Také zhas-
ne ukazatel provozu BETRIEB (7). Sundejte
ochrannou rukavicí skleněné víko (6) a po-
stavte ho do stojánku (11). Rošty (14–16) s
jídlem vyndejte kleštěmi (12).
Pokud chcete jídlo uchovat teplé, otočte ter-
mostat TEMPERATUR (9) dolů a nastavte dobu
trvání!
PRVNÍ UVEDENÍ DO PROVOZU
Spojte síťový kabel (13) se zdířkou na připoje-
ní k síti (2) na skleněném víku a odpovídající
zásuvkou.
Vložte – pokud není v následujících receptech
nebo v tabulce uvedeno jinak – nižší rošt (14)
do skleněné mísy a položte na něj jídlo.
Upozornění: Pokud byste chtěli vařit kom-
pletní jídlo (oběd, večeře), můžete pracovat s
oběma úrovněmi: jednu část jídla (např. zele-
ninu) dejte na parní misku (16), popř. na nižší
rošt (14), jinou část (např. maso) dejte na vyšší
rošt (15).
Dejte ale pozor na to, že různé potraviny mají
různou dobu vaření. Nejdříve dejte suroviny s
delší dobou vaření do skleněné mísy na nižší
rošt (14). Později vložte do mísy vyšší rošt (15)
a položte na něj další potraviny.
3332
CZCZ
FUNKCE PŘÍSLUŠENSTVÍ
Nižší (14) / vyšší (15) rošt: standardní rošt na
opékání, grilování a pečení. Oba rošty mohou
být používány zároveň. Tímto způsobem se mů-
že uvařit celý oběd/večeře najednou.
Parní miska (16): pro vaření zeleniny, ryb a ostat-
ních potravin v páře / dušení
Rozšiřovací nástavec (17):k jednoduchému zve-
dání různých roštů i s jídlem. Kromě toho lze
použít kleště k otáčení jídla.
Víceúčelové kleště (12):K jednoduchému zve-
dání různých roštů včetně na nich ležícího jídla.
Kleště lze použít také k otáčení pokrmů
Stojánek na víko (11): pověste oba zahnuté dr-
žáky na rukojeť přístroje. Na konci můžete po-
hodlně skleněné víko zavěsit do stojánku. Pozor
na kapající vodu!
ČIŠTĚNÍ A FUNKCE SAMOČIŠTĚNÍ
ČIŠTĚNÍ
Vytáhněte zástrčku (13) ze zásuvky a nechte
přístroj vychladnout.
Vyčistěte skleněné víko (6), vnější obal a skle-
něnou mísu (4) měkkým vlhkým hadrem a
jemným čistícím prostředkem – stejně jako
všechny ostatní nástavce (14– 16). Všechny části
nakonec pečlivě vysušte.
Skleněná miska (4) i všechny nástavce (14 – 16)
se mohou mýt v myčce.
Pozor! Topné těleso (3) nikdy neponořujte do
vody nebo do jiných tekutin!
Pozor! Nikdy nemyjte přístroj agresivními čistí-
cími prostředky nebo drsnými čistícími pomůc-
kami. Zbytky potravin odstraňte nylonovou
nebo polyesterovou houbou.
Pozor! Opatrně vyčistěte kryt motoru vlhkým
hadrem, protože ostrý a agresivní čistící pro-
středek může zničit označení stupnice.
Odprýskání stupnice je vyloučeno ze záruky!
SAMOČIŠTĚNÍ
Skleněná mísa (4) může být vyčištěna také me-
todou samočištění:
Skleněnou mísu (4) naplňte až do značky na sto-
jánku (5) (ca. 3,5cm výšky) teplou vodou. Ne-
překračujte prosím udanou hodnotu (3,5 cm).
Přidejte do vody trochu jemného čistícího pro-
středku. Nasaďte skleněné víko (6) na mísu
a zaklapněte bezpečnostní rukojeť (1).
Regulátor teploty TEMPERATUR (9) nastavte do
pozice (samočištění) a regulátor času ZEIT (10)
na 10 minut. Nakonec nechte přístroj vychlad-
nout. Vyprázdněte mísu (4), omyjte ji teplou vo-
dou a pečlivě osušte.
ROZMRAZOVÁNÍ ❆
Chcete rozmrazit hluboko zmrazené potraviny?
Nastavte tedy regulátor teploty TEMPERATUR (9)
do pozice
❆
vždy podle druhu a množství potra-
vin. K tomu vám bohužel nemůžeme dát žádné
směrové hodnoty.
Upozornění: Když budete sledovat potraviny
během rozmrazování, zabráníte tím jejich vysu-
šení. V daném případě zastavte průběh rozmra-
zování, sundejte víko a vyzkoušejte potraviny
rukama.
Jídlo Doba přípravy (ca.)
Teplota
Rošt Tipy & triky
Maso
Masová sekaná 40– 60 minut 200°C nižší Potřít tomatovou
omáčkou.
Karbanátky (4 x 125g) 10 minut 250°C nižší
Vepřová kýta 30–40 minut / 500 g 200 °C nižší
Jehněčí kýta 30– 40 minut / 500g 200°C nižší
Během prvních
15 minut vařit při
250° C.
Ryby
Krevety 5 –10 minut 200 °C nižší Nejprve oloupat
a vyčistit, na jednom
špízu vařit 6– 8 krevet.
Pstruzi (300 g) 15– 20 minut 180 °C nižší/
vyšší Nejprve osolit a
pokapat citronem.
Filet z lososa (250 g) 15– 20 minut 180 °C nižší/
vyšší
Drůbež
¼ Kuřete (250g) 20 minut 180 °C nižší
Podle přání lze v
posledních 10
minutách potřít
medem/marmeládou.
½ Kuřete (500 g) 30 minut 180 °C nižší
1 Celé kuře (1000g) 50 minut 180 °C nižší
Kuřecí prsa s kostí 20– 25 minut 200°C nižší
Před pečením okořenit.
Krůtí prsa 35–50 minut 200 °C nižší
Pečivo
Pečivo-kousky 8 minut 200 °C nižší Na rošt položit
pečící papír a kousky
popř. jednou obrátit.
Keksy 8 minut 240 °C nižší
Housky 10 minut 180 °C nižší
Taco (zmrazené) 5–7 minut 240 °C nižší
Čajové pečivo 15–20 minut 170 °C nižší Použít rozšiřovací
nástavec.
Zelenina
Brambory rozkrájené na
čtvrtky, pečené
30 minut
200 °C nižší Potřít olivovým ole-
jem, osolit a ochutit
rozmarýnem.
Kukuřičné palice (3–4 ks) 15– 20 minut 200 °C nižší
Před přípravou odstra-
nit vlákna, vložit asi
na 15 min. do vody.
Plátky cukety 20 minut 200°C nižší/
vyšší
Vyměnit po 10
minutách a potřít z
druhé strany.
DOBA PŘÍPRAVY TABULKA

3534
CZCZ
PSTRUH V BYLINNÉM ŽUPANU
Přísady:
50 g čerstvých bylinek
(např. kerblík, petrželka a šťovík)
1 snítka čerstvého estragonu
10 g petrželky
sůl
pepř
citrónová šťáva (z 1 citronu)
60 g másla
1 vejce
1 lžička ostré hořčice
2 polévkové lžíce strouhanky
500 g pstruha (odpovídá 2 ks),
bez hlavy a ocasu
Ještě potřebujete:
alobal
Postup:
Vyperte, omyjte a usušte bylinky. Nasekejte na-
jemno 50g směsi z bylinek. Vyšlehejte máslo,
vejce a hořčici do pěny. Smíchejte nasekané
bylinky a strouhanku. Osolte a okořeňte podle
chuti.
Umyjte pstruhy a lehce je osušte. Zvnitřku i zven-
ku pstruhy potřete solí a do břišní dutiny vložte
snítku estragonu a petrželky. Kůži nařízněte na
pruhy vždy 2 cm od sebe a dovnitř nakapejte
citrónovou šťávu.
Na vyšší rošt (15) položte alobal a na něj pstru-
hy. Stejnoměrně je potřete bylinkovým más-
lem.
Regulátor teploty TEMPERATUR (9) nastavte na
180°C a přepínač času ZEIT (10) na 20–25mi-
nut.
K tomu se hodí:
Pečené brambory: Zpola uvařené brambory
zabalte do alobalu a položte je na parní misku
(16) pod pstruha.
RECEPTY (Všechny údaje množství jsou pro dvě osoby.)
PLNĚNÉ CUKETOVÉ LODIČKY
Přísady:
2 cukety (à 180 g)
1 červená feferonka
1 šalotka
2 plátky sušené šunky
1 lžíce olivového oleje
2 snítky rozmarýnu
2 snítky petrželky
sůl
pepř
180g ovčího sýra
Ještě potřebujete:
1 pánev
Postup:
Cuketu opláchněte, rozřízněte napůl, vydlabejte
dužinu a nakrájejte na kostičky. Omyjte feferon-
ku, podélně rozřízněte, odstraňte jádra a také
nakrájejte na kostičky. Šunku a šalotku nakrájejte
na tenké proužky, bylinky nasekejte.
Na jedné lžíci oleje orestujte na pánvi šalotku,
feferonku, šunku a na kostičky nakrájenou cu-
ketu (3–4 minuty). Pak přidejte bylinky a pánev
odstavte z ohně.
Nechte okapat sýr, nakrájejte jej také na kostky a
přidejte do zeleniny. Osolte a opepřete jen obě
půlky cuket a naplňte je směsí ze zeleniny a sýra.
Naplněné půlky cuket položte na nižší rošt (14)
do skleněné mísy.
Regulátor teploty TEMPERATUR (9) nastavte na
200°C a regulátor času ZEIT (10) na 15 minut.
K tomu se hodí:
Veka nebo rýže.
ZELENINOVÝ HAMBURGER
Přísady:
Na zeleninový hamburger:
250 g zeleniny
(cukety, mrkve, atd.)
1 brambor
½ cibule
3 lžíce strouhanky
sůl
pepř
2 lžičky ostré hořčice
Hamburger s oblohou
4 malé celozrnné housky,
popř. 2 velké celozrnné housky
1 rajče
¼ salátové okurky
trochu salátu
Ještě potřebujete:
papír na pečení
(zabraňuje připečení)
Postup:
Oloupejte / očistěte zeleninu a brambory a na-
hrubo je nastrouhejte. Cibuli nakrájejte najemno.
Pak vše smíchejte se strouhankou, osolte a do-
chuťte pepřem a 2 lžičkami ostré hořčice. Vy-
tvořte 4 malé, nebo 2 malé karbanátky tak, aby
okraje byly hladké.
Položte je na vysoký nástavec (15) – můžete je
také podložit papírem na pečení, aby se karba-
nátek nepřilepil na nástavec.
Regulátor teploty TEMPERATUR (9) nastavte na
200ºC a časový spínač ZEIT (10) na 25 minut.
Během pečení karbanátky jednou obraťte.
Omyjte rajče a okurku a nakrájejte je na plátky.
Na spodní část rozkrojené housky položte list sa-
látu, na něj zeleninový karbanátek, plátky rajčete
a okurky. Pak všechno zakryjte druhou půlkou
housky.
Podle chuti můžete zjemnit váš hamburger hoř-
čicí, rajčatovou omáčkou nebo pestem.
PŠTROSÍ VEJCE
Přísady:
2 vejce
1 bílek
150g mletého masa
2 lžíce nasekaných bylinek
1 malá červená cibule
špetka soli
špetka pepře
50g strouhanky
Ještě potřebujete:
hrnec s vodou nebo vařič na vejce
papír na pečení
Postup:
Uvařte vejce (natvrdo) a oloupejte je.
Nakrájejte cibuli na kostičky a smíchejte ji s
mletým masem, čerstvými bylinkami, bílkem,
solí a pepřem. Směs rozdělte na dvě části a
rukama zformujte dvě placičky. Na každou po-
ložte jedno vejce a zabalte je do masové smě-
si. Nakonec obě vaječné koule obalte pečlivě
ve strouhance.
Na nižší rošt (14) položte pečící papír a na něj
obě koule.
Nastavte regulátor teploty TEMPERATUR (9) na
190°C a přepínač času ZEIT (10) na 20 – 25mi-
nut.
Obě koule během pečení obraťte.
K tomu se hodí:
Salát s jogurtovým přelivem: Omyjte a nakrá-
jejte salát, okurky, rajčata atd. podle chuti.
Na jogurtový přeliv smíchejte 50 g jogurtu,
hořčici, ½ – 1 citron (podle chuti), 1 lžíci naseka-
ných bylinek, sůl a pepř. Pokud je zálivka příliš
hustá, přidejte mléko.

3736
CZCZ
SLADKÝ RÝŽOVÝ NÁKYP
Přísady:
250 ml mléka
100 ml vody
3 lžíce cukru
1 lžička másla
nebo margarínu
špetka soli
kůra z 1 citronu
80g g mléčné rýže
3 vejce
½ balíčku vanilkového cukru
2 lžíce strouhanky
1 jablko
50g rozinek
Ještě potřebujete:
formu na rýžový nákyp
trochu tuku na vymazání a trochu mouky
na vysypání formy
Postup:
Mléko s máslem (popř.margarínem), solí a citró-
novou kůrou přiveďte k varu. Nechte v něm asi
30 minut nabobtnat rýži.
Jablko oloupejte, zbavte jádřince a nakrájejte na
malé kousky. Oddělte žloutek od bílků. Z bílků
a jedné lžíce cukru ušlehejte sníh. Žloutky smí-
chejte se 2 lžícemi cukru a vanilkovým cukrem.
Žloutkovou směs, strouhanku, kousky jablek a
rozinky vmíchejte do prochladlé rýže. Vše dů-
kladně promíchejte a nakonec lehce vmíchejte
sníh z bílků.
Hmotu vlijte do vymazané a vysypané formy a
tu postavte na nižší rošt (14).
Nastavte regulátor teploty TEMPERATUR (19) na
180ºC a regulátor času ZEIT (10) na 30–35mi-
nut.
Tip k servírování:
Na hotový nákyp dejte trochu skořice. To mu
dodá obzvlášť lahodnou chuť.
RYCHLÝ CHŘESTOVÝ DORT
Přísady:
300 g zeleného chřestu
150 ml osolené vody
100g celozrnného toustového chleba
(asi 6 plátků)
1 vejce natvrdo
50g kerblíku
100 ml mléka
50 ml šlehačky
2 vejce
sůl
pepř
50g strouhaného sýra
Ještě potřebujete:
1 hrnec
2 koláčové formy (nebo: alobal)
Postup:
Chřest očistěte, oloupejte a vařte v osolené vodě
asi 10 minut. Nechte ho dobře odkapat. Pokud
chřest nechcete vařit, můžete použít naložený
chřest – ten také nechte důkladně odkapat.
Formu na nákyp vyložte plátky celozrnného tous-
tového chleba. Pokud nemáte žádné mělké náky-
pové formy, můžete si sami udělat odpovídající
formy z alobalu s okrajem asi 1,5 cm.
Chřest rozkrojte napůl a rozdělte ho na plátky
toustového chleba. Vajíčko uvařené natvrdo i
kerblík nasekejte a nasypte na chřest i mezi něj.
Rozmíchejte mléko a smetanu s vejci, osolte a
opepřete. Touto hmotou polijte chřest a postrou-
hejte sýrem
Jednu formu postavte na nízký nástavec (14),
druhou na vysoký nástavec (15) do skleněné mí-
sy. Horní formu přikryjte alobalem, aby se sýr ne-
připekl. Regulátor teploty (9) nastavte na 200ºC
a časový spínač ZEIT (10) na 30 minut. Formy asi
po 12 minutách vyměňte.
nebo:
nakládaný chřest
Přísady:
Piškot:
2 vejce
2 lžíce teplé vody
50g cukru
na špičku nože citrónové kůry
špetka soli
50g mouky
25g škrobové moučky
Krém:
2 vejce
½ lusku vanilky
7 plátků želatiny
500 g tučného tvarohu
šťáva a kůra
z jednoho citronu
20g cukru
2 lžíce minerální vody
špetka soli
2 kiwi
1 červený pomeranč
Ještě potřebujete:
dortová forma (ø 24– 26 cm)
papír na pečení
spodní část a kruh z dortové formy
Postup:
Piškot: Oddělte žloutky od bílků na piškot. Vy-
šlehejte do pěny žloutky a 2 lžíce teplé vody,
postupně přidávejte cukr a citrónovou kůru.
Prosijte mouku a prášek do pečiva a vmíchejte
do žloutkové hmoty. Ušlehejte sníh z bílků a
soli a opatrně vmíchejte do těsta.
Hmotu dejte do formy vyložené pečícím pa-
pírem a postavte ji na nižší rošt (14). Umístěte
na skleněnou mísu rozšiřovací nástavec (17) a
přikryjte víkem.
Nastavte regulátor teploty TEMPERATUR (9) na
170°C a přepínač času ZEIT (10) na 15–20mi-
nut.
Po této době piškot vyndejte a nechte ho vychla-
dit. Pak postavte piškot na dortový tác a uzavřete
ho kolem dokola dortovým kruhem.
Krém: Oddělte žloutky od bílků a nechte na-
močit želatinu. Vymíchejte krém z tvarohu,
žloutků, dřeně z lusku vanilky, citrónové šťávy
a kůry, cukru a minerální vody (asi 3 minuty).
Vymačkejte želatinu, postupným zahříváním
(ne k bodu varu) v parní lázni ji rozpusťte a
zamíchejte pomalu do krému. Ten nechte asi
20 minut stát, aby želatinu ztuhla.
Ušlehejte sníh z bílků a soli a zamíchejte do kré-
mu. Hmotu naneste na piškot a nechte asi 4ho-
diny vychladit.
Oloupejte kiwi a nakrájejte je na plátky. Olou-
pejte také pomeranč a rozdělejte ho na men-
ší kousky. Dort obložte ovocem krátce před
servírováním – tak má ovoce nejlepší chuť.
Tipy & triky
Pečení koláčů v
horkovzdušné troubě BHG 206
Pokud chcete péct koláče a dorty podle vlast-
ního receptu, držte se následujících rad:
Nasaďte rozšiřující nástavec (17) na skleně-
nou mísu (4).
Zvolte teplotu (9) asi o 5% nižší než v nor-
mální troubě, např. místo 170°C jen 160°C.
I přes nižší teplotu se vaše pečivo upeče rych-
leji
.
Při prvním pečení můžete zkusit špejlí, jestli
je už váš koláč propečený. Píchněte do středu
koláče. Pokud se těsto na špejli nenalepí, je váš
koláč hotový!
TVAROHOVÝ DORT S KIWI A ČERVENÝM POMERANČEM

3938
CZ
ZÁRUČNÍ LIST
Pro záruku začínající dnem prodeje spotřebiče platí pro země EU (i Českou republiku) a
Švýcarsko tyto podmínky:
Na tento spotřebič poskytujeme 2 roky záruku na nedostatky, které jsou označeny jako
výrobní chyby nebo chyby materiálu. Záruční doba začíná dnem prodeje a je uznána po
předložení záručního listu a dokladu o zaplacení. Jiné nároky neuznáváme.
1. Trvání záruky: 2 roky
2. Poskytování záruky:
a) záruční opravu provedeme podle našeho
zvážení opravou nebo výměnou vadných
dílů, jestliže tyto závady vznikly prokazatelně
vadou materiálu nebo chybou při výrobě.
b) záruční oprava bude provedena jen při
předložení tohoto záručního listu a dokladu
o
zaplacení.
c)
záruku mohou uplatnit pouze první majitelé
spotřebiče.
d) jestliže dojde k opravě nebo výměně
spotřebiče v záruční době, záruční doba
se prodlouží.
e) poplatky za dopravu hradí kupující.
f) v případě, že se závada nebo škoda nedá
odstranit, nebo se překročí doba servisního
zásahu (30 dnů), bude spotřebič vyměněn
za nový, nebo vráceny peníze v prodejně,
kde byl spotřebič zakoupen.
3. Záruka se nevztahuje na případy:
poškrábání nebo eky na spotřebiči a na
světelné kontrolky nebo žárovky a na moto-
rové kartáče.
na lehce rozbitné díly z bakelitu, skla, plastů
apod., pokud se nejedná o chybu materiálu.
poškození jako následek chybné instalace
nebo upevnění.
kdy je spotřebič zapojen do sítě s vyšším
napětím než je na spotřebiči uvedeno.
chybného nebo neodpovídajícího použití.
nedbalosti při používání.
upadnutí spotřebiče nebo jeho jednotlivých
částí.
nevhodného transportu nebo nedostateč-
ného zabalení.
4. Záruka zaniká:
při použití spotřebiče jinak než v domácnosti.
při provádění opravy nebo změny na spot-
řebiči osobou jinou než pověřenou naším
servisem.
razítko a podpis prodávajícího datum prodeje
Důležité ! Prosím, napište si FD kód, který je
umístěný na štítku:
Model:
D
Notizen
GB
Notes
F
Notes
I
Note
CZ
Poznámky
Other manuals for BHG 206
2
Table of contents
Languages:
Other BIELMEIER Convection Oven manuals


Popular Convection Oven manuals by other brands


Bakers Pride
Bakers Pride Cyclone CO11-G Installation and operating instructions

Oster
Oster TSSTTVPZDA user manual

Wolf
Wolf WKG ML-126620 owner's manual

Wolf
Wolf WKECX1 Specification sheet

Electrolux
Electrolux AOS061E Series Installation, operation and maintenance

Inoksan
Inoksan INOSMART INO-FBG010 instruction manual


