Bignay Gi Fly User manual
Owner’s
Manual
1st Edition
© 2017 Bignay Inc.


Gi Fly Owner’s Manual
1st Edition, 2017
This Manual meets ISO-4210 and 16 CFR 1512 standards.
IMPORTANT:
This Manual contains important safety, performance, and service information. Read this
Manual in its entirety before you take the rst ride on your new Gi Fly, and keep it for
future reference.
Additional safety, performance, and service information may also be available for specic
components such as the belt drive or pedals on your bicycle, or for accessories such as
helmets or lights that you purchase.
If you have any questions or do not understand something, take responsibility for your
safety and consult with your dealer or the bicycle manufacturer, Bignay Inc.
This Manual is not intended as a comprehensive use, service, repair, or
maintenance manual. Please see your dealer or Bignay Inc. for all service,
repairs, or maintenance. Bignay Inc. or your dealer may also be able to
refer you to classes, clinics, and books on bicycle use, service, repair, or
maintenance.
Note

Dear friend,
Thank you for your support and congratulations on the purchase of your Gi Fly. We welcome you
to the Gi Fly Family!
This Manual will serve as your guide for proper usage. It will explain features and functions, as well
as provide useful tips with regards to maintenance.
It is our hope that your Gi Fly provides you with the freedom to move, interact, connect and enjoy
your commute.
As a member of our community, we invite you to engage in meaningful conversations with us.
Please do not hesitate to reach out to us with any comments, questions, and concerns. Just email
us at contact@giybike.com. We are here to help.
All the very best,
Lucas Toledo Agustín Augustinoy Eric Sevillia
PS: Be sure to follow us on Facebook, Instagram, Twitter, and YouTube!
3

Table of contents
4
Letter from the Founders
Table of contents
1. Quick start guide
2. General warnings
3. Laws and regulations
4. A special note for parents
5. Modications and renishing
6. Fitting your Gi Fly
A. Saddle position
i. Adjusting saddle height
ii. Front and back adjustment
B. Handlebar height and angle
C. Brake position adjustments
7. Pre-ride steps
A. Mechanical safety check
B. First ride
8. Safety
A. The basics
B. Riding safety
C. Wet weather riding
D. Night riding
9. Getting to know your Gi Fly
A. General overview
B. Gi Fly System Serial Number
C. Activating your Gi Fly
D. Using your USB key for the rst time
E. Folding mechanism
i. Folding your Gi Fly - Beginner
ii. Folding your Gi Fly - Expert
iii. Unfolding your Gi Fly - Beginner
iv. Unfolding your Gi Fly - Expert
v. Moving your folded Gi Fly
vi. Adjusting your folding mechanism and eliminating “play” between
the front and rear parts of the bike.
F. LED lights
G. Gi Fly’s smart locking system
i. Managing the locking mechanism via the Gi Fly mobile app
3
4
6
11
13
14
15
16
16
17
18
19
20
21
21
22
23
23
24
26
26
28
28
28
29
31
33
33
34
36
37
37
38
40
40
41

5
ii. Locking/Unlocking Gi Fly using the Gi Fly mobile application
iii. Managing the locking mechanism via the USB key
H. Charging your phone with Gi Fly
10. Hardware
A. Battery
i. Cautions
ii. Knowing when to charge your Gi Fly
iii. Care and maintenance of your LifePo4 battery
iv. Proper charging sequence
B. Brakes
i. Brake controls and feature
ii. How brakes work
C. Motor
i. Maximizing your motor and battery’s performance and reliability
D. Rear mudguard
E. Belt drive
i. How to regulate the belt tension
F. Solid tires
G. Saddle
H. Cell phone holder
I. Pedals
11. Cleaning and preventing corrosion
A. Removing and installing wheels or brake pads/discs
12. Service
A. Service intervals
B. If your bicycle sustains an impact
13. Warranty
14. Troubleshooting
A. I am having trouble folding and unfolding the bike
B. I am having trouble with the Gi Fly mobile application
C. I am unable to charge my Gi Fly
D. I am unable to pedal
E. I am unable to brake
F. My belt drive has fallen out of place
G. My motor is not working
H. My cell phone holder is not functioning properly
I.The bike folds a little at the hinge when I use the brakes.
Appendix A
Appendix B
Appendix C
41
42
43
44
44
45
45
46
47
50
51
51
52
53
54
54
55
56
57
57
59
60
60
61
61
63
64
65
65
66
71
71
71
71
72
72
72
73
74
78
6
1
Quick start guide
Read these instructions carefully or use the following link
to watch a demonstration:
http://giybike.com/videos/quickstart-giy.mp4
Remove the small boxes within the large
box. The smaller boxes contain the bike’s
charger, pedals, cellphone holder, reec-
tors, as well as the tools for assembly.
1 |
2 |
3 |
4 |
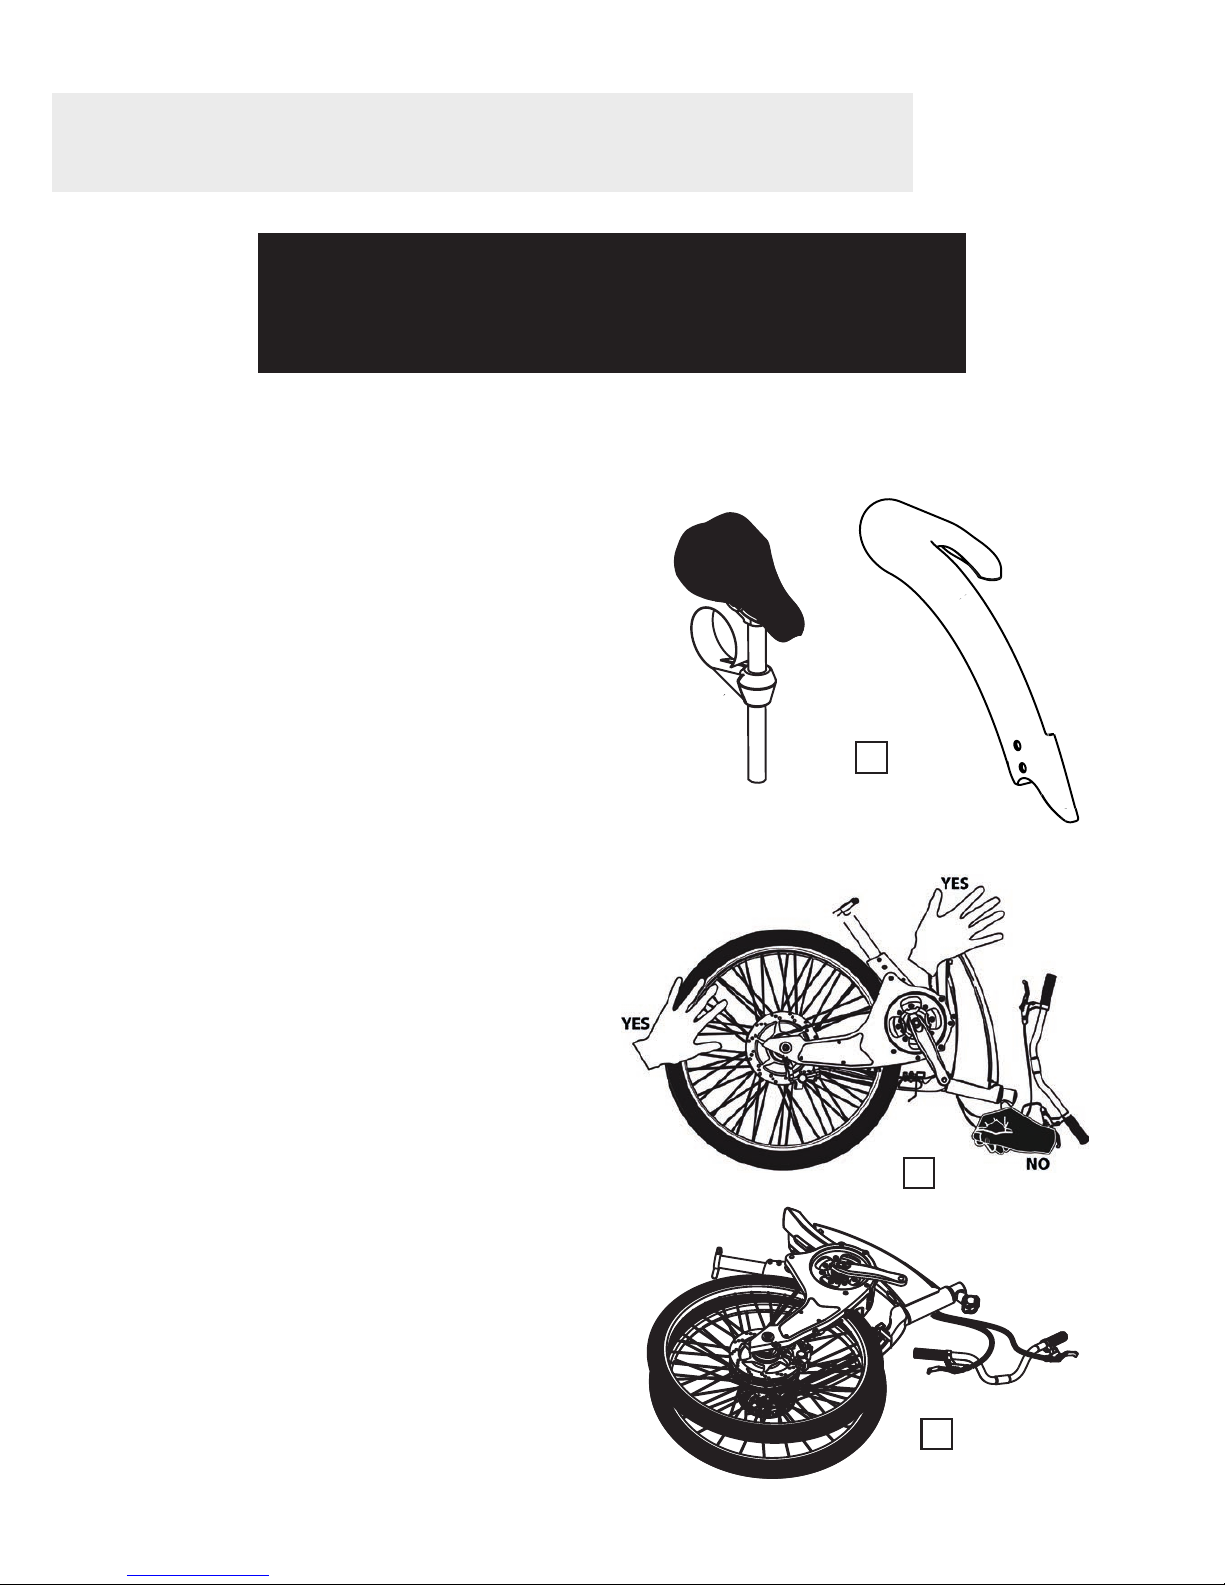
Unpacking the box.
Remove the seat and seatpost, the rear
mudguard, and rear light from the box.
These parts will arrive unattached to the
bike. We will assemble them shortly (see
image A).
Remove the bike and handlebars from the
box. The handlebars will be attached to the
folded bike by wires. For this reason, it is
important to take the bike out by grabbing
onto the wheels and frame of the bike. Do
not pull any of the wires in an attempt to
take out the bike (see image B).
Lay the bike on the ground on its side, in the
same position that the bike was in while in
the box. We will assemble the handlebars
onto the bike shortly (see image C).
A
B
C

7
5 |
6 |
Do not attempt to unfold the bike at this point in time!
Caution
Assembling your Gi Fly
Put the seatpost on the folded bike. Slide the tube of the seatpost halfway into the
seat tube. Once you have inserted the seatpost tube, securely fasten the clasp on
the bike tube (refer to section 6.A.i of the Gi Fly manual for further instruction). Don’t
worry about the height of the seatpost – we are not tting you to your Gi Fly at this
point. We are putting the seatpost onto the bike so that it can stand while in its folded
position (see image D).
D
Stand the bike in its folded position. Now
that you have attached the seatpost and
saddle you can stand the bike up in its fold-
ed position. To do this, balance the bike on
the back of the saddle and on its two wheels
(See image E).
E

8
7 |
8 |
9 |
Attach the handlebars to the stem. Get the
box with the tools. In this box you will nd 4
M5 screws as well as a 3-ended allen wrench
(See image F).
Fasten the handlebars onto the bike. Make
sure that the wires are not tangled and that
the handlebars are in their correct position.
Fasten the stem screws to 9.8 newtons or
until the handlebars do not move. Be care-
ful not to strip the threads and make sure
that the center of the handlebar lines up
with the center of the frame (See image G).
To unfold your bike, stand on the LEFT side of the bike, with your left hand on the left handle
grip.
• Slide the stainless steel button on the folding lever upwards so that the lever pops
out of the frame (see image H).
• Make sure that the left pedal crank is not interfering with the bike’s front wheel
(see image I).
• Push the front wheel forward with your left hand on the left grip while simultaneously
pulling the back wheel up and backwards using your right hand on the lever (see
image J).
• Push the folding lever back down into the frame and slide the stainless steel button
down to secure the lever and lock the folding mechanism (see image K).
Unfolding your Gi Fly for the rst time
F
G
H
I
J
K

9
10 |
11 |
12 |
Attach the rear light. Now that the handlebars are attached you can go ahead and attach the
rear light. Connect the cable of the rear light (ensure the colors match) which you can nd
on the right side of the bike, to the cable dangling below the seatpost and next to the front
sprocket (see image L).
Use the 2 M6 screws and the 3-ended allen wrench (which you can nd in the small box with
the rest of the tools) to attach the rear light component to the frame. Fasten this component
securely (see image M ).
L M
Attaching the pedals
Attach the pedals to the bike. Take a look at
the screws of both pedals –one is inscribed
with an “L” (indicating that this pedal goes
on the left side of the bike) and the other
has an “R” (indicating that this pedal goes
on the right side of the bike). Screw the left
pedal in counterclockwise and the right
pedal in clockwise (see image N).
L R
N
Attaching the cellphone holder
Attach the cellphone holder.
Follow the instructions on the cell phone
holder box (see image O). O
13 |
14 |
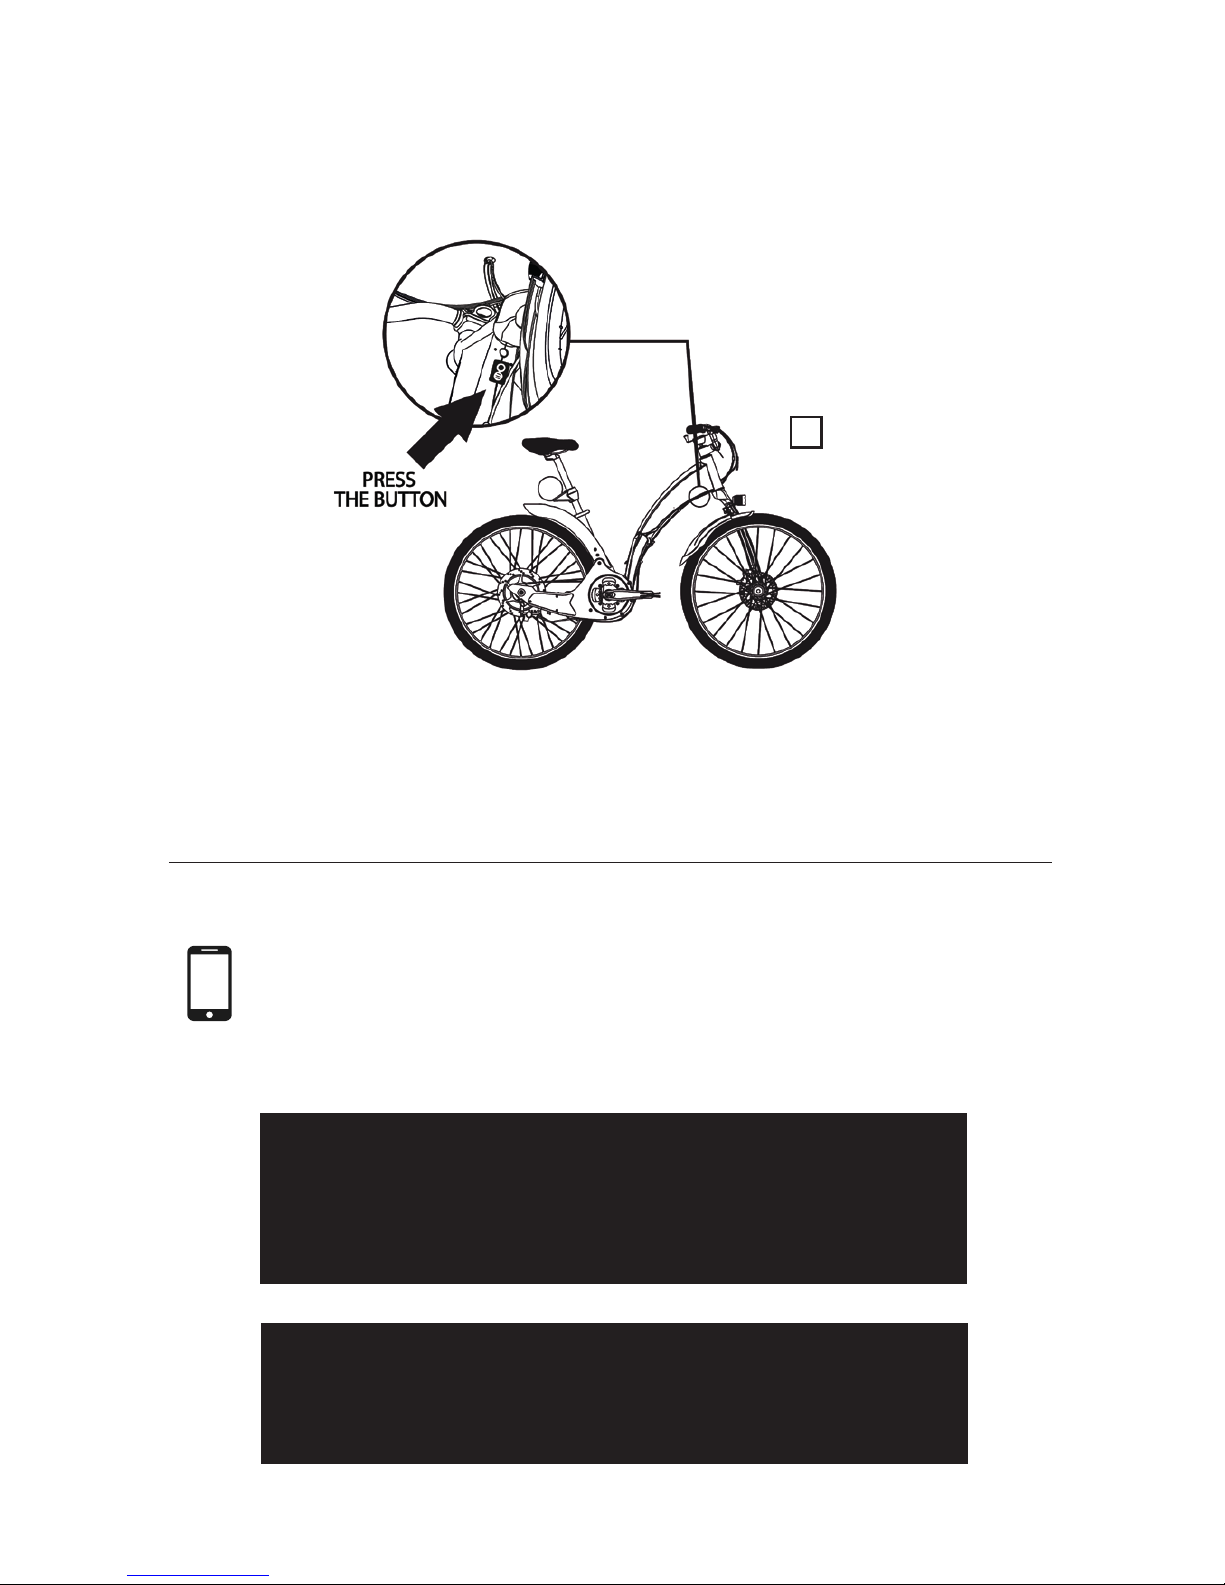
Turning on the bike
Turn on the battery. Press the button on the underside of the frame (see image P).
10
In order to add reectors, refer to appendix C of the manual to determine which ones you
much attach to your bike (dierent reectors are required by dierent countries). Choose
from the selection of reectors in the box appropriately.
Head to Section 11.C in the manual for detailed instructions.
Activate your Gi Fly via the Gi Fly mobile app
Read the manual in its entirety before
heading out for your rst ride.
Warning
P
Note
Be sure to charge your Gi Fly upon receiving your
bike! You cannot actvate the bike without rst
having charged your battery.
2
11
DISCLAIMER, COPYRIGHTS AND TRADEMARKS
Like any sport, bicycling involves risk of injury and damage. By choosing to ride a bicycle, you
assume the responsibility for that risk, so you need to know and to practice the rules of safe
and responsible riding and of proper use and maintenance. Proper use and maintenance of
your bicycle reduces risk of injury. This Manual contains many “Warnings” and “Cautions” con-
cerning the consequences of failure to maintain or inspect your bicycle and of failure to follow
safe cycling practices.
The combination of the safety alert symbol and the word WARNING indicates a potentially
hazardous situation which, if not avoided, could result in serious injury or death.
The combination of the safety alert symbol and the word CAUTION indicates a potentially
hazardous situation which, if not avoided, may result in minor or moderate injury, or is an alert
against unsafe practices.
The word CAUTION used without the safety alert symbol indicates a situation which, if not avoid-
ed, could result in serious damage to the bicycle or the voiding of your warranty.
Many of the Warnings and Cautions say “you may lose control and fall.” As any fall may result in
serious injury or even death, we do not always repeat the warning of possible injury or death.
Because it is impossible to anticipate every situation or condition which can occur while riding,
this Manual makes no representation regarding the safe use of the bicycle under all conditions.
There are risks associated with the use of any bicycle which cannot be predicted or avoided, and
which are the sole responsibility of the rider.
It is extremely dangerous to use the Gi Fly mobile app while riding.
Such behavior could result in serious injury and even death. Find a
safe place to stop pedaling in order to congure the settings of the
Gi Fly mobile app.
Warning
Disclaimer
Hey! Gi Fly features are operated via the Gi Fly mobile app. They cannot be operated
manually. You may nd the app in the App Store for iOS and on Google Play for Android.
General warnings
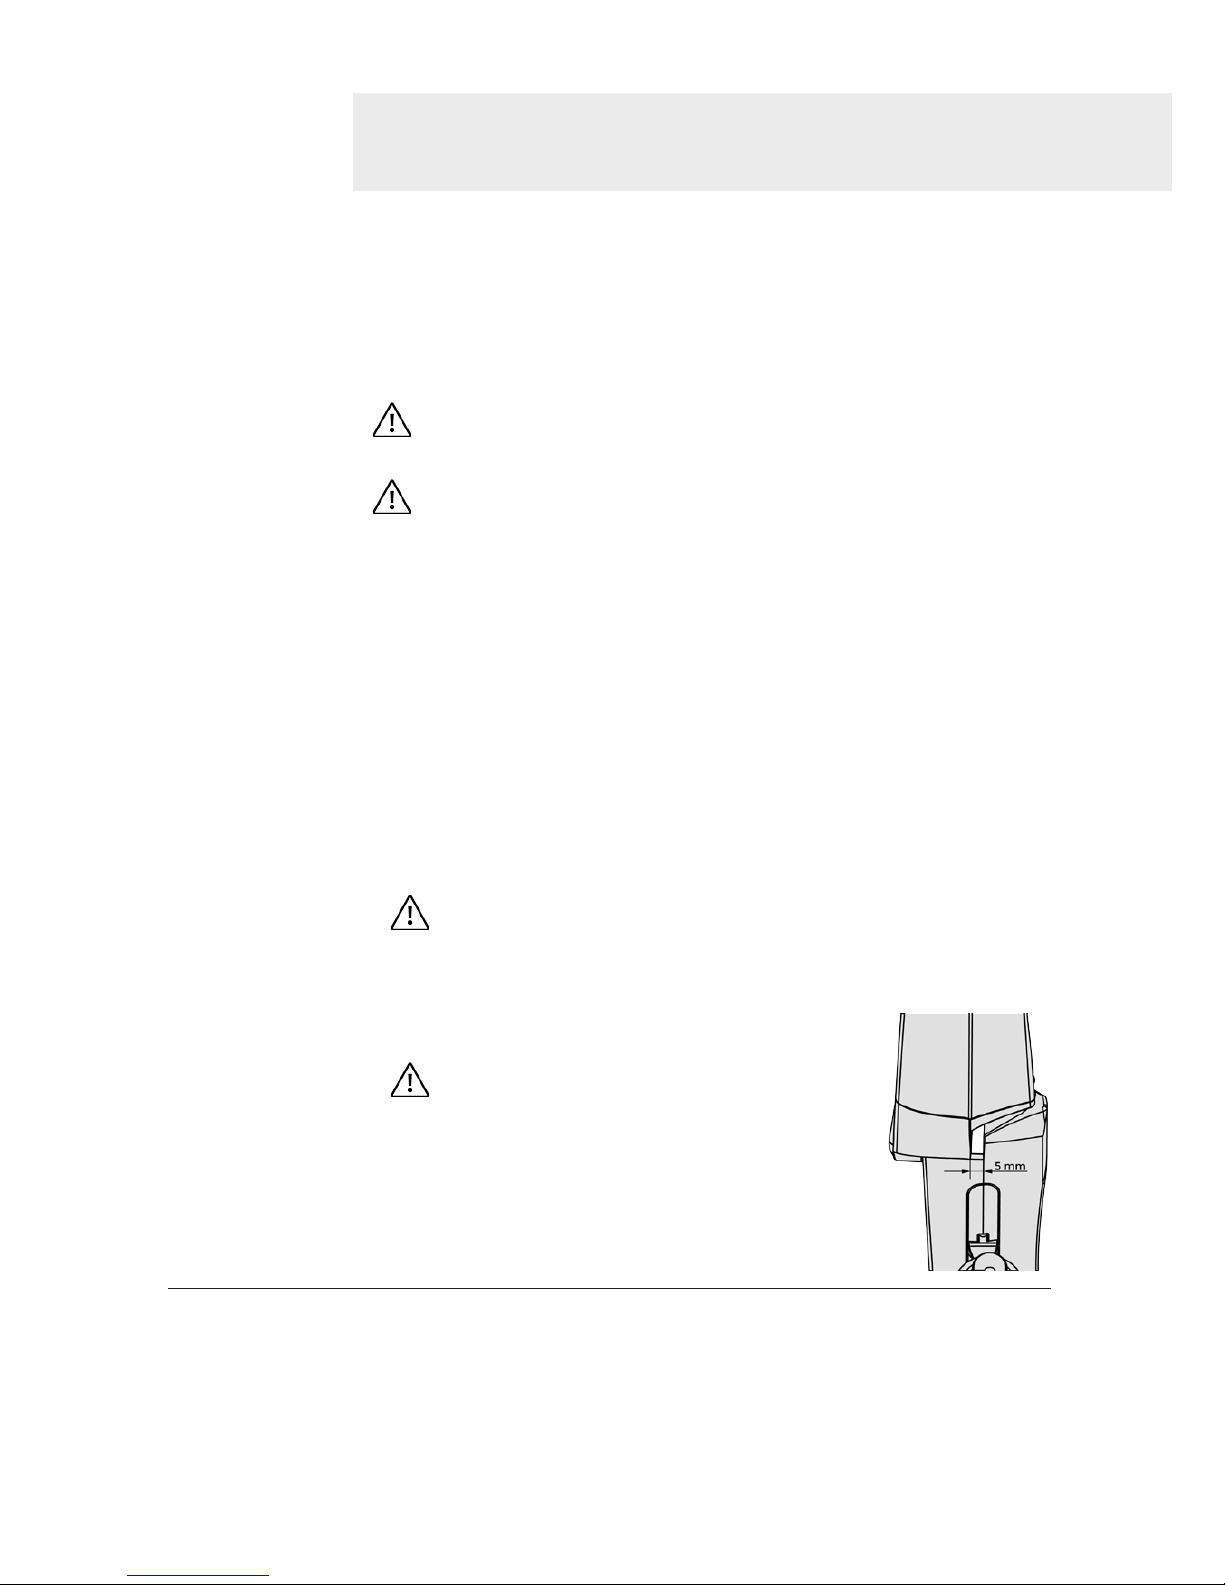
If your frame begins to separate and the
distance grows larger than 5 mm, as seen in
the picture to the right, then you must stop
riding your bike immediately. Contact your
retailer or Bignay to contact@giybike.com.
Warning

The specications, information, and performance of Gi Fly and other products manufactured by,
sold under license, granted by, and featured in this document by Bignay Inc. may change without
notice. The use of this information or products and the conditions under which the products are
used are the sole responsibility of the buyer and/or the rider. It is the buyer’s and/or rider’s re-
sponsibility to determine the correct and safe selection of settings and conditions of use of the
products and to periodically check the products for secure and proper operation. To the extent
that the law permits, any liability which may be incurred as a result of the use of a product manu-
factured by or sold under license granted by Bignay is limited to the cost of repairing or replacing
the failed product or component at the discretion of Bignay, either within or outside of warranty
periods, and does not extend to any loss or damage which may be caused as a consequence of
misuse or failure of the products. Damages to the product, other property, or any persons are
the responsibility of the buyer and/or rider. By using this product manufactured by or sold under
license granted by Bignay, you are stating that you have read this disclaimer and agree to hold
Bignay, its owner(s) and any of its employees or directors free from all liabilities, that you agree
you are using and operating the product at your own risk, and that no warranties or guarantees
are made by Bignay Inc., expressed or implied, on performance or operation.
Attention
Electric powered bike/e-bike
The product has been found compliant with the requirements of the following standards for
bicycles: “CPSC 16 CFR 1512 according to the CPSC Bicycle Compliance Test Manual (1976)” and
“ISO 4210:2015 according to the ISO Cycles-Safety requirements for bicycles (2015E). Electrical
components comply with international safety certications UN 38.3, MSDS, FCC, CE and RoHS.
Copyright notice
© Copyright Bignay Incorporated. All rights reserved.
This material provided by Bignay Inc. is the property of Bignay Inc. and is protected by copyright,
trademark, and other intellectual property laws. You may view this material and print this material
only for personal use, provided that you maintain all copyright, trademark, and other proprietary
rights or notices. You may not otherwise use, reproduce, store, post, broadcast, transmit, modify,
sell, or make available to others or the public, content from this material without the prior written
approval of Bignay Inc.
Trademarks
Gi Fly® is a registered trademark of Bignay Inc.
Gi Fly™ is a trademark of Bignay Inc.
Bignay® is a registered trademark of Bignay Inc.
The trademarks and logo may not be used without the prior written approval of Bignay Inc.
goo.gl/m3l6Mo goo.gl/FBm9Zy
12

13
3
Laws and regulations
Do not violate local laws. Do not ride on the highway, metro station, or any public place where
e-bikes or bikes are not allowed. Electric-powered bikes are under the protection of the trac
laws. When available, ride your bike in the special lane designated for biking. The speed of the
e-bike will uctuate and the maximum speed is 25 km/h with the electric assistance. In some
countries or regions, some featured e-bikes should meet the following standards:
• Lighting system is necessary: front lamps
should be white and rear lamps should be red.
• A ring bell.
• Reectors: please see Appendix C to identify
the proper use and application of your reectors.
The maximum power is 250 W, with a maximum speed of 25km/h
with the electric assistance. A helmet, license, and insurance may
be required when riding in your location. This is the responsibility
of the owner of the bike.
Safety is always the rst priority even
if the speed is within 25 km/h.
Electric-powered bikes are not allowed to carry other people.
Please keep children away from the bike.
Manufacturers, distributors, and retailers are not responsible for
abuse, such as improper repair or overload.
This electric-powered bike is not designed for bearing excessive
weights. Certications were acquired through tests conducted
with a 100 kg rider. Thus, 100 kg is our recommended weight limit
for Gi Fly. That is, the product is ensured for riders up to 100 kg.
Warning
Warning
Warning
Warning
Warning

4
As a parent or guardian, you are responsible for the activities and safety of your minor child,
and that includes making sure that the bicycle is properly tted to the child; that it is in good
repair and safe operating condition; that you and your child have learned and understand
the safe operation of the bicycle; and that you and your child have learned, understand, and
obey not only the applicable local motor vehicle, bicycle and trac laws, but also the common
sense rules of safe and responsible bicycling. As a parent, you should read this Manual, as well
as review its warnings and the bicycle’s functions and operating procedures with your child,
before letting your child ride the bicycle.
Make sure that your child always wears an approved bicycle hel-
met when riding; but also make sure that your child understands
that a bicycle helmet is for bicycling only, and must be removed
when not riding. A helmet must not be worn while playing, in play
areas, on playground equipment, while climbing trees, or at any
time while not riding a bicycle. Failure to follow this warning could
result in serious injury or death.
A special note for parents
Warning
14

5
15
Modications and renishing
Modications can cause damage which can increase the risk of failure and accident which may
result in serious injury or death. Renishing can hide structural damage, such as fatigue cracks or
structural problems which may also result in an accident.
There are many components and accessories available to enhance the comfort, performance, and
appearance of your bicycle. However, if you change components or add accessories, you do so
at your own risk. The bicycle’s manufacturer may not have tested the specic component or ac-
cessory for compatibility, reliability, or safety on your bicycle. Before installing any component or
accessory, including but not limited to a dierent size tire, a lighting system, a luggage rack, a child
seat, a trailer, etc., make sure that it is compatible with your bicycle by checking with your dealer
or with Bignay Inc. Be sure to read, understand, and follow the instructions that accompany the
products you purchase for your bicycle.
See also Appendix A for proper usage of your Gi Fly.
Do not modify or renish your Gi Fly or any of Gi Fly’s components
in any way. Such modications or renishing will void any applica-
ble warranty and could pose a serious threat to the rider.
Failure to conrm compatibility, properly install, operate, and
maintain any component or accessory can result in serious injury
or death.
Exposed springs on the saddle of any bicycle tted with a child
seat can cause serious injury to the child.
Changing the components on your bike with those other than
genuine replacement parts may compromise the safety of your
bicycle and may void the warranty. Check with your dealer or with
Bignay Inc. before changing any components of your bike.
Warning
Warning
Warning
Warning

6
Correct t is an essential element of bicycling safety, performan-
ce and comfort. Making the adjustments to your bicycle which
result in correct t for your body and riding conditions requires
experience, skill and special tools. Always have your dealer or local bike
shop make the adjustments on your bicycle; or, if you have the experien-
ce, skill and tools, have your dealer or local bike shop check your work
before riding.
Caution
A — Saddle position
Saddle screws are appropriately fastened when torque force is equal to
9.8 Nm. Please be considerate of this specication and use the proper
tools to achieve this torque. If necessary, see your local bike mechanic.
Warning
Correct saddle adjustment is an important
factor in getting the most performance and
comfort from your Gi Fly. If the saddle po-
sition is not comfortable for you, see your
dealer or local bike shop. Alternatively, you
can attempt to t your bicycle:
• Sit on the saddle.
• Place one of your feet on the appropriate
pedal (see Img.1).
• Rotate the crank until the pedal with your
heel on it is in the down position and the
crank arm is parallel to the seat tube (see
Img.1).
If your leg is not completely straight, your
saddle height needs to be adjusted. If your
hips must rock for the heel to reach the
pedal, the saddle is too high. If your leg is
bent at the knee with your heel on the
pedal, the saddle is too low. Img. 1
Fitting your Gi Fly
16
17
i. Adjusting saddle height
Ask your dealer or local bike shop to set the saddle for your optimal riding position and to show
you how to make this adjustment. Please follow the instructions below if you choose to make your
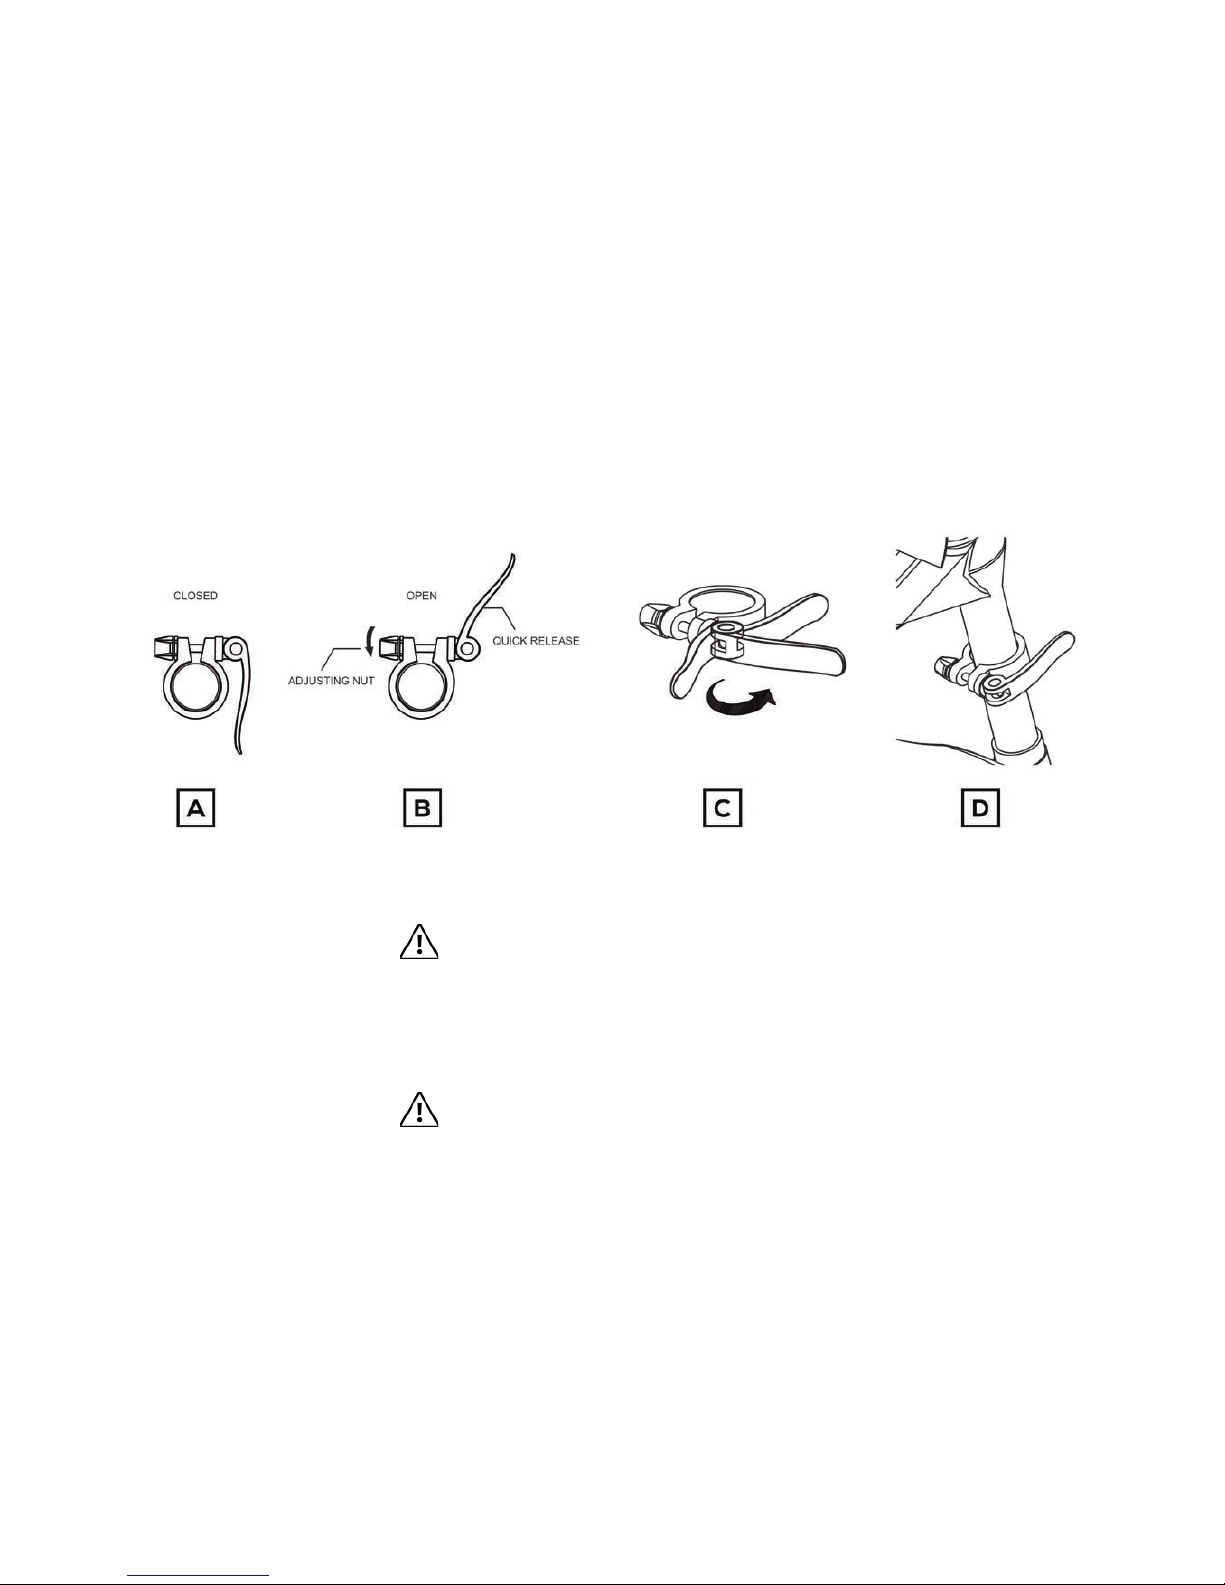
own saddle height adjustment:
If the lever is moved to the CLOSE position with little or no resistan-
ce, clamping strength is insufcient. Return the lever to the open
position, tighten the quick-release adjusting nut further and close
the lever, and again test for resistance.
1. Move the quick-release lever from its closed position (Img.2.A) to its open position
(Img.2.B).
2. While the lever is open, tighten the quick-release adjusting nut until nger-tight
(Img.2.B).
3. Place the lever in the palm of your hand and squeeze the lever with signicant force
(Img.2.C), until it reaches the closed position (Img.2.D).
4. Keep in mind that you can adjust the height of your Plume Mudguard, which, in turn,
will allow you to adjust your seatpost height.
Orient the quick-release lever so it does not touch the frame or in-
terfere with any other bicycle part or accessory part (such as a rack
or brake cable) or touch any part of the bicycle.
If you follow these procedures but still cannot get the seat clamp
to function properly, either repeat these adjustment procedures
again or take your bicycle to your retailer for service.
Img. 2
Warning
Warning
Warning
Be careful not to raise the height of the Plume Mudguard to the
point that the saddle interferes with the Plume’s ability to coil and
uncoil. Also note that if the Plume Mudguard is placed too low,
then it will interfere with the rear light.
Warning

18
Img. 3
Once the saddle is at the correct height, make sure that the
seatpost does not project from the frame beyond its “Minimum
Insertion” mark (see Img.3.A).
If the minimum and maximum insertions of your seatpost are not
respected (see Img.3), then the seatpost, binder, or even the frame
may break, which could cause you to lose control and fall.
ii. Front and back adjustment
The saddle can be adjusted forward or backward to help you achieve optimal position on the bike.
Ask your dealer or local bike shop to set the saddle for your optimal riding position and to show
you how to make this adjustment. If you make your own front and back adjustment, make sure
that the clamp mechanism is clamping on the straight part of the saddle rails and is not touching
the curved part of the rails, and that you are using the recommended torque on the clamping
fastener(s).
Warning
Warning
When making saddle angle adjustments with a single bolt saddle
clamp, always check to make sure that the serrations on the mating
surfaces of the clamp are not worn. Worn serrations on the clamp
can allow the saddle to move, causing you to lose control and fall.
Warning
Always tighten fasteners to the correct torque. Bolts that are too
tight can stretch and deform. Bolts that are too loose can move and
fatigue. Either mistake can lead to a sudden failure of the bolt, cau-
sing you to lose control and fall.
Warning
Table of contents


