Bike Box JB902 User manual

Model: JB902
WARNING: To reduce risk of injury, the user must read and understand this instruction manual
before using the Bike Box. This machine is intended for domestic, indoor use only in accordance
with the instructions provided in this manual.
Please read these instructions carefully and retain for future use
Ideal Sourcing Ltd, Ideal Home House, Newark Road, Peterborough PEl 5WG
2 3
You must not use the Bike Box without your doctor’s consent if you:
• Are pregnant
• Have had a recent operation or surgery
• Have knee, shoulder, back or neck injuries
GENERAL SAFETY INSTRUCTIONS
• Consult your doctor before
beginning this or any exercise or
diet programme.
• Follow the warm-up exercises
before you commence your
workout.
• Inspect the Bike Box for any
damage before using.
• Make sure the Bike Box is
securely assembled as described
in this manual before use.
• The Bike Box is NOT suitable for
use by children.
• Do not let the Bike Box get wet
with any type of liquid.
• In addition, do not use the Bike
Box while your hands are wet.
• Only use the Bike Box on a
surface that will not be dented
or damaged by the weight of the
machine.
• Place the Bike Box on an old cloth
or training mat before use, to
avoid marking the oor or carpet.
• Only one person is allowed to use
the Bike Box at any time.
•
•
• Keep children and pets away from
equipment while in use. This Bike
Box is designed for adults only.
• Leave yourself 1 metre of space
either side of the Bike Box for your
safety.
• Always wear the appropriate
workout clothes and footwear
when exercising. Avoid wearing
loose clothing which might get
caught in the Bike Box.
• The Bike Box has been tested and
certied to EN957-5 Class HC.
Maximum weight of user 120kg.
• Follow a workout which best suits
your physical, strength and
exibility level. Know your limits
and train within them.
• Increase speed, intensity and
duration of exercises gradually.
• The Bike Box is not suitable for
therapeutic use.
• Do not workout on a full stomach. Do
not eat an hour before working out.
• Have a water bottle close by when
working out.
Congratulations on the purchase of your Bike Box.
Please study these instructions carefully before use
paying special attention to the following guidelines.
For your safety and the safety of others the
following safeguards are very important. Failure to read
and follow these instructions may lead to serious injury.
Discontinue using if you experience dizziness, nausea, shortness of breath, pain,
or any other abnormal symptoms. Consult your Doctor before continuing.
MEDICAL RECOMMENDATIONS
• Heart condition or
cardiovascular disease
• High blood pressure
• Acute thrombosis
• Acute hernia
• Severe diabetes
• Epilepsy
• Severe migraines
• Malignant tumour
• Pacemaker, implants, articial
joint(s) or limb(s), stents or IUDs,
metal plates or pins
• Any recent illnesses or infections
• Deep Vein Thrombosis
• Cancer
You are strongly recommended to consult your doctor before using
the Bike Box if you have any of the following:
4 5
UNPACKING:
• To avoid danger of suffocation,
please keep all plastic bags out of
the reach of children.
• Check that there is no damage to
the unit prior to use. Call our
Customer Service number
0330 332 1300 (Calls cost 9p
per minute plus your phone
company’s access charges) if you
have any issues.
• The Bike Box is designed for
home use only and is not intended
for commercial use. Please do not
use outdoors.
• Please retain all packaging and
paperwork for future use and
store safely away from children
and animals.
HOW TO USE:
Features After removing the Box Bike from all packaging and inspecting it for damage,
follow these simple steps for safe use.
STEP 4.
STEP 3.
STEP 2.
STEP 1.
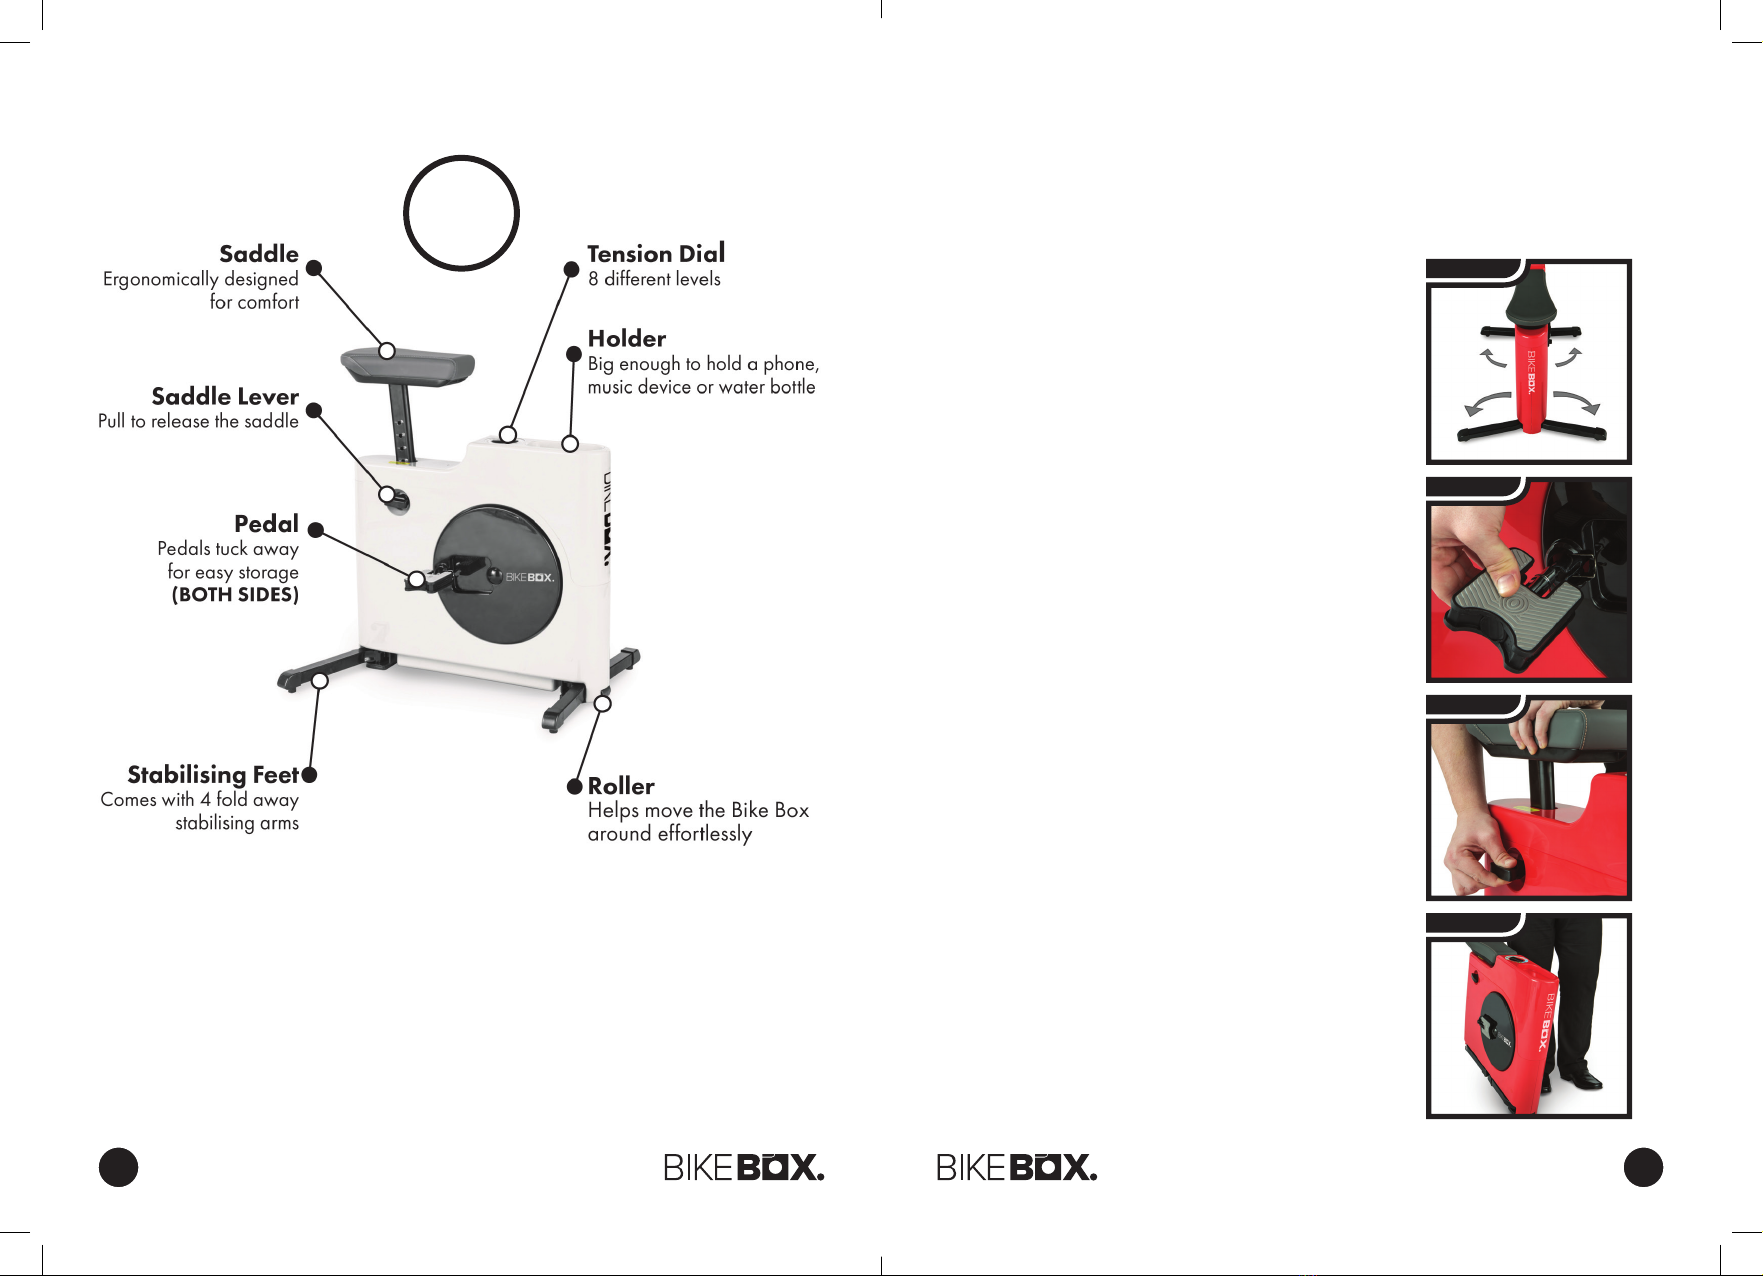
1. Stabilising Feet
Hold the Bike Box with one hand to keep it
steady and pull the feet out from under the
body of the machine with your other hand.
Both sides should pull out at the same time.
Repeat for both front and rear of the machine.
Do NOT use the Bike Box without deploying
the stabilising feet!
2. Pedals
Pull the pedal out so it is horizontal. The pedal
is on a wire, so it is permanently attached to the
machine. Pull it tight and slide it into the shaft
located above the pedal.
This will make the pedal secure in place.
Repeat on the other side of the machine.
3. Saddle Height
Adjust the saddle so that it is in a comfortable
position, by pulling out the lever on the side
of the machine and raising or lowering the
saddle with your other hand.
4. Roller
The Bike Box comes with a roller at the front
of the Bike Box to help you manoeuvre your
machine around the home. Lean the Bike
forward lifting from the underside of the
saddle and push it on the roller.
6 7
WARMING UP AND COOLING DOWN – IMPORTANT
One of the most important parts of your workout is to prepare your body for
exercise on the Bike Box.
Warming up and cooling down exercises are identical and easy to
remember. Both warming up and cooling down should be done slowly and
accurately, there is no hurry to complete these exercises, it is more important
to complete them. In addition, it is good practise to move around after the cool
down exercises to further dissipate the lactic acid.
Warming up
Warming up the muscles substantially
decreases the chances of injury
and only takes a few moments to
do. The Bike Box can also be used
for warming up and cooling down
exercise,
Cooling down
Cooling down helps removes the
lactic acid build-up in the muscles by
oxygenating the muscles after your
exercise routine.
Lactic acid is what makes you ache
after a workout, cooling down should
be undertaken soon after the last set
of exercises you intend to complete. TOP TIP
Use a chair or a
wall to help keep
your balance
if you need to.
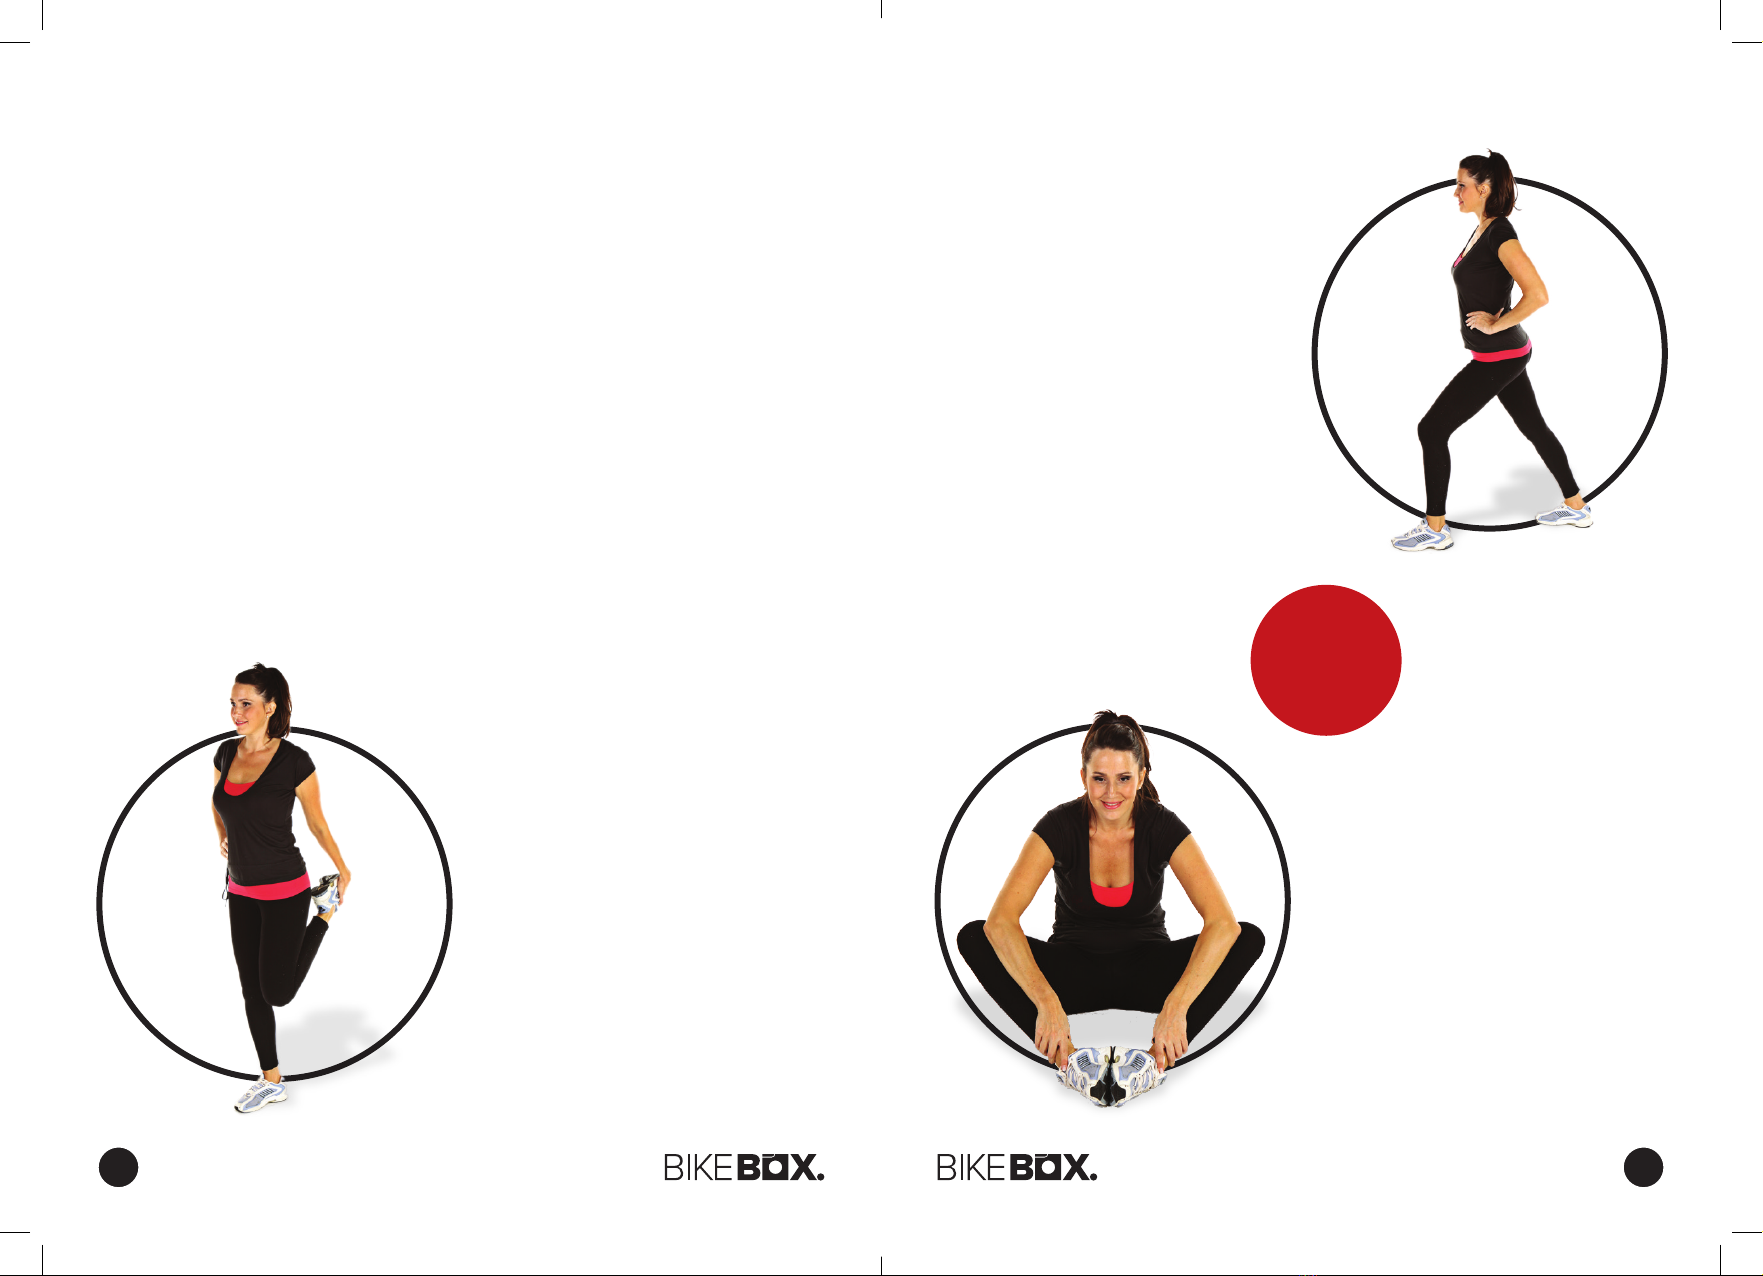
CALF AND ACHILLES STRETCH
Stand approximately one arm’s length
away from a wall or chair with your
feet hip-width apart. Keeping your toes
pointed forward, move one leg in close
to the chair while extending the other
leg behind you. Bending the leg closest
to the chair and keeping the other leg
straight, place your hands on the chair.
Keep the heel of the back leg on the
ground and move your hips forward.
Slowly lean forward from the ankle,
keeping your back leg straight until
you feel a stretch in your calf muscles.
Hold for 20 to 30 seconds. Repeat the
exercise for the opposite leg.
QUADRICEPS STRETCH
Stand close to a wall, chair or other
solid object. Use one hand to assist
your balance. Bend the opposite
knee and lift your heel towards your
buttocks. Reach back and grasp the
top of your foot with the same side
hand. Keeping your inner thighs close
together, slowly pull your foot towards
your buttocks until you feel a gentle
stretch in the front of your thigh. You
do not have to touch your buttocks
with your heel. Stop pulling when you
feel the stretch. Keep your kneecap
pointing straight down and keep your
knees close together. (Do not let the
lifted knee swing outward.) Hold the
stretch for 20 to 30 seconds. Repeat
the exercise for the other leg.
INNER THIGH STRETCH
Sit on the oor and bend your legs so
that the soles of your feet are together.
Place your hands on your ankles. Lean
zforward from the waist and press
down lightly on the inside of your
knees. You should feel a stretch in the
muscles of your inner thighs.

8 9
When Exercising Sit on the saddle
and place feet on the pedals.
The ideal position is so that the saddle
is hip height when standing next to the
machine.
The basic rule for getting the seat height
correct is that as the pedal reaches its
lowest point, the leg is almost straight.
Make sure your back is straight whilst
exercising especially for long periods.
You should be stable and balanced
whilst on the saddle.
Make sure the tension is at level 1 to
begin with and start pedalling. Turn the
dial clockwise to increase the tension
and anti-clockwise to decrease the
tension. Maximum tension level is 8. We
recommend to start off pedalling at the
lowest tension and increase gradually.
The period for which you should
exercise depends on your current level
of tness. If you’re just starting out on a
new exercise program, you should start
off gradually and build up. Do not try to
do too much too quickly. 30 minutes, 3
times a week should be enough.
Don’t forget to drink plenty of liquids
when exercising.
TOP TIP
As you progress, you can
create your own warm up
and cool down exercise
routine, you do not need to
keep strictly to the above
routine so long as you utilise
all the basic muscle types
included above.
BUTTOCKS, HIPS AND
ABDOMINAL STRETCH
Lay at on your back with your hips
relaxed against the oor. Bend one leg at
the knee. Keeping both shoulders at on
the oor, gently grasp the bent knee with
your hands and pull it over your body and
towards the ground. You should feel a
stretch in your hips, abdominal
and lower back. Hold for 20
to 30 seconds and release.
Repeat the exercise for the
opposite side.
STANDING HAMSTRINGS STRETCH
Stand with your legs hip width apart.
Extend one leg out in front of you and
keep that foot at against the ground.
With your hands resting lightly on your
thighs, bend your back leg and lean
forward slightly from your hips until you
feel a stretch in the back of your thigh.
Be sure to lean forward from the hip
joint rather than bending at your waist.
Hold for 20 to 30 seconds. Repeat the
exercise for the opposite leg.
OVERHEAD / TRICEPS STRETCH
Stand with your feet shoulder width apart
and your knees slightly bent. Lift one arm
overhead and bend your elbow, reaching
down behind your head with your hand
toward the opposite shoulder blade. Walk
your ngertips down your back as far as
you can. Hold this position. Reach up
with your opposite hand and grasp your
exed elbow. Gently assist the stretch
by pulling on the elbow. Hold for 20 to
30 seconds. Repeat the exercise for the
opposite arm.
Warming up and cooling down should take around ten minutes each. It is sensible to
adjust this timing according to your own situation. You would benet from a longer
warm-up session if you exercise soon after waking up than you would after a walk to
the shops and back for example.
Take your time warming up and cooling down, enjoy the
stretches as they will make you feel better.
Remember to cool down after exercising!
Table of contents
Popular Exercise Bike manuals by other brands


Sunny Health & Fitness
Sunny Health & Fitness SF-B121021 user manual

Monark
Monark 827E instruction manual

Stamina
Stamina 1310 owner's manual

American Fitness
American Fitness SPR-BK1072A owner's manual
 Service manual")
Cateye
Cateye CS-1000 (CYCLO SIMULATOR) Service manual

BH FITNESS
BH FITNESS H9158H Instructions for assembly and use