Bikecorp Pacific PTDD User manual

INSTRUCTIONS D A T E : 1 9 - 1 - 2 0 1 7
2 IN 1 TRAILER/STROLLER - PTDD
Pag.
2
/1
1
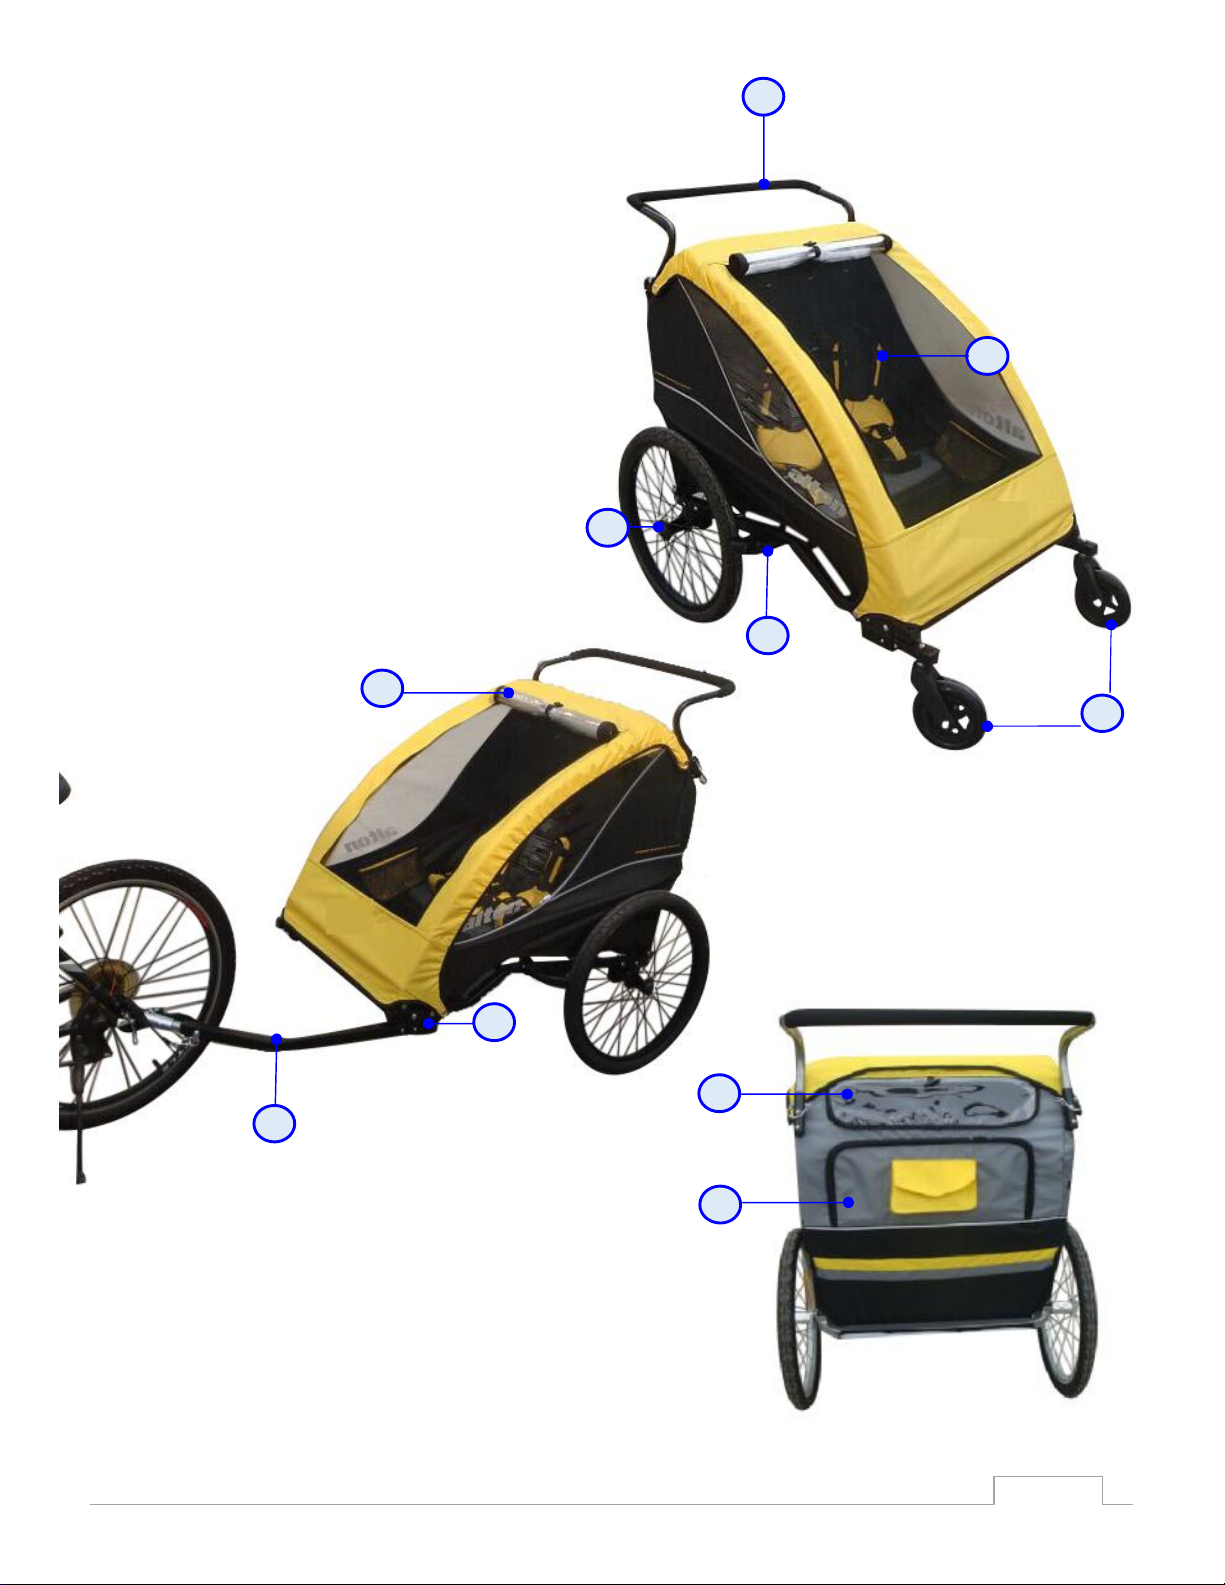
COMPONENTI- TRAILERCOMPONENTS
1. allweather cover
2. tow bar and hitchconnector
3. tow bar receiver
4. removablehandlebar
5. 5 pointsafetyharness
6. pushbottonreleasewheels
7. brakes
8. strollerwheels
9. rear window
10.rearstorage
2
3
4
5
6
7
8
1
9
10

Pag.
3
/1
1
COMPONENTI- TRAILERCOMPONENTS
1. trailerbody 7. hex key
2. cover 8. safetyflag
3. rear wheels 9. hitchconnector
4. tow bar 10.strollerkit
5. leftbrake 11.rearhandlebar
6. rightbrake
3
4
5
6
7
8
9
1
1
1
0
2
1

Pag.
4
/1
1
MAINFRAMEASSEMBLY
1. Removeall thetrailerpartsfromthebox
2. Opentherearstoragearea
3. Whileholdingtheupperframein theraisedposition, pull
theseat frame(A)back andtowardsyou.
4. Closethepaddlelatcheson eachsideoftheframeto lock
theframein place
5. Check that bothpaddlelatchesareengagedandsecure
6. To fold thetrailersimplyreversetheabovesteps.The
trailercanbefoldedwith orwithoutthewheelson.If the
wheelsareremoved,theycanbestowedinsidethe
trailerwhennot in use.
A
Pag.
5
/1
1
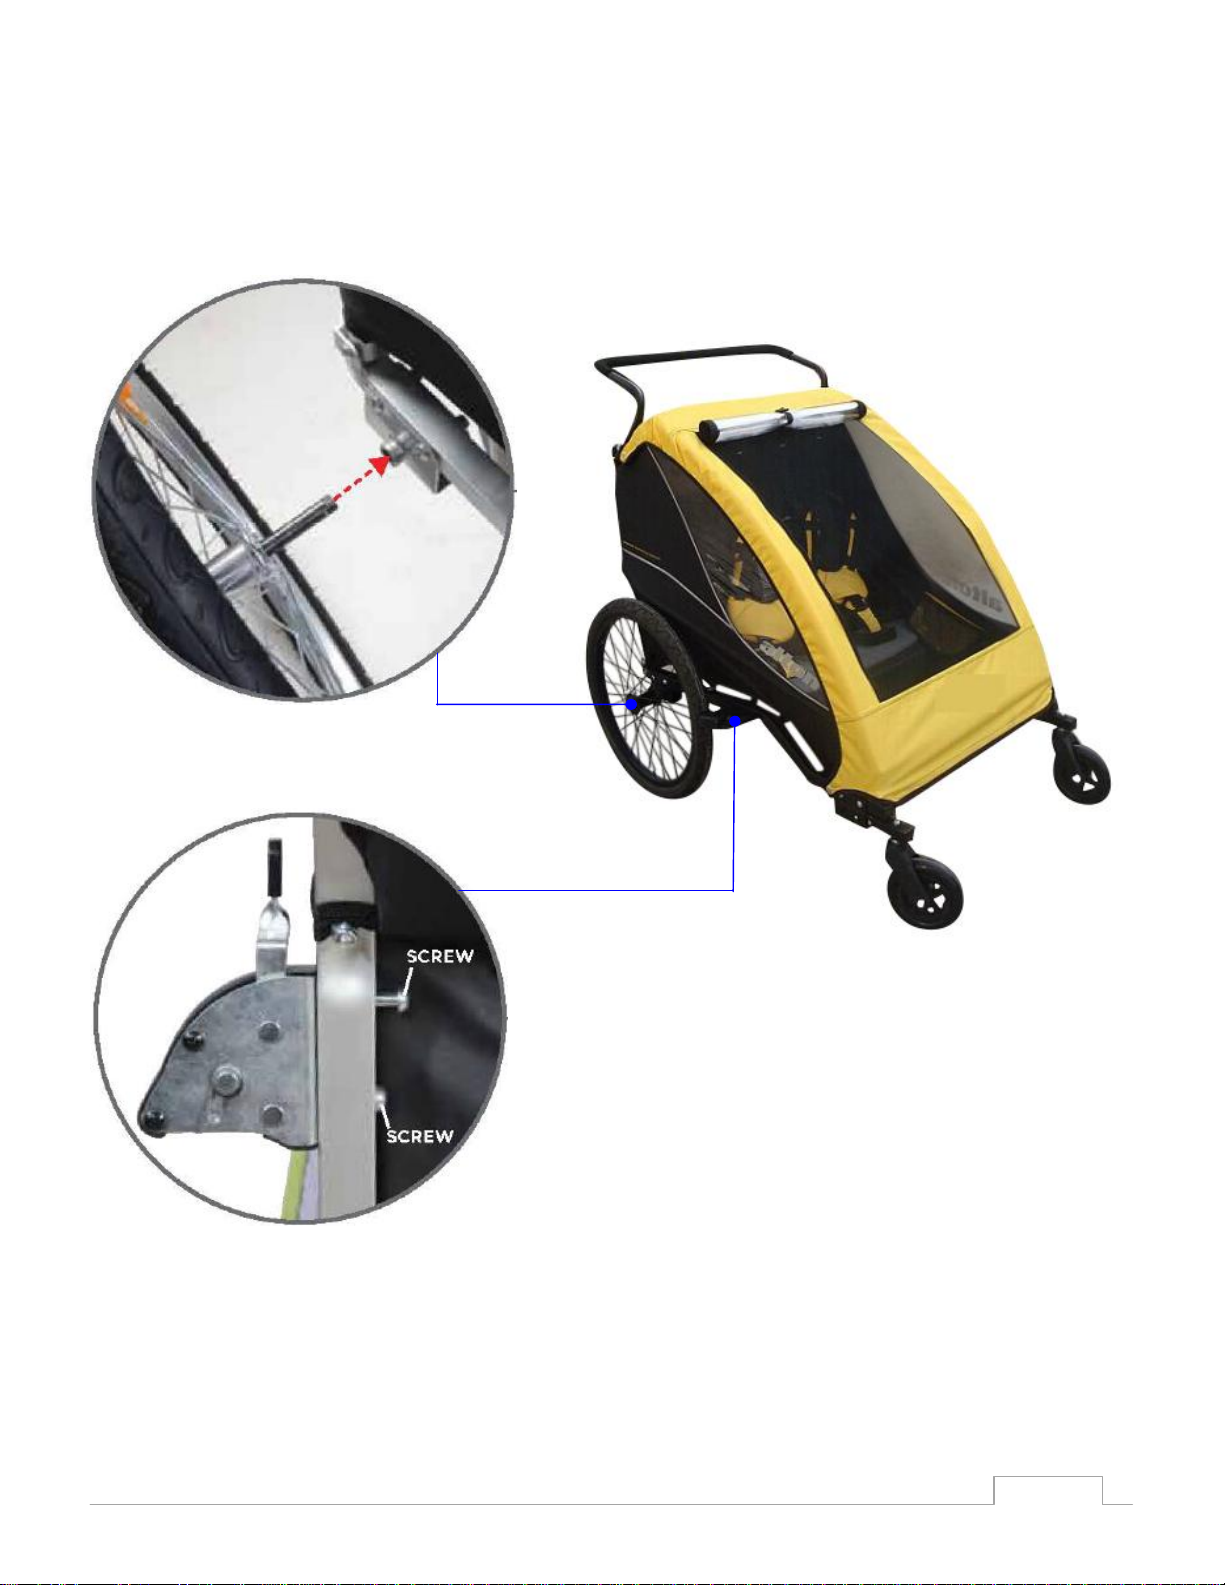
MOUNTING
THEWHEELS
1. Pushintherubberbuttonontheoutsideofthewheel
hub
2. Insertthewheelaxleinto theaxlereceiveron thetrailer
frame
3. Pull firmlyonthewheelto confirmtheaxleisfully
engagedand locked
4. To removethewheelspushin therubberbuttonand pull
thewheelout
INSTALLINGTHEBRAKES
1. Leanthetrailerbackwardssothatitrestsonthehandlebarand
front oftrailerispointing upwards
2. Locatethetwoholesinthetrailerframejustforwardof therear
wheels
3. Placescrewsthroughholesinframe,from insidetooutside,as
shown
4. Placethebrakeassemblyagainsttheframeand usethehex key
wrenchprovidedto tightenthescrewsuntil snug

Pag.
6
/1
1
ATTACHING THECOVER
1. Claspthetopadbottombuttons
2. Makesurethebuttonstightlyon bothsides
USING THEBRAKES
Tooperatebrake, simplymoveleveroutwardto contacttire.Releaseby
pushingtheleverin towardframeasshown.
NOTE:thisbrakeisself-adjusting totirewear,but forbestfunction,
makesureto keeptireswithin therecommendedpressureon sidewall
and replacetireswhenyou noticevisiblesignsofwear

Pag.
7
/1
1
SECURINGYOURCHILD
Whenusing thetrailerwith onechild,alwaysseat chechild
in thecentralposition.
1. Unclip thebuckleson thecrotchstrap and waistbelt.
Placeyourchild in theseat.
2. Placethepaddedshoulderharness ontothechild s
shouldersandadjusttheverticalstrapsasneeded.
Bucklethecrotchstrapto theshoulderharness.
3. Bucklethewaiststrap andadjustsoyoucanfit average
sizefingersbetweenbeltand yourchild.Thebuckle
should becenteredin yourchild sabdomen
NOTE:beforeloading orunloadingyourchild,therear
brakesmustbeengagedto prevent rolling.
ADJUSTINGTHESHOULDERHARNESS
Adjusttheverticalstrapssotheshoulderharness fitssnugly
on yourchild sshouldersand thebottomoftheharnessis
centeredin yourchild slowerchest.
You canincreaseordecreasethenumberofloopsthe
vertical strapsarefedthrough to raiseorlowertheheight of
theshoulderharness

Pag.
8
/1
1
Yourtrailerisdesignedtoattacheasilytojustaboutanyfull-sizebicycle(with“quick release”or “hexagonal nuts”.Onceinstalled
thehitchconnectorcanbeleftonthebicycleand thetrailerreleasedusing thelockpin. Thehitchconnectormustbeattachedto the
leftrearaxleofthebike.Do not attachtoanycyclewhereitcannot attachtotheaxle. Thistrailerisnotdesignedtobeusedwith
electricbikesormotorcycles.
MOUNTINGTHETOWBAR
1. Insertthetowbaronthebracket.
2. Makethesafetypinin rightposition
3. Insertthelockpin
IMPORTANT:Ensurethat lock pinissecurelylocked,becauseitmaycause
aloss ofcontrol ofthetrailerwhileriding.
(
TRAILER
MODE)
Pag.
9
/1
1
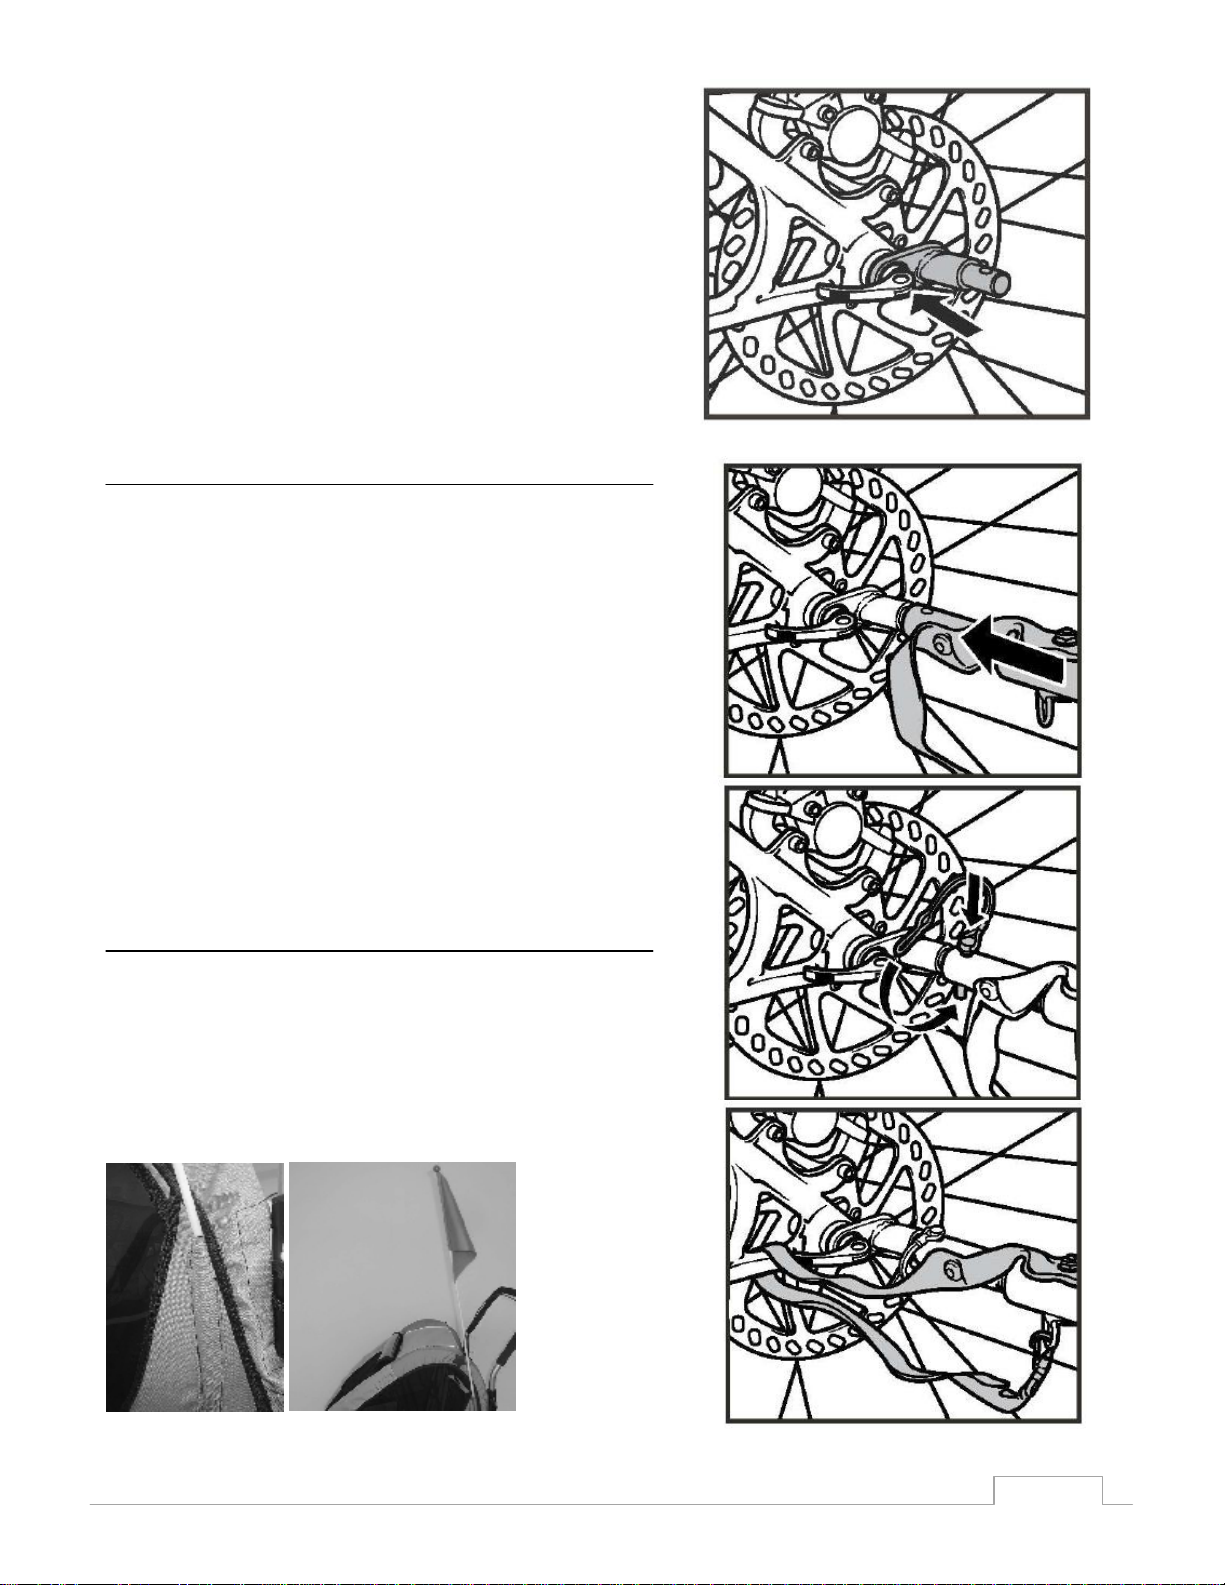
ATTACHINGTHEHITCHCONNECTORTOABIKE
1. Removethequickreleaseorhexagonal nut fromtheleftsideofthe
bikesrearaxle
2. Installthehitchconnectorbetweenthequickreleaseorhexagonal
nut andthebikeframe
3. Tightenthequick releaseorhexagonal nut
ATTACHING/REMOVINGTHETRAILER TOABIKE
1. Insertthehitchconnectorin thetowbarandlineup the2holes
2. Insertthelockpinthroughthetowbarandinto theholeinhitch
connector.Oncethepin isthrough,rotatethespringclip upand
overuntilitsnapsinto placeoverthepin head.Givethepin atugto
besureitissecure
3. Wrap thesafetystraparoundtheframeof thebikeand latchto the
D-ring on thetowbar
4. To removethetrailerreversetheabovesteps.Thehitchconnector
can remain on thebikewhenthetrailerisremoved
ATTACHINGTHESAFETY FLAG
1. Assembletheflag
2. Inserttheend intothesmallsleeveontherightsideofthetrailer
body

Pag.
10
/1
1
MOUNTINGTHEPUSHBAR
1. Insertthepushbaron thebracket
2. Installthequickreleasepin andmakesureit locked
MOU
NTINGTHE
STROLLER
KIT
1. Insertthestrollerkitonthebracket
2. Lock with safetypin
(STROLLERMODE)

Pag.
11
/1
1
GENERALMAINTENANCE
Fromtime totimecheckyourtrailerforloosehardware,wornparts, tornmaterialsorstitching.Repairorreplacepartsasneeded.
Donotmakeanymodificationstothetrailer.Besurethatthetrailerandbikeareingoodworkingconditions. Abikedealercan helpyou
withinspectionand maintenance.
Donotusecleaningsolvents,clean only withmildsoapandwater.
1. Inspectthetraileranditspartsbeforeand aftereachuse
2. Donotuse withchildrenunder8-10months
3. Childrenshouldwearapprovedsafety helmets
4. Have alwayswearseatbeltstochildren
5. Neverleavechildreninthetrailer unattented
6. Donotoverloadthetrailerbeyond the weightlimit(45kg)
7. Donotplacemorethan 5kginstoragecompartment.Accessoriesorparcelsplacedintrailermaycauseittochangebalanceand
becomeunstable.
8. Donotexceedthemaximumspeedof16 km/h
9. Donotuse theprotection ofraininthehotdays
10.Whennotinuseplacethetrailerinadryplaceawayfromdirectsunlight. Donotexposetoextreme heatthetrailerorrigidandhigh
humidity
11.Beforeeachtripcheckthe integrity andcondition ofthetrailer
12.Thetirepressureshouldbe40 to65PSI(2.0to2.8BAR)orasindicatedon tire sidewall.
13.Useonlyonpavedroads
14.Donotuse atnight
15.Thistrailerisnotsuitablefortheinstallation ofgear,carseats,bouncers, etc..
Table of contents
Popular Stroller manuals by other brands


WONDERFOLD
WONDERFOLD WAGON W4S 2.0 Assembly and safety instructions

Mountain Buggy
Mountain Buggy Strollers instruction manual

Specialised Orthotic Services
Specialised Orthotic Services Baby Jogger user manual

Edwards & Co
Edwards & Co oscar g3 instruction manual

EasyWalker
EasyWalker Mini Buggy+ manual

Maclaren
Maclaren Easy traveller user guide


