Billion BiPAC 8200N User manual

BiPAC 8200M
VDSL2 Modem
BiPAC 8200N
Wireless-N VDSL2
Firewall Router
Qui k Start Guide


Billion BiPAC 8200M VDSL2 Modem/ BiPAC 8200N Wireless-N VDSL2 Firewall Router
1
Pa kage Contents
BiPAC 8200M VDSL2 Modem
RJ-11 xDSL/ telephone able
Ethernet (RJ-45) able
Power adapter
Console (PS2-RS232) Cable
Qui k Start Guide
Splitter/ Mi ro-filter (Optional)
BiPAC 8200N Wireless-N VDSL2 Router
CD ontaining the on-line manual
RJ-11 xDSL/ telephone able
Ethernet (RJ-45) able
Power adapter
Qui k Start Guide
Splitter/ Mi ro-filter (Optional)
Warning
PLEASE READ THE QUICK START GUIDE AND FOLLOW THE
STEPS CAREFULLY. THIS QUICK START GUIDE WILL HELP YOU
INSTALL THE DEVICE PROPERLY AND AVOID IMPROPER USAGE.
IF YOU NEED MORE INFORMATION ON BiPAC 8200N SOFTWARE
CONFIGURATION, PLEASE REFER TO THE USER MANUAL ON
CD-ROM.
Do not use the
router
in high humidity or high temperatures.
Do not use the same power sour e for the router as other
equipment.
Do not open or repair the ase yourself. If the router is too hot,
turn off the power immediately and have it repaired at a qualified
servi e enter.
Avoid using this
produ t
and all
a essories
outdoors.
Pla e the router on a stable surfa e.
Only use the power adapter that omes with the pa kage. Using a
different voltage rating power adaptor may damage the router.
Attention

Qui k Start Guide
2
Hardware Overview – BiPAC 8200M VDSL2 Modem
The Front LEDs
The Rear Ports
* Note 1: For CPE/RT or CO/COT mode swit h, you need to onfigure it b
be
ef
fo
or
re
e
p
po
ow
we
er
r
o
on
n
t
th
he
e
d
de
ev
vi
i
e
e.
.
Conne t it with
the supplied
power adapter.
Lit green when
the devi e
su essfully onne ted to a
VDSL DSLAM (“line syn ”).
Blink when the VDSL onne tion
is trying to syn .
Lit green when the
devi e set to COT mode
through pushing down
D
DI
IP
P
s
sw
wi
it
t
h
h
#
#4
4 (see ba k
panel)
Lit when onne ted to an Ethernet devi e.
Lit green when the speed of transmission
hits 10/100Mbps; Blink when data is being
transmitted / re eived.
When VDSL line syn
su
essfully,
blink green when upstream and
downstream speed of transmission
rea hes 10Mbps.
Conne t omputer or an
offi e/ home network to a
LAN port with the supplied
RJ
-
45 Ethernet Cable
Power
ON/OFF
swit h
Conne t the supplied
RJ-11 able to this port
when onne ting to the
VDSL network
Conne t with
onsole able
For ba k
-
to
-
ba k appli atio
n,
D
D
I
I
P
P
s
s
w
w
i
i
t
t
h
h
#
#
4
4
an be
onfigured between RT and COT mode.
S
Sw
wi
it
t
h
h
U
UP
P
f
fo
or
r
d
de
ef
fa
au
ul
lt
t
s
se
et
tt
ti
in
ng
g:
:
u
us
st
to
om
me
er
r-
-p
pr
re
em
mi
is
se
es
s
e
eq
qu
ui
ip
pm
me
en
nt
t
(
(C
CP
PE
E/
/R
RT
T)
)
m
mo
od
de
e;
;
S
Sw
wi
it
t
h
h
D
DO
OW
WN
N
f
fo
or
r
e
en
nt
tr
ra
al
l
o
of
ff
fi
i
e
e
(
(C
CO
O/
/C
CO
OT
T)
)
m
mo
od
de
e.
.
*1
Lit red when power is on. Lit green
when the system is ready. Lit red
and flash green when the devi e is
downloading firmware. Lit red when
the devi e is booting or fails to boot.

Billion BiPAC 8200M VDSL2 Modem/ BiPAC 8200N Wireless-N VDSL2 Firewall Router
3
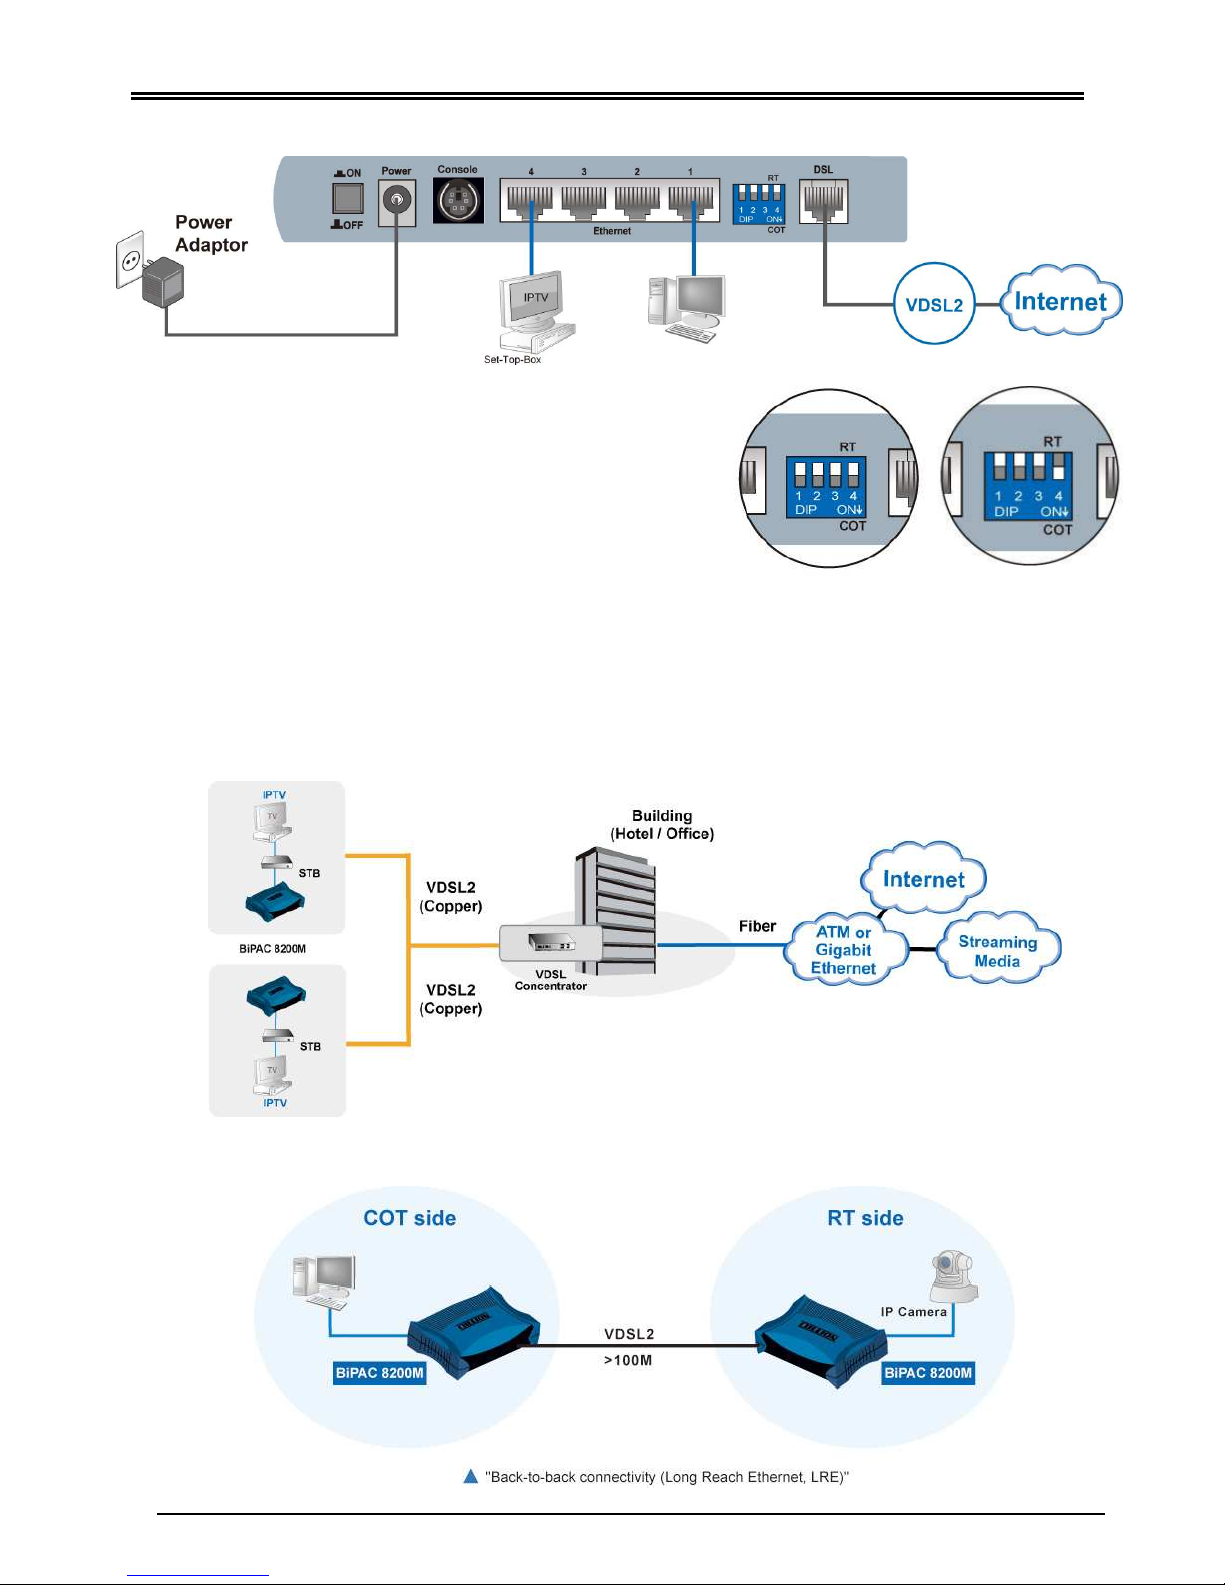
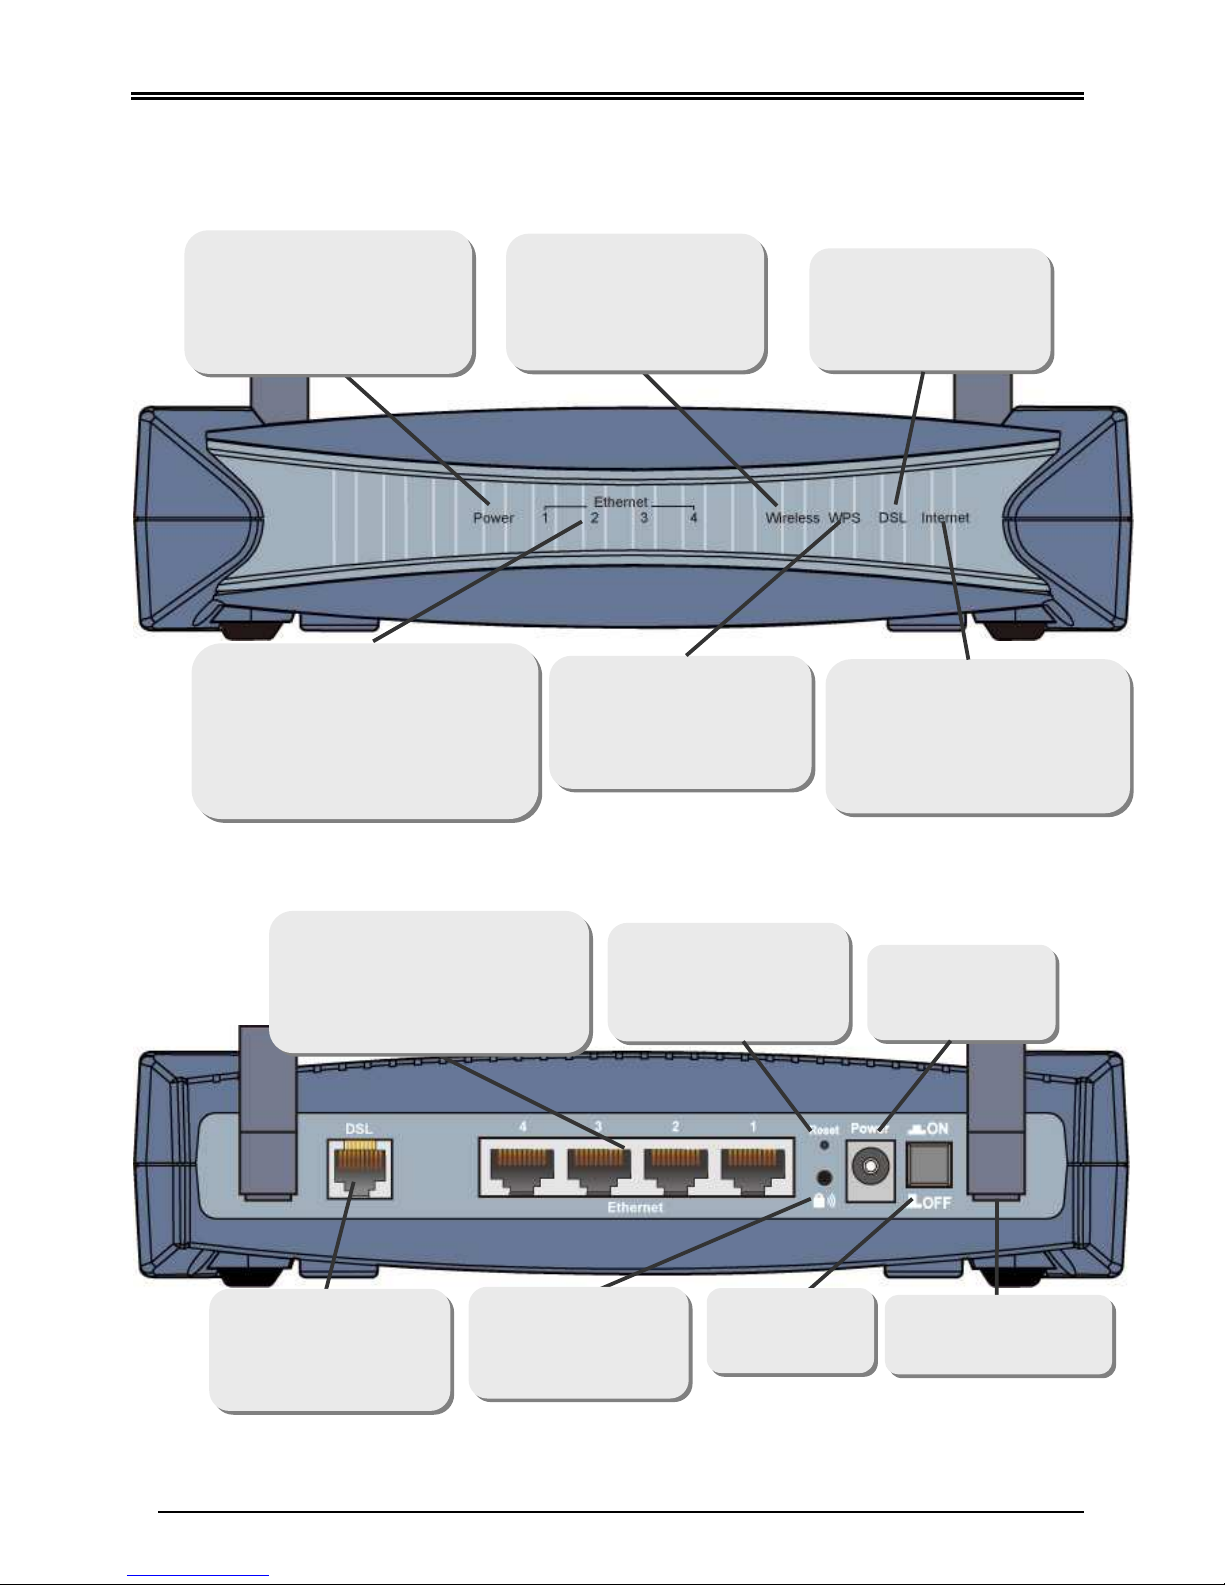
Hardware Conne tion – BiPAC 8200M VDSL2 Modem
1. Before power on, make sure DIP switch #4 is
up for CPE RT mode, or down for CO COT mode.
(Default is up for CPE RT mode)
2. Connect DSL port to a VDSL connection with
supplied RJ-11 cable, and connect Ethernet port
to your computer or an office home network with
RJ-45 Ethernet cable.
3. Plug the supplied power adapter and power on the device.
4. Check the LEDs, and start to surf.
Deployment s enario for VDSL using FTTx (BiPAC 8200M)
Ba k-to-ba k onne tivity (BiPAC 8200M)
RT (or CPE)
COT (or CO)

Qui k Start Guide
4
Hardware Overview – BiPAC 8200N Wireless-N VDSL2 Firewall Router
The Front LEDs
The Rear Ports
*Note 2: For WPS onfiguration, please refer to the WPS se tion of User Manual.
Lit green when the system is
ready. Lit red when the devi e
is booting. Flashes when the
system is rebooting or
firmware upgrading.
Lit green when a wireless
onne tion is established.
Blinking when data is
transmitted/re eived.
Lit green when the
devi e is su essfully
onne ted to a VDSL
DSLAM. (“line syn ”)
Lit w
hen one of LAN ports is
onne ted to an Ethernet devi e.
Lit green when the speed of
transmission hits 100Mbps; Lit
orange when the speed of
transmission hits 10Mbps.Blinking
when data is transmitted/re eived.
Lit green when a wireless
onne tion is established.
Blinking when WPS
onfiguration is in progress.
Lit red when WAN port fails to
get IP address; Lit green when
WAN port gets IP address
su essfully. Lit off when the
devi e is in bridge mode or
when WAN onne tion absent.
Conne t this port to the
VDSL/telephone network
with the RJ-11 able
(telephone) provided.
Press this button for
more than 1 se ond to
restore the devi e to its
default mode.
Conne t it with the
supplied power
adapter.
Push this button to
trigger Wi-Fi Prote ted
Setup fun tion.
*2
Power ON/OFF
swit h.
Conne t the deta hable
antenna to this port.
Conne t a UTP Ethernet able
(Cat-5 or Cat-5e) to one of the
four LAN ports when onne ting
to a PC or an offi e/home
network of 10Mbps or 100Mbps.

Billion BiPAC 8200M VDSL2 Modem/ BiPAC 8200N Wireless-N VDSL2 Firewall Router
5
Hardware Conne tion – BiPAC 8200N Wireless-N VDSL2 Firewall
Router
Deployment s enario for VDSL using FTTx (BiPAC 8200N)

Qui k Start Guide
6
Network Configuration
C
Configuring PC in Windows 7
1.
Go to
Start
. Click on
Control Panel.
2. Then click on
Network and
Internet.
3. When the Network
and Sharing Center
window pops up,
select and click on
Change adapter
settings on the left
window panel.
4. Select the Lo al
Area Conne tion,
and right click the
icon to select
Properties.
Only BiPAC 8200N requires network onfiguration as below.

Billion BiPAC 8200M VDSL2 Modem/ BiPAC 8200N Wireless-N VDSL2 Firewall Router
7
5.
Select
Internet
Proto ol Version 4
(TCP/IPv4) then click
Properties.
6. In the TCP/IPv4
properties window,
select the Obtain an
IP address
automati ally and
Obtain DNS Server
address
automati ally radio
buttons. Then click
OK to exit the setting.
7. Click OK again in the
Lo al Area
Conne tion
Properties window
to apply the new
configuration.

Qui k Start Guide
8
Configuring PC in Windows Vista
1.
Go to
Start
. Click on
Network.
2. Then click on
Network and
Sharing Center at
the top bar.
3. When the Network
and Sharing Center
window pops up,
select and click on
Manage network
onne tions on the
left window panel.
4. Select the Lo al
Area Conne tion,
and right click the
icon to select
Properties.

Billion BiPAC 8200M VDSL2 Modem/ BiPAC 8200N Wireless-N VDSL2 Firewall Router
9
5.
Select
Internet
Proto ol Version 4
(TCP/IPv4) then click
Properties.
6. In the TCP/IPv4
properties window,
select the Obtain an
IP address
automati ally and
Obtain DNS Server
address
automati ally radio
buttons. Then click
OK to exit the setting.
7. Click OK again in the
Lo al Area
Conne tion
Properties window
to apply the new
configuration.

Qui k Start Guide
10
Configuring PC in Windows XP
1. Go to Start / Control
Panel (in Classi
View). In the Control
Panel, double-click on
Network Conne tions
2. Double-click Lo al Area
Conne tion.
3. In the Lo al Area
Conne tion Status
window, click
Properties.

Billion BiPAC 8200M VDSL2 Modem/ BiPAC 8200N Wireless-N VDSL2 Firewall Router
11
4. Select Internet
Proto ol (TCP/IP) and
click Properties.
5. Select the Obtain an IP
address automati ally
and the Obtain DNS
server address
automati ally radio
buttons.
6. Click OK to finish the
configuration.

Qui k Start Guide
12
Configuring PC in Windows 2000
1. Go to Start / Settings
/ Control Panel. In the
Control Panel,
double-click on
Network and Dial-up
Conne tions.
2. Double-click Lo al
Area Conne tion.
3. In the Lo al Area
Conne tion Status
window click
Properties.

Billion BiPAC 8200M VDSL2 Modem/ BiPAC 8200N Wireless-N VDSL2 Firewall Router
13
4. Select Internet
Proto ol (TCP/IP)
and click Properties.
5. Select the Obtain an
IP address
automati ally and the
Obtain DNS server
address
automati ally radio
buttons.
6. Click OK to finish the
configuration.

Qui k Start Guide
14
Verifying Your Lo al Network Conne tion with the Devi e
To see if this VDSL Router is
visible on the local network, go
to Start Run. In the Run dialog
box, type “ping 192.168.1.254”
then presses OK.
A command prompt window will
pop out. If your ping is
successful which means your
local network is able to reach to
the device, then the command
prompt window will close up
automatically.
Connection fails, when you see
“Request timed out” in the
command prompt window. You
may need to check your set up.
Conne ting to the Router
Only BiPAC 8200N enables advan ed onfiguration as below.
1. Open the web browser and type http://192.168.1.254 in the browser's address box. This
number is the default IP address for this router. Press Enter.
2. A username and password window will appear. The default username is “admin”,
password is “admin”. Press OK to proceed.
3. You will get a status report web page and main menu screen.
Please see the relevant se tions of user manual for detailed instru tions on how to
onfigure BiPAC 8200N.
Only BiPAC 8200N enables onfiguration as below.

Billion BiPAC 8200M VDSL2 Modem/ BiPAC 8200N Wireless-N VDSL2 Firewall Router
15
Troubleshooting
1. None of the LEDs are on when you turn on the router.
Check the connection between the adaptor and the router. If the error persists, you may
have a hardware problem. In this case you should contact technical support.
2. Can’t ping any PCs on the LAN.
Check the Ethernet LEDs on the front panel. The LED should be on for a port that has a PC
connected. If it is off, check the cables between your router and the PC. Make sure you have
uninstalled any software firewall for troubleshooting. Verify that the IP address and the
subnet mask are consistent between the router and the workstations.
3. Frequent loss of VDSL line syn (dis onne tions).
Ensure that all other devices connected to the same telephone line as your router (e.g.
telephones, fax machines, analogue modems) have a line filter connected between them
and the wall socket (unless you are using a Central Splitter or Central Filter installed by a
qualified and licensed electrician), and ensure that all line filters are correctly installed and
the right way around. Missing line filters or line filters installed the wrong way around can
cause problems with your VDSL connection, including causing frequent disconnections. If
you have a back-to-base alarm system you should contact your security provider for a
technician to make any necessary changes.
Produ t Support and Conta t Information
Most problems can be solved by referring to the Troubleshooting section in the User Manual.
If you cannot resolve the problem with the Troubleshooting chapter, please contact the dealer
where you purchased this product.
Conta t Billion
WORLDWIDE
http: www.billion.com
BiPAC 8200M/ 8200N: V1.00EN (AAMPIMBIL8200MXXX0)
Other manuals for BiPAC 8200N
1
This manual suits for next models
1
Table of contents
Other Billion Other manuals
Popular Other manuals by other brands

Task Force Tips
Task Force Tips MONSOON MONITOR Instructions for installation, safe operation and maintenance

JohnDow Industries
JohnDow Industries FC-25PFC-D Operator's manual

Würth
Würth 0891 703 140 Translation of the original operating instructions

Bosch
Bosch Eyes instruction manual

Snap-On
Snap-On Modis Ultra user manual

Dometic
Dometic 3106863.214B installation instructions