Billy Smoker OPEN FIRE ARTIST User manual

OPEN FIRE COOKERS
INSTALLATION GUIDE
Designed & Manufactured in Australia by
Plant | Grow | Prosper!
of 126
Revision 2

CONTACT INFORMATION
BILLY SMOKER
Location: Greenhill, SA
Web: billysmoker.com
Mail: hello@billysmoker.com !
Mob: +61 (0)401 553 437
Information in this manual may be updated without notice, please check online for latest version!
of 226

TABLE OF CONTENTS
WARNINGS AND CAUTIONS 4
PLANT | GROW | PROSPER 5
BILLY SMOKER 6
BILLY SAFETY 7
OPEN FIRE COOKERS 8
MODELS & DIMENSIONS
PRODUCT FEATURES
INSTALLATION 11
INITIAL CHECKS
AIR SUPPLY
CLEARANCES TOCOMBUSTIBLES
HEAT SENSITIVE MATERIALS EXCLUSION ZONE
WALL SHIELD REQUIREMENTS
FLOOR PROTECTOR REQUIREMENTS
FLUE REQUIREMENTS
EXAMPLE ENCLOSURE INSTALLATIONS
ASSEMBLING BILLY
OPERATION 19
REMOVABLE DOOR
FUEL
FIRST LIGHT PROCEDURE
REGULAR LIGHT PROCEDURE
HOW TO COOK IN BILLY 21
PIZZA
BAKING
SMOKING
GRILLING
ROTISSERIE
MAINTENANCE 23
ASH REMOVAL
OVEN & STONE CLEANING
FLUE CLEANING
TROUBLESHOOTING 25
BURNING POORLY
DOOR JAMMING
SMOKE SPILL
SPARE PARTS 26
of 326

WARNINGS AND CAUTIONS
•WARNING: THE APPLIANCE AND FLUE SYSTEM SHOULD BE INSTALLED IN ACCORDANCE WITH AS/NZS 2918 AND THE
APPROPRIATE REQUIREMENTS OF THE RELEVANT BUILDING CODE OR CODES
•ANY MODIFICATION OF THE APPLIANCE THAT HAS NOT BEEN APPROVED IN WRITING BY THE TESTING AUTHORITY IS
CONSIDERED TO BE IN BREACH OF THE APPROVAL GRANTED FOR CONFORMANCE WITH AS/NZS 4012 & AS/NZS 4013
•WARNING: ANY MODIFICATION OF THE APPLIANCE THAT HAS NOT BEEN APPROVED IN WRITING BY THE TESTING
AUTHORITY IS CONSIDERED NOT CONFORMING TO AS/NZS 4013
•WARNING: DO NOT USE FLAMMABLE LIQUIDS OR AEROSOLS TO START OR REKINDLE THE FIRE
•WARNING: DO NOT USE FLAMMABLE LIQUIDS OR AEROSOLS IN THE VICINITY OF THIS APPLIANCE WHEN IT IS OPERATING
•WARNING: DO NOT STORE FUEL WITHIN HEATER INSTALLATION CLEARANCES
•WARNING: WHEN OPERATING THIS APPLIANCE AS AN OPEN FIRE USE A FIRE SCREEN
•WARNING: DO NOT BURN WOOD THAT IS PAINTED; OR IS COATED WITH PLASTIC; OR HAS BEEN TREATED WITH ANY
CHEMICAL
•CAUTION: MIXING OF APPLIANCE OR FLUE-SYSTEM COMPONENTS FROM DIFFERENT SOURCES OR MODIFYING THE DIMENSIONAL
SPECIFICATION OF COMPONENTS MAY RESULT IN HAZARDOUS CONDITIONS. WHERE SUCH ACTION IS CONSIDERED, THE
MANUFACTURER SHOULD BE CONSULTED IN THE FIRST INSTANCE
•CAUTION: CRACKED AND BROKEN COMPONENTS, FOR EXAMPLE GLASS PANELS OR CERAMIC TILES, MAY RENDER THE
INSTALLATION UNSAFE
•CAUTION: DO NOT OPERATE THIS APPLIANCE IF GLASS IS CRACKED OR BROKEN
•CAUTION: THIS APPLIANCE SHOULD BE MAINTAINED AND OPERATED AT ALL TIMES IN ACCORDANCE WITH THESE INSTRUCTIONS
Keep these instructions for future reference!
of 426

PLANT | GROW | PROSPER
We develop Australian brands and multicultural cooking products to encourage outdoor living with friends and family in style. Our
smart design principles enable sustainable manufacture within Australia, building and supporting local industry.
The PGP team offers an extensive range of product design & engineering services; from ideation to commercialisation. We utilise
knowledge and manufacturing skills from multiple industries to plant and grow ideas into viable products that help the community
prosper. PGP draws upon over 25 years of combined product development experience to deliver quality Australian made products.
!
of 526
GREG
LIAM
ANDREW
BILLY SMOKER
It is no new philosophy that cooking brings people together. Across time, across cultures, bringing family and friends together
involves – perhaps requires – food. Favourite family dishes become famous family dishes, replicated and re-imagined for
generations to enjoy. While new ways of cooking have and will be engineered, fire offers more. Fire is primal, has supported our very
existence like nothing else and offers a genuine charm, warmth and romance.
The wood crackles in our ears as we find ourselves mesmerised by the flame and are filled with a smoky aroma that foreshadows
the good food yet to come. Our senses are fully engaged with the simple and ancient phenomenon. We have been perfecting the
art of cooking on flame for centuries, however our generation seems to be loosing this knowledge, opting for convenience over
substance. We believe in bringing food back to its roots. It is there you will find flavours and textures unachievable by others
means.
Billy Smoker is owned and made in Australia. Many local families are involved through the products’ lifecycle; research,
development, design, engineering, machining, fabrication, blasting, painting, integration, assembly, marketing, sales, distribution,
logistics, installation and customer support. PGP Enterprise’s goal is to build a sustainable and thriving ecosystem which delivers
long term value to Australian communities.!
of 626

BILLY SAFETY
To get the most enjoyment and longevity out of your Billy Smoker product, there are a few things to keep on top of. Caring for your
Billy also keeps it safe. Remember this manual needs to be kept somewhere accessible near Billy.
Getting to know Billy. If you are a new user or introducing someone to Billy, be sure to understand the information in this manual.
Cooking with fire is fun but should also be done with the upmost respect. Take the time to point out any hot spots and how handles
and mechanisms work before lighting. Children must be supervised when handling a Billy.
Feeding Billy. Billy prefers to burn dry wood, especially hardwood as it burns cleaner and longer. Do not over fire Billy, if parts of
Billy turn red, remove any fuel that is safe to do so and let combustion reduce down.
Billy’s hot and tough. Be conscious of handles that may be hot when operating, we recommend you use oven mitts or welding
gloves when touching Billy's doors. Billy is also tough so do not stress knocking Billy while cooking.
Combusting near Billy. Do not place any combustable items inside the specified clearances area mentioned in the ‘Installation’
section of this document.
A clean Billy is a safe Billy and a safe Billy is a happy Billy. Please remember to crank Billy and burn offany organic matter left
on the cooking surfaces after use. Periodically scrape offany remaining fat or creosote on surfaces. Pro tip: before emptying ash,
use it as an abrasive and to soak up liquids when cleaning.
Billy needs to breathe. Due to the nature of open coal cooking is it important to make sure the flue system is installed correctly
according to the Australian and New Zealand Standard for the installation of domestic solid fuel burning appliances (AS NZS 2918).
Failure to do so will cause an uncomfortable amount of smoke and hazardous combustion fumes to spill from the firebox opening.
If installed indoors, be sure to monitor anything (especially exhaust fans) that may cause a negative pressure in the room. See
‘Troubleshooting’ section of this document for further information.
A damaged Billy. If any parts of Billy become damaged do not use the appliance. See the ‘Repairs Section’ of this document to find
out how to fix it.
of 726

OPEN FIRE COOKERS
The Open Fire Cookers stay true to our philosophy of bringing people together around fire and food. Designed to suit both indoor
and outdoor living spaces, certain to create an impressive and memorable atmosphere. Clean and minimal form with elegantly
designed componentry, they come in three variants for different settings and install environments.
The Sideways Collection has been designed and engineered to meet the safe installation requirements stipulated in AS NZS 2918
(Australian and New Zealand for installation of solid fuel burning appliances).
Defined as cooking appliances, the Sideways Collection complies with the AS NZS 4012 and AS NZS 4013 (Australian and New
Zealand Standards for emissions and efficiency).
Meeting the Australian Environmental Protection Authority (EPA) requirements for air quality, these products can be installed
throughout all of Australia (including New South Wales).
MODELS & DIMENSIONS!
of 826

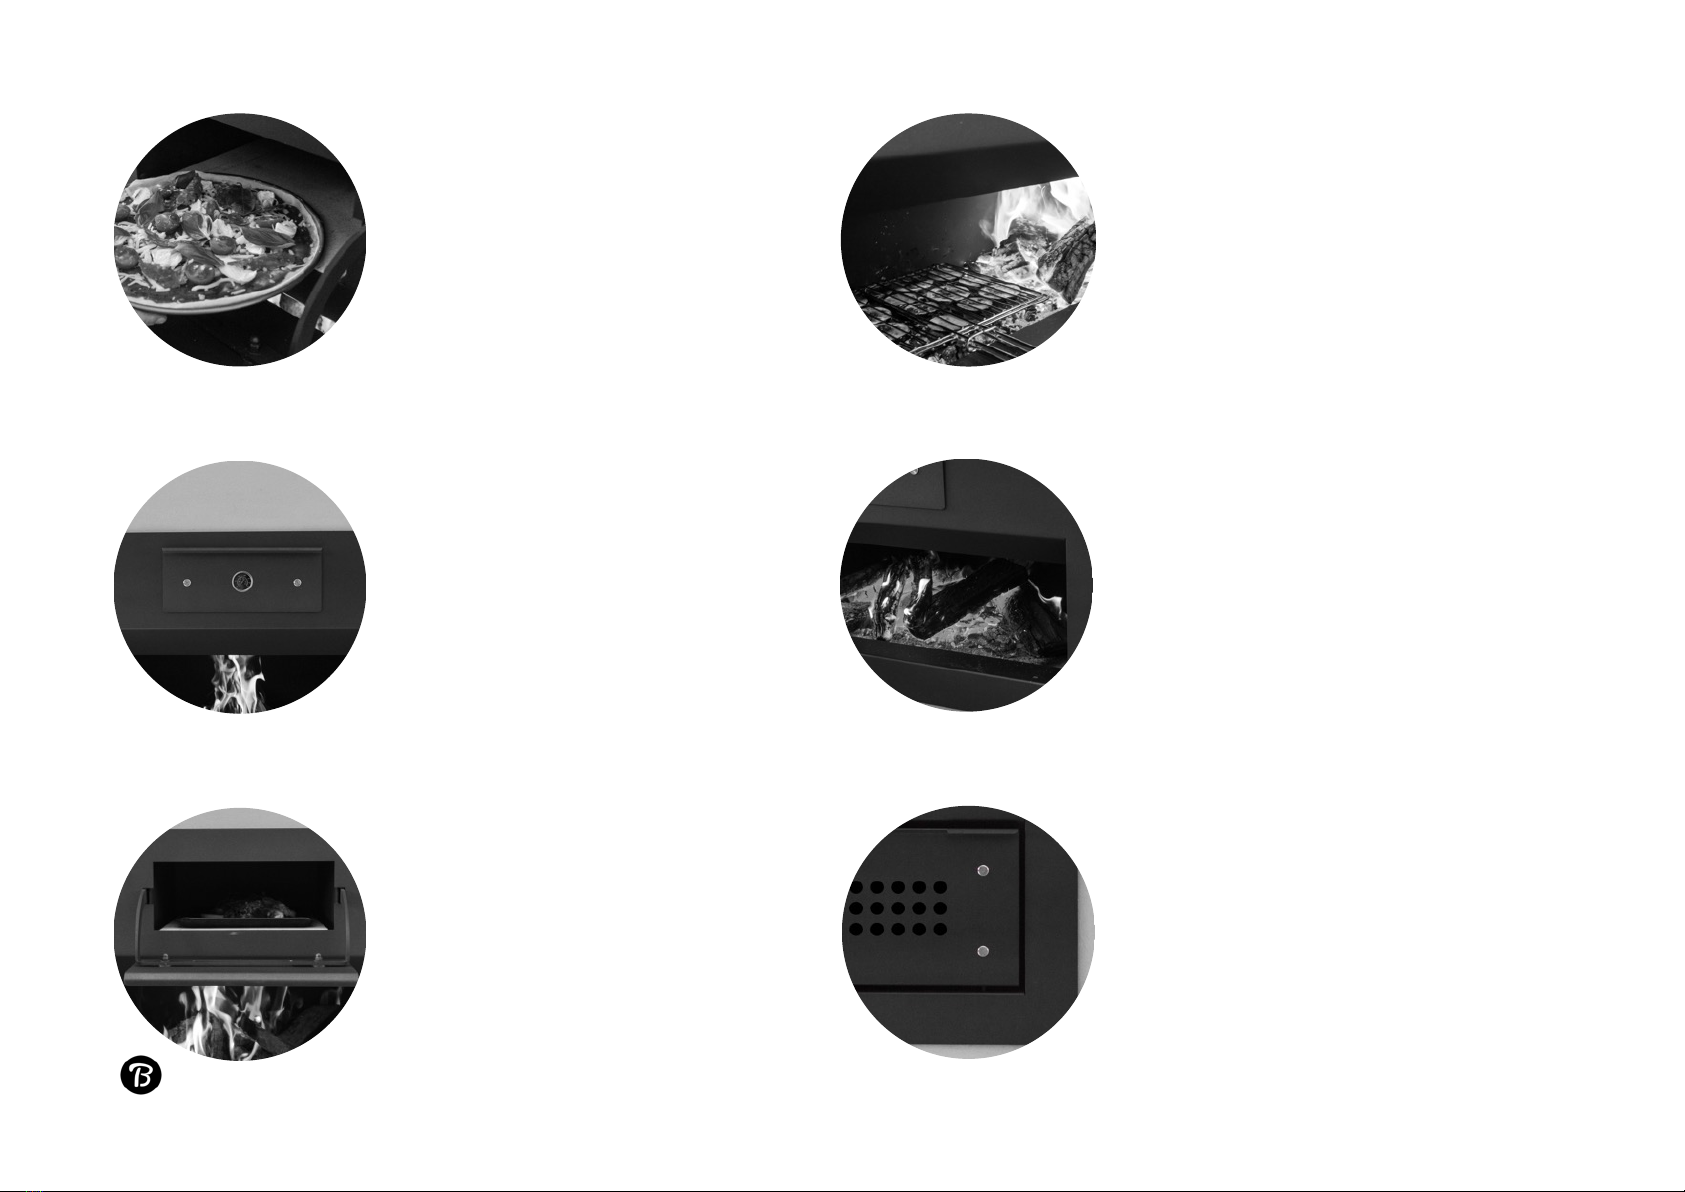
PRODUCT FEATURES
!
of 926
FIREBOX (CM)
MATERIAL
FINISH
OVEN VOLUME
OVEN (CM)
OPEN COAL VOLUME
MAX LOG (CM)
BAFFLES & DOORS
HEAT BANKS
SPIGOT
100W x 30D x 38H
3-6mm steel
metallic black paint
29 ltr
36W x 43D x 18H
136 ltr
220Ø x 85L
steel
ceramic plate
fully welded
!
of 10 26
PIZZA OVEN
Fits a 13 inch Pizza and comes
with a high temperature pizza
stone for hot and fast wood oven
pizza
BAKING OVEN
The ventilated upper wood oven
creates an easy-to-use low and
slow smoking environment with
adjustable smoke flow
SMOKING
The ventilated upper wood oven
creates an easy-to-use low and
slow smoking environment with
adjustable smoke flow.
ROTISSERIE
(SOLD SEPARATELY)
The Slimspit is a clip on rotisserie
attachment available for grilling
with your Open Fire Cooker
GRILLING
Flame grill in style with ample
room to control and push
coals around
REMOVABLE DOOR
Keep on to retain maximum heat,
smoke and sparks inside the unit or
remove after cooking for full view of
the fire

INSTALLATION
INITIAL CHECKS
Please consider the following points before installing Billy:
•Regulations & Council Requirements. Consult your council, either directly or via the avenue of sale to find out if any install
approval, local guidelines or permits are needed when installing a cooking product.
•Qualified Installer. The appliance must be installed by a qualified installer that adheres to local regulations and standards.
•Clearances to combustibles. The appliance must be installed at a distance from any combustibles no less than stated in
these instructions.
AIR SUPPLY
If installing indoors, make sure the room can provide plenty of free air to feed the appliance. Be sure to identify and monitor
anything that may cause a negative pressure in the room (exhaust fans) as this can cause smoke spillage. A solution could be to
turn offfans, open a window or add an external air supply in the room. If installing outdoors, for best results choose a location that
is protected from any cross winds.
CLEARANCES TOCOMBUSTIBLES
The Open Fire Cookers have been designed and engineered to meet the safe installation requirements stipulated in AS NZS 2918.
Some installation configurations and requirements may not be included in this manual, use as a guide only. Installation must
comply with the latest release of AS NZS 2918.
of 11 26
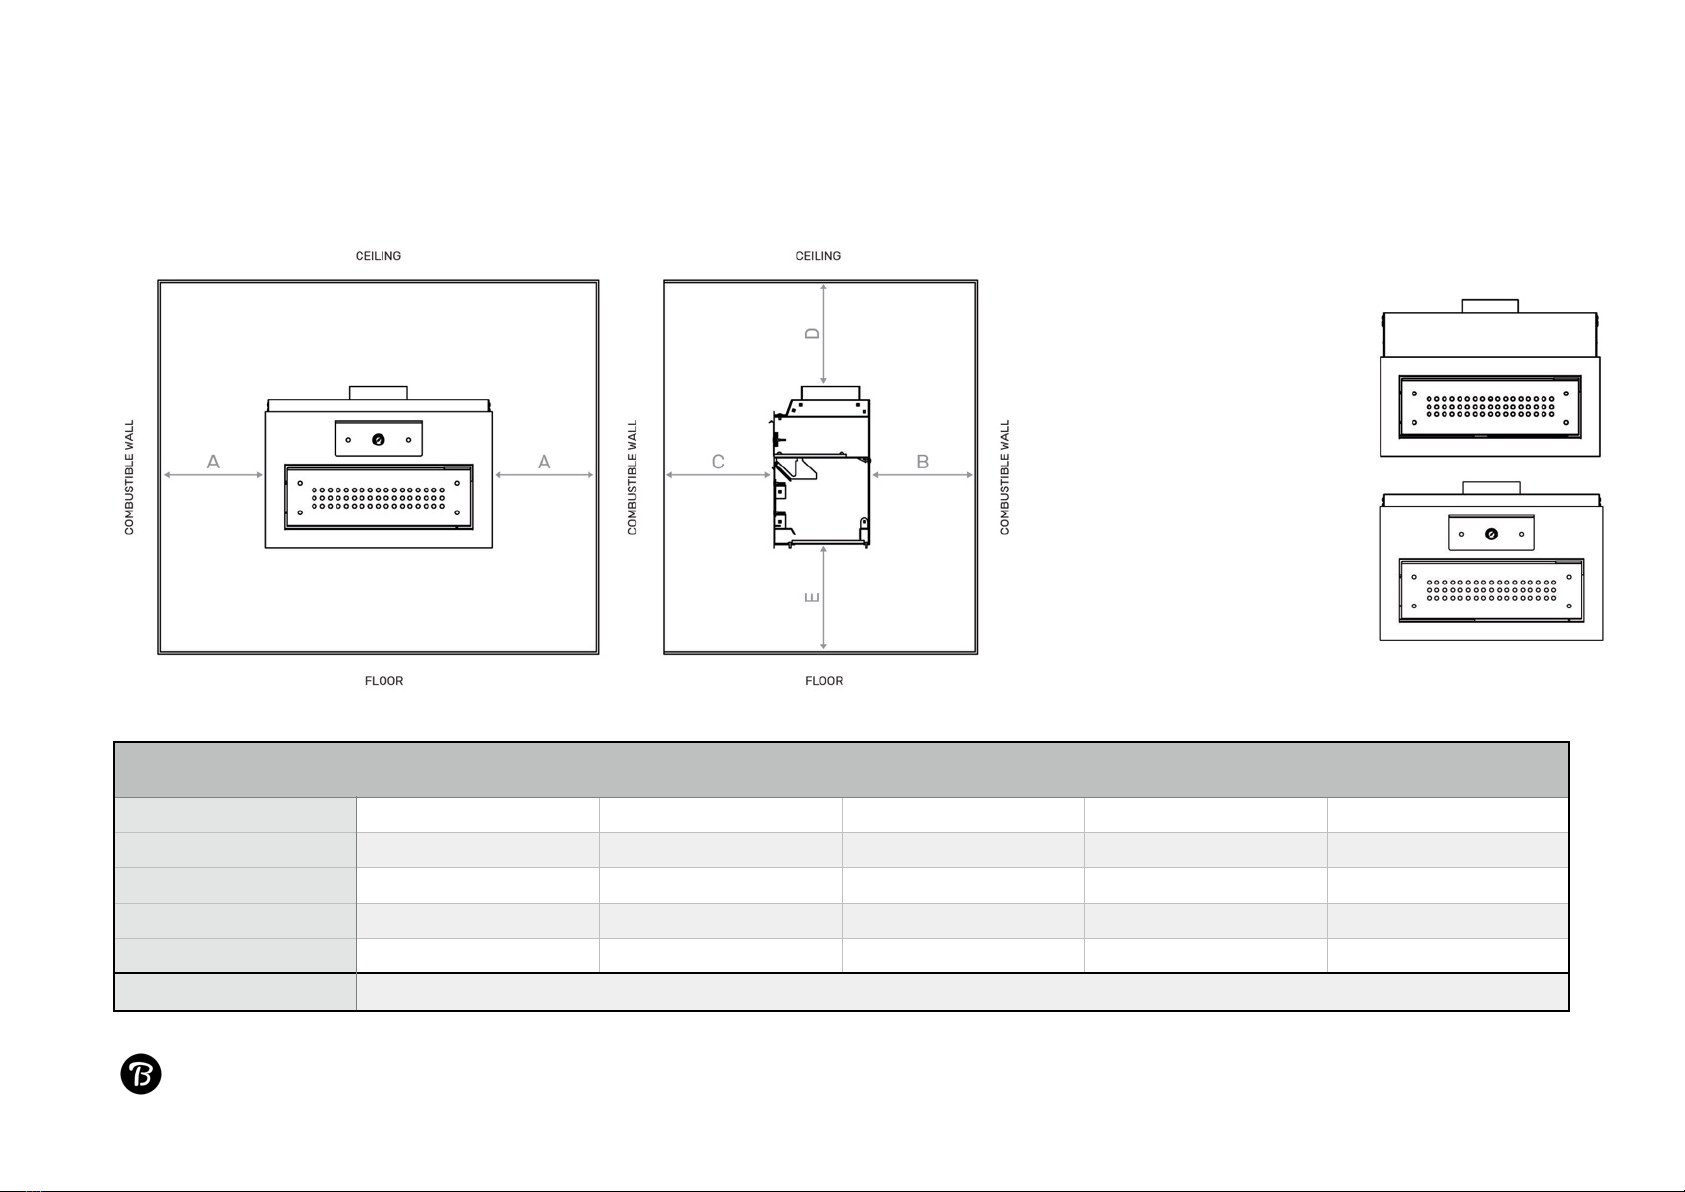
HEAT SENSITIVE MATERIALS EXCLUSION ZONE
CLEARANCE
IDENTIFIER
0 SHIELDS
1 SHIELD
(12MM GAP)
1 SHIELD
(25MM GAP)
2 SHIELDS
(12MM GAPS)
SIDE
A
1200
480
360
240
REAR
B
1200
480
360
240
FRONT
C
1200
480
360
240
TOP
D
1500
N/A
N/A
N/A
BOTTOM
E
1200
960
720
N/A
Safety clearances apply to both variants; Artist & Chef
of 12 26
ARTIST
CHEF
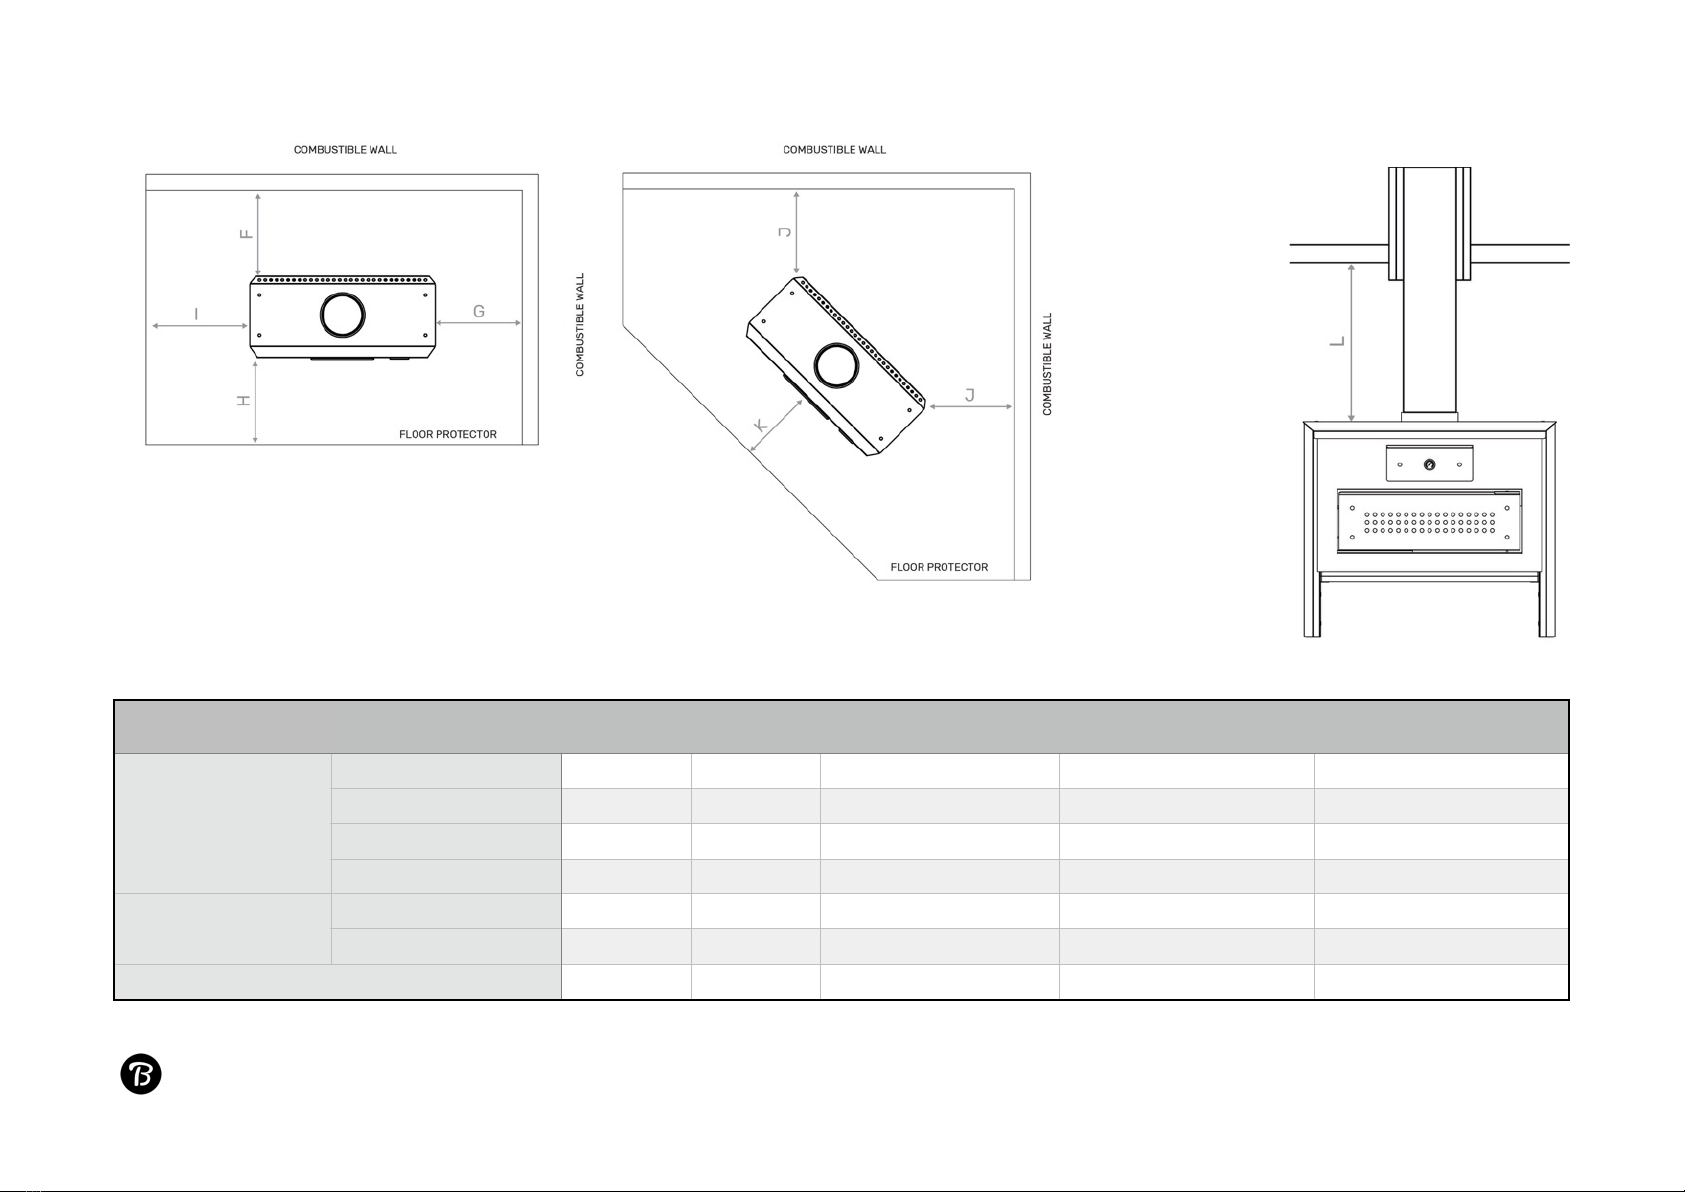
CLEARANCE
IDENTIFIER
0 SHIELDS
1 SHIELD
12MM GAP)
1 SHIELD
(25MM GAP)
2 SHIELDS
(12MM GAPS)
STANDARD INSTALL
COMBUSTIBLE WALL REAR
F
1200
480
360
240
COMBUSTIBLE WALL SIDE
G
1200
480
360
240
FLOOR PROTECTOR FRONT
H
1000
1000
1000
1000
FLOOR PROTECTOR SIDE
I
1000
1000
1000
1000
CORNER INSTALL
COMBUSTIBLE WALL REAR
J
1200
480
360
240
FLOOR PROTECTOR FRONT
K
1000
1000
1000
1000
CEILING
L
1500
N/A
N/A
N/A
of 13 26
ENTERTAINER
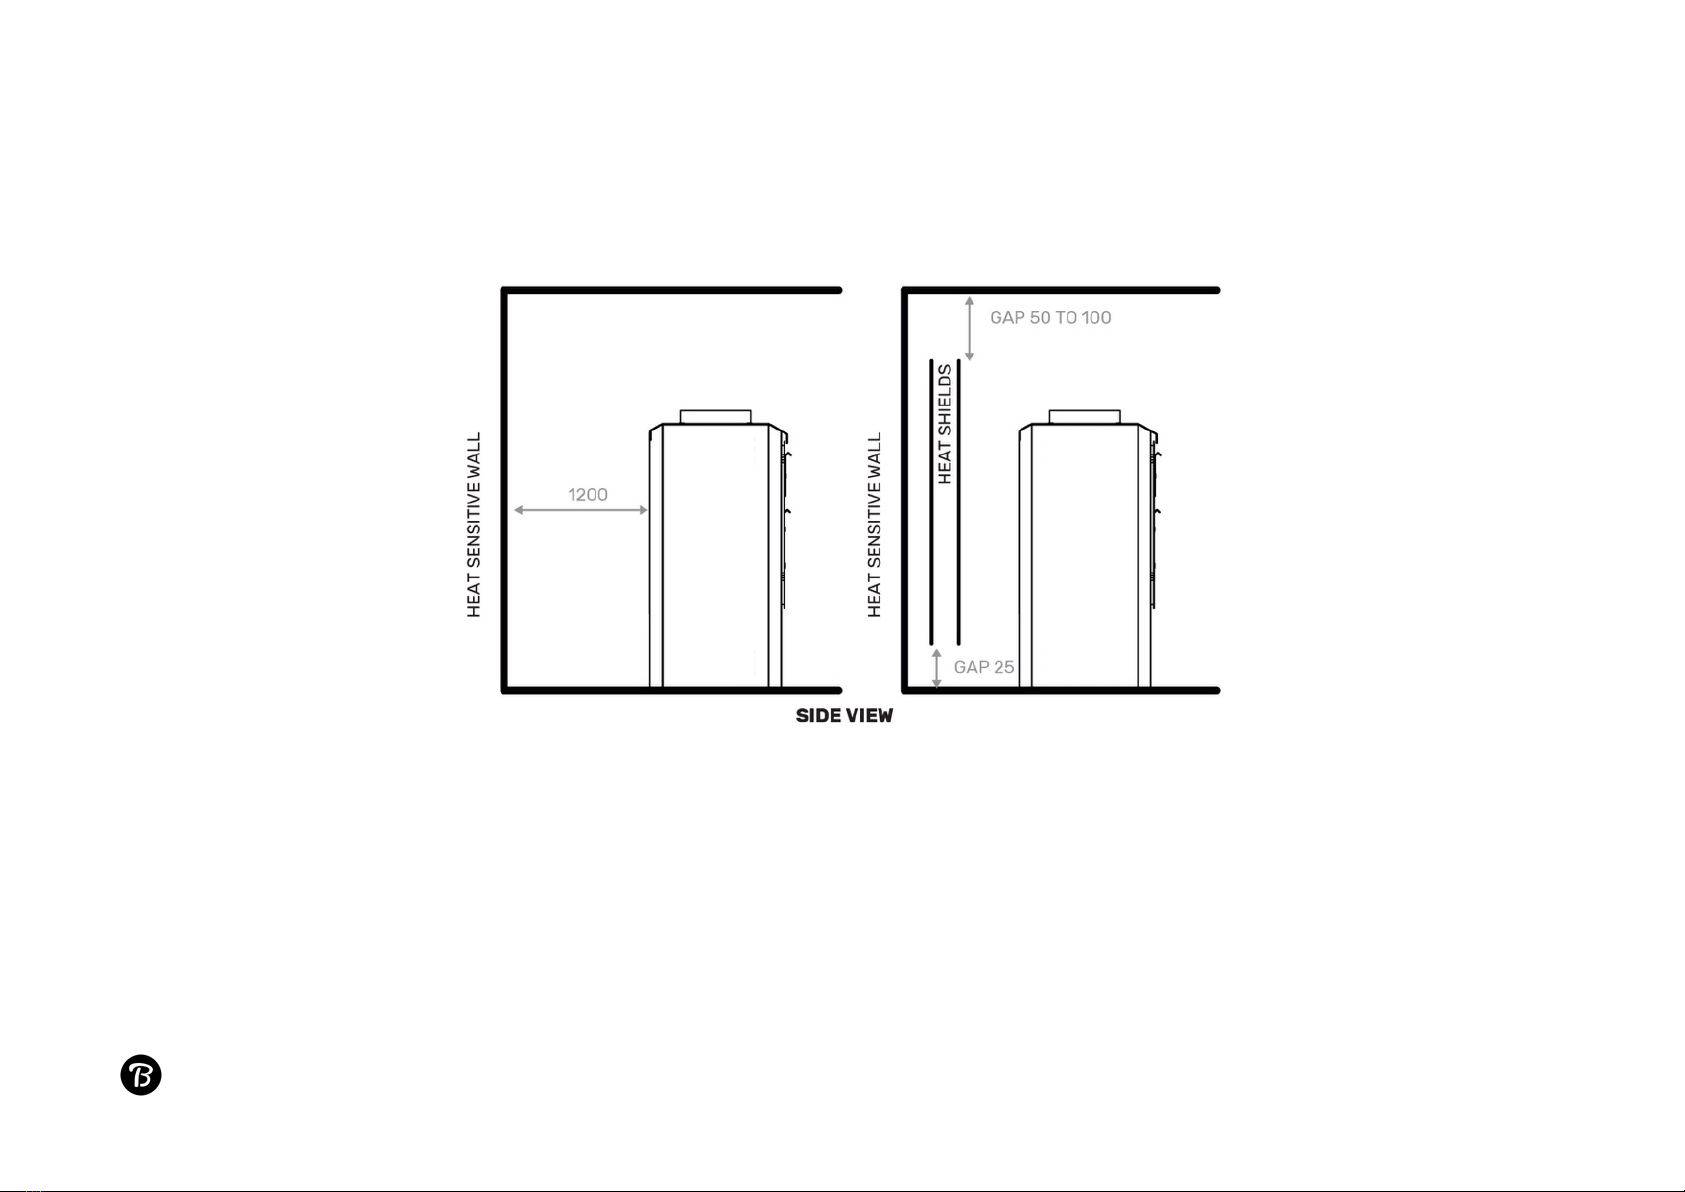
WALL SHIELD REQUIREMENTS
Wall shields must be made from heat-tolerant material (allowable service temperature greater than 150°C but less than 600°C).
Vertical shields must be vented by a 25mm gap at the bottom and a 50mm to 100mm gap at the top. They must extend no less
than 450mm either side of the appliance.!
of 14 26

FLOOR PROTECTOR REQUIREMENTS
To achieve a clean aesthetic it is recommended to install Open Fire Cooker units on or above heat-resistant material (allowable
service temperature of 600°C or greater). Appropriate materials include but are not limited to; cement, concrete, slate, brick and
steel.
A floor protector is required when any part of the floor area within 1000mm of the appliance is heat-sensitive material (allowable
service temperatures less than 150°C).
Floor protectors shall be constructed from any material, or combination of heat-resistance materials, which ensures the protector
is in accordance with or exceeds the requirements of AS NZS 2918.
The floor protector shall extend either to a distance of not less than 1000 mm beyond any part of the appliance or a lesser distance
at which it forms an abutment with a heat-resistant wall and shall be constructed in accordance to AS NZS 2918.
of 15 26

FLUE REQUIREMENTS
The flue system, including any access port covers, shall be constructed from Grades 301, 302, 304, 310, 316 or Grade 321 austenitic
stainless steel having a minimum thickness of 0.52mm in accordance to AS NZS 2918.
Flue casings (inner and outer) shall be constructed from stainless steel not less than 0.52mm or corrosion protected steel not less
than 0.55mm in accordance to AS NZS 2918.
Flue casings must be vented top and bottom as per AS NZS 2918 and with 25mm air gap all round between each. There must be at
least 25mm air gap from outer casing to heat sensitive materials.
In addition to complying with AS NZS 2918, the flue system must be installed as per the flue manufacturer’s installation
instructions.
FLUE SIZING TABLE
Active Flue
Inner Casing
Outer Casing
Cowl
Flue Pipe Diameter (Ø)
250mm / 10”
300mm / 12”
350mm / 14”
Suits 250mm/10” (Active)
Flue Pipe Material:
Stainless Steel
Galvanised Steel
Galvanised Steel
Stainless Steel
Crimp Direction:
Down
Up
Up
Sizing are the same for all Open Fire Cooker units.
of 16 26
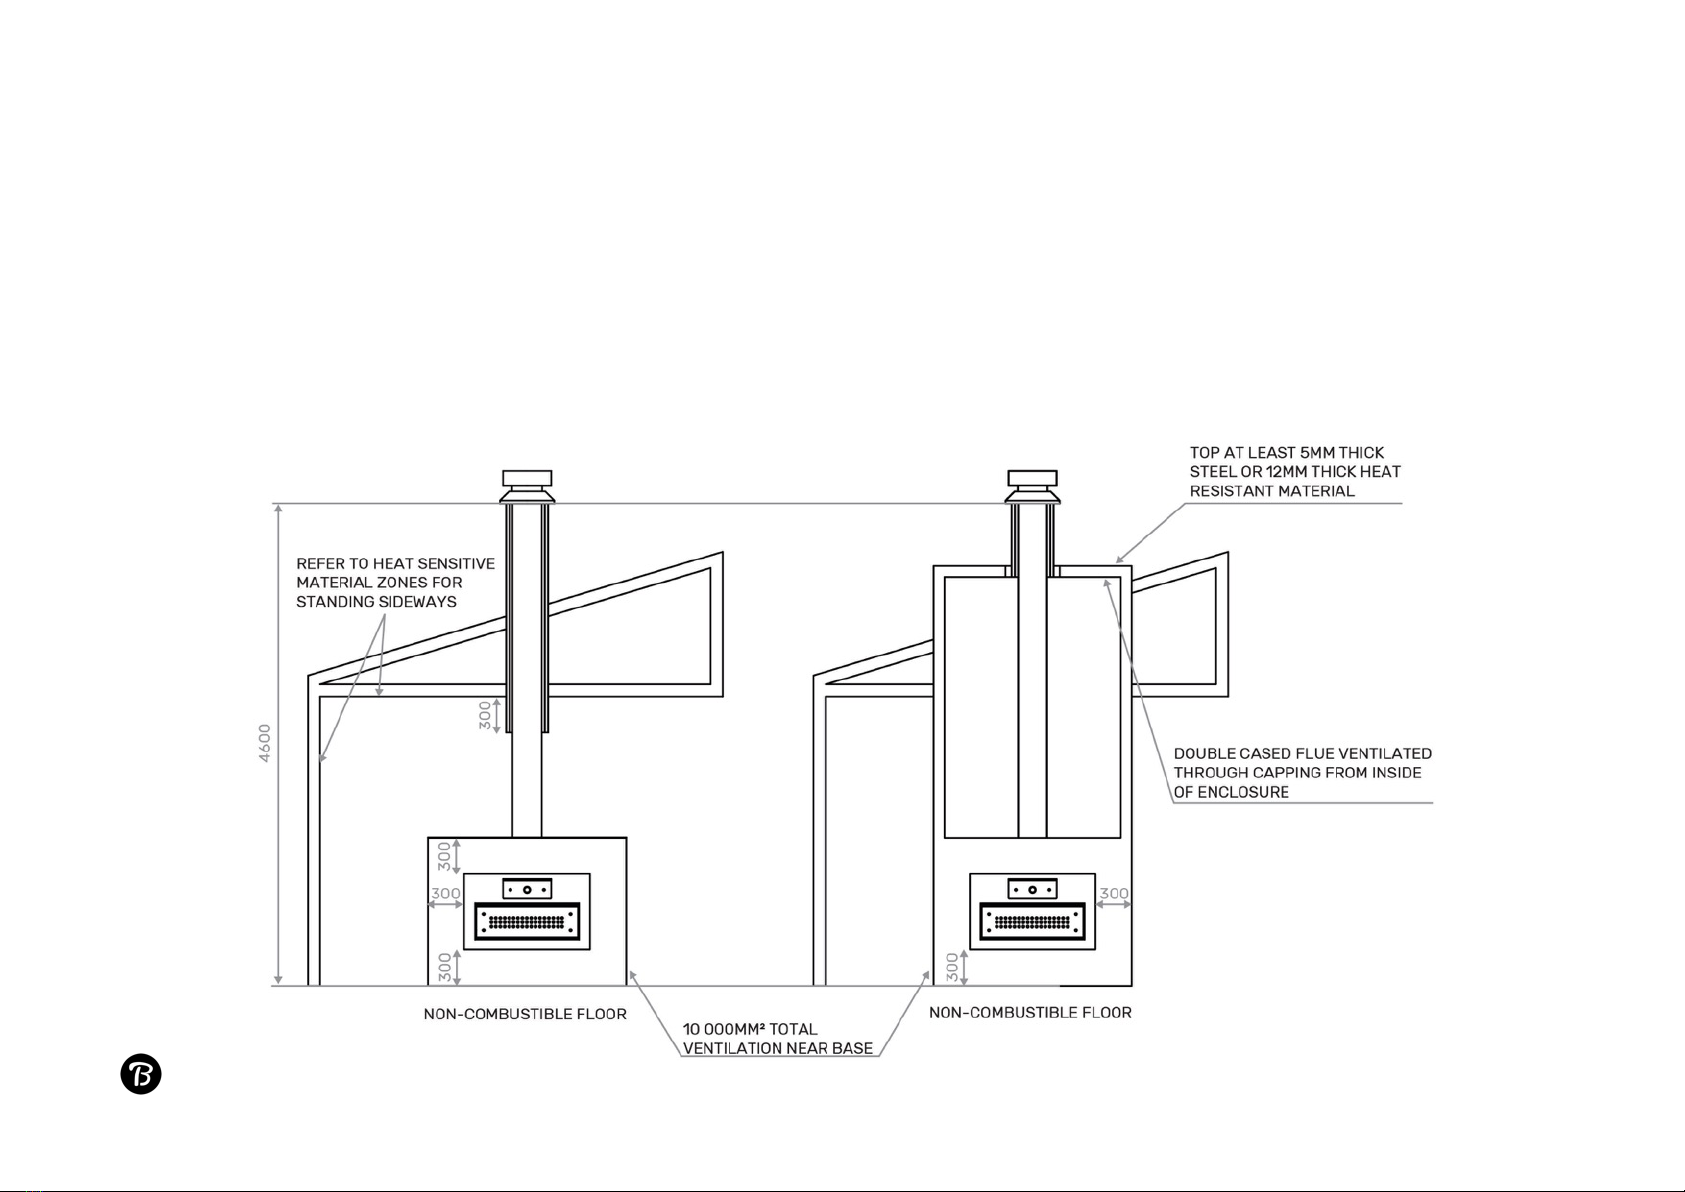
EXAMPLE ENCLOSURE INSTALLATIONS
We recommend building your enclosure from any of the following materials:
•19mm cement sheet
•75mm standard brick
•50mm Skamol board
•100mm Hebel panel!
of 17 26
FREESTANDING ENCLOSURE INSTALLATION
MASONRY ENCLOSURE INSTALLATION
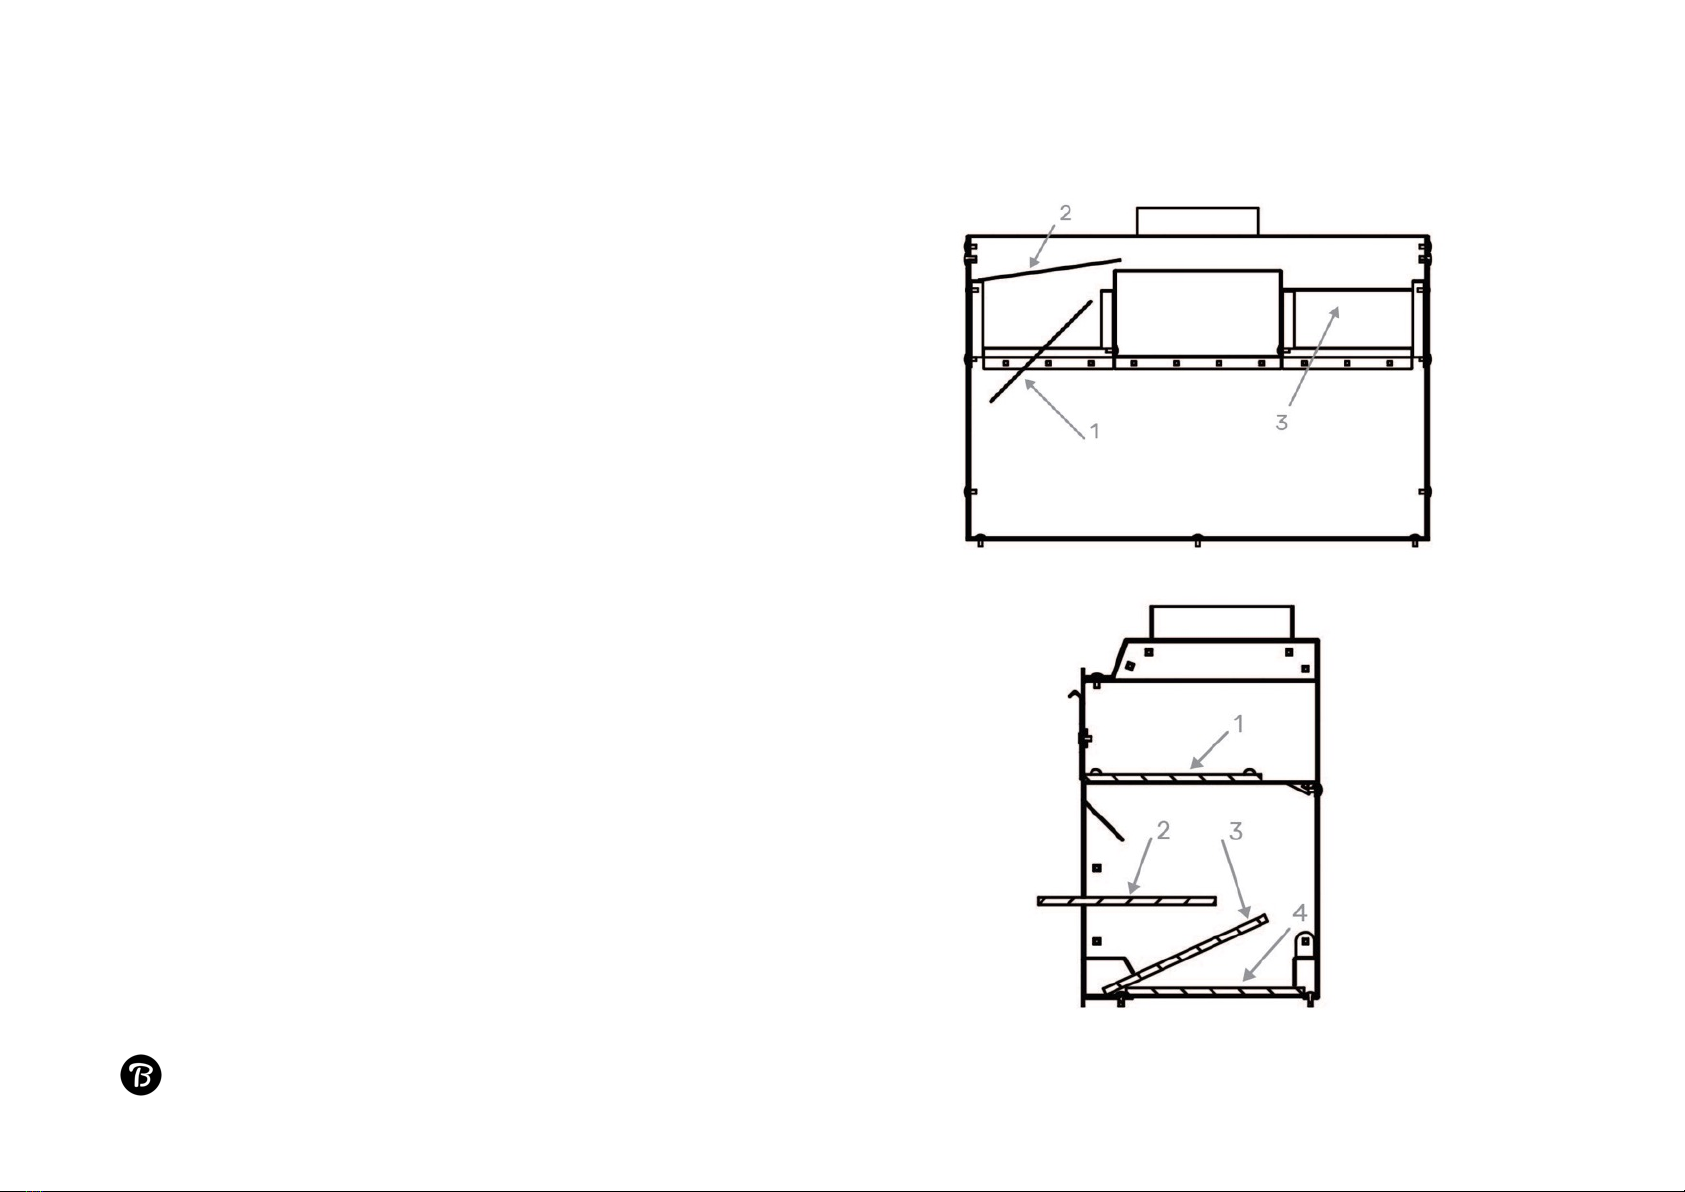
ASSEMBLING BILLY
BAFFLES
1. Lift the inner side of the baffle past the inner baffle shelf
2. Lift baffle above the oven until it clears the outer baffle shelf
3. Drop into place on top of baffle shelves
4. Repeat for both left and right baffles
STONES
1. Open oven door and slide a stone into place leaving no gap at
the front
2. Feed 3 stones through the main opening
3. Tuck front under the ash lip and pivot to floor
4. Stones sit flat between raised locators in base!
of 18 26
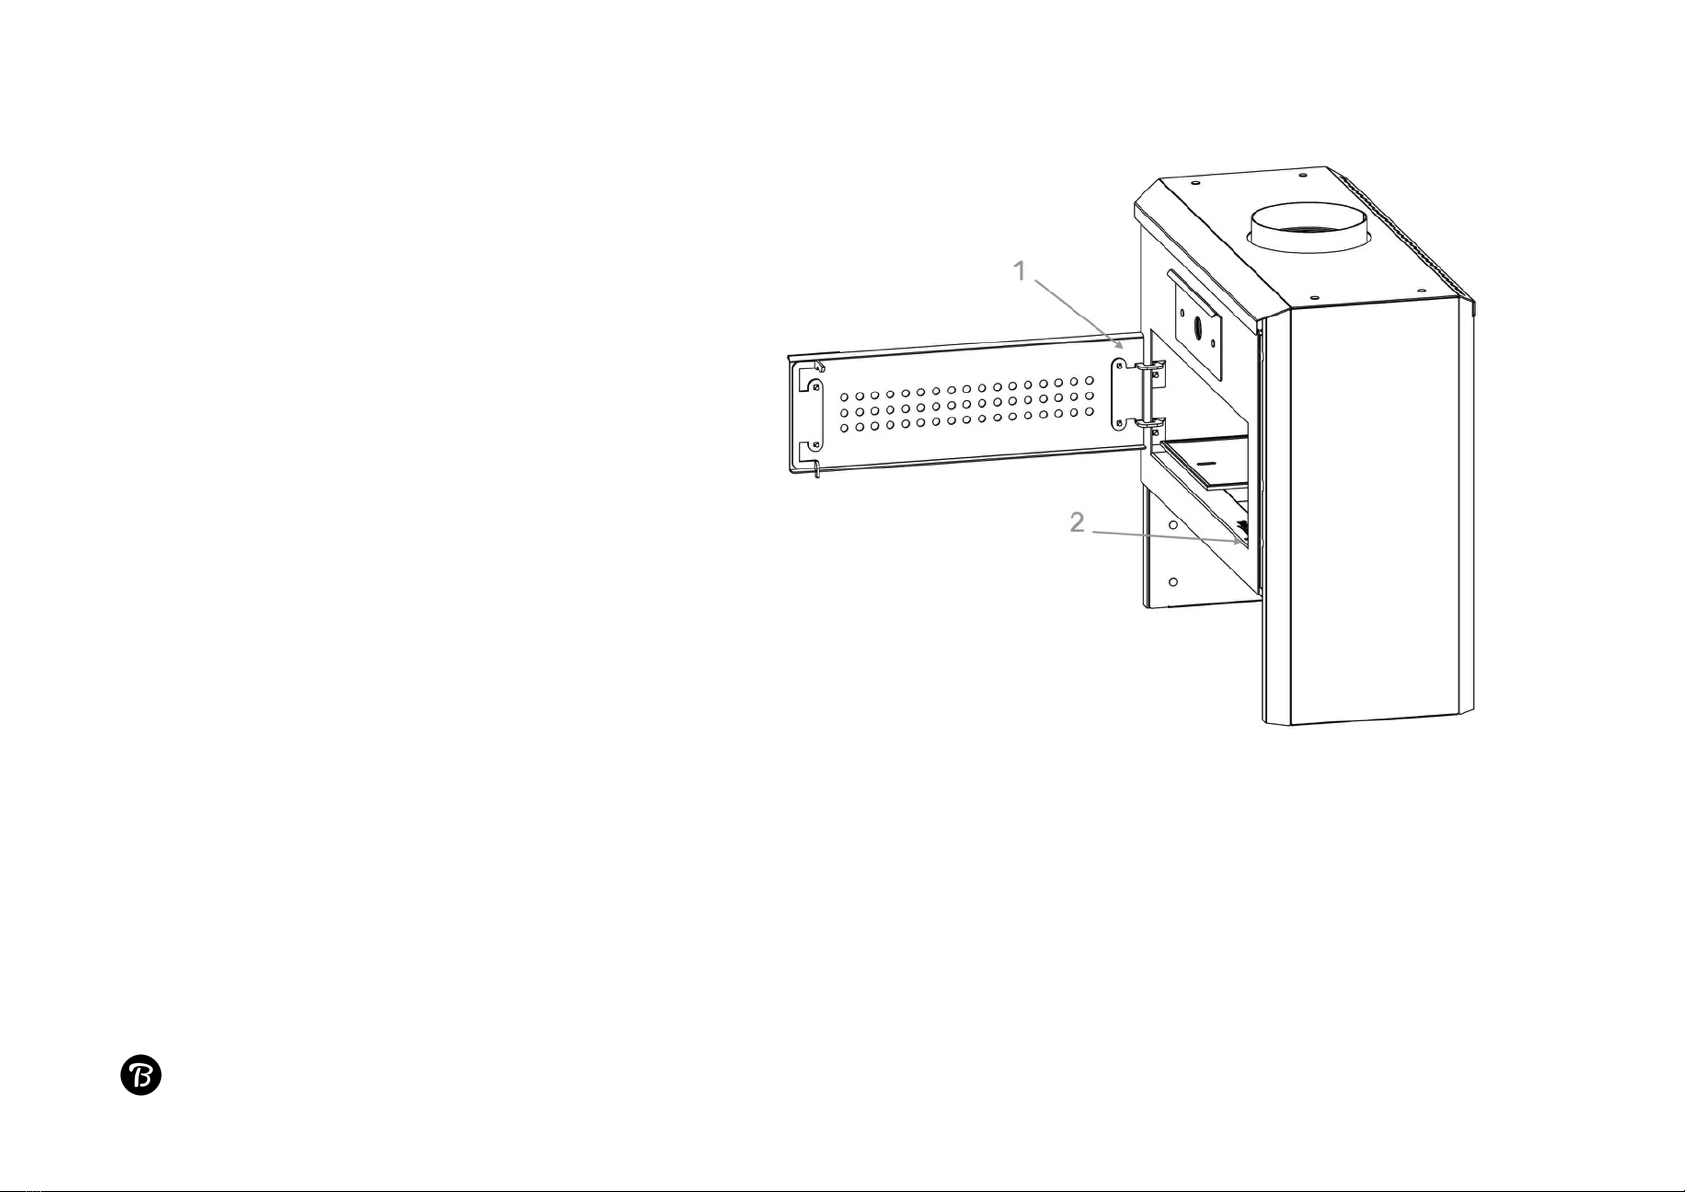
OPERATION
REMOVABLE DOOR
This door is removable and can be used or put aside
based on your needs, for example:
ON
•Cook at higher temperatures
•Retain heat for the pizza oven
•Prevent smoke spillage
•Retain falling logs or sparks
OFF
•Grill with plenty of space
•Appreciate the aesthetics of the fire
1. To attach the door, drop the hinge pins (vertical bolts)
through the tabs hidden behind the front left opening
2. To close the door, lift the handle until the latch
catches the slot on the ash lip
FUEL
Billy is designed to burn dry wood for cleaner and longer operation. Prohibited items include but are not limited to, plastics, paper
(large amounts), cardboard, treated wood, composite woods or flammable liquids. Burning prohibited items increases the likelihood
of a flue fire and creates a toxic environment.!
of 19 26

Do not over fill the appliance. If the appliance glows red, wait until it stops glowing before adding more fuel.
Wood should be stored in a dry place. It is recommended to be split and seasoned for a year to reduce moisture content before
burning. For more information about seasoning and storing timber we recommend Norwegian Wood: Chopping, Stacking, and
Drying Wood the Scandinavian Way - Lars Mytting.
FIRST LIGHT PROCEDURE
The first time you light your Billy it will emit smoke and a strong odour into the air, this is the paint curing. During this process, it is
important not to touch any surfaces as the paint temporarily becomes soft and is easily marked. Ensure all packaging has been
removed.
When lighting Billy for the first time…
•Keep all doors open so they are not in contact with other curing surfaces
•Leave the removable door slightly ajar to cure without damaging paint on ash lip
•Provide as much ventilation to the area as possible to remove odour
•Maintain only a small fire for the first 15 minutes
•Build the fire slowly to a medium size and maintain for 60 minutes
•Carefully increase to a very hot fire (approximately 1/3 of firebox) and maintain for another 60 minutes
•To complete the curing process, let the fire cool to room temperature
REGULAR LIGHT PROCEDURE
Once the initial curing procedure has taken place follow these points for lighting a cold Billy…
•Place firelighters and kindling stack in the middle of the firebox
•Light Billy
•Gradually build up the fire to desired size by regularly adding fuel
•Keep the removable door closed to speed up the fire building process and avoid smoke spill!
of 20 26
This manual suits for next models
6
Table of contents
Popular Cooker manuals by other brands


Parkinson Cowan
Parkinson Cowan Lyric 55G Owner's handbook

Zanussi Electrolux
Zanussi Electrolux Cookers user manual

GIGA
GIGA I2P Installation, operating and maintenance instructions

InstantPot
InstantPot RIO PLUS user manual

Bayou Classic
Bayou Classic KDS-1 SAFETY ALERTS, ASSEMBLY & OPERATING INSTRUCTIONS GENERAL MAINTENANCE & STORAGE

Smeg
Smeg SA9066XS Brochure & specs

Siemens
Siemens HS 33024 instruction manual

SKLADOVA TEHNIKA
SKLADOVA TEHNIKA Plamak instruction manual

IH
IH GTB2 Quick start instructions

CDA
CDA RV911SS/1 Installation, use and maintenance

montpellier
montpellier MTCC60FW Installation and operating instructions

Belling
Belling Cookcenter Series Installation & user's instructions