binger EFIS 4 User manual

Titelbild
Operating Instructions
EFIS®4
VEHICLE INSPECTION MIRROR
Trolley mirror with LEDS
www.ebinger.org

2
Trademarks
The Ebinger logo is a registered trademark of Ebinger Prüf- und Ortungstechnik GmbH.
Names of other registered trademarks as follows:
EBEX®| EFIS®| EPAD®| EPAS®| MAGNEX®| MAILEX®| PASSEX®| TREX®
UPEX®| UWEX®
All other trademarks used are the property of their respective registered owners.
Technical specification
Ebinger retains the right to changes technical specifications at any time without prior notice.
The scope and timing of such changes are at the discretion of the manufacturer. Both
minor and fundamental changes are possible, as part of our programme of continuous
product improvement.
The information presented in this document relates to an entire range of products. The
technical data for individual units can be requested from Ebinger, by quoting the model
name and serial number.
Copyright
© 2012, Ebinger Prüf- und Ortungstechnik GmbH
BA-EFIS4/09-12-E-Europe
Unless granted explicit permission, you are prohibited from distributing or reproducing the-
se Operating Instructions, and from utilising or publishing their content. Breach of these
terms will be prosecuted. All rights of registration for potential patents, utility models or
industrial designs reserved. Printed in Germany.
Ebinger Prüf- und Ortungstechnik GmbH
Technology center Wiesbaum
Vulkanstraße 14
54578 Wiesbaum
Germany
Tel: + 49 6593 99894 - 0
Fax: + 49 6593 99894 - 50
Email: eifel@ebingergmbh.de
Web: www.ebinger.org
Service address

3
1 General safety guidelines 4
1.1 About these operating instructions 4
1.2 Handling technical faults 5
1.3 Instructions for LED models 5
1.4 Instructions for models powered by disposable or rechargeable batteries 5
1.5 Instructions for cleaning 6
1.6 Usage in professional security work 6
2 Product description 7
2.1 EFIS - Ebinger inspection tools - Trolley mirror systems 7
2.2 EFIS®4 Vehicle inspection mirror 7
3 Components 8
3.1 Components 8
3.2 Identification 9
4 Assembly 9
4.1 Connecting the telescopic handle to the mirror support 9
4.2 Changing the dry batteries 10
4.3 Recharging the rechargeable batteries 11
5 Start-up procedure and operation 12
5.1 Changing the handle length and mirror angle 12
5.2 Changing the angle of the mirror head 13
5.2.1 Manual change of the the mirror head angle 13
5.2.2 Using the (optional) mechanism to change the angle of the mirror head 14
5.3 Activating mirror illumination 14
5.4 Using the search and inspection mirror 15
6 Care and troubleshooting 16
6.1 General equipment care instructions 16
6.2 Troubleshooting 16
6.3 Replacing the control cable 17
7 Accessories and order details 18
7.1 Available spare parts / part numbers 18
7.2 Dimensions 19 - 22
7.3 Components / part numbers / weight 23
7.4 Optional accessories 24 - 25
8 Technical data 26
i
!
EFIS®4
4General safety guidelines
1. GENERAL SAFETY GUIDELINES
This section presents some important safety guidelines that must be observed at
all times when using the unit.
1.1 About these operating instructions
Important:
Before starting to use this unit, read and observe the following safety guidelines:
➊ Read this manual carefully before assembly and use!
➋ Ensure that you follow the instructions in this manual for all work involving this unit!
EBINGER and EBINGER‘s representatives do not accept liability for losses resulting from
actions or activities that have not been described in this manual.
➌ Use the unit only for the intended purpose as described in this manual!
Warning notices, precautionary measures, instructions and tips present information of par-
ticular importance for the user and are marked as follows:
WARNING
Warning notices indicate situations that can present health hazards or
endanger life. Instructions in these sections must be followed strictly at
all times!
CAUTION
Precautionary measures relate to situations in which damage to the unit
or consequential damages or loss (e.g. data loss) may occur. Instructions
in these sections must be followed strictly at all times!
ADVICE
Follow the advice given in these sections to avoid faults, which may occur
when operating the unit.
TIP
Follow the advice given in these sections to improve operating.
EFIS®4
5
General safety guidelines
1.3 Instructions for LEDs
WARNING
Do not look directly into the LEDs.
1.4 Instructions for devices powered by disposable or
rechargeable batteries
WARNING
Batteries and rechargeable batteries can explode if used incorrectly!
Always ensure you follow below the warning notices:
•Use disposable or rechargeable batteries as specified in the Operating
Instructions.
• When inserting batteries, ensure correct polarity.
• Do not expose batteries to fire or high temperatures.
• Never attempt to recharge, short-circuit, disassemble or recharge disposa-
ble dry batteries.
.• In case of a short-circuit, rechargeable batteries can generate especially
high currents that can cause cable fires, sparks or injury. An integrated
electronic fuse prevents damage of the device.
• Keep disposable or rechargeable battery contacts dry and avoid short
circuits, do not let them come into contact with conductive materials.
1.2 Handling technical faults
WARNING
Do not continue to use the unit if connection leads or components are da-
maged!
If parts are defective or missing, replace them only with original EBINGER
spare parts. Failure to do so may presents a risk of short-circuits, overloading,
incorrect polarity or electric shock.
Perform maintenance activities only as described in this manual or as in-
structed during specialist training courses provided by the manufacturer.
iTip
If problems occur, please first read the „Maintenance and Troubleshoo-
ting“ section thoroughly before contacting your local EBINGER Service.
EFIS®4
6General safety guidelines
CAUTION
Observe the following safety precautions to avoid damage:
• If the unit is to be stored or not used for a longer period of time, remove
batteries.
• Avoid deep discharge of rechargeable batteries. Resulting damage can-
not be claimed against product warranty.
• Before operating the battery charger, check for correct voltage of mains
supply.
1.5 Instructions for cleaning
CAUTION
Do not use chemical substances to clean the unit. Chemical substances may
react with housing components and cause irreparable damage. For cleaning,
please use a soft cloth dampened with water.
1.6 Usage in professional security work
WARNING
Any equipment used to support the search for potentially dangerous objects
should be used only by personnel who possess the necessary qualifications
according to the applicable international and/or national regulations.
Before deployment in a potentially danger inclined work qualified personnel
must assess and decide on the tactical suitability of the unit.
!ADViCE
Dispose unserviceable batteries only as per applicable local regulatory
provisions.

EFIS®4
7
Product description
2. PRODUCT DESCRIPTION
This section informs you about the key properties of this unit and/or of the unit‘s
corresponding product range.
2.1 EFIS®– Ebinger inspection tools – Trolley mirror systems
Ebinger Prüf- und Ortungstechnik GmbH offers a complete range of search and inspection
mirrors – and systems.
The EFIS®– search mirrors help to rapidly inspect areas that are difficult or impossible to
view directly. Our mirrors have a wide range of applications. For example, they can be
used to look under vehicles, into packing nets, spaces between or above items of furni-
ture, as well as into cavities and gaps or areas of buildings hidden from direct view. The
mirrors enable police, customs, military and security personnel to make a much more pre-
cise and thorough search or improve checkpoint processing times. Our inspection mirrors
stand out from the average due to their robust, all-weather design.
We have mirrors to fit a wide range of requirements, including:
• Hand held and/or wheeled version
• Shadowless illumination by torch or LEDs to support inspection in low light conditions
• Convex shaped mirror to enlarge the field of view
• Video search apparatus using videocamera and colour monitors
2.2 EFIS®4 Vehicle inspection mirrors
The trolley mirror EFIS®4 is a convenient tool for a fast and easy inspection of the under-
side of vehicles and furniture etc. It is characterised in particular by the following product
features:
• Easy to handle, rugged, weatherproof
• Petrol prove LED illumination
• Wheeled, telescopic handle
• Can be dismantled for transport
The following special models are available:
• Remote controlled mirror angle adjustment
• Mirror head, 200 x 400 mm
• Rugged polished stainless steel mirror

EFIS®4
8Components
Ten splashproof LEDs provide a bright illumination of the inspection area. The unit has an
ergonomic design: the telescopic handle can be adjusted to suit tall or short operators and
to reach far under large vehicles.
The LEDs are powered by 3 disposable 1.5 V C-cell batteries (IEC no. LR 14).
Upon request rechargeable NiMH batteries and a suitable charger are available as optional
accessory.
3. COMPONENTS
This section informs you about the parts from which the EFIS®4 inspection mirror
is built as well as the features that you can use to unambiguously identify the unit.
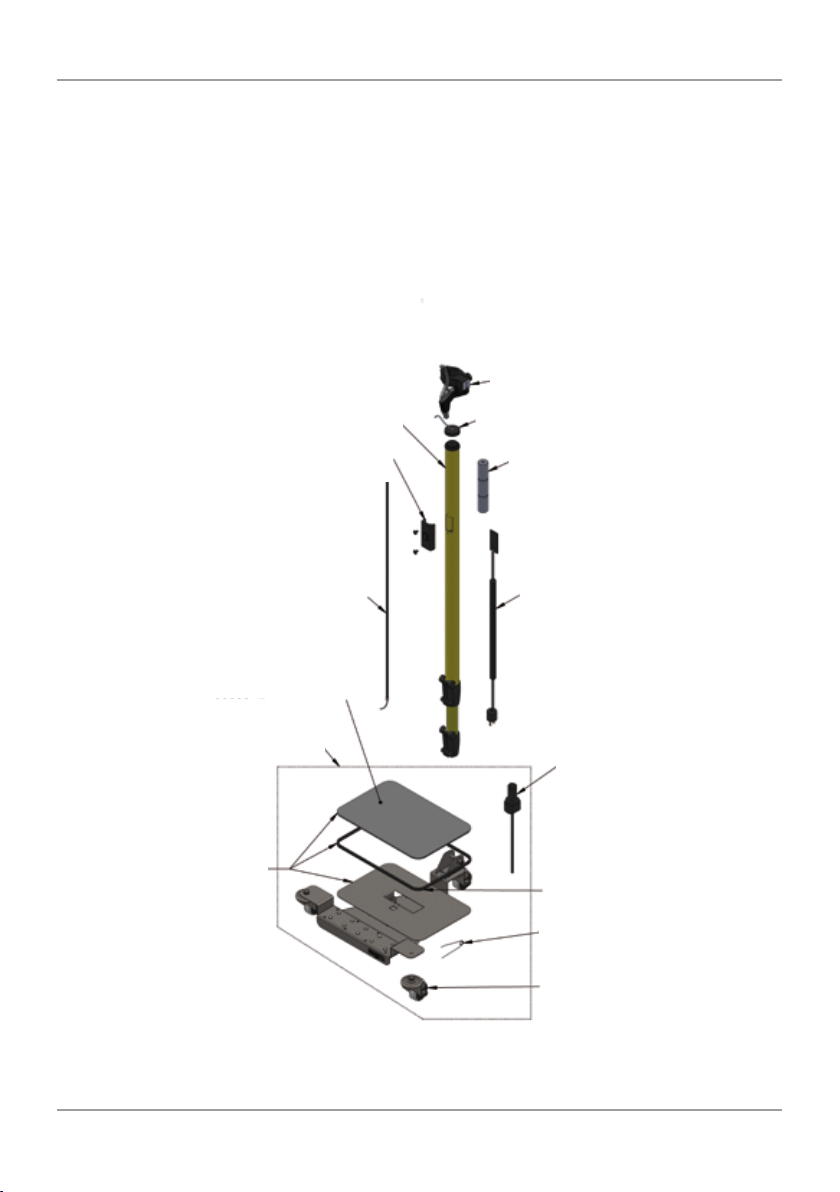
3.1 Components
The EFIS®4 Vehicle inspection mirror consists of the following components:
➊ Mirror chassis 200 x 300 mm with three rollers and LED illumination (10 LEDs)
➋ Telescopic handle with controls and integrated battery compartment
•Operating instructions (not shown)
Battery operation:
➌3 x 1.5 V C-cells (IEC LR14)
Rech. battery operation (accessory part):
➌ 3 x rechargeable 1.2 V NiMH
C-cell batteries, 4500 mAh
➍ACS 110 charger for 3 x 1.2 V
NiMH 4500 mAh with charging cable
EFIS®4 components
➊
➋
➌
➍
EFIS®4
9
Assembly
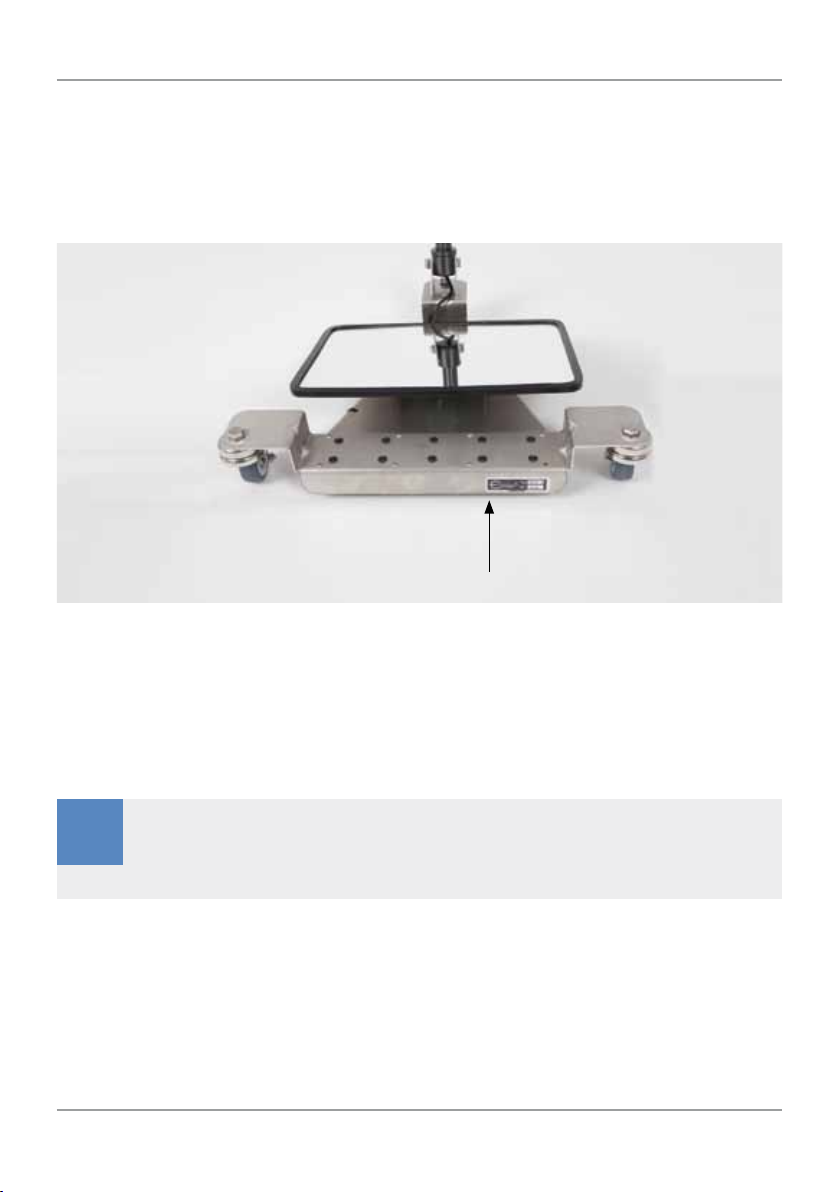
3.2 Identification
Information about the unit type and serial number, as well as any customer-specific refe-
rence codes, can be found at the following location:
•Label on the mirror support chassis, specifying the model type and serial number.
4. ASSEMBLY
This section informs you about the correct assembly of the unit. For the EFIS®4
search mirror, assembly merely involves the fitting of the telescopic tube and the
insertion of batteries into the battery compartment.
!ADViCE
Before assembling components and parts, inspect these to ensure they are
clean, undamaged and complete.
4.1 Connecting the telescopic handle to the mirror support
1. Open the locking clamp located at the lower end of the telescopic handle.
2. Insert the end of the telescopic tube – as shown in the following figure – into the hinge
joint attached to the mirror support.
3. Close the locking clamp.
Identification point for EFIS®4 Search and inspection mirror

EFIS®4
10 Assembly
Connecting the telescopic handle to the mirror support
!ADViCE
During assembly, the locking clamp on the telescopic handle should
point upwards in order to ensure that the other user controls on the tele-
scopic handle are aligned in the correct position (see figure).
CAUTiON
Do not use a mix of dry batteries and rechargeable batteries!
4.2 Changing the batteries
The battery compartment is located inside the upper end of the telescopic handle. Electric
power is supplied by:
•3 x 1.5 V dry batteries (C-cells, IEC LR14) or
•3 x 1.2 V rechargeable NiMH 4500 mAh
Proceed as follows:
1. Open the battery compartment by turning the protective cap in anti-clockwise direction.
2. Remove any batteries which might be still in the compartment.
3. Fit 3 dry or rechargeable batteries to the battery compartment.
4. The batteries‘ positive terminals must point towards the closure of battery compart-
ment.
5. Close and lock the battery compartment by turning the closure in clockwise sense.

EFIS®4
11
Assembly
CAUTiON
Take care not to damage the rim the protective cap when replacing it!
4.3 Recharging the NiMH batteries
Rechargeable NiMH batteries can be recharged directly inside the battery compartment.
To do so, use the Ebinger supplied charger accessory available for the unit.
1. Insert the plug of the charger connection lead into the charging socket located laterally
at the telescopic tube control section.
2. Follow the charger‘s operating instructions.
Connecting the charger to the charging socket on the controls
Opening the battery compartment and replacing the batteries

EFIS®4
12 Start-up procedure and operation
CAUTiON
Never attempt to recharge dry batteries! This can cause them to explode!
Always follow the advice given in the charger‘s operating instructions!
Ensure that the mains rating given for the charger matches the specifica-
tions of your electricity distribution network!
5. START-UP PROCEDURE AND OPERATION
This section familiarises you with the unit‘s various operating and display compon-
ents. It provides you with details of the various procedures required for unit start-
up and for checking the unit is functioning properly.
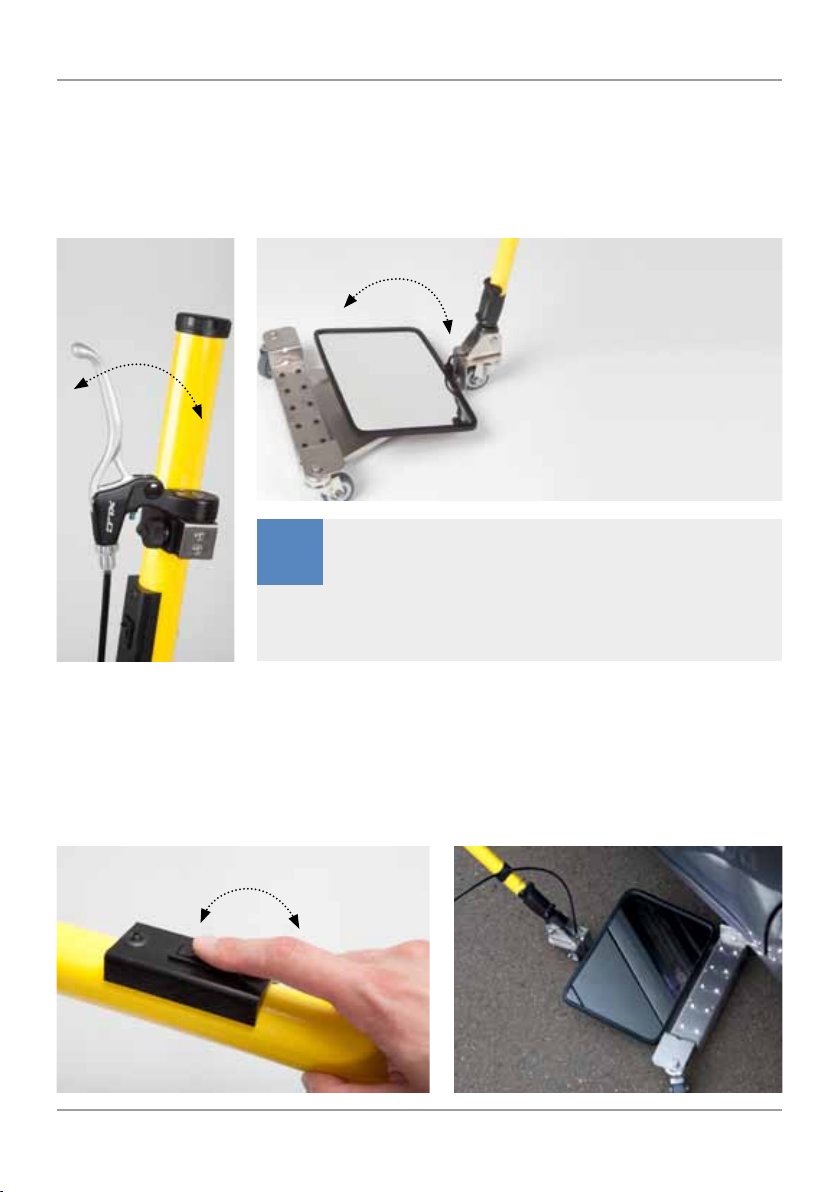
5.1 Changing the handle length and mirror angle
The length of the telescopic handle can be adjusted. After opening the locking clamp, the
telescopic handle can be freely adjusted for operator comfort.
Tip
To make this section easier to understand, we assume that you have as-
sembled the unit according to the instructions in the previous section.
i
Locking clamp on telescopic handle to adjust
the handle length

EFIS®4
13
Start-up procedure and operation
Hinge joint for adjusting the telescopic handle‘s angle
5.2 Changing the angle of the mirror head
The tilt-adjustable mirror is attached to the support at 90° to the front wheel axis.
5.2.1 Manual change of the mirror angle
To ensure the best possible view of the vehicle underside, the tilt angle of the mirror can
be adjusted manually.
Manuelle Änderung des Winkels des Spiegelkopfes
!ADViCE
To avoid damaging the unit, the desired tilt angle of the mirror must be
set manually, if you have ordered the EFIS®4 without a mechanical ad-
justment mechanism!
Manually changing the angle of the mirror head
EFIS®4
14 Start-up procedure and operation
Adjustment lever for
the control cable
5.3 Activating mirror illumination
To improve visibility under poor light conditions or in darkness, the mirror has been fitted
with LEDS, which illuminate the inspection area.
The LEDs are switched on and off by a rocker switch at the upper end of the telescopic
handle.
5.2.2 Using the (optional) mechanism to change the angle of the
mirror head
The adjustment lever at the upper end of the telescopic handle can be used to adjust the
mirror mechanically, to give the best possible view.
ON/OFF switch for the LED
mirror illumination
LED mirror illumination
with 10 LEDs
!ADViCE
Lubricate the control cable from time to time, to
extend the life cycle of the control cable. After
about 20,000 activations, the control cable will
need replacing.
Changing the angle of the mirror head
EFIS®4
15
Start-up procedure and operation
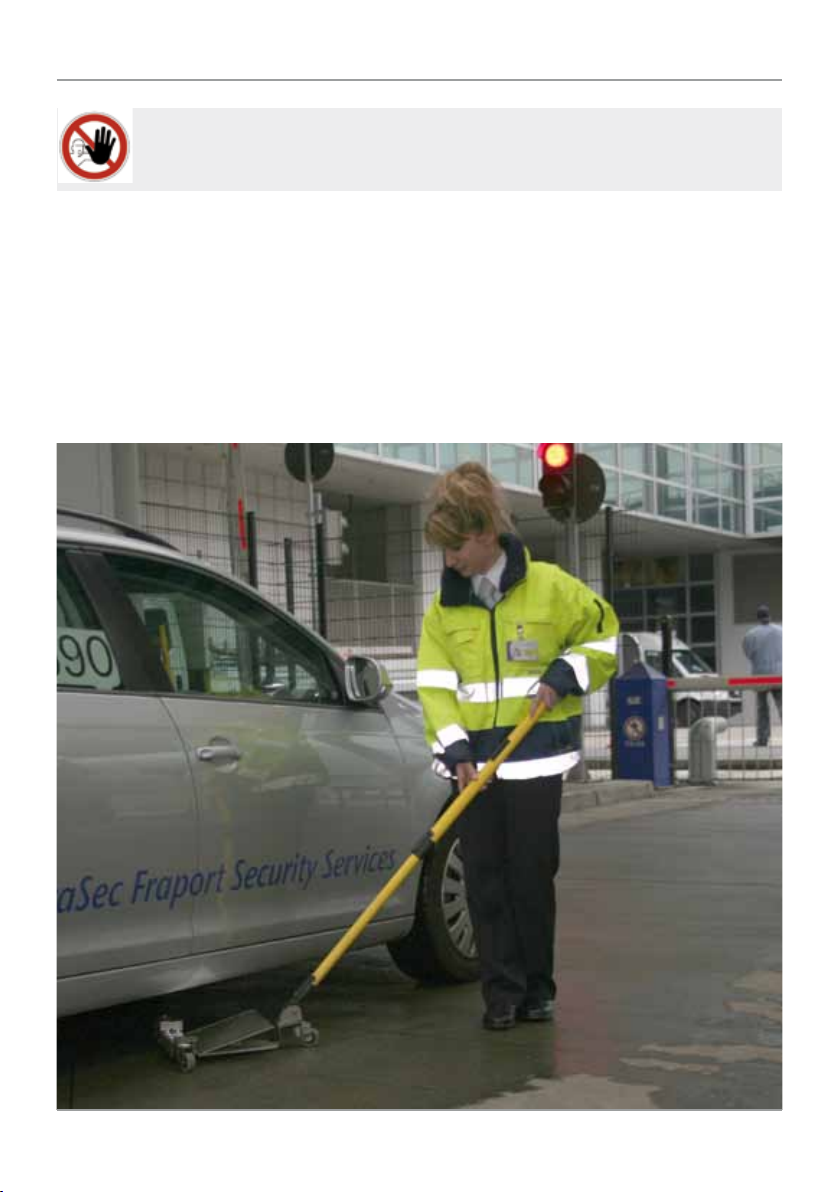
5.4 Using the search and inspection mirror
The search and inspection mirror can now be used. Use the telescopic handle to push the
mirror under the object to be investigated. The rubber edging of the mirror prevents scrat-
ching if it comes into contact with the object‘s surface.
The mirror can be tilted to various angles to ensure the user can search the underside of
the object under investigation; if lighting conditions are poor, the user can activate the
mirror illumination by pushing the rocker switch at the handle.
Example use
WArNiNg
Do not look directly into the LEDs!
EFIS®4
16 Care and troubleshooting
•Do not pack and store the unit while it is still damp.
•Remove batteries if equipment is stored as leaking batteries can damage the unit.
•Check rechargeable batteries monthly. If required, recharge them using the charger
supplied.
6. CARE AND TROUBLESHOOTING
This section describes both general and specific care procedures that you can
and should complete as a user. The section also presents some advice for trouble-
shooting.
6.1 General equipment care instructions
Users should complete the following maintenance procedures:
•The unit must be switched off when not in use.
•Electrical contacts, terminals and mechanical connection points, especially the screw
thread, etc. should be kept clean.
•Clean the unit with a damp cloth if soiled before and/or after use. To clean the mirror
surface, we recommend using a lint-free cloth or paper towel and standard commercial
glass cleaner.
6.2 Troubleshooting
Unit does not switch on or goes off randomly when in use.
Cure:
•Ensure that there are fresh batteries in the compartment. Check for correct polarity
•If rechargeable batteries used, check for sufficient charge and recharge as requiered
•Check terminals at the telescopic handle‘s end and on the mirror support chassis
•Contact Service
CAUTiON
Replace the batteries if the LEDs start losing their brightness!
Before storing the unit, ensure illumination is switched off to avoid in-
advertent battery discharge. Remove (rechargeable) batteries if the unit
is to be stored unused for longer periods. Charge rechargeable batteries
regularly to protect them against becoming fully discharged.
Always charge and use rechargeable batteries as a set (3 batteries)!
!ADViCE
During winter conditions in particular, clean all salt water off the unit!
EFIS®4
17
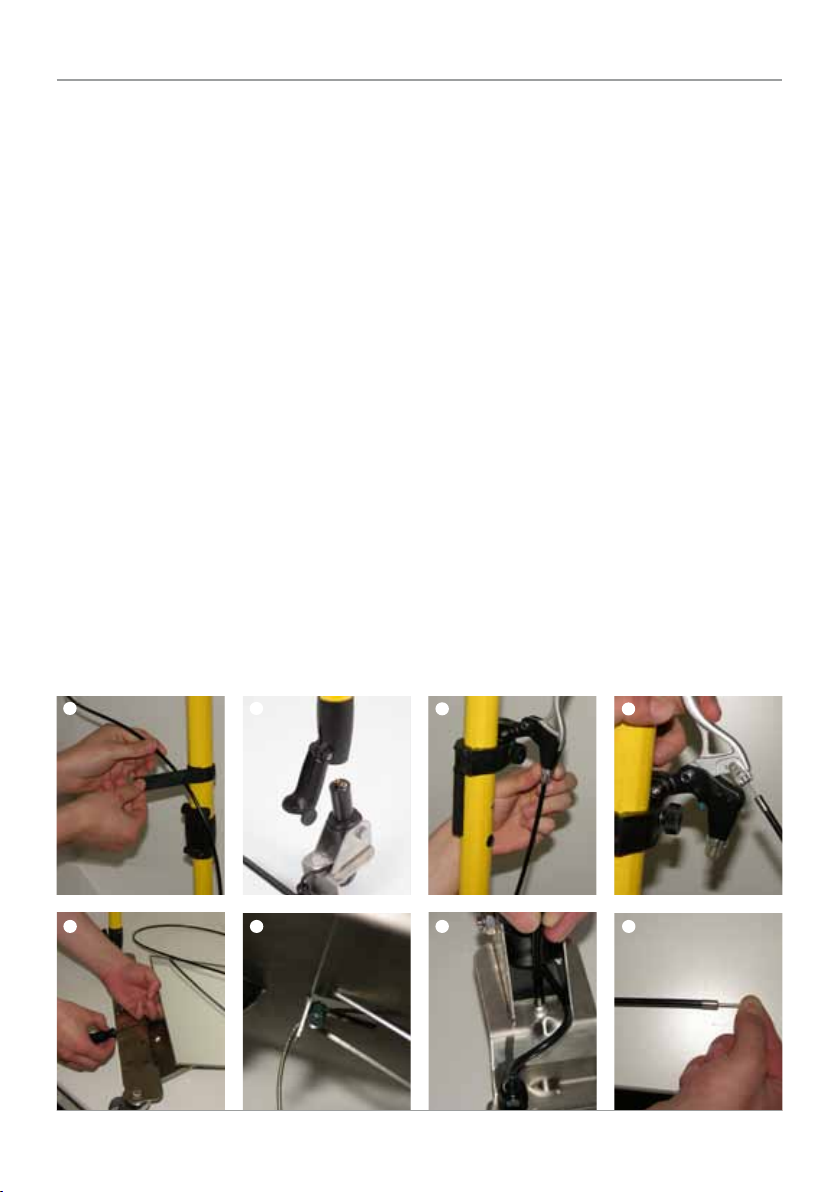
6.3 Replacing the control cable
After approx. 20,000 operations, the control cable of the mirror mechanism may need ser-
vice by replacing the internal cable of the bowden cable.
To replace the wire, use the following tools and procedure:
•Screwdriver
•Flat - nose pliers
•Wire cutters
➊Disengage the cable from the clamps on the telescopic handle.
➋Disengage the telescopic handle from the hinge joint on the mirror support.
➌Loosen the cable guide bolt on the control cable adjustment lever.
➍Pull the inner control cable through the slot in the side of the adjustment lever, until the
end is exposed so that you can release the control cable from the handle.
➎Use the screwdriver to loosen the fixture securing the control cable to the underside of
the mirror.
➏Pull the free end of the control cable through the mirror support duct.
➐Pull the free end of the control cable carefully through the opening in the hinged joint,
until it is freed.
➑Starting from the upper end of the control cable, pull the wire out of the sheath.
Care and troubleshooting
Install the replacement wire in the cable by completing steps 1– 8 in reverse order.
➊ ➋ ➌ ➍
➑➐➏➎
EFIS®4
18 Accessories and order details
7. ACCESSORIES AND ORDER DETAILS
This section gives you an overview of the spare parts available and the dimensions
of the EFIS®4 unit. In addition, the section also lists all details for components and
accessory parts.
7.1 Available spare parts / part numbers
Battery compartment cap with safety strap
HEFIS4403
Dry battery 1.5 V (C-cell)
95130015
Handle connection lead
HEFIS4201
Connection lead + hinge joint
HEFIS4103
EFIS®4 Rim protection
HEFIS410
Curved spring
I0005096
Wheel (complete)
I0005015
Manual mechanical adjustment lever
HEFIS4603
User controls (complete)
HEFIS4302
Control cable with protective sheath
HEFIS4602
Mirror head 200 x 300 mm
HEFIS4152
EFIS®4 Chassis / mirror + man. mech.
10004001
EFIS®4 Screw set SCREWSETEFIS4
Telescopic handle GRP 100 - 130 cm
20004001
EFIS®4 Mirror, 200 x 300 mm
I0005312
EFIS®4
19
Accessories and order details
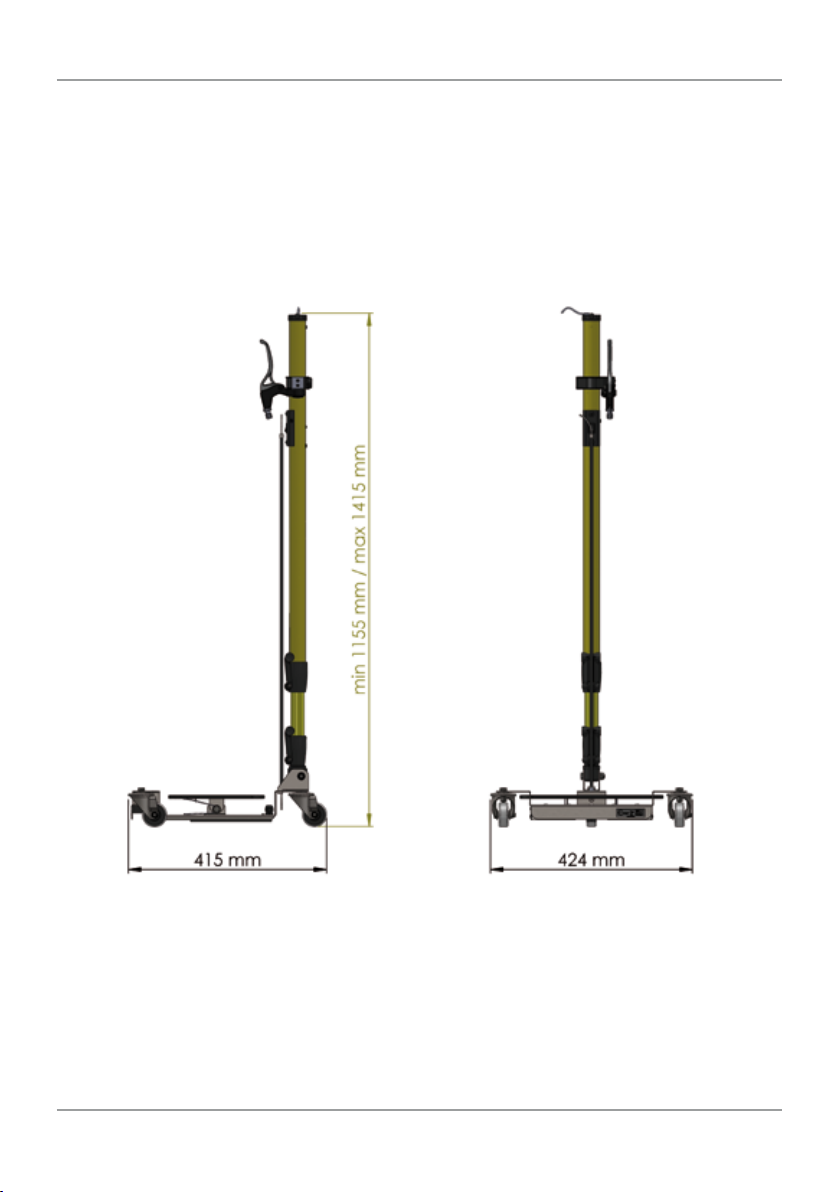
7.2 Dimensions
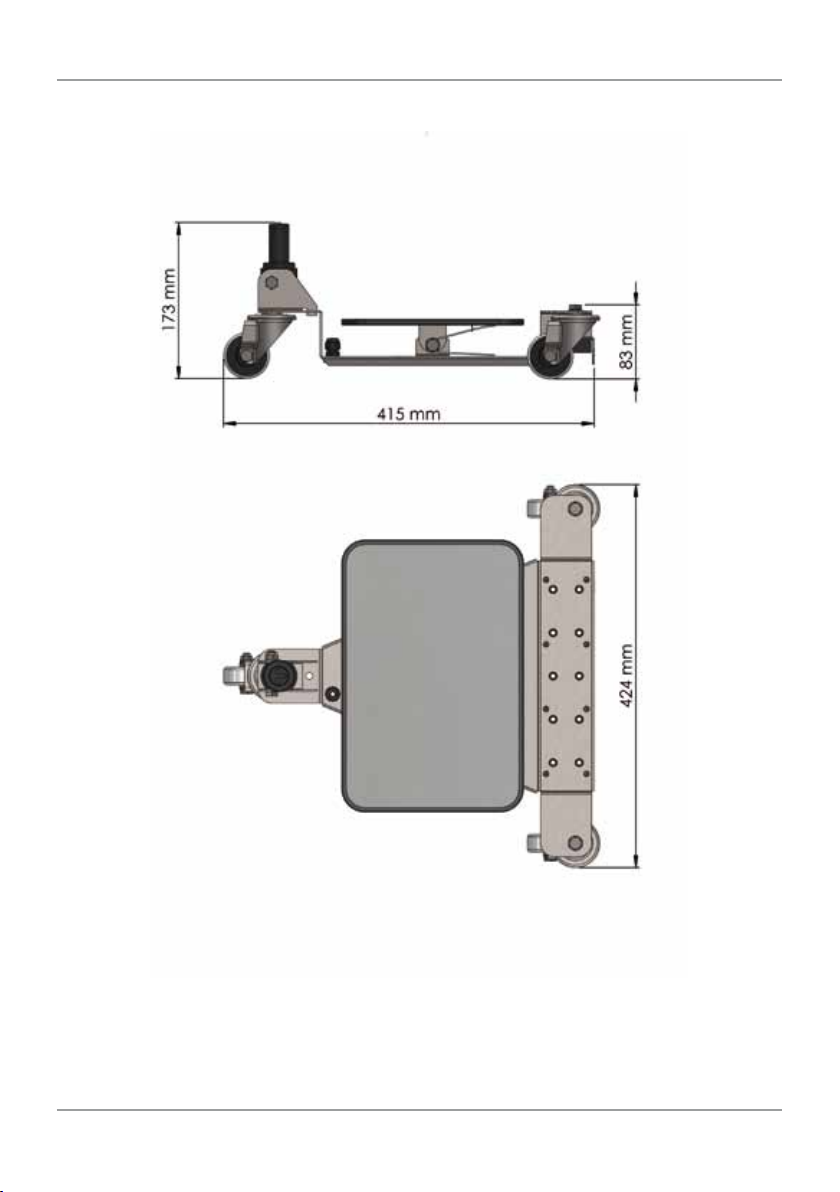
EFIS®4
20 Accessories and order details
Table of contents
Popular Indoor Furnishing manuals by other brands

Regency
Regency LWMS3015 Assembly instructions

Furniture of America
Furniture of America CM7751C Assembly instructions

Safavieh Furniture
Safavieh Furniture Estella CNS5731 manual

PLACES OF STYLE
PLACES OF STYLE Ovalfuss Assembly instruction

Trasman
Trasman 1138 Bo1 Assembly manual

Costway
Costway JV10856 manual


