biodex 950-192 User manual
MEDBIKE®
APPLICATION/OPERATION MANUAL
950-192
950-193
FN: 16-181 Rev A 12/16
2 Biodex Medical Systems, Inc. © 2017
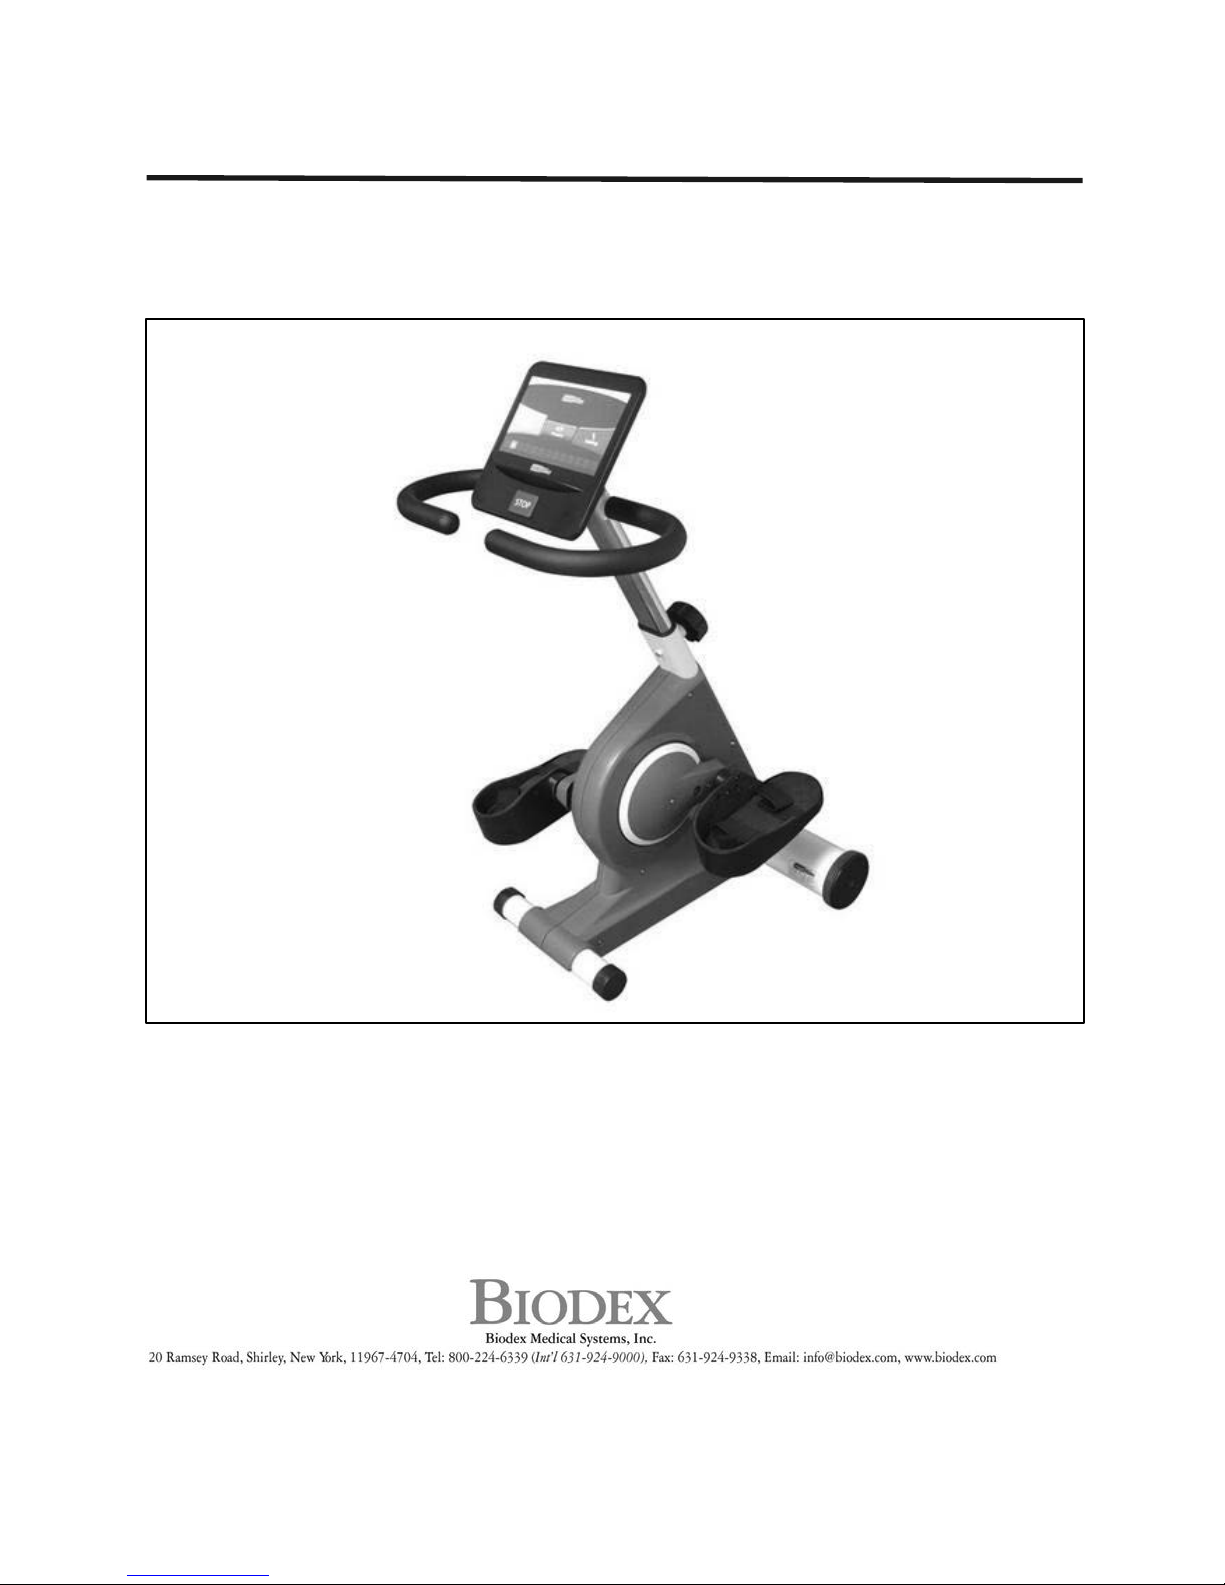
medBike
This manual covers operation procedures for the following products:
950-192 medBike
950-193 medBike Calf Supports
Contact Information
Biodex Medical Systems, Inc.
20 Ramsey Road, Shirley, New York, 11967-4704
Tel: 800-224-6339 (Int’l 631-924-9000)
Fax: 631-924-8355
email: supportservices@biodex.com
www.biodex.com

3 Biodex Medical Systems, Inc. © 2017
Table of Contents
Definition of Symbols ................................................................................................................4
Before Proceeding .....................................................................................................................5
Important Safety Information.....................................................................................................6
Biodex Warranty ........................................................................................................................8
1.Introduction ................................................................................................. 10
Intended Use................................................................................................ 10
Indications For Use ....................................................................................... 10
General Cleaning and Maintenance .................................................................. 10
2.Set-up and Operation .................................................................................... 12
Unpackaging and Assembling the medBike ....................................................... 12
Adjusting Pedals on the MedBike ..................................................................... 16
Positioning or Relocating the medBike.............................................................. 17
Display and Handlebars Height Adjustment....................................................... 17
On / Off....................................................................................................... 17
Changing Pedaling Directions While Exercising .................................................. 19
Spasm Control.............................................................................................. 21
Emergency Stop ........................................................................................... 21
3.Active Modes................................................................................................ 23
Active Manual Mode ...................................................................................... 23
Active Resistance Mode (Program A)................................................................ 25
Continuous Watt Mode (Program B)................................................................. 28
4.Passive Modes .............................................................................................. 31
Passive Manual Mode..................................................................................... 31
Passive User Profile Mode............................................................................... 34
Passive Pedal Assisted Mode........................................................................... 38
5.Specifications ............................................................................................... 42
6.Assembly Drawings and Schematics ................................................................ 43
Calf Support Assembly................................................................................... 46
Calf Support Assembly................................................................................... 47
4 Biodex Medical Systems, Inc. © 2017
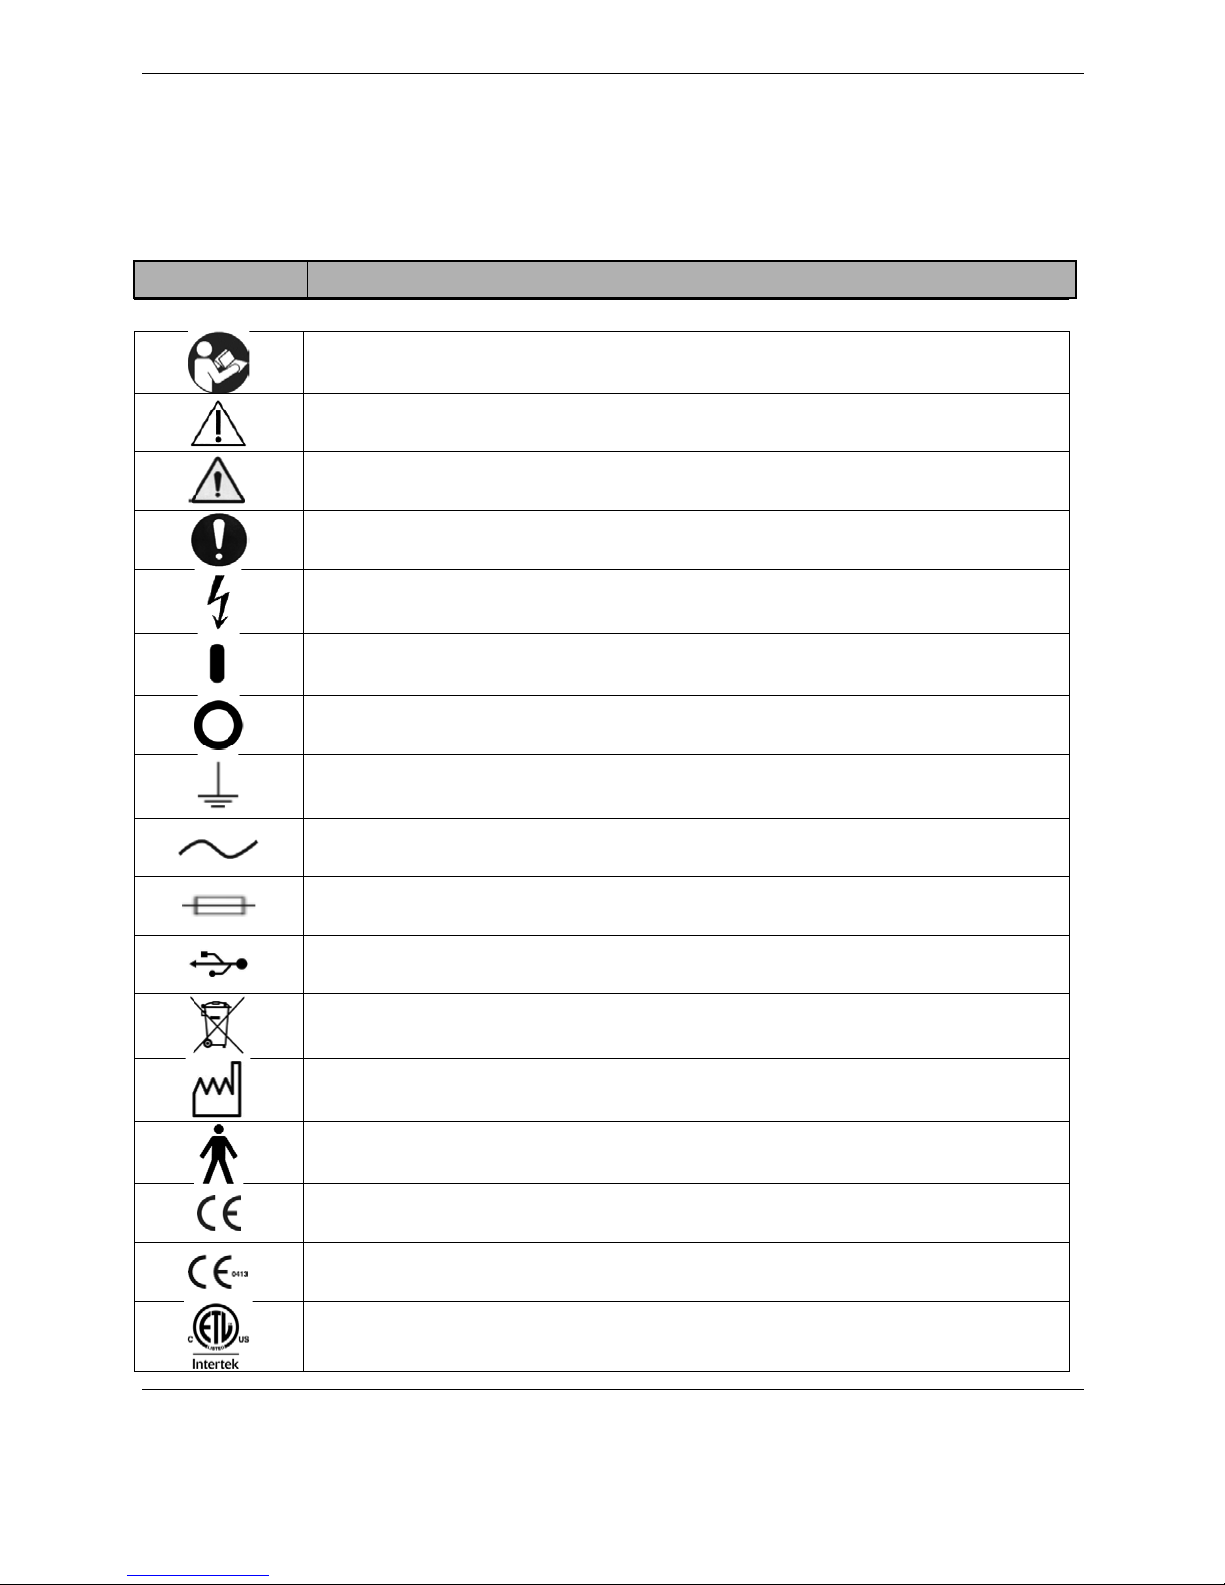
Definition of Symbols
The following symbols and their associated definitions are used and implied throughout this
manual.
S
S
y
y
m
m
b
b
o
o
l
l
D
D
e
e
f
f
i
i
n
n
i
i
t
t
i
i
o
o
n
n
Carefully read these instructions prior to use
Caution
General Warning
General Mandatory Action
Dangerous Voltage
“On” Power
“Off” Power
Earth (ground)
Alternating Current
Fuse
USB Connector/Cable
Waste in Electrical Equipment
Date of Manufacture
Type B Applied Part
CE Mark
CE Mark for products with EC Certificate
Certified for Safety by ETL Intertek

5 Biodex Medical Systems, Inc. © 2017
Before Proceeding
NOTE: The warnings, cautions and instructions provided in this manual must be
read, followed and kept available for consultation at all times. Observing the
information, instructions and procedures presented throughout this manual is
essential for using this product both properly and safely.
SPECIFIC CAUTIONS
●Allow only qualified, trained personnel to operate or service this product.
●If the equipment is used in a manner other than specified in this operation
manual, the protection provided by the equipment may be impaired and
results could be compromised.
●
Never leave user unattended on device.
EN GARDE SPÉCIFIQUES
●Permettez au personnel seulement autorisé, entraîné de faire marcher ou
assurer l'entretien de ce produit.
●Si l'équipement est utilisé dans une manière autre qu'indiqué dans ce
manuel d'opération, la protection fournie par l'équipement peut être
diminuée et les résultats pourraient être compromis.
●Ne quittent Jamais le patient sans surveillance.
CAUTION: Unauthorized modifications to this product are not permitted and will
void the manufacturer’s warranty. Unauthorized modification of the product may
result in a hazard to the user and/or patient. Do not modify this equipment
without authorization from the manufacturer.
ATTENTION: Les modifications faites sans autorisation à ce produit ne sont pas
permises et va faire le vide la garantie du fabricant. La modification faite sans
autorisation du produit peut s'ensuivre dans un hasard à l'utilisateur et-ou le
patient. Ne modifiez pas cet équipement sans autorisation du fabricant.
Training
This operation manual includes assembly and operating instructions. Operating/assembly
questions can be directed to the service department during business hours.

6 Biodex Medical Systems, Inc. © 2017
Important Safety Information
CAUTION: Federal Law restricts this device to sale by or on the order of a
physician, sonographer or other licensed professional.
ATTENTION: La Loi Fédérale restreint cet artifice à la vente par ou sur l'ordre
d'un docteur, sonographer ou d'autre professionnel agréé.
Follow the unpacking and assembly instructions document.
Before using this equipment, read the entire operation manual carefully.
Failure to read the manual may result in user error or injury. Be sure to save all
provided documents for future reference.
Make certain to understand all warning and caution labels as explained in the
Before Proceeding section of this manual.
This product should be used only as specified in the operation manual.
CAUTION: Biodex devices are designed for use in a client environment.
ATTENTION: Artifices Biodex sont conçus pour une utilisation dans un
environnement du client.
For product specifications, refer to the Table of Contents.
This medical electrical equipment requires special precautions regarding EMC
and must be assembled and placed into service according to EMC information
provided in this manual.
CAUTION: Operation for 950-192: 115 VAC.
ATTENTION: Opération pour 950-192: 115 VAC.
WARNING: Only use approved power supplies.
AVERTISSEMENT: N'utiliser que les alimentations homologuées
CAUTION: To avoid risk of electric shock, this equipment must only be
connected to supply mains with protective earth.
ATTENTION: Pour éviter le risque de choc électrique, cet équipement doit
uniquement être connecté à un approvisionnement conduites avec la terre
protectrice.

7 Biodex Medical Systems, Inc. © 2017
CAUTION: The plug is considered the method of disconnecting the product
from main power. Do not place the product in a position where the plug is not
easily accessible.
ATTENTION: Le bouchon est considérée comme la méthode de déconnexion du
produit d'alimentation. Ne placez pas le produit dans une position où le
bouchon n'est pas facilement accessible.
CAUTION: This product is intended to remain in one location during operation.
It is provided with wheels for relocation which should be used when moving.
ATTENTION: Ce produit est destiné à rester à un endroit pendant le
fonctionnement. Il est muni de roues pour la réinstallation qui devraient être
utilisés lors du déplacement.

8 Biodex Medical Systems, Inc. © 2017
Biodex Warranty
1. Product Warranty
A. This equipment and its accessories are warranted by BIODEX MEDICAL SYSTEMS, INC.
against defects in materials and workmanship for a period of two years from the date of
shipment from BIODEX MEDICAL SYSTEMS, INC. During the warranty period, BIODEX
MEDICAL SYSTEMS, INC. will in its sole discretion, repair, send replacement parts or
replace the equipment found to have such defects, at no charge to the customer.
EXCEPT AS STATED ABOVE, THERE ARE NO WARRANTIES, EXPRESSED OR IMPLIED,
INCLUDING WITHOUT LIMITATION WARRANTIES OR MERCHANTABILITY OR FITNESS FOR
USE. BIODEX DOES NOT ASSUME LIABILITY FOR INCIDENTAL, CONSEQUENTIAL OR
INDIRECT DAMAGES INCLUDING LOSS OF USE, SALES, PROFITS OR BUSINESS
INTERRUPTION.
B. This warranty does not apply if the product, as determined by BIODEX MEDICAL
SYSTEMS, INC., is defective due to abuse, misuse, modification or service performed by
other than a BIODEX MEDICAL SYSTEMS, INC. authorized repair representative. Misuse
and abuse include, but are not limited to, subjecting limits and allowing the equipment
to become contaminated by fluid materials.
C. In order to obtain warranty repair service and to expedite repair process, please contact
BIODEX MEDICAL SYSTEMS, INC. Support Services Dept. at 800-224-6339, and select
product support as prompted.
2. Warranty is non-transferable
3. Non-Warranty Service
A. Repairs and/or replacements not covered by this warranty may be performed by
BIODEX MEDICAL SYSTEMS, INC. authorized service representatives.
B. The cost of transportation to and from the service location will be the responsibility of
the customer.

9 Biodex Medical Systems, Inc. © 2017
Service Procedure
If you think you have a service problem, take the following action:
1. Check to see that the problem occurs more than once.
2. Refer to the instruction manual and operations procedure.
If you still think you have a service problem, call BIODEX MEDICAL SYSTEMS, INC.,
Service Department at (800) 224-6339 and select product service as prompted.
1. Keep yourself and the phone next to the equipment.
2. Service will ask you for a brief description of the problem. We will ask specific questions
about the malfunction that occurred. This diagnostic process may take a few minutes,
so call us when you can set aside an uninterrupted block of time.
3. After taking the information, we will advise on the action we will take.
4. Sometimes service personnel must consult with engineering and it may take time to get
back to you. Be sure to let the service representative know your schedule so that we can
call at a convenient time.
5. The return call may be from a person other than whom you first reported the problem
to.
6. After analyzing the problem, we will decide if the unit can be repaired on site, or
replacement parts will be sent.
7. If the unit must be returned, Biodex will provide a return materials authorization
number (R.M.A. #.) Pack the table in the carton that it was originally shipped in. It is the
customer's responsibility for any damage that occurs during shipping.
8. Non-warranty/non-service contract charges for repair are as follows:
a. Materials
+
b. Time
+
c. Travel Zone
Contact information
Biodex Medical Systems, Inc.
20 Ramsey Road, Shirley, New York, 11967-4704
Tel: 800-224-6339 (Int’l 631-924-9000)
Fax: 631-924-8355
email: supportservices@biodex.com
www.biodex.com

10 Biodex Medical Systems, Inc. © 2017
1. Introduction
Intended Use
The medBike is designed to provide a safe ergonomic environment for the clinician and
customer. The design features are intended to relieve musculoskeletal stress while providing
the utmost comfort during exercises.
Indications For Use
The medBike is typically used in cardiovascular facilities, skilled nursing facilities, elder care
fitness centers, and private practice clinics to achieve quality exercise sessions for a variety of
health wellness applications.
General Cleaning and Maintenance
1. As required, cleanse all exterior surfaces and seat pad with a mild detergent solution such
as Parker Laboratories Protex Disinfectant or any one-step disinfectant that does not contain
bleach.
2. Keep pedal/wheel assemblies free of foreign materials and dirt accumulation.
3. Periodically inspect all welds.
4. Periodically check bolts, tighten if necessary.
5. Periodically inspect pedal strap holders.
11 Biodex Medical Systems, Inc. © 2017
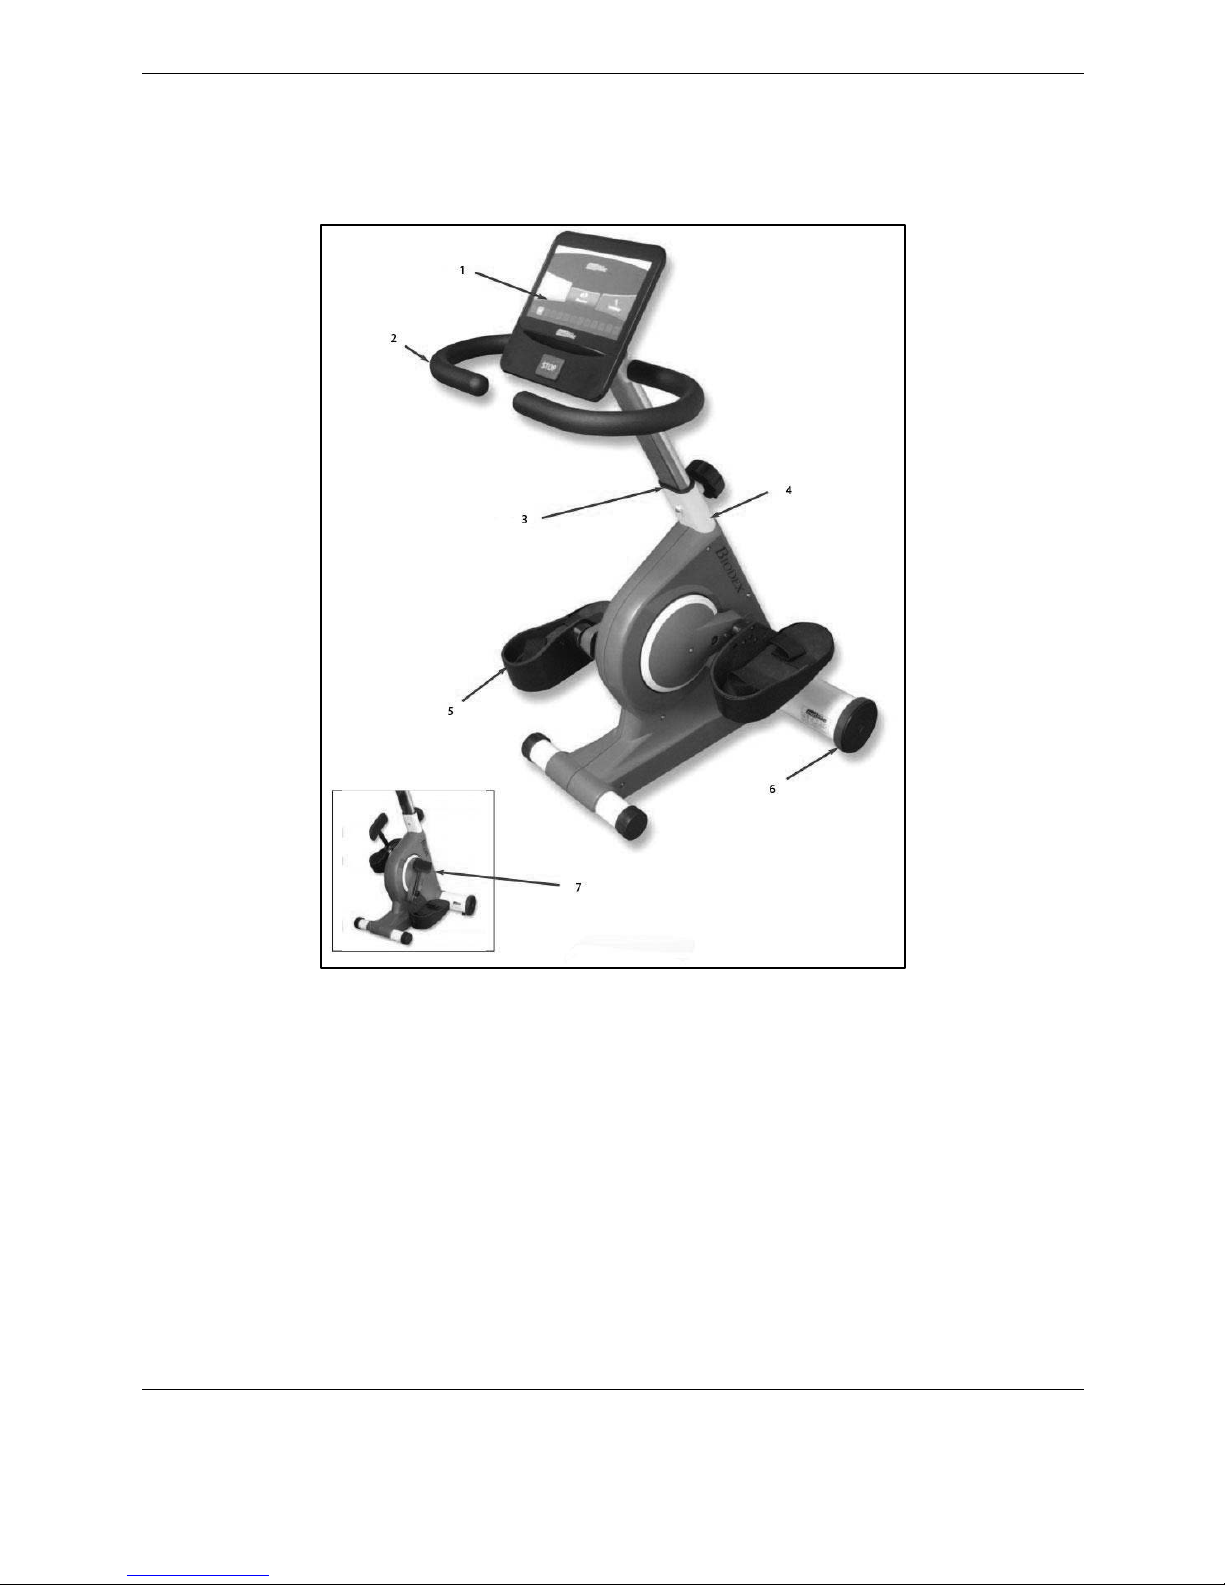
Parts and Adjustments
Figure 1.1. The Biodex medBike parts and adjustments include:
Standard Parts and Adjustments:
1. 10" display
2. Non-allergic, high-density grip
3. Telescopic handlebar post, adjustable knob
4. Full metal frame enamel powder, electrostatic spraying
5. Safety pedal with straps
6. Durable transport wheels
Optional:
7. Calf Support (950-193)

12 Biodex Medical Systems, Inc. © 2017
2. Set-up and Operation
Unpackaging and Assembling the medBike
Your medBike will require a minimal amount of assembly. The only tool required is an Allen
wrench; provided within the packaged contents.
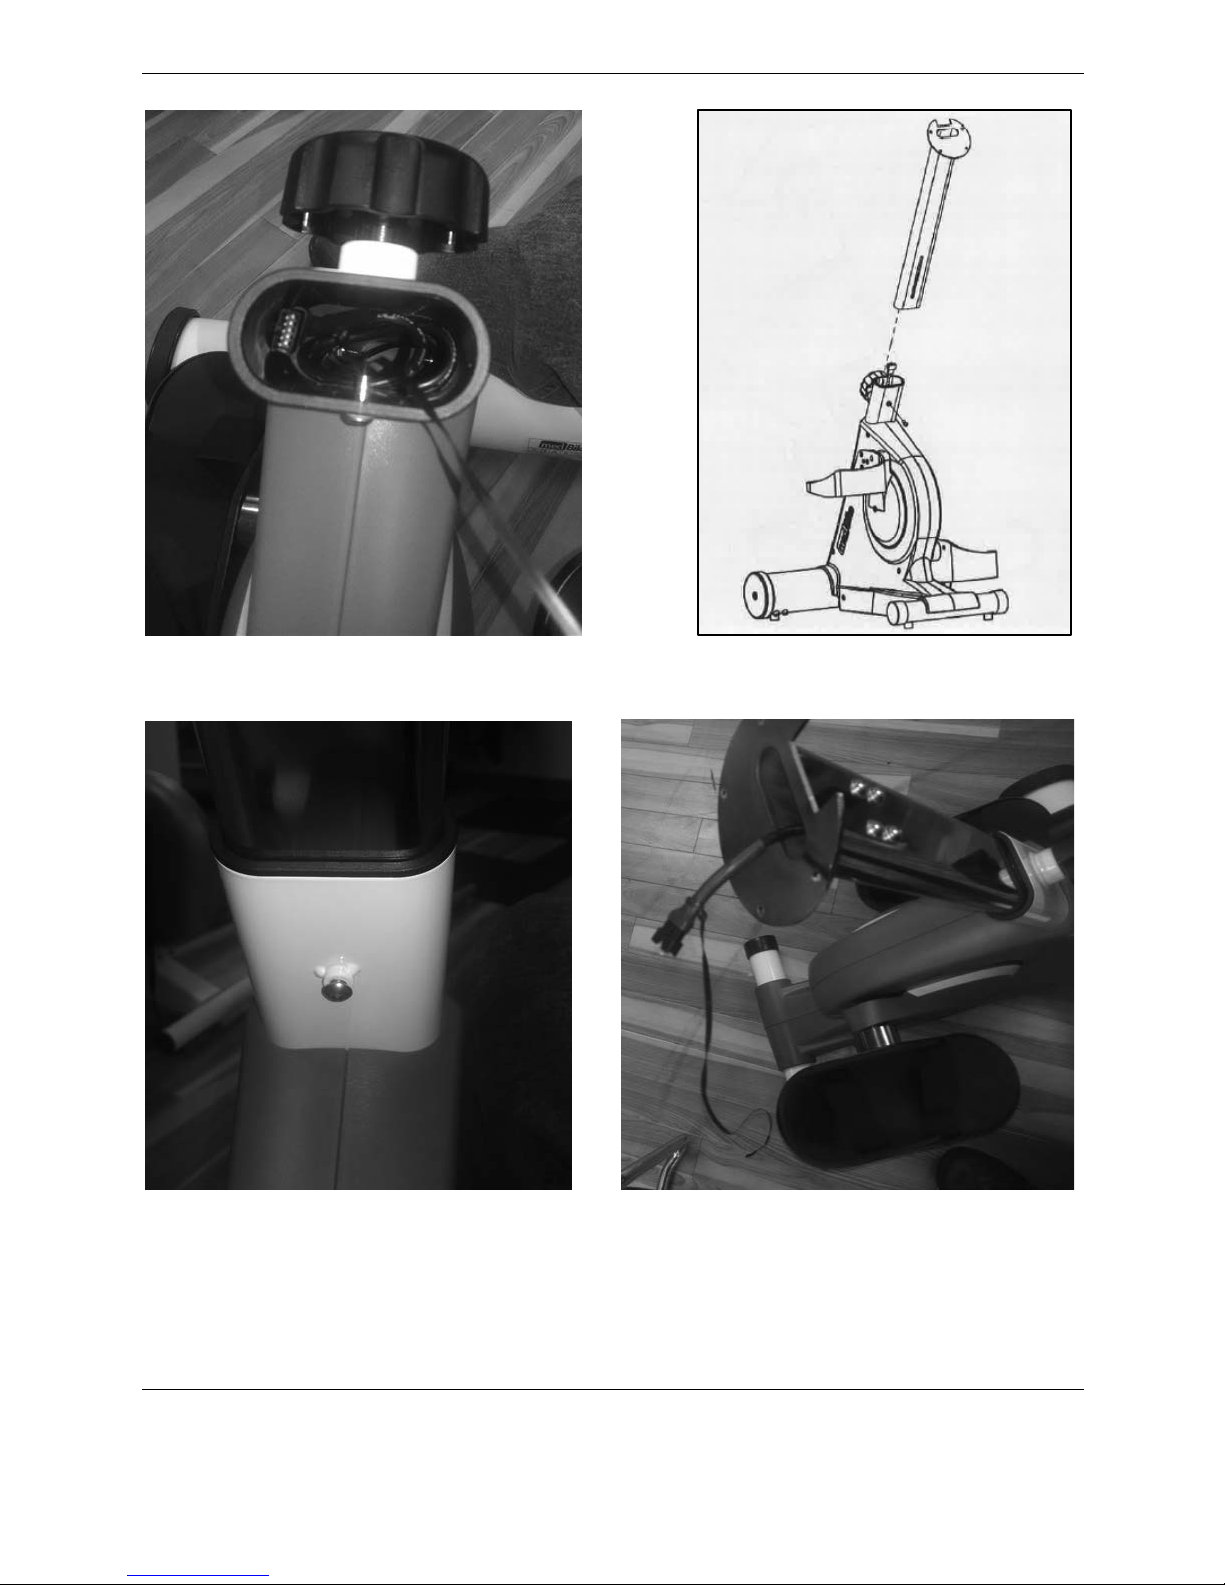
Figure 2.1. medBike--packaged contents.
Begin by removing the medBike’s main pedal/motor assembly from the packaging. From inside
the tube opening (just above the knob), you will see the cable that connects the display to the
motor.
The cable will have a guide wire that can be used to move the cable up through the handlebar
stem tube. When this is complete, place the tube into the pedal/motor assembly opening, and
affix the tube with a bolt using the Allen wrench.
Use the guide wire to move the display cable up through the handlebar stem tube (Figure 2.2),
and use the Allen wrench to affix the handlebar stem tube to the pedal/motor assembly (Figure
2.3).
13 Biodex Medical Systems, Inc. © 2017
Figure 2.2. Use the guide wire to move the display cable up through the handlebar
stem tube.
Figure 2.3. Use the Allen wrench to affix the handlebar stem tube to the pedal/motor
assembly.

14 Biodex Medical Systems, Inc. © 2017
Figure 2.4. Handlebars stem tube--secured in pedal/motor assembly.
Once the bottom of the handlebars stem tube has be secured, the display can be affixed to the
top. But first, the cable must be connected as illustrated below:
Figure 2.5. Connect the display cable.
15 Biodex Medical Systems, Inc. © 2017
Next, line up the holes in the back of the display with the four holes on the top of the
handlebars stem tube, and affix the two pieces with the four bolts. Use the Allen wrench to
tighten.
Figure 2.6. Connect the display.
The last step is to affix the handlebars to the handlebars stem tube. Line up the holes for the
bolts (4) and tighten with the Allen wrench.
Figure 2.7. Connect the handlebars.

16 Biodex Medical Systems, Inc. © 2017
Figure 2.8 Bolts (4) for handlebars.
Adjusting Pedals on the MedBike
Managing the degree of hip flexion for certain patients using this device could be a concern.
First, consider moving their seat back a few inches. If the seat back reclines, consider that
option as well. As for the device itself, the pedal radius is easily changed. Using the Allen
wrench, remove pedal bolt and move it into a closer hole on the crank as illustrated in
Figure 2.9 below thus reducing the radius of the pedal cranks:
Figure 2.9. Adjusting the Pedals using an Allen Wrench
Or, using the slim wrench included with the medBike, move the pedal to another optional
hole on the crank by inserting the wrench between the pedals and the crank as illustrated in
the diagrams below and unscrewing the pedal:

17 Biodex Medical Systems, Inc. © 2017
Figure 2.10. Adjusting the Pedals Using the Included Slim Wrench
This method avoids damaging the inner thread of the Allen bolt.
Positioning or Relocating the medBike
CAUTION: Before moving the medBike, make sure the power cord is detached. If left
attached, the cord plug will rub against the floor as the device is being moved,
possibly causing black marks on your flooring.
ATTENTION: Avant de déplacer le medBike , faire le cordon d'alimentation est
détaché. Si elle reste attachée , la fiche du cordon se frotter contre le sol lorsque le
dispositif est déplacé, peut provoquer des marques noires sur votre plancher.
The medBike can be easily moved across smooth surfaces. To move the medBike, remove the
power cord from the base of the device. Stand behind the device and lift the back end up,
pivoting it forward until the front wheels make contact with the floor. Push or pull the device to
a new location and set it down gently
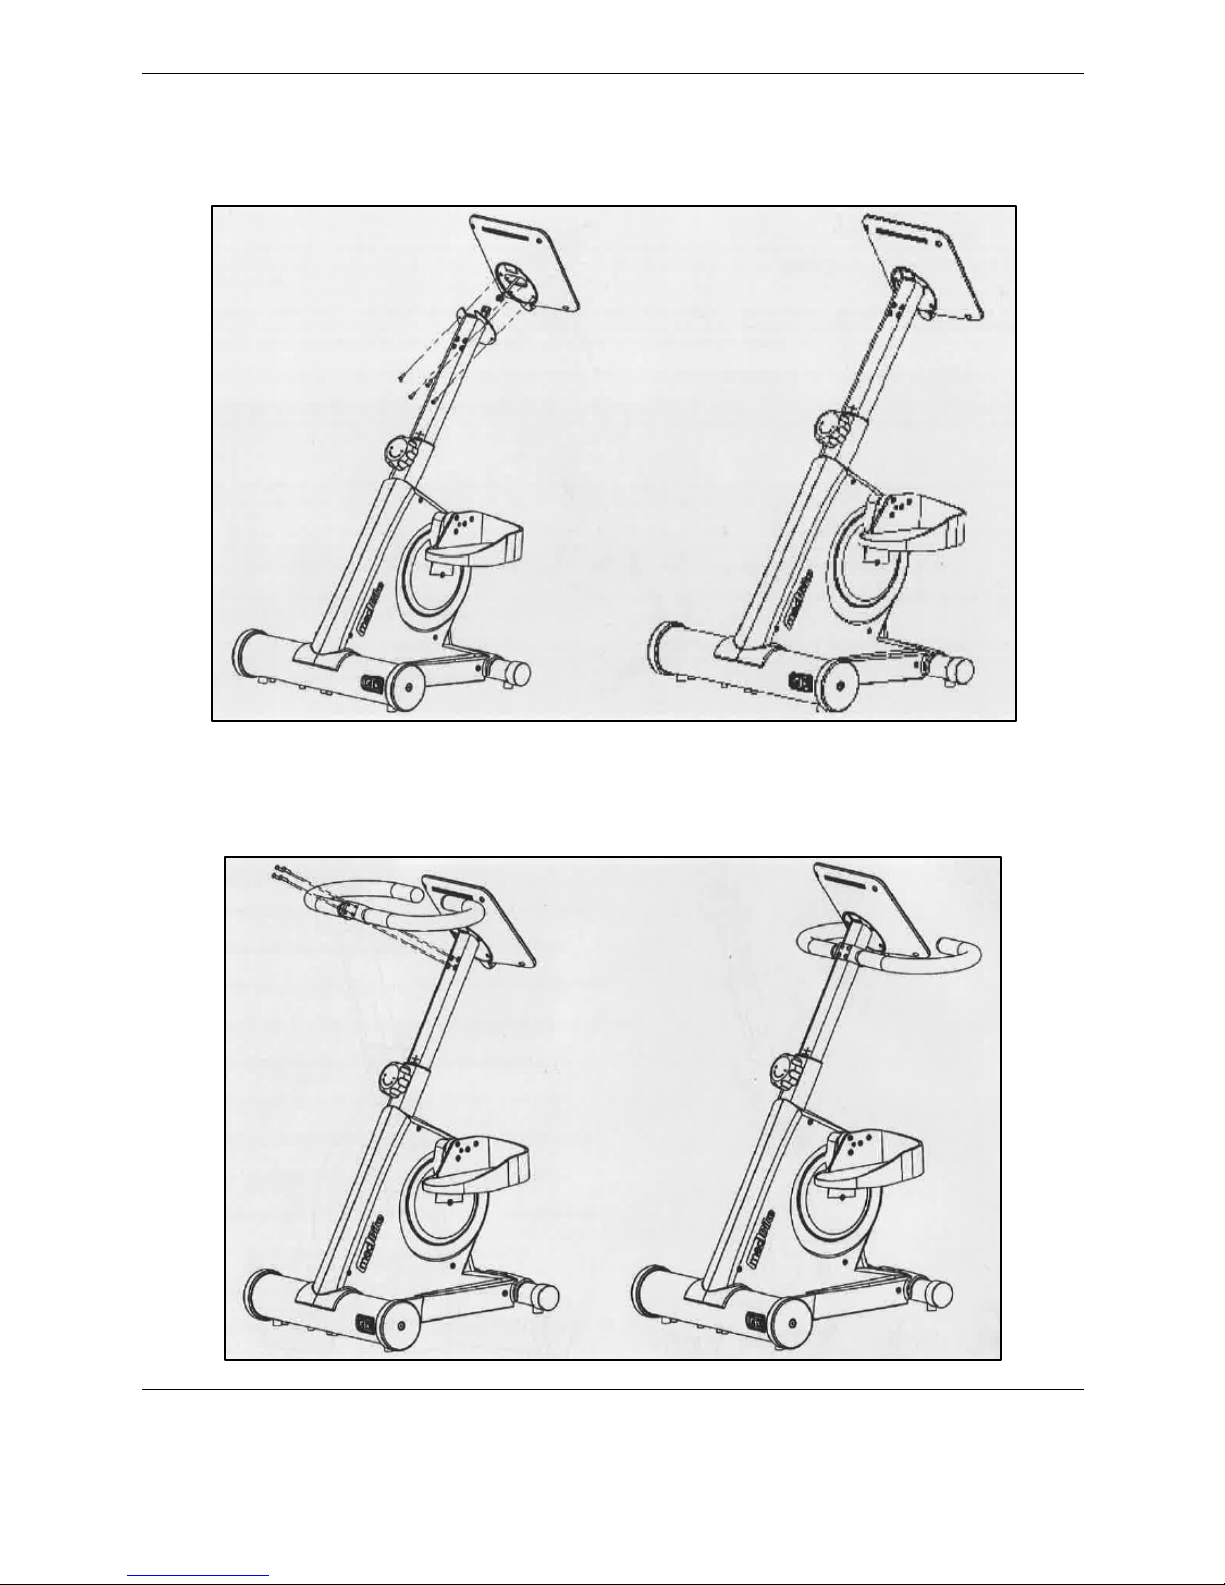
Display and Handlebars Height Adjustment
The height of the monitor display and handlebars is conveniently adjusted with the hand-turned
knob on the front of the device.
To raise or lower the display and handlebars, loosen the knob, pull up or down on the
handlebars, and re-tighten the knob.
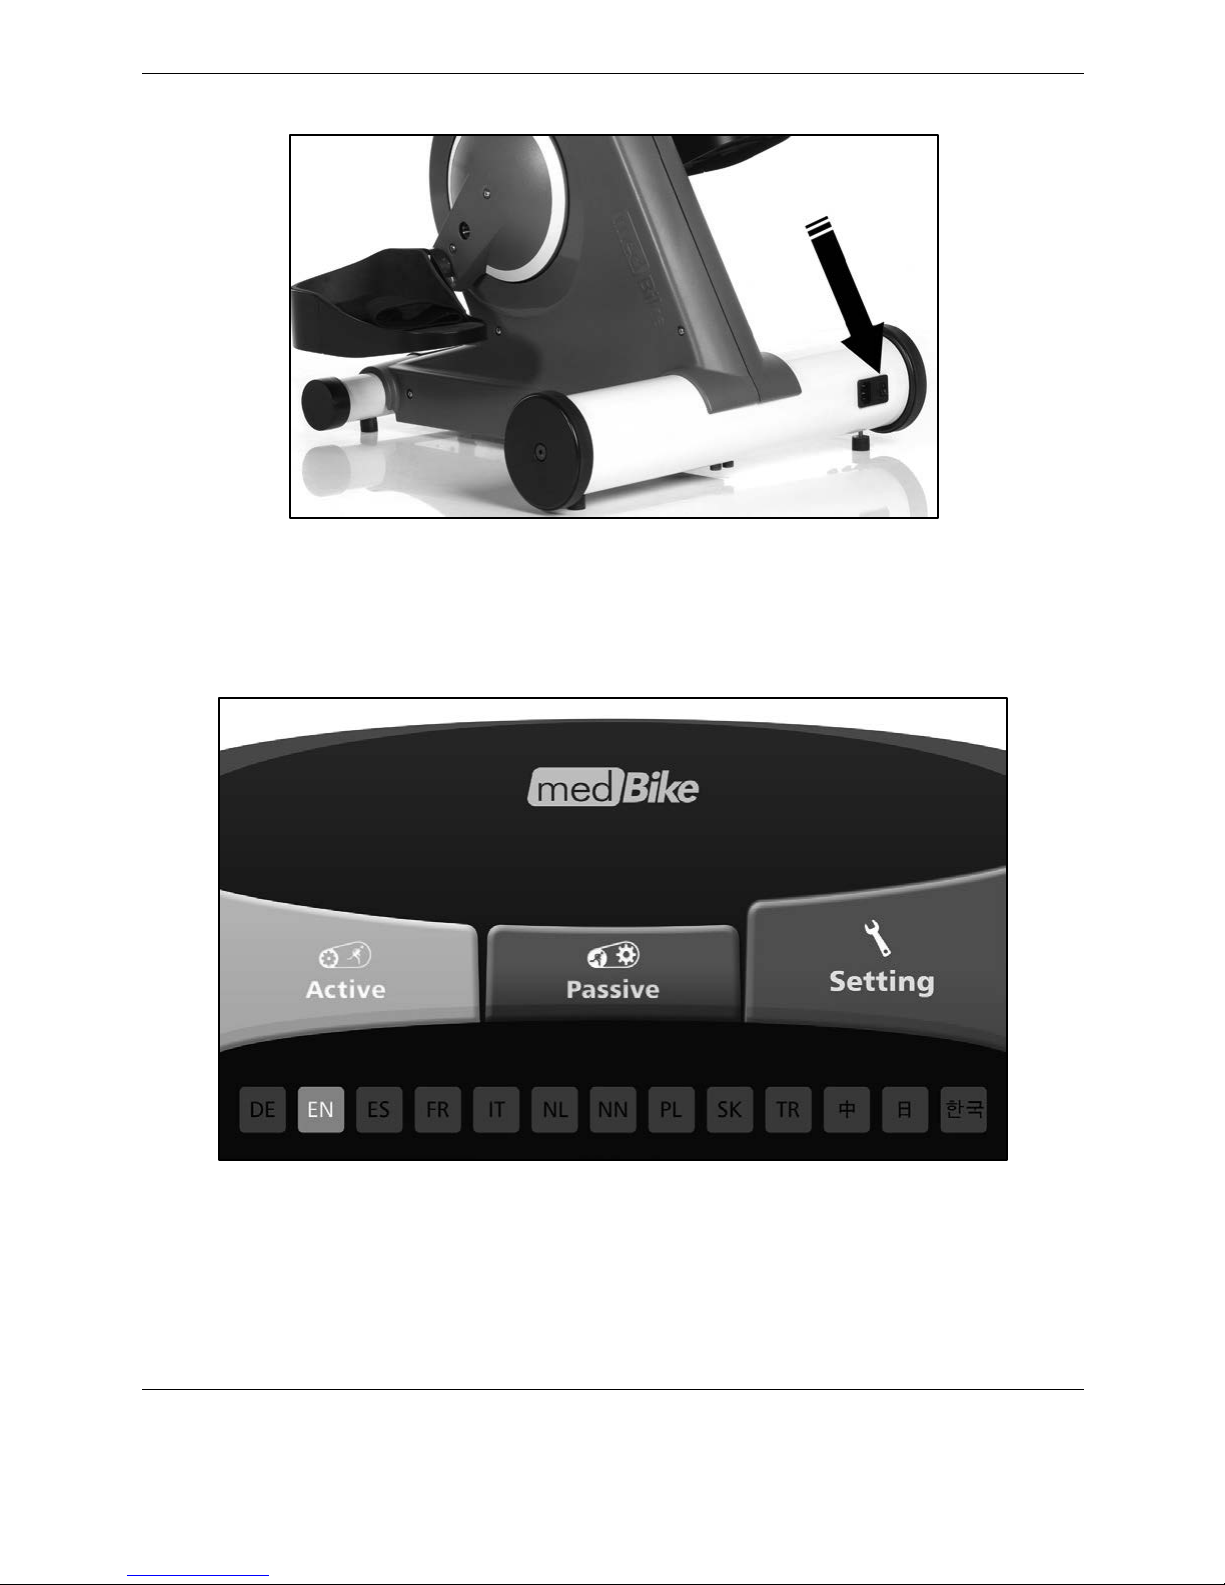
On / Off
To turn the device on, press the black switch on the base.
18 Biodex Medical Systems, Inc. © 2017
Figure 2.11. The ON / OFF switch.
Settings
If the device is not already set to your preferred language, make your selection on the bottom
of the screen (EN = English) and select <Settings>.
Figure 2.12 Home screen.
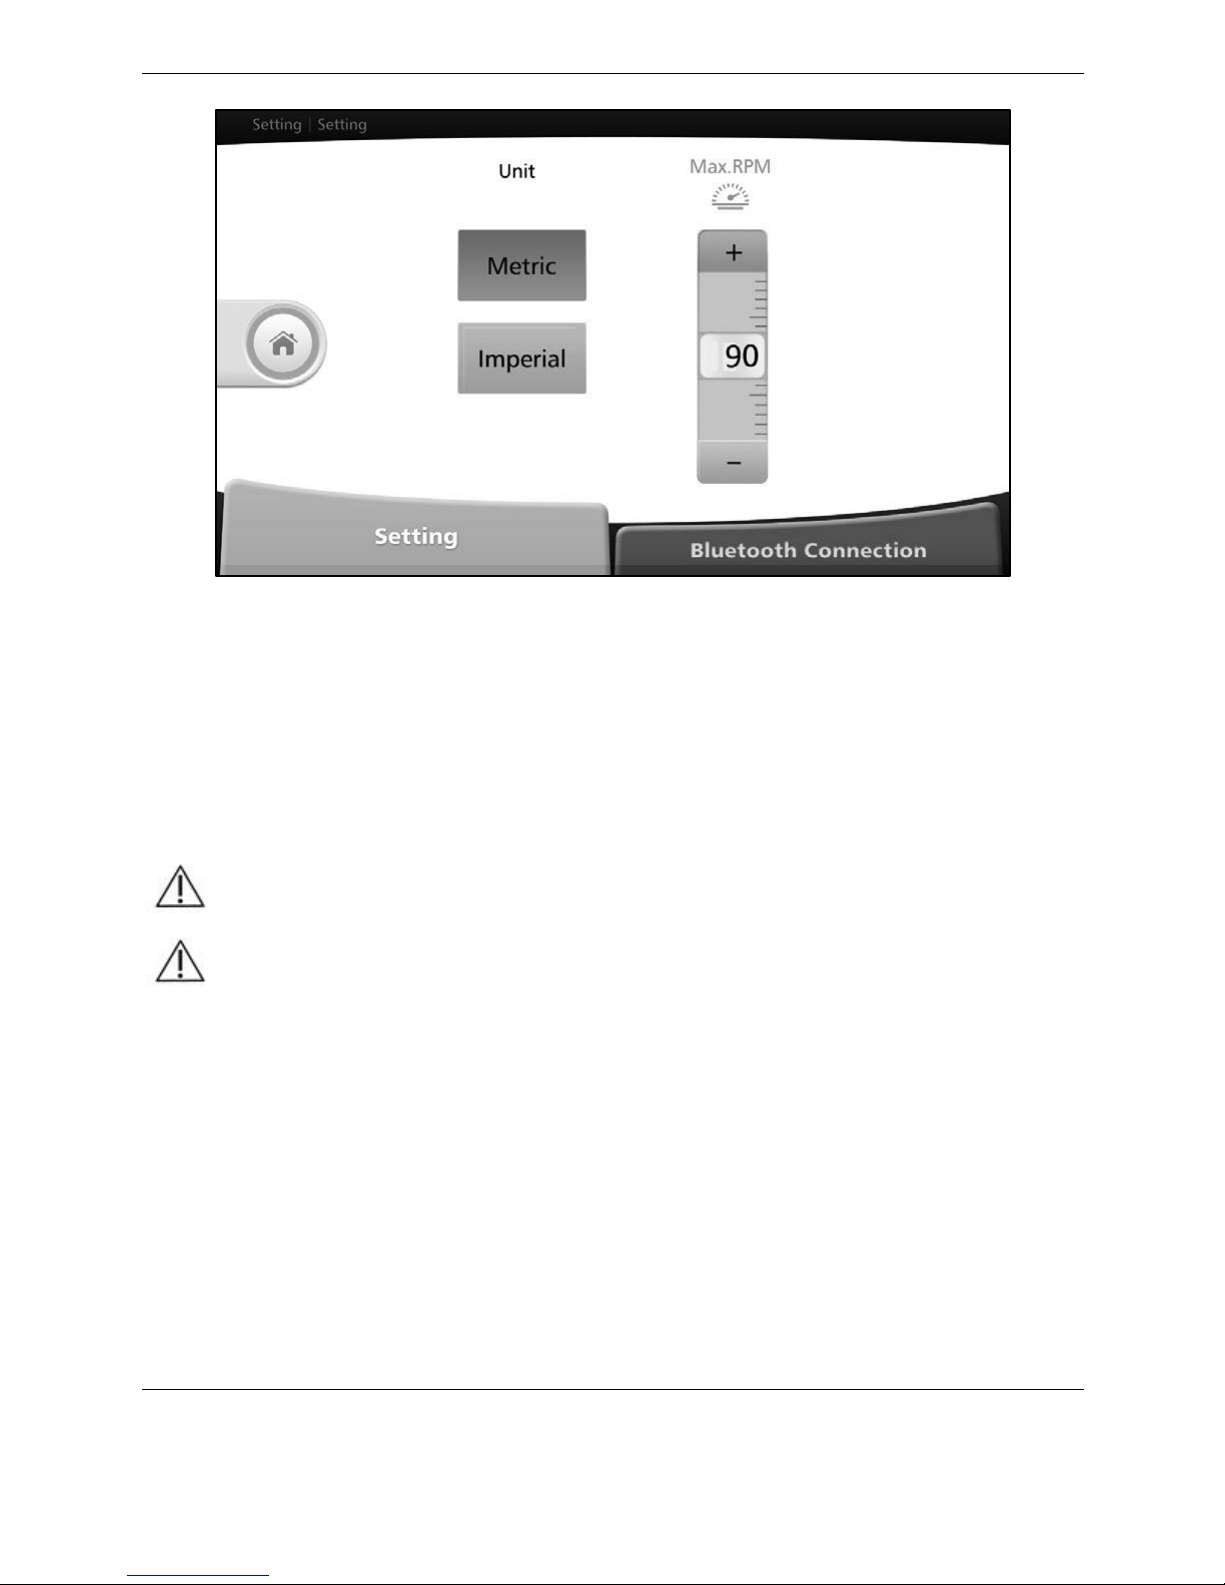
Select either the <METRIC> or <IMPERIAL> setting for your preferred units of measure. Select
the maximum number of rotations per minute (rpm) for the Passive Mode. A rotation is the
singular event of moving the pedals all the way around a circular motion.
19 Biodex Medical Systems, Inc. © 2017
Figure 2.13. Settings screen.
NOTE: Although there is a “Bluetooth Connection” tab on the Settings screen, that this aspect of
the device is not covered in this document.
Changing Pedaling Directions While Exercising
The user or clinician may elect at any time during a session to change the pedaling direction
from forward to reverse or reverse to forward. It is important to stop pedal movement
completely for a few moments while the device mechanisms reset.
CAUTION: Stop pedaling when switching between forward to reverse, and vice versa.
ATTENTION: Arrêtez de pédaler lors de la commutation entre la marche avant à la
marche arrière, et vice versa.

20 Biodex Medical Systems, Inc. © 2017
Figure 2.14. Warning screen—stop pedaling completely for a moment before reversing
direction.
After the warning screen and countdown disappears, press the <Green Arrow> button to
resume the exercise in the new pedaling direction, or press the <Red Square> button to end the
exercise.
Figure 2.15. START / STOP screen
Other manuals for 950-192
1
This manual suits for next models
1
Table of contents
Popular Exercise Bike manuals by other brands


Smooth Fitness
Smooth Fitness SMB-XBIKE owner's manual

Nowa Szkola
Nowa Szkola Orbitrek SG 0003 manual

NordicTrack
NordicTrack C5 Zl Gw Bike Manuale d'istruzioni

Cardio Shop
Cardio Shop HP-810B2 manual

BH FITNESS
BH FITNESS G2518i Instructions for assembly and use

Sole Fitness
Sole Fitness LCR Fitness Bike owner's manual


