Bionizer 60564 User manual

INSTRUCTION BOOK
BIO -EFFECTIVE POOL AND SPA PURIFIER
Read before you call us for advice
APVMA Product No: 60564 ; Label Approval No: 60564/01/0106 Version 2.28c, 26-Sep-2017

GETTING YOU STARTED
2
INSTRUCTION B OOK
PREPARATION
o Watch the videos on how to install on our website ( ).http://www.bionizer.com.au/instructions-videos/
o If your pool has algae then super-chlorinate as per page 30 of the Bionizer manual before proceeding.
o Test pool water and bring into balance using the Snap Pool Balance Chart as your guide.
o For new pools or pools that have just been refilled: Add 1x15kg bag of salt per 50,000 litres to help water conductivity
– brush in well to dissolve. This allows your Bionizer to operate on full power when boost function is activated.
o refer to page 8 of the Bionizer Instructions. IMPORTANT: NEW POOLS OR NEWLY RENOVATED POOLS
o Check filter medium – we recommend changing your filter medium if it is more than 5 years old (Bionizer's
recommendation: glass or silica sand for filter). Make sure your cartridge is in good condition if you have a cartridge
filter.
START-UP
o Locate the Copper Start-up Kit in your Bionizer packaging. Measure half a lid (40 grams) and pour into the skimmer box
for every 30,000 litres of pool water (make sure the filter is running).
o After 30 minutes of filtering: test the water for copper level using the copper test kit.
o Plug your pool pump into the Bionizer and plug Bionizer Control unit into power.
o Enter real time of day as per page 13.
o Enter pool size (volume) as per page 13.
o Enter desired pumping times (4 pumping sessions available) as per page 14.
o Ensure that the Bionizer is switched to setting. See page 15.AUTO
o Activate the boost function on Bionizer. Enter the copper level you measured and start the boost function as per page
18 (see install video on ).http://www.bionizer.com.au/instructions-videos/
o After the boost function has completed, the Bionizer will switch back to its daily operation in auto mode.
o Check your copper levels again to make sure the levels are the required level of 0.5-0.6. If levels are still low, activate
boost function again with recent copper level measurement.
o Enjoy your chlorine free pool!
For the first couple of weeks test your copper level every 3-4 days and after that once a week. Adjust Bionizer settings up
or down as per page 14 if needed, until you have found the right ionizing time/output for your pool. pH level has to be
within the correct range for an accurate copper reading.
PS. Keep your instruction booklet in a safe place, this and your Snap Pool Balance Chart are your guides to a trouble free
pool. Use them!
QR CODE LINK TO INSTRUCTION VIDEOS
If you have a QR Code App on your smartphone or tablet, scan the code below to link directly to the instruction videos.

TABLE OF CONTENTS
An all natural pool that requires minimal maintenance and
expense is a real joy. Before start up correctly balance and
maintain the pool water and you will be rewarded by having a
toxic free, eco pool that will not cause corrosion (as salt does)
or threaten your health in any way. Feel free to water your
garden or lawn with any backwash water.
Take note of the few "don'ts" and you will have a seamless
start up and thereafter you will be amazed at your pool water
quality and clarity.
Bionizer Pty Ltd is committed to creating a more healthy
environment… the Bionizer Pool System is only part of our
ongoing journey in this direction.
We have now introduced three other products to advance
ourselves along the path back to a toxic free world. They are
Bionizer Eco-Oxidizer, Bionizer pH BOSS (auto pH Control)
and the Mini-B, a “no frills” Ionizer for spas and above ground
pools. A pool with all three of these systems will never require
a toxic chemical to be placed in the water... ever! In fact the
most difficult part of the process of pool maintenance will
then be to add some soda bicarbonate. to the water and clear
the leaves from the skimmer every several weeks. It just does
not get any easier than that… not with swimming pools
anyway.
You can start with a Bionizer on your pool and a short while
later when you are delighted and confident with the Bionizer
technology you can add the Eco- Oxidizer unit and/or the pH
Boss unit to augment the Bionizer. You will then have the
'Ultimate' Eco Pool Care System operating your pool - zero
toxicity and/or salt, zero corrosion, tiny running costs, low
maintenance whilst saving water.
We know Ionization technology and we know pools and, we
know more than most do about water and just how special a
substance it really is. Water is in fact vital to all life on earth…
water and oxygen are essential substances… as are beneficial
ions.
Bionizer Pty Ltd has harnessed the three of these
technologies to protect and maintain your pool water in the
most powerful natural way known on Earth. The Eco-Pool
Partners.
Nothing is more powerful than Nature.
Witness a Volcano blowing its top, a Force 5 hurricane or a
devastating Tsunami…Bionizer has united the most essential
elements in Nature to ensure that you swim safely and hassle
free.
Now for the first time pools are able to stay healthy and clear
without any toxic substances polluting your swimming
environment or your lifestyle. You are removed from all but
the most simple tasks required for pool care.
If you use a pool care service you can halve the time they
visit… they are now almost redundant. Let them visit once a
month and sweep the pool, check the skimmer and add some
acid to the pH reservoir and you do no pool care whatsoever.
This is the Bionizer "Ultimate Solution" to Pool Care…
and your commitment to help us all return to a toxic free
Planet for your children to enjoy.
PLEASE TAKE THE TIME TO READ THESE INSTRUCTIONS CAREFULLY.
NOTE HOW THEY APPLY TO YOUR PARTICULAR POOL AND EQUIPMENT.
3
Page
GETTING YOU STARTED . . . . . . . . . . . . . . . . . 2
BIONIZER ILLUSTRATION . . . . . . . . . . . . . . . . 5
BIOPOD ANODE CARTRIDGE . . . . . . . . . . . . . . 6
BIONIZER SAFETY INSTRUCTIONS . . . . . . . . . . . 6
BIONIZER DISPLAY . . . . . . . . . . . . . . . . . . . . 7
SETTING UP YOUR POOL . . . . . . . . . . . . . . . . 8
STEP 1 - PREPARE YOUR POOL . . . . . . . . . . . . . 8
STEP 2 - BIONIZER INSTALLATION. . . . . . . . . . . . 8
BIOPOD CARTRIDGE INSTALLATION . . . . . . 8
BIONIZER CONTROL BOX INSTALLATION. . . 10
STEP 3 - WATER PREPARATION & TESTING . . . . . . 11
STEP 4 - FIRST TIME START-UP PROGRAMMING . . . 13
PROGRAMMING YOUR BIONIZER . . . . . . . . . . . 14
SELECTING OPERATING MODE . . . . . . . . . . . . 15
IONIZING SETTINGS . . . . . . . . . . . . . . . . . . 16
COPPER ION TESTING . . . . . . . . . . . . . . . . . 17
SPAS . . . . . . . . . . . . . . . . . . . . . . . . . . . 18
Page
USING THE BOOST FUNCTION . . . . . . . . . . . . . 18
BASIC POOL ROUTINE . . . . . . . . . . . . . . . . . 19
CHECKING ANODES . . . . . . . . . . . . . . . . . . 20
ANODE REPLACEMENT. . . . . . . . . . . . . . . . . 21
DO'S AND DON'T'S . . . . . . . . . . . . . . . . . . . 22
OPERATIONAL CHECK . . . . . . . . . . . . . . . . . 24
TIPS FOR TROUBLE-FREE SWIMMING. . . . . . . . . 25
TIPS FOR KEEPING YOUR POOL CRYSTAL CLEAR . . . 26
BIONIZER SUPPORT PAGES . . . . . . . . . . . . . . 27
TROUBLESHOOTING . . . . . . . . . . . . . 27
WHAT TO DO IN CASE OF ALGAE ATTACK . 29
SUPER-CHLORINATION . . . . . . . . . . . 30
CIRCULATION . . . . . . . . . . . . . . . . 30
DISPLAY MESSAGES . . . . . . . . . . . . . 31
RESETTING THE CIRCUIT BREAKER . . . . . . . . . . 32
pH BOSS & ECO-OXIDIZER . . . . . . . . . . . . . . . 33
BIONIZER POOL SUPPLEMENTS . . . . . . . . . . . . 34
SNAP POOL BALANCE CHART . . . . . . . . . . . . . 35

BIONIZER POOL MANAGEMENT SYSTEM
Dear Bionizer Owner,
Congratulations and thank you for choosing the Bionizer
Pool Management System.
By purchasing this product you have taken a major step
towards helping the environment, as well as the health of
your family.
Superior Pool System
We have developed one of the most superior pool and spa
management systems on the market today.
The Bionizer pool ionizer manages your pool superbly
while you spend your valuable time relaxing in your
environmentally sensible and healthy pool.
No more dry skin and hair. No more red eyes. No more
corrosive salt. Now you and your family will be swimming
in pure sanitized mineral water that needs only small
amounts of oxidizer to remain crystal clear and healthy.
The important point is that with Bionizer this occurs
without an overload of hazardous, costly chemicals or
corrosive salt !
Olympic Swimmers Use Ionization
Currently the most common way of sanitizing your pool is
by using environmentally degrading and costly pool
chemicals. This also applies to controlling algae in your
pool.
Yet, ionization is a well tried and long time proven natural
alternative to chemical-based pool treatments. Ionization
is endorsed & embraced by the World Health
Organization (WHO) and the US EPA -Environmental
Protection Authority.
Ionization does not ever exacerbate asthma or eczema as
high levels of chlorine are shown to do. Many USA Public
Pools have chosen ionization as their primary form of
sanitation and pool control and the public who use these
pools have overwhelmingly endorsed this choice.
Our Bionizer is used on many Eco-Award swimming pools,
learn to swim pools, health resort pools and public pools
in over 18 countries
NASA Developed Ionizers
Ionizers have been used for sanitizing water for many
years now and were refined by NASA in the 1960's for its
space program.
The main function of ionizers is to control the growth of
micro-organisms in bodies of water.
They are in widespread use in water towers for air
conditioning systems where they efficiently control
Legionella bacteria that cause the deadly Legionnaires'
disease, whilst reducing the chemicals that promote
structural decay.
In Australia the APVMA, the government authority in
regards to pool & spa chemicals (APVMA - The
Australian Pesticides & Vetinary Medicines Authority)
requires that a registered sanitizer be used with this
product when the pool is used for bathing. Bionizer uses
only official APVMA Authorized Anodes.
The Bionizer Eco-Oxidizer creates Hydroxyl Radicals and
Peroxy Compounds electrochemically and these products
effectively impart a powerful oxidative effect into your
pool water when the pump/filter is running. If using a
Bionizer and Eco-Oxidizer we advise that the pump is
running when bathing.
Happy Swimming!
4
INSTRUCTION B OOK

BIONIZER ILLUSTRATION
BIONIZER MODEL NO.
SELF CLEAN (Green light that switches
from solid to flashing when the ionizer function
is operating to show that self-cleaning system is active.
WATER CONDUCTIVITY
ON/OFF + AUTO SET+ BOOST
DISPLAY
WALL MOUNTING FEET
PROGRAMMING + SETTING
SETTING ADJUSTMENT
CONNECTION TO ANODES
12V DC OUTPUT SOCKETS.
pH BOSS AND ECO-OXIDIZER CAN BE
POWERED FROM THESE OUTPUTS
USING DC ADAPTOR CABLES.
CONNECTION FOR POOL PUMP AND
OTHER MAINS POWERED DEVICES.
pH BOSS OR ECO-OXIDIZER CAN BE
POWERED FROM HERE.
MAXIMUM COMBINED OUTPUT FOR
BOTH POWER OUTLETS IS 9.5 AMPS
(2280 WATTS). CONNECTING MORE
LOAD THAN THIS WILL CAUSE THE
INTERNAL CIRCUIT BREAKER TO TRIP.
RESET BUTTON
Push to re-set the unit,
if the circuit breaker blows
due to overload or pump
fault.
POWER
CONNECTION
5
All user-programmed settings are backed
up in memory indefinitely when power is
switched off.
Clock is backed up for up to 2 weeks
when power is switched off.
DOWN U P
AUTO /
OFF
CANCEL
PROGRAM /
SET
TM
Eco - Oxidizer
Oxidizing On / Off

BIOPOD ANODE CARTRIDGE
BIONIZER SAFETY INSTRUCTIONS
IMPORTANT SAFETY INSTRUCTIONS
It is important to follow basic safety precautions when
installing and using this electrical equipment, including
the following:
1. Ensure you read and follow all instructions.
2. WARNING – Do not allow children to use this product
unless they are closely supervized at all times. This is to
prevent accidental injury.
3. Keep cord visible and do not bury it. Also position the
cord so that it does not get damaged by lawn mowers,
hedge trimmers and other equipment.
4. WARNING – To prevent electrical shock, replace
damaged cord immediately.
5. Save these instructions.
Scan this QR Code with your smartphone
or tablet to download a PDF copy of the
Bionizer manual from the Bionizer Web
Site.
CAUTION:
Your warranty could become invalid should you fail to
observe the following:
1. The Bionizer must be installed and operated as
specified.
2. Do not open plastic enclosure with mains power
connected.
3. Turn off the power to the Bionizer before detaching
the anode connectors.
4. The life of the unit will be extended (as with most other
pool equipment) if it is placed indoors or in an
enclosed structure. This is recommended as sunlight
can damage the Liquid Crystal Display on the face of
the control unit.
5. Never plug more than one pump at a time into the 3-
pin socket in the base of the control unit.
6. Disconnect pump from mains power (or control unit)
before inspecting or working on the pump.
6
INSTRUCTION B OOK
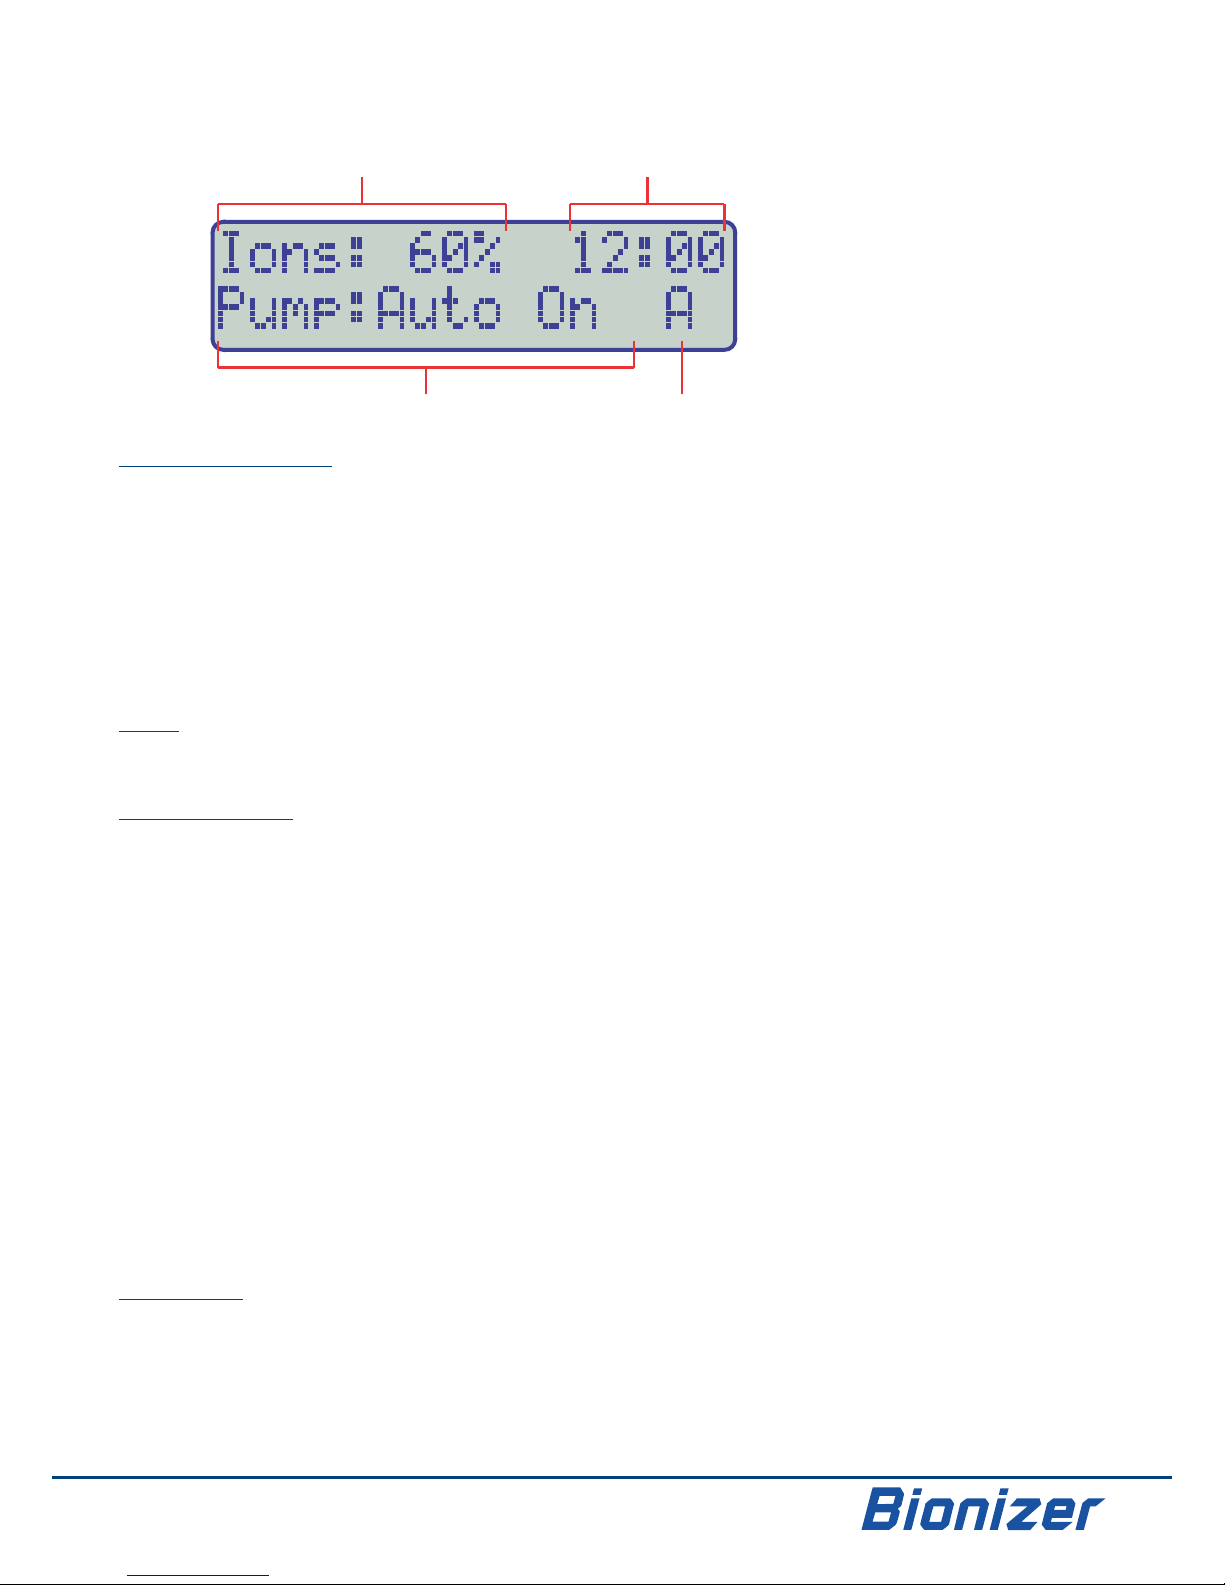
BIONIZER DISPLAY
Ionizing Output
PUMP OUTPUT
TIME
PROGRAM
The illustration below shows what the information of the various sections of the Bionizer Display represents.
IONIZING OUTPUT
! When the Ionizing Output is on, the current output setting is displayed here (Page 14).
! Displays “ ” when the Ionizing Time is completed for the day and the Ionizing output is off.Off
NOTE: The Ionizing Time for each day, and the Pump Times are two separate things, and should not be confused. For
example the Bionizer may only require 1 Hour of Ionizing Time each day, even though there are 4 Hours of Pump Time
in total. In this example, for the first hour of filtration each day the Bionizer will display the Ionizing Output (eg. “Ions:
60% Ions:Off”). For the other three hours of filtration, the Bionizer will display “ ” to indicate that it is not Ionizing
during this time.
TIME
! Displays the current time, in 24 hour clock format. Clock is backed up for up to 2 weeks if power is lost.
PUMP OUTPUT
! Auto On . . . . . . . . . Unit is in Automatic Timer mode, and the Pool Pump is switched on (page 15).
! Auto Off . . . . . . . . . Unit is in Automatic Timer mode, and the Pool Pump is switched off (page 15).
NOTE: When the Bionizer is displaying “ ” it is not indicating the Bionizer unit is switched Auto:Off
in any way. It is merely indicating that the Pool Pump is being controlled by the Timer and is simple
switched Off at this time.
! Manual On . . . . . . . Pool Pump is switched ON, regardless of the Timer Programs. If the power to the unit is switched
off at any time, it will resume this Manual On mode when the power is restored. Use this mode
when operating the Bionizer from an external controller or timer system (page 15).
! Manual Off . . . . . . . Pool Pump is switched OFF, regardless of Timer Programs. If the power to the unit is switched off at
any time, it will resume this Manual Off mode when the power is restored. Use this mode when
servicing the pump, pool cleaner, skimmer box etc (page 15). DO NOT FORGET TO SET THE UNIT
BACK TO AUTO MODE, OR THE POOL PUMP AND IONIZING FUNCTION WILL NOT OPERATE.
! Boost . . . . . . . . . . . Unit operates the Pool Pump AND Ionizing outputs to boost Copper level. Use this function when
installing the Bionizer, or in times of high rainfall (page 18).
PROGRAM
! Displays which of the A, B, C or D timer programs is running, when the unit is in Auto mode and the Pool Pump is ON.
7

SETTING UP YOUR POOL
READ THE DO'S AND DON'TS AND TAKE THE TIME TO SET UP CORRECTLY
STEP 1 – PREPARE YOUR POOL
STEP 2 – BIONIZER INSTALLATION
FOR EXISTING POOLS:
! If unsure about your pool water quality we
recommend that the pool should be super-chlorinated
and the walls and floor brushed. (See Super-
Chlorination on page 23).
! If the pool has a sand filter where the sand has not
been changed for more than 5 years, we recommend
to replace the sand with glass media as part of this
installation.
FOR NEW POOLS:
For a new pool with quartzon, marblesheen and
specialized plaster, do not start to use the Bionizer
ionization for the first 4 weeks after filling the pool with
water. Use Chlorine for sanitation in the meantime. Set
the Ionizing time to 0:00 Hours (page 14).
It is critical to maintain correct pH and Total Alkalinity
for these types of pool surfaces.
For all types of pools, place a sock on your skimmer box
basket for 3 to 4 weeks and clean and refit it every few
days. Do not run an automatic pool cleaner for several
weeks after first filling your pool as fine particles are
released from the pool surface for two to three weeks
whilst the new surfaces are 'curing'. If these particles
manage to get into your filter they have the potential to
'trap' the copper ions in your filter which will result in
low copper levels in the pool until the next time the filter
is backwashed or cleaned.
We recommend using a filter sock during this time to
capture these particles.
FOR BOTH EXISTING AND NEW POOLS:
Test your pool water for pH, Total Alkalinity, Calcium
Hardness, Phosphates and balance the pool to the
following levels:
! pH. . . . . . . . . . . . . . . . . . . . . . . . . . . . . . . 7.0 – 7.4 pH
! Total Alkalinity . . . . . . . . . . . . . . . . . . . . 80 - 120 ppM
(150 - 180 ppM for freshly painted pools)
! Calcium Hardness. . . . . . . . . . . . . . . . . 200 - 250 ppM
! Phosphates . . . . . . . . . . . less than 0.4 ppM (400ppB)
If the pool has been filled with fresh water, we
recommend adding Calcium Chloride (Hardener) until
the 250ppM level is reached. See Snap Pool Balance on
page 35. Mix and brush in well to dissolve.
! Installing your Bionizer Ionizer takes around 30
minutes, depending on the amount of pipework
required for your specific installation.
! Alternatively engage a plumber or a handyman to do
the job.
! If installing it yourself you will need:
!PVC pressure glue and primer
!A fine tooth saw.
!Fine tip marker pen and ruler.
! The Bionizer must be fitted on the pipe that sends
water back to the pool after it has been filtered (the
“Return Line”).
! If a salt chlorinator is currently fitted between the filter
and the pool turn off the chlorinator. Remove the old
cells or the electrode chamber.
BIOPOD CARTRIDGE INSTALLATION
! NOTE: Turn off all valves prior to fitting the BioPod (to
avoid leaks) and turn them on again before ionizing /
filtering the pool.
! Check the system drawings on the next page to work
out the best position to install the BioPod.
! Are you installing a pH BOSS or Eco-Oxidizer ? Be sure
to install the 2 or 3 fittings in the correct order, as per
the system drawings over the page.
! A little more time spent on planning the installation
now, will result in a system that gives you many years
of reliable, hassle-free service.
! Allow 60 minutes for PVC glue to dry before running
water through the system.
8
INSTRUCTION B OOK
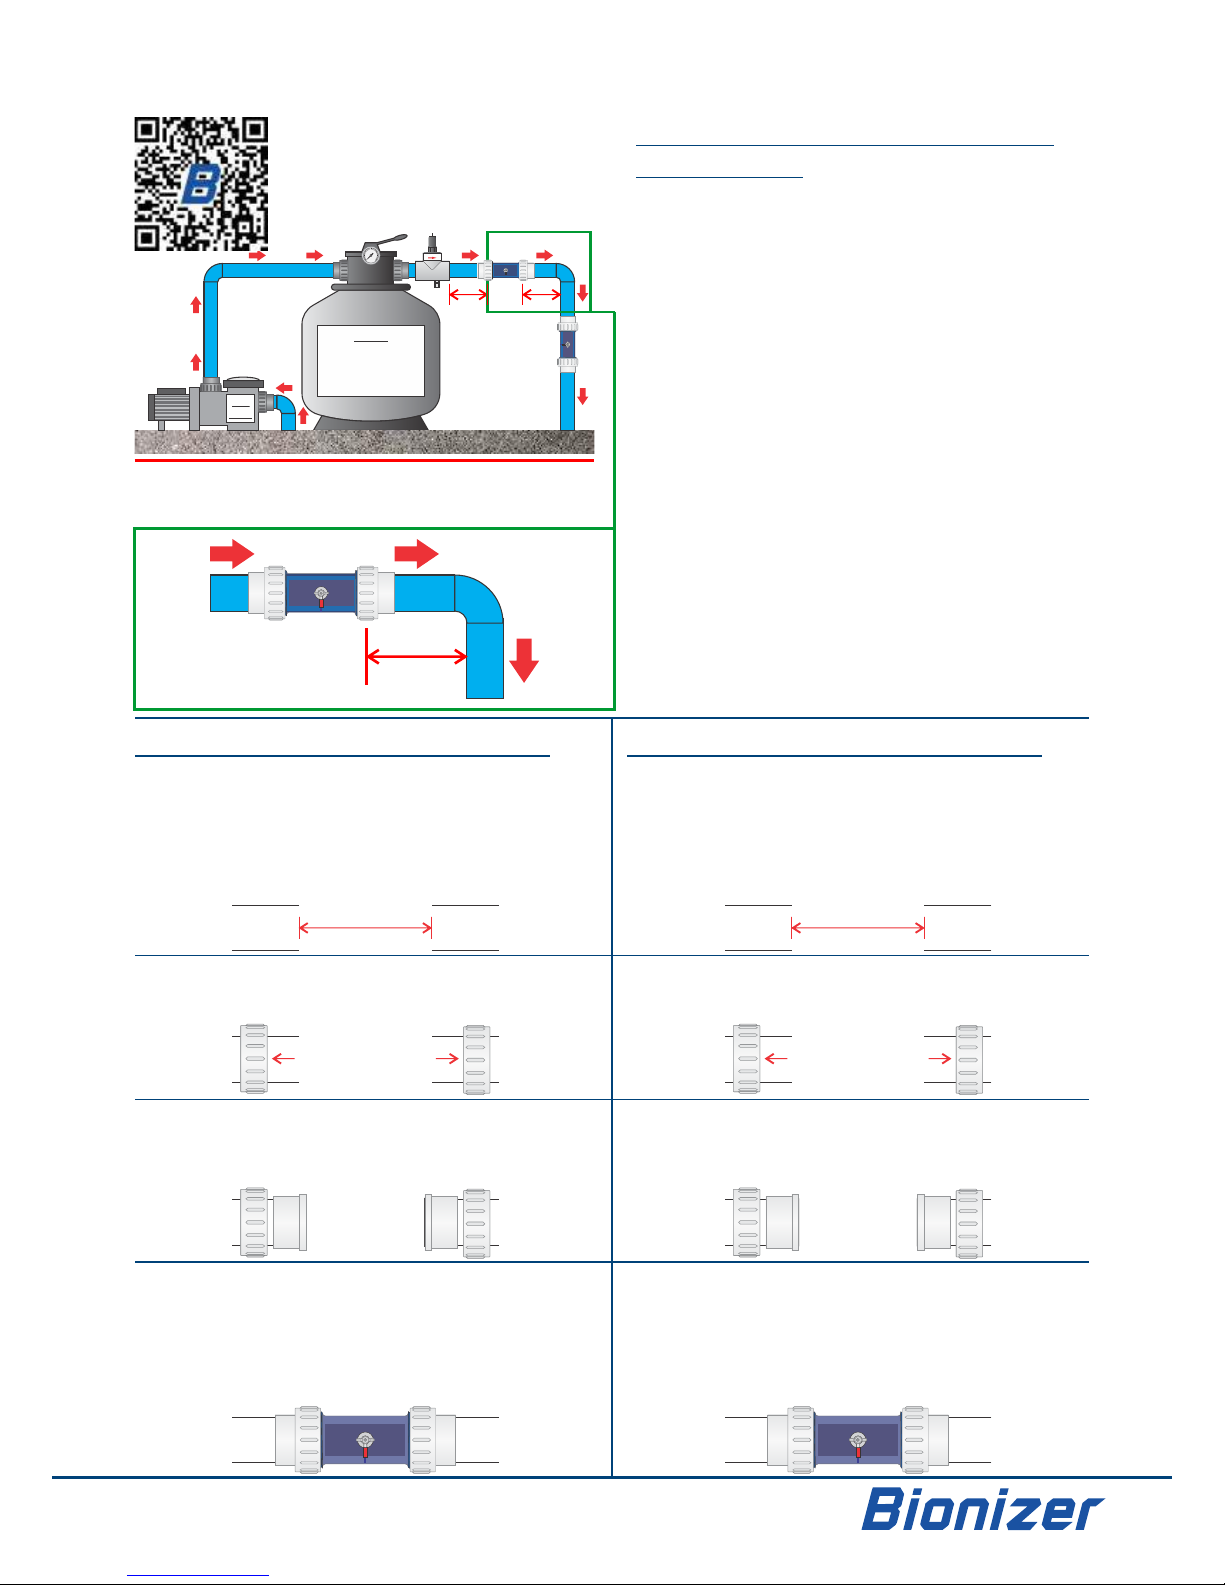
FITTING 50mm BIOPOD CARTRIDGE
(2-60L, 2-120L, 2-250L, 2-500L)
1. 50mm Pipe : Cut out a 175mm section of pipe sufficient for
the BioPod and 50mm barrel unions.
40mm Pipe : Cut out a 165mm section of pipe sufficient for
the BioPod and 40mm barrel unions.
2. Slide the barrel union nuts onto the pipe. Ensure that the
threads are facing the correct way, so that the nuts can be
screwed onto the BioPod at the last stage of installation.
3. Glue the barrel union halves onto the pipe. Use either the
50mm or 40mm barrel union halves, depending on your
return pipe size. Do not lose the O-rings from the unions,
and ensure that they are in place before fitting the BioPod
in place.
4. Fit the BioPod into place and secure the barrel union nuts.
Hand tighten only - do not use a tool.
Fit the ring connectors onto the bolts on each side of the
BioPod and tighten the wing nuts securely. The rings can
be f i tted to ei t h e r an o d e b o l t s . T h e re is n o
+ / - polarity for the connections.
FITTING 40mm BIOPOD CARTRIDGE
(2-30L)
1. 40mm Pipe only: Cut out a 110 mm section of pipe
sufficient for the BioPod and 40mm barrel unions.
For 50mm pipe, contact Bionizer to upgrade to a 50mm
BioPod.
2. Slide the barrel union nuts onto the pipe. Ensure that the
threads are facing the correct way, so that the nuts can be
screwed onto the BioPod at the last stage of installation.
3. Glue the barrel union halves onto the pipe. Do not lose the
O-rings from the unions, and ensure that they are in place
before fitting the BioPod in place.
4. Fit the BioPod into place and secure the barrel union nuts.
Hand tighten only - do not use a tool.
Fit the ring connectors onto the bolts on each side of the
BioPod and tighten the wing nuts securely. The rings can
be f i tted to ei t h e r an o d e b o l t s . T h e re is n o
+ / - polarity for the connections.
PLANNING THE BIOPOD CARTRIDGE
INSTALLATION
! Locate a section of pipe where the BioPod can
easily fit.
! Ensure that there is a minimum of 10cm of straight
pipe AFTER the BioPod.
! The BioPod cartridge can be fitted horizontally or
vertically, so it can be mounted where it is
convenient and easy to install.
! If you are installing a pH BOSS and/or Eco-Oxidizer,
the fittings MUST be installed in this order :
1. pH BOSS Probe and Injection Tee
2. Eco-Oxidizer OxiPod Oxidizing Cartridge
3. Bionizer BioPod Ionizing Cartridge
The OxiPod and BioPod cartridges can be fitted
horizontally or vertically, as long as they are in the
order shown above.
! HINT : Even if you are not installing a pH BOSS now,
you may want to leave a space for the pH BOSS Tee-
Piece Fitting. This requires 20cm of HORIZONTAL
pipe BEFORE the OxiPod.
BIOPOD CARTRIDGE INSTALLATION
9
Scan this QR Code with your smartphone
or tablet to go to the BioPod installation
video on the Bionizer web site.
10cm
(minimum)
Filter
Pressure
Pool
Pump
10cm 10cm
NOTE THAT THE 10cm SPACINGS SHOWN ABOVE ARE
FROM THE EDGES OF THE PODS, NOT THE CENTRE
OF THE PODS.
Oxidizing Pod
Ionizing Pod
Filter
For sand filters,
glass or silica sand
media provides
optimum results.
FLOW DIRECTION
40mm Pipe: 110mm
Cut pool return pipe
FITTING 40mm BIOPOD CARTRIDGE
(2-30L)
1. 40mm Pipe only: Cut out a 110 mm section of pipe
sufficient for the BioPod and 40mm barrel unions.
For 50mm pipe, contact Bionizer to upgrade to a 50mm
BioPod.
2. Slide the barrel union nuts onto the pipe. Ensure that the
threads are facing the correct way, so that the nuts can be
screwed onto the BioPod at the last stage of installation.
3. Glue the barrel union halves onto the pipe. Do not lose the
O-rings from the unions, and ensure that they are in place
before fitting the BioPod in place.
4. Fit the BioPod into place and secure the barrel union nuts.
Hand tighten only - do not use a tool.
Fit the ring connectors onto the bolts on each side of the
BioPod and tighten the wing nuts securely. The rings can
be f i tted to ei t h e r an o d e b o l t s . T h e re is n o
+ / - polarity for the connections.
Glue 40mm barrel
union halves onto
pipe.
Slide barrel union nuts
onto the pipe, facing
the correct way.
40mm Pipe: 165mm
50mm Pipe: 175mm
Cut pool return pipe
FITTING 50mm BIOPOD CARTRIDGE
(2-60L, 2-120L, 2-250L, 2-500L)
1. 50mm Pipe : Cut out a 175mm section of pipe sufficient for
the BioPod and 50mm barrel unions.
40mm Pipe : Cut out a 165mm section of pipe sufficient for
the BioPod and 40mm barrel unions.
2. Slide the barrel union nuts onto the pipe. Ensure that the
threads are facing the correct way, so that the nuts can be
screwed onto the BioPod at the last stage of installation.
3. Glue the barrel union halves onto the pipe. Use either the
50mm or 40mm barrel union halves, depending on your
return pipe size. Do not lose the O-rings from the unions,
and ensure that they are in place before fitting the BioPod
in place.
4. Fit the BioPod into place and secure the barrel union nuts.
Hand tighten only - do not use a tool.
Fit the ring connectors onto the bolts on each side of the
BioPod and tighten the wing nuts securely. The rings can
be f i tted to ei t h e r an o d e b o l t s . T h e re is n o
+ / - polarity for the connections.
Glue 50mm or
40mm barrel union
halves onto pipe.
Slide barrel union nuts
onto the pipe, facing
the correct way.

BIONIZER CONTROL BOX INSTALLATION
POWER
INPUT
LEAD
IONIZING
OUTPUT
LEAD
12V DC
OUTLET
SOCKETS
MAINS
POWER
OUTLET
MAINS
POWER
OUTLET
10
INSTRUCTION B OOK
CONTROL BOX INSTALLATION
1. Make sure that the Control Box is positioned near
enough to a power outlet and to the BioPod Cartridge
to allow the power connecting and anodes cables to
reach the socket and BioPod Cartridge.
2. Choose a position that will allow you to see the LCD
(Display) easily. Fix the control box in position using
screws at each corner of the box.
3. Make sure (if possible) that the unit is undercover and
that the LCD (Display) is not in direct sunlight as it is
not covered by warranty if it is damaged by sunlight.
4. Once fixed in position attach the connecting wires to
the anode connectors and tighten the wing nuts onto
each connector. It does not matter which connector
goes on which anode.
5. Plug the pump power cable into either of the outlet
sockets at the base of the control box.
The spare mains power outlet can be used for any
mains powered device that will operate whenever the
pool pump is running. The AC/DC adaptor of a pH
BOSS or Eco-Oxidizer can be connected here.
6. Two 12V DC outlets are provided for powering a pH
BOSS and an Eco-Oxidizer. Connect the short DC-DC
Adaptor Cable supplied for this purpose. These units
will thereby only operate when the pool pump is
operating.
DO NOT connect any other 12V DC device to the 12V
DC power outlets. Damage from connecting non-
genuine accessories is not covered by your warranty.
7. Lastly, plug the power cable for the Bionizer unit into a
power source.
For low tariff power installations where the Control
Box will be hard wired to the power source, a licensed
contractor will be required.
Your Bionizer is now ready for programming.
MAXIMUM COMBINED OUTPUT FOR BOTH POWER OUTLETS IS 9.5 AMPS (2280 WATTS).
CONNECTING MORE LOAD THAN THIS WILL CAUSE THE INTERNAL CIRCUIT BREAKER TO TRIP.

STEP 3 - WATER PREPARATION & TESTING
VERY IMPORTANT POINT:
Balance your pool water.
Test and adjust to levels below :
! pH . . . . . . . . . . . . . . . . . . . . . . . . 7.0 – 7.4 pH
! Total Alkalinity . . . . . . . . . . . . . . 80 - 120 ppM
! Phosphates . . . . . . . . . . . < 0.4 ppM (400ppB)
! Calcium Hardness . . . . . . . . . . 200 – 250 ppM
! Stabilizer. . . . . . . . . . . . . . . . . . . . . < 30 ppM
Refer to the Snap Pool Balance chart, supplied with your
new Bionizer, and also printed onto the inside back cover
of this instruction manual.
pH
pH is extremely important. If pH is too high, the copper
ionization will not be as effective, and you will get
incorrect copper test readings. Also, algae grows more
readily at high pH.
Total Alkalinity (“TA”)
TA helps the pool water to resist changes to pH from
outside influences. Correct TA helps to produce crystal
clear water. Low TA makes copper less effective, and the
pool water can take on a green appearance.
Phosphates
Phosphates are algae food and are introduced into the
pool water by bathers, plants and animals. If the
phosphate levels get above 0.5 ppM then they assist algae
to form when it gets introduced to the water during rainy
and/or windy periods, especially if the pH is too high.
Algae thrive on high pH and high phosphate levels. One
drop of rainwater may contain as many as 30,000 algae
spore.
Check your phosphates every month. If your phosphate
reading is around 0.5 ppM or higher, treat the pool with
Bionizer PFP according to the directions on the label.
This small task will save you from algae attack –
prevention not cure is the intelligent course of action.
In areas that do not have testing facilities for Phosphates
treat the pool for phosphates anyway just to make sure
that they are not present in the pool water. This may save
you an algae attack.
Salt
Bionizer’s smart software allows for large variations in salt
level without compromising performance so there is no
need to empty and refill water in your pool if you are
converting from salt chlorination. The maximum
permitted salt level is 5000ppM.
Calcium Hardness
If your Calcium Hardness is too low the water will, over
time, absorb calcium from pool surfaces and pool
equipment. This can cause the pebbles in a pebblecrete
pool to fall off and etching to appear on the walls and floor
of quartzon type and concrete pools. It can also cause
damage to other pool equipment and be a cause of cloudy
water if levels are low. Calcium Chloride is used to raise
the Calcium Hardness of the water.
Low Calcium Hardness level will also cause Copper test
readings to be low. Always maintain Calcium Hardness at
correct levels to be sure that there is enough Copper in
the water, and that it can be measured accurately.
Bionizer supplies calcium and phosphate test kits for
your convenience.
MINERAL ION USE
1. The Mineral Ions supplied with your Bionizer can
be used to more quickly build the initial Copper
Ion levels. These are also known as Start-Up Ions.
Add around 15 grams of Mineral Ions per 10,000
Litres of pool water.
For Zeolite filter medium or D.E. Filters, use 30
grams of Mineral Ions per 10,000 Litres.
2. Run the pool pump for an hour or more, then test
the Copper Ion level with your Copper Test Kit.
Now activate the BOOST function as per Page 18,
and enter the result of the Copper Ion test.
The Bionizer will now run continuously to boost
Copper Ion level to the required 0.5 to 0.6 ppM.
3. When the Boost cycle is complete, please test the
Copper Ion level again. If the reading is lower than
0.5ppM, run the Boost function again and enter
the Copper Ion level that you just measured.
11

START UP PROCEDURE
1. The start-up period will be from 8 hours to 2 days
depending on pool size. The Bionizer ionizer can make
a correctly water balanced domestic pool immune to
algae in as little as 6 hours (without start up ions being
added). Do not use an automatic pool cleaner, Kreepy
Krauly, Barracuda etc, or run a waterfall during the
start up period. These devices slow the water flow
thereby increasing the amount of time it takes to
ionize the pool.
2. The Copper (Cu) Ion Test Kit supplied with the Bionizer
indicates whether or not the pool has sufficient ions in
it (see Copper Ion Testing, page 16).
At 0.4ppm Cu your pool is guarded against
contaminants, however we recommend keeping the
copper ion level in swimming season at between 0.5
and 0.6ppM with the pH at 7.0 – 7.4. This should
ensure that algae cannot thrive - keep Phosphate level
below 500ppB.
3. It is not recommended to use your pool/spa unless the
ion level has reached 0.4 ppm on your Copper Ion Test.
4. If no ions are detected in the pool water after several
days of operation it may indicate that the water
conductivity or Calcium Hardness level is low. Check if
the unit was set correctly. To increase Conductivity,
add add Calcium Hardener (Calcium Chloride) to bring
Calcium Hardness level to 250 ppM. See Snap Pool
Balance chart on page 33.
For installations where a multi-speed pump is being
used, increase the speed to a higher setting to ensure a
higher flow rate through the BioPod Anode cartridge.
Alternatively add additional Start-up Ions to the pool
water. Always add start up ions into the pool's
skimmer box with the filter running or pour them into
the balance tank. Once the start-up ions have been
added operate the unit as for normal operation. (See
step 4)
5. When adding acid to the pool first mix it into a 10 litre
bucket of water and spread around the pool (always
add acid to a larger volume of water, NEVER add water
to acid). The fitting of a 'pH Boss' Auto pH controller
will eliminate this process.
Scan this QR Code with your smartphone
or tablet to go to the pH Boss web site.
6. Test pH before testing for copper. If the pH is too high
bring it down to the required level (7.2 – 7.5) before
testing for copper or you may get an inaccurate copper
reading. It is very important to maintain these levels of
pH. Copper is somewhat less effective at pH levels
above 7.5 just as chlorine is less effective at pH levels
above 7.5.
7. If a copper-based algaecide has been used, the pool
water will probably show an ion reading when testing
with the copper test kit. This will also be the case if
"start up ions" have been used. If the copper readings
are detected prior to start up, proceed as outlined
under the "Ion Testing" section.
8. If intending to swim prior to ionizing your pool ensure
adequate levels of chlorine are present in the pool
water.
12
INSTRUCTION B OOK
13
Scan this QR Code with your smartphone
or tablet to go to the Programming video
on the Bionizer web site.
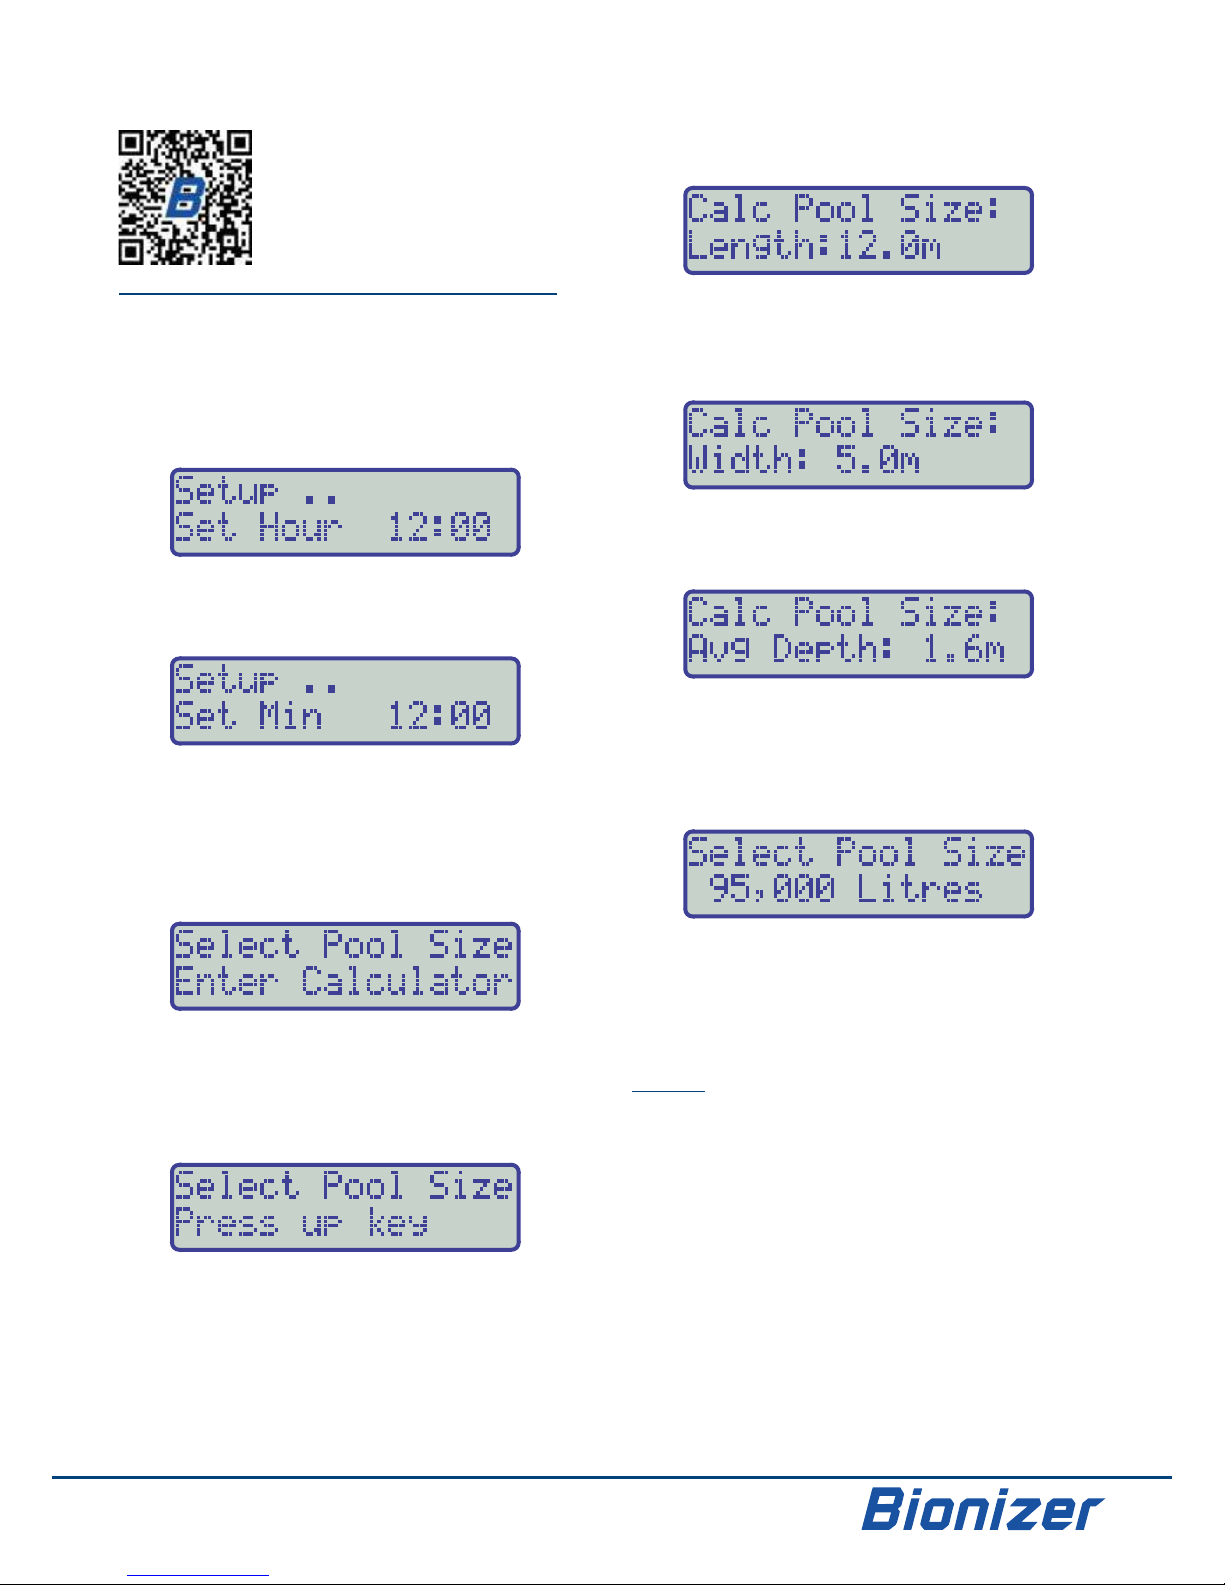
FIRST TIME START-UP PROGRAMMING
The first time you switch your Bionizer on, you will be
able to set the clock and the pool size. This will
automatically choose optimum settings for most pools.
You can still choose to customize settings later, as
needed.
! First, set the HOURS (the hours will be flashing):
! Use the buttons to change the Hours.éê
! Press once to go on to setting the PROGRAM/SET
MINUTES (the minutes will be flashing):
! Use the buttons to change the Minutes.éê
! Press once to go on to the Pool Size / PROGRAM/SET
Pool Calculator selection menu (“Pool Size” will be
flashing). From this screen, you can select whether to
enter the Pool Size (in litres), or if you would want to use
the Pool Size Calculator :
! Use the buttons to change between “Pool Size” éê
and “Enter Calculator”, then press to PROGRAM / SET
go to the next step.
If you selected Pool Size, the following screen will now
be displayed :
Press the button to start scrolling the pool size values. é
If your Pool Size falls between two settings, select the
lower setting.
If your Pool Size falls below the minimum setting
allowed for the Bionizer model you have installed, use
the Pool Size Calculator instead.
Press to save the Pool Size setting.PROGRAM / SET
If you selected Enter Calculator, the following screen
will now be displayed :
! Use the buttons to set the Pool Length, in éê
metres.
! Press to save the setting and go to PROGRAM / SET
setting the Pool Width :
! Use the buttons to set the Pool Width, in metres.éê
! Press to save the setting and move PROGRAM / SET
to setting the Average Pool Depth :
! Use the buttons to set the Average Pool Depth, in éê
metres. For example, a pool with a 1.7m deep end
and 1.1m shallow end has an average depth of 1.4m.
! Press to save the setting. The PROGRAM / SET
Bionizer will confirm the Pool Size calculation :
Press to save the calculated Pool PROGRAM / SET
Size.
Alternatively, use the buttons to enter a different éê
value, then press to save.PROGRAM / SET
NOTES:
! If your Pool Size falls between two settings, select the
lower setting.
! While setting Pool Size, if wish to change to using the
Pool Size Calculator instead of entering the Litres
directly, press the button until “Press up key” is ê
displayed, then press . This will go to PROGRAM / SET
the Pool Size Calculator.
! The Pool Size setting will automatically set your
Ionizing Time and Ionizing Output settings to default
optimal values for your pool size, over-writing any
custom settings you may have entered previously.
! The Pool Size setting is used to calculate the correct
Boost setting, so it is important to enter the correct size
of your Pool.
STEP 4 - FIRST TIME START-UP PROGRAMMING
All user-programmed settings are stored in memory indefinitely when power is switched off.

Scan this QR Code with your smartphone or
tablet to go to the Programming video on
the Bionizer web site.
This programming guide corresponds to the order of the
menus of the Bionizer. To change any settings of your
choice, simply refer to the relevant section.
1. SETTING THE OUTPUT LEVEL
! Press once to show the Output Level PROGRAM / SET
setting screen. In this example, the current output
setting is 60%:
! Use the buttons to change the Output Level. See éê
page 16 for a information about Ionizing Settings for
your pool.
! After selecting the desired Output Level press
PROGRAM / SET once to go on to the Ionizing Time
setting.
2. SETTING THE IONIZING TIME
! The Ionizing Time menu allows you to set the amount of
time per day for which the Bionizer will ionize your pool.
In this example, the Ionizing Time is set to 3 hours per
day. Ionizing Time is NOT the same as the Pool Pump
Timer Refer to IONIZING OUTPUT on page 7.
! Use the buttons to change the Ionizing Time.éê
! After selecting the desired Ionizing Time press
PROGRAM / SET once to go on to the Clock setting.
3. SETTING THE POOL PUMP TIMER
! The Bionizer will operate your pool filtration pump for
up to four sessions per day. These four sessions are
labelled A, B, C and D.
! First, set the time when session A will start :
• Use the buttons to set the ON A time in 30 minute éê
increments.
!
! Press once to go on to setting the time PROGRAM / SET
when session A will finish :
! Use the buttons to set the OFF A time in 30 minute éê
increments.
! Set the ON and OFF times for the remaining pump timer
sessions as detailed for the A session. Press PROGRAM
/ SET each time to save a new setting and move to the
next one.
! To operate the pool pump 24 hours per day, set the
Bionizer to “Manual:On” mode (see page 15). The
Ionizing time will re-set after midnight every night.
! To delete any of the pool pump timer sessions, set the
same time for the ON and OFF times, as per the
example below. Note the “ * ”, which shows that the
session is ignored :
4. SETTING THE CLOCK
! The Bionizer has a real time clock, which displays time in
24 hour format
! The clock is backed up by a Super-capacitor when power
to the Bionizer is lost. This will keep correct time for up
to 2 weeks without power.
! First, set the HOURS (the hours will be flashing):
! Use the buttons to change the Hourséê
! Press once to go on to setting the PROGRAM / SET
MINUTES (the minutes will be flashing):
! Use the buttons to change the Minuteséê
! Press once to go on to the Pool Size PROGRAM / SET
setting next.
NOTE: If you continue from this point to the Pool Size
setting, and re-enter your pool size, the Ionizing Output
and Ionising Time settings will be changed back to
factory default values for that pool size. To avoid this,
simply allow the display to time out.
PROGRAMMING YOUR BIONIZER
This section details all of the settings that can be programmed by the user.
14
INSTRUCTION B OOK
SELECTING OPERATING MODE
Set the Operating Mode to the way you want the Bionizer to work for you.
The following four operating modes are available on the
Bionizer.
! Auto ..............Unit will operate the Pool Pump and
Ionizing outputs according to the Pool
Pump Timer sessions (page 14).
! Manual On ....Overrides Pool Pump Timer Program, and
operates the pool pump continuously
whenever the Bionizer is switched on.
Ionizing time will restart at midnight each
night, or as soon as the Bionizer is first
switched on for the day.
Use this mode when operating the
Bionizer from an External timer (such as
C-Bus) or for solar powered installations.
! Manual Off....Overrides the Pool Pump Timer Program,
and switches the pool pump and ionizing
outputs off.
Use this mode when doing maintenance
such as cleaning out the pump hair and
lint pot etc, when the pump must not
start.
Caution : Be sure to return the Bionizer to
Auto or Manual On modes as required,
or your pool will not be filtered or
ionized, resulting in water that is unsafe
for swimming.
! Boost.............Unit operates the Pool Pump and Ionizing
outputs for a calculated number of hours
to boost Copper level. The number of
boost hours is calculated from the Pool
Size setting and the current Copper
reading. See the “Using the Boost
Function” on page 18 for instructions.
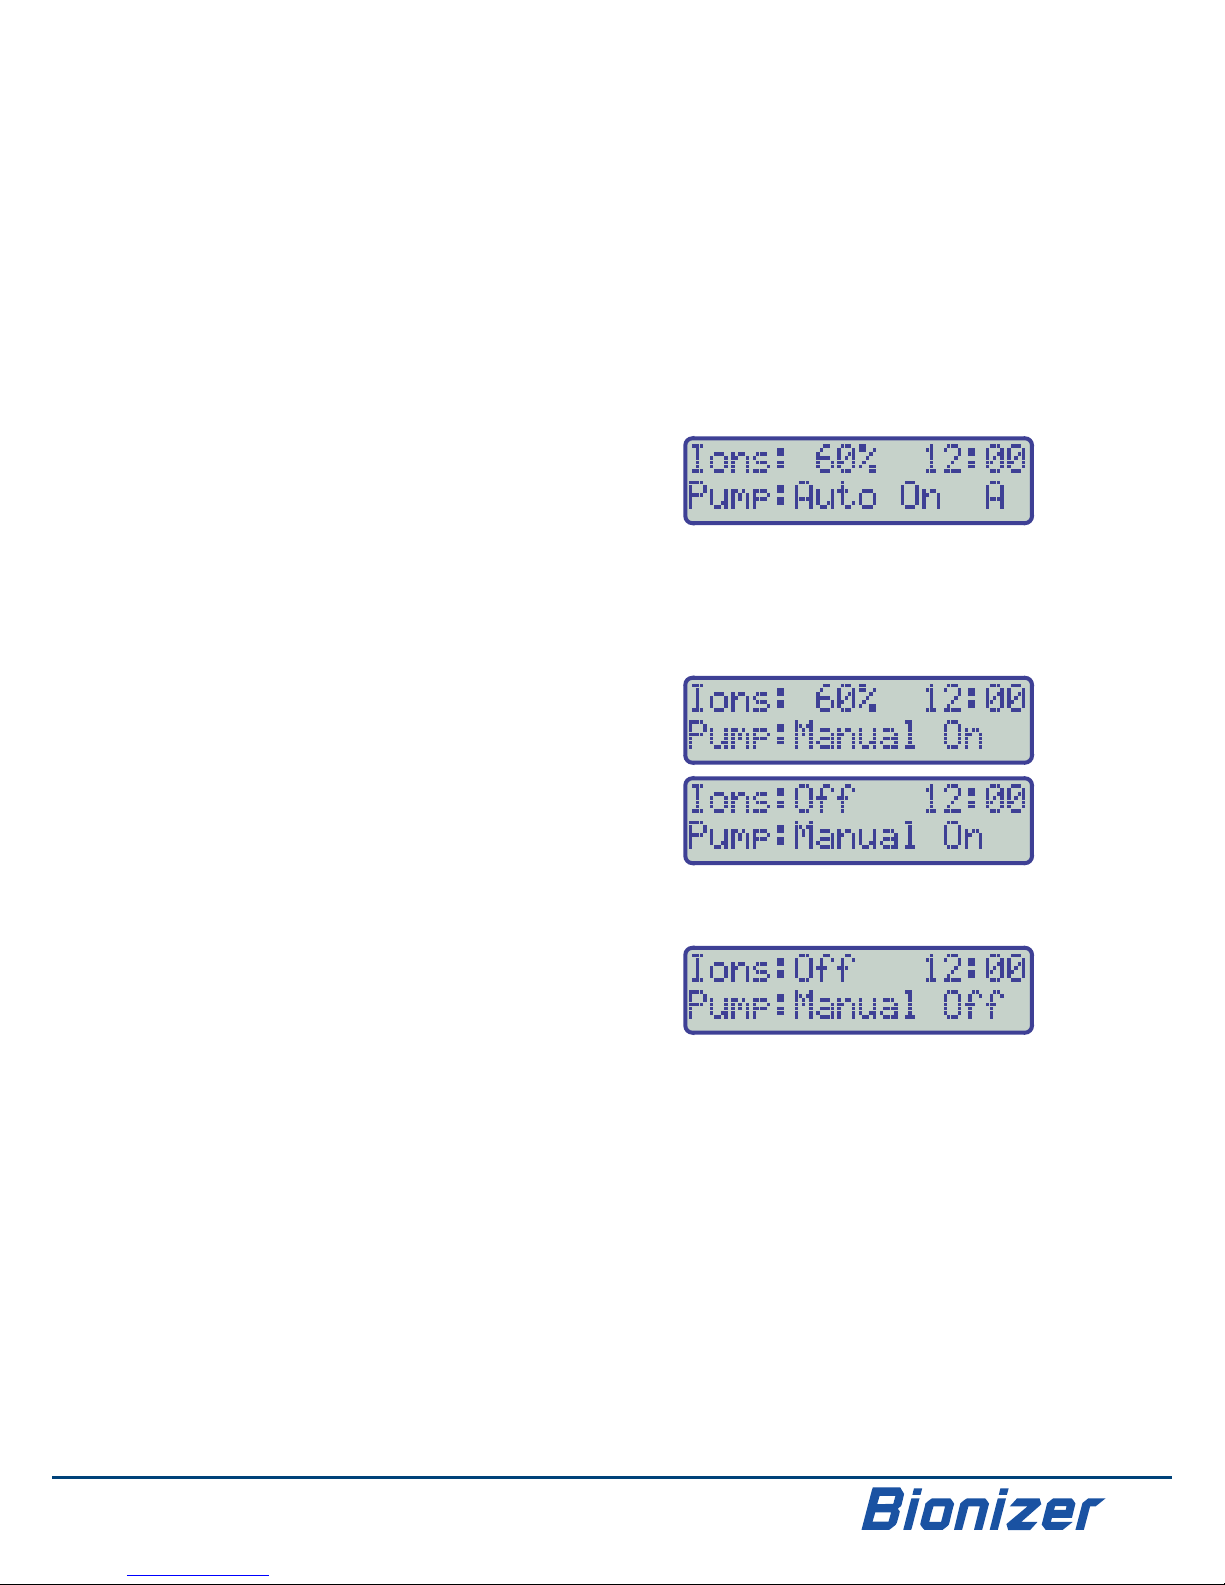
Selecting the required operating mode :
! Short presses of the button select ON/OFF/AUTO
between the following Auto and Manual modes.
Auto
The display will show Auto:On or Auto:Off when this is
first selected, depending on the time of day and Pump
Timer settings.
Please note that “Auto:Off” only indicates that the
pool pump is switched off because it is currently not in
one of the Pool Pump timer cycles. This is NOT an
indication that the Bionizer is switched off.
Manual: On
The unit will show “Manual:On”, and the currently
selected output level (see page 14). When the Ionizing
Time is finished for the day, the unit will show
“Ions:Off”.
Manual: Off
The unit will show “Manual:Off” and and “Ions:Off”
Boost Mode
! Press AND HOLD the button for 4 ON/OFF/AUTO
seconds to select “Boost” mode.
! Press AND HOLD the button for 4 ON/OFF/AUTO
seconds to EXIT “Boost” mode.
! See the “Using the Boost Function” section on page 18
before using this feature.
15

IONIZING SETTINGS
POOL CONDITION
New Pools
The water condition of a new, freshly filled pool is a great
starting point for the Bionizer system. Simply balance your
pool according to the Snap Pool Balance chart. Your pool
professional will be able to assist with this.
Existing Pools
The Bionizer system should be installed on a clean, well
maintained pool. If the pool is in poor condition due to a
failed salt chlorinator or other cause, then consult a pool
professional to assist with getting back to good condition.
Finally, balance the pool according to the Snap Pool
Balance chart.
COPPER START-UP KIT
Pour the granules of the supplied Copper Start Up Kit at
the suggested dose rate (see page 11) into the skimmer
box whilst the filter is running. This will saturate the filter,
allowing the Bionizer to be effective from start-up.
BOOST FUNCTION
When the Bionizer is first installed on a new or existing
pool, we recommend that you use the Boost function, as
detailed on page 18. This will boost your Copper ion
levels quickly.
ENSURE THAT ALL POOL BALANCE LEVELS ARE
CORRECT BEFORE BOOSTING, ESPECIALLY pH AND
TOTAL ALKALINITY.
RECOMMENDED IONIZING SETTINGS
Drawing on our many years of experience in pool
ionizing, we have made the initial ionizing settings
extremely easy for the first time user.
When you entered your Pool Size during the first time
start-up, the Bionizer automatically adjusted the
Ionizing Output and Ionizing Time settings for your
pool. See page 13 for more information.
If you have changed the Ionizing Output and/or
Ionizing Time settings and wish to restore them to
the initial start-up settings, you can re-enter the Pool
Size again to reset them. See page 13.
! Test your Copper Levels every 3 to 4 days for the
first 2 to 3 weeks after installation.
! Ideal Copper Levels are :
Summer . . . . . . . 0.5 to 0.6 ppM
Winter . . . . . . . . 0.3 to 0.4 ppM (unheated pool)
In Tropical climates with high rainfall, the summer
level should be maintained all year round.
! Adjust the Ionizing Time and/or Ionizing Output
settings until the Bionizer is consistently giving the
ideal Copper Ion Level.
! Once you have established the best setting to
maintain the correct Copper level in your pool, it
will rarely require adjustment, except at the
beginning of summer or winter. However, we
recommend that you test Copper weekly to be sure
you pool will stay crystal clear.
! If Copper readings drop in times of heavy rain, wind
or bather load, simply use the Boost (super ionize)
function to compensate for the increased
env i r o n me nt a l s tre s s th at th e wate r i s
experiencing. The ions in the water will be
replenished. See page 18 for instructions.
16
INSTRUCTION B OOK

The mineral anodes are made of a unique alloy of copper
and silver, predominantly copper.
Why Test for Copper Ions?
• The purpose of copper ion testing is to establish how
long to run the ionizer each time the filter is operating
so as to maintain a steady ion level.
The target reading for Copper is 0.5 to 0.6 ppM in
summer and 0.4 to 0.5 ppM in winter. When 0.4ppm is
reached the pool is adequately ionized for swimming.
• Reaching 0.5ppm or less should only take 1 day of
continuous ionization in a 50,000-litre pool.
• The ion test kit detects the presence of copper ions,
thereby determining if the water has an adequate
level of protective minerals. It is an accurate test when
used correctly.
• The reagents should be replenished every time you
change anodes or when they have run out.
TESTING SCHEDULE
• pH MUST be between 7.0 and 7.4 to obtain correct
copper readings.
! Test copper and pH at least once every week to ensure
your pool has an adequate level of ions and the pH is
correct.
• The anode mineral composition is homogenous. As a
result silver ions are created at the same time as the
copper ions. If the copper ion level is adequate then so
is the silver ion level.
COPPER ION TEST KIT
Testing for ions with the Bionizer Copper Ion Test Kit is
different from testing for pH or Total Alkalinity which
require looking through the side of the test tube.
• To use the copper ion test look down through the top
of the tube with the cap off.
• Depending on the kit supplied, the colour comparison
chart is either on the top of the plastic bottle that
contains the Copper Ion test kit or a separate printed
card.
• Go off the shading to judge copper level as computer
colours rarely match our test hues.
1. Read instructions on the test kit.
• When taking a reading place the tube on the white
part of the colour chart in the centre of the various
comparison colours. (Cu ion levels). Leave the tube for
a minute or two to arrive at the true reading.
• When the water sample is taken and the reagents
added correctly remove the cap from the test tube and
look down through the tube to obtain a comparative
colour reading.
2. Test the water from different positions around the
pool with the filter running. You should be getting the
same reading each time.
3. If the ion reading climbs to 0.7 ppM or thereabouts,
turn down the ionizer current output or ionizing time
period.
• Test ion levels weekly. By doing this you will know the
average ion loss from the pool.
5. If the ion level drops to less than 0.5 ppM increase the
unit's ionize time or current output enough to restore
the pool to the 0.5 ppM to 0.6 ppM range.
• In a short time you will ascertain how long and at what
level to run the ionizing function each day so as to keep
the pool at the correct levels of copper.
COPPER ION TESTING
17
0.2
0.4
0.6
0.8
1.0

As spas have much less water volume than pools the required
times and levels for each are less than for pools.
• The average time to ionize a 1500 litre spa for instance may
be as little as 30 minutes at 60% of current output levels.
Ask us about our Spa model Ionizer, the Mini-B. It was designed
to treat spas and smaller pools at a lesser cost.
The same balancing rules for pools are used and small amounts
of oxidizer or sanitizer should be added.
If the water is being retained for several weeks or months in the
spa then adequate levels of ions and oxidizer should be
maintained in the spa to control any nasties.
• Copper and silver ions are not affected by hotter water and
have a high residual and therefore remain active for days
and weeks even if the ionizing unit is switched off.
However if the spa has not been used for some time care should
be taken to check the levels of copper ions and Oxidizer in the
water before using the spa.
SPAS
USING THE BOOST FUNCTION
The Boost function boosts Copper ion levels quickly,
and should only be used for 2 reasons :
1. For new installations, to bring Copper Ions up to the
required level quickly.
2. In times of heavy rainfall or if the pool is topped up
with fresh water, and the Copper Ion level has dropped
to below 0.4 ppM.
DO NOT use the Boost function to boost copper levels in
a pool that has had an algae attack. The algae attack
would more likely be due to incorrect pool balance levels,
as outlined on the Snap Pool Balance chart provided with
the Bionizer (also on printed the inside back cover of this
manual).
BEFORE USING THE BOOST FUNCTION
! Check all pool balance levels as per the Snap Pool
Balance Chart. Of particular importance is pH, which
MUST be between 7.0 to 7.4 in order for the Copper
Ion test to show a correct reading.
! Make a note of the Copper reading, which you will
need to enter into the Bionizer when starting the Boost
function. If a dose of Mineral Start-Up Ions has been
added, be sure to wait for at least one hour of filtration
time before taking a Copper reading.
! Multiple use of the Boost function should not
required. Test Copper Ions and Pool Balance again
before running the Boost function again.
! See the Bionizer Support Pages in this manual if
Copper Ion levels continue to be low.
STARTING AND STOPPING BOOST MODE
! Press AND HOLD the button for 4 ON/OFF/AUTO
seconds to start “Boost” mode. The Bionizer will now
ask you to enter the Copper reading from your pool:
! Use the buttons to enter the Copper Reading that éê
you obtained from your Bionizer Copper Test Kit.
For a new installation, be sure to enter 0.0, which will
start a special longer Boost cycle for new pools.
For existing installations, you MUST enter the Copper
Ion level that you have measured in the pool using the
Copper Test Kit. The value you are setting is the
CURRENT Copper Level, BEFORE the Boost starts.
Press to start the Boost function. The PROGRAM / SET
following Boost screen will be displayed :
Ions . . . . . . . . The Ionizing Output is fixed at 100% while
Boosting.
Time . . . . . . . Current clock time is displayed.
Boost:Auto . . The Bionizer will return to Auto mode
when the Boost cycle is finished. To return
to Manual:On mode instead, press the
ON/OFF/AUTO button once.
Boost:Man . . The Bionizer will return to Manual:On
mode when the Boost cycle is finished. To
return to Auto mode instead, press the
ON/OFF/AUTO button once.
Countdown. . Counts down the hours and minutes of
Boost cycle remaining. This time is
calculated from your pool size and the
Copper reading you entered.
18
INSTRUCTION B OOK

BASIC POOL ROUTINE
1. It is important to spend a few minutes a week to
monitor the water balance and to learn the trends of
the pool.
2. After a couple of weeks a clear pattern will be
identified as to how many hours and at what current
control levels the ionizer should function.
3 Do not haphazardly alter the pH, or add algaecide, or
try to alter perfectly clear water. Give the pool water
time to stabilize and remember simplicity is the key.
4. Always keep the pH, Phosphates, Total Alkalinity,
Calcium Hardness and Copper Ion levels at the correct
levels. See the Snap Pool Balance Chart.
5. Brush the pool or operate your auto pool cleaner once
a week and your pool water will settle down into a
healthy sparkling body of water.
3 TESTS EACH WEEK
Test every week (adjust if required):
1. pH . . . . . . . . . . . . . . . . . . . . . . . . . . . . . 7.0 - 7.4 pH
2. Copper . . . . . . . . . . . . . . . . . . . . . . . . 0.5 - 0.6 ppM
3. Total Alkalinity. . . . . . . . . . . . . . . . . . 80 to 120 ppM
2 TESTS EACH MONTH
(If weather/conditions are very wet/windy then do these
2 tests weekly)
1. Phosphates (Algae Food). . . . . . <0.4ppM (400 ppB)
2. Calcium Hardness . . . . . . . . . . . . . . . 200 - 250 ppM
Correct phosphate levels are as important as correct pH
levels and are easily controlled by using Bionizer PFP
Phosphate remover. When levels of phosphates are
above 0.4ppM (400ppB) in the pool water there is a risk of
algae as phosphates are food for algae.
Follow these rules and check your Bionizer regularly to
ensure it is operating correctly and the anodes are not
worn. Do these simple steps and we promise your pool
will be the source of joy it was meant to be.
Using a Bionizer to manage and control your pool or spa
rewards you with sparkling and healthy water which is a
pleasure to swim or spa in.
19

CHECKING ANODES
The copper/silver mineral anodes are "sacrificial" and
designed to slowly disintegrate, contributing mineral ions
to the pool water.
• After an average of 18 – 36 months, (for 50,000 Litre
pool), the anodes will wear away and require
replacing.
REPLACEMENT INDICATOR
• This will be apparent when the ion readings start to
drop for no apparent reason. The red light on the
control box (Maximum Output) will light up and the
message "Check Anodes" will appear on the display
screen .
• When this happens it is indicating that the anodes are
wearing down.
NOTE: When the anodes are worn it will not damage
the Bionizer. This is also true if the pump fails or
there is no water passing the anodes when the
Bionizer is operating – no damage to the unit or
pool equipment will result and there will be no
risk of fire or explosion as can occur with many
salt chlorinator electrodes if they are left
running.
ADJUSTING IONIZATION WHEN ANODES
ARE WORN
1. If they are becoming worn reduce the Ionizing Output
setting until the red light goes out.
2. Increase the length of ionizing time that the unit
operates to compensate.
EXAMINING THE ANODES
NOTE: At this time it is important to check the anodes.
1. The Anodes can simply be inspected for wear through
the clear BioPod cartridge.
2. If there is noticeably more wear on one end of the
anodes, remove the cartridge, turn around, and re-fit.
3. Don't forget to have the filter turned off and the taps
or valves closed to prevent water from spurting out
when you remove the BioPod from the pipeline..
20
INSTRUCTION B OOK
Table of contents


