Pool Systems Avenger User manual

Instruction
Manual &
Warranty

SECTION 1. INTRODUCTION
SECTION 2. ASSEMBLY COMPONENTS
SECTION 3. INSTALLATION INSTRUCTIONS
SECTION 4. IMPORTANT ADJUSTMENTS
SECTION 5. CARING FOR YOUR AVENGER
SECTION 6. AVENGER® SPARE PARTS
SECTION 7. REPLACING THE DIAPHRAGM
SECTION 8. TROUBLESHOOTING GUIDE
SECTION 9. AVENGER®TWO-YEAR WARRANTY
SECTION 10. PURCHASE DETAILS
SECTION 11. OWNER REGISTRATION
This product is protected by one or more of the following:
AUST. PATENT APP. 2008902923
AUST. DESIGN APP. 11325/2008
AUST. DESIGN APP. 11326/2008
AUST. INNOVATION PAT. 2006100934
INTERNATIONAL PATENTS PENDING
www.avengerpoolcleaner.com
Avenger®and AutoPilot®are registered trademarks
Warranty claims valid only with proof of purchase receipt.

POOL SYSTEMS - AVENGER®INSTRUCTIONS
1. INTRODUCTION
Congratulations on your purchase of the Avenger®High Performance Pool Cleaner.
The Avenger®has been designed to be user friendly and low maintenance providing
years of trouble free service.
Dependable - contains just one internal moving part.
Quiet Operation - proven diaphragm technology.
Efficient - cleans the walls as well as the floor.
Economical - no additional running cost powered by suction from your filtration system.
Durable - no nuts, bolts, screws or gears.
Performance - AutoPilot®revolutionary steering and buoyancy control.
2. ASSEMBLY COMPONENTS
Please check the following items have been provided:
a. Avenger®Head Assembly (inc. Disc & Foot)
b. Hose (Twelve Lengths Total)
c. Hose Weight
d. Leader Hose Adaptor
e. Deflector Wheel
f. Weir Cuff Elbow/
Speed Controller
g. Suction Tester
h. Instructions
If any items are missing please contact your place of purchase.
a.
c.
e.
b.
d.
f.
g.
3.

3. INSTALLATION INSTRUCTIONS
Your Avenger®has been designed for simple installation and low maintenance.
Step 1. Clean or backwash your filter and empty the skimmer basket.
Step 2. Turn off all ancillary equipment such as waterfalls, spa seats and spillover
spas while the Avenger®is operating to ensure maximum performance.
Check the main drain opening is plugged (vacuum position) in the skimmer
box and, if applicable, secondary skimmers are closed. Your Avenger®needs
good suction to work correctly. Contact your place of purchase if you have
questions or require advice about ancillary equipment.
Step 3. Unpack your Avenger®near the skimmer box of the pool.
Step 4.Check the Teflon slip ring is placed
between the top of the Upper Body
and the Outer Extension Pipe.
Step 5.Place the Deflector Wheel onto the
main body of the Avenger Head
Assembly and screw the hand nut
tight to hold in place.
Step 6.Push the Leader Hose Adaptor into
the end of one of the hose lengths
and attach to the Avenger®Head.
Join together and attach the
remaining hose needed from the
skimmer to the furthest point plus
one additional hose length.
4.

Step 7. Attach the Hose Weight on the
second hose from cleaner head about
midway. The Hose Weight can be
adjusted up or down the hose to
achieve the correct balance. The disc
and foot should be flat/horizontal to
the bottom of the pool when resting.
Step 8. Submerge the cleaner head and first
hose length in the water - make sure
that there are no air bubbles inside.
Step 9. Ensure there is no trapped air
anywhere in the hose. An easy way
to do this once the required hose is
tightly joined is to hold the end of the
final hose length over the pool return,
allowing the flowing water to push
the air through the hose and out of
the cleaner.
Step 10.Attach the Speed Control/Weir Cuff
to the final hose length. Ensure that
the vacuum plate in your skimmer
box is properly fitted, and push the
Speed Control/Weir Cuff into the hole.
Remember the main drain opening
in the skimmer must be plugged
(vacuum position)and, if applicable,
secondary skimmers are closed.
Your Avenger®requires good suction
to work correctly.
Step 11.Switch the pump on and your
Avenger®should start cleaning.
Adjust the Speed Controller to the
optimal setting. If you experience
difficulties check for good suction where
the Avenger®attaches to the hose
using the suction tester gauge supplied.
5.

4. IMPORTANT ADJUSTMENTS
Here are some points to ensure your Avenger®operates at maximum performance.
• Ensure that the Avenger®is
properly balanced. The cleaner
at rest should sit flat on the floor of
the pool. You can adjust the balance
by moving the hose weight up or
down the hose. You may also
find the best balance without the
Hose Weight attached.
•Ensure that the Avenger®has the
correct amount of suction.
Adjusting the speed controller varies
the suction to the head of the
cleaner, and thus alters its speed.
Use the Suction Tester on the end
of the hose (instead of the cleaner)
to gauge the suction level and adjust the speed controller accordingly.
•Ensure that the Avenger®covers
all of the pool. Suction cleaners
have no programmed route, and
their movement depends largely on
the flow of water throughout the
pool. Making adjustments to the
eyeball returns of the pool can
help the cleaner cover dead spots, or prevent the cleaner from sticking in
corners.
If you encounter any problems with the Avenger®automatic pool cleaner refer
to the troubleshooting guide prior to contacting your place of purchase.
5. CARING FOR YOUR AVENGER®
Here are some tips for looking after your Avenger®, to ensure that it provides many
years of faithful service.
•Don’t leave your Avenger®out of the pool in the sun for prolonged
periods. If you take it out of the pool, store it in the shade. Prolonged
summer sun can be detrimental to your Avenger®.
•Store the hose lengths straight. If the cleaner is out of the pool, ensure
that the hose is dismantled and the lengths stored straight. Curling the
lengths up can often impress a curled memory into the hose causing it
to tangle in the pool and affect your Avenger®operation.
6.

•Take the Avenger®out in unusual circumstances. If your pool is green
and cloudy or if you are going to add any large doses of chemicals or
superchlorinating, it’s best to take the cleaner out of the pool until it returns
to normal. Unusual chemical balance can severely damage and deteriorate
your Avenger®.
•Remove any sharp objects from the pool by hand. Sharp twigs, nuts,
small pool toys, stones and bottle caps can damage the soft diaphragm
inside. It’s best to remove these type of objects before your Avenger®gets
there first.
Children and pets are responsible for most damage caused to pool cleaners. Please
ensure your Avenger®is never used as a toy and it will give you years of dependable
service.
7.
6. AVENGER®SPARE PARTS
3
4
5
67
8
9
10
11
171615
14
13
12
1. Hose Sections
2. Hose Adaptor
3. Inner tube
4. Outer tube
5. Hand Nut
6. Slip Washer
7. Bushing
8. Upper Body
9. Lower Body
10. Diaphragm
11a.Blue Foot - Concrete, etc.
11b.Yellow Foot - Smooth Surface
12. Skirt
13. AutoPilot®Assembly
14. Deflector Wheel
15. Hose Weight
16. Suction Test Gauge
17. Speed Control Elbow
2
1

7. REPLACING THE DIAPHRAGM
A.Purchase a new Avenger®diaphragm - Picture 1
B.Disassemble Avenger®head assembly - Pictures 2-8
C.Remove the diaphragm from underneath the cleaner - Picture 9
D.Feed the small end of the innertube through the cleaner - Picture 10
E.Fold the new diaphragm in half and place inside the inner-tube - Pictures 11 & 12
F. Pull the innertube through machine aligning the diaphragm in body - Pictures 13 & 14
G.Push the innertube into end of diaphragm and reverse previous steps to
reassemble the cleaner - Pictures 15 & 16
Note: If you have any difficulties in replacing the diaphragm in the cleaner take it back
to your place of purchase for their assistance.
1
10 12
2 3 4
6 7 85
9
11
14 16
1513
8.

8. TROUBLESHOOTING GUIDE
If you encounter any problems with the Avenger®automatic pool cleaner check the
following troubleshooting guide prior to seeking assistance from your place of purchase.
PROBLEM POSSIBLE SOLUTIONS
Avenger®stops and starts, • Check that the filter is clean and the pump is switched on.
or won’t move at all. • Disengage the safety suction, ensure main drain is plugged.
• Ensure that the vacuum plate is properly installed.
• Check the cleaner and hose are free of trapped air.
• Check the diaphragm for any damage or blockages.
Avenger®is missing spots • Ensure that the correct amount of hose is installed.
in the pool. Try adding or taking away one or two hose lengths.
• Ensure that all the returns are directing water flow towards
the floor of the pool, adjusting the eyeballs, or using water
diverters available at your local pool shop.
• Ensure that hose is straight and untangled.
Avenger®doesn’t climb • Increase the suction using the speed controller.
• Ensure the pool water is properly balanced. For example,
High pH and/or lack of chlorine, makes the walls very slippery.
• Check float arm is in the correct position.
Note: In pools with a sharp 90 degree wall-to-floor it is
unreasonable to expect the cleaner to climb the walls.
Avenger®spends too much • Decrease the suction using the speed controller.
time on the walls, and/or •Adjust the hose weight provided towards the cleaner head..
climbs out of the water. •Attach the AutoPilot®float assembly to another position.
Avenger®sticks in corners, • Ensure that the correct amount of hose is installed.
under ladders, on lights Try adding or taking away one or two hose lengths.
or on pool steps. • Ensure that all the returns are directing water flow towards
the floor of the pool, adjust the eyeballs, or use water diverters
available at your local pool shop. Excess water movement on
the water surface will hold or push the hose.
• Add optional hose motors and / or replace wheel deflector
with larger size available from your local pool shop.
That’s it! From all of us at Pool Systems, we wish you all the best for summer after
summer of hassle free pool cleaning with the Avenger®!
The AutoPilot®floatation chamber is factory set in the
middle position.
If your Avenger®is staying on walls or staying on the
floor simply try adjusting the float up or down as well as
adjusting the hose weight and suction at the speed
control valve.
123
9.

10.
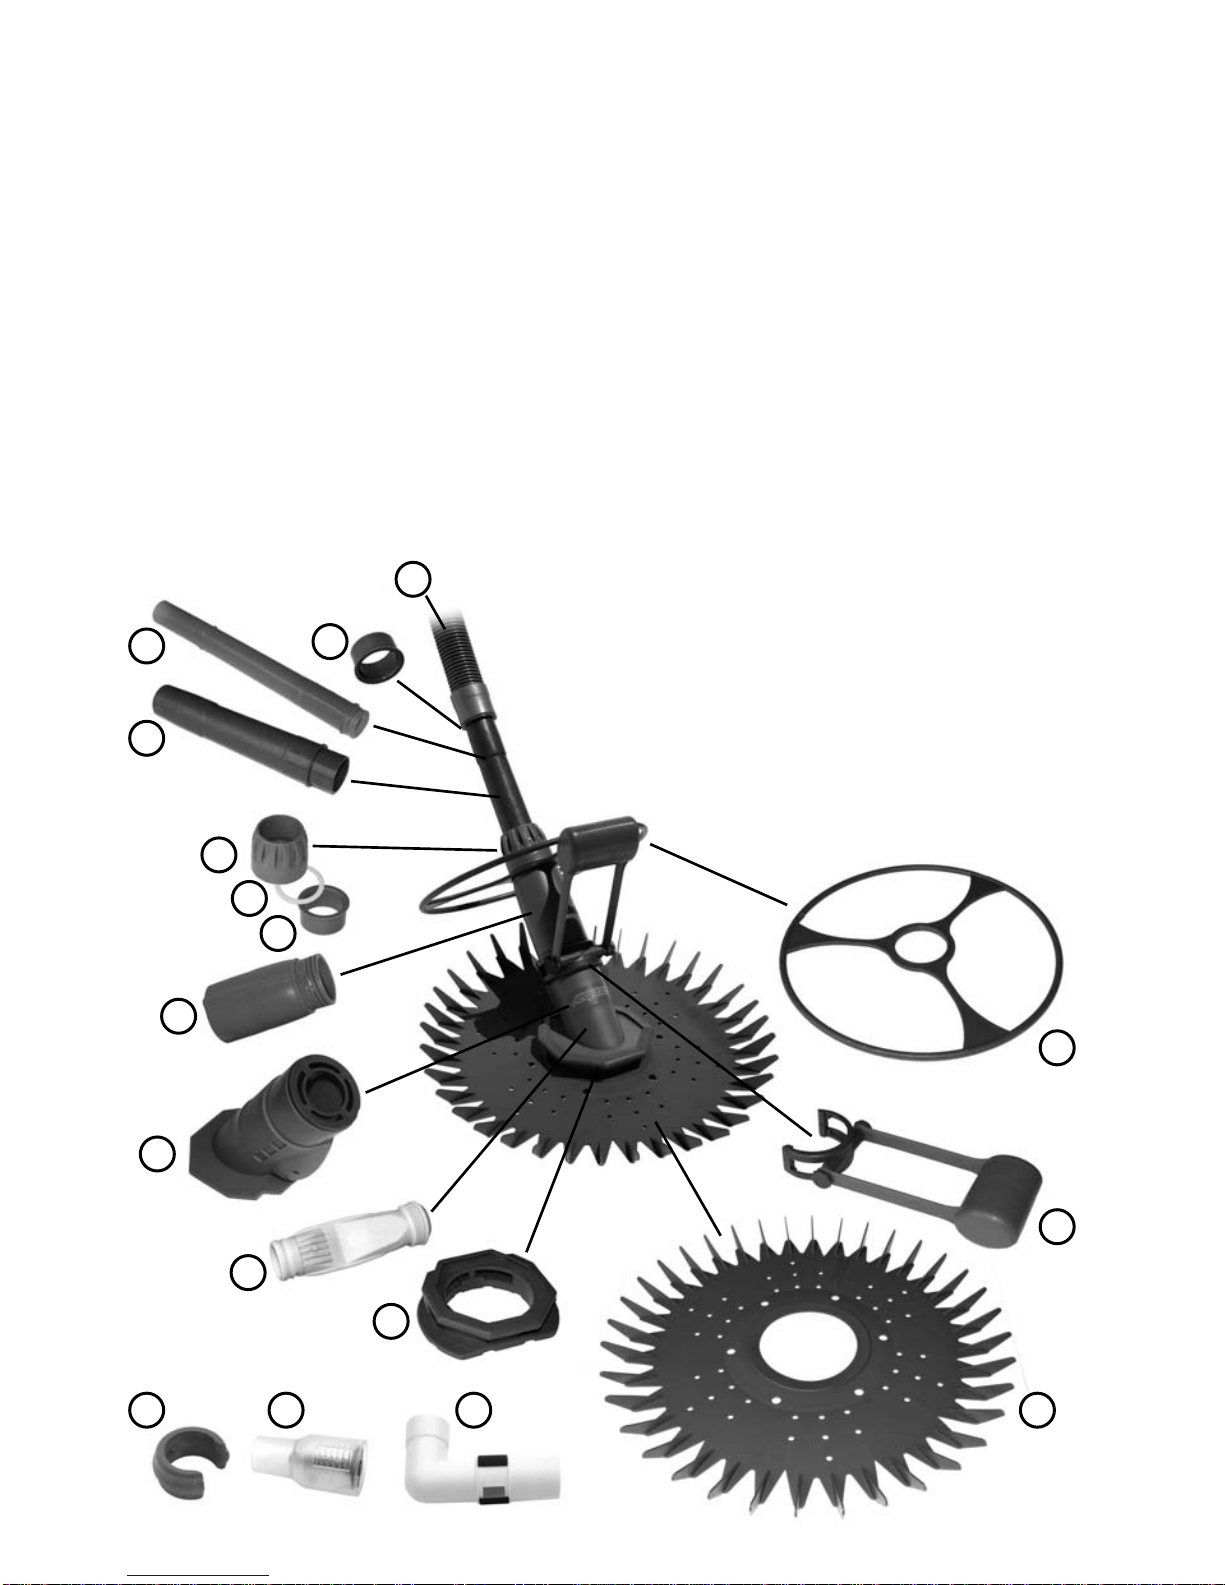
AVENGER®High Performance Pool Cleaner
TWO-YEAR WARRANTY
This Avenger®Automatic Pool Cleaner was carefully inspected before shipment from our warehouse. Upon
unpacking, if any parts are missing or found to be defective, please notify your dealer immediately. Please
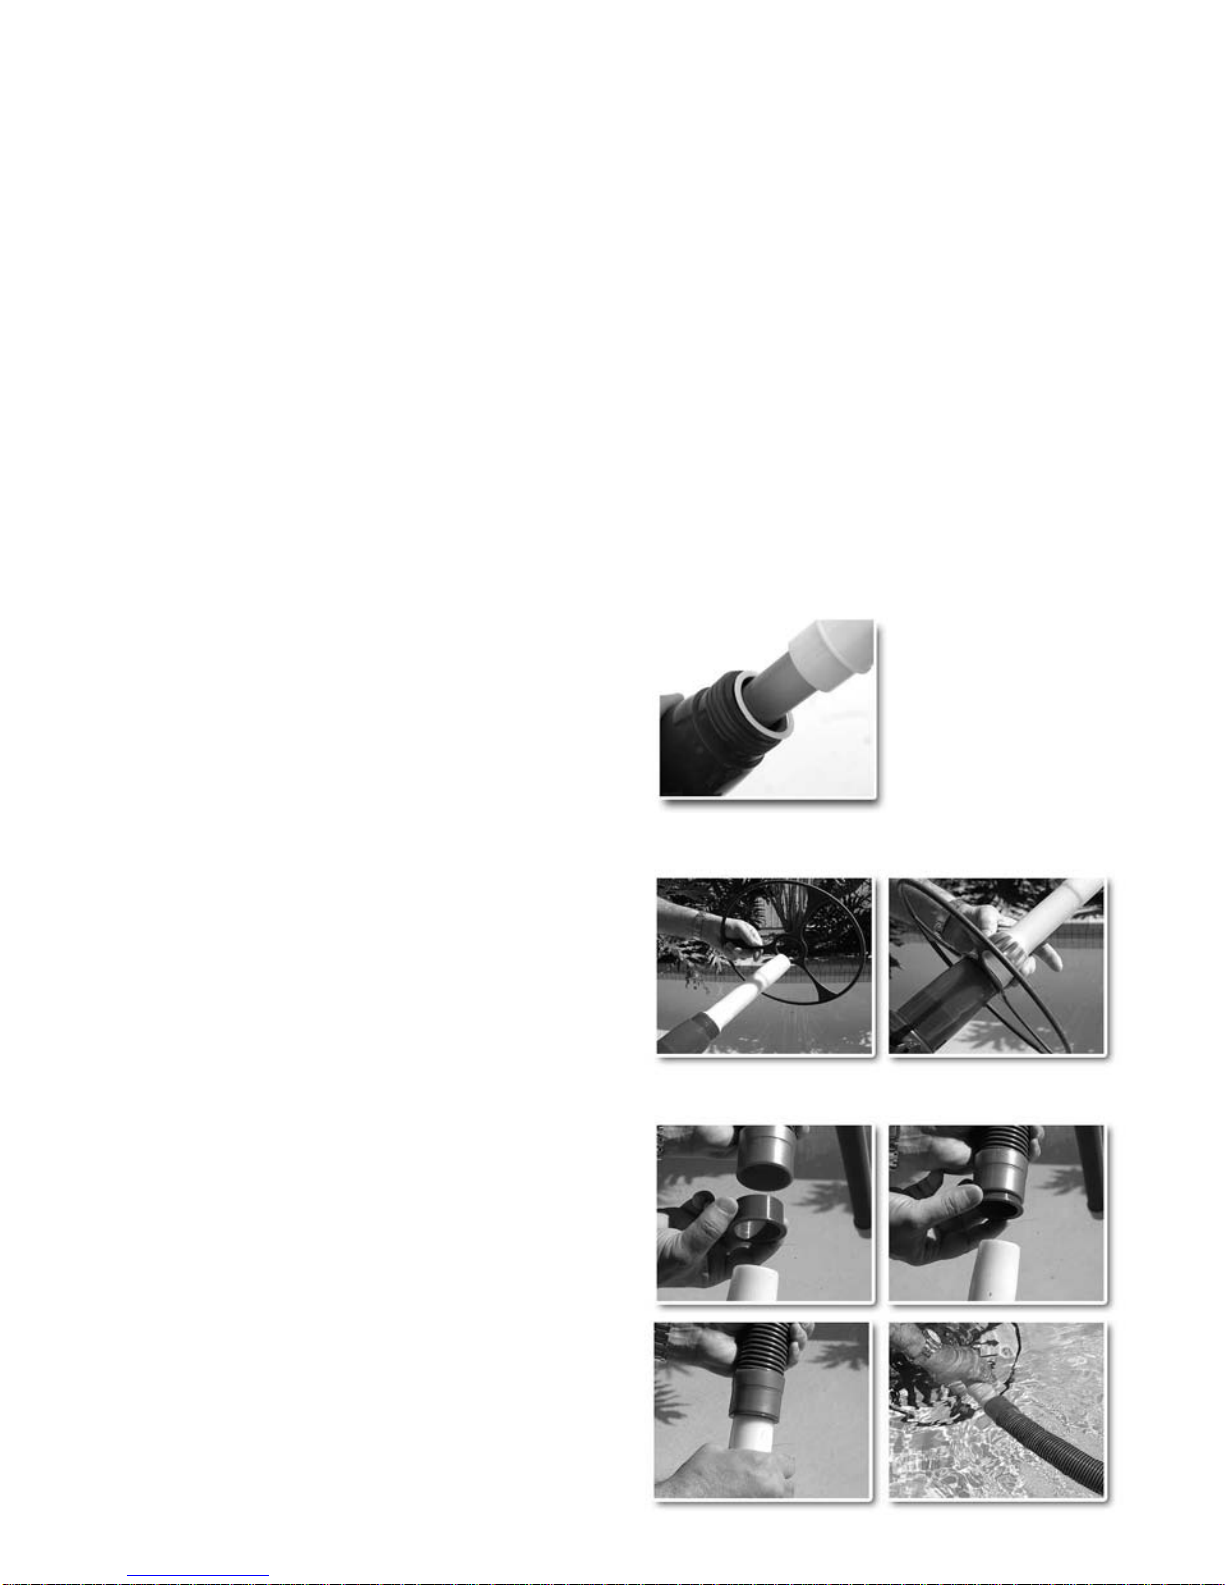
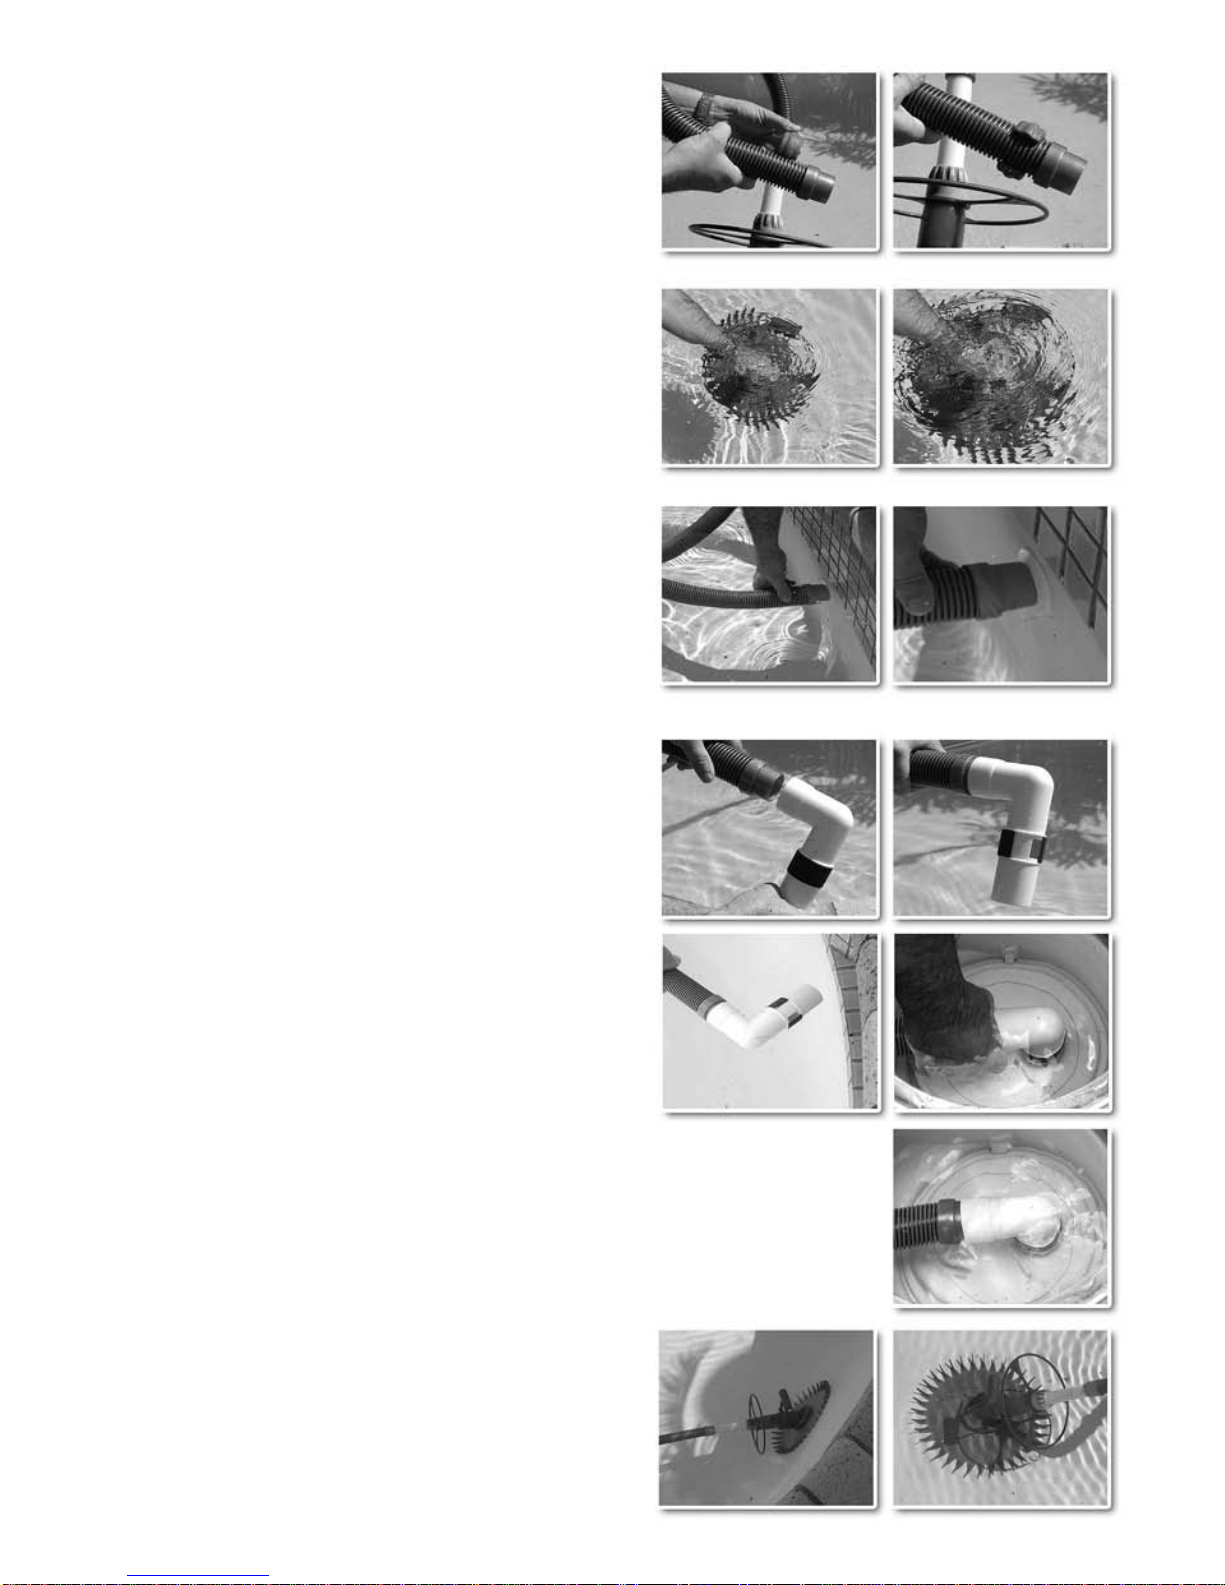
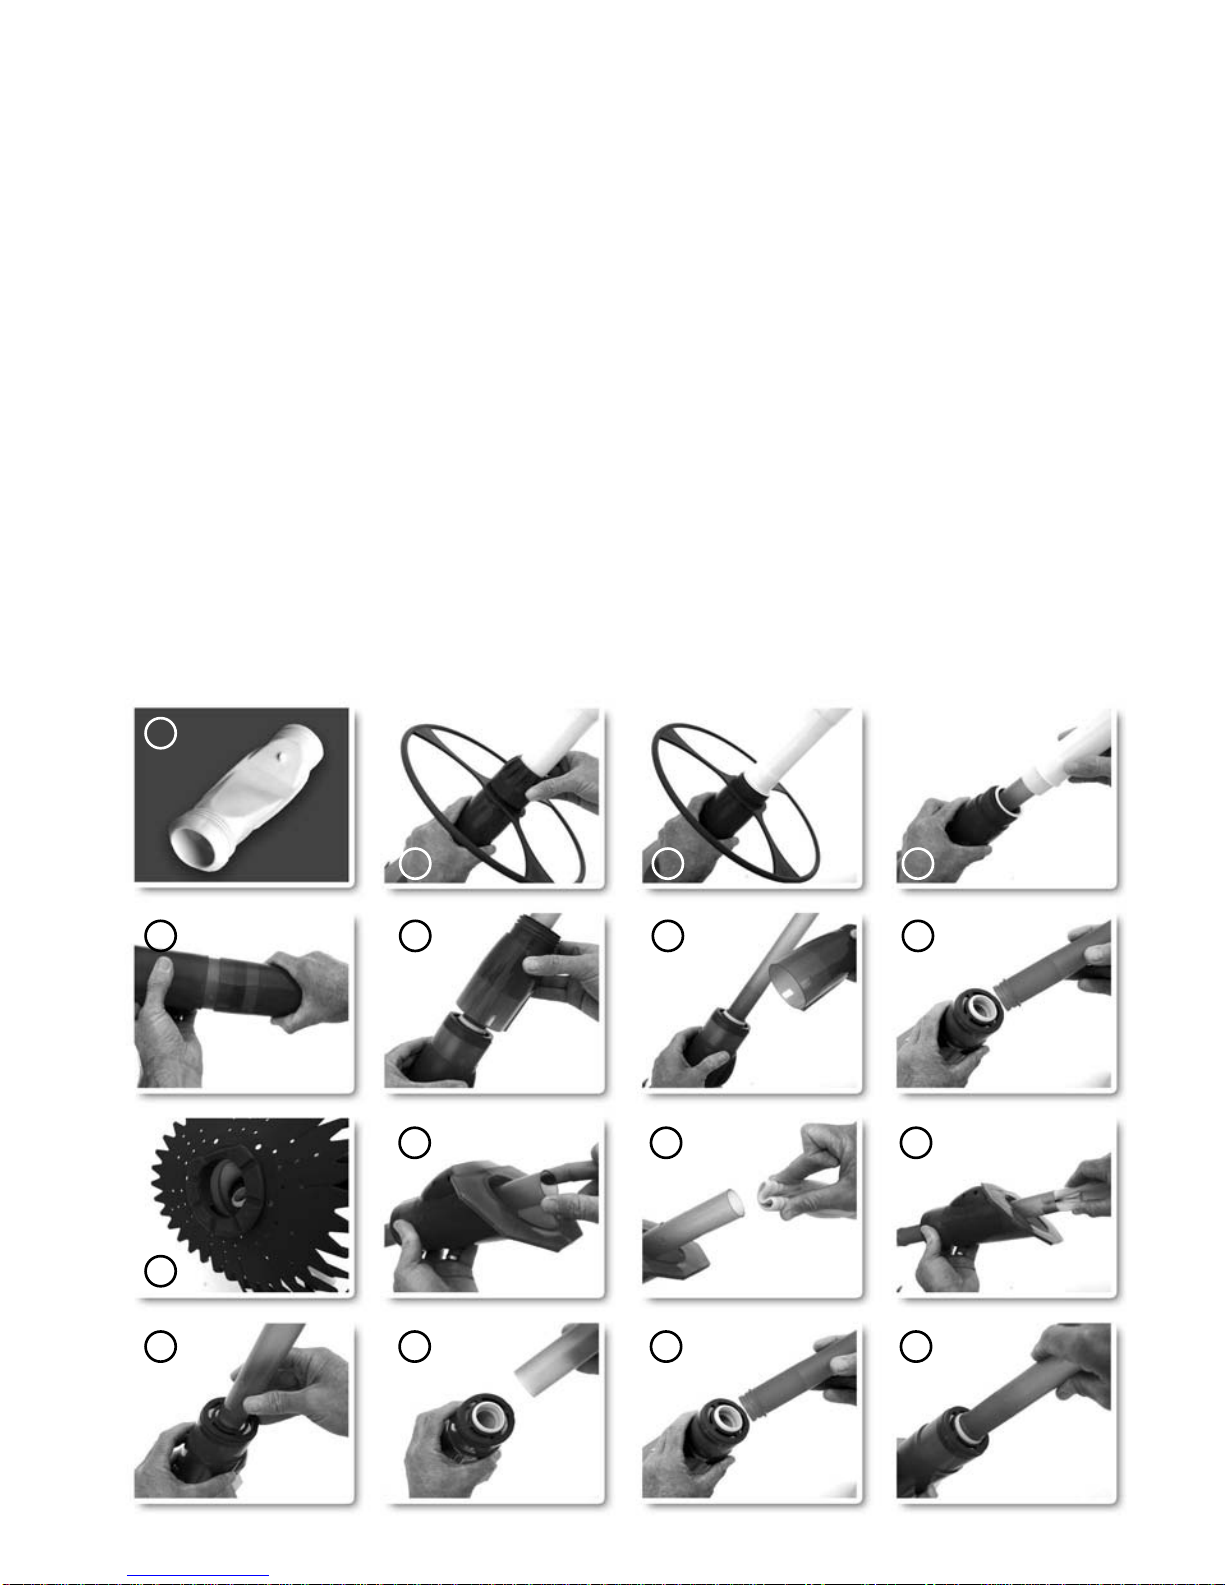
consult owner's manual for complete instructions on the installation and operation of your Avenger®.
POOL SYSTEMS PTY LTD WARRANTS THE AVENGER®AUTOMATIC POOL CLEANER TO BE FREE
FROM DEFECTS IN MATERIALS AND WORKMANSHIP TO THE ORIGINAL PURCHASER FOR A
PERIOD OF TWO (2) YEARS FROM DATE OF PURCHASE. THE AVENGER®AUTOMATIC POOL
CLEANER HOSE IS WARRANTED FOR TWO (2) YEARS AGAINST MANUFACTURING DEFECTS.
THIS LIMITED WARRANTY EXCLUDES THE FOLLOWING:
1. Discolouration of the Avenger®automatic pool cleaner caused by reaction to chemicals used in the pool
water. Discolouration does not affect the operating ability of the Avenger®automatic pool cleaner.
Therefore, this limited warranty does not cover the replacement of discoloured parts.
2. Damage to or malfunction of the unit resulting from excess chlorination or improper water chemistry balance.
3. Replacement of parts which fail or become defective as a result of improper installation, negligence,
misuse, abuse or tampering by unauthorised repair personnel.
4. Age, pool water imbalance, and improper installation can cause pool liners to become brittle or unduly
wrinkled. Corrosion of the supporting walls and/or irregularities in the pool base may also cause liner
failure. The use of this product in such an environment is at the pool owner's risk. Therefore, the pool
owner hereby releases the manufacturer from any and all claims for damage where these conditions exist.
5. Abrasion to the hose or damage caused by misuse or improper installation.
No claim will be recognised without proof of purchase. Only the original purchaser may submit a
claim under this limited warranty. Purchaser's claims against POOL SYSTEMS Pty. Ltd. shall be limited
to those claims which may be asserted under the limited warranty relating to any manufacturing defect.
To obtain warranty replacement or repair, the unit should be returned, freight prepaid, to the place of
purchase or directly to: POOL SYSTEMS PTY. LTD. P.O. Box 5225, Brendale, Queensland 4500. When
submitting a claim, always supply serial number, evidence of purchase date, retailer and a brief description
of the problems/defects encountered. POOL SYSTEMS PTY. LTD. reserves the right to repair or replace
all defective or worn parts covered by this limited warranty and return same to purchaser, freight collect.
POOL SYSTEMS Pty. Ltd. assumes no responsibility for any warranties or representations made by other
Individuals or businesses beyond the express terms contained in this limited warranty .
This warranty gives you specific legal rights, and you may also have other rights which vary from state
to state. This warranty remains the property of POOL SYSTEMS PTY. LTD.
www.avengerpoolcleaner.com
Pool Systems Pty Ltd
ABN 68 074 166 975
79 Kremzow Road, Brendale, QLD. 4500
www.poolsystems.com.au
Avenger®and AutoPilot®are registered trademarks
© Pool Systems Pty Ltd
9.

Record your Avenger®Automatic Pool Cleaner purchase details here.
IMPORTANT- MAIL TODAY
Warranty claims valid only with proof of purchase receipt.
Date of purchase:
Purchased from:
Suburb: State: P/C:
Serial No. Please quote this number when you contact us
This product is not warranted outside Australia and New Zealand.
IMPORTANT - Keep this card with your purchase receipt
Warranty claims valid only with proof of purchase receipt.
Serial No.
Complete and mail within 14 days of purchase. Todays date: / /
I have read and understand the terms and conditions of the Avenger®Automatic Pool Cleaner
My Avenger®Automatic Pool Cleaner was purchased on: / /
Surname: First Name:
Address:
Suburb: State: P/C:
Contact Details: Phone (Home): ( ) (Mobile):
Email:
Purchased from:
Company Name:
Address:
Suburb: State: P/C:
Shape of pool: oKidney oOval oSquare oOther Pool Size: Age of Pool:
Pool surface: oConcrete oPebble oFibreglass oFully Tiled oOther
Avenger®is my first Automatic Pool Cleaner o It replaces a:
I heard about Avenger®from: oPool shop oPool builder oAd oFriend oInternet oOther

AFFIX
STAMP
HERE
Pool Systems Pty Ltd
P.O. Box 5225
Brendale, QLD 4500
Important
Keep this section
of the card with
your purchase
receipt
Important
Complete & mail
within 14 days
of purchase
Warranty claims valid only
with proof of purchase
receipt.
Table of contents
Other Pool Systems Swimming Pool Vacuum manuals
Popular Swimming Pool Vacuum manuals by other brands

Hayward
Hayward TigerShark QC owner's manual

Steinbach
Steinbach Poolrunner Twin ORIGINAL OWNER'S MANUAL

Dolphin
Dolphin PROX 2 Gyro operating instructions

Intex
Intex 35IO quick start guide

Hangzhou Gaoyue Technology
Hangzhou Gaoyue Technology ICH Roboter iCleaner-300/TSX user manual

Oase
Oase Pondovac 4 operating instructions