BIOWAIR biow 100 User manual

USER MANUAL
CRU BIOW
R
egeneration &
L
ife

R
egeneration &
L
ife

3
R
egeneration &
L
ife
INDEX
1. INSTALLATION AND TECHNICAL DATA .....................................................................................4
1.1. SAFETY INFORMATION .......................................................................................................................4
1.2. EQUIPMENT PARTS ...............................................................................................................................6
1.3. TECHNICAL DATA...................................................................................................................................7
1.4. EQUIPMENT ENVIRONMENTAL CONDITIONS ...........................................................................8
1.5. SYMBOLS AND LABELLING ..............................................................................................................8
1.6. EQUIPMENT INSTALLATION .............................................................................................................8
2. CRU BIOW OPERATION............................................................................................................... 10
2.1. START-UP .................................................................................................................................................10
2.2.REMOTECONTROL...............................................................................................................................10
2.3. QUICKGUIDE........................................................................................................................................... 11
2.4. PROGRAMMING AND FUNCTIONALITIES................................................................................. 12
2.5. ADDITIONAL FUCTIONS................................................................................................................... 14
2.6. AUTO MODE .......................................................................................................................................... 14
2.7. NIGHT MODE ......................................................................................................................................... 15
2.8. MODO MANUAL ................................................................................................................................... 15
2.9. WIFI PROGRAMMING MODE........................................................................................................... 15
2.10. DISPLAY ................................................................................................................................................. 16
2.11. SAFE EQUIPMENT SHUTDOWN.................................................................................................... 18
2.12. HOW TO OPTIMISE MY CRU BIOW............................................................................................. 18
3. 3.
BIOW APP - ON DEMAND PROGRAMMING ..................................................................................20
3.1. BIOW APPINSTALLATION ..............................................................................................................20
3.2. ON DEMAND PROGRAMMING ...................................................................................................... 25
4. CLEANING AND MAINTENANCE................................................................................................26
4.1. RECOMENDACIONES DE CORRECTA LIMPIEZA Y MANTENIMIENTO.......................... 26
4.2. FILTER PACK CLEANING AND REPLACEMENT ......................................................................27
4.3. FILTER PACK MAINTENANCE ...................................................................................................... 28
4.4. METALLIC MESH PRE-FILTER MAINTENANCE ...................................................................... 28
4.5. PARTICLE SENSOR MAINTENANCE........................................................................................... 28
5. AFTER-SALES SERVICE ...............................................................................................................29
5.1. CUSTOMER SERVICE AND TECHNICAL SUPPORT................................................................ 29
5.2. SPARE PARTS AND ACCESSORIES ............................................................................................ 29
5.3. GUARANTEE.........................................................................................................................................30
6. RECYCLING ................................................................................................................................... 31
7. FREQUENTLY QUESTIONS..........................................................................................................32

4
R
egeneration &
L
ife
01 INSTALLATION AND TECHNICAL DATA
1. INSTALLATION AND TECHNICAL DATA
1.1. SAFETY INFORMATION
Read the manual carefully before beginning
installation of your CRU Biow.
This manual includes specific warnings, safety
instructions and operating instructions according
to current standards.
The company BIOWAIR TOTAL SYSTEMS S.L., as
the manufacturer of this product, is responsible
for its safety and proper functioning, provided
that:
• The electrical installation of the enclosure
where it will be used complies with EC
regulations.
• The equipment is only used according to the
specifications detailed in the user manual.
• The equipment is not used by the user when
parts of the it become active due to shock,
deterioration, or mechanical wear.
• The device is not used by people with reduced
physical, sensory, or mental capabilities.
• Under no circumstances should the repair
and internal handling of the device be carried
out by sta who are not properly trained and
authorized by BIOWAIR TOTAL SYSTEMS
S.L., as the active parts may be dangerous.
PRELIMINARY INDICATIONS FOR USE
Make sure that the power supply voltage
corresponds to the one indicated on the rating
plate (located on the bottom left side of the
equipment).
The equipment consists of a detachable power
cable. Make sure that it is well fitted to the
equipment before putting it into operation.
If you notice any damage to the power cable, it
must be replaced by the manufacturer, by the
after-sales service, or by qualified and authorized
sta in order to avoid any risk.
WARNING:
To avoid any risk of electric shock, the device
must be connected to a supply network with
stable ground protections that comply the EC
standard.

5
R
egeneration &
L
ife
01 INSTALLATION AND TECHNICAL DATA
PRECAUTIONS
Before carrying out cleaning or maintenance, the CRU Biow must be disconnected from the wall
socket and/or equipment switch.
It is recommended that children not be allowed to handle the CRU Biow and should be supervised
by an adult.
User cleaning and maintenance must not be carried out by unsupervised children.
Children between the ages of 3 and 8 should only switch the device on/o when it has been
placed or installed in its normal operating position and when they have been supervised or given
instruction related to the safe use of the device. Furthermore, they must not plug in, adjust, and/
or clean the device or carry out any maintenance operations without adult supervision.
The use of this device is not intended for people with reduced physical or mental capabilities
unless they have been given instructions or supervision related to the use of the device by a
person responsible for their safety.
Some parts of this product can get hot and cause burns. Special attention should be paid when
children and vulnerable people are present.
The device should not be powered through an external switching device, such as a timer, nor
should it be connected to a circuit that is regularly switched on and o by the power distribution
company.
Do not handle the equipment with damp or wet hands.
Do not obstruct the flow of air, this can lead to poor cooling of the equipment.
The switch must be free at all times so that it can be accessed immediately if necessary.
WARNINGS
To avoid overheating, do not cover the equipment and do not place it immediately under a power
outlet.
Do not install in bathrooms or other damp rooms.
If you notice any malfunctioning in the electronics of your Biow, unplug it or turn it o with the
switch on the right side for one minute and turn it on again to reset the electronics and get it
working properly again.
Do not operate the device if you notice any wear on any component or cable. If this happens,
please inform technical support.

6
R
egeneration &
L
ife
01 INSTALLATION AND TECHNICAL DATA
IMPORTANT
The top storage shelf, made of silicon, allows you
to place all kinds of decorative objects up to a
maximum weight of 15 to 20 kg. We recommend
not to place real owers or other materials that
may contaminate the air supply with pollen or
other compounds.
1.2. EQUIPMENT PARTS
1. Storage shelf
2. Manual ON/OFF button
3. Display
4. Supply air grille
5. Main or deflector guiding slat It has a vertical movement to direct the supply of air.
6. Filter pack
7. Filter pack adjustment knobs
8. Remote control
2
1
3
4
5
6
8
7

7
R
egeneration &
L
ife
01 INSTALLATION AND TECHNICAL DATA
IMPORTANT
Do not modify this equipment without
manufacturer’s authorization.
CRU BIOW 60
MEASUREMENTS AND WEIGHTS
Model description BIOW 60
Dimensions 60 cm x 23 cm
x 26 cm
Net weight 13,6 kg
TECHNICAL SPECIFICATIONS
Power supply voltage 230 Vac
Frequency 50 Hz
Peak consumption 2.2 A
Type of protection according
to EN 606011-1
Clase I
IP degree of protection IP 21
Maximum power 500W
Operating mode Continuous
MATERIALES
Lower part High quality
steel
Upper part Compact high
strength silicon
CRU BIOW 100
MEASUREMENTS AND WEIGHTS
Model description BIOW 100
Dimensions 102 cm x 23 cm
x 26 cm
Net weight 21.5 kg
TECHNICAL SPECIFICATIONS
Power supply voltage 230 Vac
Frequency 50 Hz
Peak consumption 4.4 A
Type of protection according
to EN 606011-1
Clase I
IP degree of protection IP 21
Maximum power 1000W
Operating mode Continuous
MATERIALES
Lower part High quality
steel
Upper part Compact high
strength silicon
1.3. TECHNICAL DATA
8
R
egeneration &
L
ife
01 INSTALLATION AND TECHNICAL DATA
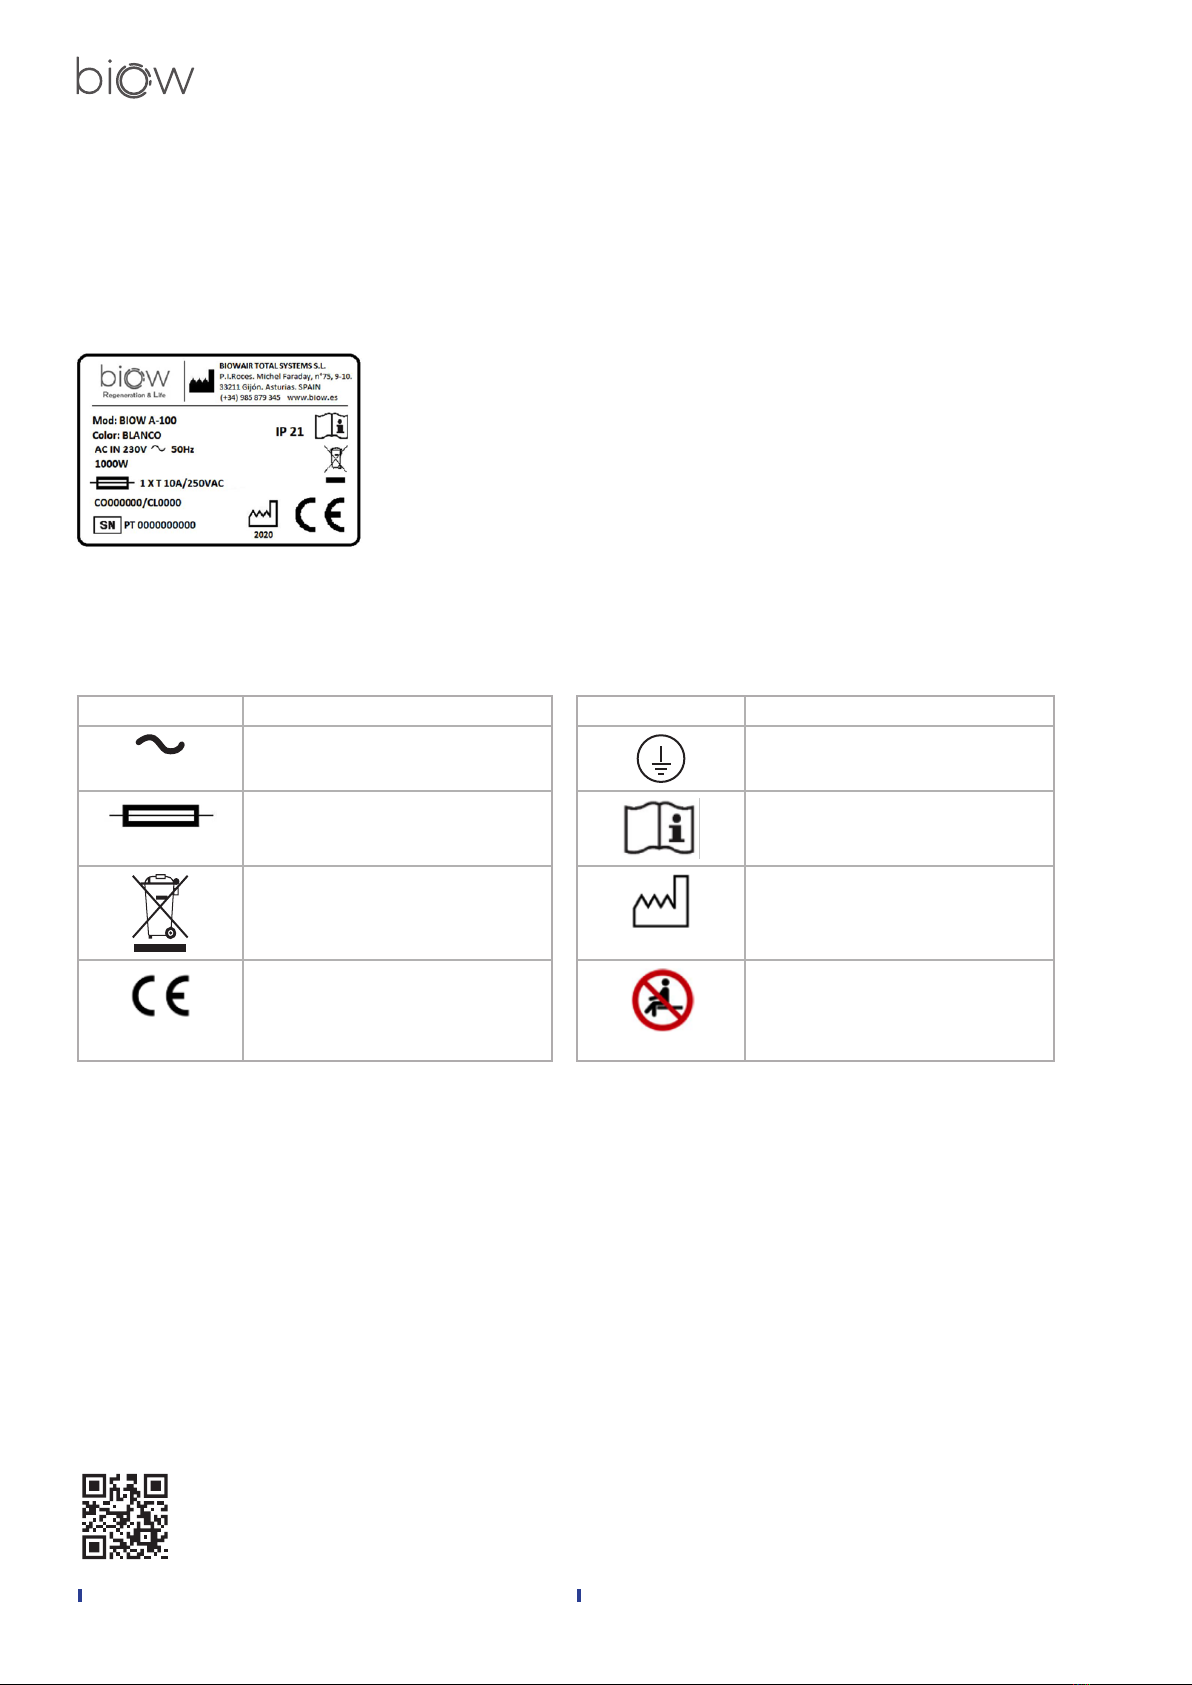
1.5. SYMBOLS AND LABELLING
SYMBOL DESCRIPTION SYMBOL DESCRIPTION
Alternating current Protective earth
Protective fuse Check operating instructions
Electrical and electronic
equipment waste(WEEE)
Date of manufacture
CE marking Sitting on the equipment is
forbidden
CRU Biow label
1.4. EQUIPMENT ENVIRONMENTAL CONDITIONS
Ambient operating temperature: 10-40 °C
Ambient storage/transport temperature: 0-45 °C
Relative air humidity: 35 – 75% non-condensing
Air pressure: 700-1060 hPa
CRU Biow has an integrated base that enables
you to easily place the device on a piece of
furniture or a flat surface shelf, without the need
for installation. All that is required is a power
outlet to which the device will be connected.
Once the installation site is prepared, remove
the packaging by tilting the box to remove the
equipment and its assembly kit easily.
1.6. EQUIPMENT INSTALLATION
Unpacking and start-up
watch video

9
R
egeneration &
L
ife
01 INSTALLATION AND TECHNICAL DATA
• Attention: The wall plugs supplied in the
assembly kit are not suitable for plaster or
plasterboard walls, specific wall plugs must
be used for these types of walls.
• Remove the support base fitted to the
equipment. You can store it or use it for
other purposes. You can even attach it to
the wall as a support shelf underneath the
CRU Biow.
• Subsequent sealing plugs must be removed.
Attach the equipment to the wall as shown in
the figure.
2x
Measurements to attach to the wall the
CRU Biow 100:
Minimumground clearance:
850 mm
Measurements to attach to the wall the
CRU Biow 60
Minimumground clearan-
ce: 850 mm
FRONT VIEW 370 mmFRONT VIEW 833 mm
Both in CRU Biow 100 and in CRU Biow 60:
Move downwards, pressing gently until it fits
into place
Direct the equipment ensuring that it always rests
on the top of the support.
ALTERNATIVE
WALL ATTACHMENT
Wall attachment
watch video
If you wish to attach the CRU Biow to the wall, an assembly kit is included, consisting of screws
(8mm wall plugs and screws). To do so, follow the steps below:
10
R
egeneration &
L
ife
02 CRU BIOW OPERATION
2. CRU BIOW OPERATION
2.1. START-UP
• Connect the CRU Biow to an earthed power
outlet.
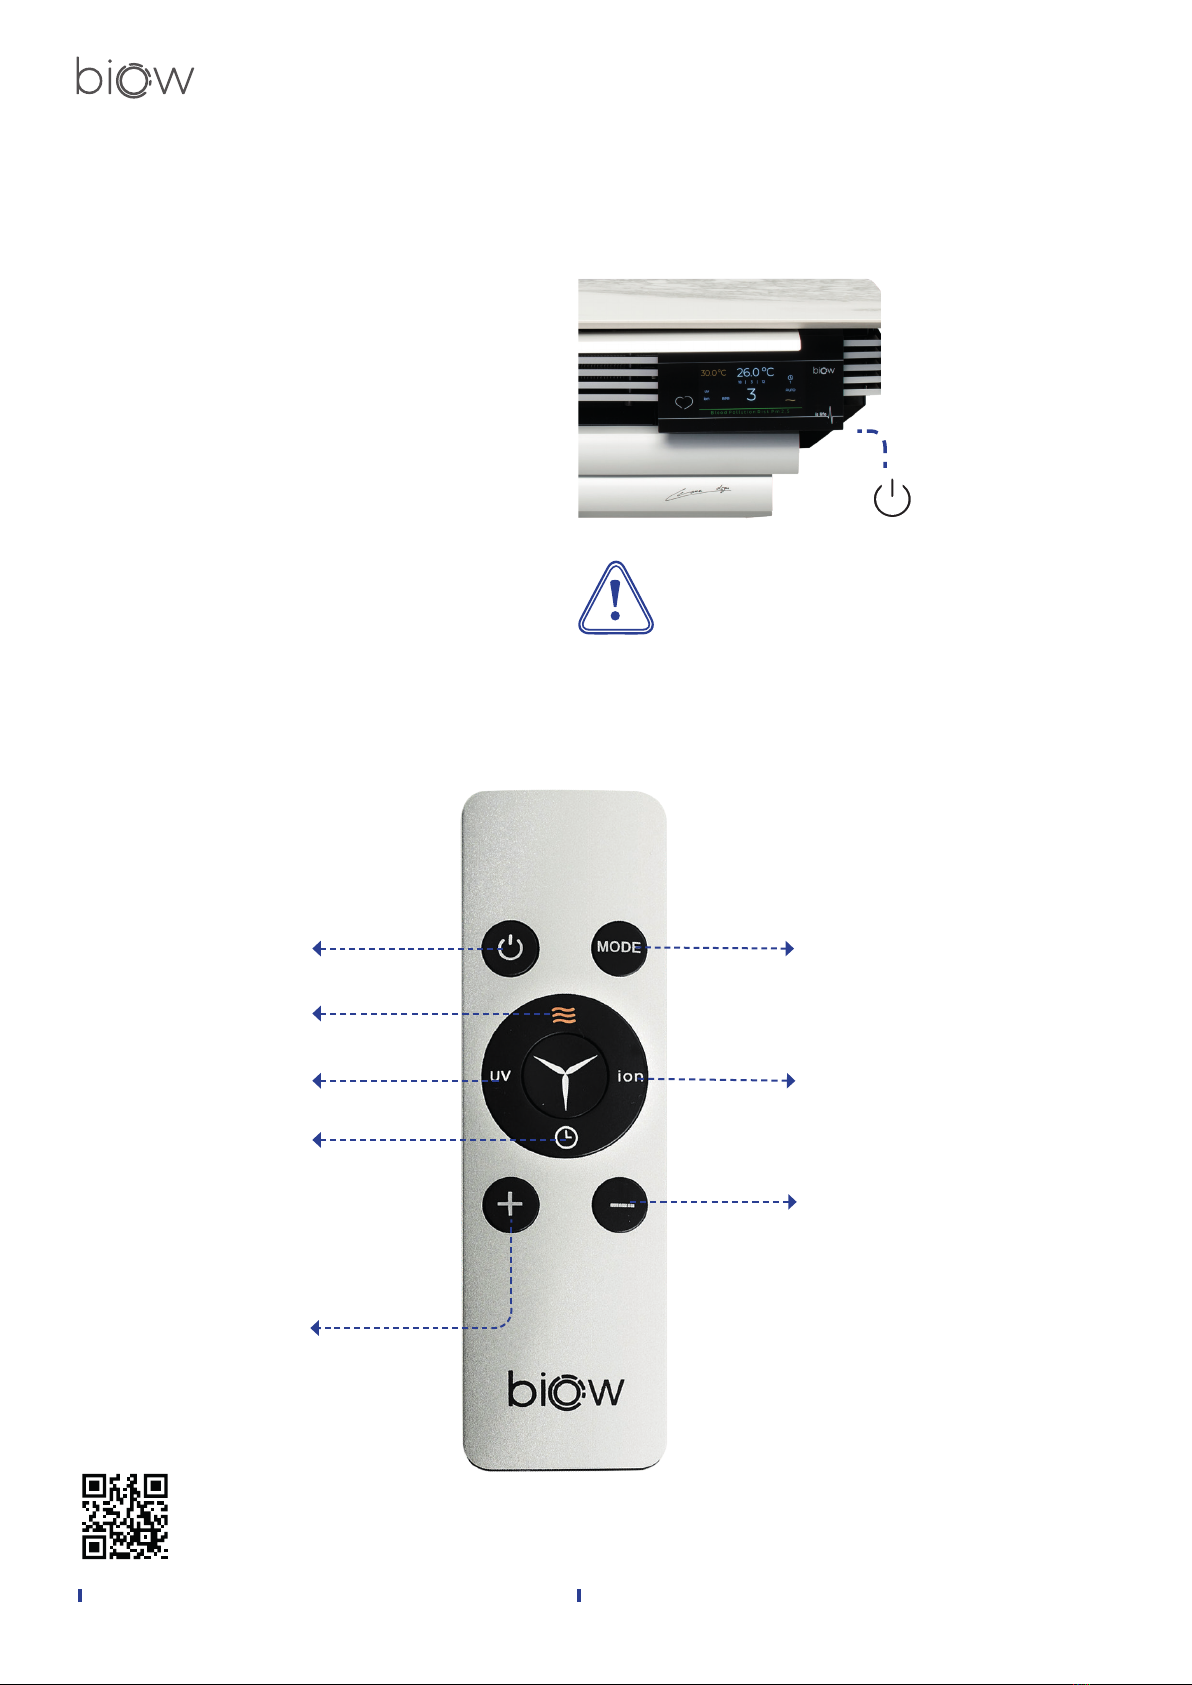
• Check that the switch is in the ON position.
If not, turn the equipment on at the ON/
OFF switch located on the right side of the
equipment, indicated in the image below.
Once the equipment has been switched on, the
display will light up and from this moment on
the equipment will be controlled by the remote
control.
IMPORTANT
Once the equipment is connected to the
network, ensure that the ON/OFF switch
remains easily accessible at all times so that
the equipment can be disconnected at any
time.
2.2.REMOTECONTROL
On/Off
Thermal treatment
Heat mode
Ultraviolet lamps
activation
Timer
activation
+ button
(Increases
temperature
in Heat Mode)
Program selection
Plasma ionization
activation
- button
(Decreases temperature
in Heat Mode)
Use of the remote control
watch video

11
R
egeneration &
L
ife
02 CRU BIOW OPERATION
• Place the equipment at a height between 80
and 150 cm.
• Direct the supply of air towards people (in
bedrooms, direct it toward the headboard of
the bed).
• Turn on the equipment with the switch
located on the right side of the Biow.
• Press the MODE button on the remote
control until AUTO appears on the display.
To change speeds, you must exit the AUTO
mode.
• From this moment on, Biow can be operated
autonomously, regulating itself according to
the level of contamination and light in the
room.
• Activate ION and UV mode for the removal of
viruses and bacteria as well as nanoparticles.
• Use the aluminum deflector to direct the air
foil.
• To activate permanent silent mode,
press the MODE button to select or
mode and then select SILENT or
WHITE with the button .
2.3. QUICKGUIDE
12
R
egeneration &
L
ife
02 CRU BIOW OPERATION
2.4. PROGRAMMING AND FUNCTIONALITIES
The following table summarizes the use and functionalities of the equipment using the remote
control:
BUTTON DESCRIPTION FUNCTION
POWER - ON / OFF The equipment must be connected to the network and
the switch must be in the ON position.
MODE
MANUAL It enables customized configuration, meaning the user
is able to select:
Speed, UV, ION, Heat and Timer.
The display will always be on regardless of ambient
light.
The speed is selected without taking pollution into
account:
V SILENT VWHITE , V2 y V3
MODE
AUTO
In this mode, the equipment operates automatically
depending on the level of particles and the light
intensity of the room.
If there is light:
• Speed according to need, depending on the
concentration of particles in the room.
• ION/UV selectable.
If there is not enough light:
• V SILENT
• ION/UV OFF
MODE
NIGHT Customized configuration (same as in MANUAL mode),
promoting rest:
If there is light: Dimmed display.
If there is not enough light: Display o after 15 seconds.
MODE
WIFI 100% customizable programming by hours, available
after linking the device through the BIOWAPP: Speed,
UV, ION, Heat, +Protect.
THERMAL
TREATMENT –
HEAT FUNCTION
Activates thermal treatment allowing a greater
protective function against microorganisms. It
facilitates an increase the room temperature in a range
of 16-32 ºC, using the + and - buttons. The selected
temperature will be displayed in yellow to dierentiate
it from the actual room temperature.
13
R
egeneration &
L
ife
02 CRU BIOW OPERATION
ION
IONIZER Facilitates the activation and deactivation of the plasma
ionizers. These components act as electropolarizers by
changing the electric charge of the nanoparticles in the
room, which promotes their elimination. In AUTO mode
they will be deactivated during the night.
NOTE: Some particularly sensitive people may
experience certain unpleasant sensations, such as slight
nasal obstruction or a scratchy throat. If this happens,
temporarily disconnect the ionizer. You can activate it
for limited periods of time.
UV
ULTRAVIOLET
LIGHT
Facilitates the activation and deactivation of the
ultraviolet lights. These work by increasing the
elimination of microorganisms. In AUTO mode they will
be deactivated during the night.
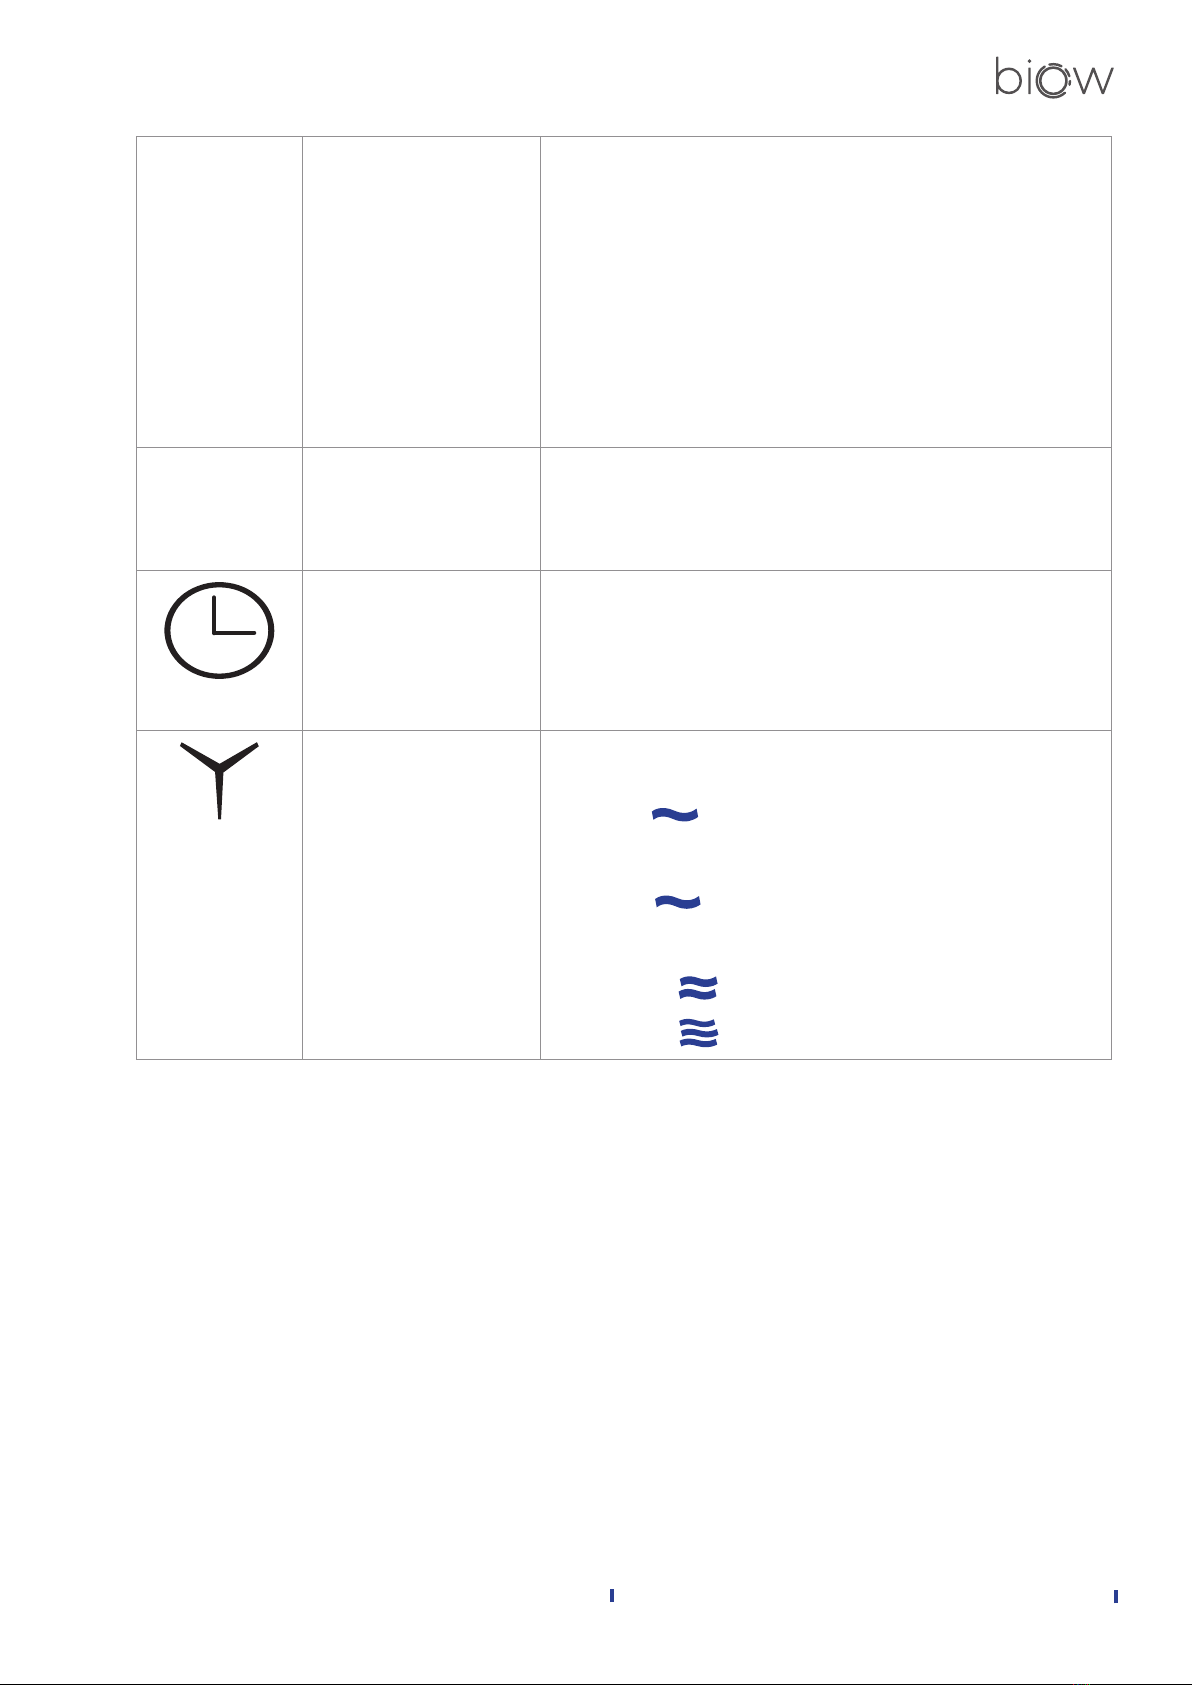
TIMER Facilitates the activation and deactivation of the timer.
Although it is not recommended to disconnect the
CRU BIOW, you can limit the operating time if you want
it to switch o after a few hours. You can limit this
disconnect to between 1 and 8 hours after activation of
the timer.
SPEED It allows you to select the operating speed from 4
dierent options:
V SILENT : Speed 1, 100% silent. In AUTO mode,
it is activated automatically in the absence of light to
promote rest.
V WHITE : VSpeed 1 emits a noise called “white
noise”, almost imperceptible, which can help you relax
by promoting sleep.
V2: Speed 2
V3: Speed 3

14
R
egeneration &
L
ife
02 CRU BIOW OPERATION
2.5. ADDITIONAL FUCTIONS
The following table summarizes the use and functionalities of the equipment using the remote
control, pressing the indicated buttons for 3 seconds.
It will display 3 pollution sensor measurements depending on the molecular weight: PM1
– PM 2,5 – PM Nanoparticles.
The reading of the 3 particle levels will not appear until there is a variation of particles
in the environment.
MODE
Buzzer that beeps when each function is activated on the remote control.
UV Activates WIFI mode (see detail in section 4).
Resets the equipment after changing the filter pack. This will remove the filter pack
change icon from the display.
Change in particle measurement according to its size.
PM1 – PM2,5 – PM Nanoparticles.
Complete shutdown of the display illumination to promote rest.
2.6. AUTO MODE
When you activate your CRU Biow for the first
time, it will start operating in AUTO mode in
order to make it easier to handle for all users.
This operating mode provides the user with
absolute comfort due to two factors:
1. Automatic adaptation of the equipment to
the environmental variations of the room.
2. Noise reduction and dimming of the display
brightness in case of low light in the room,
in order to promote rest. The CRU Biow
has an optical sensor that measures the
amount of light in the room, thus adapting
its functionality to promote rest.
Speed with automatic adjustment according to
the suspended particle concentration:
• If the suspended particles exceed the
limit of 25 µg, the “Blood Pollution Risk
Nanoparticles” indicator will turn yellow, and
the equipment will automatically switch to
V2 speed to reduce the level of suspended
particles more quickly.
• If the suspended particles exceed the
limit of 150 µg, the “Blood Pollution Risk
Nanoparticles” indicator will turn red, and
the equipment will automatically switch to
V3 speed para reducir más rápidamente el
nivel de partículas en susp . . . . . . . . . .
ensión.
• to reduce the level of suspended particles
more quickly.
• If the CRU Biow sensor detects a drop in the
light level in the room, after 3 seconds, the
speed will switch to V SILENT and the display
illumination will be dimmed to promote
rest. After 20 seconds, the display will shut
down completely except for the symbol
and the symbol indicating V SILENT. .
• When the CRU Biow is operating in V SILENT
mode and the heat is activated, the speed
will automatically switch to V WHITE . If
you want to switch back to SILENT mode,
you must switch o the heat mode by
pressing the button .
• Although in AUTO mode the operating
speed is automatic depending on the level of
suspended particles, you can also adjust the
speed at will by pressing the central button
on the remote control .
However, when this is done, the equipment will
switch to manual mode directly.

15
R
egeneration &
L
ife
02 CRU BIOW OPERATION
2.7. NIGHT MODE
The CRU Biow has an optical sensor that
measures the amount of light in the room where
the equipment is. When the CRU Biow operates
in night mode, it will operate normally, but the
display will be dimmed.
If the device detects a drop in the light level in
the room, after 20 seconds, the display will shut
down completely except for the symbol and
the symbol indicating the speed at which it is
operating, since this will not change as it does in
“AUTO” mode.
This operating mode provides the user with an
adjustment of the brightness of the equipment
by dimming the brightness of the display, in
addition to the subsequent shutdown of the
display.
NOTE: To light up the display once it is dimmed
or turned off, simply press any of the buttons
on the remote control, and the equipment will
light up showing the parameters of the last
selected program.
2.8. MODO MANUAL
The CRU Biow allows full customization of its
functionality:
• Selection of the air treatment speed: V Silent
, V White , V2 y V3 .
• Activation/deactivation of plasma ionizers
(ION) to electropolarize suspended particles.
• Activation/deactivation of ultraviolet lights
(UV).
• Timer in case you want to temporarily limit
its function.
Seesummary table insection 2.4 PROGRAMMING
AND FUNCTIONALITIES
.
2.9. WIFI PROGRAMMING MODE
The programming mode, identified with the
WIFI symbol, allows 100% customization of
the CRU Biow functionality in within specific
time slots, as well as controlling or modifying
the programming of one or more CRU Biow,
comfortably and from a single mobile device.
In addition, it allows you to activate the +Protect
function, which activates thermal treatment in
sequential 10-minute tranches, for maximum
protection against viruses and bacteria.
To do so, you need to connect the CRU Biow
via WIFI, installing the Biow APP. (See section
4. BIOW APP – ON DEMAND PROGRAMMING).

Blood Pollution Risk PM 25
4
16
R
egeneration &
L
ife
02 CRU BIOW OPERATION
2.10. DISPLAY
Thermal treatment
(Heat mode)
Filter pack
change message
Ionization
Ultraviolet
light
External temperature
reader
Operating mode
Timer
Speed
Number of
suspended
particles
Light sensor
WIFI
Infrared
sensor

17
R
egeneration &
L
ife
02 CRU BIOW OPERATION
External temperature reader Indicates the temperature of the room, shown in the central part
of the display.
Thermal Treatment Heat
Mode:
Indicates that thermal treatment has been activated, which in turn,
enables the functionality to vary the room temperature using the
+ and - buttons in a range from 16 ºC to 32 ºC.
The selected temperature is displayed in yellow to dierentiate it
from the external temperature, which is displayed in white.
Operating mode
The operating mode of the CRU Biow is indicated in the upper
right corner through four dierent icons:
MANUAL AUTO NIGHT MODE WIFI MODE
Speed
The 4 speeds V White, V Silent, V2, and V3 are indicated by the
following icons:
V SILENT V WHITE , V2 y V3
Number of suspended
particles
The display shows the number of suspended particles in the room,
and this in turn indicates the air quality of the room, which is
shown with the acronym BPR (Blood Pollution Risk). It allows you
to select dierent particle size readings between PM1, PM2.5, or
PM Nanoparticles.
The number indicated by the display is related to the risk of blood
pollution and air quality which is visually shown by the following
color code for easy interpretation:
- Green: Low BPR – 0-25
- Yellow: Intermediate BPR – 25-50
- Orange: High BPR - 50-150
- Red: Very High BPR - >150
Filter pack change message The icon showing 2 overlapping rectangles indicates that the
filter pack should be cleaned/changed.
ION The word ION indicates that the ionizers are activated.
UV The acronym UV indicates that the ultraviolet lamps are activated.
Timer The clock icon indicates that the timer function has been
activated, which will allow the CRU Biow to operate during the
selected time.
The following is an explanation of each icon on the display:

18
R
egeneration &
L
ife
02 CRU BIOW OPERATION
2.11. SAFE EQUIPMENT SHUTDOWN
The equipment can be safely shut down by
pressing the POWER button on the remote
control. The display will then turn o and the
equipment will stop operating.
After this step, flip the switch to the OFF position
on the right side of the CRU Biow.
2.12. HOW TO OPTIMISE MY CRU BIOW
HOUSEHOLD USE
Usually, the bedroom is the room where we
spend the most hours at a time. Therefore, it
is the perfect place to install the CRU Biow as
it can act on our body for a longer period of
time while we sleep. In addition, it is during the
resting phase when cell, tissue, and organ repair
processes start up, releasing growth hormones.
To increase the eectiveness of the CRU Biow,
it is recommended to place it on a flat surface
ideally located in front of the bed and at the
foot of the bed, at the height of the mattress, so
that the laminar air flow emitted by the device
reaches the user while he/she sleeps peacefully.
The main or deflector guiding slat allows the
airflow to be directed on demand to promote
the action of the CRU Biow (see section 2.2.
EQUIPMENT PARTS).
BUSINESS USE
To optimize the functionality of the CRU Biow
for the protection and care of the users, a
location will be sought that allows the CRU Biow
to perform its respiratory sweeping action on
the users.
USE IN PUBLIC PLACES
It is recommended to use the CRU Biow with
the AUTO program, as in this way the device will
adapt to the needs and features of the place,
operating optimally to achieve the desired level
of air quality.

19
R
egeneration &
L
ife
02 CRU BIOW OPERATION
CONSUMPTION <1 €/MONTH
For maximum functionality, make sure Biow
operates 24 hours a day. Biow operates with
magnetic levitation motors that optimize their
functionality, minimizing friction and associated
wear. This is why the consumption of the CRU
Biow with uninterrupted 24/7 operation is less
than €1/month.
If the Heat/Thermal Sterilization Mode is
activated, the power consumption will increase
1000 W/h in the CRU Biow 100 and 500 W/h in
the CRU Biow 60, which is also an economical way
to regulate the room temperature occasionally,
and boost comfort.
MAXIMUM FUCTIONALITY
• Ultraviolet (UV) function: It will increase
protection against viruses and bacteria,
thanks to the disinfecting eect of ultraviolet
radiation due to DNA denaturation of
microorganisms that takes place inside the
device.
• Plasma ionizers (ION): The ION function
generates a cold plasma gas at atmospheric
pressure that will have an electropolarizing
eect, modifying the electric charge of
the suspended particles, and favoring their
binding to particles of opposite charge,
facilitating their elimination. In addition,
studies have shown a significant regenerative
benefit of cold plasma gas, so we recommend
activating it during the night (1,2). Particularly
sensitive people may experience certain
unpleasant sensations, such as slight nasal
obstruction or a scratchy throat. If this
happens, temporarily disconnect the ionizer.
You can activate it for limited periods of time.
• Thermal treatment: The heat by thermal
treatment function reinforces the elimination
of viruses and bacteria, since the air
passes through steel filaments that reach a
temperature of 200ºC, disintegrating all types
of biomass. To maximize use this option,
select a cut o temperature 1 or 2 degrees
above the room temperature indicated
on the display of your CRU Biow in white.
The device will reach the set temperature
indicated on the display in orange in a few
minutes and will then be activated and
deactivated intermittently thanks to the
thermostat which is incorporated into the
CRU Biow.
• V White Speed : It produces white noise
that will help you get a deep and restful
sleep. The programming of your Biow CRU
can be personalized 100% through the Biow
APP using the Wi-Fi programming mode.
(1) Braný, D. š., Dvorská, D., Halašová, E., & Škovierová, H. (2020). Cold
Atmospheric Plasma: A Powerful Tool for Modern Medicine. Internatio-
nal Journal of Molecular Sciences, 21(8), 2932. https://doi.org/10.3390/
ijms21082932
(2) Laroussi, M. (2020). Cold Plasma in Medicine and Healthcare: The
New Frontier in Low Temperature Plasma Applications. Frontiers in
Physics, 8, 1-7. https://doi.org/10.3389/fphy.2020.00074

20
R
egeneration &
L
ife
03 ABIOW APP - ON DEMAND PROGRAMMING
3. 3.
BIOW APP - ON DEMAND PROGRAMMING
BIOW
3.1. BIOW APPINSTALLATION
1. The equipment is powered on.
2. Access the Biow application (by
downloading it from the App Store or Play
Store).
In one simple step create your Biow account
(username and password) which you can access
from dierent devices.
3. After logging into the Biow application
Click on the “+” symbol in the upper right corner
APP Biow connection
watch video
This manual suits for next models
2
Table of contents


