Bitzer ECOSTAR LHV6/2DC-3.F1 User manual

Technische Information
Technical Information
技術情報
KT-200-2
BITZER ECOSTAR
Air-cooled Condensing Units with
frequency controlled OCTAGON®
compressors
• LHV6/2DC-3.F1(Y)
• LHV6/4FC-5.F1(Y)
• LHV6/4EC-6.F1(Y)
Content Page
1 General 2
2 Control 2
2.1 Function 2
2.2 Navigating in control menu 3
2.3 Switching on the Ecostar 5
2.4 Parameter settings 6
2.5 Authorizations for settings 7
3 Electrical connection 8
3.1 Schematic wiring diagrams 10
3.2 Digital inputs DI1
and DI2 13
3.3 Integrated checkpoints 13
4 Application examples 14
4.1 Possibilities of
compressor control 14
4.2 Optimising energy 17
4.3 Reducing the sound level 21
4.4 Winter start (menu 4.2.7) 21
4.5 Digital inputs 22
4.6 Oil return 25
5 Technical data 26
6 Failure correction 28
6.1 Checklists 28
6.2 Failure messages 30
6.3 Opening terminal boxes 37
6.4 Emergency service 39
6.5 Resetting factory settings 42
7 Menu structure 43
BITZER ECOSTAR
周波数制御式OCTAGON®コンプレッ
サー付き空冷コンデンシングユニット
• LHV6/2DC-3.F1(Y)
• LHV6/4FC-5.F1(Y)
• LHV6/4EC-6.F1(Y)
目次 ページ
1 概要 2
2 制御 2
2.1 機能 2
2.2 制御メニューの
ナビゲーション 3
2.3 Ecostar のスイッチオン 5
2.4 パラメーター設定 6
2.5 設定のための権限 7
3 電気接続 8
3.1 配線図 10
3.2 デジタル入力 DI1 および
DI2 13
3.3 内蔵測定ポイント 13
4 使用例 14
4.1 コンプレッサー制御の方式 14
4.2 エネルギー最適化 17
4.3 騒音レベルの低減 21
4.4 冬期起動(メニュー4.2.7)21
4.5 デジタル入力 22
4.6 オイル戻り 25
5 技術データ 26
6 故障の解決 28
6.1 チェックリスト 28
6.2 故障メッセージ 30
6.3 端子ボックスの開放 37
6.4 緊急運転 39
6.5 工場設定へのリセット 42
7 メニュー構造 43

2 KT-200-2
1 General
Systems with varying cooling
capacities, low temperature fluctuations
or with multiple evaporators often
require a parallel circuit of compressors
and make high demands on the system
control. The Ecostar condensing units
offer a wide cooling capacity range due
to a compressor regulated by
frequency inverter and speed
controlled fans, as well as an intelligent
control as Plug & Play solution.
Moreover, the control allows a very
energy-efficient and noise-reduced
operation, as well as a suction
pressure-guided or a
temperature-guided control and
evaporation rise at night.
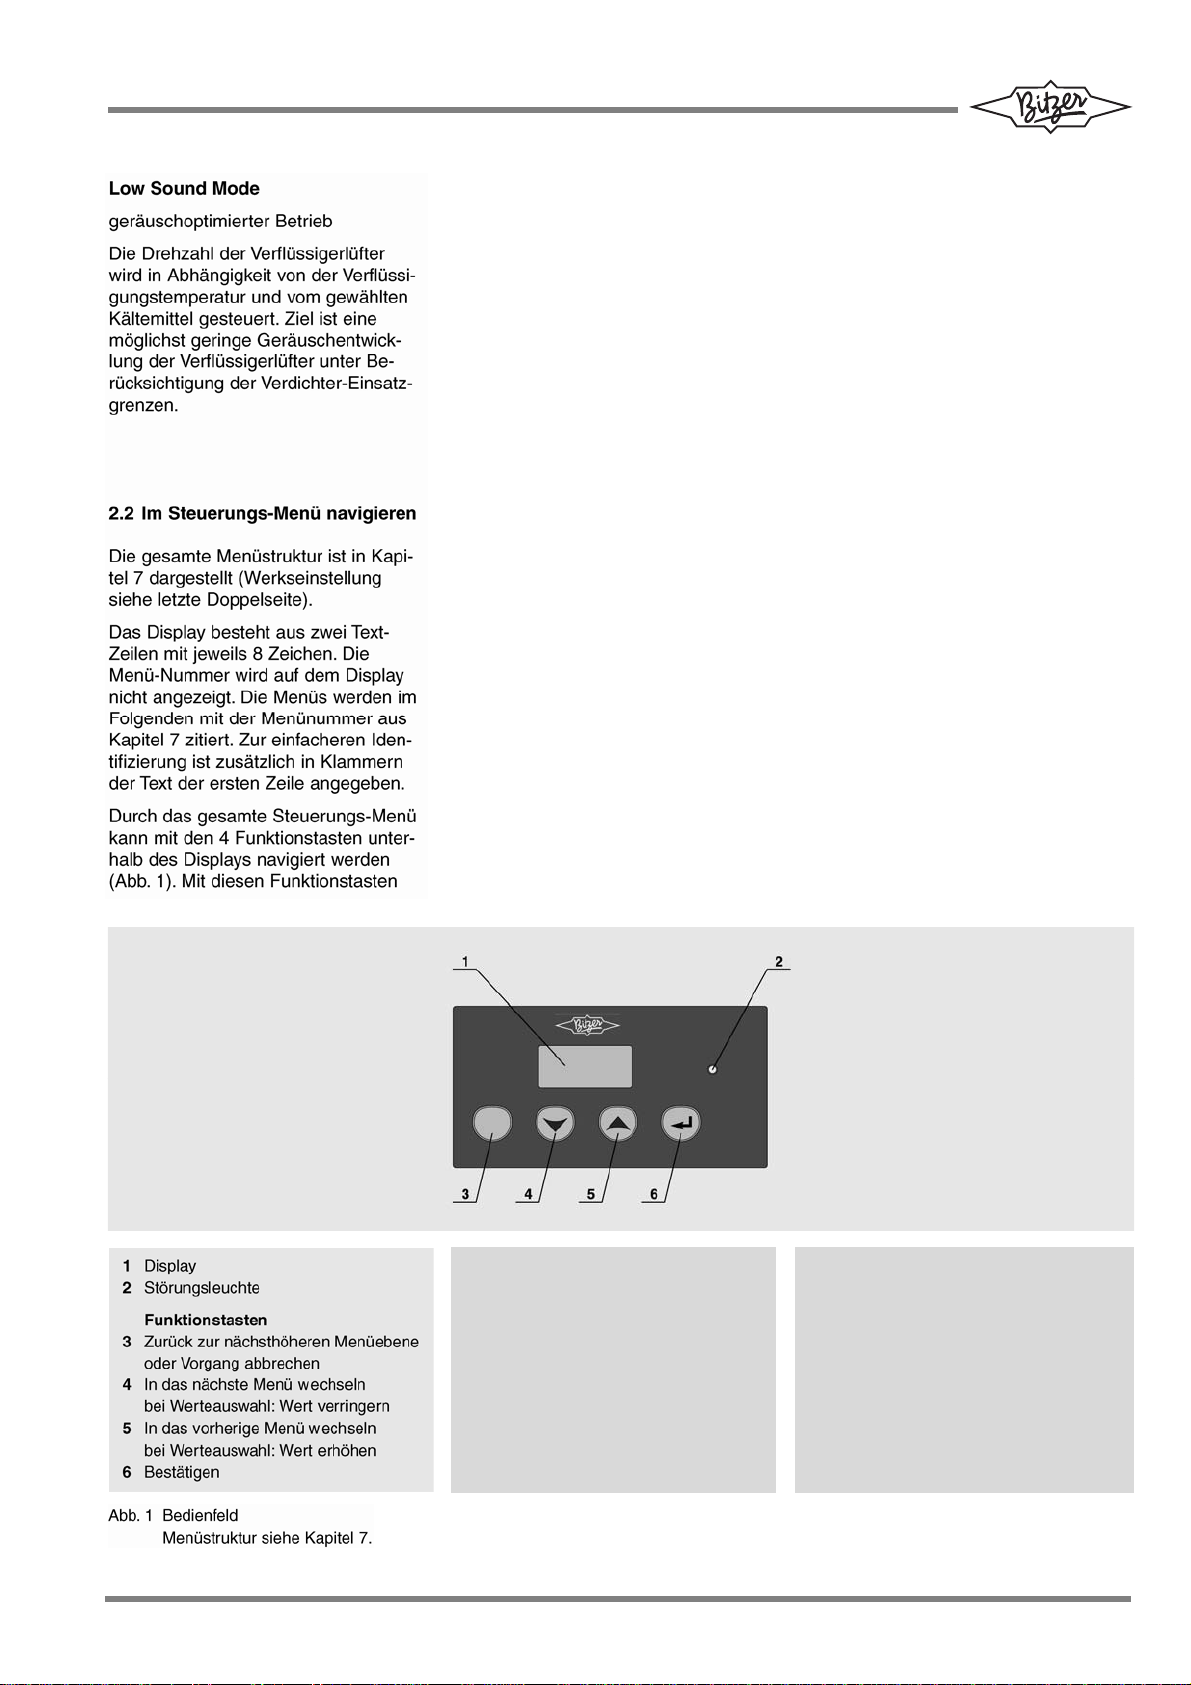
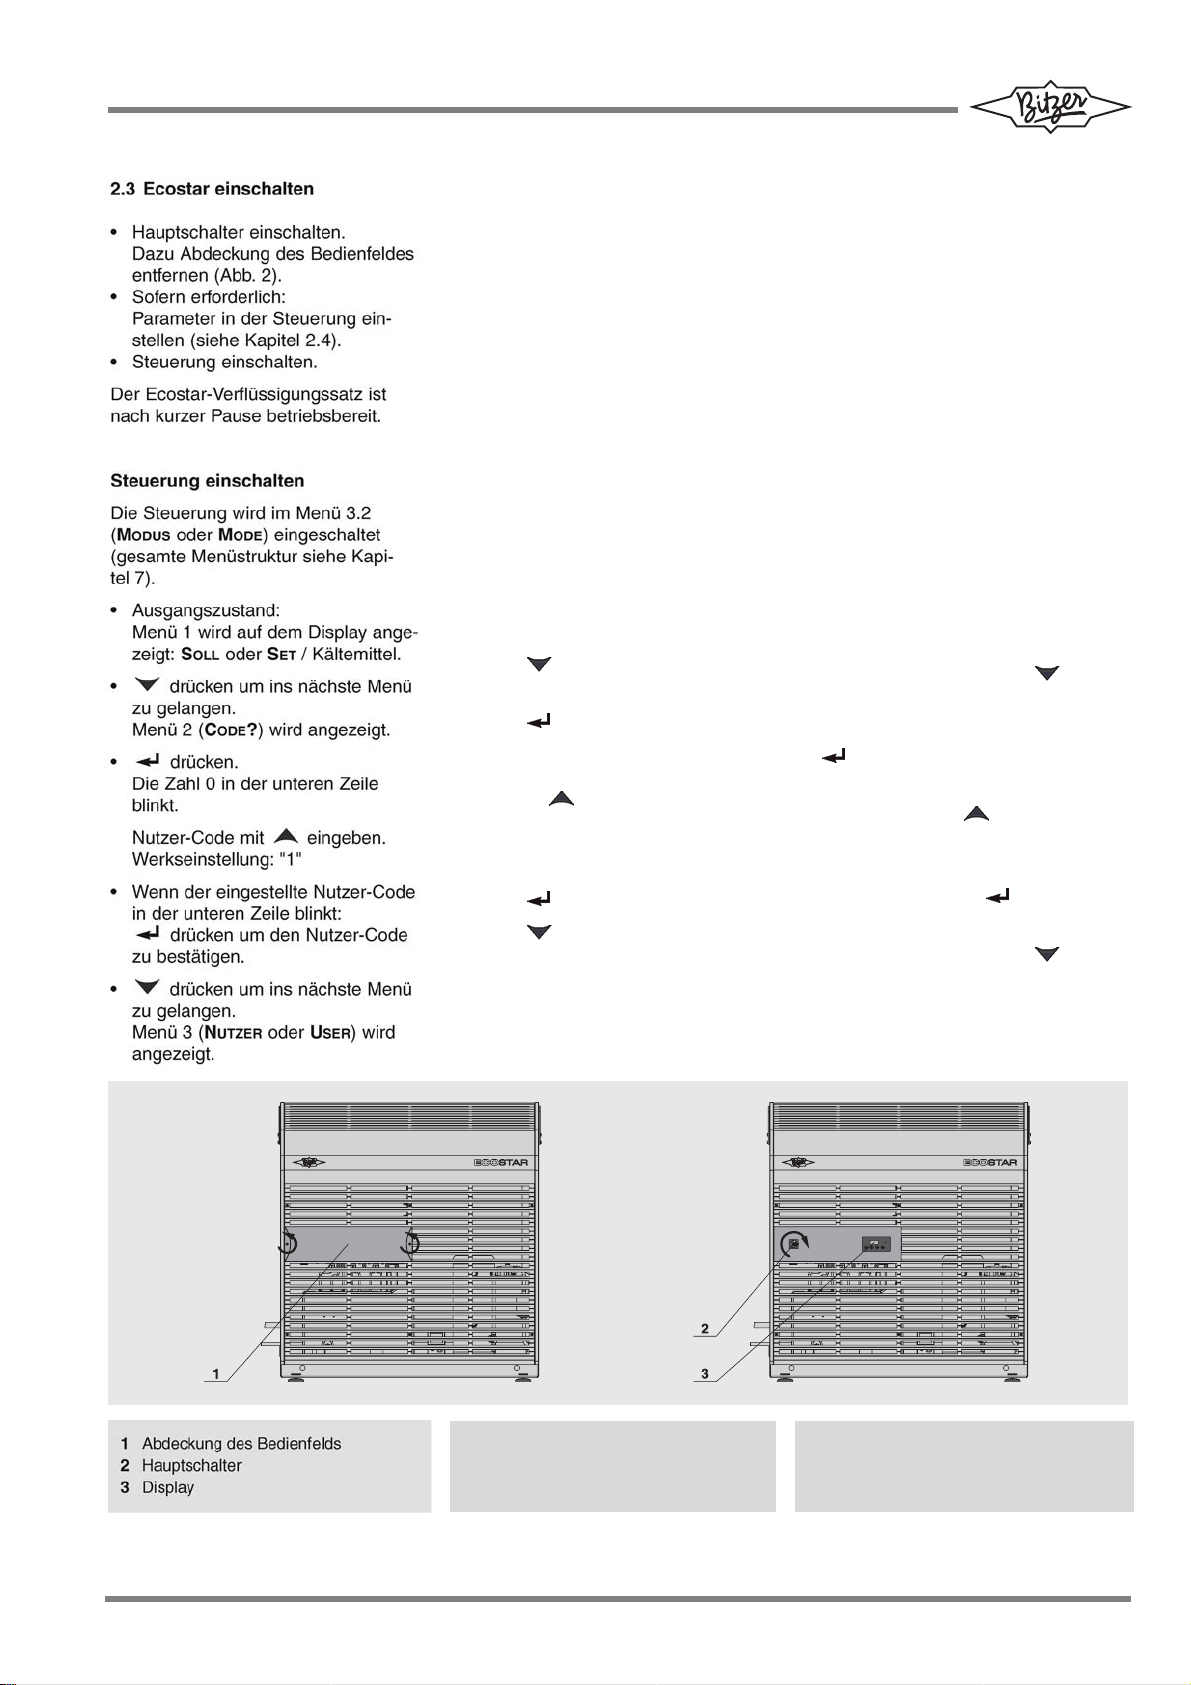
2 Control
The following pages explain how to set
the control. The factory setting already
allows the energy-optimised operation
at to= -10°C with R404A.
2.1 Function
The condensing unit is operated by a
program med logic control. The
compressor is controlled either
temperature- or suction
pressure-guided. For the condenser
fans two operation modes can be
selected:
Eco mode (factory setting)
energy optimised operation
The speed of the condenser fans is
controlled depending on the ambient
temperature in such a way that
depending on the operating conditions
(maximum COP) an optimum power
consumption of compressor and fans is
achieved. The lowest possible
condensing temperature is aimed for by
taking into account the pressure
diffference necessary for a thermostatic
expansion valve (TX).
1 概要
可変冷却能力を備えたシステム、温変動
の少ないシステムや複数の蒸発器付きシ
ステムではたびたびコンプレッサーの並
列回路が必要となり、システム制御要件
が高度なものになります。Ecostarコン
デンシングユニットは、周波数インバー
ターと速度制御式ファン、さらにプラ
グ&プレイソリューションのインテリ
ジェントコントロールによってコンプ
レッサーを制御するために、広範囲の冷
却能力を備えています。
その他にもこの制御により、非常に優れた
エネルギー効率の低ノイズ運転、吸入圧
または温度誘導式制御、夜間の蒸発温度上
昇を実現できます。
2 制御
以下に制御の設定方法を説明します。
工場設定で、R404Aを使用した t
o=-10°C
時のエネルギー最適化運転をすでにで
きるようになっています。
2.1 機能
コンデンシングユニットはプログラミン
グされたロジックコントロールによって
作動します。コンプレッサーは温度また
は吸入圧誘導により制御されます。コン
デンサーファン用に2つの運転モードを
選択できます。
Eco モード(工場設定)
エネルギー最適化運転
コンデンサーファンの速度が外気温に基
づいて制御され、運転条件(最大COP)
に応じてコンプレッサーとファンの消費
電力が最適化されます。サーモサイフォン
式膨張弁(TX)に必要な圧力差を考慮
して、できるだけ低い凝縮温度に制御
されます。

KT-200-2 3
Low sound mode
sound optimised operation
The speed of the condenser fans is
controlled depending on the
condensing temperature and the
selected refrigerant. The aim is a
minimium sound development of the
condenser fans by taking into account
the compressor’s application limits.
2.2 Navigating in the control menu
The entire menu structure is shown in
chapter 7 (factory settings). Please
refer to the double page at the end of
the document.
The display consists of two text lines
with 8 characters each. The menu
number is not displayed. In the
following, the menus are mentioned
with the menu numbers from chapter 7.
For an easier identification, the text of
the first line is additionally given in
brackets.
Navigation through the entire control
menu is realised by means of the 4
function keys that can be found below
the display (fig. 1).
静音モード
ノイズ最適化運転
コンデンサーファンの速度が凝縮温度と
選択された冷媒に基づいて制御され
ます。これは、コンプレッサーの適用制
限を考慮してコンデンサーファンのノイ
ズ発生を最小限に抑えることを目的とし
ています。
2.2 制御メニューのナビゲーション
メニュー構造の全体は7章に示してい
ます(工場設定)。本書最後の見開きペー
ジを参照してください。
ディスプレイは、それぞれ8文字以下か
ら成る2つのテキスト行で構成されてい
ます。メニュー番号は表示されません。
以下の説明では、メニューに7章のメ
ニュー番号を付けて表記しています。分
かりやすいように、第1行のテキストは
括弧付きで表します。
全制御メニューのナビゲーションは、
ディスプレイの下部にある4個のファン
クションキーを使って行います(図1)。
1 Display
2 Fault lamp
Function keys
3 Back to next higher menu level or
cancel
4 Change to the next menu or reduce
value when setting values
5 Change to the previous menu or
increase value when setting values
6 Enter
1 ディスプレイ
2 故障ランプ
ファンクションキー
3 ひとつ上のメニューレベルに戻る、また
は中止
4 次のメニューに切り換える、または値の
設定時に数値を下げる
5 前のメニューに切り換える、または値の
設定時に数値を上げる
6 エンターキー
Fig. 1 Control panel
Menu structure see chapter 7.
図1 コントロールパネル
メニュー構造は7章を参照してください。
ESC

4 KT-200-2
These function keys may also be used
for setting the control parameters.
Chapter 2.3. "Switching on Ecostar"
explains in detail how to navigate in the
menu structure and how to set
parameters.
Navigating in the menu
yGo to the next menu (same menu
level):
Press .
yGo to the previous menu (same
menu level):
Press .
yOpen a sub-menu:
Press .
If there is a sub-menu for a menu
item, an arrow is displayed on the
bottom right.
yGo back to the next higher menu
level:
Press ESC.
Setting parameters
The menus in which parameters may
be set are shown darker in the menu
structure.
Changing parameters:
yOpen a menu item and
press .
yThe parameter is flashing in the
display. The change mode is
activated while the parameter is
flashing.
yFor values:
To increase the displayed value:
Press .
To reduce the displayed value:
Press .
yWhen selecting different options, e.
g. refrigerants:
Press or until the desired
parameter is displayed.
yTo save a new parameter:
Press .
The new parameter is now displayed
on the bottom right.
yTo cancel a process:
Press ESC.
これらのファンクションキーは制御パ
ラメーターの設定にも使用します。
2.3章「Ecostarのスイッチオン」で、メ
ニュー構造のナビゲーションの使い方と
パラメーターの設定方法を詳しく説明し
ます。
メニューのナビゲーション
y次のメニューに進む
(同じメニューレベル):
を押します。
y前のメニューに戻る
(同じメニューレベル):
を押します。
yサブメニューを開く:
を押します。
メニュー項目にサブメニューがある
場合、右下に矢印が表示されます。
yひとつ上のメニューレベルに戻る:
ESC を押します。
パラメーターの設定
パラメーターの設定が可能なメニューは、
メニュー構造の中で濃く表示されてい
ます。
パラメーターの変更:
yメニュー項目を開き、
を押します。
yパラメーターがディスプレイに点滅
表示されます。パラメーターが点滅
している間は変更モードが有効
です。
y値の入力:
表示された値を上げるには:
を押します。
表示された値を下げるには:
を押します。
y異なるオプション(冷媒など)を選
択する場合:
希望するパラメーターが表示される
まで、 または を押します。
y新しいパラメーターを保存するに
は:
を押します。
新しいパラメーターが右下に表示さ
れます。
y手順を中止するには:
ESC を押します。

KT-200-2 5
2.3 Switching on the Ecostar
yTurn on main switch.
In order to do it, first remove the
cover of the control panel (fig. 2).
yIf required:
Set the parameters in the control
(see chapter 2.4).
yTurn on control.
A
fter a short pause, the Ecostar
condensing unit is ready for operation.
Switch on the control
The control is switched on in menu 3.2
(MODE or MODUS)
(for the menu structure see chap,. 7).
yInitial state:
Menu 1 is displayed:
SET or SOLL / refrigerant.
yPress to open the next menu.’
Menu 2 (CODE?) is displayed.
yPress .
"0" in the bottom line is flashing.
Enter the user code by
pressing .
Factory setting: "1"
yIf the entered user code is flashing
in the bottom line:
Press to confirm the user code.
yPress to open the next menu.
Menu 3 (USER or NUTZER) is
displayed.
2.3 Ecostar のスイッチオン
yメインスイッチをオンにします。
オンにするには、まずコントロール
パネルのカバーを外します(図 2)。
y必要に応じて:
制御パラメーターを設定します(2.4
章を参照)。
y制御をオンにします。
短時間の休止後、Ecostarコンデンシン
グユニットは作動可能状態になります。
制御をオンにする
制御はメニュー3.2(MODEまたはMODUS)
でオンになります(メニュー構造は7章
を参照)。
y初期状態:
メニュー1が表示されます。
SET または SOLL/冷媒。
y次のメニューを開くには を押し
ます。メニュー2(CODE?)が表示さ
れます。
yを押します。
下の行で「0」が点滅します。
ユーザーコードを で入力します。
工場設定:"1"
y入力したユーザーコードが下の行で
点滅表示されたら、 を押してユー
ザーコードを確定します。
y次のメニューを開くには を押し
ます。
メニュー3(USER または NUTZER)が
表示されます。
1Control panel cover
2 Main switch
3 Display
1コントロールパネルカバー
2 メインスイッチ
3 ディスプレイ
Fig. 2 Switching on the Ecostar Fig. 2 Switching on the Ecostar 図2 Ecostar のスイッチ

6 KT-200-2
yPress to open the first submenu.
Menu 3.1 (LANGUAGE or SPRACHE) is
displayed.
yPress to open the next
submenu. Menu 3.2 (MODE or
MODUS) is displayed:
MODE / OFF
(or German: MODUS / AUS).
yPress to activate the parameter
change.
OFF is flashing in the bottom line
(or German: AUS).
Press .
ON is flashing in the bottom line
(or German: EIN).
yPress to save the new
parameter.
The control is now switched on.
yPress
ESC twice to return to menu 1
(SET or SOLL).
2.4 Setting the parameters in the
control
A
ll control pa
r
ameters can be set by
means of the function keys 3 to 6 at the
control panel (see chapter 2.2 and fig.
1). For the entire menu structure see
chapter 7.
State of delivery
yMenu language: English
yRefrigerant: R404A
ySetpoint evaporation temperature:
to= -10°C
yControl of compressor:
suction pressure-guided
yOperating mode of condenser fans:
eco mode
yDate and time: CET
yManual change between summer
and winter time
ySummer time
yControl is in mode OFF
yWinter start ON (chap. 4.4)
yOil return OFF (chap. 4.6)
yExternal release (S2) bridged
yDigital inputs DI1 and DI2 (S5 and
S6) not bridged
For all factory settings of the Ecostar
condensing unit please see chapter 7
on the last double page.
y最初のサブメニューを開くには を
押します。メニュー3.1(LANGUAGE
または SPRACHE)が表示されます。
y次のサブメニューを開くには を押
します。メニュー3.2(MODE または
MODUS)が表示されます。
MODE/OFF
(またはドイツ語:MODUS/AUS)
yパラメーター変更を有効にするには
を押します。
下の行で OFF が点滅します
(またはドイツ語:AUS)。
を押します。
下の行で ONが点滅します
(またはドイツ語:EIN)。
y新しいパラメーターを保存にするに
は、 を押します。
これで制御がオンになります。
yメニュー1(SET または SOLL)に戻る
には、ESC を2回押します。
2.4 制御パラメーターの設定
すべての制御パラメーターはコントロー
ルパネルのファンクションキー3~6を
用いて設定することができます(2.2章と
図1を参照)。メニュー構造については
7 章を参照してください。
納品状態
yメニュー言語:英語
y冷媒:R404A
y蒸発温度の設定値:
to= -10°C
yコンプレッサーの制御:
吸入圧誘導式
yコンデンサーファンの作動モード:
eco モード
y日付と時間:CET
y夏時間と冬時間の手動変更
y夏時間
y制御は OFF モード
y冬期起動 ON(4.4 章)
yオイル戻り OFF(4.6 章)
y外部接続(S2)ブリッジ済み
yデジタル入力 DI1 とDI2(S5 とS6)
はブリッジされていません
Ecostarコンデンシングユニットのすべ
ての工場設定については、7章の最後の
見開きページを参照してください。

KT-200-2 7
Frequently changed parameters
yMenu 3.1 (LANGUAGE or SPRACHE):
setting the language
It may be selected between German
or English.
yMenu 3.6 (TIME or ZEIT):
changing time and manual change
between summer and winter time
yMenu 3.7 (DATE or DATUM):
changing date
yMenu 4.1.1 (REFRIG. or KÄLTEM.):
setting refrigerant data (application
limits):
It may be selected between R134a,
R404A, R507A, R407C and R22.
yMenu 4.1.3 (SETPOINT or SOLLWERT):
Description see chapter 4.1.
yMenu 4.1.4 (FANMODE or LÜFTER):
changing fans operation mode:
eco low sound mode
yMenu 4.1.5 (SOMMERT. or SOMMERZ.):
Clock change (between summer and
winter time):
manual automatical
2.5 Authorizations for settings
2 profiles with different authorization
levels are preset: user and installer.
yUSER or NUTZER
- factory setting: code = "1"
- Displayed menus:
menu 1, 2 and 3 with all submenus
of menu 3
- The parameters of menu 3 may be
changed.
yINSTALLER or MONTEUR
- factory setting: code = "2"
- all menus are displayed.
- all parameters may be changed
Change authorization code
The codes can be changed in the
submenus 3.8 (USER or NUTZER) and 4.4
(INSTALLER or MONTEUR). Codes can
consist of one to three digits.
よく変更されるパラメーター
yメニュー3.1(LANGUAGE または
SPRACHE):言語の設定
ドイツ語または英語を選択でき
ます。
yメニュー3.6(TIME または ZEIT):
時刻の変更、夏時間と冬時間の手動変更
yメニュー3.7(DATE または DATUM):
日付変更
yメニュー4.1.1(REFRIG.または KÄLTEM.):
冷媒データ(適用制限)の設定:
R134a、R404A、R507A、R407C、
R22 から選択できます。
yメニュー4.1.3(SETPOINT または
SOLLWERT):説明 は 4.1 章を参照して
ください。
yメニュー4.1.4(FANMODE または
LÜFTER):ファン作動モードの変更:
eco モード 静音モード
yメニュー4.1.5(SOMMERT.または
SOMMERZ.):
時刻変更(夏時間と冬時間の変更):
手動 自動
2.5 設定のための権限
次の2つの権限レベルのプロファイルが
プリセットされています(ユーザーと
インストーラー)。
yUSER または NUTZER
- 工場設定:コード =「1」
- 表示メニュー:
メニュー1、2、3(メニュー3の全サ
ブメニューを含む)
- メニュー3のパラメーターが変更可
能です。
yINSTALLER または MONTEUR
- 工場設定:コード =「2」
- 全メニューが表示されます。
- 全パラメーターが変更可能です。
権限コードの変更
このコードはサブメニュー3.8(USER
またはNUTZER)と4.4(INSTALLERまたは
MONTEUR)で変更できます。コードは1~3
桁の数字で設定できます。

8 KT-200-2
3 Electrical connection
In the terminal box of the condensing
unit the system control and the
optional OLC-K1 are prewired (fig. 4,
thin lines). The optional cold store
temperature sensor R5 as well as all
other system components (H2, H3, S2,
S5, S6 or Y1) have to be connected on
site (bold lines). Double layer terminal
strips simplify the connection and
identification of the cables
(components X101 and X102).
A
ll electrical connections are to be
made according to figure 4 and the
schematic wiring diagrams.
3 電気接続
コンデンシングユニットの端子ボックス
には、システム制御とオプションのOLC-K1
があらかじめ配線されています(図4、細い
線)。オプションの冷蔵室温度センサー
R5とその他のすべてのシステムコンポー
ネント(H2、H3、S2、S5、S6、Y1)は
設置場所で接続する必要があります
(太い線)。2層端子ストリップを使用す
れば、ケーブルの接続と識別を簡単に行
えるようになります(コンポーネント
X101とX102)。
電気接続はすべて、図4および配線図に
従って行ってください。
Caution!
High voltage!
The most terminals of terminal
strip X101 are energized by 230 V
when condensing unit is switched
on.
Before working on the electrics,
switch off main switch of
condensing unit!
警戒!
高い電圧がかかっています。
端子ストリップX101のほとんどの
端子には、コンデンシングユニット
がオンになると230 Vの電圧がかか
ります。
電気系統の作業を行う前にコンデン
シングユニットのメインスイッチを
オフにしてください。
!
!
Attention!
Protect controller B1 from
overvoltage!
Use screened cables for the
connection of setpoint
adjustment, digital inputs DI1 &
DI2 (S5, S6) and cold store
temperature sensor (R5)!
!
!注意!
コントローラーB1を過電圧から保
護してください。
設定値調整、デジタル入力DI1&DI2
(S5、S6)、冷蔵室温度センサー
(R5)の接続には、シールドケーブ
ルを使用してください。
Position der Anschlusskästen Position of terminal boxes 端子ボックスの位置
1Terminal box of condensing unit
2Terminal box of compressor
3Free space for mounting on top hat rail
1 コンデンシングユニットの端子ボックス
2 コンプレッサーの端子ボックス
3 トップハットレール上の取付けスペース
Fig. 3 Terminal boxes Fig. 3 Terminal boxes 図3 端子ボックス

KT-200-2 9
Remove the following parts for opening
the terminal box of the condensing unit:
Control panel cover, front grating of the
weather protective housing and cover
for the terminal box of the condensing
unit. For a detailed description see
chapter 6.3 "Opening the terminal
boxes".
コンデンシングユニットの端子ボックス
を開くには、以下の部品を取り外します:
コントロールパネルカバー、耐候性ハウ
ジングのフロントグリル、コンデンシン
グユニットの端子ボックスカバー。
詳しくは6.3章「端子ボックスの」を参照
してください。
factory wired
wire on site
F5 Pressure limiter for high pressure
protection
H2 Signal lamp "operation"
H3 Signal lamp "failure"
R1 Resistance 10 k
R2 Resistance 150
R5 Sensor for cold store temperature
R6 Crankcase heater
S2 External release
S5 & S6 Digital inputs DI1 and DI2
Y1 Solenid valve in liquid line
OLC-K1 Optical oil level control
工場で配線
設置場所で配線
F5 高圧保護用圧力リミッター
H2 警告ランプ「運転」
H3 警告ランプ「異常」
R1 抵抗 10 kΩ
R2 抵抗 150 Ω
R5 冷蔵室温度センサー
R6 クランクケースヒーター
S2 外部接続
S5 & S6 デジタル入力 DI1 および DI2
Y1 液ライン電磁弁
OLC-K1 光電子オイルレベルモニター
Fig. 4 Electrical connection
dark-grey fields: scope of delivery
and optional accessories (OLC-K1,
and R5). Legend see page 12.
図4 電気接続
濃いグレーの領域:標準装備品とオプ
ションアクセサリー(OLC-K1、R5)記
号説明については 12 ページを参照して
ください。
Anschlusskasten des Verdichters
Terminal box of compressor
コンプレッサーの端子ボックス
Anschlusskasten des Verflüssigungssatzes
Terminal box of the condensing unit
コンデンシングユニットの端子ボックス
(オプション)
オプション
Steuerung
Control
制御

10 KT-200-2
Free space for mounting
There is a free space of 60 mm on a top
hat rail in the terminal box of the
condensing unit for mounting. It may be
enlarged by 10 mm when removing 2
terminal blocks (fig. 3).
This space may be used, for example,
for external release S2, for one or two
relays (digital inputs DI1 and DI2) or for
an isolation amplifier (connection of the
setpoint adjustment).
3.1 Schematic wiring diagrams
①Optional accessory
②Setpoint adjustment
③Operation
④Failure
Legend of components see page 12.
取付け用スペース
コンデンシングユニットの端子ボックス
のトップハットレール上に60 mmの取付
け用スペースがあります。2個の端子ブ
ロックを取り外すと、このスペースをさら
に10 mm広げることができます(図3)。
このスペースは、例えば外部接続S2用、
1個または2個のリレー(デジタル入力
DI1およびDI2)用、緩衝増幅器(設定値
調整の接続)用などに使用できます。
3.1 配線図
①オプションアクセサリー
②設定値調整
③運転
④異常
コンポーネントの記号説明については
12ページを参照してください。
Mfan1
Mfan2
Mcpr

KT-200-2 11
violett/violet/紫
blau/blue/青
braun/brown/茶
grau/grey/グレー
オレンジ
rosa/pink/ピンク

12 KT-200-2
名称
コントローラー
ディスプレイヒーター
吐出ガス温度センサー
外気温センサー
高圧トランスミッター
低圧トランスミッター
リレーモジュール
ファンヒューズ 1
ファンヒューズ 2
端子ストリップ 1
保護デバイス
保護デバイス
冷蔵室温度センサ
ー
圧力リミッター(高圧保護)
ステータスメッセージ(無電位)
コンプレッサーコンタクター
ファン 1
ファン 2
設定値調整
クランクケースヒーター
外部接続
電磁弁
端子ストリップ 2
DI1 用無電位コンタクト
DI2 用無電位コンタクト
ファンバックアップヒューズ
制御回路ヒューズ
ディスプレイ
コンプレッサー
周波数インバーター(FI)
ファン速度制御
メインスイッチ
変圧器
Designation
Controlle
r
Display heate
r
Discharge gas tempe. Senso
r
A
mbient temperature senso
r
High pressure transmitte
r
Low pressure transmitter
Relay module
Fan fuse 1
Fan fuse 2
Terminal strip 1
Protection device
Protection device
Sensor for cold store temperature
Pressure limiter (high pressure
protection)
Status message (potential-free)
Compressor contacto
r
Fan 1
Fan 2
Setpoint adjustment
Crankcase heate
r
External release
Solenoid valve
Terminal strip 2
Potential-free contact for DI1
Potential-free contact for DI2
Fan back-up fuse
Control circuit fuse
Display
Compresso
r
Frequency inverter (FI)
Speed regulator of fans
Main switch
Transforme
r
Bezeichnung
Regle
r
Display-Heizung
Druckgas-Temperaturfühler
Umgebungs-Temperaturfühler
Hochdruck-Transmitter
Niederdruck-Transmitter
Relaismodul
Sicherung des Lüfters 1
Sicherung des Lüfters 2
Klemmleiste
Schutzgerät
Schutzgerät
Fühler für Kühlraumtemperatur
Druckwächter (HochdruckSchutz)
Statusmeldung (potenzialfrei)
Verdichte
r
-Schütz
Lüfter 1
Lüfter 2
Sollwert-Justierung
Ölsumpfheizung
Externe Freigabe
Magnetventil
Klemmleiste 2
Potenzialfreier Kontakt für DI1
Potenzialfreier Kontakt für DI2
Lüfte
r
-Vorsicherung
Steuersicherung
Display
V
erdichte
r
Frequenzumrichter (FU)
Drehzahlregler der Lüfte
r
Hauptschalte
r
Transformato
r
Klemme
Terminal
端子
1, 2
5, 6
2, 3
4, 5, 6
1, 2, 3
1
3
6, 7, 21
8, 9, 22, 23, 24
13, 26
5, 20
14, 15, 27
20
1, 16
2, 17
10, 11
4, 19
12, 25
3, 18
4, 9
3, 8
Bauteil
Component
コンポーネント
R7
R3
R4
B3
B4
F2
F3
SE-B1
OLC-K1
R5
F5
K1
M2
M3
R1, R2
R6
S2
Y
1
S5
S6
Klemmleiste
Terminal strip
端子ストリップ
CN2
CN5
CN11
CN22
X101
X102
Abkürzung
Abbreviation
略称
B1
K5
X101
X102
F1
F4
H1
M1
N1
N2
Q1
T1

KT-200-2 13
3.2 Digital inputs DI1 and DI2
The two digital inputs DI1 and DI2 may
be activated on site by means of a
potential-free contact each (S5 and S6).
y1. Digital input (DI1):
potential-free contact S5 connect it
to terminals 3 and 8 of the terminal
strip X102 factory setting: 2nd
setpoint
y2. Digital input (DI2):
potential-free contact S6 connect it
to terminals 4 and 9 of the terminal
strip X102 factory setting: winter
start
Selection of the functions and
description see chapter 4.5.
3.3 Integrated checkpoints
Several checkpoints have been
integrated in the Ecostar condensing
unit for automatic control. See figure 5.
3.2 デジタル入力 DI1 および DI2
無電位コンタクト(S5とS6)を使用して、
現場で2個のデジタル入力DI1とDI2を制
御することができます。
y1. デジタル入力 1(DI1):
無電位コンタクト S5を端子ストリッ
プX102 の端子 3と8に接続します。
工場設定:第 2設定値
y2. デジタル入力 2(DI2):
無電位コンタクト S6を端子ストリッ
プX102 の端子 4と9に接続します。
工場設定:冬期起動
機能の選択と説明については4.5章を参
照してください。
3.3 内蔵測定ポイント
Ecostarコンデンシングユニットには、自
動制御用として数カ所の測定ポイントが
設けられています。図5を参照してくだ
さい。
Fig. 5 Position of the checkpoints in the
Ecostar condensing unit
図5 Ecostar コンデンシングユニットの測定
ポイントの位置
Ecostar
Kühlraum / Cold store / 冷蔵室
①B4 Niederdruck-Transmitter
Low pressure transmitter
低圧トランスミッター
②F5 Druckwächter für steigenden Druck
Pressure limiter for high pressure protection
高圧保護用圧力リミッター
③R3 Druckgas-Temperaturfühler
Discharge gas temperature sensor
吐出ガス温度センサー
④R4 Umgebungs-Temperaturfühler
Ambient temperature sensor
外気温センサー
⑤B3 Hochdruck-Transmitter
High pressure transmitter
高圧トランスミッター
⑥R5 Fühler für Kühlraumtemperatur (Option)
Sensor for cold store temperature (option)
冷蔵室温度センサー(オプション)

14 KT-200-2
4 Application examples
4.1 Possibilities of compressor
control
In menu 4.1.2 (COM MODE or VERDMODE)
it can be selected between suction
pressure-guided and temperature-guided
compressor control.
Suction pressure-guided
compressor control (factory setting)
4 使用例
4.1 コンプレッサー制御の方式
メニュー4.1.2(COM MODEまたはVERDMODE)
吸入圧誘導式と温度誘導式のコンプレッ
サー制御を選択できます。
吸入圧誘導式コンプレッサー制御
(工場設定)
Fig. 6 Suction pressure-guided control of
compressor
Legend see page 16
図6 コンプレッサーの吸入圧誘導式制御
記号説明については 16 ページを参照し
てください。
Anlagensteuerung
System control
システム制御
Kühlmöbel 1 /Display cabinet 1 / 冷蔵装置 1
Kühlmöbel 2 /Display cabinet 2 / 冷蔵装置 2
Kühlmöbel 3 /Display cabinet 3 / 冷蔵装置 3
Ecostar

KT-200-2 15
With this type of control, several
cooling points may be operated
independently of each other using one
Ecostar condensing unit. The
temperature of each individual cooling
point is controlled individually by means
of a solenoid valve that works as
thermostat (fig. 6). The Ecostar control
keeps the suction pressure of the entire
system at a constant level and adapts
the compressor speed infinitely to the
cooling demand by means of a
frequency inverter.
ySet suction pressure-guided
compressor control in menu 4.1.2
(COM MODE or VERDMODE):
Select SUC.PRES or SAUGDR. (factory
setting).
yIn menu 4.1.3 (SETPOINT or
SOLLWERT), a P appears in the
second line.
Adjust the setpoint of the evaporation
temperature in this menu.
yCheckpoint:
low pressure transmitter B4
Temperature-guided compressor
control (fig. 7)
With this type of control, the cold store
temperature is kept at a constant level.
Temperature fluctuations of less than
one degree may be achieved.
However, it is only possible for one cold
store per Ecostar condensing unit.
Compared to the suction pressure
guided control, a much higher
evaporation temperature may be
achieved. It may be activated variably
by means of the week program (menu
4.2.1 WEEK PROGRAM or
WOCHEN-PROGRAM).
ySet temperature-guided compressor
control in menu 4.1.2 (COM MODE or
VERDMODE): Select TEMP or RAUM.
yIn menu 4.1.3 (SETPOINT or
SOLLWERT), a T appears in the
second line.
Adjust the setpoint of the cold store
temperature in this menu.
yCheckpoint:
cold store temperature sensor R5
yConnect the cold store temperature
sensor to the terminal strip X101
(terminals 13 and 26).
このタイプの制御の場合、1台のEcostar
コンデンシングユニットを使用して、複
数の冷却ポイントを互いに独立して作動
させることができます。各冷却ポイント
の温度は、サーモスタットとして働く電
磁弁によって個別に制御されます(図6)。
Ecostar制御はシステム全体の吸入圧を
一定レベルに保ち、周波数インバーター
によってコンプレッサー速度を冷却要求
レベルに応じて無段階に調整します。
y吸入圧誘導式コンプレッサーをメニュー
4.1.2(COM MODE または VERDMODE)
で設定します。
SUC.PRES または SAUGDR.(工場設定)
を選択します。
yメニュー4.1.3(SETPOINTまたは SOLLWERT)
で、2行目に Pが表示されます。
このメニューで蒸発温度の設定値を
調整します。
y測定ポイント:
低圧トランスミッターB4
温度誘導式コンプレッサー制御
(図 7)
このタイプの制御では、冷蔵室温度が一
定レベルに保たれます。温度変化を1°C
以内に抑えることができます。ただしこ
の制御を行えるのは、1台のEcostarコン
デンシングユニットにつき1つの冷蔵室
のみです。
吸入圧誘導式制御と比較して、はるかに
高い蒸発温度を実現できます。ウィーク
プログラム(メニュー4.2.1 WEEK PROGRAM
またはWOCHEN-PROGRAM)を使用してさ
まざまな制御を実行することができ
ます。
y温度誘導式コンプレッサーを
メニュー4.1.2(COM MODE または
VERDMODE)で設定します。
TEMP または RAUM を選択します。
yメニュー4.1.3(SETPOINT または
SOLLWERT)で、2行目に Tが表示さ
れます。
このメニューで冷蔵室温度の設定値
を調整します。
y測定ポイント:
冷蔵室温度センサーR5
y冷蔵室温度センサーを端子ストリップ
X101(端子 13 と26)に接続します。

16 KT-200-2
① Solenoid valve connection (Y1)
② Setpoint adjustment connection
③ External release connection (S2)
④ Output status message Ecostar
(operation / failure)
⑤ Cold store temperature sensor
connection (R5)
⑥ Digital input 1 (DI1)
connection for the potential-free
contact S5
⑦ Digital input 2 (DI2)
connection for the potential-free
contact S6
⑧ Interface Ecostar control
⑨ Interface control display cabinets
① 電磁弁接続口(Y1)
② 設定値調整接続口
③ 外部接続口(S2)
④ Ecostar 出力ステータスメッセージ
(運転/異常)
⑤ 冷蔵室温度センサー接続口(R5)
⑥ デジタル入力 1(DI1)
無電位コンタクト S5 用接続口
⑦ デジタル入力 2(DI2)
無電位コンタクト S6 用接続口
⑧ Ecostar 制御インターフェース
⑨ 冷蔵室制御インターフェース
Fig. 7 Temperature-guided control of
compressor
図7 温度誘導式コンプレッサー制御
Anlagensteuerung
System control
システム制御
Kühlraum / Cold store / 冷蔵室
Ecostar

KT-200-2 17
4.2 Optimising energy
By optimising the evaporation and
condensing temperatures a far longer
service life may be achieved. Capacity
might be increased considerably by
increasing the suction pressure in
part-load operation in addition to the
infinite capacity control. Further
improvements may be achieved by
reducing the condensing temperature
in winter or by integrating heat
recovery.
Practical applications show that an
evaporation temperature may be
increased by approx. two degrees by
means of infinite capacity control.
Therefore, it is recommended to set a
very high evaporation temperature and
to reduce it step by step if required.
Suction pressure increase
The control offers several options for
increasing evaporation temperature
and suction pressure:
ytime-dependent:
by means of an integrated weekly
timer
yinfinitely:
by means of setpoint adjustment
analogue control signal by external
voltage source
yexternally activated:
via digital input (external
potential-free contact).
This allows adapting the cooling
capacity of the condensing unit flexibly
to the actual cooling demand. For all
three options, first select suction
pressure-guided or temperature-guided
compressor control (SUC.PRES or
SAUGDR., factory setting) in menu 4.1.2
(COM MODE or VERDMODE).
Correspondingly, the nominal
temperature may be increased with
temperature-guided compressor
control. In order to do it, the weekly
timer, the setpoint adjustment and the
external activation via the digital input
are also available (alternatively:
preselect it in menu 4.1.2).
4.2 エネルギー最適化
蒸発温度と凝縮温度を最適化することで、
寿命を大幅に延ばすことができます。
無段階容量制御に加え、部分負荷運転時
の吸入圧を上げることによって能力を大
幅に向上できます。冬期に凝縮温度を下
げたり、熱回収を組み込むことによって
もさらに能力をアップすることができ
ます。
実際に使用する場合、無段階容量制御に
よって蒸発温度を約2°C上げることがで
きます。そのため、できるだけ高い蒸発
温度を設定しておき、必要に応じてその
温度を少しずつ下げることを推奨します。
吸入圧の上昇
蒸発温度と吸入圧を上げるための制御方
法はいくつかあります。
yタイマー作動:
内蔵のウィークリータイマーを使用
y無段階制御:
設定ポイント調整を使用
外部電源によるアナログ制御信号
y外部からの制御:
デジタル入力(外部無電位コンタク
ト)を使用
これにより、コンデンシングユニットの
冷却能力を実際の冷却要求レベルに柔軟
に適合させることができます。上記の3
つの方法のすべての場合、まずメニュー
4.1.2(COM MODEまたはVERDMODE)で吸
入圧誘導式コンプレッサー制御(SUC.PRES
またはSAUGDR.、工場設定)を選択します。
これに対し、温度誘導式コンプレッサー
制御では公称温度を適切に上昇させるこ
とができます。その際、ウィークリータ
イマー、設定値調整、デジタル入力による
外部作動も利用できます(あるいは、メ
ニュー4.1.2でこれを予備選択)。

18 KT-200-2
Time-dependent suction pressure
increase
A
weekly timer is integrated in the
menu control: Define up to four
switchpoints for each weekday in menu
4.2.1 (WEEK PROGRAM or
WOCHEN-PROGRAM). The following
parameters can be selected:
yTime (switching time)
yEvaporation temperature
yLow sound mode ON / OFF
Therefore, it is easy to raise the
temperature at night, for example,
without the need of additional
installations.
A
t the same time – for example at night
– the low sound mode may be activated
(ON or EIN). If the low sound mode is
switched off, the system runs
automatically in eco mode.
Infinite suction pressure increase
The suction pressure may be set
infinitely by means of setpoint
adjustment. This function is activated in
menu 4.2.2.5 (ADJUST or EXT.JUST). In
addition, the maximum deviation of the
suction pressure may be selected
individually. In order to do this, set the
max. permitted deviation from the
setpoint in menu 4.2.2.6 (ADJ.OFFS or
JUS.WERT). Figure 8 shows a value of 5 K.
タイマー作動による吸入圧上昇
ウィークリータイマーはメニュー制御に
組み込まれています。メニュー4.2.1
(WEEK PROGRAMまたはWOCHEN-PROGRAM)
で各平日用に最大で4つの切換えポイン
トを設定できます。以下のパラメーター
を選択できます。
y時間(スイッチング時間)
y蒸発温度
y静音モード ON/OFF
このため、追加で設置しなくても、例え
ば夜間に温度を簡単に上昇させることが
できます。
同時に、夜間などに静音モードを作動さ
せることができます(ONまたはEIN)。
静音モードがオフになると、システムは
自動的にecoモードで運転を行います。
無段階の吸入圧上昇
吸入圧を設定値調整によって無段階設定
することができます。この機能はメニュー
4.2.2.5(ADJUSTまたはEXT.JUST)で有効
にします。さらに、吸入圧の最大偏差を
個別に選択できます。これを行うには、
メニュー4.2.2.6(ADJ.OFFSまたはJUS.WERT)
で設定値からの最大許容偏差を設定し
ます。図8は5 Kの値を示しています。
Fig. 8 Infinite suction pressure
increase by means of setpoint
adjustment Example: -10 °C set
in menu 4.1.3 (SETPOINT or
SOLLWERT) and 5.0°C in menu
4.2.2.6 (ADJ.OFFS or JUS.WERT).
図8 設定値調整による無段階吸入圧
(例):メ ニ ュ ー 4.1.3(SETPOINTまた
はSOLLWERT)で-10 °Cに設定、メ
ニュー4.2.2.6(ADJ.OFFSまたは
JUS.WERT)で5.0°Cに設定。

KT-200-2 19
Possible signal ranges:
y4 to 20 mA (depending on current)
y0 to 10 V (depending on voltage)
For the electrical connection, please refer
to wiring diagrams and technical data.
Correspondingly, the nominal
temperature and the max. permitted
deviation may be set for
temperature-guided compressor control.
External control of the suction
pressure via digital input
See chapter 4.5 "Digital inputs".
Reducing the condensing pressure
The condenser fan speed is controlled
infinitely by default, the fans are
operated in eco mode. The fan speed is
determined by the temperature
difference between condensing and
ambient temperature. Apart from that,
the speed characteristic ①changes
depending on the ambient temperature
(fig. 9).
可能な信号範囲:
y4~20 mA(電流に依存)
y0~10 V(電圧に依存)
電気接続については、配線図と技術デー
タを参照してください。
これにより、公称温度と最大許容偏差を
温度誘導式コンプレッサー用に設定でき
ます。
デジタル入力による吸入圧の外部制御
4.5章の「デジタル入力」を参照してくだ
さい。
凝縮圧の低下
コンデンサーファン速度は無段階制御さ
れます。初期設定では、ファンはecoモー
ドになっています。ファン速度は凝縮温
度と外気温の温度差によって決まり
ます。それとは別に、速度特性曲線①は
外気温に応じて変化します(図9)。
n Fan speed in %
tcCondensing temperature
tamb Ambient temperature
①to ③ Speed characteristics (eco mode)
① Example: 13°C ambient temperature
② Example: 39°C ambient temperature
③ Example: 43°C ambient temperature
④ Change of the speed characteristics
with different ambient temperatures
n ファン速度(%)
tc凝縮温度
tamb 外気温
①~③ 速度特性曲線(ecoモード)
① 例:外気温13°C
② 例:外気温39°C
③ 例:外気温43°C
④ 外気温が異なる場合の速度特性曲線の
変化
Fig. 9 Characteristic of the fan speed in
eco mode
図9 ecoモード時のファン速度の特性
EIN/ONEIN/ONEIN/ON

20 KT-200-2
The fans start when the condensing
temperature is 5 K above the current
ambient temperature or minimum 15°C.
With high ambient temperatures, they
are always operated at max. speed
from tc= 50°C.
This characteristic causes a
considerably reduced power
consumption of the condenser fans, in
particular with lower compressor
speeds.
To achieve additional savings in
systems with electronic injection valves,
the lower switch-on level of the
condenser fan (menu 4.2.5.8 MIN.SET or
MIN.SOLL) may be reduced. On the
other hand, it might be necessary to
increase the lower switch-on level in
case of unfavourable configuration to
guarantee a certain minimum pressure
upstream of the injection valve.
When the upper switching threshold
(menu 4.2.5.10 MAX.SET or MAX.SOLL) is
exceeded, the condenser fans are
operated at maximum speed,
independently of the ambient
temperature.
凝縮温度が現在の外気温を5 K上回るか、
最低15°Cになるとファンが起動します。
外気温が高い場合、tc= 50°C以上になる
とファンは常に最高速度で作動します。
この特性のため、特にコンプレッサーが
低速のときにはコンデンサーファンの消
費電力が大幅に低減します。
電子噴射弁付きシステムでは、さらに節
約できるよう、コンデンサーファンの下
限スイッチングレベル(メニュー4.2.5.8
MIN.SETまたはMIN.SOLL)を下げることが
できます。一方で、不利となる設計の場
合には、噴射弁の上流側の最低圧力を保
証するために下限スイッチングレベルを
上げる必要があります。
上限スイッチングレベル(メニュー4.2.5.10
MAX.SETまたはMAX.SOLL)を超えた場合
には、コンデンサーファンは外気温に関
係なく最高速度で作動します。
n Fan speed in %
tcCondensing temperature
tamb Ambient temperature
①to ③ Speed characteristics (low sound
mode)
① Example: 13°C ambient temperature
② Example: 27°C ambient temperature
③ Example: 38°C ambient temperature
n ファン速度(%)
tc凝縮温度
tamb 外気温
①~③ 速度特性曲線(静音モード)
① 例:外気温13°C
② 例:外気温27°C
③ 例:外気温 38°C
Fig. 10 Characteristic of the fan speed in
low sound mode
図10 静音モード時のファン速度の特性
EIN / ONEIN / ONEIN / ON
This manual suits for next models
5
Table of contents
Popular Air Handler manuals by other brands

IV Produkt
IV Produkt Envistar Compact Assembly instructions

Lennox
Lennox CBA25UH Series installation instructions

Mitsubishi Electric
Mitsubishi Electric PAC-AH63 installation manual

Rec Temovex
Rec Temovex G10125 user manual

Alarko
Alarko 2T Installation, use and maintenance manual

Vortex
Vortex combo-pac installation instructions