BJ ADAPTACIONES SHX Multisensory Room User manual

SHX Multisensory Room
User Guide

Contents
How to launch the SHX system
How to control the multisensory room using the SHX app
How to control the entire room using the SHX Controller, Die or
Mat
How to control the room using switches
How to access Edit Mode and change the content of a cell
How to create a new scene
How to edit actions activated by each cell
Editing actions: adding multimedia content
Editing actions: adding a sound or song
Editing actions: controlling devices
Editing actions: adding pauses between series of actions
Editing actions: controlling luminous elements
How to enable audio-activated lighting
How to import and export SHX settings
How to use SHX with two screens
How to use SHX Proximity in the sensory room
How to control the system with a different tablet
How to close the SHX System

How to launch the SHX system
2. Switch on the SHX Device
3. Switch on the PC
1. Switch on the projector, television or monitor
4. Switch on the
vibroacoustic amplifier
Make sure the acoustic amplifier is on
the following settings:
a) Direct: off
b) Speakers: A on, B on
c) Loudness: off
d) Volume: any setting other than 0
e) Source: AUX.
Here are the steps for launching the SHX system with an SHX Rack.
Follow the same procedure when using the SHX Compact and SHX Device Lite.
The program should launch automatically when
you open Windows. If not, double-click on the
program icon on the desktop.
6. Switch on the tablet
and open the SHX app
ON
OFF
5. Launch the SHX program on the PC
ON/OFF
Vibration
Sound ON/OFF
Vibration controls
You will need a keyboard and
mouse to access the software.
SHX Rack
2
3
4
ON/OFF
keyboard
mouse
sound
vibration
bc
ade
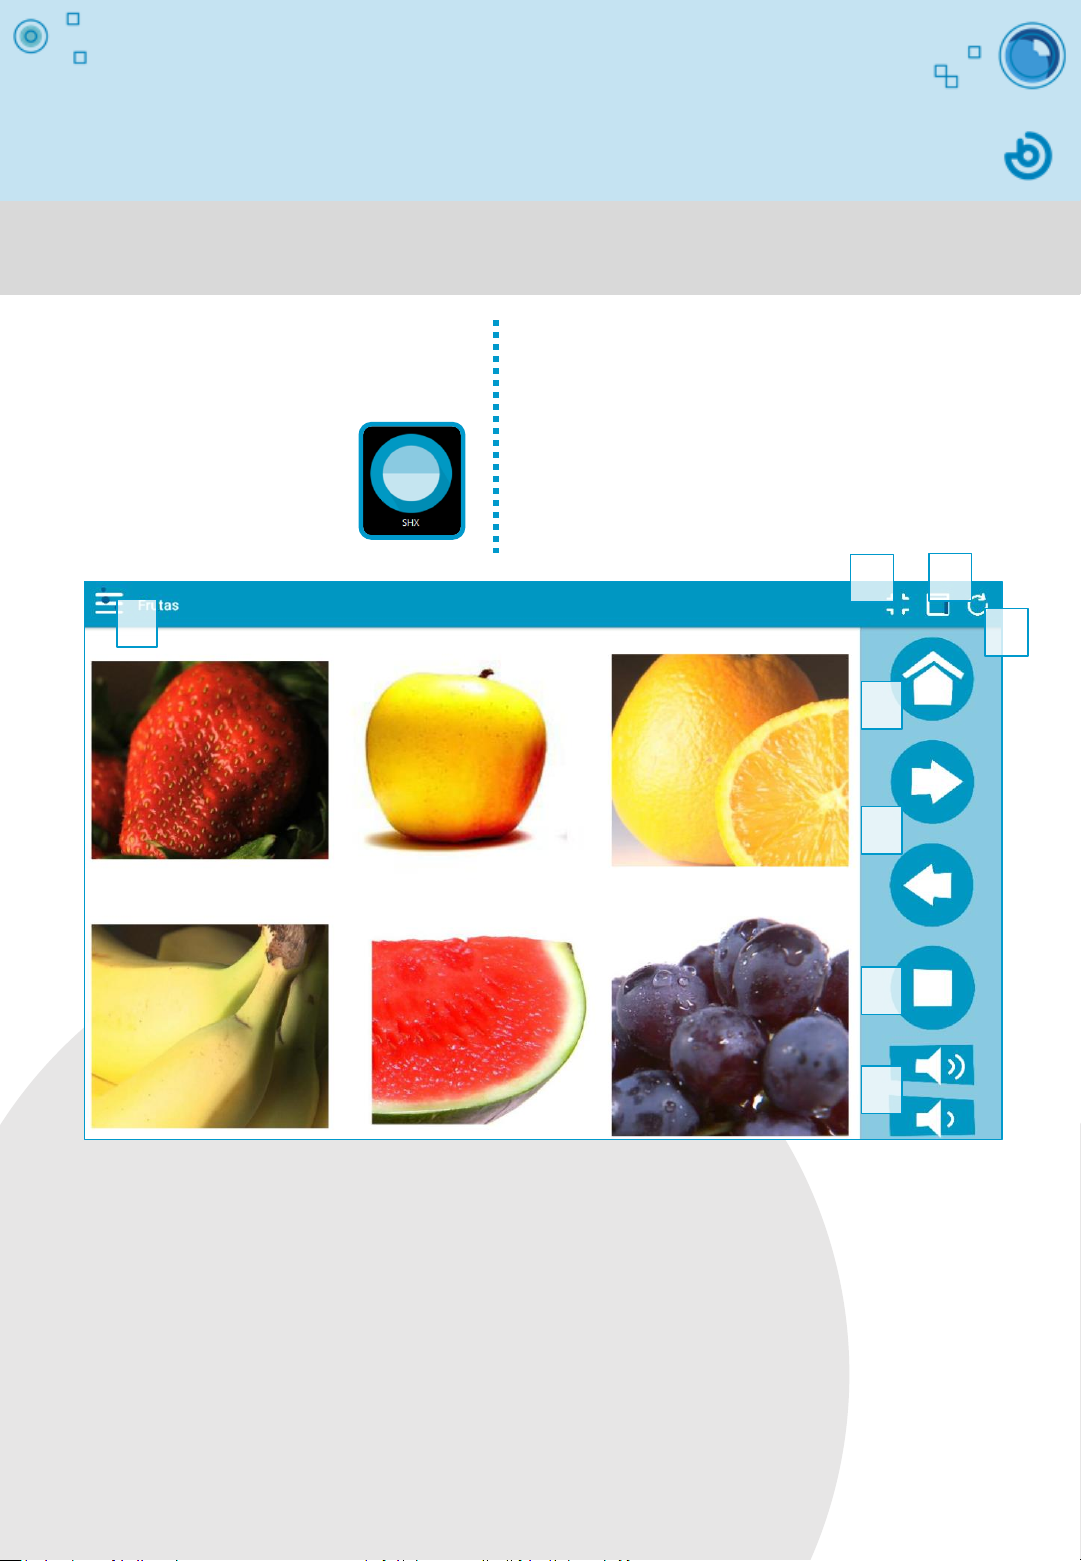
How to control the multisensory
room using the SHX app
When the SHX app is
opened on the tablet, any
changes that have been
made to the content will be
synchronized automatically.
3
2
4
5
6
7
8
1
2. Controlling the room with the tablet
Using the SHX app:
1. Scene selection menu.
2. Full screen mode.
3. Hide/Show the navigation bar (in iOS, this option can be accessed from the Menu).
4. Refresh edited content (in iOS, this option can be accessed from the Menu).
5. Go to the home screen.
6. Buttons for moving to the previous or next scene.
7. Room STOP button: switches off lights and devices.
8. Volume control buttons.
If you have purchased an SHX tablet with the SHX
system, no adjustments will be necessary as it is
ready for use.
If you wish to control the room with a different
tablet (Android or iOS), you will need to adjust its
settings to allow it to connect to the server.
See info sheet: How to control the system with a
different tablet.
Once the system is running, you will be able to control the entire room with
the tablet.
1. Open the SHX app
on the tablet

On switch
Light switch
How to control the entire room using
the SHX Controller, Die or Mat
1. Select a scene
In the Options menu in the SHX app, select “Set scene on the server”. Then, search for
the scene you wish to work with in the tablet. Any system controller can now be used to
activate the cells displayed on the screen.
2. Use the SHX Controller
Every button on the SHX Controller corresponds to
a cell in the selected scene, in the same order.
iOS
SHX Die
SHX Controller
1 2 3
456
Android
Button/cell equivalencies:
Remember to charge
the Die.
1. Open the
zip.
2. Connect it
to the charger.
The system recognizes the order of
the elements in use, not the color of
the controls.
Remember
to charge the
Controller.
Place pictograms on
each face of the Die.
Different controllers, such as the SHX Controller, Die or Mat, can be used
to interact with the SHX room.
The SHX software cell activated by each
button on the Controller, Mat, or face of
the Die, is as follows:
SHX Mat
Red:cell 1
Green:cell 2
Yellow:cell 3
Blue:cell 4
Orange:cell 5
White: cell 6
123
456
5
3
4
4
5
6
1
2
3
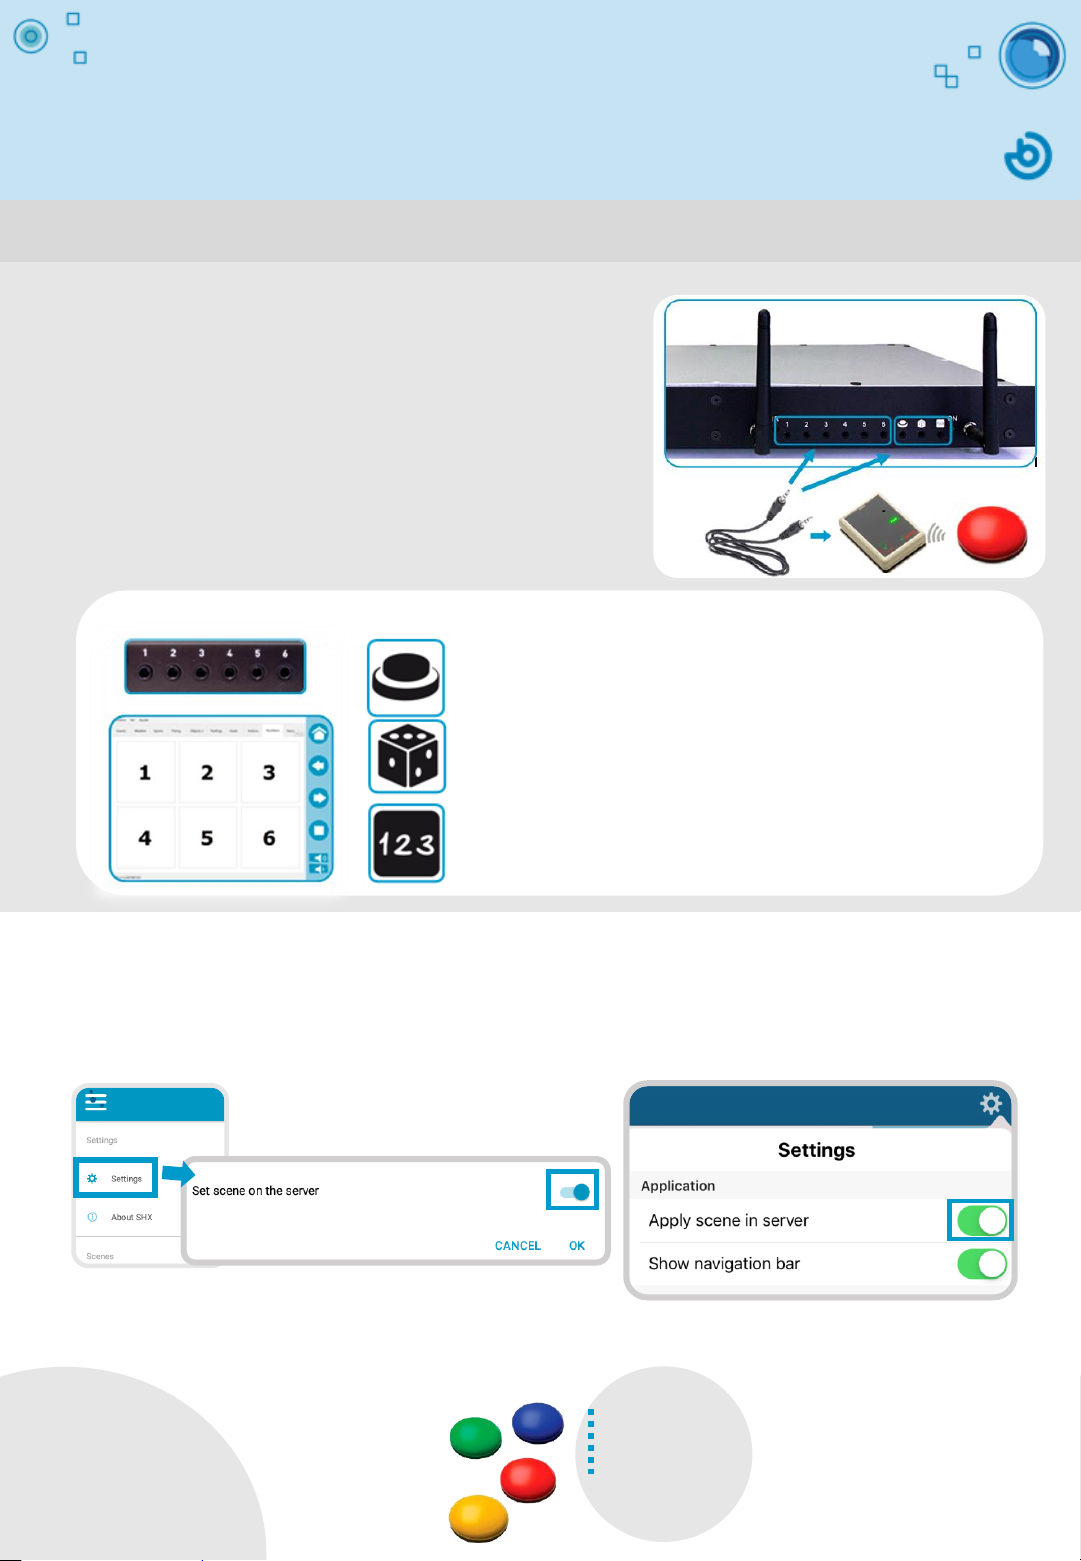
How to control the room using
switches
1. Connect the SHX Device
•The first 6 jack plugs activate the first 6 cells in
in every scene tab.
•The next 3 activate special functions.
Scanning: this input system allows the different cells on the active
scene tab to be activated by scanning. A second activation of the
switch will launch the content associated with the selected cell.
Random: every activation launches the content of a random cell
on the active scene tab.
Sequential: every activation launches the content of each cell on
the active tab in order.
Connect a switch to one of the 9 control inputs
depending on the desired function.
2. Select a scene
In the Options menu in the SHX app, select “Set scene on the server”. Then, search for the
scene you wish to work with in the tablet. The input switch activates the cells on the
screen.
3. Press the push button
Input jacks Special function input jacks
When using wireless switches, remember
that both the controllers and the
receivers require batteries.
The SHX room can also be controlled using push button switches.
iOS
Android

How to access Edit Mode and change
the content of a cell
4. Appearance
Use the menu on the left to change the name
of the scene tab, alter the number of rows and
columns of cells, display or hide the cell and
frame, or edit the image and text in the cell.
5. Confirm changes
6. Refresh the content in
the tablet
See info sheet: How to control the
entire room using the SHX app.
3. Edit the cells
Double-click on a cell to begin changing its functions.
See info sheet: How to edit cell actions
2. Select Edit Mode
Press F11 or select File -> Edit in the menu.
1. Exit Reproduction Mode
If you have been displaying content in the
room, you will need to exit Display Mode. To do
so, move the mouse until a cross appears on
the screen. Click it to close and you will return
to the main menu.
You will need to connect a mouse and a keyboard to the PC. The TV set or
area you are projecting onto, such as the wall, will act as a screen.
Check the File
menu is not
hidden. Press “ALT”
to show or hide it.
3
4
5

How to create a new scene
4. Name the scene
5. Change the number of cells
6. Edit every cell
See info sheets: Editing actions...
3. Select the scene format
•Blank: this creates a new scene with 6 default
blank cells. The number of cells, their position
on the tab and their appearance can be
changed with the Scene and Cell menus.
•Copy existing scene: this duplicates an existing
scene and all its settings.
•From image or video file: this allows you to
select several multimedia files and create a cell
for each one.
2. Create a new scene
Go to the last scene tab and press “Add scene”.
1. Select Edit Mode
7. Confirm changes
8. Refresh the content in the
tablet
See info sheet: How to control the entire
room using the SHX app.
The SHX content is organized in scenes or tabs, in which each a series of cells
are displayed. The software can be used to create as many scenes as desired.
The settings group together the number of
scenes, appearance and combination of actions
that are defined in each cell. Every setting is
saved in a file with the .bjx extension. You can
name each file as you wish. You can create as
many settings profiles as you wish, each with its
own personalized content to suit the needs of
different users or purposes.
See info sheet: How to import and export
SHX settings.
See info sheet: How to access Edit Mode and change the content of a cell.

How to edit actions activated by each
cell
1. Double-click on a cell to go to the “Add an action” menu
You can decide how and when the different elements in the sensory room
behave by selecting a series of actions.
Actions allow you to program special effects adding devices, lighting and
multimedia files, for example, into any scene.
See info sheet: How to access Edit Mode and change the content of a cell.
b
4
2
3
See info sheets: Editing actions: adding multimedia content, Editing actions: adding a
sound or song, Editing actions: controlling devices, Editing actions: controlling luminous
elements and Editing actions: adding pauses between series of actions.
4. Test
You can preview the changes you make with
the “Test” button. Use the “Stop” button to
stop the actions.
3. Edit actions and
change launching order
Use the side buttons with the list of
actions to (a) change the order they
are launched in, (b) delete them or
(c) edit them. 5. Confirm changes
5
2. Select the desired action by clicking on the cell
The icons on the left (actions) will allow you to achieve the desired effect in the room.
They will appear in selection order in the panel on the right, from top to bottom. You
can use the side bar to navigate between them.
c
a

Editing actions: adding multimedia
content
1. Double-click on a cell to go to the
“Add an action” menu
2. Select Video/Image by clicking on
the cell
3. Select the file type
•Pause: turns the screen black and silences the
sound of the previous action.
•Type: image, video file, slideshow, YouTube video
or webpage.
Images, video, webpage or YouTube files can be used in the room by
selecting the Video/ Image function.
You can adjust the image to fit the screen:
maintain appearance, expand or zoom to
fill the screen.
If the images are part of a slide presentation, such as a
series of photographs, you can choose how long each
image is projected before the presentation continues.
You can also repeat the sequence if you wish.
Remember that some YouTube videos may be subject to
broadcasting and copyright restrictions.
See info sheet: How to access Edit Mode and change the content of a cell.
You can also decide to
silence the sound on a video
file (Mute) or select Repeat
mode to play it on loop. Default Stretch Zoom
If you wish to generate new content, we recommend creating a file with the scene name in
C:\BJCSHX\ and saving all the audio, video or image files used there. This will make it easier for
you to find your content and manage your settings.
If you choose to use images or video files, we recommend
you save them all in the same location on your PC.

Editing actions: adding a sound or
song
In addition to introducing sounds and songs with the Video/Image action
cell, a single sound can also be added to the scene with the Sound cell.
3. Select the desired file
We recommend that all the sound files used
in the scene are saved in the same location
on your PC.
See info sheet: How to access Edit Mode and change the content of a cell.
If you wish to generate new content, we recommend creating a file with the scene name in
C:\BJCSHX\ and saving all the audio, video or image files used there. This will make it easier for
you to find your content and manage your settings.
1. Double-click on a cell to go to the
“Add an action” menu
2. Select Sound by clicking on the cell

Editing actions: controlling
devices
3. Select the device you wish to
control from the list
4. Select the desired action
•ON: the device will switch on.
•OFF: the device will switch off completely.
•Change state: The device will work for the length
of time assigned in the RF receptor (yellow
selector on the Enabler Socket+).
Set the cells to create special effects in the room with a fan, a bubble
machine, star projector, UV light or other items using the Device cell.
See info sheet: How to access Edit Mode and change the content of a cell.
Function
selector
The Enabler Socket+ is a device that
allows you to use the system to activate
and deactivate electrical devices that are
plugged into the mains, such as fans,
soap bubble machines, etc.
Use the table as a guide to program the
activation time of the different devices
with the function selector.
Enabler
Socket+ Avoid setting the
selector to 0 (bistable)
or small values.
1. Double-click on a cell to go to the
“Add an action” menu
2. Select Device by clicking on the cell
Selector
position
functions
Operating mode
ON/OFF
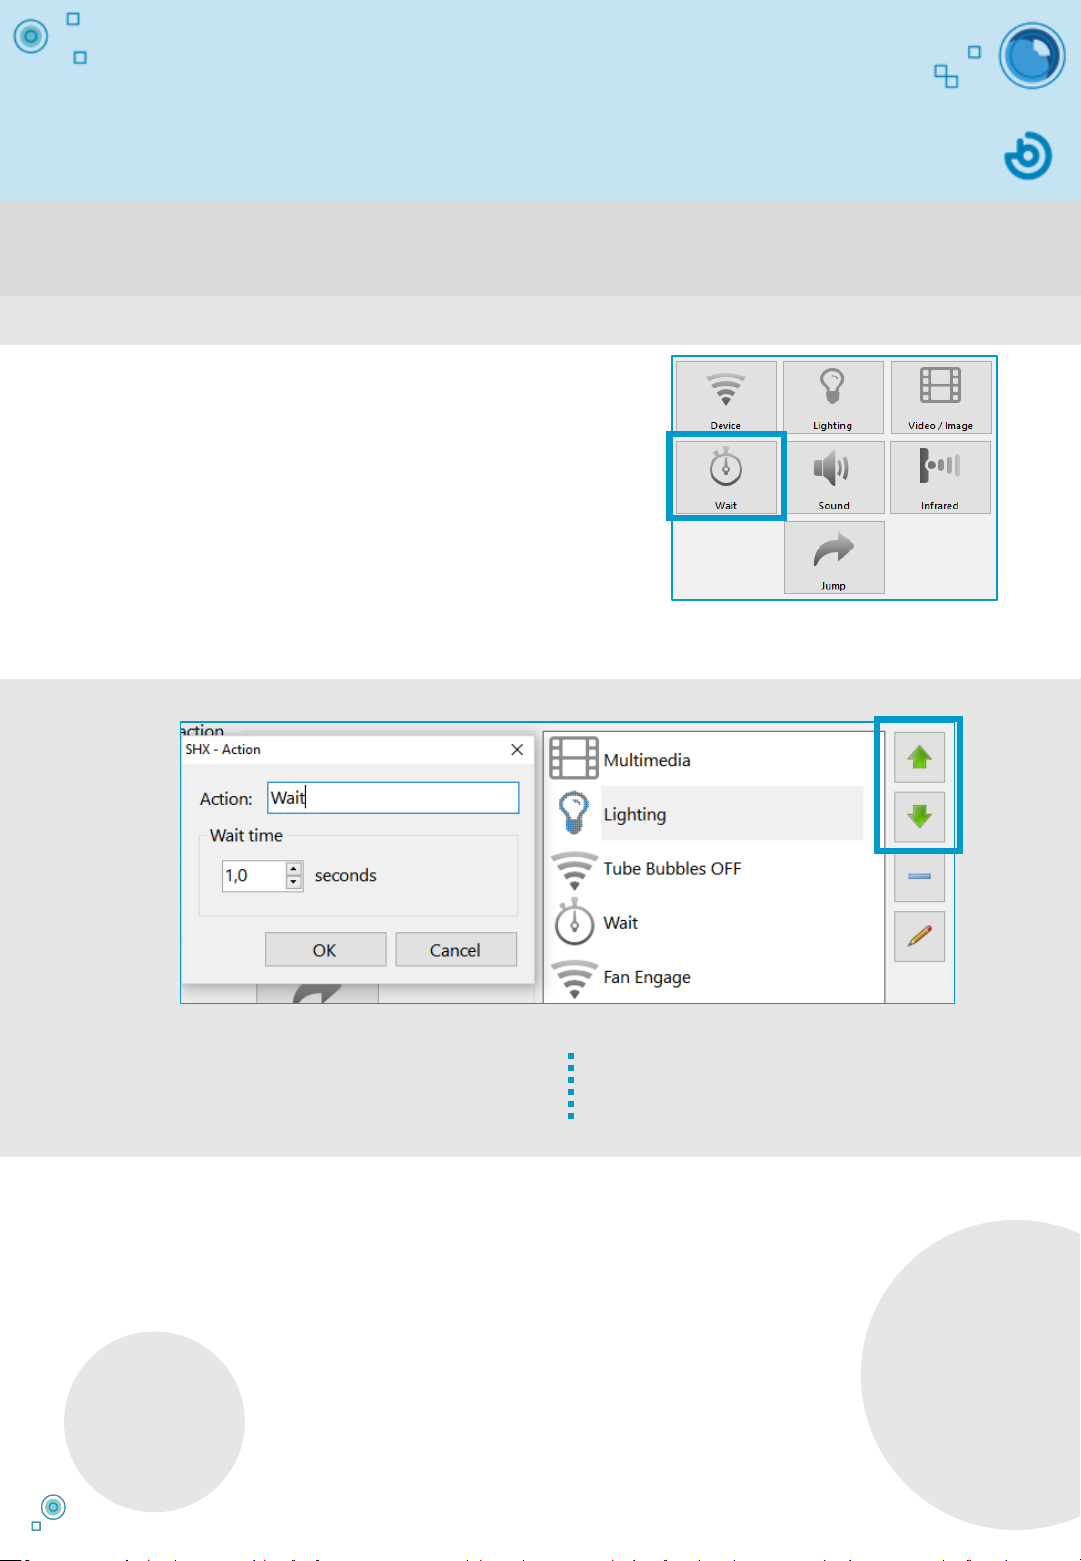
Editing actions: adding pauses
between series of actions
Use the buttons at the side to change
the order of the actions, delete or edit
them.
Sequences of actions can be created and programmed to launch at a
different time with the Wait function.
The Wait function can be used to add pauses
between one action and the next or program
actions to occur at a specific time, such as special
effects during a video projection.
See info sheet: How to access Edit Mode and change the content of a cell.
1. Double-click on a cell to go to the
“Add an action” menu
2. Select Wait by clicking on the cell

Editing actions: controlling
luminous elements
3. Select the device you wish to
control from the list
•White: the device lights up in varying intensities of white
depending on the volume of the noise.
•VU Meter: the color will change from green to red
depending on the volume of the noise.
•Peaks: the light shines white when the noise goes above
a certain level.
•Random: the color changes randomly when the noise
exceeds a certain volume.
Control the color and intensity of the room lighting and luminous devices
with the Lighting function.
4. Select 1 of the 4 lighting modes
•Manual: Select a color. Adjust the transition time for a gradual color change.
•Image activated: The device will light up in the average color of the image being
projected.
See info sheet: How to access Edit Mode and change the content of a cell.
•Audio activated: The device will change color depending on the volume of the noise.
There are four different lighting modes:
The “All” option controls the ambient lighting in the
room (LED strips, LED light bars/panels, etc.) and all
of the luminous devices (bubble tubes, fiber optic
elements, etc.); the “General” option only controls
the ambient lighting.
Select the sound source in the SHX Program
Options menu: microphone or PC output (stereo
mixer).
See info sheet: How to configure the sound
source for the Audio-activated lighting function
•Automatic: The device will change color automatically, following a cycle.
1. Double-click on a cell to go to the
“Add an action” menu
2. Select Lighting by clicking on the cell
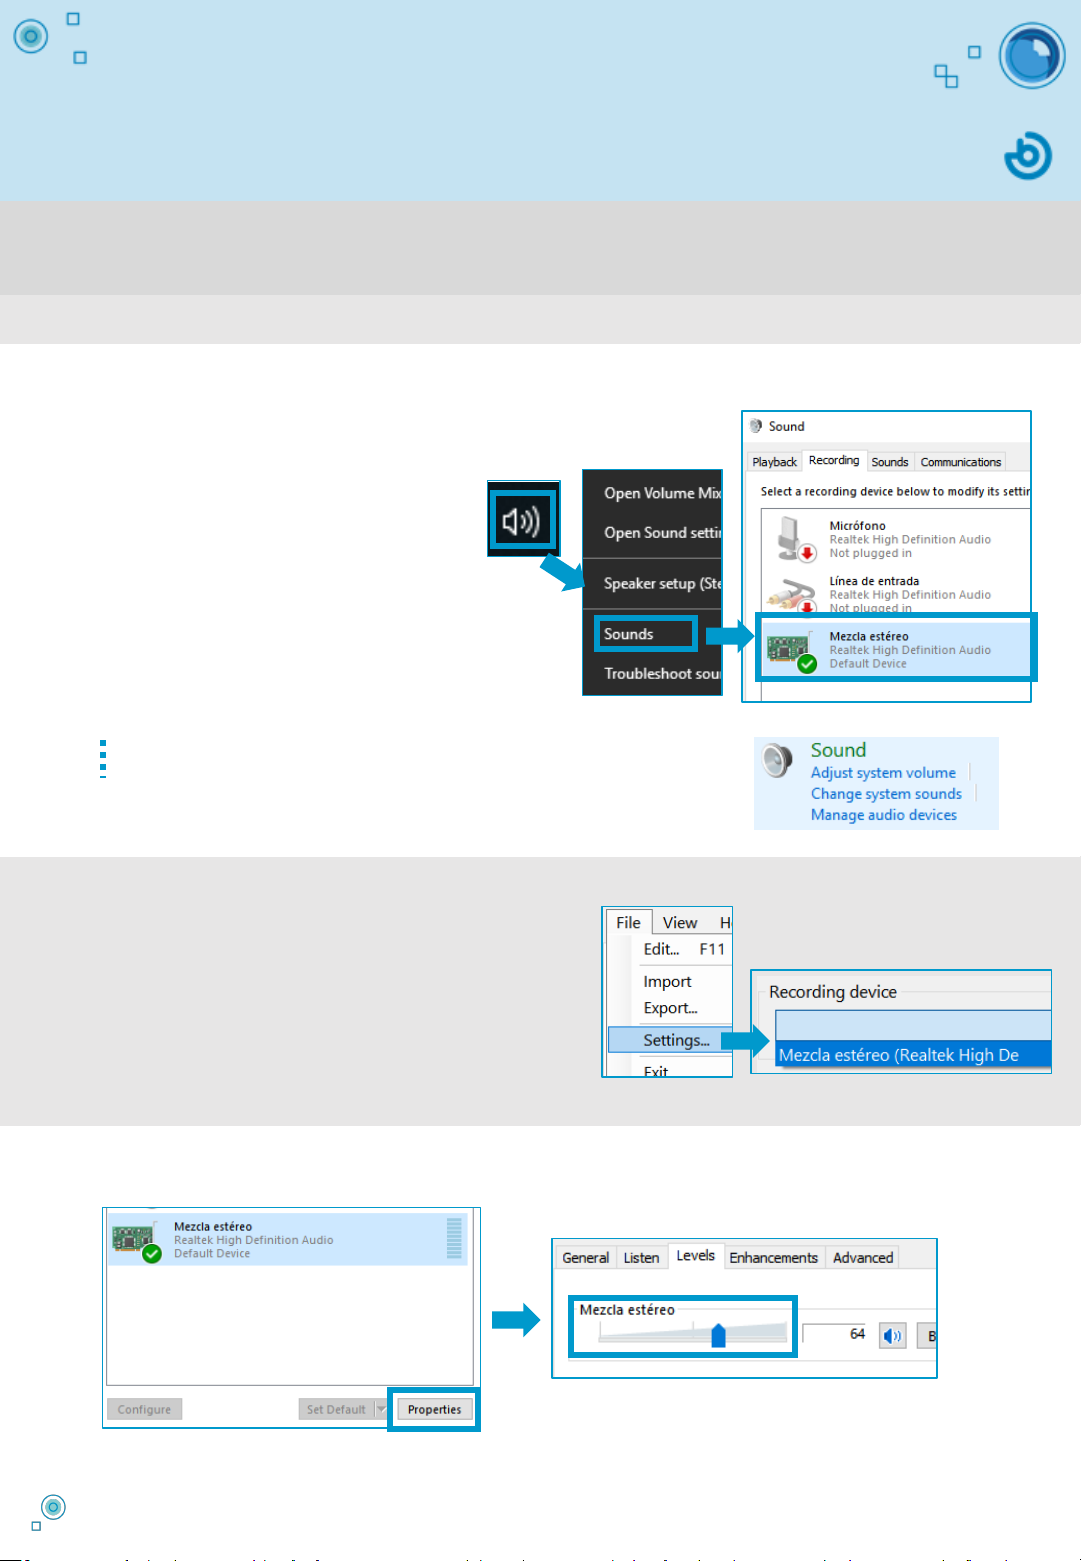
How to enable
audio-activated lighting
You can select the microphone or your PC (stereo mix) as the sound source to
launch lighting effects in the room.
1. Make sure stereo mix is
installed and enabled
This option is not
available on all PCs.
Go into the sound settings in the
Windows control panel to enable the
volume on stereo mix or the
microphone. A simple way of doing this
is to right-click on the microphone icon
at the bottom right of the screen and
select Sound ->Record.
You can also navigate to Start ->
Control Panel -> Sound.
2. Select the sound source in the
SHX Program Settings menu
In the SHX program in the PC, access the sound
source options by navigating to File -> Settings
-> Recording device. Select the desired source
in the drop-down menu: microphone or PC
output (stereo mixer).
You can use the sound settings on your PC to adjust the audio levels to modify the
sensitivity of the lighting effects in the room.
3. Adjust the sound levels
See info sheet: Editing actions: controlling luminous elements
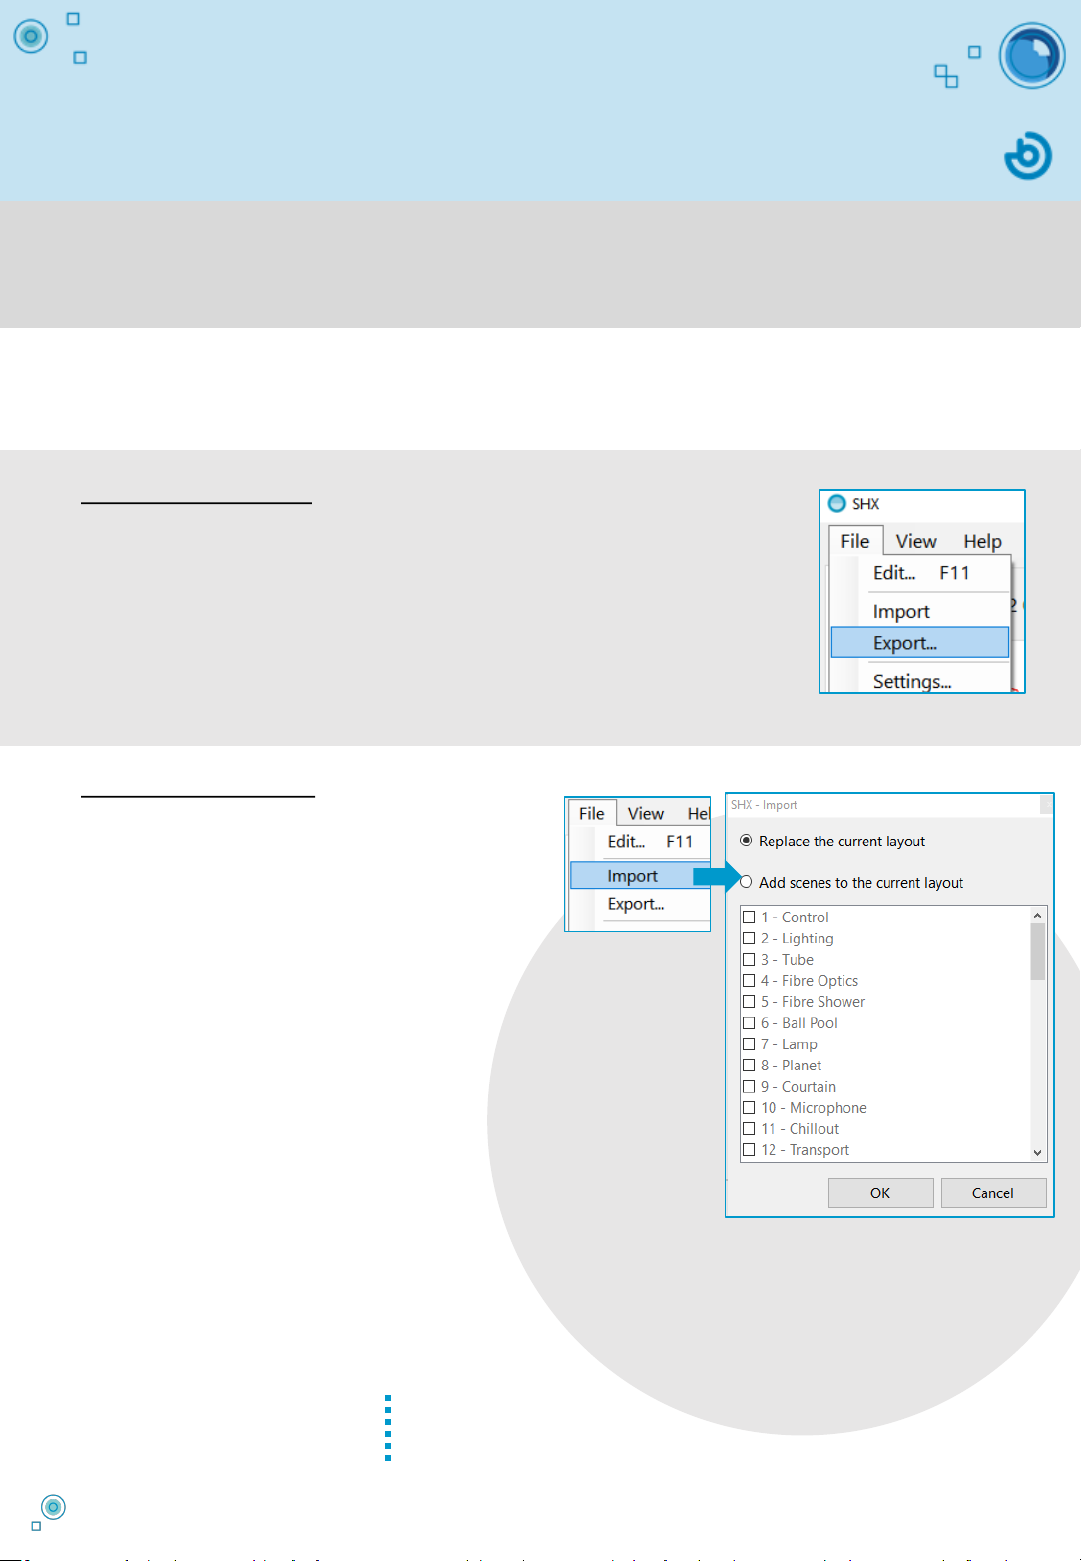
How to import and export SHX
settings
You can create as many settings profiles as you wish, each with personalized
content to suit different purposes and user needs. It is also possible to export
or save series of scenes and import them at any moment.
To export settings:
1. Use the Export option in the File menu
2. Name and save the setting on your PC
Select the desired folder and save the file. The settings will be saved
automatically as a program file with a “.bjx” extension.
To import settings:
1. Use the Import option in
the File menu
Choose between “Replace current settings” and “Add scenes to current settings”. If you select
“Replace current settings”, the new settings will replace the current program settings. If you
select “Add scenes to current settings”, you will be able to select the scenes you wish to
import and add to the current program settings.
4. Select the
desired option
REMEMBER: multimedia files are not stored in the .bjx file. If you
wish to export the settings to another computer, you will need
to copy and store the multimedia files in the same location.
2. Select the .bjx file you wish to import
3. Decide if you wish to select the full
settings profile or only certain scenes
The settings include all the scenes with a specific profile and actions
associated with each cell. Every setting is saved in a file with the .bjx
extension. You can name each file as you wish.
In the SHX program in the PC, access this menu by selecting File ->
Options -> Export...
In the SHX program in the PC, access the
menu by selecting File -> Options -> Import...

How to use SHX with two screens
The SHX System allows multimedia content to be projected with two screens or
projectors in order to create more immersive sensory environments.
1. Adjust the number of
available screens and
define the default screen
Access File->Settings->Video/Image
to select one or two screens for
projecting the multimedia content
(images and videos).
If two screens or projectors are connected to the SHX
System, select which will be the main screen. From now
on, content will be projected there by default, and you
will use it to access the Edit Mode.
Click on “Open Display settings” to see the screen
order and which is the default and secondary screen
on your computer.
2. Select where you want to
project your images and videos
in every multimedia action
See info sheet: Editing actions: adding
multimedia content
You can select and organize your screens in the Windows
screen settings menu. Click on “Identify” to find out which
is nº1 and which is nº2. Then, change the screen order by
dragging them with the mouse.
If you only wish to project on one screen, select “Default” on the Display Settings menu.
If you are using two screens, you can select all screens, the secondary screen, the left or
the right.
Once you have adjusted the number of
screens, you will be able to define how your
content is projected when you edit it.
Check the File menu is
not hidden. Press “ALT”
to show or hide it.
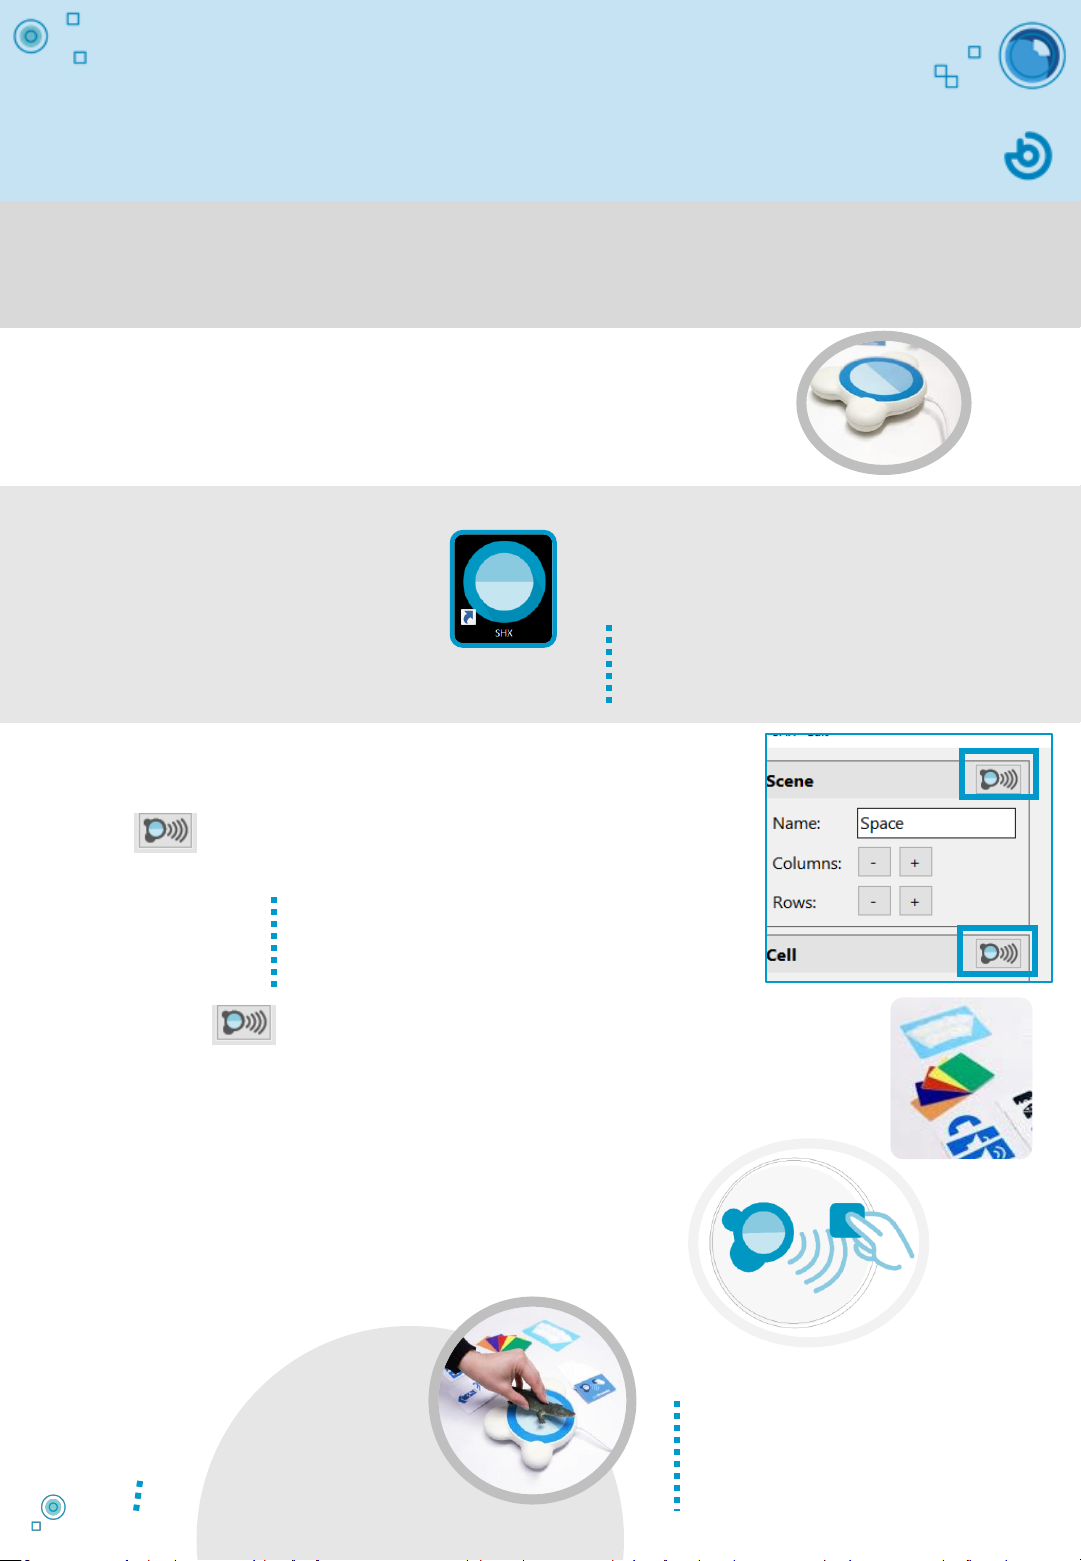
How to use SHX Proximity in
the sensory room
SHX Proximity allows you to interact with the elements in the sensory room
using real, physical objects. Activate the desired content and effects by
moving the cards or stickers close to the SHX Proximity device.
1. Connect the SHX Proximity Device to
a USB port on the PC
2. Open the SHX
program in the PC and
access Edit Mode
3. Select the scene or cell
that you wish to link
with the card or sticker
The icon will allow you to link individual scenes and
cells to SHX cards or stickers.
5. Use the card or sticker to
control the room
See info sheet: How to access
Edit Mode ...
4. Click on the SHX Proximity icon and move
the card or sticker close to the SHX Device
Move the card or object that
has the sticker on it towards
the SHX Device to launch the
effects in the room.
Remember that, in order to create effects, you
need to assign actions to cells beforehand.
See info sheet: Editing actions...
Place a sticker on any object
to make it a controller.
Click on the SHX Proximity icon and place the card or sticker
on the SHX Device. Wait for a few seconds, and when the
recording process has finished, remove the object and click on OK
to confirm the setting.
Use a scene change to adjust the actions of the
controllers (remote control, etc.).
Use a cell change to enable or launch the effects of
different elements in the room.
Use the same procedure to reprogram a
card or sticker as often as you wish. The
special function cards that come SHX
Proximity are protected and cannot be
reprogrammed.
If an error message appears, there is a problem with the
connection. Make sure the reader is correctly connected
and bring the reader and receiver closer together.

How to control the system with a
different tablet
1. Use the tablet to
download and install the
SHX app
To find it, simply type SHX BJLive! into
Google Play or the App Store.
Both Android and iOS tablets can be connected to the SHX system.
2. Adjust the WiFi settings on the tablet or PC
The tablet and PC (SHX server) must be connected to the same wireless network in order for
the system to work correctly.
The SHX System is programmed to create an internal wireless network (without internet
connection). To do so, enter the SSID (the default is MultisensorialSHX) and the password
provided.
In the SHX program in the PC, access
the server application menu by
selecting File -> Settings, Remote app -
> Settings...
4. Enter the tablet IP address
This can be done in 2 different ways from the Settings menu in the SHX app:
We recommend deleting other wireless
networks from the device to avoid it connecting
to them automatically.
Check the File menu is not hidden.
Press “ALT” to show or hide it.
1. Enter the IP
manually
2. Scan the QR
code
3. Find the SHX server’s IP address on the PC
Remember that, in order for the other room controls to work correctly, the tablet must
have the “Set scene on the server” option selected.
111.111.0.15
111.111.0.15

SHX Rack
4
5
How to close the SHX System
1. Press the SHX app OFF button
This way, you will switch off all the devices in the
room. It will be impossible later!
When the activity has finished, follow these steps to switch off the devices
and close the SHX system in the room.
2. Close the SHX program in the PC
3. Select the Shut
Down option on the
Windows menu.
4. Switch off the SHX Vibroacoustic Amplifier
5. Switch off the SHX Device
6. Switch off the tablet
and put it on charge
8. Switch off the SHX
Controller and Die to save
battery power
7. Switch off the projector,
television or monitor
ON/OFF
ON/OFF
ON/OFF
Vibration
Sound
sound
31
2
vibration
This manual suits for next models
8
Table of contents
Popular Toy manuals by other brands

hand2mind
hand2mind Number Line Clock Activity guide

TILLIG BAHN
TILLIG BAHN BR 112.1 manual

Playskool
Playskool Around Town Activity Center 06032 instructions

Xray
Xray t1m instruction manual

Eduard
Eduard Zoom P-40N seatbelts STEEL quick start guide

Enabling Devices
Enabling Devices Sing Along CD Player user guide


