BKI GO-36 User manual

Revised 2/22/2018
SS-OM-057.01
Series: GO
Operation Manual
Half-Size Cook & Hold
Oven Series

SS-OM-057.01 11/10/16
KI LIMITED WARRANTY
2812 Grandvie Dr. • Simpsonville, SC 29680 • USA
(864) 963-3471 • Toll Free: (800) 927-6887 • Fax: (864) 963-5316
WHAT IS
COVERED
This warranty covers defects in material and workmanship under normal use, and applies
only to the original purchaser providing that:
អ
T
he equipment has not been accidentally or intentionally damaged, altered or misused;
អ
The equipment is properly installed, adjusted, operated and maintained in accordance
with national and local codes, and in accordance with the installation and operating
instructions provided with this product.
អ
The serial number rating plate affixed to the equipment has not been defaced or
removed.
WHO IS
COVERED
This
warranty
is
extended
to the original
purchaser
and applies only
to
equipment
purchased
for use in the U.S.A.
COVERAGE PERIOD
អ
Warranty claims must be received in writing by KI within one (1) year from
date of installation or within one (1) year and three (3) months from data of
shipment from the factory, whichever comes first.
អ
CO Models: One (1) Year limited parts and labor.
អ
COM Models: Two (2) Year limited parts and labor. COM convection ovens also have a
two (2) year door warranty.
អ
CO1 Models: Two (2) Year limited parts and labor. Five (5) Year limited door
warranty.
អ
Warranty period begins the date of dealer invoice to customer or ninety (90) days
after shipment date from KI, whichever comes first.
WARRANTY COVERAGE
This
warranty
covers on-site labor, parts and
reasonable
travel
time
and travel
e
xpenses
of the
authorized
service
representative
up
to
(100) miles
round
trip and (2)
hours
travel time and
performed
during
regular,
weekday
business
hours.
EXCEPTIONS
Any exceptions must be pre-approved in advance and in writing by KI. The extended
door warranty on convection ovens years 3 through 5 is a parts only warranty and does not
include labor, travel, mileage or any other charges.
EXCLUSIONS
អ
Negligence
or acts of
God,
អ
Thermostat
calibrations
after (30) days
from
equipment
installation
date,
អ
Air and g
as
adjustments,
អ
Light
bulbs,
អ
Glass doors and
door
adjustments,
អ
Fuses,
អ
Adjustments
to
burner
flames and
cleaning
of
pilot
burners,
អ
Tightening
of screws
or
fasteners,
អ
Failures
caused
by erratic
voltages
or gas
suppliers,
អ
Unauthorized
repair by
anyone
other
than
a KI F
actory
Authorized
Service Center,
អ
Damage
in
shipment,
អ
Alteration,
misuse or
improper
installation,
អ
Thermostats
and safety valves with
broken
capillary tubes,
អ
Freight
–
other
than
normal UPS charges,
អ
Ordinary
wear and
tear,
អ
Failure to follow
installation
and/or
operating
instructions,
អ
Events
beyond
control
of the
company.
INSTALLATION
Leveling, as well as
proper
installation
and check out of all
new
equipment
-
per
appropriate installation
and use materials – is t
he
responsibility of the
dealer
or
installer, not the
manufacturer.
REPLACEMENT PARTS
KI
genuine
Factory OEM parts receive a (90) day
materials
warranty
effective from the
date of
installation
by a KI F
actory
Authorized
Service
Center.

Gourmet Oven Table of Contents
1
Table of Contents
Table of Contents ..................................................................................................................... 1
Introduction .............................................................................................................................. 2
Safety Precautions .................................................................................................................................... 2
Safety Signs and Messages ................................................................................................................. 2
Safe Work Practices ............................................................................................................................. 3
Safety Decals ....................................................................................................................................... 4
Health and Sanitation Practices................................................................................................................ 4
Food Handling ...................................................................................................................................... 5
Storage of Raw Meats .......................................................................................................................... 5
Coding Cooked Foods .......................................................................................................................... 5
Storage of Prepared Foods .................................................................................................................. 5
Operation .................................................................................................................................. 6
Controls and Indicators ............................................................................................................................. 6
Hardware Controls................................................................................................................................ 6
CP0066 Analog Controller ........................................................................................................................ 7
Configuring the CP0066 Controller ...................................................... Error! Bookmark not defined.
CP0066 Recipe Editing ........................................................................................................................ 7
Cooking with the CP0066 Controller .................................................................................................... 7
CP0065 Color Touch Screen Controller ................................................................................................... 9
Configuring the CP0065 Controller ...................................................................................................... 9
Changing Access Code ...................................................................................................................... 11
Importing Recipe & Configuration Files .............................................................................................. 11
Exporting Recipe, Configuration and History Files ............................................................................. 11
Exporting Recipe, Configuration and History Files (continued) ......................................................... 12
Setting the Clock ................................................................................................................................ 12
Viewing the Error and Event History File ........................................................................................... 12
Cooking with the CP0065 Controller .................................................................................................. 13
Optional Wood Smoker ........................................................................................................................... 15
Installation ...............................................................................................................................16
Unpacking and Handling ......................................................................................................................... 16
GO-36 Stacking Instructions ................................................................................................................... 16
Location and Clearance .......................................................................................................................... 17
Extraction ................................................................................................................................................ 17
Wiring ...................................................................................................................................................... 17
General Guidelines ............................................................................................................................. 17
Maintenance ............................................................................................................................19
Scheduled Maintenance ......................................................................................................................... 19
Oven Cleaning (Daily) ........................................................................................................................ 19
Troubleshooting ...................................................................................................................................... 22
CP0065 Controller Warnings .............................................................................................................. 22
Wiring Diagram .......................................................................................................................23
GO-36 & GO-36S ................................................................................................................................... 23
GO-36C & GO-36CS .............................................................................................................................. 24
Notes ........................................................................................................................................25
BKI Worldwide, Inc. is a wholly owned subsidiary of Standex International Corporation.

Gourmet Oven Introduction
2
Introduction
Thank you for your purchase of a BKI® GO-36 series cook and hold oven.It consists of a cooking cabinet,
door assembly and control unit. The cooking cabinet contains rack supports that hold 4 racks and 1 drip
pan. To seal the oven cavity, a door with a magnetized door latch is provided. The control unit contains
heating elements for cooking as well as a time/temperature computer and manual switches for quick
setup and operation. It also contains a fan for cooling and a blower for heat circulation.
The BKI name assures you of the finest in design and engineering -- that it has been built with care and
dedication -- using the best materials available. Attention to the operating instructions regarding proper
installation, operation, and maintenance will result in long lasting dependability to insure the highest
profitable return on your investment.
PLEASE READ THIS ENTIRE MANUAL EFORE OPERATING THE UNIT. If
you have any questions, please contact your KI Distributor. If they are unable to
answer your questions, phone the applicable KI Technical Services Department:
BKI North America: (864) 963-3471
Safety Precautions
Always follow recommended safety precautions listed in this manual. elow is the safety alert symbol.
When you see this symbol on your equipment, be alert to the potential for personal injury or property
damage.
Safety Signs and Messages
The following Safety signs and messages are placed in this manual to provide instructions and identify
specific areas where potential hazards exist and special precautions should be taken. Know and
understand the meaning of these instructions, signs, and messages. Damage to the equipment, death or
serious injury to you or other persons may result if these messages are not followed.
This message indicates an imminently hazardous situation, which, if not avoided,
will result in death or serious injury.
This message indicates a potentially hazardous situation, which, if not avoided,
could result in death or serious injury.
This message indicates a potentially hazardous situation, which, if not avoided,
may result in minor or moderate injury. It may also be used to alert against unsafe
practices.
This message is used when special information, instructions or identification are
required relating to procedures, equipment, tools, capacities and other special
data.

Gourmet Oven Introduction
3
Safe Work Practices
Wear Safe Clothing Appropriate To Your Job
Always wear your insulated mitts when handling hot racks or touch any hot
metal surface. If you lose or damage your mitts, you can buy new ones at
your local restaurant equipment supply store or from your local KI
Distributor.
Never wear loose clothing such as neckties or scarves while operating this
equipment. Keep loose hair tied back or in a hair net while operating this
equipment.
Always wear appropriate personal protection equipment during the cleaning
process to guard against possible injury from hot cleaning solution.
Be are of High Voltage
This equipment uses high voltage. Serious injury can occur if you or any
untrained or unauthorized person installs, services, or repairs this
equipment. Always use an Authorized Service agent to service your
equipment.
Keep this manual ith the Equipment
This manual is an important part of your equipment. Always keep it near for
easy access.
If you need to replace this manual, contact:
BKI North America: (864) 963-3471
Protect Children
Keep children away from this equipment. Children may not understand that
this equipment is dangerous for them and others.
NEVER allow children to play near or operate your equipment.
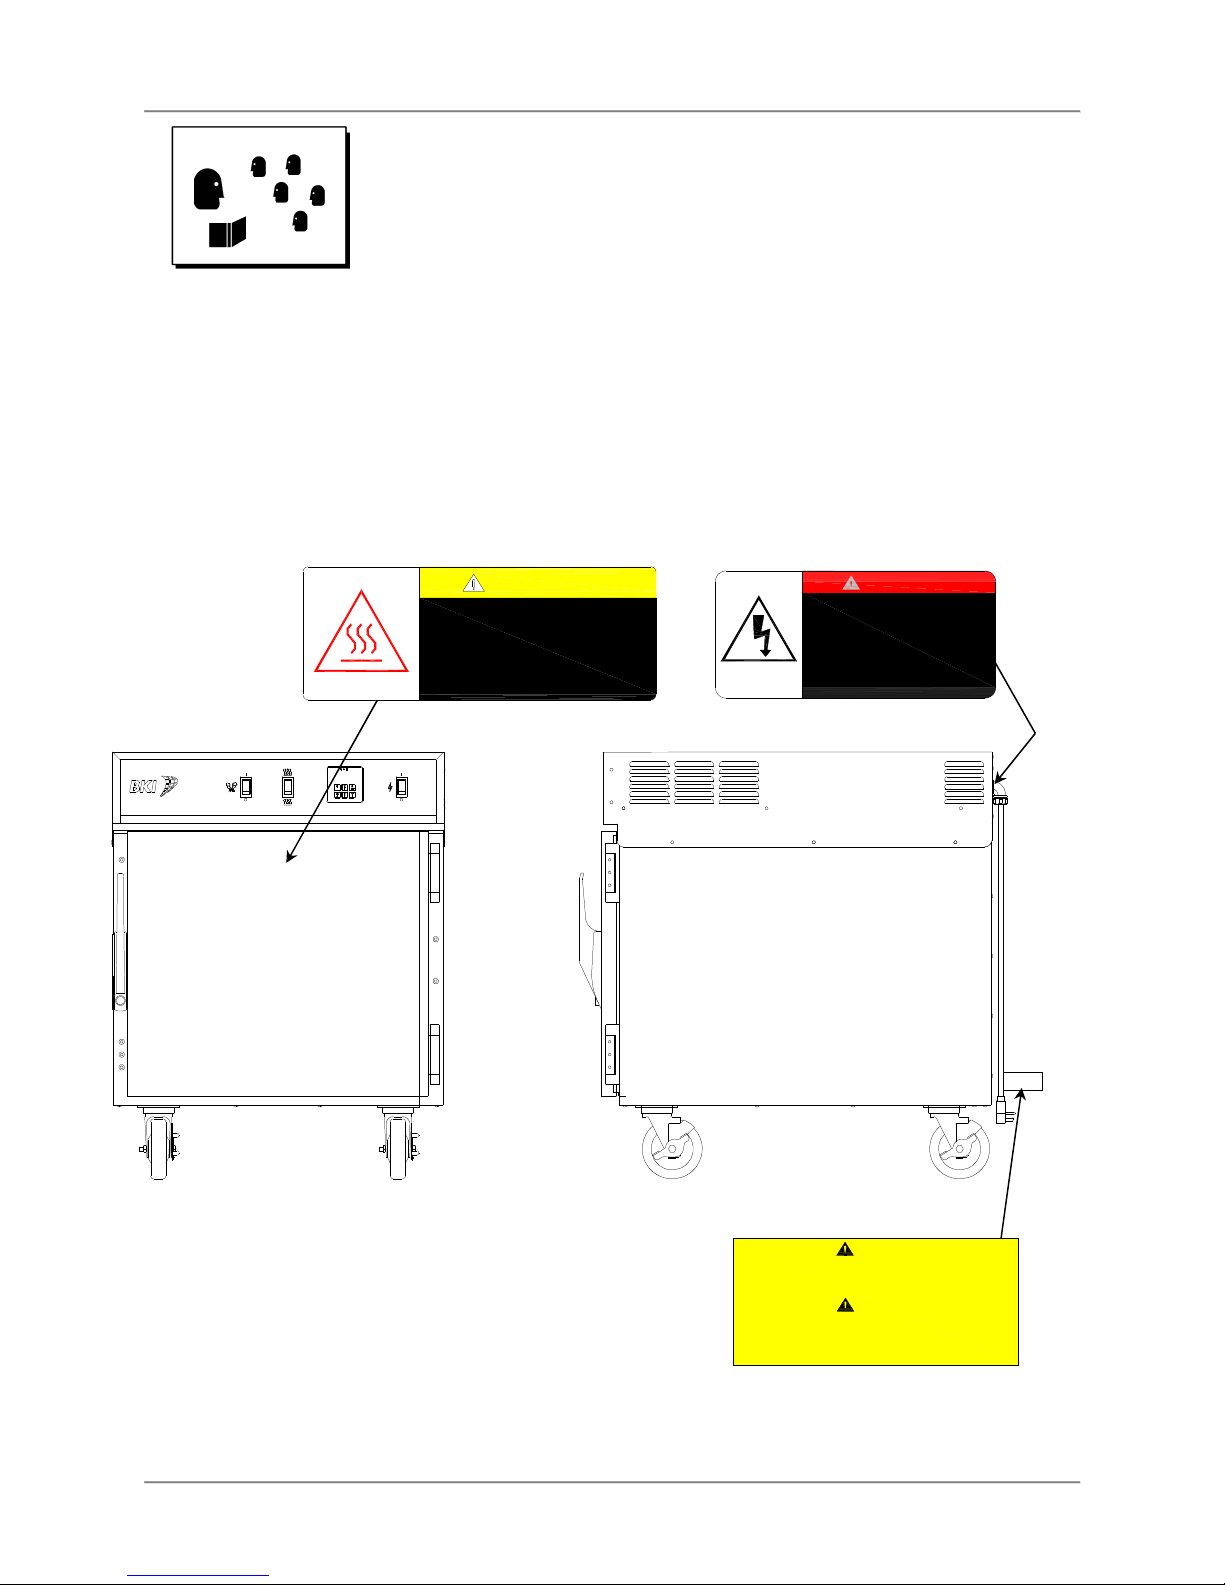
Keep Safety Labels Clean and in Good Condition
Do not remove or cover any safety labels on your equipment. Keep all safety
labels clean and in good condition. Replace any damaged or missing safety
labels. Refer to the Safety Labels section for illustration and location of
safety labels on this unit.
If you need a new safety label, obtain the number of the specific label
illustrated on page 4, then contact:
BKI North America: (864) 963-3471
Be Prepared for Emergencies
e prepared for fires, injuries, or other emergencies.
Keep a first aid kit and a fire extinguisher near the equipment. You must use
a 40-pound Type C fire extinguisher and keep it within 25 feet of your
equipment.
Keep emergency numbers for doctors, ambulance services, hospitals, and
the fire department near your telephone.
Gourmet Oven Introduction
4
Kno your responsibilities as an Employer
• Make certain your employees know how to operate the equipment.
• Make certain your employees are aware of the safety precautions on the
equipment and in this manual.
• Make certain that you have thoroughly trained your employees about
operating the equipment safely.
• Make certain the equipment is in proper working condition. If you make
unauthorized modifications to the equipment, you will reduce the function
and safety of the equipment.
Safety Decals
Electrical Grounding Instructions
- This appliance is equipped with a
three-prong (grounding) plug for your protection against shock hazard and should be
plugged directly into a properly grounded three-prong receptacle. Do not cut or
remove the grounding prong from this plug.
Mise à la terre
- Cet appareil est pourvu d’une fiche à trois broches dont une
mise à la terre assurant une protection contre les chocs électriques. La prise dans
laquelle elle est branchée doit être correctement mise à la terre. Ne pas couper ni
enlever la broche de mise à la terre de la fiche.
CAUTION
AVERTIR
DO NOT COVER or REMOVE THIS LA EL NE RECOUVREZ PAS ou ENLEVEZ PAS CETTE ÉTIQUETTE
DANGER
HIGH VOLTAGE.
Turn power off before
servicing. May have more than
one disconnect switch.
HAUTE TENSION.
Mettez l'appareil hors tension avant
de proceder a l'entretien. Peut-etre
d'u commutateur de deconnexion.
Hot surface can cause
CAUTION
severe burns.
La surface Chaude peut
causer des brulures severes.
Ne pas toucher.
Do not touch.
N0645

Gourmet Oven Introduction
5
Health and Sanitation Practices
BKI® ovens are manufactured to comply with health regulations and are tested and certified to UL
, CUL
, and NSF
standards. You must operate the equipment properly using only quality products and use
meat thermometers to insure meats are thoroughly cooked.
Food Handling
•Wash hands thoroughly in warm, soapy water after handling raw poultry or meats.
•Clean and sanitize all utensils and surfaces that have been in contact with raw products.
•Never place cooked meats on the same surfaces used to prepare raw meats, unless the area
has been thoroughly cleaned and sanitized.
Storage of Ra Meats
•Designate an area or shelf strictly for the storage of all raw meats to be used in the oven.
•Raw product must always be stored at temperatures below 38° F. (3° C.).
•Never store or mix raw foods above cooked foods, as this is a health hazard. The drippings from
raw foods contaminate cooked or processed foods.
•All chicken and chicken parts to be stored overnight must be thoroughly iced down and
refrigerated.
Coding Cooked Foods
All products cooked during the day should be sold the same day.
NOTE: It is not the intent of the cooking program to have unsold merchandise at the end of the cooking
day. Follow your company’s procedures for the handling of any leftover product.
Storage of Prepared Foods
•Cold foods should be kept at or below 38° F. (3° C.).
•Hot foods must be maintained to meet local health codes, usually a minimum 145° F. (63° C.).

Gourmet Oven Operation
6
P C H
2 13
4
O
I
O
I
Operation
Controls and Indicators
Hard are Controls
Item #
Description
Function
1
Main Power Switch
Turns power to the entire unit on or off. When placed in the on position [I], the
controller is powered, the fans operate and the optional smoker can be
operated. When placed in the off position [O], power is removed from the
entire unit.
2
Cooking Controller Used for operation and programming of the oven. The standard analog
controller features 6 programmable recipes with preheat, cook and hold
stages. The optional touch screen controller feature 15 programmable recipes
with preheat, multiple cook and hold stages.
3
Power Level
Selector Switch
Controls the heat output of the oven. In the high position (upper) the ovens
heats at the maximum rate. In the low position (lower) the oven heats at a
slower rate.
4
(Optional) Smoker
Power Switch
When the main power switch is on, this switch turns power on [I] or off [O] to
the optional wood smoke heater in the oven cavity.

Gourmet Oven Operation
7
P C H
CP0066 Controller
CP00 Analog Controller
CP0066 Recipe Editing
With the oven Main Power Switch in the On position, press and hold the
[3
SET
] button for two or three seconds until the controller chirps twice.
Release the button and the controller will display Edit .
Select the recipe to edit by pressing one of the six buttons. The controller
now displays the Preheat Temperature for that recipe and the indicator
below the P above the display is illuminated. Set the desired Preheat
Temperature as detailed below. If the Preheat Temperature is set below
150F, the controller will display OFF and the Preheat stage is disabled.
Next the Cook Temperature is displayed and the indicator below the C above the display is illuminated.
Set the desired Cook Temperature value and press the [3
SET
] button to advance to the Cook Time. The
Cook Time is displayed in hours and minutes.
After pressing the [3
SET
] button to accept the Cook Time, the value for the Hold Temperature is displayed
and the indicator below the H above the display is illuminated. Set the Hold Temperature to the desired
value. If the Hold Temperature is set below 150F, the controller will display OFF and the Hold stage is
disabled.
Press and hold the [3
SET
] button for two or three seconds until the controller chirps twice. The recipe is
now saved and the controller will return to operating mode.
Cooking ith the CP0066 Controller
Move the Main Power Switch to the On position and the controller displays OFF . In this state the
controller is ready to cook.
Cooking a Recipe ith Preheat
To Preheat the oven press one of the six buttons. The oven will begin preheating and the indicator below
the P above the display will illuminate. The display will cycle between PreH and XXX° (the recipe
preheat temperature).
When the oven reaches the preheat temperature, the controller will sound an alarm for 5 seconds and the
controller will display rdY .
Load the food product into the oven, close the oven door and touch the [3
SET
] button to start the Cook
stage. The oven will begin cooking and the indicator below the C above the display will illuminate. The
display will cycle between cX:XX (the remaining cook time) and XXX° (the recipe cook temperature).
At the completion of the cook stage the control will sound an alarm and the display will flash donE . If
there is no Hold programmed the controller will return to the ready state and display OFF .
If there is a Hold temperature programmed the controller will maintain the programmed hold temperature
and a count-up timer will start. The controller display will cycle through XXX° (the recipe hold
temperature), X:XX (the elapsed hold time) and hold .
After the food product has been removed from the oven press and hold the [3
SET
] button for two or three
seconds until the controller chirps twice. The controller will return to the ready state and display OFF .
NOTE: To stop a cook recipe at any point press and hold the [3
SET
] button for two or three seconds until
the controller chirps twice.
Changing Recipe Values
eginning with the right-most digit, press the [4◄] or [6►] buttons to highlight the digit to be edited.
Press the [2▲] or [5▼] buttons to increase or decrease that digit to the desired value.
Once all of the digits are set to the desired value press the [3
SET
] button to save that values and advance
to the next recipe item.

Gourmet Oven Operation
8
Cooking a Recipe ithout Preheat
Press one of the six buttons to select a recipe. The controller will display rdY .
Load the food product into the oven, close the oven door and touch the [3
SET
] button to start the Cook
stage. The oven will begin cooking and the indicator below the C above the display will illuminate. The
display will cycle between cX:XX (the remaining cook time) and XXX° (the recipe cook temperature).
At the completion of the cook stage the control will sound an alarm and the display will flash donE . If
there is no Hold programmed the controller will return to the ready state and display OFF .
If there is a Hold temperature programmed the controller will maintain the programmed hold temperature
and a count-up timer will start. The controller display will cycle through XXX° (the recipe hold
temperature), X:XX (the elapsed hold time) and hold .
After the food product has been removed from the oven press and hold the [3
SET
] button for two or three
seconds until the controller chirps twice. The controller will return to the ready state and display OFF .
NOTE: To stop a cook recipe at any point press and hold the [3
SET
] button for two or three seconds until
the controller chirps twice.
Gourmet Oven Operation
9
CP00 5 Color Touch Screen Controller
Configuring the CP0065 Controller
Configuration Access
Touch and hold the
lower right portion of the
screen until the control
chirps twice.
The area on the control screen is black. The
red graphic in this diagrams indicates the
area to touch and hold.
Enter your access code.
Touch [X] to exit and
return to Main Recipe
screen.
[Delete] clears the last character.
[Clear] clears all characters.
The default Supervisor access code is 1234.
Use the default code the first time the
Configuration is accessed.
The access code can be changed after initial
access to configuration (recommended).
Write the new access code below and keep
this manual where only supervisors have
access to it.
Access Code ___________________
Use the screen keypad to enter the access
code then touch [ENTER].
Supervisor level
configuration screen is
displayed.
Touch [X] to exit and
return to Main Recipe
screen.
The supervisor has access to change
Recipes, change the Access Code, Set the
Clock, Import or Export recipes and
configurations or view the control History.
Touch the desired function button and follow
the configuration instructions below.
Recipe Editing
Touch and highlight the
desired recipe.
Touch [EDIT].
Touch [X] to exit and
return to Supervisor
Access screen.
There are 15 programmable recipes in the
control. Touch [▲] or [▼] to scroll through
the list.
Touch and highlight the recipe name in the
selection window. Touch [EDIT].
Touch and highlight the
desired Recipe Item.
Touch [EDIT].
Touch [X] to exit and
return to Select Recipe
screen.
Touch and highlight the Recipe Item to be
edited in the selection window. Touch
[EDIT].
Once all changes have been made you must
touch [SAVE] to store the recipe revisions.
X

Gourmet Oven Operation
10
Recipe Editing (continued)
Edit Recipe Name.
Touch [SAVE].
Touch [X] to exit and
return to Select Item
screen.
Edit the Recipe Name using the alpha-
numeric keyboard. Recipe Names are limited
to a maximum of 14 characters.
Touch [SAVE] to save the new Recipe Name
and return to the Select Item screen.
[Clr] – Clears the editing box of all characters.
[Rst] – Restores the original recipe name.
[Space] – Adds a space character at the end.
[Del] – Deletes the last character.
Edit Recipe Items.
Touch [SAVE].
Touch [X] to exit and
return to Select Item
screen.
All Recipe Items (Preheat, Cook and Hold)
are edited in this screen. Touch [<<] and [>>]
to move between the Recipe Items.
The value field active for editing has a red
background. Touch the inactive field to make
it active for editing.
The Preheat and Hold items only have a
temperature value. The time field for these
items is greyed out and not selectable.
Use the dial on the right of the screen or the
[+] and [-] buttons to change the value.
To turn the Cook Cycle 2, Cook Cycle 3 or
Hold segments Off, set the temperature value
below 150F.
Touch [SAVE] to save the new values before
moving to the next Recipe Item.
Return to the Select
Item screen.
Touch [SAVE] to save
Recipe.
Touch [X] to exit and
return to Select Recipe
screen.
After Recipe editing is complete, touch [X] on
the Recipe Item screen above to return to the
Select Item screen.
You must touch [SAVE] to store the recipe
revisions.
Touch and highlight
another Recipe.
Touch [EDIT].
or
Touch [X] to exit and
return to Supervisor
Access screen.
Touch and highlight another Recipe name in
the selection window. Touch [EDIT].
or
Touch [X] to return to the Supervisor Access
screen if you are done editing Recipes.

Gourmet Oven Operation
11
Changing Access Code
Supervisor level
configuration screen is
displayed.
Touch [X] to exit and
return to Main Recipe
screen.
Touch [Chg Code].
Enter new Access
Code.
Touch [ENTER].
Touch [X] to exit and
return to Supervisor
Access screen.
[Delete] clears the last character.
[Clear] clears all characters.
Use the screen keypad to enter the new
4 digit Access Code.
Touch [ENTER].
Record the new Access Code in the area
provided in the Configuration Access section
of this manual.
Once the new Access Code is entered the
old code will not provide configuration
access.
Importing Recipe & Configuration Files
Supervisor level
configuration screen is
displayed.
Touch [X] to exit and
return to Main Recipe
screen.
Supervisor Access gives the ability to Import
Recipe and Configuration files from a US
flash drive.
Touch [Import].
Insert US Drive.
Touch [Read Recipes]
and/or [Read Config].
Touch [X] to exit and
return to Supervisor
Access screen.
Insert the US flash drive into the US port
located on the back of the controller. The
message line will change to read “Drive
Inserted” and the [Read Recipes] and
[Read Config] buttons will become active.
Touch [Read Recipes] and/or [Read Config]
to upload the files to the control.
Remove the US drive when finished and the
control will return to the Supervisor Access
screen.
Exporting Recipe, Configuration and History Files
Supervisor level
configuration screen is
displayed.
Touch [X] to exit and
return to Main Recipe
screen.
Supervisor Access gives the ability to Export
Recipe, Configuration and History files to a
US flash drive.
Touch [Export].

Gourmet Oven Operation
12
Exporting Recipe, Configuration and History Files (continued)
Supervisor level
configuration screen is
displayed.
Touch [X] to exit and
return to Main Recipe
screen.
Insert the US flash drive into the US port
located on the back of the controller. The
message line will change to read “Drive
Inserted” and the [Save Recipes], [Save Config]
[Save History] buttons will become active.
Touch [Save Recipes], [Save Config] and/or
[Save History] to download the files to the US
drive.
Remove the US drive when finished and the
control will return to the Supervisor Access screen.
Setting the Clock
Supervisor level
configuration screen is
displayed.
Touch [X] to exit and
return to Main Recipe
screen.
The control has a real time clock that will
maintain the current date and time for up to
7 days with no power. This information is
used for the error and event history log.
Touch [Set Clock].
Touch value and
change using [+] and [-]
buttons.
Touch [SAVE] to save
and return to Supervisor
Access screen.
Touch and highlight the value below the item
to be changed. Use the [+] and [-] buttons to
change the item to the desired value.
To change the am/pm setting simply touch
that value to toggle between am and pm.
Touch [SAVE] to save the changes. The
control will return to the Supervisor Access
screen.
Vie ing the Error and Event History File
Supervisor level
configuration screen is
displayed.
Touch [X] to exit and
return to Main Recipe
screen.
Supervisor Access gives the ability to view
the controls History log. The log includes the
total numbers of operating hours, the total
number of cooking hours and all event and
error messages.
Touch [History].
Controller History
screen is displayed.
Touch [SAVE] to save
and return to Supervisor
Access screen.
Total: the total number of hours the control
has been turned on.
Cook: the total number of hours the control
has been cooking (includes preheat).
Touch [▲] or [▼] to scroll through the list of
trackable events and errors. The date, time
and a descriptive string are displayed for
each event. A list of the errors and events
follows in this manual
.
Gourmet Oven Operation
13
Cooking ith the CP0065 Controller
Vie a Recipe
Touch and highlight
desired recipe.
Touch [VIEW].
There are up to 15 recipes programed in the
control. Touch [▲] or [▼] to scroll through
the list.
Touch and highlight the recipe name in the
selection window. Touch [VIEW].
Touch [X] to return to
the Main Recipe screen.
The summary screen for the recipe selected
is displayed. The screen displays the
Preheat temperature setting, the Cook time
and temperature for each cook segment and
the Hold temperature.
Any stage labeled “off” is disabled in the
recipe.
Cooking a Recipe
Touch and highlight the
desired recipe.
Touch [COOK].
There are up to 15 recipes programed in the
control. Touch [▲] or [▼] to scroll through
the list.
Touch and highlight the recipe name in the
selection window. Touch [COOK].
Touch [PREHEAT] or
[COOK].
Touch [PREHEAT] to heat the oven to the
programmed preheat temperature.
Touch [COOK] to begin the first cook
segment without preheating the oven.
It is recommended to always preheat the
oven before starting to cook.
Touch [T] at any point to view the actual oven
cavity temperature. The temperature will be
displayed for 10 seconds.
Preheating screen is
displayed.
To exit the cook recipe
touch and hold [X] until
the control chirps twice.
The preheating screen for the recipe is
displayed.
The programed preheat temperature is
displayed at the bottom of the screen. Touch
[T] at any point to view the actual oven cavity
temperature. The oven cavity temperature
will be displayed for 10 seconds.

Gourmet Oven Operation
14
Cooking a Recipe (continued)
LOAD OVEN screen is
displayed.
To exit the cook recipe
touch and hold [X] until
the control chirps twice.
When the oven reaches the programed
preheat temperature the LOAD OVEN
screen is displayed.
The control will emit an audible alarm for 5
seconds and the screen background will
alternate between green and blue.
efore loading the oven touch the large
[LOAD OVEN] button.
Load the oven.
Touch the large [START
COOK] button to begin
cooking.
The START COOK screen is displayed.
The screen background will alternate
between green and blue until the large button
is touched.
To beginning cooking, close the oven door
and touch the large [START COOK] button.
Main cooking screen is
displayed.
To exit the cook recipe
touch and hold [X] until
the control chirps twice.
The main cooking screen is displayed while
the cook in in progress.
The Time displayed is the time remaining in
the active cook segment. The progress bar
shows the progress through the sum of all of
the programed cook segment times.
The Temperature display is the programed
temperature for the active cook segment.
Touch [T] at any point to view the actual oven
cavity temperature. The oven cavity
temperature will be displayed for 10 seconds.
Touching [Ex] will add the preset extra time
(typically 5 minutes) to the active cook
segment.
End of Cooking
End of Cooking ithout Hold
On completion of the last cook
segment the [ EEP] button will
flash red and the control will
emit a continuous audible alarm.
To cancel the audible alarm,
touch [ EEP].
If additional cooking is required,
touch [Ex]. This will cook for the
preset extra time (typically 5
minutes) at the temperature
programed for the last cook
segment.
If no additional cooking is
required, remove all cooked
product from the oven then
touch and hold [X] until the
control chirps and returns to the
main recipe screen.
End of Cooking ith Hold
On completion of the last cook segment the
[ EEP] button will flash red and the control will
emit a continuous audible alarm.
The control will automatically go into Hold and
maintain the oven cavity at the programed
temperature.
To cancel the audible alarm, touch [ EEP].
The control will stay in Hold.
Measure the internal temperature of the cooked
product.
If additional cooking is required, touch [Ex].
This will cook for the preset extra time (typically
5 minutes) at the temperature programed for
the last cook segment.
Once all cooked product has been removed
from the oven, touch and hold [X] until the
control chirps and returns to the main recipe
screen.
Gourmet Oven Operation
15
Smoker Power Switch
Wood Chip
Tray & Cover
Smoker
Heated
ase
Optional Wood Smoker
Optional Wood Smoker
The optional wood smoker gives the ability to cook
products with an authentic smoked barbque flavor. Any
type of wood, hickory, mesquite, apple, etc., can be
used in the smoker. It is recommended that wood chips,
not chunks be used and that the wood chips be soaked
in water prior to being used in the smoker.
The temperature of the wood smoker is preset at the
factory. The wood should smolder, not burn in the wood
smoker. Should the temperature need to be adjusted
contact your local authorized KI service agent.
Place the pre-soaked wood chips into the Wood Chip
Tray and close the Cover. Do not overfill the Wood Chip
Tray. The bottom rack will not slide completely into the
oven if the Wood Chip Tray Cover does not fully close.
Set the loaded Wood Chip Tray onto the Smoker
Heated ase. The vent slots in the Wood Chip Tray
should be oriented toward the sides of the oven.
Preheat the oven and load the food product into the preheated oven. Start the cook stage on the
controller then turn the Smoker Power Switch to the On position.
Touching the wood smoker components could cause severe burns. Turn the oven
Main Power Switch to the Off position and allow the oven and wood smoker to cool before handling the
wood smoker components.
The amount of wood chips required depends on the product cook time and the size of the wood chips.
Smoke does not need to be generated during the entire cook cycle. After the surface temperature of the
product being cooked reaches approximately 145°F [60°C] the product will not absorb the smoke flavor
as readily. Smoke generated after this point will have little effect on the flavor of the cooked product.
Varying cooking time, cooking temperature and the amount of wood chips will effect the flavor of the
cooked product. Experience with the Gourmet Oven and wood smoker will allow you to create the perfect
smoked barbeque flavor in the products cooked in the oven.

Gourmet Oven Installation
16
Installation
Serious injury, equipment damage or death could result if attempting to install this
oven. Ensure that an authorized KI service agent install the oven.
Unpacking and Handling
It is the owners’ responsibility to file all freight claims with the delivering truck line. Inspect all cartons and
crates for damage as soon as they arrive. If damage to cartons or crates is found, or if a shortage is
found, note this on the bill of lading (all copies) prior to signing.
If damage is found when the equipment is opened, immediately call the delivering truck line and follow up
the call with a written report indicating concealed damage to your shipment. Ask for an immediate
inspection of your concealed damage item. Packaging material MUST be retained to show the inspector
from the truck line.
Remove all packing from the interior and exterior of the oven.
GO-3 Stacking Instructions
Tools Required:
7/16 combination wrench
7/16 socket and ratchet
(2) 2x4x30” pieces of wood
NOTE: Remove all plastic from stacking kit parts.
1. Remove racks and drip pans from inside both ovens.
Place two wood 2x4x30” pieces on the floor. Tilt unit back onto wood pieces being careful not to
crush fuse holders or power cord.
2. Remove casters and place large aluminum base W 56210600 (lip goes downward) between the
bottom of the oven and the casters. Install the caster hardware that was removed.
3. Carefully place unit upright.
4. Remove the heater control unit of the base unit (3 screws on each side). Place four (4) small
stainless steel angles (FA56210702) at the outside corners of the gasket on the oven cabinet.
Replace heater control unit.
5. Carefully place second unit on its back just as in step 2.
6. Remove casters and store. Place stacking kit piece A 56210500 (with louvers on sides) with
notches toward the oven back. Install hardware removed from the casters to secure the stacking
kit piece to the oven bottom. Install four (4) handles on sides of stacking kit piece using
1/4-20 x 1” bolts and lock washers.
NOTE: e sure handles are secure.
7. Place unit upright.
NOTE: Lock the casters on the bottom unit.
e careful not to pinch hands while installing the top unit.
8. Carefully lift the oven with the handles and place on top of other oven.
9. Seal the base and the stacking kit piece to the oven bottoms using silicone rubber RTV (S0018)
approved for this use.
10. Replace racks and drip pans.

Gourmet Oven Installation
17
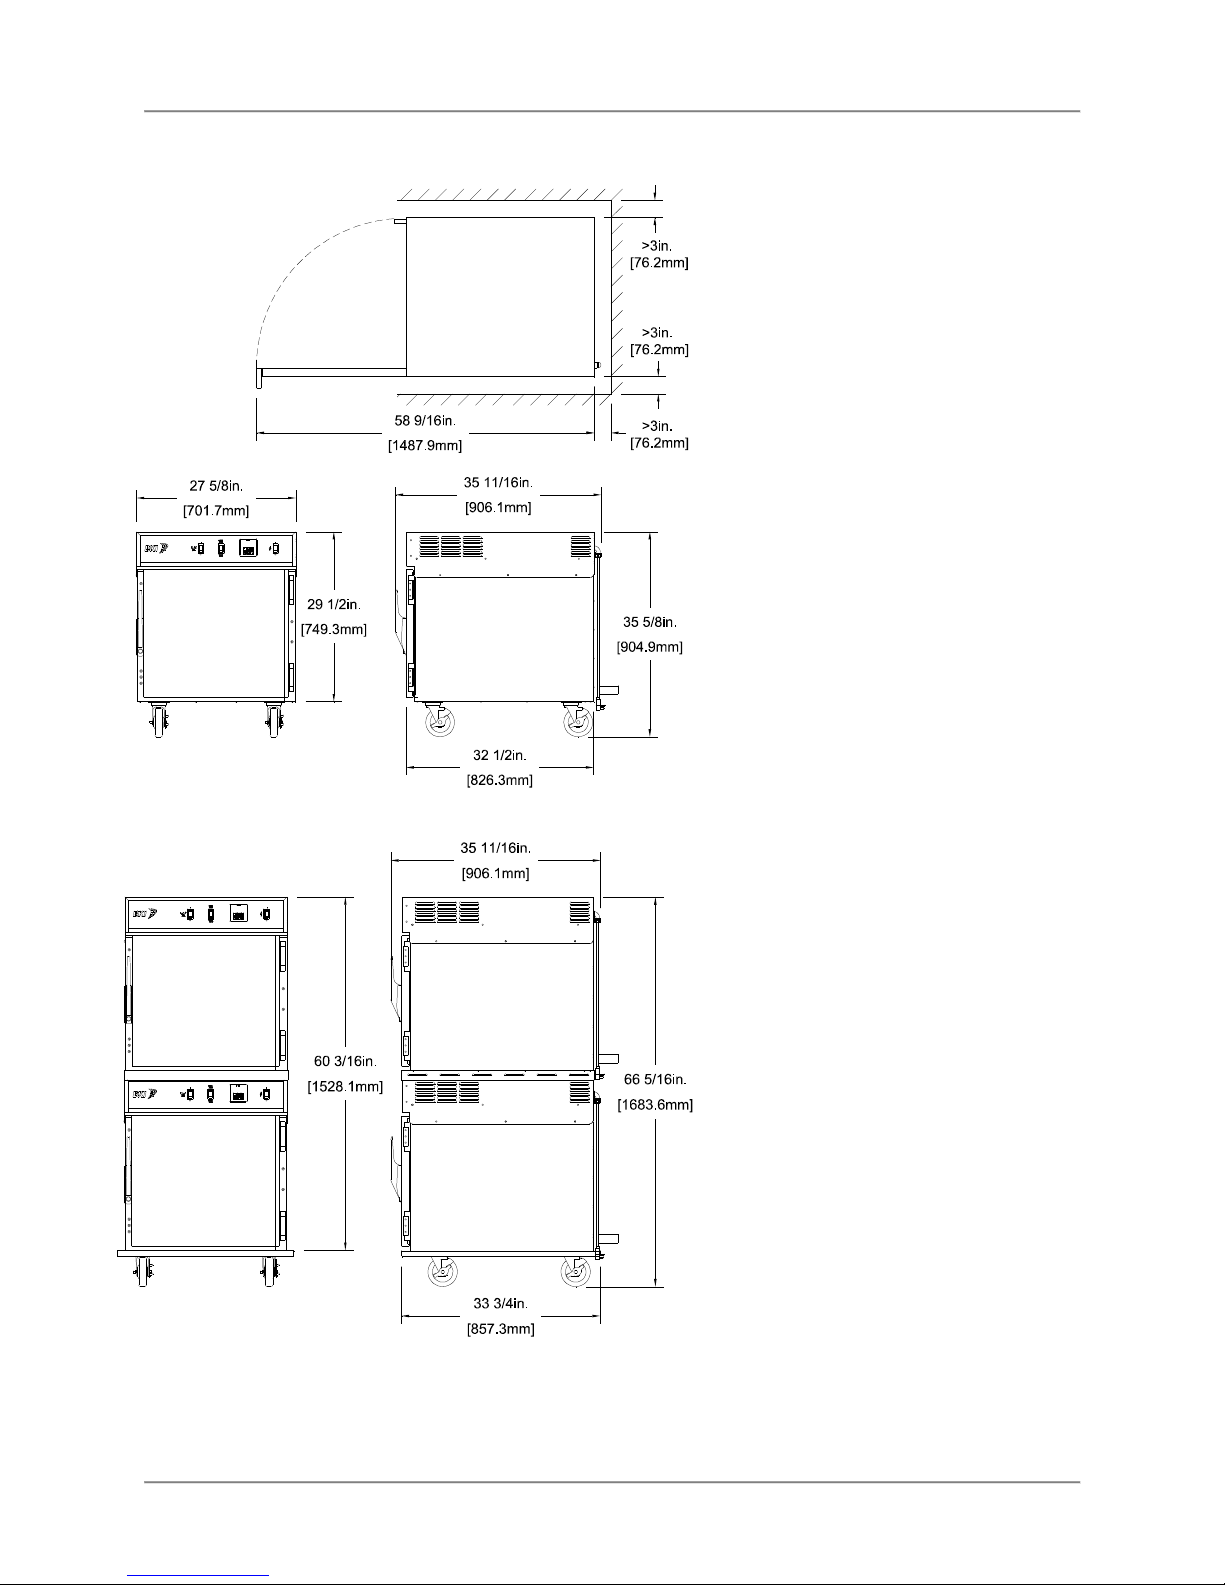
Location and Clearance
The oven must be mounted on a level surface capable of supporting the fully loaded oven. Refer to
Chart 1 for the oven weight.
Adequate clearance must be provided around the oven for safety, proper operation and ventilation. Refer
to Chart 1 for required minimum clearances. Note that these are minimum clearances. If the oven is to
be permanently mounted near other immovable objects additional clearance must be provided for
connection and service of the oven on both sides.
All ventilation slots must be kept free from obstruction.
Extraction
Extraction is not a specific requirement for this type of appliance. Certain conditions, e.g./ installation in a
confined space, temperature controlled environment or use of the wood smoker option may require the
need for extra ventilation or extraction. Consult your local ventilation/extraction air conditioning company
or contact the technical services department at KI.
Wiring
Electrocution, equipment failure or property damage could result if an unlicensed
electrician performs the electrical installation. Ensure that a licensed electrician
perform the electrical installation in accordance with applicable local and national
codes.
General Guidelines
•In the absence of local codes refer to the latest edition of one of the following:
•National Electrical Code, ANSI/NFPA 70-20XX (USA) which can be obtained from:
The National Fire Protection Association
atterymarch Park
Quincy, MA 02269
•I.E.E. Wiring Regulations (Europe)
•Verify that the power supply conforms to the electrical rating listed on the oven data plate.
•Ensure that the appliance is grounded (earthed).
Gourmet Oven Installation
18
GO-36
GO-36-2
Chart 1 Location & Clearance
Mechanical Specifications
Uncrated
Dimension
GO
-
36
GO
-
36
-
2
Height 33 3/4 in. 64 1/2 in.
[857.3mm] [1638.2mm]
Width 27 5/8 in. 27 5/8 in.
[701.7 mm] [701.7 mm]
Depth 36 in. 36 in.
[914.4 mm] [914.4 mm]
Floor Space 6.9 sq. ft. 6.9 sq. ft.
[0.64 m
2
] [0.64 m
2
]
Weight 320 lb. 620 lb.
[145 kg] [282 kg]
Crated
Dimension
GO
-
36
GO
-
36/2
Height 42 in. 72 in.
[1067.7 mm] [1828.8mm]
Width 38 in. 38 in.
[966.9 mm] [966.9 mm]
Depth 40 in. 40 in.
[1016.0 mm] [1016.0 mm]
Floor Space 10.6 sq. ft. 10.6 sq. ft.
[0.98 m
2
] [0.98 m
2
]
Weight 355 lb. 650 lb.
[161 kg] [295 kg]
Electrical Specifications
Model: GO
-
36
1Ph + Gnd, 60Hz
Volts
Amps
KW
Breaker
208 16.5 3.4 20
220 17.3 3.8 30
240 19.0 4.6 30
Model: GO
-
36S
1Ph + Gnd, 60Hz
Volts
Amps
KW
Breaker
208 17.7 3.7 30
220 18.8 4.1 30
240 20.4 4.9 30
Other manuals for GO-36
1
This manual suits for next models
3
Table of contents
Popular Cooker manuals by other brands


Parkinson Cowan
Parkinson Cowan SIG 554 Operating and installation instructions

Frymaster
Frymaster 17EC Installation, operation & service parts manual

Bartscher
Bartscher IK 3341 user manual

Campingaz
Campingaz CAMPING KITCHEN 2 CV Instructions for use

Gaggenau
Gaggenau CG 492 operating instructions

Orava
Orava VP-8 S instruction manual