BLACK DECKER BXGP600PBE User manual

EN
IT
BG
CS
DA
DE
PTEL
ES
ET
FI
FR
HR
HU
LT
LV
NL
NO
PL
PT
RO
RU
SK
SL
SV
TR
UK
cod. 94149 - HN
BXGP600PBE
BXGP800XBE
BXGP1100XBE
www.blackanddecker.eu
BXGP600PBE BXGP800XBE
BXGP1100XBE

2
EN
Please read these instructions carefully before use. Please retain these instructions for future reference.
In case of problems or difficulties, please contact the consumer helpline: www.2helpu.com Page: 5-14
IT
Leggere attentamente queste istruzioni prima dell’uso. Conservare queste istruzioni per future consultazioni.
In caso di problemi o difficoltà, contattate l’helpline consumatori: www.2helpu.com Pagina: 15-25
BG
Прочетете внимателно тези указания преди употреба. Запазете тези указания за справка.
При проблеми или затруднения се обърнете към отдела за обслужване на клиенти: www.2helpu.com Страница: 26-36
CS
Před použitím si pozorně přečtěte tento návod. Laskavě si uložte tento návod pro budoucí použití.
V případě jakýchkoli problémů nebo potíží laskavě kontaktujte linku pomoci zákazníkům: www.2helpu.com Strana: 37-46
DA
Læs disse instruktioner omhyggeligt inden brug. Opbevar disse instruktioner til senere brug.
Kontakt kundeservicetelefonen i tilfælde af problemer eller vanskeligheder: www.2helpu.com Side: 47-56
DE
Lesen Sie bitte diese Bedienungsanleitung vor Gebrauch aufmerksam durch.
Bewahren Sie diese Bedienungsanleitung sorgfältig auf, damit Sie sie auch später zu Rate ziehen können.
Wenden Sie sich im Falle von Problemen bitte an die Verbraucher-Hotline: www.2helpu.com Seite: 57-67
EL
Διαβάστε προσεκτικά αυτές τις οδηγίες πριν από τη χρήση. Φυλάξτε αυτές τις οδηγίες για μελλοντικές αναφορές.
Σε περίπτωση προβλημάτων ή δυσκολιών, επικοινωνήστε με τη γραμμή helpline υποστήριξης καταναλωτών: www.2helpu.com Σελίδα: 68-78
ES
Leer atentamente estas instrucciones antes de usar el equipo. Guardar estas instrucciones para poder consultarlas en el futuro.
En caso de problemas o dificultades, ponerse en contacto con el servicio de asistencia al cliente: www.2helpu.com Página: 79-89
ET
Enne kasutamist lugege see juhend tähelepanelikult läbi. Hoidke juhend hilisemaks kasutamiseks alles.
Probleemide või raskuste ilmnemisel pöörduge klienditoe poole: www.2helpu.com Lk: 90-99
FI
Lue ohjeet huolellisesti ennen käyttöä. Säilytä ohjeet huolellisesti tulevaa käyttöä varten.
Jos kohtaat ongelmia, ota yhteys kuluttajien helpline-palveluun: www.2helpu.com Sivu: 100-108
FR
Lire attentivement ces instructions avant emploi. Conserver ces instructions pour toute consultation à venir.
En cas de problèmes ou de difficultés, contacter l’assistance consommateur: www.2helpu.com Page: 109-119
HR
Molimo vas da prije uporabe pažljivo pročitate ovaj priručnik. Sačuvajte ove upute za buduće korištenje.
Ako naiđete na kakve probleme ili poteškoće, molimo vas da se obratite službi za podršku korisnicima: www.2helpu.com Stranica: 120-129
HU
A készülék használatba vétele előtt gondosan olvassa el az útmutatót. A későbbi hivatkozások érdekében őrizze meg az útmutatót.
Kérdés vagy probléma esetén forduljon ügyfélszolgálatunkhoz: www.2helpu.com 130-139. oldal
LT
Prieš pradėdami naudoti įrenginį, atidžiai perskaitykite šias instrukcijas. Išsaugokite šias instrukcijas, kad bet kada galėtumėte jas vėl perskaityti.
Jei kyla problemų arba sunkumų, kreipkitės į klientų pagalbos liniją: www.2helpu.com Puslapiai: 140-149
LV
Pirms lietošanas, lūdzu, rūpīgi izlasiet šo pamācību. Lūdzu, saglabājiet šos norādījumus turpmākai uzziņai.
Ja rodas kādas problēmas vai grūtības, lūdzu, sazinieties ar klientu palīdzības dienestu: www.2helpu.com Lappuse: 150-159
NL
Lees deze gebruiksaanwijzing vóór het gebruik aandachtig door. Bewaar deze gebruiksaanwijzing voor latere raadpleging.
Contacteer bij problemen of moeilijkheden de hulplijn voor de gebruikers: www.2helpu.com Pagina: 160-170
NO
Les disse instruksjonene nøye før bruk. Ta vare på instruksjonene for senere bruk.
Ved problemer eller vanskeligheter, kontakt kundeservice: www.2helpu.com Side: 171-180
PL
Przed użyciem należy uważnie przeczytać niniejszą instrukcję obsługi. Instrukcję należy zachować na przyszłość.
W razie jakichkolwiek problemów lub trudności można skontaktować się z działem pomocy technicznej pod adresem:
www.2helpu.com Strona: 181-191
PT
Leia atentamente estas instruções antes de utilizar o aparelho. Conserve estas instruções para consultas futuras.
Em caso de problemas ou dificuldades, contacte a helpline de atendimento aos consumidores: www.2helpu.com Página: 192-202
RO
Vă rugăm să citiţi cu atenţie aceste instrucţiuni înainte de utilizare. Vă rugăm să păstraţi aceste instrucţiuni pentru consultarea pe viitor.
În caz de probleme sau dificultăţi, vă rugăm să contactaţi linia de asistenţă a clienţilor: www.2helpu.com Pagina: 203-212
RU
Внимательно прочитайте эти инструкции до начала использования. Сохраните инструкции для пользования ими в будущем.
При появлении проблем или затруднений обращайтесь в отдел обслуживания клиентов: www.2helpu.com Страница: 213-223
SK
Pred použitím si, prosím, pozorne prečítajte tento návod. Tento návod si odložte na použitie vbudúcnosti.
Ak narazíte na akékoľvek problémy alebo ťažkosti, obráťte sa na linku pomoci pre zákazníkov: www.2helpu.com Strana: 224-233
SL
Pred uporabo pazljivo preberite ta navodila. Ta navodila shranite za prihodnjo uporabo.
Če naletite na težave, se obrnite na službo za pomoč kupcem: www.2helpu.com Stran: 234-243
SV
Läs bruksanvisningen noggrant före användning. Förvara bruksanvisningen för framtida bruk.
Vid ev. problem eller frågeställningar, kontakta kundtjänst på www.2helpu.com Sid.: 244-253
TR
Kullanmadan önce, bu talimatları dikkatlice okuyunuz. Bu talimatları, ileride danışmak için saklayınız.
Problem veya zorluk durumunda, tüketici yardım hattına başvurunuz: www.2helpu.com Sayfa: 254-263
UK
Перед експлуатацією уважно прочитайте цю інструкцію. Зберігайте цю інструкцію для подальшого використання в
довідкових цілях. У разі виникнення проблем або труднощів звертайтеся до нашої служби підтримки:
www.2helpu.com Сторінки: 264-274

3
E1
E3
D1-D2-D3
BXGP600PBE BXGP800XBE
BXGP1100XBE
A10
A5
A12
A3 A11
A4b
A2
A1
A4
A6
A8
A7
A10
A5
A12
A3 A11
A4b
A2
A1
A4
A6
A8
A7
A10
A5
A12
A3 A11
A4b
A2
A1
A6
A8
A7
A2b
A9A9b
A4
1

4
2 3
4 5
6 7
A1
8m max.

5
ENGLISH
(Original instructions)
EN
1 SAFETY INSTRUCTIONS
1.1 The appliance you have purchased
is produced by one of Europe's top
manufacturers of household and
gardening pumps. Our appliances
are not designed to withstand the
stresses typical of commercial or
industrial use, or for continuous
duty. You must know and comply
with the instructions provided in this
manual to get the most from your
pump. During connection, use and
servicing of the appliance, take all
possible precautions to protect your
own safety and that of the people
in the immediate vicinity. Read the
safety regulations carefully and
comply with them strictly; failure to
do so may put health and safety at
risk or cause expensive damage.
The manufacturer is not responsible
for any damage caused by incorrect
or improper use.
2 SAFETY DECALS / INFORMATIVE
DECALS
2.1
Comply with the recommendations of
the decals affixed to the appliance.
Check that they are present and
legible; otherwise, fit replacements in
the original positions.
Warning - Danger
Pleasereadtheseinstructions
carefully before use.
Symbol E1.
The appliance must
not be disposed of as household
waste; it may be returned to the dealer
on purchase of a new appliance.
The appliance’s electrical and
electronic parts must not be reused
for improper uses because they
contain substances which constitute
health hazards.
Symbol E3.
Indicates that the
appliance is intended for
household use.

6
ENGLISH
(Original instructions)
EN
CE Symbol.
Indicates that the
appliance complies with the
relevant EU directives.
ON/OFF switch position
Indicates
the position of the ON/OFF switch.
I = Switch ON
0 = Switch OFF
Guaranteed sound power level
This produce is rated in
insulation class I. This means
that it is equipped with a protective
earthing conductor (only if the symbol
appears on the appliance).

7
ENGLISH
(Original instructions)
EN
3 SAFETY RULES / RESIDUAL RISKS
3.1 SAFETY PRECAUTIONS: DO NOTS
3.1.1 Injury hazard! DO NOT allow the appliance to be used by children or persons with impaired
physical, sensory or mental capabilities, or who do not have the necessary experience and
knowledge. Children must not use the appliance as a toy. Cleaning and user maintenance must not
be carried out by children.
3.1.2 Explosion or poisoning hazard! Never use the appliance with ammable, toxic or aggressive
liquids, or liquids with characteristics incompatible with its proper operation.
3.1.3 Injury hazard! Do not point the water jet at people or animals.
3.1.4 Electrocution hazard! Do not point the water jet at the appliance, electrical parts or other electrical
devices.
3.1.5 Short-circuit hazard! Do not use the appliance outdoors in the rain. This does not apply to
submersible pumps, which may also be used in the rain; however, it is essential to ensure that the
connections of the plug (A12) and any extension leads used are protected from water splashes and
flooding.
3.1.6 Injury hazard! Do not allow the appliance to be used by children, persons with impaired physical,
sensory or mental capabilities, or any unauthorised persons.
3.1.7 Electrocution hazard! Do not touch the plug (A12) and/or socket with wet hands.
3.1.8 Electrocution and short-circuit hazard! If the power cable (A8) is damaged, it must be replaced
by the manufacturer, one of its authorised Service Centres or similarly qualied persons in order to
prevent all risks.
3.1.9 Explosion hazard! Do not use the appliance if the suction or delivery hose is damaged.
3.1.10 Injury hazard! Place the appliance in a stable position; when using the appliance in the vicinity of
swimming-pools, garden ponds or other outdoor bodies of water, keep it at least 2 m from the water's
edge and protect it from falling into the water or flooding. This does not apply to submersible pumps,
since they can be used immersed in water.
3.1.11 Injury hazard! Check that the appliance is fitted with the data plate which carries its specifications;
contact your dealer at once if it is missing. Appliances without data plate must not be used, since
they cannot be identified and are potentially hazardous.
3.1.12 Explosion hazard! No adjustment of control valves, safety valves or other safety devices, or
tampering with their settings, is permitted.

8
ENGLISH
(Original instructions)
EN
3.1.13 Scalding hazard! In the event of a pressure switch malfunction or water supply failure, the water left
inside the pump body (A4) may overheat and cause scalding when discharged.
3.1.14 Injury hazard! Do not use the appliance unattended if there is the risk of fouling.
3.1.15 Short-circuit hazard! Do not move the appliance around by pulling the plug (A12), the power cable
(A8) or other connection fixtures; use the handle (A4 b).
3.1.16 Explosion hazard! Do not allow vehicles to drive over the suction or delivery hose. Do not drag or
transport the appliance by the suction or delivery hose.
3.1.17 Injury hazard! Do not use the appliance when people or pets are in the pumped liquid, or may come
into contact with it.
3.2 SAFETY PRECAUTIONS: MUSTS
3.2.1 Short-circuit hazard! All electrical conductors must be protected from splashes of water.
3.2.2 Electrocution hazard! Only connect the appliance to an electrical power source compliant with the
relevant standards (IEC 603641-1); during start-up, the appliance may generate interference on the
electrical system. Only connect the appliance to a socket fitted with a residual current device rated at
30 mA or less. Use only electrical extension leads compliant with the relevant regulations, approved for
outdoor use and with gauge at least equal to that of the appliance's power cable. Power cables wound
onto reels must be completely unwound.
3.2.3 Danger! The appliance must never operate dry; always fill the pump body (A4) with water before
starting it. Even a short period of operation without water may cause damage.
3.2.4 Accidental switch-on hazard! Always disconnect the plug (A12) from the power socket before
carrying out any work on the appliance.
3.2.5 Danger! To guarantee the appliance's safety, the maximum temperature of the pumped liquid must
not exceed 35°C. The ambient temperature must not drop below +5°C.
3.2.6 Danger! The appliance is not designed to pump drinking water or water for human consumption.
The pumped water may be contaminated by lubricant leaks.
3.2.7 Injury hazard! Maintenance and/or repair of the appliance or electrical components must only be
carried out by specialist staff.
3.2.8 Injury hazard! Discharge residual pressure before disconnecting the hose from the appliance; to do
this, disconnect the appliance from the electricity supply and open a user outlet.
3.2.9 Injury hazard! Before use, and at regular intervals, inspect the accessories and check the
appliance's components for signs of failure and/or wear.

9
ENGLISH
(Original instructions)
EN
4 GENERAL INFORMATION
4.1 Use of the manual
This manual forms an integral part of the appliance and should be kept
for future reference. Please read the manual carefully before installing/
using the appliance. If the appliance is sold, the seller must pass on
this manual to the new owner along with the appliance. Ensure that
every user has access to the manual before the appliance is started
up, and is able to find out about the safety and operating instructions.
4.2 Delivery
The appliance is delivered in a cardboard box.
The supply package is illustrated in fig.1.
4.2.1 Informative material supplied with the appliance
D1 Use and maintenance manual
D2 Safety instructions
D3 Warranty regulations
4.3 Disposing of packaging
The packaging materials are not environmental pollutants but must still
be recycled or disposed of in compliance with the relevant legislation
in the country of use.
5 TECHNICAL INFORMATION
5.1 Intended use
The appliance is designed to pump clean water from wells or rainwater
cisterns for gardening or for use in household water supply systems;
these appliances may not be used for pumping drinking water.
Dirt, sand and sediments are abrasive and damage the impeller.
Fit suitable filters to trap these particles upstream of the pump.
Chemically aggressive substances in the pumped liquid damage the
appliance.
The minimum permitted hourly flow rate is 80 l/h (1.3 l/min).
These appliances are not suitable for drip irrigation systems, since the
water flow rate is too low, meaning that the pumped liquid is unable to
cool the appliance as required.
The appliance must be installed in a dry, well ventilated place,
protected from frost and weather, with an ambient temperature not
exceeding 35°C. It must never be installed or used in the rain, in damp
locations or in wells.
The appliance conforms to the EN 60335-2-41 European standard.
5.2 Improper use
Use by unskilled persons or those who have not read and understood
the instructions in the manual is forbidden.
Supplying the appliance with flammable, explosive, toxic or chemically
aggressive liquids is forbidden.
Use of the appliance in a potentially flammable or explosive
atmosphere is forbidden.
All modifications to the appliance are prohibited. Any modifications
made to the appliance render the warranty null and void and relieve the
manufacturer of all liability under civil and criminal law.
Grinding and polishing substances, or other substances which
attack materials, damage the appliance. These appliances are
not suitable for pumped liquids containing abrasive sand, mud or
clay. These appliances are suitable for pumping water for sanitary
purposes, but not for pumping drinking water!
Faecal substances may not be pumped with these appliances.
5.3 Main components (fig. 1)
A1 Threaded suction fitting
A1b Integral pre-filter (if installed)
A2 Threaded delivery fitting
A2b Filler cap (if installed)
A3 Drain plug
A4 Pump body
A4b Handle
A5 ON/OFF switch
A6 Reinforced hose
A7 Pressure switch
A8 Power cable
A9 Valve
A9b Valve cap
A10 Tank
A11 Pressure gauge
A12 Plug
6 INSTALLATION
Warning - danger!
All installation and assembly operations must be performed with the appliance
disconnected from the mains power supply (fig. 3).
Warning - danger!
Before use, always perform a visual check on the appliance, and especially
the plug (A12) and power cable (A8), for damage. A damaged appliance must
not be used; in the event of damage, have the appliance inspected by the
Service Centre or an authorised electrician.
Warning - danger!
If the power cable (A8) is cut, the warranty becomes null and void and a
replacement genuine power cable (A8) must be installed during the repair,
at the customer's expense (even in case of repair under warranty). If it is
necessary to extend the power cable (A8), only use an extension with gauge
at least equal to that of the original power cable (A8). Never lift the appliance
or remove the plug (A12) from the socket by means of the power cable (A8).
6.1 Assembling the appliance
Before the appliance is put into operation, the suction and delivery
hoses must be connected. Place the appliance in a stable position on
a flat surface, in a location protected from flooding (fig. 4).
To prevent the transmission of vibrations to the pipes or walls, place
the appliance on a rubber mat and use lengths of hose (which must
be resistant to suction and pressure) immediately upstream and
downstream of the appliance (fig. 5) to dampen the vibrations.
6.2 Fitting the suction hose
Warning - danger!
If your device does not have an integral pre-filter, a check valve must be
installed between the suction hose and the suction fitting (A1): this valve
ensures that the suction hose is not pressurised, which could cause leaks
or bursts.
The suction hose conveys the water from the suction point to the
appliance. Connect the suction hose to the threaded fitting (A1).
Check that the suction hose fitted is airtight, since any leaks may
reduce the appliance's flow rate or completely prevent it from drawing
in water. The suction hose must be at least 25 mm (1”) in diameter and
must be resistant to crushing and vacuums.

10
ENGLISH
(Original instructions)
EN
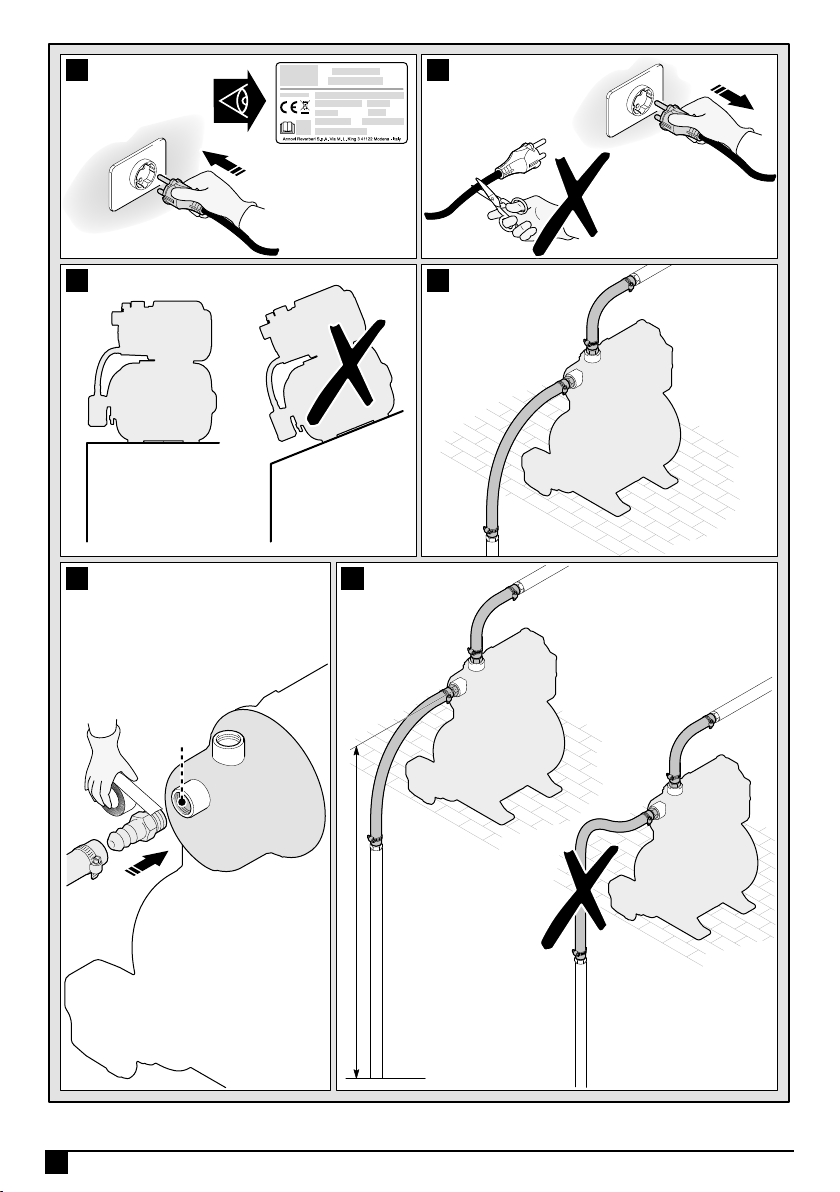
Use of a suction hose with foot valve is recommended. To ensure
an airtight connection, use Teflon tape (12 - 15 layers) (fig. 6).
Make sure that there is sufficient water in the suction point and that the
hose suction zone is permanently below the water level.
Since the maximum suction lift of self-priming pumps is 8 metres,
the appliance must be no more than 8 m above the water level in
the suction point. The horizontal part of the suction hose must rise
continually from the suction point to the appliance, to prevent the
formation of air bubbles in the hose, which could impair operation of
the appliance (fig. 7).
A pre-filter must be installed between the suction hose and the suction
fitting (A1), unless the appliance has an integral pre-filter (A1 b).
6.3 Filling the appliance
Before fitting the delivery hose, completely fill the pump body (A4) and
the suction hose with water through the delivery fitting (A2). The pump
can also be filled through the filler cap (A2 b), if present (fig. 8).
Bubbles form during filling of the pump body (A4) and must be
discharged by tilting the appliance slightly in various directions.
Fill again and repeat this procedure until the water level is just below
the filling hole.
If the appliance has an integral pre-filter, more water must be added
through the cap of the pre-filter (A1 b). Open the cap, fill with water to
the rim and screw the cap back on by hand (fig. 8).
6.4 Fitting the delivery hose
The delivery hose fitting is on the top of the appliance (A2). The hose
should be connected to a hose or pipe with the largest possible
diameter (at least 19 mm, ¾”). Smaller diameters drastically reduce
the appliance's flow rate. To ensure an airtight connection, use Teflon
tape (12 - 15 layers) (fig. 9).
In a household pumping system, the connected pipes are permanently
pressurised. Therefore, we recommend the use of a reinforced hose,
capable of withstanding this permanent pressure, when connecting to
a permanent distribution system.
Warning - danger!
The use of garden hoses or suction hoses on the appliance's delivery side is
not permitted if the pipes are permanently pressurised, since the continuous
pressure combined with wear and fatigue of the materials may cause them
to burst or tear even after only a short time. Garden hoses may only be used
when not permanently pressurised, e.g. when they are installed downstream
of a stop valve or a water supply tap, and only ever outdoors.
6.5 Safety Measures
The user must prevent damage arising from the flooding of premises
or other causes in the event of a failure of the appliance or external
components by adopting suitable measures (e.g. installation of an
anti-flooding protection circuit, alarm system, backup pump, collection
tank or similar features), which must be connected to a separate,
fail-safe electrical circuit. The safety measures must be suited to the
specific conditions of use and must be able to reduce and/or prevent
the damage caused by water leaks.
The user must also install a spray guard to prevent water leaks or
splashes due to a pump failure from causing damage. A backup pump
or a floor drain must be installed to ensure that any water from leaks
is promptly removed. Otherwise, an alarm system can be installed
to trigger an alarm and/or an emergency shut-down of the appliance
and water supply in the event of a water leak, before damage to the
equipment or property can occur.
We also recommend raising all equipment in appliance installation
rooms about 5-10 cm above the floor so that any water leaks will
not cause immediate damage. The manufacturer accepts no liability
for damage caused by failure to comply with this recommendation.
Warning - danger! Dry operation
If the appliance runs for more than 5 minutes with the water suction point
closed, it may be damaged due to overheating. Switch off the appliance when
the normal water flow is obstructed.
Dry operation will damage the appliance beyond repair, so never allow it to
run dry for more than 10 seconds.
7 ADJUSTMENTS
7.1 Preliminary adjustments
Our appliances are preset in the factory and users must not modify
these settings.
8 START-UP
Warning - danger!
All installation and assembly operations must be performed with the appliance
disconnected from the mains power supply (g. 3).
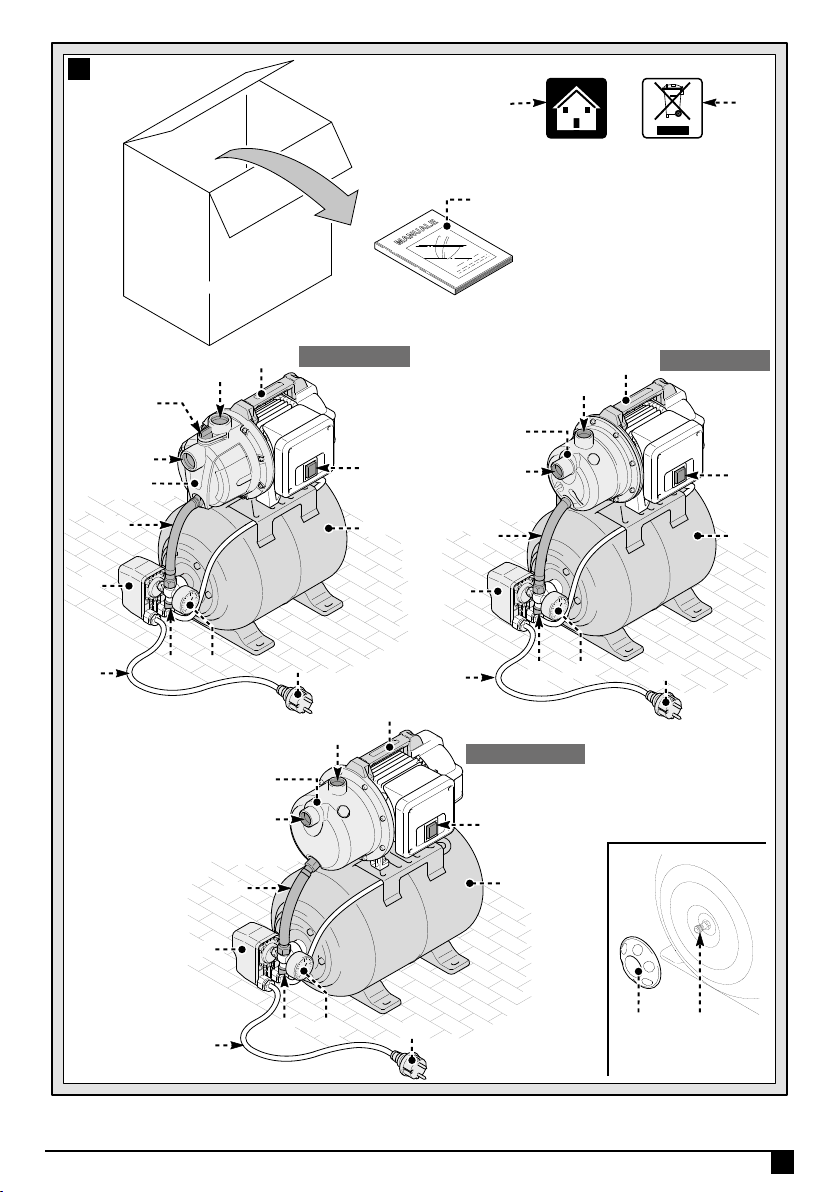
8.1 Start-up
Once all the pipes have been connected and the pump body (A4) is
full of water, the plug (A12) can be connected and the ON/OFF switch
(A5) turned to ON. During the priming phase, the delivery pipe must
be open to allow the air in the system to escape and to enable the
water pressure to build up. If the suction hose is not completely full
of water, it may take the appliance up to 7 minutes to become fully
operational. If the water has not pressurised after the maximum
priming time stated, switch the appliance off and proceed as described
in the troubleshooting plan (chapter 11).
8.2 Technical information
The appliance's stated ow rate values are maximum values, which
are reduced if external components (e.g. delivery hose, elbows,
pre-lter, etc.) are used. This should be borne in mind when choosing
the appliance. The actual ow rate for specic installation conditions is
stated in the ow rate graph (g. 12).
9 MAINTENANCE
Warning - danger! The system is pressurised!
Before any maintenance procedure and/or during troubleshooting, disconnect
the power cable (A8) from the socket.
Check that the connection hoses or the appliance's tank (A10) are not still
pressurised. To ensure this, turn on a user (water supply tap) and drain all
the water from the system. All maintenance and cleaning work can then be
carried out.
9.1 Cleaning the filters
Clean the pre-lter (A1 b) regularly with clean water and/or inspect it
to ensure that it is not fouled (g. 10). Sluice the lter compartment
with clean water.

11
ENGLISH
(Original instructions)
EN
9.2 Checking the pressure in the tank (A10)
To ensure that the appliance operates correctly, the pressure in the
tank (A10) must be checked at regular intervals (3-4 times a year); it
must be 1.5 bar. To check the pressure, unscrew the valve cap (A9 b)
on the tank (A10) and check the pressure by connecting an air pump
with pressure gauge to the valve (A9) (g. 11). If the pressure is less
than 1.5 bar, restore it to that value.
Insufcient air pressure causes the appliance to malfunction and leads
to wear of the rubber diaphragm in the tank (A10). Any damage to
the appliance caused by incorrect pressure in the tank (A10) is not
covered by the warranty.
10 STORAGE
Warning - danger! The system is pressurised!
Before any maintenance procedure and/or during troubleshooting, disconnect
the power cable (A8) from the socket.
Check that the connection hoses or the appliance's tank (A10) are not still
pressurised. To ensure this, turn on a user (water supply tap) and drain all
the water from the system. All storage procedures can then be carried out.
It is essential to protect the appliance from frost, and in case of
temperatures of +5°C or below it must be uninstalled and stored in
a dry place, protected from frost. After disconnecting the suction and
delivery hoses, unscrew the drain plug (A3) and tilt the appliance to
drain out all the water in the tank (A10). To empty the pump body (A4)
turn the appliance upside down to drain the water from the delivery
tting (A2).

12
ENGLISH
(Original instructions)
EN
11 TROUBLESHOOTING
Problems Possible causes Remedies
The motor is running but the
appliance does not suck in water
1) The pump body (A4) was not filled with water before start-up. 1) Fill the pump body (A4, see point 6.3).
2) Suction hose not airtight. 2) Check that the recommended accessories were used. Check that
the suction hose is airtight, use Teflon tape on the threads.
3) Foot valve suction strainer obstructed. 3) Clean foot valve and suction strainer.
4) Delivery side air unable to escape because suction point
is closed.
4) During priming, open the suction points (water supply tap, water
hoses).
5) Not enough time allowed. 5) Completely fill the suction hose with water and wait up to 7
minutes after the appliance is started.
6) Excessive suction lift. 6) Reduce the suction lift (max. 8 m).
7) Suction hose not immersed in water. 7) Check the water level in the well or cistern and lengthen the
suction hose if possible .
Motor does not start 1) No mains power. 1) Check the voltage, connect the plug (A12).
Water flow rate insufficient
1) Suction lift and/or head excessive. 1) Excessive suction lift and head and external components all
reduce the flow rate! This is not a malfunction.
2) Foot valve suction strainer obstructed. 2) Clean the suction strainer.
3) Water level in suction point drops too fast. 3) Immerse the foot valve in a greater depth of water.
4) The appliance's flow rate is being reduced by soil in the water.
4) Clean the pump body (A4) by directing a jet of water in through
the suction fitting (A1) and delivery fitting (A2), and if necessary
have the appliance checked by the Service Centre. Use a pre-filter
if the appliance does not have an integral pre-filter (A1 b).
The thermostat is cutting out the
appliance
1) Motor overloaded due to friction between dirt particles and
impeller.
Dry operation or flow of water insufficient.
1) Clean the inside of the pump body (A4) by directing a jet of water
in through the delivery fitting (A2), leave the thermostat to cool for
about 1 h, and if necessary have the appliance checked by the
Service Centre.
2) Dry operation.
2) Check that there is water present, leave the thermostat to cool
for about 1 h, and if necessary have the appliance checked by the
Service Centre.
The appliance continually switches
on and off
1) No check valve on suction hose, water flowing back from
suction hose.
1) Check whether a foot or intermediate valve is installed on the
suction side.
2) Rubber diaphragm in tank (A10) faulty. 2) Replace the rubber diaphragm or the tank. Contact the Service
Centre.
3) No air pressure in tank. 3) Fill the tank (A10) with air by means of the relative valve (A9) to
a pressure of 1.5 bar (see Maintenance).
4) Delivery side not airtight. 4) Seal the delivery side to render it airtight, check that the system
is airtight.
The appliance operates continually
1) The switch-off pressure set for the pressure switch is too high. 1) Notify the Service Centre and have the switch-off pressure
adjusted.
2) Delivery side not airtight. 2) Seal the delivery side to render it airtight, use Teflon tape on
the threads.

13
ENGLISH
(Original instructions)
EN
WARRANTY
The warranties relating to the appliances described in this manual are conditional on compliance with all the recommendations it contains, especially those
relating to use, installation and operation.
We grant a warranty of 24 months (12 months for professional sales) from the date of purchase for the product described, covering defects in material or
workmanship in accordance with current legislation. Requests for service under warranty must be accompanied by the original proof of purchase.
The warranty does not cover the costs of dismantling and installing the appliance concerned in the place of use, travel costs to and from the place of use for
repair staff, or transport costs.
Claims arising from incorrect installation or operation, unsuitable conditions of use, negligence, commercial use or inappropriate repair attempts are not covered
by the warranty and no responsibility is accepted for them; normal wear and tear is also excluded.
The resulting costs, and especially inspection and transport costs, will be charged to the sender and/or the appliance's operator. This also applies, in particular,
when a warranty request is submitted but the appliance is found to be operating perfectly with no defects, or the problem is not due to defects in materials or
workmanship.
Before return to the user, every product undergoes strict technical inspection. Repairs under warranty must only be performed by one of our Service Centres or
an authorised repair workshop. Attempted repairs by the customer or unauthorised third parties during the warranty period will result in the loss of all warranty
entitlement.
Cutting off the power plug and/or shortening the power cable result in loss of warranty entitlement.
Work done by us under warranty does not extend the duration of the warranty, or give rise to a new warranty period for the parts replaced or repaired.
All further entitlement, including the right to discounts, changes or compensation, or consequent damage of any kind, is excluded.
In the event of malfunction, contact the point of sale where the product was purchased, showing proof of purchase.

14
ENGLISH
(Original instructions)
EN
Technical Data Unit BXGP600PBE BXGP800XBE BXGP1100XBE
Voltage V/Hz 230 V ~ 50 Hz 230 V ~ 50 Hz 230 V ~ 50 Hz
Power W 600 800 1100
Max. head (Hmax) m 35 38 45
Max. ow rate (Qmax) l/h 3100 3500 4600
Working pressure bar 1.3~2.6 1.5~3.0 1.5~3.0
Max. water temperature (Tmax) °C 35 35 35
Max. suction lift m 888
Max. particle size Ø mm 000
Protection class -
Motor insulation - Class B Class B Class B
Motor protection - IPX4 IPX4 IPX4
Sound power level LWA (EN ISO 3744) dB (A) 76 79 84
Net weight kg 10.8 10.9 14.1
Gross weight kg 11.8 12.2 15.4
Fitting diameter mm 25.4 25.4 25.4
Cable length m 111
Tank volume l 19 19 24
Subject to technical modication!

15
ITALIANO
(Istruzioni originali)
IT
1 ISTRUZIONI PER LA SICUREZZA
1.1 L’apparecchio che avete acquistato
è prodotto da un costruttore leader
a livello europeo di pompe per uso
domestico e pompe da giardino.
I nostri apparecchi non sono
adatti per le sollecitazioni tipiche
dell’uso commerciale o industriale
e per il funzionamento continuo.
L'utilizzo ottimale dell'apparecchio
presupponela conoscenzae ilrispetto
delle istruzioni contenute in questo
manuale. In fase di allacciamento,
uso e manutenzione dell'apparecchio
adottare tutte le precauzioni possibili
per salvaguardare la propria
sicurezza e quella delle persone nelle
immediate vicinanze. Leggere con
attenzione e rispettare strettamente
le istruzioni di sicurezza poiché, se
trascurate, possono mettere a rischio
la salute e la sicurezza delle persone
o provocare danni economici.
Il produttore non è responsabile di
eventuali danni causati da utilizzo
errato o uso improprio.
2 ADESIVI DI SICUREZZA / ADESIVI
INFORMATIVI
2.1
Attenersi alle etichette applicate
sull’apparecchio. Verificare che siano
sempre presenti e leggibili; in caso
contrario sostituirle applicandone di
nuove nella posizione originale.
Attenzione - Pericolo
Leggere attentamente queste
istruzioni prima dell’uso.
Icona E1.
Vieta lo smaltimento
dell'apparecchio come rifiuto
domestico; può essere riconsegnato
al distributore all'atto dell'acquisto
di un apparecchio nuovo. Le parti
elettriche ed elettroniche costituenti
l'apparecchio non devono essere
riutilizzate per usi impropri a causa
della presenza di sostanze dannose
alla salute.
IconaE3.
Indicachel'apparecchio
è destinato all'uso domestico.

16
ITALIANO
(Istruzioni originali)
IT
Simbolo CE.
Indica che
l'apparecchio è conforme alle
direttive UE vigenti.
Posizione interruttore ON/OFF.
Indica la posizione dell’interruttore
ON/OFF.
I = Interruttore inserito
0 = Interruttore disinserito
Livello di potenza sonora
garantito
Questo prodotto è in classe di
isolamento I. Ciò significa che è
equipaggiato di un conduttore di
protezione di messa a terra (solo se il
simbolo appare sull’apparecchio).

17
ITALIANO
(Istruzioni originali)
IT
3 PRESCRIZIONI DI SICUREZZA / RISCHI RESIDUI
3.1 AVVERTENZE: NON FARE
3.1.1 Pericolo di lesioni! L’apparecchio NON può essere utilizzato da bambini e da persone con ridotte
capacità fisiche, sensoriali o mentali, o prive di esperienza o della necessaria conoscenza I bambini
non devono giocare con l’apparecchio. La pulizia e la manutenzione destinata ad essere effettuata
dall’utilizzatore non deve essere effettuata da bambini.
3.1.2 Pericolo di esplosione o di avvelenamento! Non utilizzare in alcun caso l'apparecchio con liquidi
inammabili, tossici o aggressivi o con liquidi che possano comprometterne il corretto funzionamento.
3.1.3 Pericolo di lesioni! Non dirigere il getto dell’acqua contro persone o animali.
3.1.4 Pericolo di folgorazione! Non dirigere il getto d'acqua sull'apparecchio, su parti elettriche o su altri
apparecchi elettrici.
3.1.5 Pericolo di corto circuito! Non utilizzare l'apparecchio all'aperto in caso di pioggia. Ciò non vale
per le pompe sommergibili, che possono essere utilizzate anche in caso di pioggia; occorre tuttavia
garantire che la spina (A12) ed eventuali prolunghe dell'apparecchio siano collegate al riparo dagli
spruzzi d'acqua e dagli allagamenti.
3.1.6 Pericolo di lesioni! Non consentire l’utilizzo dell'apparecchio da parte di bambini o di persone con
limitate capacità sensoriali, fisiche o mentali o comunque non autorizzate.
3.1.7 Pericolo di folgorazione! Non toccare la spina (A12) o la presa con le mani bagnate.
3.1.8 Pericolo di folgorazione e cortocircuito! Se il cavo elettrico (A8) è danneggiato, esso deve essere
sostituito dal costruttore o dal suo servizio assistenza tecnica o comunque da una persona con
qualica similare, in modo da prevenire ogni rischio.
3.1.9 Pericolo di scoppio! Non utilizzare l’apparecchio con tubo di aspirazione o di mandata danneggiato.
3.1.10 Pericolo di lesioni! Collocare l'apparecchio stabilmente; in caso di utilizzo dell’apparecchio vicino
a piscine, stagni da giardino o altri bacini d'acqua aperti, mantenere una distanza minima di 2 m
e proteggere l'apparecchio contro la caduta in acqua o l’allagamento. Ciò non vale per le pompe
sommergibili, poiché queste possono essere utilizzate immerse in acqua.
3.1.11 Pericolo di lesioni! Controllare che l’apparecchio sia provvisto della targhetta recante le
caratteristiche specifiche, in caso contrario avvertire immediatamente il rivenditore. Gli apparecchi
sprovvisti di targhetta caratteristiche non devono essere usati, essendo anonimi e potenzialmente
pericolosi.

18
ITALIANO
(Istruzioni originali)
IT
3.1.12 Pericolo di scoppio! Non è consentito intervenire su valvole di comando, valvole di sicurezza o altri
dispositivi di sicurezza, né modificarne le regolazioni.
3.1.13 Pericolo causato da acqua calda! In caso di pressostato difettoso o assenza di alimentazione
idrica, l’acqua ancora presente nel corpo pompa (A4) può surriscaldarsi e causare lesioni alla sua
fuoriuscita.
3.1.14 Pericolo di lesioni! Non utilizzare l'apparecchio senza sorveglianza se sussiste il pericolo che corpi
estranei possano ostruirlo.
3.1.15 Pericolo di corto circuito! Non trasportare l'apparecchio tirando la spina (A12), il cavo elettrico
(A8) o altri elementi di allacciamento; utilizzare la maniglia (A4 b).
3.1.16 Pericolo di scoppio! Evitare il passaggio di veicoli sul tubo di aspirazione o di mandata. Non tirare
o trasportare l'apparecchio mediante il tubo di aspirazione o di mandata.
3.1.17 Pericolo di lesioni! Non utilizzare l’apparecchio quando persone o animali sostano nel liquido
pompato o possono entrare in contatto con esso.
3.2 AVVERTENZE: FARE
3.2.1 Pericolo di corto circuito! Tutte le parti conduttrici di corrente devono essere protette contro gli
spruzzi d’acqua.
3.2.2 Pericolo di folgorazione! Allacciare l’apparecchio esclusivamente a una sorgente di elettricità idonea
e conforme alle normative vigenti (IEC 60364-1); durante la fase di avviamento l’apparecchio può
generare disturbi in rete. Collegare l'apparecchio solo a una presa provvista di interruttore differenziale
con corrente residua nominale non superiore a 30 mA. Utilizzare esclusivamente prolunghe conformi
alle normative vigenti, approvate per l'impiego all'aperto e con una sezione pari almeno a quella
del cavo di alimentazione dell’apparecchio. I cavi elettrici avvolti in avvolgicavo devono essere
completamente srotolati.
3.2.3 Pericolo! L’apparecchio non deve mai funzionare a secco; prima di accenderla riempire sempre con
acqua il corpo pompa (A4). Anche un breve periodo di funzionamento senza acqua può causare
danni.
3.2.4 Pericolo di accensione non intenzionale! Prima di qualsiasi intervento sull'apparecchio estrarre
la spina (A12) dalla presa di corrente.
3.2.5 Pericolo! Per garantire la sicurezza dell’apparecchio, la temperatura massima del liquido pompato
non deve superare i 35°C. La temperatura ambientale non deve scendere al di sotto di +5°C.
3.2.6 Pericolo! L'apparecchio non è destinato al pompaggio di acqua potabile o acqua per consumo
umano. L’acqua trasportata dall’apparecchio può essere contaminata da perdite di lubrificante.

19
ITALIANO
(Istruzioni originali)
IT
3.2.7 Pericolo di lesioni! La manutenzione e/o la riparazione dell’apparecchio o dei componenti devono
essere effettuate solo da personale specializzato.
3.2.8 Pericolo di lesioni! Scaricare la pressione residua prima di staccare il tubo dall’apparecchio; a tale
scopo scollegare l'apparecchio dall'alimentazione elettrica e aprire un’utenza.
3.2.9 Pericolo di lesioni! Prima dell'uso e a intervalli regolari controllare gli accessori e verificare che i
componenti dell'apparecchio non presentino segni di rottura e/o usura.

20
ITALIANO
(Istruzioni originali)
IT
4 INFORMAZIONI GENERALI
4.1 Uso del manuale
Il presente manuale è parte integrante dell'apparecchio; conservare
con cura per future consultazioni. Leggere attentamente il manuale
prima dell’installazione/uso. In caso di passaggi di proprietà il
cedente ha l’obbligo di consegnare il manuale al nuovo proprietario.
Accertarsi che ogni utilizzatore disponga del manuale prima della
messa in funzione dell'apparecchio e possa informarsi sulle istruzioni
di sicurezza e per l’uso.
4.2 Consegna
L’apparecchio è consegnato all’interno di un imballo di cartone.
Per la composizione della fornitura vedere fig. 1.
4.2.1 Materiale informativo in dotazione
D1 Manuale di uso e manutenzione
D2 Istruzioni per la sicurezza
D3 Regole garanzia
4.3 Smaltimento degli imballi
I materiali costituenti l’imballo non sono inquinanti per l’ambiente,
tuttavia devono essere riciclati o smaltiti secondo la normativa vigente
nel paese di utilizzo.
5 INFORMAZIONI TECNICHE
5.1 Uso previsto
L'apparecchio è destinato al pompaggio di acque pulite da pozzi
o cisterne di acqua piovana per il giardinaggio o per l'uso impianti
domestici di approvvigionamento idrico; questi apparecchi non
possono essere utilizzati per il pompaggio di acqua potabile. Impurità,
sabbia e sedimenti hanno un effetto abrasivo e distruggono la girante.
Installare a monte filtri adeguati in grado di filtrare queste particelle.
Sostanze chimicamente aggressive nel liquido pompato distruggono
l’apparecchio.
Il flusso orario minimo deve ammontare a 80 l/h (1,3 l/min).
Questi apparecchi non sono adatti per l'irrigazione a goccia, perché
il flusso d'acqua è troppo ridotto e il liquido pompato non può pertanto
garantire il raffreddamento dell’apparecchio.
L’apparecchio deve essere installato in un luogo asciutto, ben aerato e
al riparo dal gelo e dalle intemperie, con una temperatura ambientale
che non dovrebbe superare i 35°C. Non deve mai essere installato o
utilizzato sotto la pioggia, in ambienti umidi o in pozzi.
L’apparecchio è conforme alla norma europea EN 60335-2-41.
5.2 Uso non consentito
È vietato l'uso a persone inesperte o che non abbiano letto e compreso
le istruzioni riportate nel manuale.
È vietato alimentare l’apparecchio con liquidi infiammabili, esplosivi,
tossici o chimicamente aggressivi.
È vietato utilizzare l'apparecchio in atmosfera potenzialmente
infiammabile o esplosiva.
È vietato eseguire modifiche all'apparecchio; l’esecuzione di modifiche
fa decadere la garanzia ed esonera il produttore da responsabilità
civili e penali.
Sostanze smeriglianti o altre sostanze che attaccano i materiali
distruggono l’apparecchio. Questi apparecchi non sono adatti per
l'impiego in liquidi pompati contenenti sabbia, fango o argilla abrasivi.
Questi apparecchi sono adatti per il pompaggio di acqua per i servizi,
mentre non sono idonei per il pompaggio di acqua potabile!
Con questi apparecchi non è consentito trasportare sostanze fecali.
5.3 Parti principali (fig. 1)
A1 Raccordo filettato di aspirazione
A1b Prefiltro integrato (se presente)
A2 Raccordo filettato di mandata
A2b Tappo di riempimento (se presente)
A3 Tappo di scarico
A4 Corpo pompa
A4b Maniglia
A5 Interruttore di alimentazione
A6 Tubo flessibile armato
A7 Pressostato
A8 Cavo elettrico
A9 Valvola
A9b Tappo coprivalvola
A10 Tanica
A11 Manometro
A12 Spina
6 INSTALLAZIONE
Attenzione - pericolo!
Tutte le operazioni d’installazione e montaggio devono essere effettuate con
l’apparecchio scollegato dalla rete elettrica (fig. 3).
Attenzione - pericolo!
Prima dell'utilizzo effettuare sempre un controllo a vista per determinare
se l'apparecchio, e in particolare spina (A12) e cavo elettrico (A8), sono
danneggiati. Un apparecchio danneggiato non deve essere utilizzato; in
caso di danni fare controllare l'apparecchio dal Centro Assistenza o da un
elettricista autorizzato.
Attenzione - pericolo!
Tagliare il cavo elettrico (A8) comporta il decadimento della garanzia
e l’installazione a pagamento, durante la riparazione (anche in caso di
riparazioni in garanzia), di un cavo elettrico (A8) originale. Se il cavo elettrico
(A8) deve essere allungato, utilizzare esclusivamente una prolunga la
cui sezione sia almeno uguale a quella del cavo elettrico (A8) originale.
Non sollevare mai l’apparecchio o estrarre la spina (A12) dalla presa usando
il cavo elettrico (A8).
6.1 Montaggio dell’apparecchio
Prima di mettere in funzione l’apparecchio è necessario collegare i tubi
di aspirazione e di mandata. A tale scopo collocare l’apparecchio su una
superficie piana in posizione stabile e al riparo dagli allagamenti (fig. 4).
Affinché le vibrazioni non vengano trasmesse a eventuali tubi rigidi o
alle pareti, raccomandiamo di collocare l’apparecchio su un tappetino
in gomma e di collegare porzioni di tubi flessibili (ma resistenti
ad aspirazione e pressione) nei tratti immediatamente adiacenti
all’apparecchio (fig. 5), al fine di smorzare le vibrazioni.
6.2 Montaggio del tubo di aspirazione
Attenzione - pericolo!
Se il vostro apparecchio è privo di prefiltro integrato, è assolutamente
necessario l’utilizzo di una valvola di ritegno tra tubo di aspirazione e
l’raccordo di aspirazione (A1): la valvola garantisce che il tubo di aspirazione
non sia sotto pressione con conseguente rischio di perdite o scoppi.
This manual suits for next models
2
Table of contents
Languages:
Popular Water Pump manuals by other brands

West Marine
West Marine 7865645 instruction manual

Grundfos
Grundfos SQ instructions

Kremlin-Rexson
Kremlin-Rexson EOS 15-C25 Installation and safety instructions

MULTIQUIP
MULTIQUIP MAYCO Series Operation manual

Oase
Oase ProMax Pressure Automatic 5500/5 operating instructions

Bestway
Bestway FlowClear 58389 manual

Grizzly
Grizzly TSP 1100 inox Translation of the original instructions for use

CSI
CSI Alfa Laval SolidC-1 instruction manual

VONROC
VONROC SP503AC Original instructions

Raider
Raider RD-GWP03J user manual

Muncie
Muncie E Series troubleshooting guide

GORMAN-RUPP
GORMAN-RUPP SF SERIES Nstallation, operation and maintenance manual