Black Horse 17FJ26MA User manual

\
TEL:1-866-XANATOS
INSTALLATION INSTRUCTIONS
GRILL GUARD FOR FORD EXPLORER 02-05
PART # 17FJ26MA

MODULAR GRILLGUARD FOR DODGE RAM MEGA CAB 1500/2500/3500 06-08
Page 1 of 5
NOTE: Please read this information before assembling. Complete step by step instruction sheets will be found on the
following page. The one-piece front guard has been designed to be installed on vehicle in one complete stage. NO
DRILLING REQUIRED
Illustrations are for reference only, styles vary with application. Please proceed to next page of the instruction sheet.
IMPORTANT: To obtain correct installation, we recommend you to follow these step by step instructions carefully.
Please take care when assembling and installing this product to protect the finish and your investment. To protect your
investment, wax this product after installing. Regular waxing is recommended. Do not use any type of polish or wax that
contains abrasive that could damage the finish.
Step One: Locate hardware and check the contents with the hardware listed below.
DESCRIPTION QTY
M12 x 30mm Hex Head Bolts 10
M12 Lock Nuts 6
M12 Flat Washers 16
M6 x 20mm Phillips Bolts 2
M6 Lock Nuts 2
M6 Flat Washers 2
Mounting Bracket-Left 1
Mounting Bracket-Right 1
Front Support Bracket 1
Retainer Brackets 2
Step Two: Locate the Mounting Brackets, (2) Retainer Brackets, (4) M12 x 30mm Hex Head Bolts, (4) M12 Lock nuts,
and (4) M12 Flat washers. Insert Retainer Bracket though slotted hole on the frame of truck as shown in Fig 1. Line up
holes on the bracket with holes on the frame. NOTE: Make sure the flat side of the Retainer Bracket is facing down when
inserted into the frame. Orient Mounting Brackets as per Fig 2 and loosely install them to the Retainer Brackets by using
the hardware listed in this step.
Step Three: Locate (6) M12 x 30mm Hex Head Bolts, (6) Lock Nuts, and (12) Flat Washers. Position the Guard on the
vehicle and place the lower portion of the guard to the inside of the lower support brackets as per Fig 3. Secure the Guard
to Mounting Brackets with hardware listed in this step, do not tighten at this time.
Step Three: Loosen up the factory plastic grille by unfastening the top four fasteners. Insert Front Support Bracket
through plastic grille as per Fig 4. Install it to vehicle by using factory screw as per Fig 5. Once the Front Support Bracket
is secure to the vehicle, re-install factory plastic grille.
Step Four: Locate (2) M6 Philips Bolts, (2) M6 Lock Nuts, and (2) M6 Flat Washers. Install Front Support Bracket to
Guard by using the hardware listed in this step as per Fig 6. Tighten all hardware at this time.
Fig 1 Fig 2

MODULAR GRILLGUARD FOR DODGE RAM MEGA CAB 1500/2500/3500 06-08
Page 2 of 5
Fig 3 Fig 4
Fig 5 Fig 6
Factory
Bolt
MODULAR GRILLGUARD FOR DODGE RAM MEGA CAB 1500/2500/3500 06-08
Page 3 of 5
INSTALLATION INSTRUCTIONS
1ST STAGE
1 Set Grille Guard
1 Set Brackets(left & right, when sitting in the car)
4 pc 7/16 x 1-1/4”Hex Bolts
4 pc 7/16 Nylon Lock Nuts
8 pc 7/16 Flat Washers
8 pc M10 Flat Washers
8 pc M10 Lock Washer
2 pc M6 x 25 Allen Bolts
2 pc M6 Lock Nuts
4 pc 6mm Flat Washers
8 pc M10*45 Hex Head Bolt
8 pc M10 Hex Nut
Instructions:
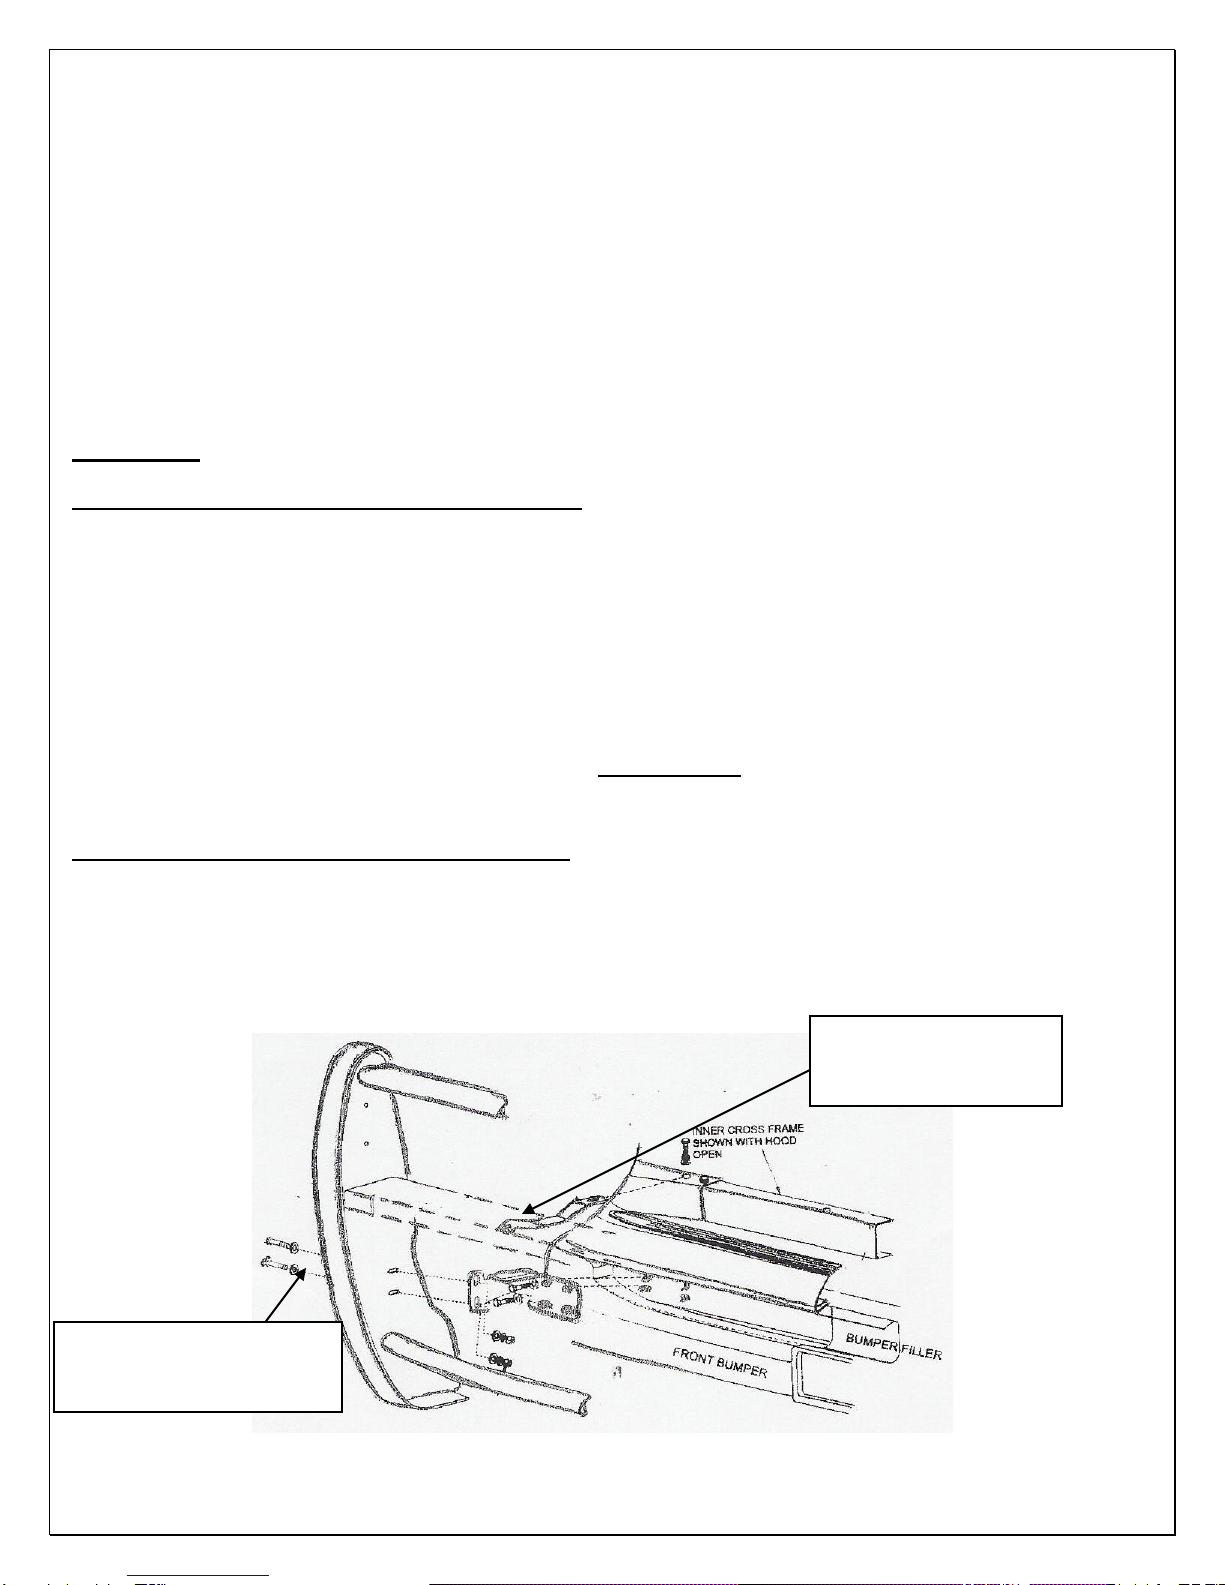
INSTALLING FRAME BRACKETS AND FRONT BAR
1、REMOVE TOW HOOKS FROM FRONT BUMPER. (REMOVE TEMPORARY
2、ATTACHE PASSENGER SIDE FRAME BRACKET BETWEN FRAME AND TOW HOOK
PASSENGER SIDE SHOWN )USING THE FACTORY BOLT.(NOTE:RUN ONE OF
THE 3/8 x 1-3/4” HEX BOLT FROM BEHIND OF THE FRAME AND THE 3/8 NYLON
LOCK JAM NUT ON THE BOTTOM LEFT CORNER ONLY, THIS WILL GIVE YOU
CLEARANCE ON THE CORNER. SNUG TIGHT ONLY。
3、REPEAT STEP 1 AND 2 ON DRIVER SIDE
4、LINE UP THE TWO HOLES ON THE LOWER PORTION OF THE BAR WITH THE TWO
OF THE HOLES IN THE FRAME BRACKETS (INNER EDGE) ATTACH FRONT BAR
USING THE 7/16 x 1-1/4 HEX BOLTS, 7/16 NYLON LOCK NUTS AND 7/16 FLAT
WASHERS. SNUG TIGHT ONLY.
INSTRUCTION TOP SUPPORT BRACKERTS
1、OPEN HOOD,ATTACH TOP SUPPORT BARACKET ON TOP OF THE CROSS FRAME
HIGHER END AS SHOWN) USING THE EXISTING BOLT. SNUG TIGHT ONLY.
LOWER END OF SUPPORT BRACKET WILL LINE UP UNDER CENTER FLANCE OF
FRONT BAR , ATTACH USING THE 1/4 SCREWS AND 1/4 NYLON LOCK NUT.
2、MAKE SURE VEHICLE HOOD WILL CLEAR WHEN CLOSING HOOD
3、PROCEED TO TIGHTEN ALL FASTERNERS
2pcs 7/16 x 1-1/4”Hex Bolts
4pcs 7/16 Flat Washers
2pcs 7/16 Nylon Lock Nuts
1pc M6 x 25 Allen Bolts
2pcs 6mm Flat Washers
1pc M6 Lock Nuts
MODULAR GRILLGUARD FOR DODGE RAM MEGA CAB 1500/2500/3500 06-08
INSTALLATION INSTRUCTION
2nd STAGE
Step One: Locate hardware. Check contents with the hardware listed below.
QTY DESCRIPTION
6 M8-1.25 x 20 button head bolts, stainless steel
6 M8-1.25 acorn nuts, stainless steel
12 M8 flat washers, stainless steel
2 rubber gaskets
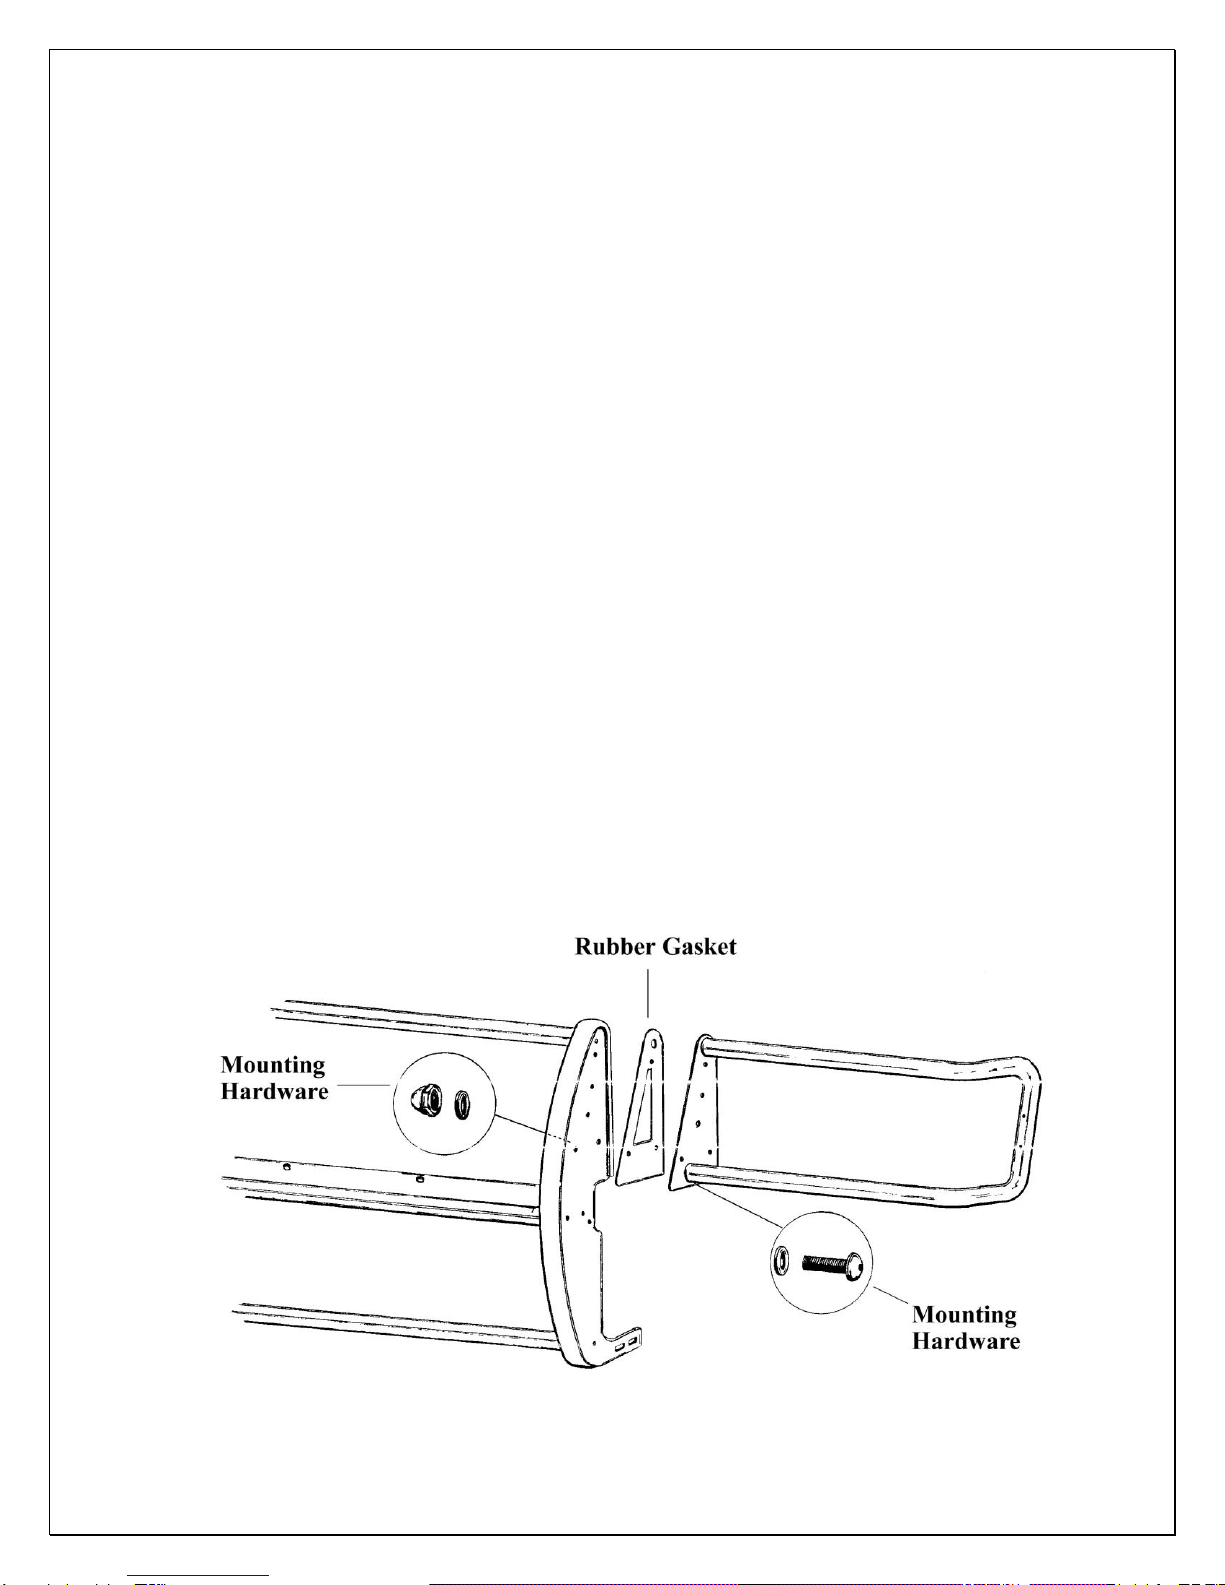
Step Two: Securing brush guards to center section. Locate the following item’s listed
below.
QTY DESCRIPTION
1 brush guard, left side
1 brush guard, right side
Assemble the brush guards to the center section of the guard as shown in illustration
below. Use the hardware from step one to secure the parts together. Be sure to fully
tighten all hardware at this time. Proceed ahead to stage four of the instruction sheet.
Page 4 of 5
MODULAR GRILLGUARD FOR DODGE RAM MEGA CAB 1500/2500/3500 06-08
INSTALLATION INSTRUCTION
3rd STAGE
Step One: Locate hardware. Check contents with the hardware listed below.
QTY DESCRIPTION
8 M6-1.00 x 25mm button head bolts, stainless steel
4 M6-1.00 acorn nuts, stainless steel
12 M6 flat washers, stainless steel
4 rubber gaskets
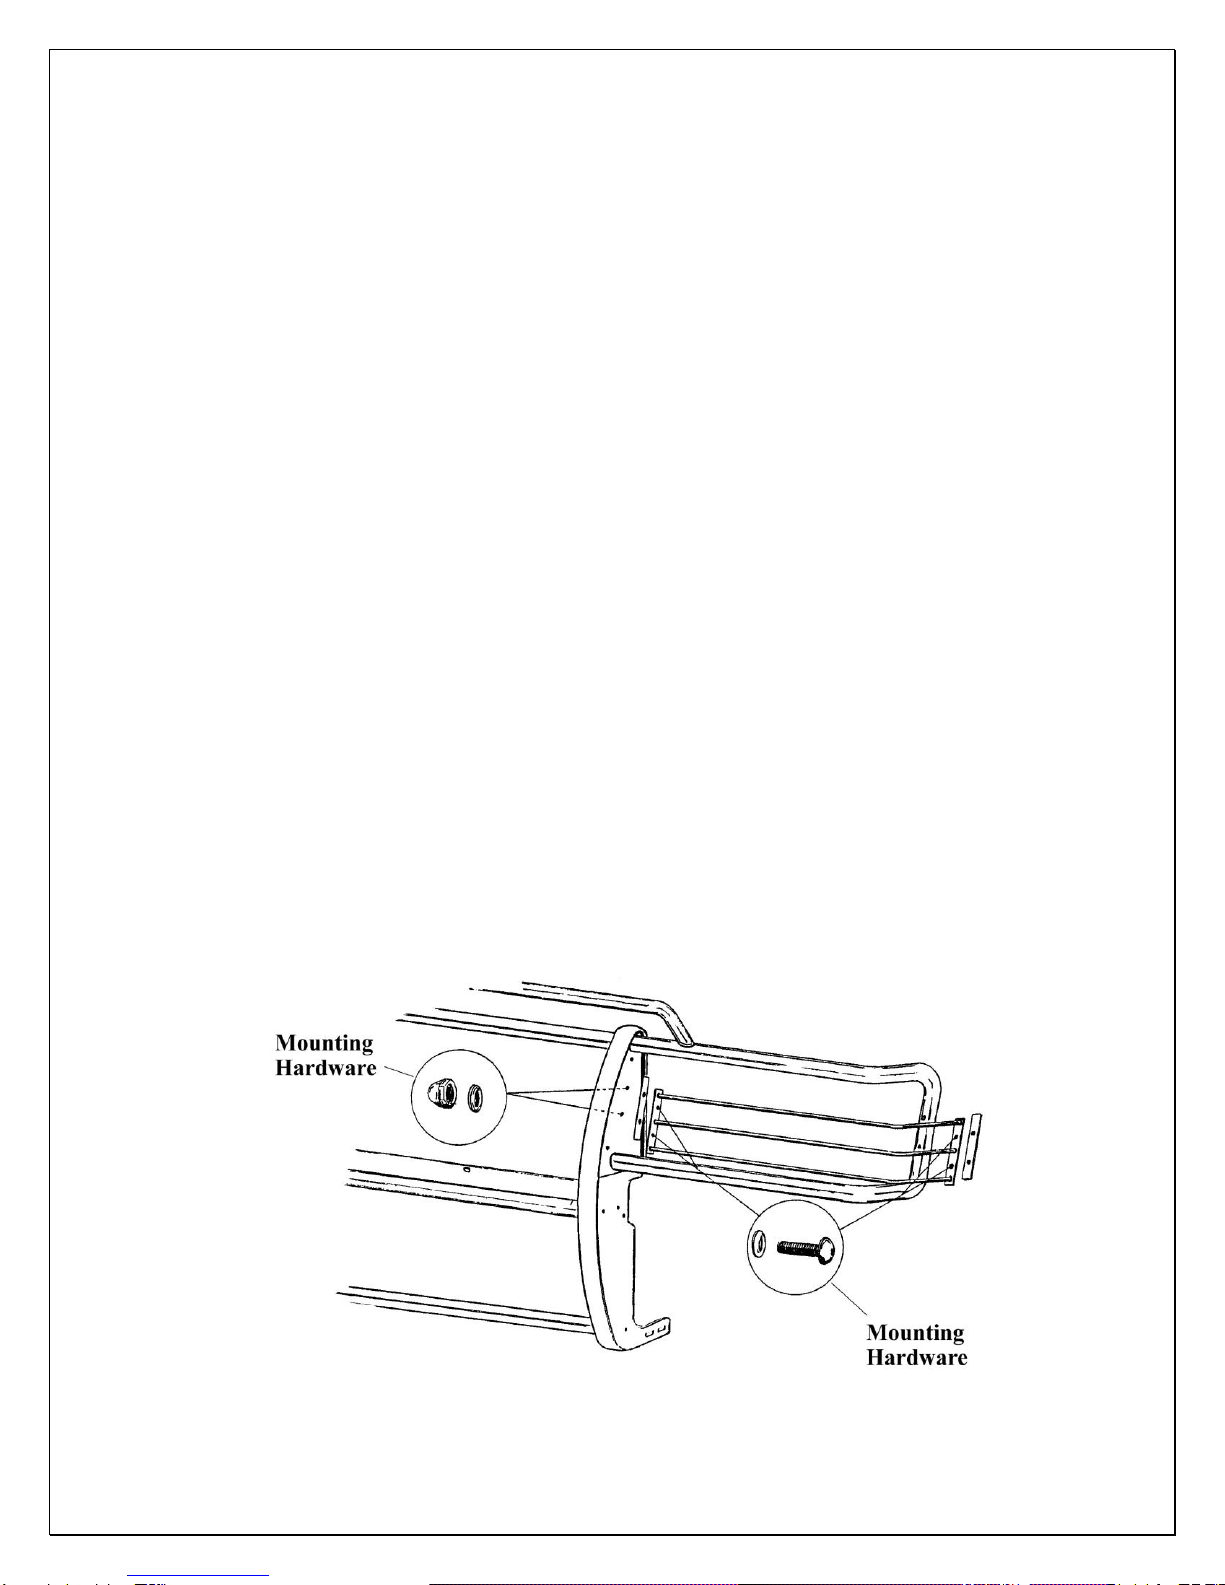
Step Two: Securing wire insert to brush guards. Locate the following item’s listed below.
QTY DESCRIPTION
2 wire guard insert, left & right side
Attach one rubber gasket to each end of the wire guard. Peel the paper backing off the
rubber gasket. Place the gasket on the end of the bracket and press firmly till the gasket is
secured in place.
Position the wire insert on the driver's side of the vehicle. Align the two holes in the
bracket with the two holes in the brush guard as shown in illustration below. Using the
hardware listed in step one, secure the wire insert to the brush guard. Be sure to fasten
both ends before fully tightening hardware. Repeat this procedure on the opposite side of
the vehicle. Be sure to use all hardware supplied and tighten all bolts.
Page 5 of 5
Table of contents
Popular Other manuals by other brands


Magnetic Autocontrol
Magnetic Autocontrol MPH 112 operating instructions

Sharper Image
Sharper Image SHP921 manual

Belkin
Belkin F5U203ea user guide

Active Tools
Active Tools CoxOrb Platinum Wiring Loom Instructions for installing

Razor
Razor Ripstik 15055040 user manual

TERASAKI
TERASAKI S100-NF instruction manual


