Blackmagicdesign Blackmagic Cinema Camera User manual

Installation and Operation Manual
Blackmagic Cinema Camera
Windows™
December 2012
Mac OS X™

Welcome
Welcome
Thank you for purchasing Blackmagic Cinema Camera!
We have worked hard to produce a camera that's designed from the ground up to have a very wide dynamic
range and to produce files that are "flat", which means they preserve this wide dynamic range. This will
allow you to make your creative decisions by using the included DaVinci Resolve 9 color correction tools!
We think this means you get a cinema style shooting experience where you capture and preserve more of
the image so you have as many creative options as possible. An added benefit of the 2.5K sensor is you
capture more pixels than you need for HD so your HD images get a wonderful anti aliased look, similar to
shooting film!
We have also included a large screen for easy focus and metadata entry as well as standard file formats
that work with all video software. We hope you connect to this camera in a creative way and produce some
amazing looking images! We will be extremely excited to see what creative work you produce!
Grant Petty
CEO Blackmagic Design
Contents
Blackmagic Cinema Camera
Getting Started
Attaching a Lens 5
Turning the Camera On and Off 5
Inserting a SSD 6
Begin Recording 6
Choosing the Recording Format 6
Playing Back Clips 7
Using Remote Control 7
Charging the Internal Battery 7
Blackmagic Cinema Camera Utility 8
How to Set Up Thunderbolt™to Capture and Monitor Video 9
Settings
Camera Settings 10
Camera ID 10
Setting Date and Time 10
ISO 10
White Balance 11
Shutter Angle 11
Audio Settings 12
Recorder Settings 13
Display Settings 15
Adjusting Settings 16
Iris Button and Control 16
Focus Button 16
Focus Zoom - Double Tap 16
Image Stabilizer 16
Status Strip 17
5
10
18
19
21
25
Entry of Metadata
What is the Slate? 18
How to Enter Metadata Information 18
Connections
Remote 19
Headphones 19
Audio In 19
SDI Out 19
Thunderbolt™19
Power 19
USB 19
Blackmagic Cinema Camera 20
Software Compatibility
Accessing Clips 21
RAW Files 23
Workflows 24
Using Blackmagic Video Software 24
About SSDs
Important Information About SSD Speeds 25
Supported Disk Format 26
Recommended SSDs for RAW Recording 27

Contents
Blackmagic Cinema Camera
30
31
39
51
53
Attaching Accessories
Sun Shield 28
Carry Strap 28
Blackmagic Cinema Camera Handles 29
Working with Thunderbolt Technology
What Can I Do with the Thunderbolt Port on My Camera? 30
Using Blackmagic Media Express
Using Blackmagic UltraScope
Help
Getting Help 51
Blackmagic Design Online Support Pages 51
Contacting Blackmagic Design Support 51
Checking the Version Currently Installed 51
How to Get the Latest Software Updates 51
Battery Replacement 51
Replacing the Fan 52
Warranty Information
28

Getting Started
5
Getting started with the Blackmagic Cinema Camera is as simple as attaching a lens, turning the camera on
and inserting a SSD. You can test the camera by recording and playing back your first shot and, of course,
don't forget to charge the battery before you start shooting!
Attaching a Lens
Before you attach a lens to the camera, you'll need to remove the camera's dust cap from the lens mount.
You can then attach and remove your favorite EF and ZE mount lenses. When no lens is attached to the
camera, don't forget to replace the camera's dust cap.
Dust Cap
To remove the protective dust cap from the lens mount, hold down the locking button and rotate the cap
in a counterclockwise manner until its dot reaches the 12 o’clock position. The mounting points should now
be aligned, and the cap should easily lift off.
To replace the dust cap, align the dot on the mounting ring with the dot on the dust cap and turn in a
clockwise fashion until locked into place.
Attaching and Removing a Lens
The Blackmagic Cinema Camera is compatible with EF and ZE mount lenses. We recommended that you
always turn off your Blackmagic Cinema Camera prior to attaching or removing a lens.
To attach a lens, first remove the protective dust cap from the Blackmagic Cinema Camera and also the rear
cover from your desired lens. Many lenses have a colored dot (typically blue, red or white) or other indicator,
which you should align with the dot on the camera mount. Then twist the lens in a clockwise direction until
the lens locks into place.
To remove the lens, hold down the locking button, rotate the lens counterclockwise until its dot or indicator
reaches the 12 o’clock position and gently remove.
Turning the Camera On and Off
The camera's power button is located below the touchscreen. Press the power button to turn it on and the
status strip will appear along the bottom of the touchscreen. Hold the power button for 2 seconds to switch
off the camera.
Removing the dust cap
Attaching and removing the lens
Turning the camera on and off

Getting Started
6
Inserting a SSD
You can insert any 2.5" SSD formatted in either the HFS+ or exFAT file systems:
Step 1. Open the SSD door on the right hand side of the camera.
Step 2. With the gold SATA contacts facing towards the camera door, insert the SSD until you feel it press
into place.
Step 3. Close the SSD door.
When you first switch on Blackmagic Cinema Camera, or any time you insert a SSD into the SSD slot, the
status strip will change from NO SSD to a moving dot while checking the SSD, and then READY. If the SSD
has not been formatted correctly, or fails to work, the status strip will show NO SSD. Remove the SSD and
refer to the later section "About SSDs" to check if the SSD is formatted correctly and also check that it works
with a computer. If it doesn't work with a computer, there's something wrong with the SSD and it's not going
to work with your camera. Try another SSD and preferably use a model that is on the recommended SSD list
in the "About SSDs" section of this manual.
Begin Recording
To record with your Blackmagic Cinema Camera, insert a SSD and press the REC button on the front face of
the camera or the record button in the transport control under the touchscreen. Press record again to stop
recording. This is all you need to do to record unless you prefer to record in a different video format.
Choosing the Recording Format
You can choose to record to CinemaDNG RAW 2.5K video or to a compressed, high definition, QuickTime
movie in Apple ProRes 422 (HQ) or Avid DNxHD video formats. To select the desired video format:
Step 1. Press the MENU button below the touchscreen.
Step 2. Press the REC menu icon on the touchscreen.
Step 3. Press the left-right selection arrows to set the desired recording format.
Step 4. Press the MENU button again to exit.
Your camera is now ready to record in the video format you have selected. The current recording format is
shown at the bottom left of the touchscreen display.
Press the REC button on the front face
or on the transport control on the back of the camera
Inserting a SSD

Getting Started
7
Playing Back Clips
Recorded clips can be played back on the camera's touchscreen. Once you have recorded your video, you
can use the transport control buttons under the touchscreen to play back your video.
Press the play button once for instant playback and you'll see your video on the touchscreen and on any
display connected to the SDI output. Hold down the forward or reverse buttons to fast forward or reverse
through the clip. Playback will finish when the end of the current clip is reached.
The controls of your camera work just like a CD player, so pressing the forward button will skip to the start of
the next clip. Press the reverse button once to go to the start of the current clip or press twice to skip back
to the start of the previous clip.
Using Remote Control
The remote port on your camera can be used to remotely control the following functions of your camera
including starting and stopping record, iris adjustments and also focus adjustments when using a compatible
lens.
The remote port can be found under its dust cap on the left face of the camera. The port is a 2.5 mm stereo
jack which uses the standard Sony LANC protocol.
Charging the Internal Battery
The camera's internal battery can be charged using the supplied DC adapter. Alternatively, you can use any
DC power source between 11V and 30V to charge the battery.
The camera can be charged and operated while connected via DC power. You can also charge the camera
via a powered USB connection. However, it takes a longer time to charge the camera via USB so we
recommend using the DC adapter when possible.
Simply press the Play button on the transport controls
to view your clip.
Use a LANC remote cable to control the cinema camera

Getting Started
8
Blackmagic Cinema Camera Utility
Blackmagic Cinema Camera Utility is used to change settings and update the internal software in your
camera.
How to Update Your Cinema Camera Software on Mac OS X
After downloading the Blackmagic Cinema Camera Utility software and unzipping the downloaded file,
open the resulting disk image to reveal its contents.
Launch the Blackmagic Cinema Camera Installer and follow the onscreen instructions.
How to Update Your Cinema Camera Software on Windows
After downloading the Blackmagic Cinema Camera Utility software and unzipping the downloaded file,
you should see a Blackmagic Cinema Camera Utility folder containing this PDF manual and the Blackmagic
Cinema Camera Utility installer.
Double-click the installer and follow the onscreen prompts to complete the installation.
How to Update the Internal Software
After installing the latest Blackmagic Cinema Camera Utility on your computer, connect a USB cable
between the computer and the camera. Launch the Blackmagic Cinema Camera Utility and follow any
onscreen prompt to update the internal software in your camera.

Getting Started
9
How to Set Up Thunderbolt to Capture and Monitor Video
This section guides you through how to set up your Blackmagic Cinema Camera with your computer for
video capture and waveform monitoring.
Connecting the Blackmagic Cinema Camera to your computer
Step 1. Connect power to the Blackmagic Cinema Camera using the included power adapter. Battery
power can be used but you'll usually want to connect the power adapter for longer sessions.
Step 2. Connect a Thunderbolt cable between the Thunderbolt port on the Blackmagic Cinema Camera
and a Thunderbolt port on your Mac OS X computer, or to a Thunderbolt disk array which is
attached to your Mac OS X computer.
Step 3. Use your camera to record or play back video so that your video software can obtain a video
signal from the camera.
Settings
10
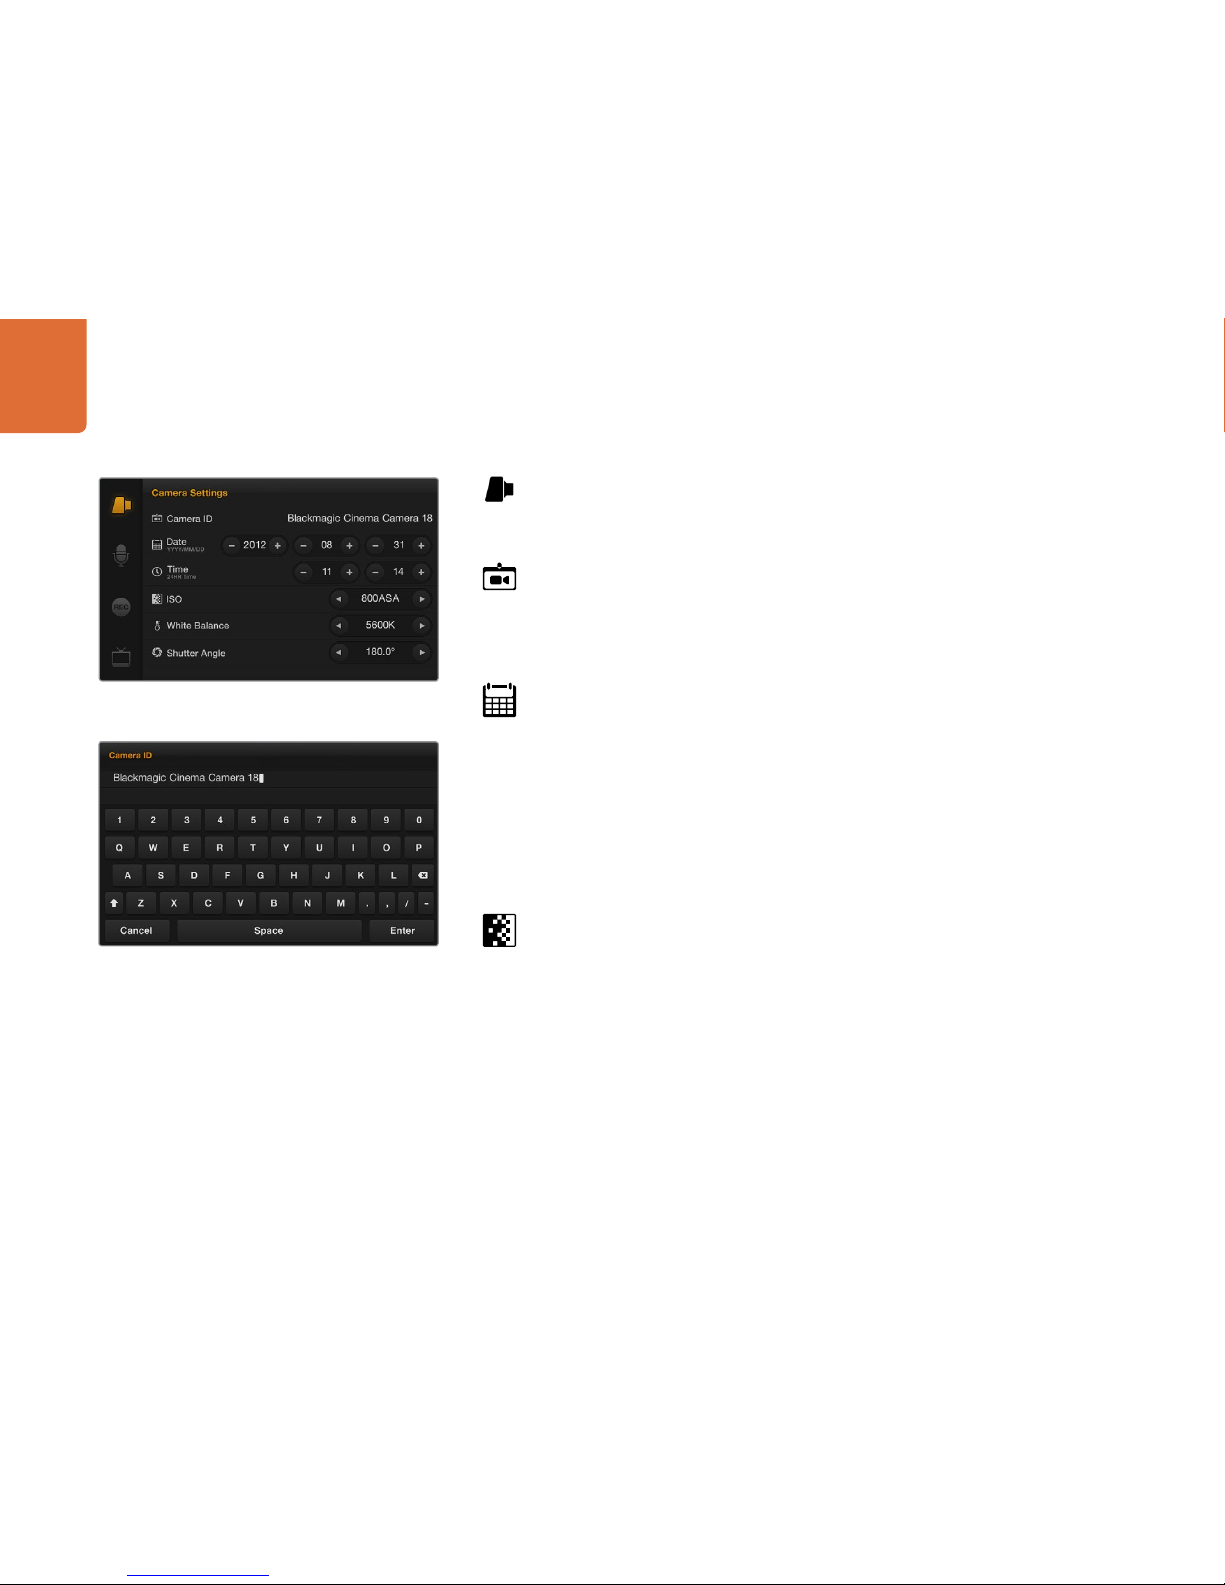
Camera Settings
To configure camera settings on your Blackmagic Cinema Camera, press the MENU button in the
transport control and tap the onscreen camera menu icon.
Camera ID
If you're using more than one Blackmagic Cinema Camera, it can be helpful to set a camera ID
which will be included with any metadata recorded with your clips. You can change the camera ID
by tapping the current name and then changing or entering a new camera ID with the onscreen
keyboard. Use the Enter button to save the new camera ID or press Cancel to discard any changes.
Setting Date and Time
To set date and time on your Blackmagic Cinema camera, press MENU button and change the year,
month and day settings to the correct date.
To set the time, adjust the time settings on the screen to the desired time in 24 hour format. You will
need to manually change the date and time to local time zones if traveling with your Blackmagic
Cinema Camera.
If you have your Blackmagic Cinema Camera stored for a length of time, the clock may become
inaccurate. It is always a good idea to check the time and date prior to recording. If you connect the
camera via USB to your computer and run the Blackmagic Camera Utility, the camera time will also
be synced with your computer's time.
ISO
ISO settings are helpful when you are shooting in a variety of light conditions. The optimum ISO
setting for the Blackmagic Cinema Camera is 800ASA. Depending on your situation, however, you
may choose a lower or higher ISO setting. For example, in low light conditions 1600ASA would
be suitable but might introduce some visible noise. In bright conditions 400ASA would be best to
record richer colors.
To adjust the ISO settings, tap the arrow icons on the touchscreen.
You can change the camera ID with the onscreen keyboard
The Camera Settings screen

Settings
11
White Balance
Your Blackmagic Cinema Camera includes 6 white balance presets for a variety of color temperature
conditions. These are
3200K for tungsten light
4500K for fluorescent light
5000K, 5600K, 6500K and 7500K for a variety of daylight conditions such as time of day
To adjust the White Balance settings, tap the arrow icons on the touchscreen.
Shutter Angle
Shutter angle compliments the ISO setting by regulating the amount of light on the sensor. 360
degrees is considered wide open and will retain a significant amount of motion blur. This would be
best for extremely low light conditions as it allows maximum light on to the sensor, however it is best
suited to low impact sequences otherwise motion blur will be obvious.
While 180 degrees is commonly regarded as a normal shutter angle, you may need to use a Shutter
Angle of 172.8 degrees to minimize flickering lights when shooting 24p in countries with 50 hertz
power supplies. You can use any shutter angle to shoot 24p in countries with 60 hertz power supplies
and most people will choose 180 degrees for a normal look.
To adjust the shutter angle settings, tap the arrow icons on the touchscreen.
The Camera Settings screen

Settings
12
Audio Settings
To adjust audio input and audio monitoring settings on your Blackmagic Cinema Camera, press the
MENU button and select the microphone icon to the left of the touchscreen display.
Microphone Input
Microphone input adjusts the built-in microphone. Drag the audio slider icon to increase or decrease
levels. The mono microphone input is recorded to audio channels 1 and 2 when no external audio
source is connected to the camera.
Channel 1 and Channel 2 Input Levels
The external audio inputs accept audio at microphone level or line level. It's important to select Mic
or Line level audio as appropriate to avoid your external audio sounding almost inaudible or too hot
and distorted.
Set the external audio input levels by using the left and right arrows. To prevent damage, the camera
will automatically switch to line level input if the input levels are over the limit for a sustained period
of time.
Channel 1 Input
Drag the audio slider icon for channel 1 to increase or decrease levels. The external audio input
overrides the built-in microphone and is recorded to audio channel 1.
Channel 2 uses Channel 1 Input
Use this setting if you only have channel 1 input and want to record the same external audio to
channels 1 and 2. Press the Off button to change it to On. Press the On button if you want to change
it back to Off.
Channel 2 Input
Drag the audio slider icon for channel 2 to increase or decrease levels. The external audio input
overrides the built-in microphone and is recorded to audio channel 2.
Headphone Volume, Speaker Volume
When headphones are connected, a headphone icon will be displayed. When no headphones are
detected, a speaker icon will be displayed. Headphones will always be active when recording or
playing back, however speakers will only work when playing back. Drag the volume slider to increase
or decrease volume levels for audio monitoring.
The Audio Settings screen

Settings
13
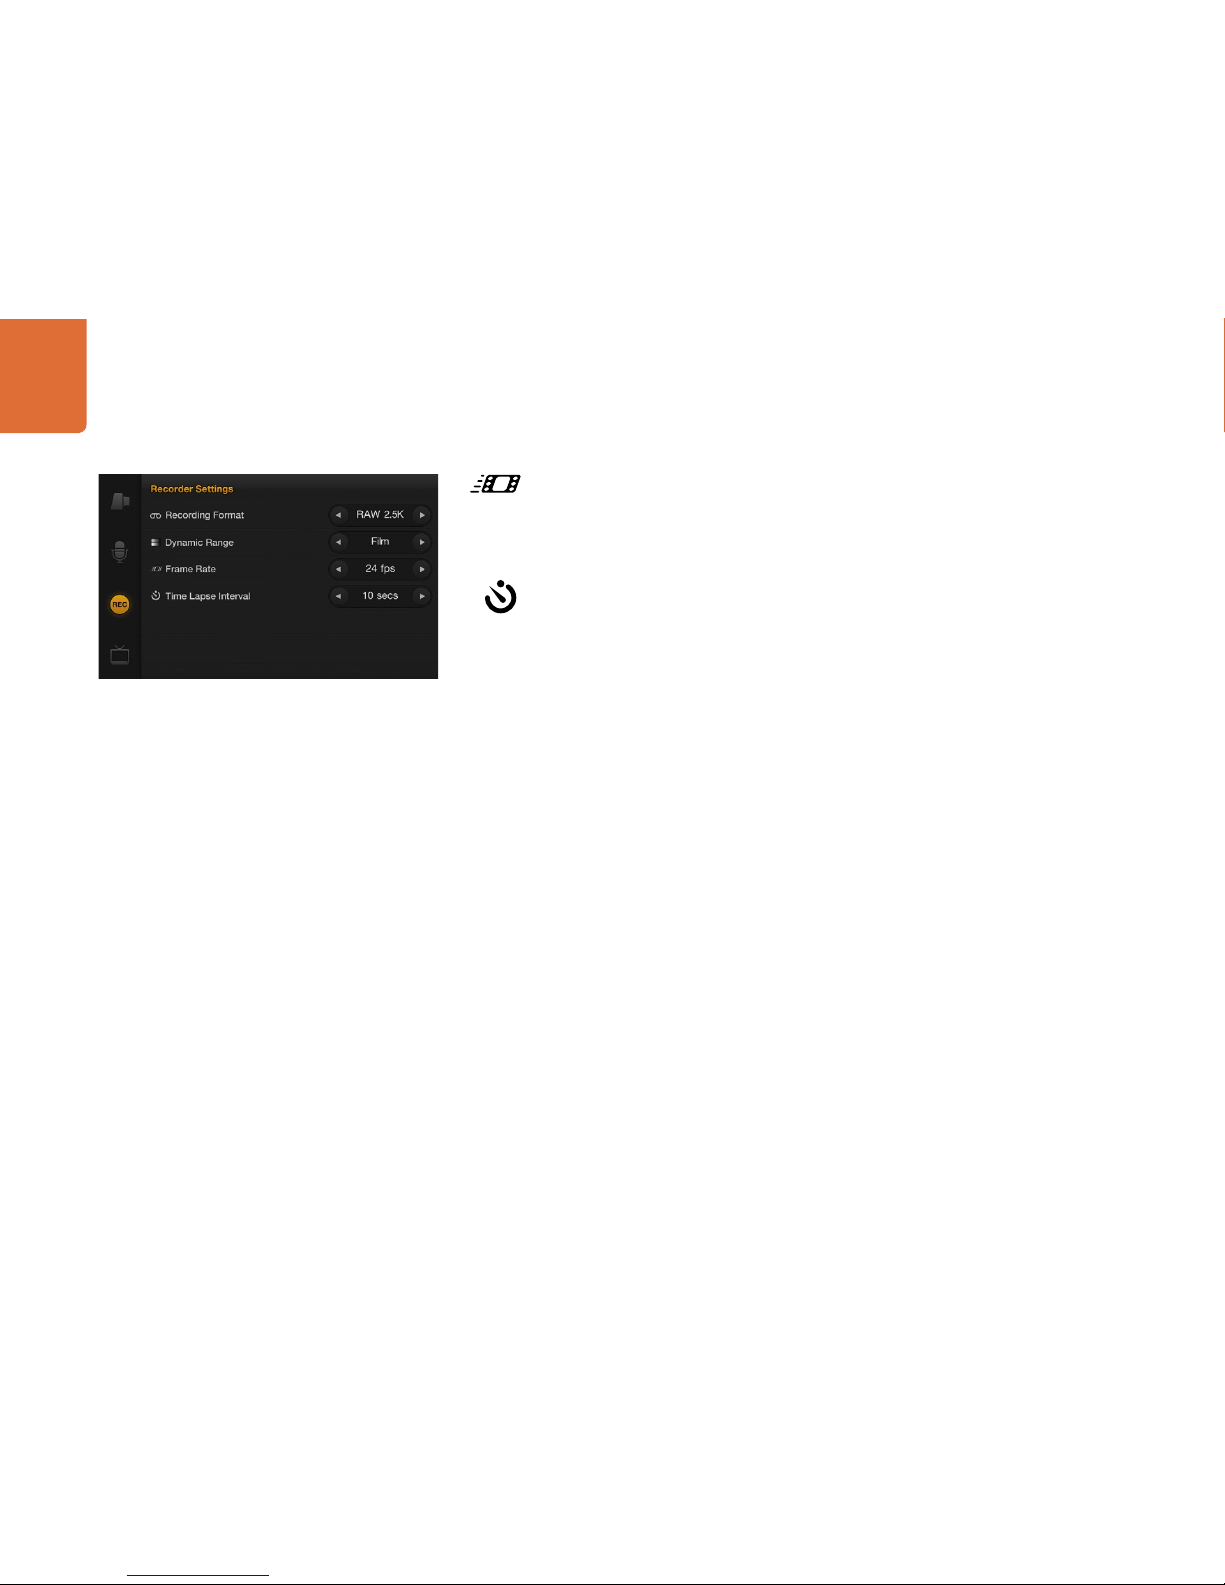
Recorder Settings
The recorder settings are used to set the video format recorded to the built-in SSD recorder. To set
recorder settings on your Blackmagic Cinema Camera, press the MENU button in the transport
control panel and then tap the onscreen REC icon.
Recording Format
You can choose to record to CinemaDNG RAW 2.5K video or to a compressed, high definition,
QuickTime movie in Apple ProRes 422 (HQ) or Avid DNxHD video formats. Choose RAW 2.5K for
maximum quality, especially if you intend to color grade your video. Choose ProRes or DNxHD if
you want to record in a high definition format suitable for broadcast.
To select the recording format, tap the arrow icons on the touchscreen.
Dynamic Range
Your Blackmagic Cinema Camera has two dynamic range settings, Film and Video, which are
available when ProRes or DNxHD is selected as the recording format.
Film
The film setting shoots video using a log curve and gives you 13 stops of dynamic range, which
increases contrast levels to help you get the most out of color grading software such as DaVinci
Resolve.
Video
The video setting uses the REC709 standard for high definition video which lets you work faster by
recording directly to the Apple ProRes 422 (HQ) or Avid DNxHD video formats, which are compatible
with popular post production software.
To select the dynamic range, tap the arrow icons on the touchscreen.
The Recorder Settings screenThe Recorder Settings screen
Settings
14
Frame Rate
Your Blackmagic Cinema Camera has five different frame rate settings for shooting common film
and video frame rates: 23.98 fps, 24 fps, 25 fps, 29.97 fps, 30 fps.
To select the frame rate, tap the arrow icons on the touchscreen.
Time Lapse Interval
This setting allows you to record individual frames at interval ranges of 1 - 10 seconds or 1 - 10
minutes. For example, you can set the camera to record a still frame every 5 minutes. The format
of each still frame is based on your recording format, so if you set the camera to record in ProRes,
the time lapse setting will maintain this format. The frame rate will be based on the video frame rate
you have set the camera to, i.e., 24fps, so your time lapse footage can be incorporated into your
workflow easily.
To select the time lapse interval, tap the arrow icons on the touchscreen or leave it set it to Off if you
do not want to use the time lapse feature.
The Recorder Settings screen

Settings
15
Display Settings
To adjust the display settings for the camera's touchscreen, press the MENU button and select the
television icon on the touchscreen.
Dynamic Range
The touchscreen serves as your viewfinder, allowing you to view your video as you are recording. You
can set the dynamic range of your viewfinder by tapping the onscreen television icon and selecting
video or film.
The dynamic range of the display is set independent of the recorder settings. Some people prefer
to monitor video with the touchscreen display set to “video” even when the recording format is set
to “film”.
To select the dynamic range, tap the arrow icons on the touchscreen.
Brightness, Contrast
Adjust the brightness and contrast settings by tapping the touchscreen and sliding the control to
the left or right to achieve desired levels for comfortable viewing.
Zebra + Warning Level
The Blackmagic Cinema Camera has a zebra feature which gives an indication of exposure levels.
Diagonal lines will appear across any part of the video which exceeds the zebra exposure level.
Turn zebra on and select the desired zebra warning level by using the left and right arrows.
SDI Overlays
The SDI Overlays setting lets you display useful information on your SDI monitor. Tap the arrow icons
on the touchscreen to select which overlays to display on your SDI feed.
All: displays both frame guides and recording information.
Status: displays only the recording information, such as f-stop number, frame rate, battery life etc.
Guides: displays only the frame guides.
Off: gives you a clean SDI feed.
The Display Settings screen
SDI Overlays set to display on a monitor attached to the SDI output

Settings
16
Adjusting Settings
Your Blackmagic Cinema Camera supports electronic iris control, focus peaking and image stabilization and
is compatible with cinema style EF and some ZE mount lenses, all of which have the highest optical quality.
Iris Button and Control
You can also manually adjust the iris of your lens by using the forward and reverse buttons on the transport
control panel.
When shooting using the Video dynamic range, exposure will be set using an average similar to what you're
used to on a stills camera. However, in Film dynamic range, the IRIS button adjusts your exposure to ensure
that nothing in your scene is clipped.
Focus Button
The FOCUS button allows you to sharpen the images without affecting your recorded picture, as it creates
a peaking edge around the sharpest part of the image to confirm focus.
To turn on, press the FOCUS button located near the top-right of the touchscreen.
The FOCUS button turns on focus peaking, which highlights the edges in your scene that are in focus and
helps you get accurate focus when using manual lenses.
Focus Zoom - Double Tap
Double tap the touchscreen display to zoom into the image to help you adjust focus at the 1:1 pixel scale.
Double tap the display again to zoom out.
Image Stabilizer
Blackmagic Cinema Camera supports the image stabilizer (IS) feature found in many EF lenses. Simply set
the Stabilizer switch to ON to use it with your camera. If your lens also features a Stabilizer Mode switch, set
it to the appropriate mode for still shots or for movement.
When using battery power, the camera will only activate the image stabilizer while recording as the lens
draws additional power from the camera to operate the image stabilizer. When external power is connected
to the camera, the image stabilizer will be active any time you set the lens' stabilizer switch to ON.
The IRIS button is located near the top-left of the touchscreen
and the FOCUS button is near the top-right.
When focusing the camera, double tap the touchscreen display
to zoom into the image to help you adjust focus.

Settings
17
Status Strip
Along the bottom of the touchscreen is a status strip that contains a convenient summary of the recording
settings that have been chosen through the various menus. This information is displayed in the following
order from left to right on the strip:
Format - ProRes, DNxHD or RAW 2.5K
F-Stop number
Frame Rate
SSD Status
Timecode / Record duration / Playback duration (based on entire clip)
ISO Setting
Shutter Angle Setting
White Balance Setting
Battery Life Indicator
There are two important indicators on the status strip to note.
Battery Life Indicator
When the remaining charge drops below 25% capacity, the status strip will show the battery status in red to
warn you that battery life is running low.
SSD Status
The status strip displays important information showing the state of the inserted SSD.
Moving Dots When you see the moving dots, the camera is checking and preparing the SSD.
No SSD This means no SSD is detected or present in the camera.
Ready Ready to Record.
Rec Recording.
Rec flashing Dropped Frames were detected.
Disk Full Flashes when disk is almost full.
Playback mode Shows play, fast forward and reverse icons.
Time During capture, this shows the duration of the current shot. When playing back
clips from the SSD, this shows the time of the clip in relation to the clips on the SSD.
Entry of Metadata
18
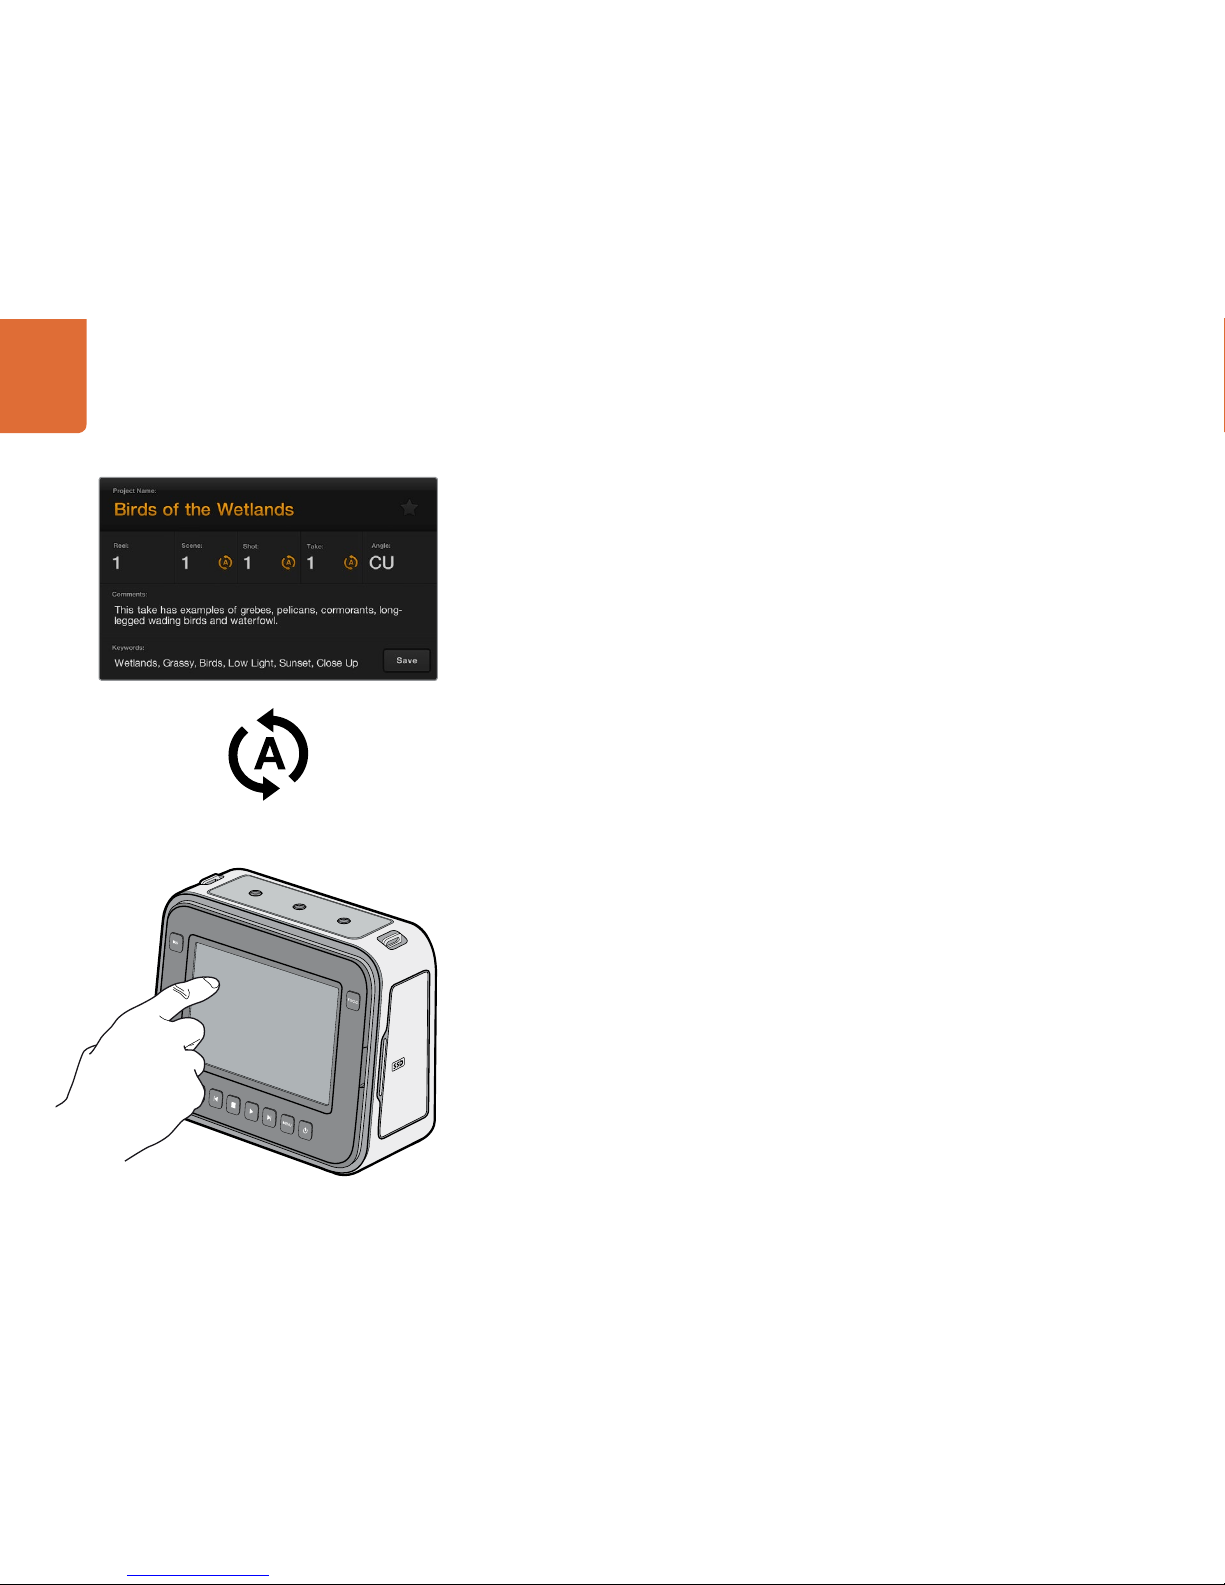
What is the Slate? - Single Tap
The large touchscreen on the Blackmagic Cinema Camera has many purposes, one of which is to allow
you to easily log metadata directly into the camera. Tap the display once with your finger and a data entry
window called the ‘slate’ will appear.
This data is referred to as ‘metadata’. The metadata is stored in the files and is easily accessed by NLE
software when editing content.
How to Enter Metadata Information
Tap once on the touchscreen to make the slate appear.
To enter or change details, tap the text that you wish to change and an onscreen keyboard will appear.
Type in the desired information and press the save button.
If you want the scene, shot or take number to auto-increment, tap the corresponding auto-increment icon
so it is illuminated. Tap it again if you want to turn off the auto-increment feature.
Entering words into the Keywords field will allow you to use them as search terms in your library database.
This may be particularly useful for large projects where you have a lot of material to sort. The use of keywords
narrows down the number of clips to search through, saving valuable time when you are editing a project.
All metadata is compatible with popular software such as Final Cut Pro X and DaVinci Resolve.
Focus Zoom - Double Tap
Double tap the touchscreen display to zoom into the image to help you adjust focus at the 1:1 pixel scale.
Double tap the display again to zoom out.
The Slate
Tap the display once with your finger and a data entry window
called the ‘slate’ will appear.
Tap the auto-increment icon if you want the scene, shot
or take number to auto-increment.

Connections
19
The Blackmagic Cinema Camera features standard connections, so custom cables are not required.
Connections are located on the left side of the camera and are protected from dust and dirt by rubber
hoods.
Remote
The 2.5mm stereojack for remote connection uses the standard LANC protocol to support record start,
record stop, iris control and manual focus.
Headphones
3.5 mm stereo headphone jack connection.
Audio In
Audio in is via ¼” TRS jack/mic. Balanced audio inputs accept mic or line level audio for recording the
highest quality uncompressed audio. Audio settings are accessed via the touchscreen to select between
mic and line level audio.
SDI Out
The BNC port provides 3 Gb/s SDI output and lets you monitor on set or send video to an SDI router.
The SDI output of your Blackmagic Cinema Camera always outputs 10-bit 4:2:2 high definition 1920 x 1080
video regardless of whether you are recording RAW 2.5K, ProRes or DNxHD to your SSD.
When SDI Overlays are set to on in the display settings, the SDI output also shows action safe and title safe
frame guides as well as the camera status strip.
Thunderbolt™
The Blackmagic Cinema Camera features a Thunderbolt port to capture video to your computer using the
included DaVinci Resolve color grading software or Blackmagic Media Express. Alternatively Thunderbolt
can be used with the included Blackmagic Design UltraScope software for waveform monitoring. For more
information about DaVinci Resolve, please refer to the accompanying manual.
Power
12 – 30V DC input for power and battery charging.
USB
A mini-USB 2.0 port is located on the right hand side of the camera, behind the SSD door, to allow you to
update the internal software of the camera with the latest Blackmagic Cinema Camera Utility software.
Connections are located on the left side of the camera and are
protected from dust and dirt by rubber hoods.
The mini-USB 2.0 port is located behind the SSD door.

Connections
20
3.5 mm Headphone
Socket
LANC 2.5 mm
Remote Control
12-30 V DC Power Input
¼” balanced jack
mic and line level
audio inputs
3 Gb/s SDI Output
Thunderbolt Port
Blackmagic Cinema Camera
Other manuals for Blackmagic Cinema Camera
4
Table of contents
Other Blackmagicdesign Camcorder manuals

Blackmagicdesign
Blackmagicdesign URSA Setup guide

Blackmagicdesign
Blackmagicdesign Blackmagic URSA User manual

Blackmagicdesign
Blackmagicdesign Pocket Cinema Camera 4K Operating instructions

Blackmagicdesign
Blackmagicdesign Blackmagic Cinema Camera User manual

Blackmagicdesign
Blackmagicdesign URSA Mini 4K User manual

Blackmagicdesign
Blackmagicdesign Blackmagic Cinema Camera User manual

Blackmagicdesign
Blackmagicdesign Cameras User manual

Blackmagicdesign
Blackmagicdesign Intensity Pro User manual

Blackmagicdesign
Blackmagicdesign URSA BROADCAST User manual

Blackmagicdesign
Blackmagicdesign Studio Camera User manual


