Blackmagicdesign URSA BROADCAST User manual

Installation and Operation Manual
Blackmagic
URSA Broadcast
Includes Blackmagic Camera Fiber Converter,
Studio Fiber Converter, Blackmagic URSA Viewfinder,
URSA Studio Viewfinder and URSA Mini Shoulder Mount Kit
February 2018

Welcome
Thank you for purchasing Blackmagic URSA Broadcast!
Since we released our first digital film camera a few years ago we have been privileged to have
received some of the best guidance and feedback we have ever had for a new product! We all
grew up admiring the work of the world’s leading cinematographers and DOPs and it’s been an
honor to spend hours in conversations with these legendary experts on the features we need
to add to our cameras. Of course, everyone we speak to has good ideas also!
With URSA Broadcast, we've packaged an amazing broadcast sensor into a super small, light
and sturdy metal chassis.
URSA Broadcast's beautiful user interface is designed for single operators who need quick,
easy access to all of their camera’s functions, while comprehensive ATEM switcher integration
and extremely low latency gives you the perfect solution for live studio production, combined
with full CCU features for incredible control over your camera directly from the switcher.
We also listened to single operators when we developed our URSAViewfinder which is perfect
for mobile ENG style shooting on the shoulder.
Additional features include ergonomic controls, interchangeable lens mounts and internal ND
filters. If you are familiar with ENG cameras, we believe you will find these ergonomic controls
and the built in ND filters extremely powerful.
We hope you use your URSA Broadcast to produce some of the world’s most exciting television
programming, documentaries and live studio content. We are extremely excited to see what
creative work you produce and to get your feedback on new features you would like to see us
add to URSA!
Grant Petty
CEO Blackmagic Design
English

Contents
Blackmagic URSA Broadcast
Getting Started 6
Attaching a Lens 6
Powering your Camera 7
Using Servo Zoom Lenses 10
Storage Media 17
CFast Cards 17
SD Cards 20
Preparing Media for Recording 23
Preparing Media on
Blackmagic URSA Broadcast 24
Preparing Media on Mac 26
Preparing Media on Windows 26
Recording 28
Recording Clips 28
Trigger Record 30
Record Duration Table 30
Playback 32
Playing Back Clips 32
Operating URSA Broadcast 33
Camera Front 33
Left Side 34
Left Side Controls 34
Right Side 35
Rear Panel 36
Top Panel 37
Underside 38
URSA Broadcast Controls 39
Forward Control Panel 39
Ergonomic Control Panel 42
Internal Control Panel 47
Touchscreen Controls 50
Touchscreen 50
Touchscreen Features 50
Settings 70
Dashboard 70
Record Settings 70
File Naming Convention 75
Monitor Settings 76
Audio Settings 83
Setup Settings 85
Presets 96
LUTS 98
Entering Metadata 101
Camera Video Output 107
HD Monitoring Output 107
12G-SDI Output 107
URSA Mini Shoulder Mount Kit 109
Blackmagic URSA Viewfinder 113
Mounting and Connecting
toBlackmagic URSA Broadcast 113
Adjusting the Eyepiece 114
Button Features 114
Menu Settings 115
Blackmagic URSA Studio Viewfinder 120
Mounting and Connecting
toBlackmagic URSA Broadcast 121
Adjusting the Blackmagic
URSA Studio Viewfinder 123
Button Features 126
Menu Settings 128

Mounting Batteries 133
Mounting V-mount or
GoldMount Batteries 133
Using your own Battery Plate 134
Blackmagic Fiber Converters 136
Getting Started with
BlackmagicFiber Converters 137
About SMPTE Fiber 137
Connecting SMPTE Fiber 139
Why Connections on the Front? 144
Plugging in Camera SDI 144
Plugging in Return SDI Outputs 144
Mounting BlackmagicCamera
Fiber Converter 145
Attaching the URSA Studio
Viewfinder 147
Plugging in a Talkback Headset 147
Operating the
CameraFiberConverter 148
Selecting a Return Feed 148
Using Talkback 149
Using Tally 150
Status Indicators 150
Audio Inputs 151
IP Video 152
Power Specifications 152
Operating in a Small Environment 153
Operating the
StudioFiberConverter 154
Selecting the LCD Source 154
Rack Mounting the Studio Unit 154
Camera Unit Connections 156
Camera Power Connection 156
PTZ Interface 156
Talkback Connection 157
Tracker Interface 158
DC Connection 158
D-Tap Output 159
Reference Output and Operation 159
Studio Unit Connections 160
12G-SDI Output 160
Return SDI Inputs 160
Reference Input and Output 161
Talkback Interface 162
PTZ Interface 163
Audio Outputs 163
Updating Internal Software 164
Updating Blackmagic Camera
Fiber Converter 164
Updating Blackmagic Studio
Fiber Converter 164
Interchangeable Lens Mount 165
Removing the B4 Mount 166
Blackmagic URSA Mini Pro EF Mount 166
Blackmagic URSA Mini Pro F Mount 168
Blackmagic URSA Mini Pro PL Mount 171
Blackmagic URSA Broadcast
B4 Mount 175
Shimming Lens Mounts 176
Blackmagic URSA Mini Pro Shim Kit 176
Shimming mounts 177
Contents

URSA Mini SSD Recorder 179
Mounting and connecting
URSA Mini SSD Recorder 180
Using URSA Mini SSD Recorder 182
Updating URSA Mini SSD
Recorder’s internal software 183
Understanding Studio
CameraControl 184
Using Camera Control 185
DaVinci Resolve Primary
ColorCorrector 190
Using DaVinci Resolve 193
Importing your Clips 194
Editing your Clips 195
Trimming Clips 196
Mapping Keyboard Shortcuts 196
Adding Transitions 197
Adding Titles 198
Color Correcting your Clips 199
Using Scopes 200
Secondary Color Correction 202
Qualifying a Color 202
Adding a Power Window 203
Tracking a Window 204
Using Plugins 204
Mixing Your Audio 205
The Fairlight Page 206
The Audio Timeline 206
What is a Bus? 207
The Mixer 207
Using the Equalizer to
Enhance your Audio 208
Mastering your Edit 210
Working with RAW files 211
Blackmagic Camera Setup Utility 214
Working with Third Party Software 216
Working with Files from
CFast2.0 and SD cards 216
Working with 3rd Party Software 216
Using Final Cut Pro X 217
Using Avid Media Composer 217
Using Adobe Premiere Pro CC 218
Using Autodesk Smoke 2013 219
Developer Information 220
Blackmagic SDI Camera
Control Protocol 220
Blackmagic Embedded
TallyControl Protocol 228
Help 230
Regulatory Notices
andSafetyInformation 231
Warranty 232
Contents

Getting Started
Getting started with URSA Broadcast is always as simple as mounting a lens and powering
your camera.
Attaching a Lens
URSA Broadcast is shipped with a B4 mount for attaching B4 mount lenses. These lenses
typically have a built in handle and strap that lets you hold the camera securely on your
shoulder, plus control the zoom rocker and iris controls.
URSA Broadcast's B4 mount features optics specifically designed to work with your camera's
Ultra HD sensor to produce the same field of view and depth of field as traditional broadcast
cameras with 2/3" sensors. This means that if you already have a broadcast background, you
can be comfortable mounting your existing B4 lenses to URSA Broadcast and capture footage
straight away.
To remove the protective dust cap from the camera, rotate the outer locking ring
counterclockwise and pull the dust cap away from the mount.
To attach a B4 mount lens:
Attaching and removing a B4 lens on Blackmagic URSA Broadcast
1 Turn the B4 lens locking ring counterclockwise to reveal the alignment pin inside
the top of the mount. Align the B4 lens to your URSA Broadcast's B4 mount so the
registration slot on the lens mount matches the position of the alignment pin.
2 Hold the lens against the B4 mount so the mount plates are against each other.
Make sure the alignment pin is secured inside the registration slot.
3 Turn the locking ring clockwise to tighten the lens against the mount and lock it
into position.
4 To power the lens and provide lens control, simply plug the lens cable into the
connector marked ‘Lens’ on the front of your URSA Broadcast's turret. Most B4 lenses
will have the hirose 12 pin connector and cable built in. This will provide power and
control signals from your URSA Broadcast to the lens.
LENS
66Getting Started

For information on the types of B4 lenses and how to use them with your camera, refer to the
'Using Servo Zoom Lenses' section in this manual.
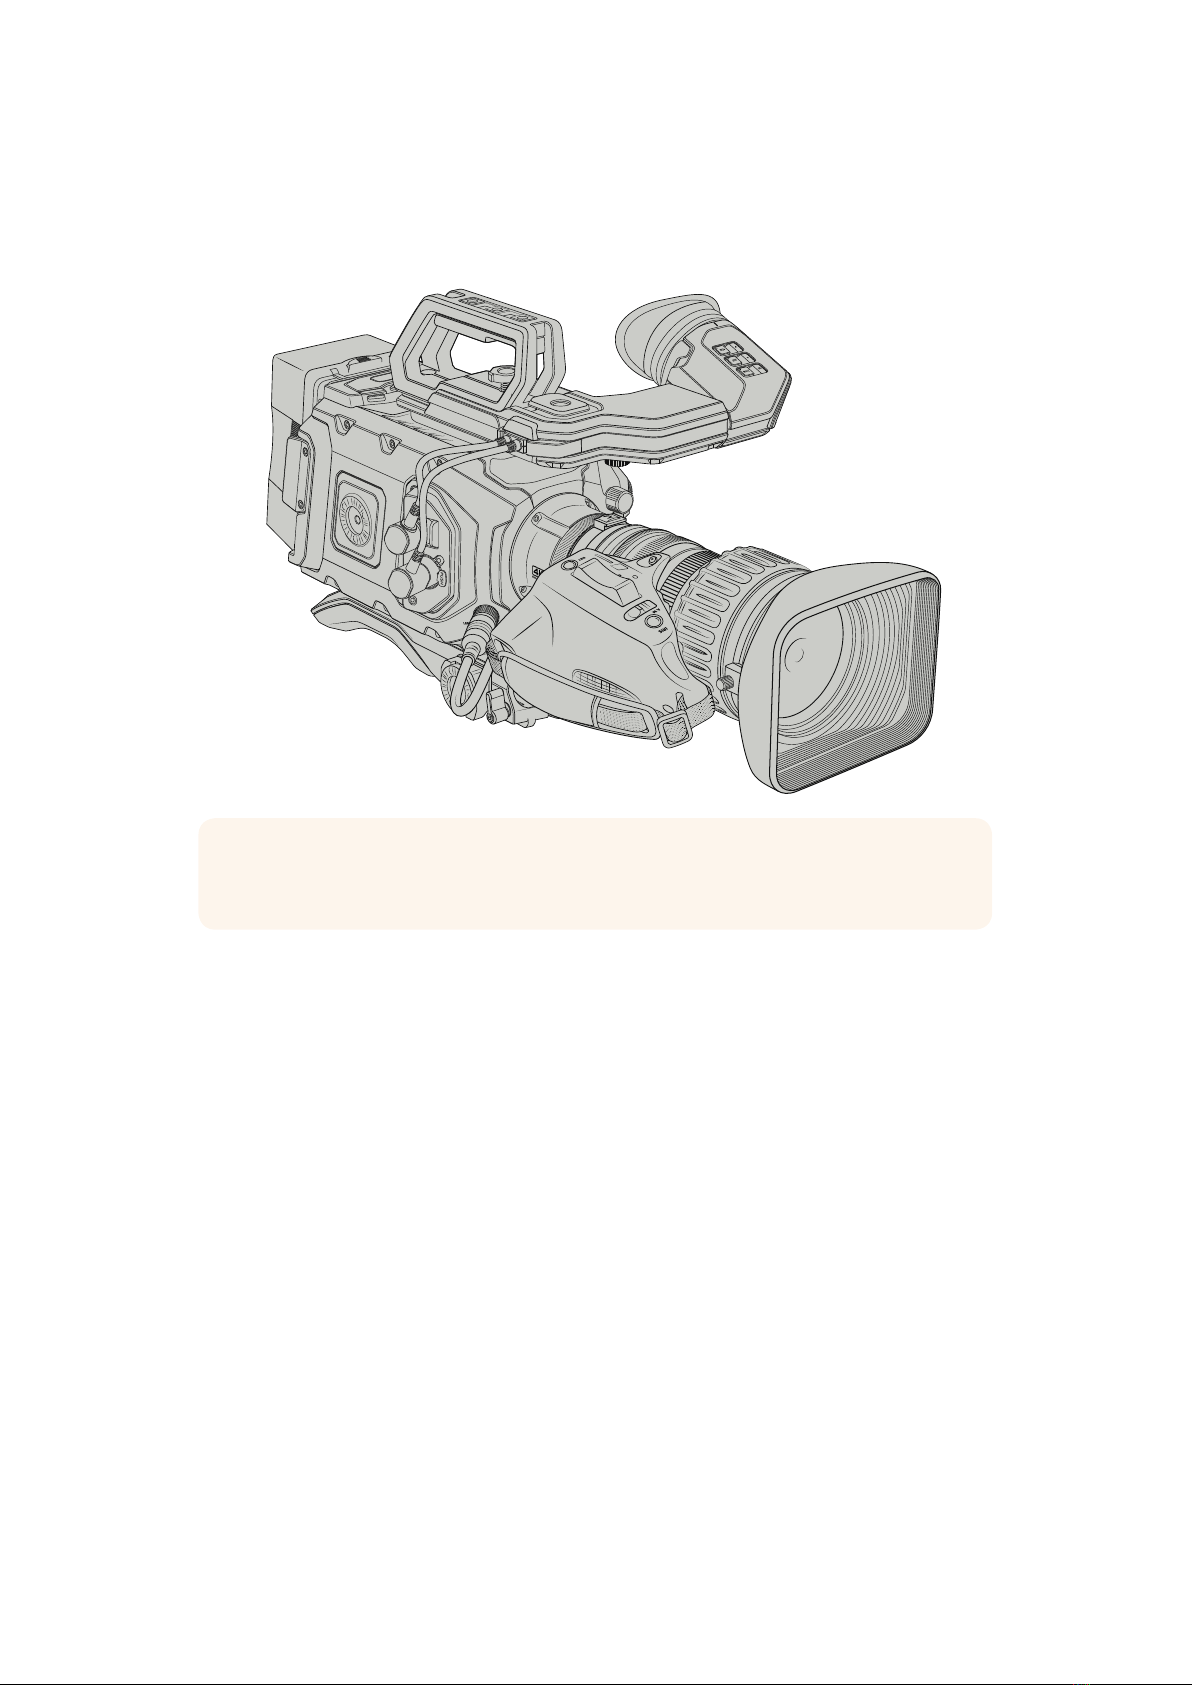
Many B4 lenses can be quite long due to their extreme zoom range. When using
URSABroadcast with B4 lenses, your camera's center of gravity will move forward.
Thereforewe recommend using the URSA Mini Shoulder Mount Kit or mounting the camera
toatripod head to help stabilize the camera before attaching your lens.
When mounting URSA Broadcast on the URSA Mini Shoulder Mount kit, it's also a good idea to
mount the camera towards the rear of the shoulder mount base. This moves your camera rig's
center of gravity back over the middle of the mount, making it easier to balance on your
shoulder and rest steadily when sitting on a desk or flat surface. See 'Blackmagic URSA Mini
Shoulder Mount Kit' for more information on fitting the base.
Powering your Camera
Now that you’ve attached a lens, you will need to supply power. The quickest way to power
your camera is to connect external power using the supplied AC to 12V DC adapter.
NOTE When no lens is attached to the camera, the optical element of
URSABroadcast's B4 mount isexposed to dust and other debris. Ensure that you
keepthe dust cap on whenever possible.
ISO/GAIN
ON OFF
Center of gravity
NOTE Blackmagic URSA Broadcast features an interchangeable lens mount, which is
capable of accepting EF and PL lenses, as well as additional lens mounts with
accessories. Formore information on switching between mount types on
URSABroadcast, refer to the 'interchangeable lens mount' section in this manual.
77Getting Started

To plug in external power:
1 Connect the AC to 12V DC adapter plug to your mains power socket.
2 Connect the AC to 12V DC adapter’s 4 pin XLR connector to the 12-20V DC power
connector on the camera.
If you have both external and battery power connected, only external power will be used. If you
remove external power while a charged battery is connected, your camera will switch to battery
power without interruption.
Use the supplied AC to 12V DC adapter to power your Blackmagic URSA Broadcast
You can use industry standard third party external batteries such as V mount or Gold Mount
batteries with your URSA Broadcast. Refer to the ‘mounting batteries' section for more
information about mounting the different types of battery plates to support different batteries.
To turn on URSA Broadcast:
1 Move the power switch, located above the fold out LCD, to the 'on' position.
2 To turn the camera off, move the switch to the 'off' position.
You are now ready to insert CFast 2.0 cards and start recording!
Move the power switch to 'on' to power your camera
AUDIO IN
1
AUDIO IN
2
SDI OUT
12V OUT
SDI OUT
SDI IN
12V
REF IN
TC IN
AUDIO IN
1
AUDIO IN
2
SDI OUT
12V OUT
SDI OUT
SDI IN
12V
REF IN
TC IN
ISO/GAIN SHUTTER WHITE BAL
XLR1
ON OFF
XLR2
SD
CFAST
USB
MIC
LINE
AES
OFF
48V
POWER
FOCUS PEAK PGM MENU
REC
ISO/GAIN SHUTTER WHITE BAL
XLR1
ON OFF
XLR2
SD
CFAST
USB
MIC
LINE
AES
OFF
48V
POWER
FOCUS PEAK PGM MENU
REC
88Getting Started
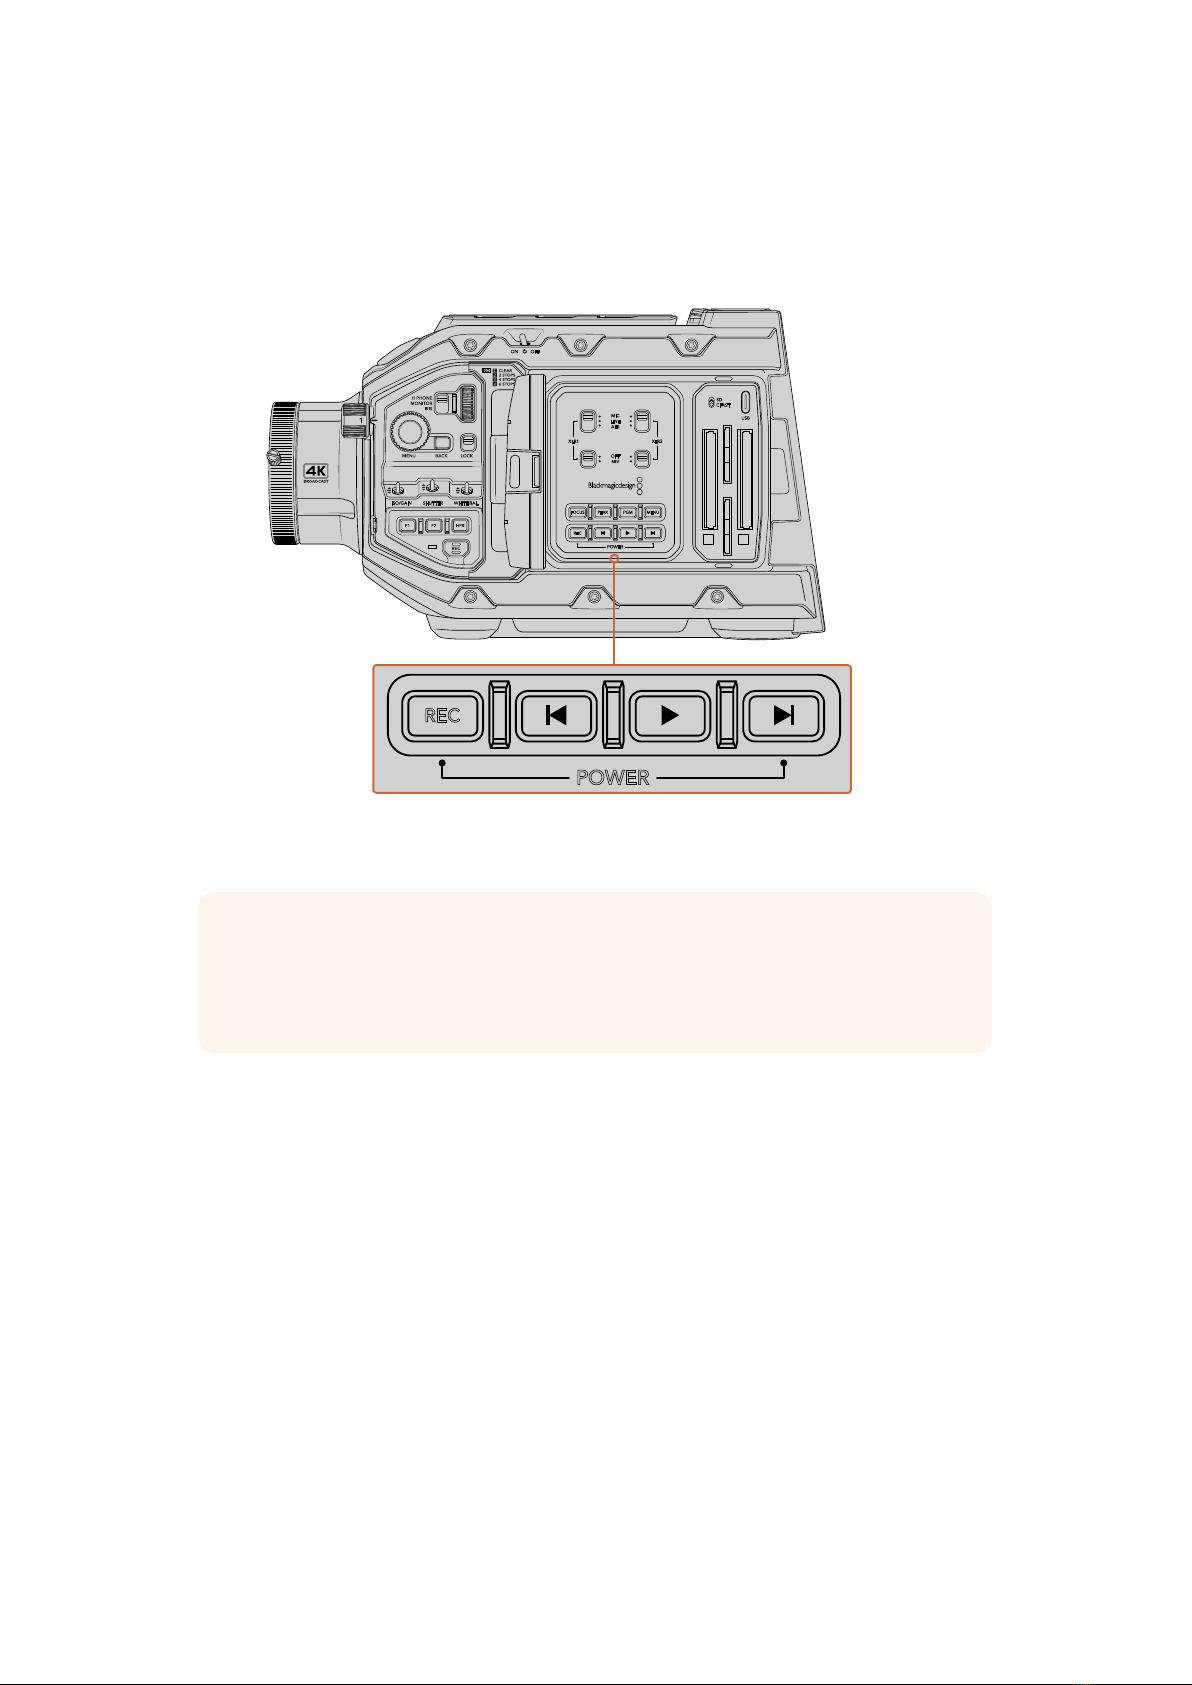
URSA Broadcast also features a redundant power switch, which allows the camera to be turned
on and off by holding down the 'rec' and 'forward skip' buttons on the inside control panel.
While you wouldn't normally power your camera using this method, it is provided as a helpful
alternative if the power switch along the top edge is obscured, for example when
mounted on a custom rig.
If you need to, you can also hold down the record and forward skip buttons
on the control panel behind the LCD to power your camera on or off
ISO/GAIN SHUTTER WHITE BAL
XLR1
ON OFF
XLR2
SD
CFAST
USB
MIC
LINE
AES
OFF
48V
POWER
FOCUS PEAK PGM MENU
REC
ISO/GAIN SHUTTER WHITE BAL
XLR1
ON OFF
XLR2
SD
CFAST
USB
MIC
LINE
AES
OFF
48V
POWER
FOCUS PEAK PGM MENU
REC
TIP If your URSA Broadcast is turned off when the power switch is set to 'on', your
camera may have been powered down via Bluetooth® control or by holding down the
record and forward skip control panel buttons. Simply toggle the power switch 'off' and
'on,' or hold down the relevant control panel buttons to power the camera on.
99Getting Started
Using Servo Zoom Lenses
Your URSA Broadcast camera natively supports servo driven B4 broadcast lenses.
B4 broadcast lenses offer several features that aren’t typically present in still photography and
cinema lenses. In addition to the ability to hold focus through a large zoom range, these lenses
are distinguished by handgrip controls and servo driven iris and zoom functions. Some lenses
also feature servo driven focus. With the 12 pin hirose connector fitted, iris and zoom can be
controlled from the handgrip, from your camera or even remotely through an ATEM switcher.
Lenses with servo focus can all accept auto focus commands from a camera or switcher.
B4 Lenses with iris and zoom control include:
Fujinon B4 lens models with HA, ZA, XA and UA prefixes in their model name and RM
in their suffix. For example, Fujinon XA20sxBRM.
Canon B4 lens models with HJ, KJ and CJ prefixes and IRSE or IRSD in their suffix.
For example for example Canon KJ20x8.2B IRSD.
B4 Lenses with full servo control for focus, iris and zoom include:
Fujinon B4 lens models with HA, ZA and UA prefixes in their name and the letters RD
or ZD in the suffix. For example, Fujinon HA22x7.8 BERD.
Canon B4 lens models with HJ, KJ..ex and CJ prefixes in their name and the letters
IASE or IASD in the suffix. For example, Canon HJ24ex7.5B IASE.
It’s important to set these functions properly so your URSA Broadcast operates as expected.
Follow these simple steps to configure your B4 lens and start shooting.
LENS
TIP Using the optional URSA Mini Pro PL mount fitted, URSA Broadcast is
alsocompatible with servo driven PL cine lenses.
10Using Servo Zoom Lenses
B4 lens controls
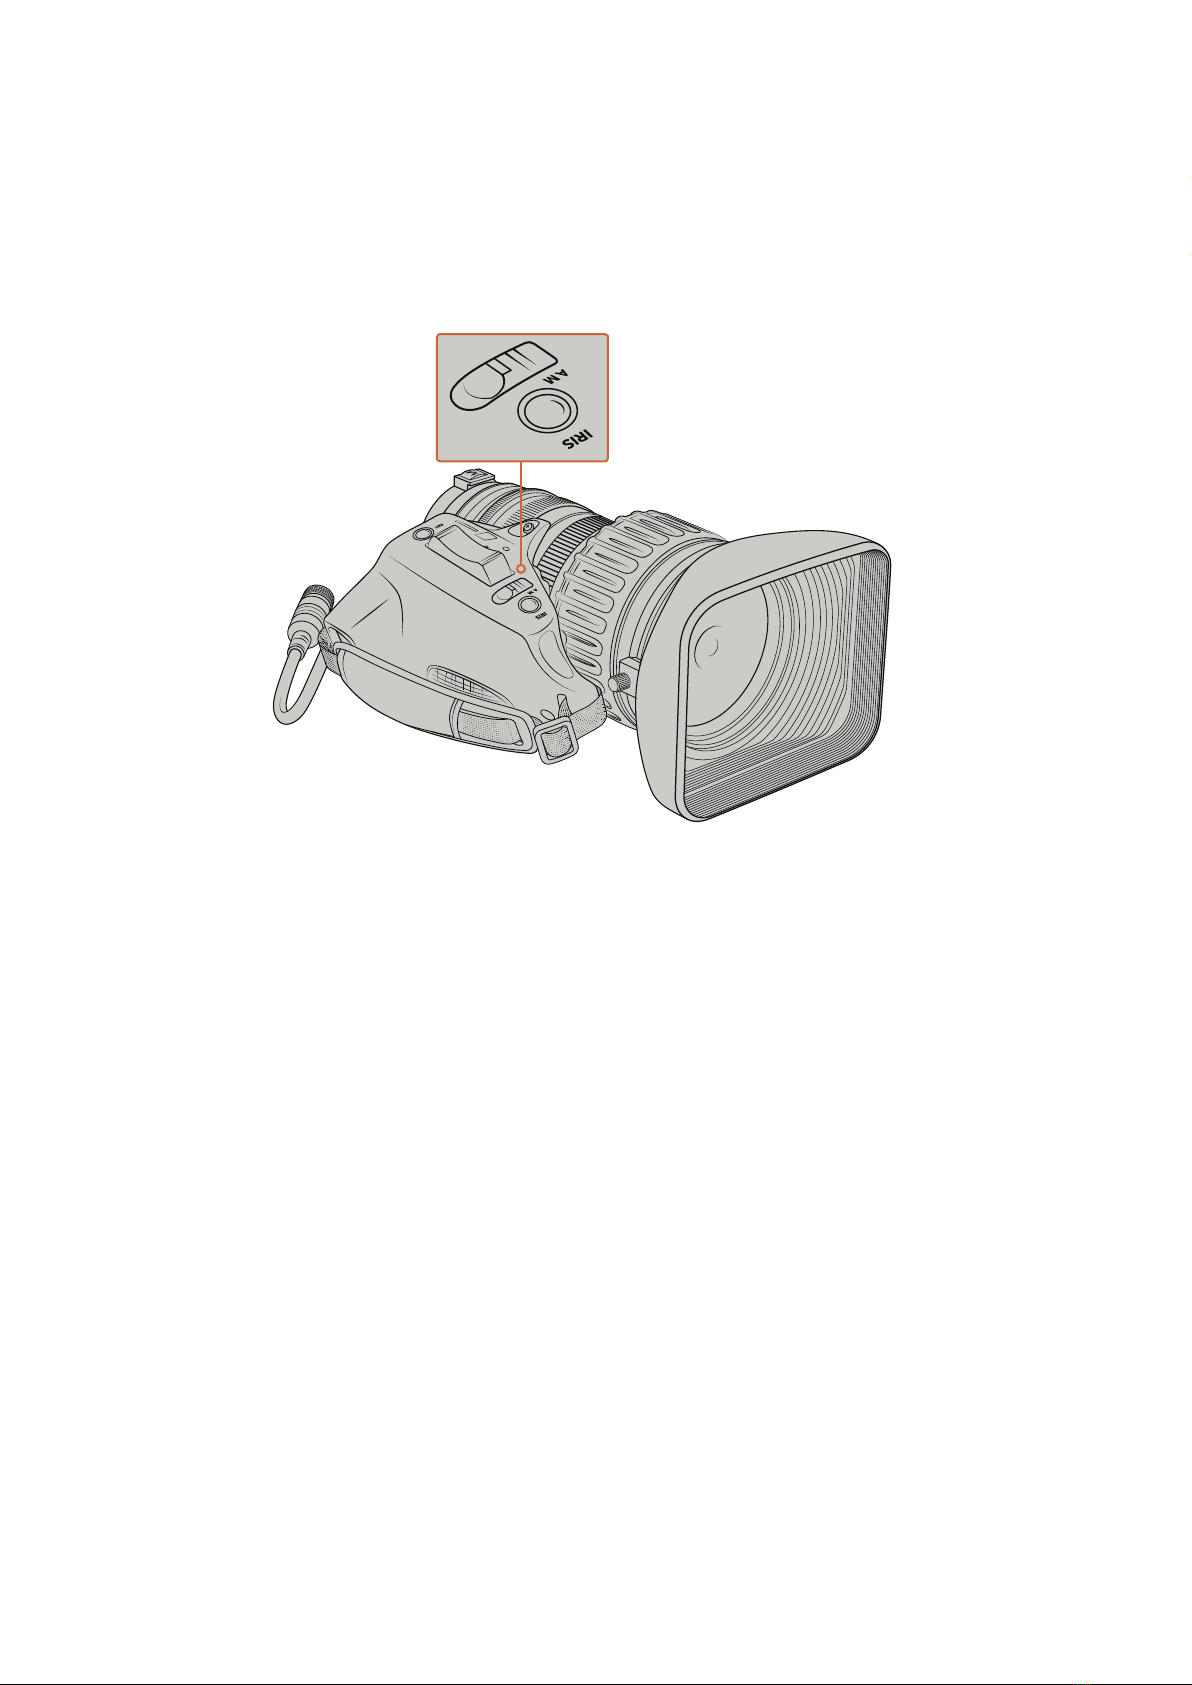
Iris
On the top of most B4 handgrips, you’ll find an 'auto/manual' or 'A/M' switch, and a 'push auto'
or 'iris' switch. These control the your lenses’ aperture ring.
Auto
Set this switch to ‘auto’ or ‘a’ to adjust your lens aperture via your URSA Broadcast or an
ATEM switcher. You can adjust lens aperture from URSA Broadcast using the iris wheel,
internal control panel buttons, touchscreen controls, or iris based auto exposure
modes. See the ‘URSA Broadcast controls’ and ‘touchscreen controls’ sections in this
manual for more details. While in ‘auto’ mode, the aperture ring on your B4 lens cannot
be moved manually.
Manual
Set this switch to ‘manual’ or ‘m’ to adjust your lens aperture by turning the iris ring on
the lens barrel. In this mode, your lens will not accept aperture commands from your
URSA Broadcast or ATEM switcher.
Push Auto / Iris
Use this button to momentarily activate ‘auto’ aperture control while in ‘manual’ mode.
This can be combined with iris controls on your camera or ATEM switcher to
great effect.
For example, with your camera set to an iris based auto exposure mode and your lens
aperture set to ‘manual,’ you can freely adjust your lens iris by using the aperture ring
on the lens barrel, however tapping the 'push auto' / 'iris' button will momentarily
activate auto exposure, adjusting your iris for the current lighting conditions.
Alternatively, you can set an iris value using the controls on your URSA Broadcast’s
LCDtouchscreen. While in ‘manual’ mode, you are free to adjust lens aperture using the
aperture ring on the lens barrel, but tapping the 'push auto' / 'iris' button will return the
lens to the preset value on your touchscreen.
11Using Servo Zoom Lenses

Zoom
On the underside of most B4 handgrips, you’ll find a ‘zoom’ switch that can be set to ’servo’ or
‘manual.’ This controls zoom behavior.
Servo
Set this switch to ‘servo’ or ’s’ to enable servo zoom control. In this mode, the rocker
switch on your handset can be used to zoom your lens in and out, as well as any other
zoom related controls, such as zoom speed and quickzoom. Your lens will also accept
zoom commands from URSA Broadcast and ATEM switchers, so long as it is connected
to the camera via the 12 pin hirose connector. In this mode, you typically can’t adjust
your lens's manual zoom ring.
Manual
Set this switch to ‘manual’ or ‘m’ to disable servo control and adjust zoom using the
zoom ring on your lens barrel. In this mode, your lens will not accept zoom commands
from the handgrip, URSA Broadcast, or ATEM switchers.
TIP Handgrip zoom rockers are typically linked to zoom speed. Push the
rocker down gently to zoom slowly, push down harder to zoom more rapidly.
ZOOM
FOCUS
S M S M
12Using Servo Zoom Lenses

Focus
Some B4 lenses also have focus servo controls. If this control is present on your lens, you’ll see
a ‘focus’ switch on the underside of the handgrip with two settings, ‘servo’ and ‘manual.’
Servo
Set this switch to ‘servo’ or ’s’ to enable servo focus control. In this mode, your lens can
accept focus commands from URSA Broadcast or an ATEM switcher via the 12 pin
hirose connector.
Manual
Set this switch to ‘manual’ to use the focus ring on the lens barrel to control focus.
B4lenses tend to autofocus quite slowly, so using manual control is more common.
ZOOM
FOCUS
S M S M
NOTE Analog B4 lenses with servos are also supported although the camera will only
power the zoom servo and support electronic iris control. Many of them are standard
definition and may not have the standard 12 pin Broadcast connector. If you are going
to use an analog B4 lens, it’s important to make sure it is compatible with your camera
first as some have limited feature sets. It is also worth testing them for their image circle
coverage as some of them may reveal resolution and light fall off towards the edge of
the frame.
13Using Servo Zoom Lenses

Setting the Back Focus on B4 Lenses
One of the huge advantages of B4 lenses is that they are designed to be ‘parfocal’ which
means they hold focus all the way through the zoom range. This means you can zoom in, get
focus on an object and then when you zoom out it will remain in focus.
The back focus ring is typically located at the rear of the lens, close to the mount
Back focus is critical in ensuring that your HD or 4K B4 lenses retain focus right through the
zoom range. When you first mount a B4 lens on your camera you should check that the back
focus is correct. Back focus should also be checked when you swap lenses, and it’s a good
idea to periodically check back focus at the start of major projects.
To check the back focus of a B4 lens:
1 Place a focus test chart, or a flat white item with good high contrast detail,
approximately seventy feet, or as far away as possible, from the camera.
2 Set the iris on the lens wide open and compensate for exposure by using the built in
NDs if you need to. You'll want a shallow depth of field so you can exaggerate any
focus issues.
3 Zoom into the chart and set focus.
4 Now zoom out. If you reach maximum wide and the focus remains sharp, then your
back focus is correct and you don't need to make any adjustments.
However, if you zoomed out and the chart drifted out of focus, the back focus is
incorrect. Zoom all the way out and adjust the back focus ring on the rear of the lens
close to the mount. The back focus ring typically has a twist knob used to loosen and
tighten. Simply loosen the twist knob and rotate the ring until your chart is in focus.
5 Now zoom in and out slowly and check if your chart remains in focus all the way
through the zoom.
6 Repeat steps 4 and 5, zooming in and out and making adjustments to the back focus
ring. If your lens holds focus all the way through the zoom range your back focus is now
set correctly.
TIP As temperature changes and wear over time can have subtle effects on the back
focus, it's worth regularly checking the back focus on B4 lenses to ensure it
staysaccurate.
14Using Servo Zoom Lenses
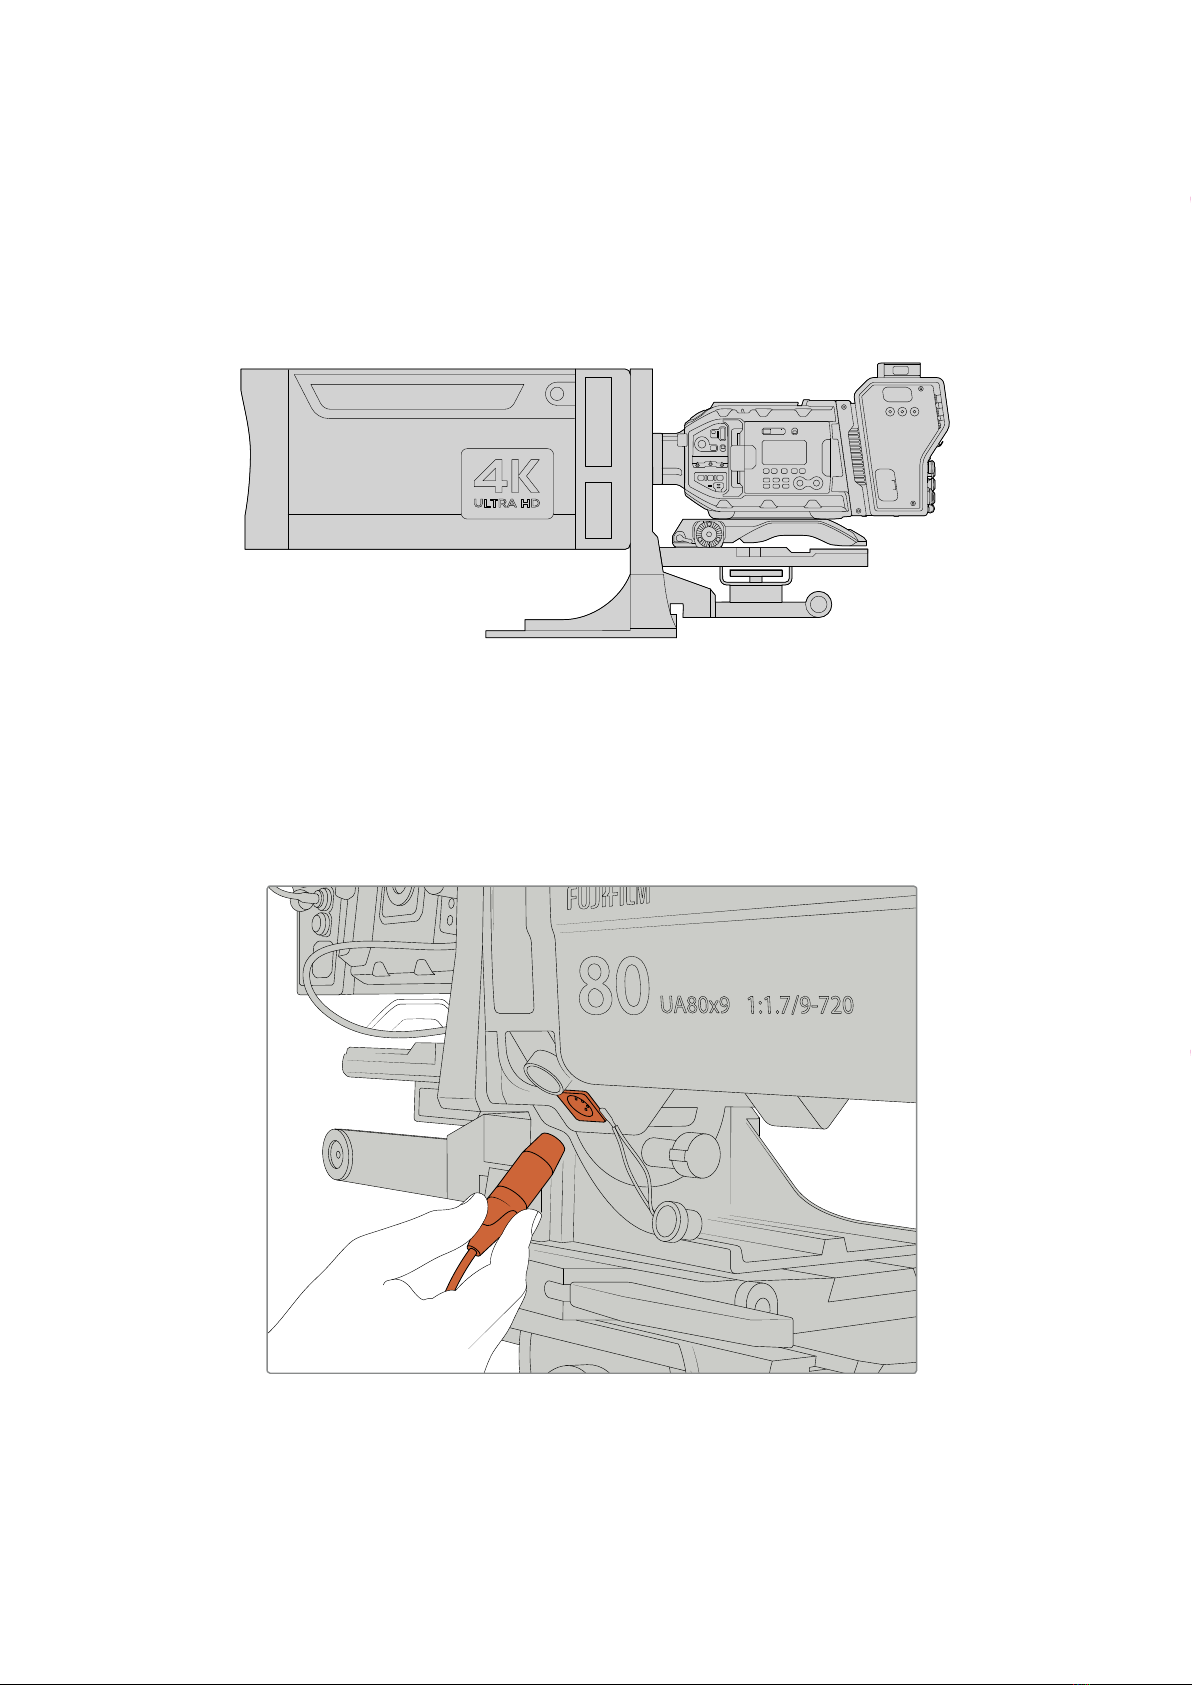
Using Box Lenses
Large studio box lenses like Fujinon’s UA series and Canon’s CJ series lenses can also be used
with URSA Broadcast or URSA Mini Pro’s B4 mount. These types of box lenses allow horizontal
and vertical image stabilization on studio style 27x lenses, as well as extreme zoom ranges with
80x, 86x, 90x and even 107x magnification which are incredible for broadcasting sports and
outdoor events.
The large size and high power draw of box lenses means that you will need to setup
your camera correctly on a heavy duty tripod or pedestal, with adequate spacing.
Thisis possible with URSA Mini Shoulder Kit, a VCT-14 plate and a box lens adapter.
Plug the 12 pin Hirose connector from the lens into URSA Broadcast or URSA Mini Pro’s 12 pin
lens connector. Add additional power to the lens by using an URSA 12 volt power supply, or
ifyou are using Blackmagic Camera Fiber Converter, you can run additional power from the
12volt D-tap output on the side of the unit.
Add additional power to your box lens by plugging in a 4 pin XLR cable
Once additional power is connected, you can power up your camera and control the lens with
your URSA Broadcast or URSA Mini Pro.
15Using Servo Zoom Lenses

PL Servo Zoom Lenses
PL zoom lenses used for motion pictures can also be used with your URSA Broadcast.
Theselenses are designed for super 35mm which is a larger format compared to 2/3" sensors,
so the image from the lens will have a narrower field of view to when it is used on a Super
35mm sensor camera. This can be effective as it decreases you field of view, so you get the
effect of zooming in even tighter. If you need to go wider, you may need to compensate for the
crop factor by using a shorter focal length lens.
Super 35mm PL lenses with full servo control of focus, iris and zoom include:
Brand Series Model Range Max. Aperture
Fujinon Cabrio ZK2.5x14-SAF 17-120mm T2.9
Fujinon Cabrio ZK4.7x19-SAFB 19-90mm T2.9
Fujinon Cabrio ZK3.5x85-SAF 85-300mm T2.9-T4
Fujinon Cabrio XK6x20 20-120mm T3.5
Fujinon Cabrio ZK12x25 with ESM-15A-SA 25-300mm T3.5-3.85
Canon Cine-servo CN7x17KAS S 17-120mm T2.9-3.9
Canon Cine-servo CN20x50 50-1000mm T5-8.9
Focus and zoom controls can also be used to drive focus and zoom from the pan handles in a
studio environment on all of the servo zoom lenses listed above.
Hybrid Compact Servo Zoom Lenses
Recently, a new category of lenses known as 'compact-servo' zoom lenses have been
introduced. These are have some of the functionality of B4 and PL servo zoom lenses but use
an EF mount. The zoom rocker for these lenses are able to be powered through the lens mount
from URSA Broadcast and information such as lens name, iris, focus and zoom position values
are all able to be read and recorded by URSA Broadcast's lens metadata system.
Electronic control of the focus, iris and zoom is available with these lenses. When connected to
a switcher, these can also be controlled remotely via ATEMSoftware Control. If you are
operating in a live broadcast or studio environment, use of Canon digital focus and zoom
control is possible, but additional custom cables are required from 3rd party manufacturers for
full functionality.
Lenses in this range include:
Canon CN-E 18-80mm T4.4 Compact-servo
Canon CN-E 70-200mm T4.4 Compact-servo
16Using Servo Zoom Lenses

Storage Media
Ursa Broadcast uses CFast 2.0 cards or fast UHS-II and UHS-I SD cards to record Ultra HD,
2Kor HD video.
CFast Cards
CFast 2.0 cards are capable of supporting very high data rates, so are perfect for recording
HDand 4K video at high frame rates. Refer to the record duration table in the ‘recording’
section for details on the maximum frame rates that can be recorded in each format.
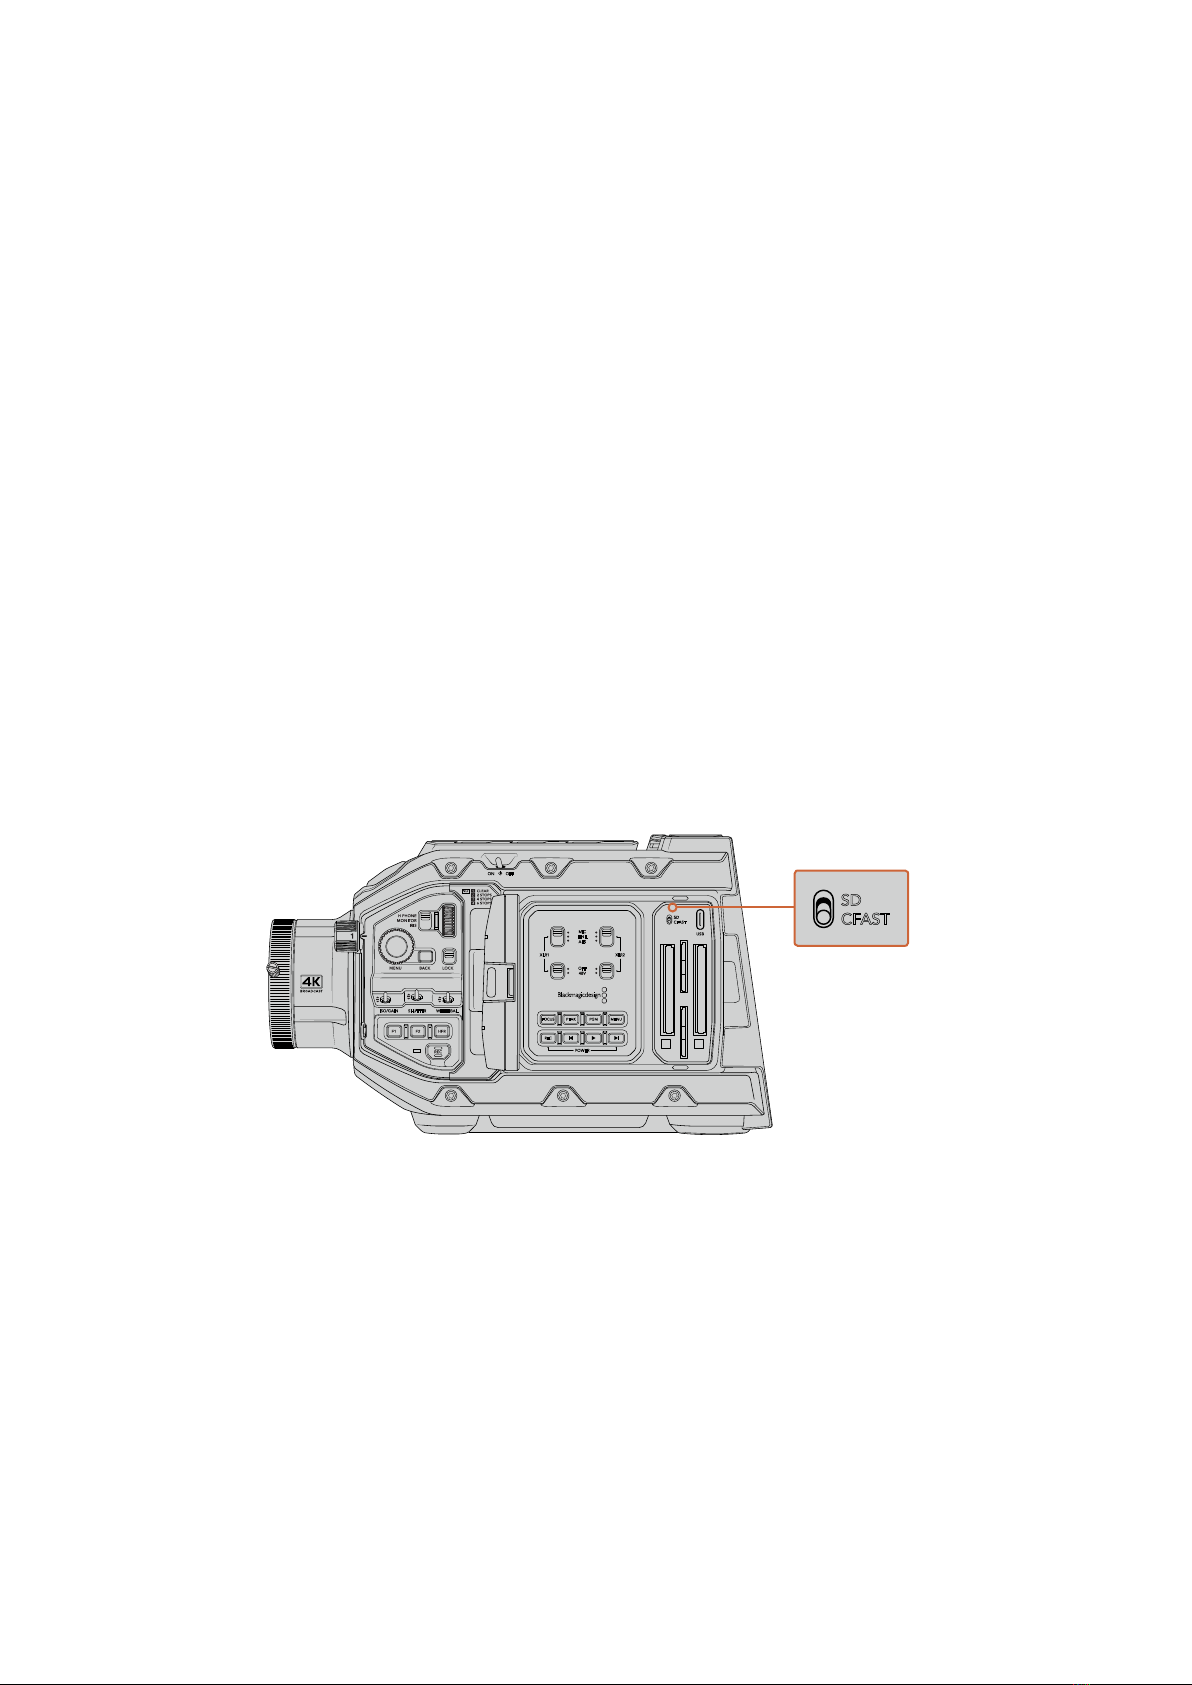
Inserting a CFast Card
To record using CFastcards you need to set your camera accordingly. To do this, set the
storage mediaswitch above the media slots to the 'CFAST' position.
To insert a CFast card.
1 Open the fold out monitor to access the CFast slots.
2 With the label on the CFast card facing the touchscreen, insert the card until you feel it
lock into place. Push the CFast card ejector button to eject the card.
The storage information at the bottom of the LCD touchscreen will show the name and
record time remaining of the detected CFast cards.
Blackmagic URSA Broadcast has two CFast
slots for continuous recording
NOTE While CFast 2.0 cards are generally high speed cards, some cards have slower
write speeds compared to read speeds, and maximum data rates can differ between
models. Toensure reliable recording in your chosen frame rates, use only the
recommended cards listed in this section.
AUDIO IN
2
AUDIO IN
2
FOCUS PEAK PGM MENU
REC
POWER
XLR1 XLR2
ON OFF
H PHONE
MONITOR
IRIS
LINE
MIC
AES
OFF
48V
AUDIO IN
2
AUDIO IN
2
FOCUS PEAK PGM MENU
REC
POWER
XLR1 XLR2
ON OFF
H PHONE
MONITOR
IRIS
LINE
MIC
AES
OFF
48V
17Storage Media

Choosing a CFast 2.0 Card
When working with high data rate video it’s important to carefully check the CFast card you
would like to use. This is because CFast 2.0 cards have different read and write speeds.
Somecards can record sustained RAW video, and some are suited to compressed recording
using ProRes and compressed RAW formats. The tables below identify the CFast cards
recommended for use when shooting with Blackmagic URSA Broadcast.
Which CFast cards should I use with the Blackmagic URSA Broadcast?
The following CFast 2.0 cards are recommended for 2160p RAW up to 30 fps.
Brand Card Name Storage
Angelbird AVpro CF 160GB
Angelbird AVpro CF 240GB
KomputerBay 3400x CFast 2.0 Card 64GB
KomputerBay 3400x CFast 2.0 Card 128GB
KomputerBay 3600x CFast 2.0 Card 64GB
Lexar Professional 3500x 128GB
Lexar Professional 3500x 256GB
Lexar Professional 3600x 128GB
Lexar Professional 3600x 256GB
SanDisk Extreme Pro. SDCFSP-128G-x46D 128GB
SanDisk Extreme Pro. SDCFSP-256G-x46D 256GB
Transcend CFX650. TS128GCFX650 128GB
Transcend CFX650. TS256GCFX650 256GB
Transcend CFX650. TS128GCFX650BM 128GB
Transcend CFX650. TS256GCFX650BM 256GB
Wise CFast 2.0 3400x 128GB
Wise CFast 2.0 3400x 256GB
The following CFast 2.0 cards are recommended for 2160p RAW up to 30 fps but have
beendiscontinued by the manufacturer.
Brand Card Name Storage
Lexar Professional 3400x 128GB
Lexar Professional 3400x 256GB
NOTE Only the 'D-series' of Sandisk CFast2.0 cards have been certified for use with
Blackmagic URSA Broadcast. These cards can be identified by a large ‘D’printed on
the back of the card in the lower left corner, and we have also listed the model
numbers to make them easier to identify. This model number varies slightly fromregion
to region, with the'x' in the model number changing in different markets. Forexample,
an 'A' in the UnitedStates and a 'G' in the Asia Pacific and Europe region.
18Storage Media

The following CFast 2.0 cards are recommended for 2160p ProRes 422 HQ up to 60 fps.
Brand Card Name Storage
Angelbird AVpro CF 160GB
Angelbird AVpro CF 240GB
KomputerBay 3400x CFast 2.0 Card 64GB
KomputerBay 3400x CFast 2.0 Card 128GB
KomputerBay 3600x CFast 2.0 Card 64GB
Lexar Professional 3500x 64GB
Lexar Professional 3500x 128GB
Lexar Professional 3500x 256GB
Lexar Professional 3600x 128GB
Lexar Professional 3600x 256GB
SanDisk Extreme Pro. SDCFSP-128G-x46D 128GB
SanDisk Extreme Pro. SDCFSP-256G-x46D 256GB
Silicon Power CFX310 CFast 2.0 Card 256GB
Transcend CFX650. TS128GCFX650 128GB
Transcend CFX650. TS256GCFX650 256GB
Transcend CFX650. TS128GCFX650BM 128GB
Transcend CFX650. TS256GCFX650BM 256GB
Wise CFast 2.0 3400x 128GB
Wise CFast 2.0 3400x 256GB
Wise CFast 2.0 3500x 512GB
The following CFast 2.0 cards are recommended for 2160p ProRes 422 HQ up to 60 fps
buthavebeen discontinued by the manufacturer.
Brand Card Name Storage
Lexar Professional 3400x 32GB
Lexar Professional 3400x 64GB
Lexar Professional 3400x 128GB
Lexar Professional 3400x 256GB
For the most up to date information on supported CFast cards for Blackmagic URSA Broadcast
please refer to the Blackmagic Design support center at www.blackmagicdesign.com/support.
19Storage Media
SD Cards
In addition to CFast 2.0 cards, Blackmagic URSA Broadcast can record on high speed UHS-I
and UHS-II type SD cards. Using high end SDXC UHS-II cards, you can even record ProRes HQ
footage in 2160p for Ultra HD content!
With SD cards, you can use more affordable storage media when shooting compressed video
formats in HD. SDXC and SDHC are a very common media storage format for consumer still and
video cameras.
If you've ever shot video using a DSLR, or use a Blackmagic Micro Cinema Camera, Pocket Cinema
Camera or Blackmagic Video Assist, you probably already have compatible SD cards to use.
For projects that don't require the highest resolution RAW files, or for when long recording
durations are needed, using SD cards can be very economical. Lower capacity and lower
speed SD cards can also be used for storing and loading LUTs and Presets.
Inserting an SD Card
To insert an SD Card.
1 Open the fold out monitor to access the SD card slots. These are the smaller slots
located between the CFast slots.
2 Set the storage media toggle switch above the slots to 'SD'.
3 With the label on the SD card card facing away from the touchscreen, insert the card
until you feel it lock into place. To remove an SD card, push the SD card in to eject it.
4 The storage indicator at the bottom of the LCD touchscreen will show the name and
record time remaining of detected cards.
When recording to SD cards on URSA Broadcast make sure
the storage media selection switch is set to 'SD'
Choosing a fast SD Card
If you are recording Ultra HD, then we recommend using the fastest high speed UHS-II type SD
cards available. It’s important to use high speed UHS-II SDcards for Ultra HD and HD recording,
or UHS-1 cards for HD recording. These cards are rated for fast data speeds and support larger
storage sizes. Generally the faster the cards, thebetter. Refer to the recommended SD cards
table earlier in this section for more information.
Before using your cards, you will need to format them to either HFS+ or exFAT formats. You can
format your media via your camera's ‘storage’ settings. Refer to the ‘settings’ section for more
information on storage settings.
ISO/GAIN SHUTTER WHITE BAL
XLR1
ON OFF
XLR2
SD
CFAST
USB
MIC
LINE
AES
OFF
48V
POWER
FOCUS PEAK PGM MENU
REC
ISO/GAIN SHUTTER WHITE BAL
XLR1
ON OFF
XLR2
SD
CFAST
USB
MIC
LINE
AES
OFF
48V
POWER
FOCUS PEAK PGM MENU
REC
20Storage Media
This manual suits for next models
1
Table of contents
Other Blackmagicdesign Camcorder manuals

Blackmagicdesign
Blackmagicdesign Pocket Cinema Camera 4K Operating instructions

Blackmagicdesign
Blackmagicdesign Blackmagic Cinema Camera User manual

Blackmagicdesign
Blackmagicdesign Blackmagic Cinema Camera User manual

Blackmagicdesign
Blackmagicdesign Blackmagic Cinema Camera User manual

Blackmagicdesign
Blackmagicdesign URSA Mini 4K User manual

Blackmagicdesign
Blackmagicdesign Intensity Pro User manual

Blackmagicdesign
Blackmagicdesign Cameras User manual

Blackmagicdesign
Blackmagicdesign Blackmagic URSA User manual

Blackmagicdesign
Blackmagicdesign URSA Setup guide

Blackmagicdesign
Blackmagicdesign Studio Camera User manual


