Blackmagicdesign Blackmagic URSA User manual


Welcome
Thank you for purchasing Blackmagic URSA!
Since we released our first digital film camera a few years ago we have been
privileged to have received some of the best guidance and feedback we have
ever had for a new product! We all grew up admiring the work of the world's
leading cinematographers and DOPs and it’s been an honor to spend hours
in conversations with these legendary experts on the features we need to
add to our cameras. Of course, everyone we speak to has good ideas also!
All those exciting conversations have been put into the new camera you
have just purchased. We think it takes care of the needs of large film crews as
well as having all the features you need if you're operating in single person
shooting. Blackmagic URSA's unique design allows you to replace the sensor,
adding new imaging capability to it over time. What this also means is we
could put more value into the screens, processing and cooling systems your
camera has, because it does not need to be thrown away every time we
develop a new sensor for it!
With URSA, you get a built in large 10 inch on set monitor built in, dual CFast
recorders that alternate recording so you can keep recording for as long as
you want, as well as scopes, super strong metal design and much more.
Our new URSA Mini camera offers similar capabilities. You get a super
strong metal chassis, dual CFast recorders, a 5 inch touchscreen and the
same amazing sensor all in a smaller, lighter package perfect for single
operators. We also listened to single operators when we developed our
new URSA Viewfinder which is perfect when you need extra precision and
for shooting on the shoulder.
We hope you use your URSA or URSA Mini to produce some of the
world's most exciting films and television programming, music videos and
commercials! We are extremely excited to see what creative work you
produce and to get your feedback on new features you would like to see us
add to URSA!
Grant Petty
CEO Blackmagic Design

Contents
Blackmagic URSA
Blackmagic URSA Mini
6 Getting Started
Attaching the Handle 6
Attaching a Lens 6
Turning Your Camera On 7
8 CFast Cards
Inserting a CFast Card 8
Preparing a CFast Card for Recording 8
Choosing a CFast 2.0 Card 8
Preparing Media for Recording 9
Preparing CFast Cards on a Mac OS X Computer 10
Preparing CFast Cards on a Windows Computer 10
11 Recording
Recording Clips 11
Recording Duration Table 14
16 Playback
Playing Back Clips 16
17 Blackmagic URSA Overview
DOP Station 17
Camera Assist and Audio Station 19
Front Panel 20
Rear Panel 20
Top Panel 20
Bottom Panel 20
21 Blackmagic URSA Connectors
Camera Assist and Audio Station Connectors 21
Rear Panel Connectors 22
Bottom Panel Connector 22
23 Blackmagic URSA Features
Blackmagic URSA Work Station Buttons 23
Touchscreens 25
Touchscreen Features 25
27 Blackmagic URSA Mini Overview
Front Panel 27
Left Side 27
Right Side 28
Rear Panel 28
Top Panel 29
Underside 29
30 Blackmagic URSA Mini Connectors
Right Side Connectors 30
Rear Connectors 30
Top Connectors 31
Left Side Connector 31
32 Blackmagic URSA Mini Features
Touchscreen 32
Control Buttons 33
Contents
Blackmagic URSA
Blackmagic URSA Mini
35 Settings
Dashboard 35
Camera Settings 35
Audio Settings 37
Recording Settings 38
File Naming Convention 41
Display Settings 41
45 Entering Metadata
The Slate 45
46 Camera Video Output
HD Monitoring Output 46
12G-SDI Output 46
48 Blackmagic URSA Viewfinder
52 Mounting Batteries
Mounting V-mount or Gold Mount Batteries 52
Using your own Battery Plate 52
54 Using DaVinci Resolve
Introducing DaVinci Resolve 54
Importing your Clips 54
Editing your Clips 55
Trimming Clips 56
Mapping Keyboard Shortcuts 56
Adding Transitions 57
Adding Titles 57
Adding Audio Tracks 58
Color Correcting your Clips 58
Using Scopes 59
Secondary Color Correction 60
Qualifying a Color 60
Adding a Power Window 61
Tracking a Window 61
Using Plugins 62
Mastering your Edit 62
64 Blackmagic Camera Setup Utility
65 Post Production Workflow
Working with Files from CFast 2.0 Cards 65
Working with 3rd Party Software 66
Using Final Cut Pro X 66
Using Avid Media Composer 66
Using Adobe Premiere Pro CC 67
Using Autodesk Smoke 2013 67
69 URSA Mini Shoulder Mount Assembly
Attaching the shoulder mount 69
73 Upgrading the Sensor Turret
76 Shimming the PL Mount
78 Help
79 Warranty
6Getting Started
SDI OUT
SDI IN
REF IN
TC IN
12V
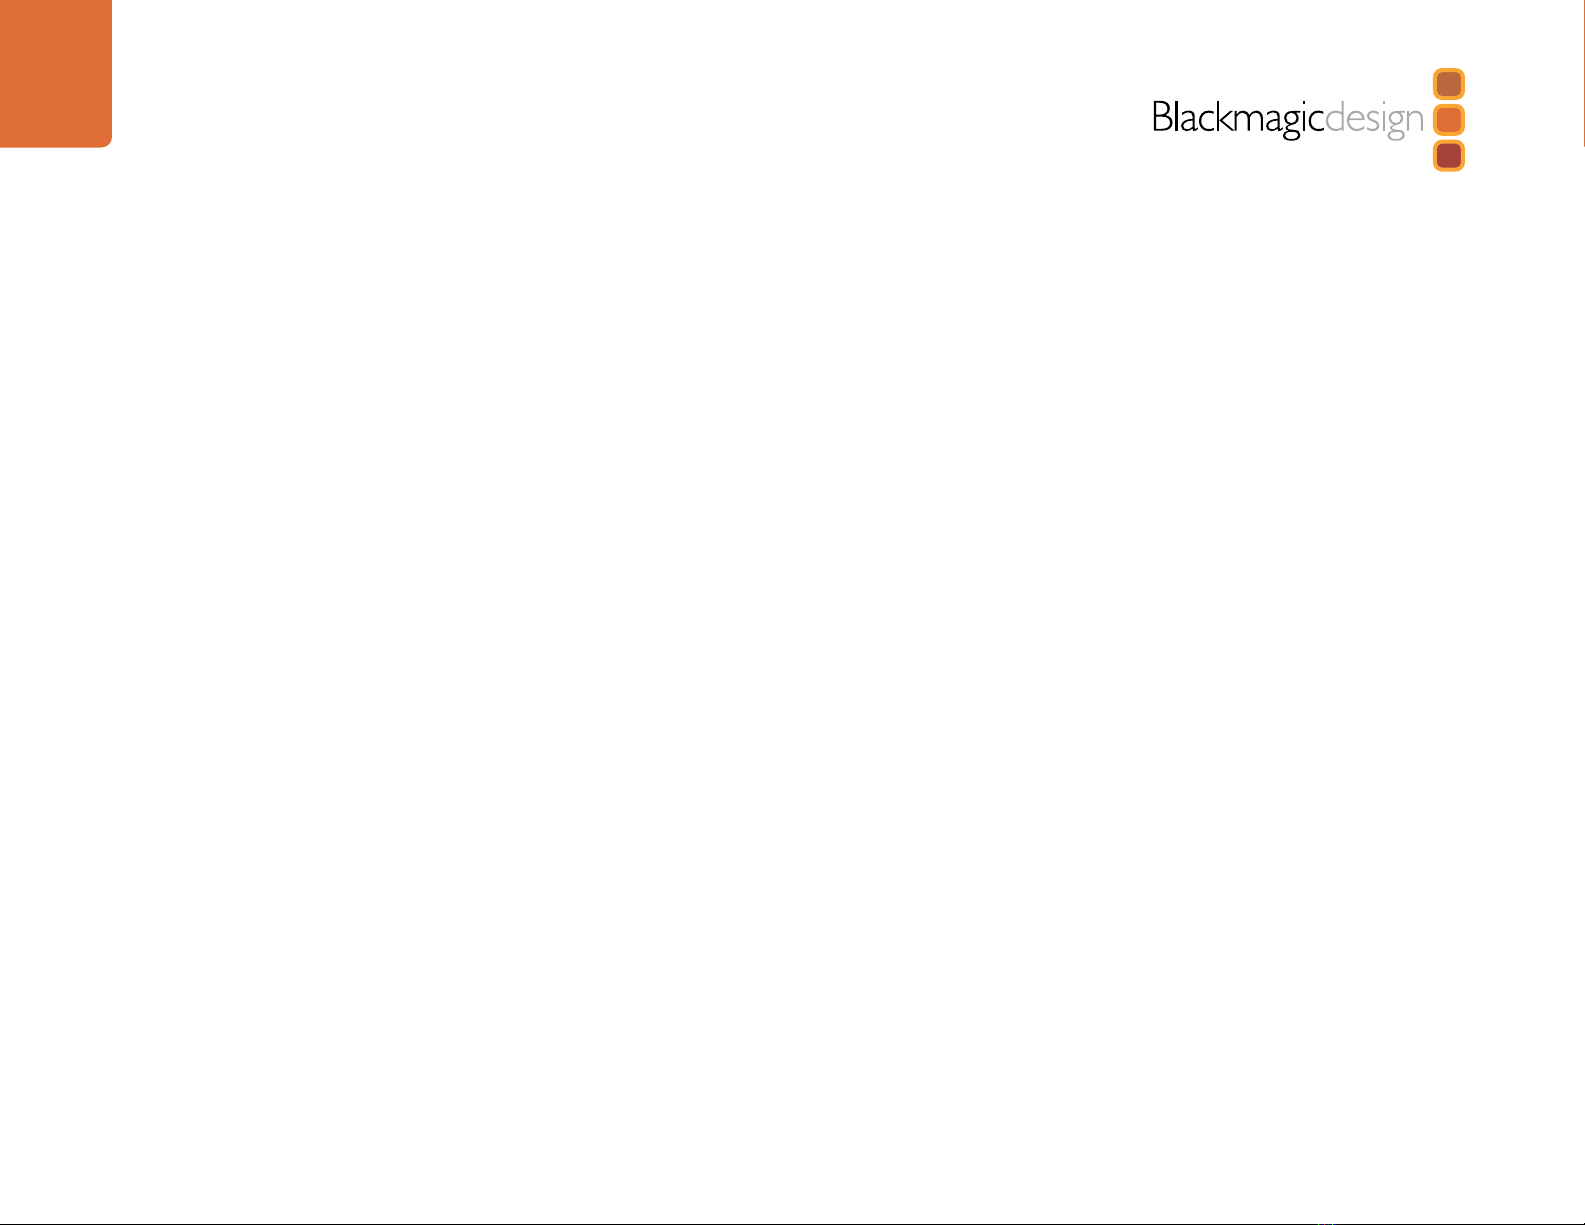
Attaching the Handle
Getting started with your Blackmagic URSA or URSA Mini is as simple as attaching the handle,
mounting a lens, and powering your camera.
To attach Blackmagic URSA's handle to the camera body, simply slide the base of the handle along
Blackmagic URSA's handle ridges and screw the handle to one of the 3/8" mounting points. Choose
a mounting point that provides the best weight balance for your camera.
Attaching URSA Mini's side handle is easy.
Step 1. Open the plastic cap on the right side of the handle to access the tightening screw.
Step 2. Align the handle with URSA Mini's side rosette mount. Fasten the handle to suit your
desired position and tighten the side handle screw with a large flat head screw driver, or
by twisting the D ring. Close the plastic cap.
Step 3. URSA Mini is shipped with a short LANC cable so you can control your camera using the
side handle buttons. Connect the LANC cable from the side handle LANC output to the
camera's LANC input.
Attaching a Lens
To remove the protective dust cap from the EF lens mount, hold down the locking button and rotate the
cap counterclockwise until it is released. For the PL mount, rotate the PL locking ring counterclockwise.
We recommend always turning off your camera prior to attaching or removing a lens.
To attach an EF mount lens:
Step 1. Align the dot on your lens with the dot on the camera mount. Many lenses have a visual
indicator, for example a blue, red or white dot.
Step 2. Twist the lens clockwise until it locks into place.
Step 3. To remove the lens, hold down the locking button, rotate the lens counterclockwise until
its dot or indicator reaches the 12 o’clock position, and gently remove.
Getting Started
IRIS
SDIOUT
SDIOUT
REFIN
TIMECODEIN
LR
TIMECODEOUT
+12V
CH1
SOLO
CH1
MUTE
CH2
SOLO
CH2
MUTE
FOCUS PEAK DISP
AUDIOIN
12VOUT
SDIOUT
MENU SLATE
0
-6
-12
-18
-24
-30
-36
-42
-48
Attaching the top handle to Blackmagic URSA.
Attaching and removing an EF mount lens on
Blackmagic URSA EF.
REFIN
+12V
TIMECODEIN
CH2
MUTE
IRIS FOCUS PEAK DISP MENU AUDIOIN
SDIOUT
+12VOUT
SLATE
TIMECODEOUT
0
-6
-12
-18
-24
-30
-36
-42
-48
SDIOUT
SDIIN
CH1
SOLO CH2
SOLO
CH1
MUTE
Attaching the side handle to Blackmagic URSA Mini.

7Getting Started
To attach a PL mount lens:
Step 1. Open your camera's PL locking ring by rotating it counterclockwise until it stops.
Step 2. Align one of the lens' four flange notches with the locating pin on the camera mount. Be
sure to align the lens for easy viewing of the lens marks.
Step 3. Tighten the PL locking ring by rotating it clockwise.
Step 4. To remove the lens, rotate the locking ring counterclockwise until it stops, then gently
remove the lens.
When no lens is attached to the camera, the glass filter covering the sensor is exposed to dust and
other debris so you'll want to keep the dust cap on whenever possible.
Turning Your Camera On
Now that you've attached a lens, you'll need to supply power. The quickest way to power your camera
is to connect external power using the supplied 12V AC adapter.
To plug in external power:
Step 1. Connect the 12V AC adapter plug to your mains power socket.
Step 2. Connect the 12V AC adapter’s 4 pin XLR connector to the 12-20V power connector on
the camera.
If you have both external and battery power connected, only external power will be used. If you
remove external power while a charged battery is connected, your camera will switch to battery
power without interruption.
You can use industry standard third party external batteries such as V-mount or gold mount batteries
with your URSA. Refer to the 'Mounting Batteries' section for more information about mounting the
different types of battery plates to support different batteries.
To turn your camera on:
Step 1. Press and release the 'power' button. On Blackmagic URSA the power button is located
on the DOP or camera assist and audio stations. On Blackmagic URSA Mini, the power
button is located on the control panel behind the fold out LCD. Simply open the LCD to
access the control panel.
Step 2. Press and hold the 'power' button to turn your camera off.
You are now ready to insert CFast 2.0 cards and start recording!
Attaching and removing a PL lens on Blackmagic URSA Mini PL.
Use the supplied 12V AC adapter to power your
Blackmagic URSA or URSA Mini.
IRIS
SDIOUT
SDIIN
REFIN
TIMECODEIN
LR
TIMECODEOUT
+12V
CH1
SOLO
CH1
MUTE
CH2
SOLO
CH2
MUTE
FOCUS PEAK DISP
AUDIOIN
12VOUT
SDIOUT
MENU SLATE
0
-6
-12
-18
-24
-30
-36
-42
-48
IRIS
SDI OUT
SDI IN
REF IN
TIMECODE IN
LR
TIMECODE OUT
+12V
CH1
SOLO
CH1
MUTE
CH2
SOLO
CH2
MUTE
FOCUS PEAK DISP
AUDIO IN
12V OUT
SDI OUT
MENU SLATE
0
-6
-12
-18
-24
-30
-36
-42
-48
IRIS
REC
FOCUS
PEAK
DISP
MENU
To turn on your URSA Mini, open the fold out LCD
touchscreen, then press and release the power button on
the control panel. Press and hold to turn off.
REC
ZOOM
DISP
PGM
1
CFAST
IRIS
FOCUS
REC
IRIS
FOCUS PEAK DISP MENU SLATE
2
IRIS
SDI OUT
0
-6
-12
-18
-24
-30
-36
-42
-48
L R
SDI IN
REF IN
TIMECODE IN
TIMECODE OUT
12V
CH1
SOLO
CH1
MUTE
CH2
MUTE
CH2
SOLO
FOCUS PEAK DISP MENU SLATE
PUSH PUSHPUSH
CFast Cards8
IRIS
REC
FOCUS
PEAK
DISP
MENU
IRIS FOCUS PEAK DISP MENU SLATE
REC
ZOOM
DISP
PGM
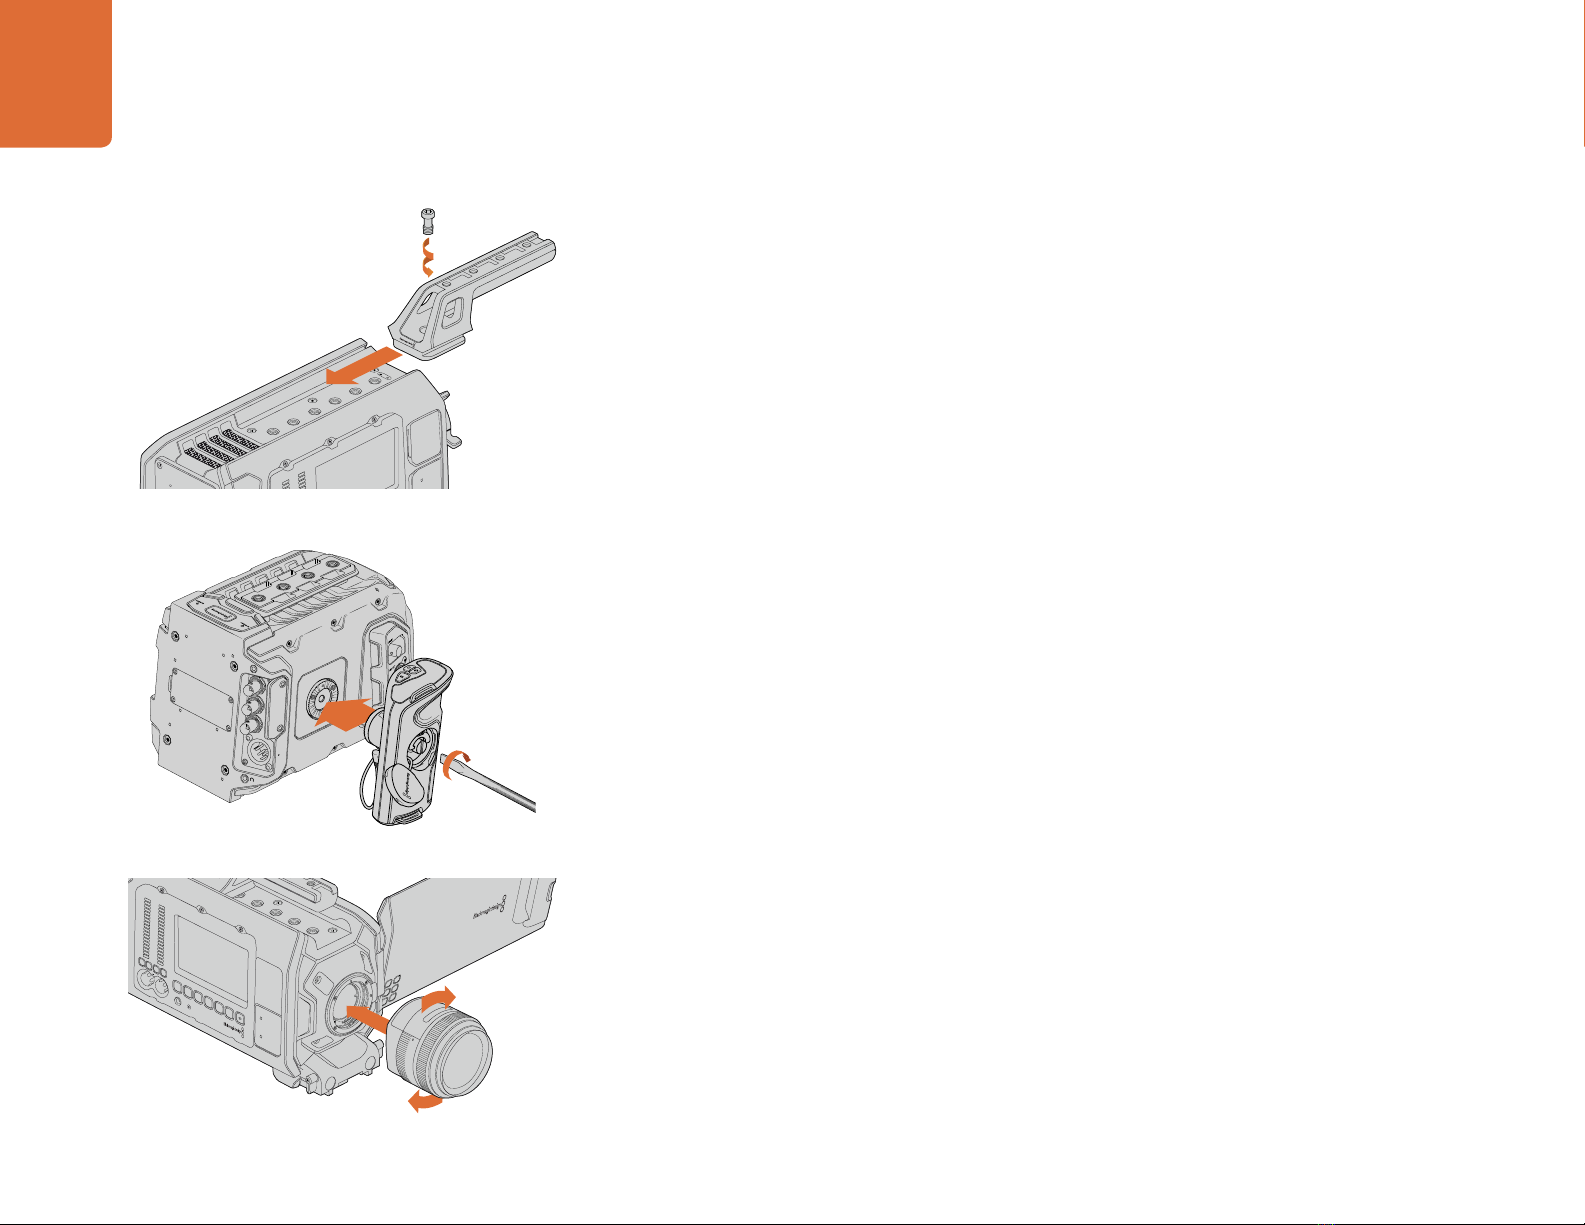
Inserting a CFast Card
Blackmagic URSA and URSA Mini use CFast 2.0 cards to record 4K, Ultra HD or HD video.
To insert a CFast card.
Step 1. Open the fold out monitor to access the CFast slots.
Step 2. With the label on the CFast card facing the touchscreen, insert the card until you feel it
lock into place. Push on the CFast card ejector button to eject the card.
Step 3. The status strip will display a moving dot while the camera checks the CFast card and then
it will say 'ready'. Additionally, on URSA, the touchscreen media timeline will display a time
remaining indicator. On URSA Mini, the CFast indicator at the top right of the screen will
show the time remaining on detected cards.
Preparing a CFast Card for Recording
CFast cards must be formatted as either HFS+ or exFAT. HFS+ is also known as Mac OS extended.
It is the recommended format as it supports "journaling". Data on a journaled CFast card is more
likely to be recovered in the rare event that your media card becomes corrupted. HFS+ is natively
supported by Mac OS X.
ExFAT is supported natively by Mac OS X and Windows without needing to purchase any additional
software. However exFAT does not support journaling.
Choosing a CFast 2.0 Card
When working with high data rate video it's important to carefully check the CFast card you would
like to use. This is because CFast 2.0 cards have different read/write speeds. Some cards can record
sustained 4K RAW video, and some are suited to compressed recording up to ProRes 422 HQ or
4K RAW 3:1.
Below is a list of recommended CFast 2.0 cards for recording compressed formats. For supported
frame rates, refer to the Blackmagic Design support center at www.blackmagicdesign.com/support.
Lexar Professional 3400x 32GB, 64GB, 128GB, 256GB
Wise CFast 2.0 3400x 128GB
Transcend 128GB, 256GB
We recommend the following CFast 2.0 cards for recording 4K RAW video up to 30 fps.
Lexar Professional 3400x 64GB, 128GB, 256GB
Wise CFast 2.0 3400x 128GB
Transcend 128GB, 256GB
Inserting a CFast 2.0 card into one of Blackmagic URSA's
two CFast slots.
IRIS FOCUS PEAK DISP MENU SLATE
REC
ZOOM
DISP
PGM
Blackmagic URSA Mini has two CFast slots for continuous
recording.
IRIS
REC
FOCUS
PEAK
DISP
MENU

CFast Cards9
Preparing Media for Recording
CFast cards must be formatted as either HFS+ or exFAT and can be formatted using the 'format
card' feature on the dashboard, or via a Mac or Windows computer. We recommend formatting your
CFast 2.0 cards using Blackmagic URSA or URSA Mini for best performance.
HFS+ is also known as Mac OS extended and is the recommended format as it supports "journaling".
Data on journaled media is more likely to be recovered in the rare event that your CFast card becomes
corrupted. HFS+ is natively supported by Mac OS X.
ExFAT is supported natively by Mac OS X and Windows without needing to purchase any additional
software. However, exFAT does not support journaling.
To format your CFast card using the dashboard 'format card' feature:
Step 1. Press the 'display' button marked DISP on URSA's control panel to cycle between the
touchscreen displays until the dashboard appears.On URSA Mini, press the 'menu' button
to display the dashboard.
Step 2. Tap on the 'format card' icon with your finger.
Step 3. Tap on the CFast slot you want to use, then tap 'continue' to proceed, or 'cancel' to select
a different slot.
Step 4. Choose your format by tapping the HFS+ or exFAT icon.
Step 5. A warning will appear asking you to confirm the format. Tap 'yes, format my card' to
continue, or 'cancel' to cancel the format.
Step 6. A progress bar shows you the status of the format. 'Complete' will appear when the
format is done.
Step 7. Tap the 'done' icon to return to the dashboard.
Step 8. Press the 'display' button to exit the dashboard.
Choose between HFS+ and exFAT formats. Confirm your
selection by tapping 'yes, format my card' to continue, or
'cancel' to cancel the format.
Select the 'format card' icon on the
camera dashboard to format your
CFast card.

CFast Cards10
Preparing CFast Cards on a Mac OS X Computer
Use the Disk Utility application included with Mac OS X to format your card in the HFS+ or exFAT
formats. Remember to back up anything important from your CFast card as all data will be lost when
it is formatted.
Step 1. Connect the CFast card to your computer using a CFast 2.0 reader/writer or CFast drive,
and dismiss any message offering to use your card for Time Machine backups.
Step 2. Go to applications/utilities and launch Disk Utility.
Step 3. Click on the disk icon of your CFast card and then click the 'erase' tab.
Step 4. Set the 'format' to 'Mac OS extended (journaled)' or 'exFAT'.
Step 5. Type a 'name' for the new volume and then click 'erase'. Your CFast card will quickly be
formatted and made ready for use.
Preparing CFast Cards on a Windows Computer
The 'format' dialog box can format a drive in the exFAT format on a Windows PC. Remember to back
up anything important from your CFast card as all data will be lost when it is formatted.
Step 1. Connect the CFast card to your computer using a CFast 2.0 reader/writer or CFast drive.
Step 2. Open the 'start' menu or 'start' screen and choose 'computer'. Right-click on your CFast card.
Step 3. From the contextual menu, choose 'format'.
Step 4. Set the file system to "exFAT" and the allocation unit size to 128 kilobytes.
Step 5. Type a volume label, select 'quick format' and click 'start'.
Step 6. Your CFast card will quickly be formatted and made ready for use.
Use the 'format' dialog box feature in Windows
to format your CFast card in the exFAT format.
Use Disk Utility on Mac OS X to erase your CFast card in the
Mac OS extended (journaled) or exFAT format.

Recording
11
IRIS FOCUS PEAK DISP MENU SLATE
REC
ZOOM
DISP
PGM
To record a clip, press the 'record' button marked REC on the
fold out monitor.
Recording
REC REC
ZOOM
ZOOM
DISP
DISP
PGM
PGM
Recording Clips
Press the 'record' button marked REC on Blackmagic URSA's monitor controls. A 'record' button is
also on the outside of the monitor when using Blackmagic URSA Viewfinder with URSA's fold out
monitor closed.
On Blackmagic URSA Mini you can start recording by pressing the red 'record' button on the inside
control panel, or on the side handle. A 'record' button is also on the outside of the fold out monitor.
Press the 'record' button again to stop recording.
Choosing the Codec, Resolution and Sensor Area
Your Blackmagic URSA or URSA Mini records using CinemaDNG RAW codecs with a choice of lossless
4K RAW or 4K RAW compression, as well as various Apple ProRes compressed codecs. Sensor frame
rate options will vary depending on the codec and resolution you choose, plus the sensor turret
you’re using on Blackmagic URSA.
It's worth noting that clips recorded using RAW 3:1 compression are compatible with DaVinci Resolve,
but may be incompatible with other software applications which may not open the files or display
them correctly.
We have provided a table for your reference containing available codecs and resolutions, plus their
maximum sensor frame rates.
Maximum Sensor Frame Rates
Codec Resolution Maximum Frame Rate
Blackmagic URSA
Maximum Frame Rate
Blackmagic URSA Mini
RAW 4000 x 2160 120 (Dual card mode) 60 (Dual card mode)
RAW 3:1 120 (Dual card mode) 60
ProRes 444 XQ 3840 x 2160 30 Available in a later
software update
ProRes 444 50 Available in a later
software update
ProRes HQ 80 60
ProRes 422 120 60
ProRes LT 120 60
ProRes Proxy 120 60
You can also record clips by pressing the 'record' button
marked REC on URSA Mini's side handle.

Recording
12
Codec Resolution Maximum Frame Rate
Blackmagic URSA
Maximum Frame Rate
Blackmagic URSA Mini
ProRes 444 XQ 1920 x 1080
(full sensor area)
120 Available in a later
software update
ProRes 444 120 Available in a later
software update
ProRes HQ 120 60
ProRes 422 120 60
ProRes LT 120 60
ProRes Proxy 120 60
ProRes 444 XQ 1920 x 1080
(windowed sensor area)
150 Available in a later
software update
ProRes 444 150 Available in a later
software update
ProRes HQ 150 120
ProRes 422 150 120
ProRes LT 150 120
ProRes Proxy 150 120
To select your desired codec and resolution:
Step 1. Press the 'menu' button on the control panel.
Step 2. Navigate to the ‘recording’ menu and select your desired ‘codec’ by tapping the codec
selection arrows on the touchscreen.
Step 3. Tap the relevant selection arrows for your desired resolution.
Step 4. If you want to record in HD using a windowed sensor area, so you can take advantage of
the higher frame rates, tap on the selection arrows to select 'window'. If you want to record
using the full sensor area, select 'full'.
Step 5. Press the 'menu' button to exit.
Maximum Sensor Frame Rates Continued

Recording
13
After setting your codec and resolution, you should set your ‘project’ and ‘sensor’ frame rates. Refer
to the ‘recording settings’ section in this manual for more information about frame rates.
A table is provided showing the supported ‘project’ frame rates for each recording format and codec.
You can create dynamic speed effects by using a sensor frame rate that is slower or faster than your
project frame rate. For standard playback, match the sensor frame rate to your project frame rate.
Recording Formats and Project Frame Rates
4000 x 2160 4K RAW 23.98, 24, 25, 29.97, 30, 50, 59.94 and 60 frames
per second using dual card mode.
4000 x 2160 4K RAW 3:1 23.98, 24, 25, 29.97, 30, 50, 59.94, 60.
3840 x 2160 Apple ProRes 444 XQ 23.98, 24, 25, 29.97, 30, 50, 59.94, 60.
3840 x 2160 Apple ProRes 444 23.98, 24, 25, 29.97, 30, 50, 59.94, 60.
3840 x 2160 Apple ProRes 422 HQ, ProRes 422,
ProRes 422 LT and ProRes 422 Proxy
23.98, 24, 25, 29.97, 30, 50, 59.94, 60.
1920 x 1080 Apple ProRes 444 XQ 23.98, 24, 25, 29.97, 30, 50, 59.94, 60.
1920 x 1080 Apple ProRes 444 23.98, 24, 25, 29.97, 30, 50, 59.94, 60.
1920 x 1080 Apple ProRes 444 23.98, 24, 25, 29.97, 30, 50, 59.94, 60.
1920 x 1080 Apple ProRes 422 HQ, ProRes 422,
ProRes 422 LT and ProRes 422 Proxy
23.98, 24, 25, 29.97, 30, 50, 59.94, 60.

Recording
14
Recording Duration Table
Tables are provided showing approximate recording durations in minutes and
seconds compared to format, project frame rate and media size. The maximum
recording time for a CFast card will vary depending on the data size of the
card and the recording format and frame rate you choose. For example, the
storage rate for Apple ProRes 422 HQ at 3840 x 2160 is approximately 880 Mbps.
At 24 frames per second, you can record approximately 48 minutes of video
on a 256GB CFast 2.0 card.
Format CFast
Card
Frame
Rate
CinemaDNG RAW ProRes 444
XQ
ProRes 444 ProRes 422
HQ
ProRes 422 ProRes 422
LT
ProRes 422
Proxy
Duration Duration Duration Duration Duration Duration Duration
Ultra HD 4K 256GB 23.98 19 mins 4K RAW
41 mins 4K RAW 3:1
22 mins 32 mins 48 mins 73 mins 104 mins 237 mins
24 19 mins 4K RAW
41 mins 4K RAW 3:1
22 mins 32 mins 48 mins 73 mins 104 mins 237 mins
25 18 mins 4K RAW
40 mins 4K RAW 3:1
21 mins 30 mins 46 mins 69 mins 100 mins 224 mins
30 16 mins 4K RAW
33 mins 4K RAW 3:1
17 mins 25 mins 38 mins 58 mins 83 mins 189 mins
50 9 mins 4K RAW
20 mins 4K RAW 3:1
10 mins 15 mins 23 mins 34 mins 50 mins 112 mins
60 8 mins 4K RAW
16 mins 4K RAW 3:1
9 mins 12 mins 19 mins 29 mins 41 mins 94 mins
HD 256GB 23.98 86 mins 129 mins 194 mins 291 mins 416 mins 948 mins
24 86 mins 129 mins 193 mins 291 mins 416 mins 948 mins
25 82 mins 124 mins 185 mins 279 mins 401 mins 898 mins
30 69 mins 103 mins 155 mins 232 mins 334 mins 758 mins
50 41 mins 61 mins 93 mins 139 mins 200 mins 449 mins
60 35 mins 51 mins 77 mins 116 mins 167 mins 379 mins

Recording
15
Format CFast
Card
Frame
Rate
CinemaDNG RAW ProRes 444
XQ
ProRes 444 ProRes 422
HQ
ProRes 422 ProRes 422
LT
ProRes 422
Proxy
Duration Duration Duration Duration Duration Duration Duration
Ultra HD 4K 128GB 23.98 10 mins 4K RAW
21 mins 4K RAW 3:1
11 mins 16 mins 24 mins 36 mins 52 mins 118 mins
24 10 mins 4K RAW
21 mins 4K RAW 3:1
11 mins 16 mins 24 mins 36 mins 52 mins 118 mins
25 9 mins 4K RAW
20 mins 4K RAW 3:1
11 mins 15 mins 23 mins 34 mins 50 mins 112 mins
30 8 mins 4K RAW
17 mins 4K RAW 3:1
9 mins 12 mins 19 mins 29 mins 41 mins 94 mins
50 5 mins 4K RAW
10 mins 4K RAW 3:1
5 mins 7 mins 11 mins 17 mins 25 mins 56 mins
60 4 mins 4K RAW
8 mins 4K RAW 3:1
4 mins 6 mins 9 mins 14 mins 20 mins 47 mins
HD 128GB 23.98 43 mins 64 mins 97 mins 145 mins 208 mins 474 mins
24 43 mins 64 mins 96 mins 145 mins 208 mins 474 mins
25 41 mins 62 mins 92 mins 139 mins 200 mins 449 mins
30 35 mins 51 mins 77 mins 116 mins 167 mins 379 mins
50 20 mins 30 mins 46 mins 69 mins 100 mins 224 mins
60 18 mins 25 mins 38 mins 58 mins 83 mins 189 mins

Playback16
12
CFAST
IRIS FOCUS PEAK DISP MENU SLATE
REC
ZOOM
DISP
PGM
Playing Back Clips
Once you have recorded your video, you can use the transport control buttons to play back your video.
Press the 'play' button once for instant playback and you'll see your recorded video on the fold out
monitor. Your clips can also be viewed on the touchscreens and any display connected to the SDI
outputs. Playback will continually play through all your recorded clips.
The controls of your camera work just like a CD player, so pressing the 'forward skip' button will skip
to the start of the next clip. Press the 'reverse skip' button once to go to the start of the current clip
or press twice to skip back to the start of the previous clip. Hold the 'forward' or 'reverse skip' button
to play or reverse at 2x speed. On Blackmagic URSA EF, you can also use the forward and reverse
skip buttons to open or close the iris on compatible lenses while recording clips.
When recording a clip using a sensor frame rate that differs from your project frame rate, your clip's
playback speed will also differ. For example, imagine you have set your camera's project frame rate
to match your post production timeline of 24 frames per second. If you record a clip with your sensor
frame rate set to 80 frames per second, your clips will play back in slow motion on both the camera
and on your post production timeline.
To ensure your clips play back at normal speed, select 'match' from the 'sensor frame rate' settings
in the 'recording' settings touchscreen menu. Refer to the 'recording settings' section of this manual
for more information about frame rates.
Use the 'play' button on the side or outside of the fold out
monitor to view your recorded clips.
Playback
REC REC
ZOOM
ZOOM
DISP
DISP
PGM
PGM
12
CFAST

Blackmagic URSA Overview17
DOP Station
Monitor Controls
1. 10" LCD VIEWFINDER
Large fold out on screen monitor, pivots for viewing at different camera heights. Pages 41 and 42.
2. RECORD BUTTON
Press to start recording and press again to stop recording. Page 11.
3. PLAYBACK CONTROL BUTTONS
Buttons for playback start and stop and skipping for the next or previous clip. On Blackmagic URSA
EF, the forward and reverse skip buttons can also be used to open or close the iris when using
compatible lenses. Page 16.
4. ZOOM BUTTON
The 'zoom' button on the fold out monitor helps you find sharp focus by zooming into your picture.
In Ultra HD 4K mode, the monitor will show a 1:1 pixel view. Press the 'zoom' button on the fold out
monitor to activate the focus zoom feature. Press again to zoom out to the standard view.
5. DISP BUTTON
Turns on and off overlays, focus peaking and other on screen displays via the 10 inch fold out
monitor. Page 42.
6. PGM BUTTON
Switches the monitor between the camera and the 'program' video from the SDI input.
Pages 22 and 46.
7. IRIS, FOCUS, REC AND TRANSPORT BUTTONS
These controls allow camera operation when the monitor is folded closed, such as when shoulder mounted.
REC
ZOOM
DISP
PGM
1
CFAST
IRIS
FOCUS
REC
IRIS
FOCUS PEAK DISP MENU SLATE
2
IRIS
SDIOUT
0
-6
-12
-18
-24
-30
-36
-42
-48
L R
SDIIN
REFIN
TIMECODEIN
TIMECODEOUT
12V
CH1
SOLO
CH1
MUTE
CH2
MUTE
CH2
SOLO
FOCUS PEAK DISP MENU SLATE
PUSH PUSHPUSH
Blackmagic URSA Overview
REC
ZOOM
DISP
PGM
1
CFAST
IRIS
FOCUS
REC
IRIS
FOCUS PEAK DISP MENU SLATE
2
IRIS
SDI OUT
0
-6
-12
-18
-24
-30
-36
-42
-48
L R
SDI IN
REF IN
TIMECODE IN
TIMECODE OUT
12V
CH1
SOLO
CH1
MUTE
CH2
MUTE
CH2
SOLO
FOCUS PEAK DISP MENU SLATE
PUSH PUSHPUSH
IRIS FOCUS PEAK DISP MENU SLATE
REC
ZOOM
DISP
PGM
IRIS FOCUS PEAK DISP MENU SLATE
REC
ZOOM
DISP
PGM
2
6
3
4
5
1
7

Blackmagic URSA Overview18
DOP Station
Work Station Features
1. MEMORY CARD SLOTS
Insert CFast 2.0 type cards into the slots for record and playback. Page 8.
2. TOUCHSCREEN
The 5" touchscreen display is used for monitoring, scopes and changing camera settings. Page 25.
3. WORKSTATION BUTTONS
Activates various camera controls and the touchscreen menu for adjusting settings. Page 23.
REC
ZOOM
DISP
PGM
1
CFAST
IRIS
FOCUS
REC
IRIS
FOCUS PEAK DISP MENU SLATE
2
IRIS
SDI OUT
0
-6
-12
-18
-24
-30
-36
-42
-48
L R
SDI IN
REF IN
TIMECODE IN
TIMECODE OUT
12V
CH1
SOLO
CH1
MUTE
CH2
MUTE
CH2
SOLO
FOCUS PEAK DISP MENU SLATE
PUSH PUSHPUSH
REC
ZOOM
DISP
PGM
1
CFAST
IRIS
FOCUS
REC
IRIS
FOCUS PEAK DISP MENU SLATE
2
IRIS
SDI OUT
0
-6
-12
-18
-24
-30
-36
-42
-48
L R
SDI IN
REF IN
TIMECODE IN
TIMECODE OUT
12V
CH1
SOLO
CH1
MUTE
CH2
MUTE
CH2
SOLO
FOCUS PEAK DISP MENU SLATE
PUSH PUSHPUSH
1 2
3
Blackmagic URSA Overview19
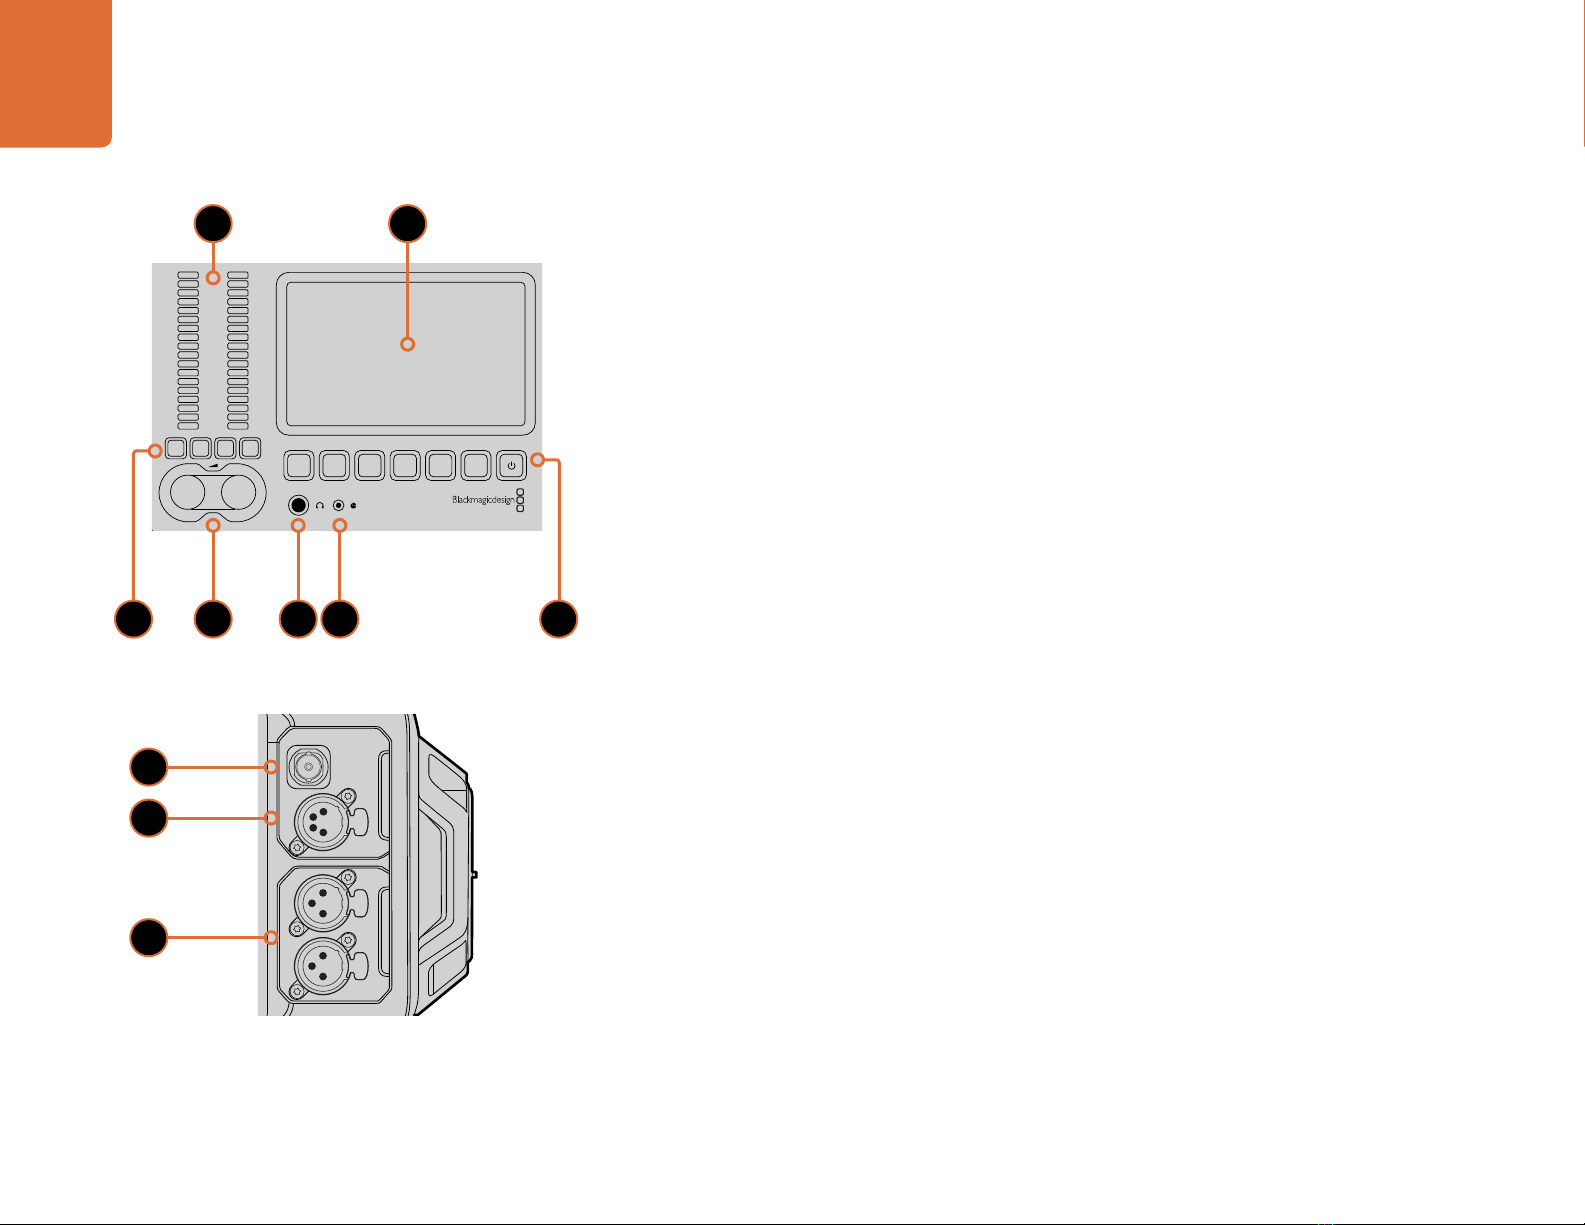
Camera Assist and Audio Station
Work Station Features
1. AUDIO METERS
Monitor your audio levels using the ch 1 and ch 2 audio meters. Page 24.
2. TOUCHSCREEN
The 5" touchscreen display is used for monitoring your camera image and scopes, and applying
camera settings. Page 25.
3. AUDIO MONITORING MUTE AND SOLO
Press these buttons to mute and monitor selected audio channels. Page 24.
4. AUDIO LEVEL ADJUSTMENT KNOBS
Adjustment knobs to set the recording levels for the left and right audio channels. Page 24.
5. HEADPHONES
1/4” jack output for headphones monitoring. Page 21.
6. LANC REMOTE
2.5mm stereo jack for LANC remote control. LANC supports record start and stop, iris and focus
control. Page 21.
7. WORK STATION BUTTONS
Activates various camera controls and the touchscreen menu for adjusting settings. Page 23.
8. HD-SDI MONITORING OUT
3G-SDI connector for down converted 1080 HD output. Pages 21 and 46.
9. +12 V POWER OUTPUT
4 pin XLR connector for powering accessories, such as the Blackmagic URSA viewfinder. Page 21.
10. XLR AUDIO IN
XLR inputs for plugging in external balanced analog audio with selectable 48 V phantom power. Page 21.
REC
ZOOM
DISP
PGM
1
CFAST
IRIS
FOCUS
REC
IRIS
FOCUS PEAK DISP MENU SLATE
2
IRIS
SDI OUT
0
-6
-12
-18
-24
-30
-36
-42
-48
L R
SDI IN
REF IN
TIMECODE IN
TIMECODE OUT
12V
CH1
SOLO
CH1
MUTE
CH2
MUTE
CH2
SOLO
FOCUS PEAK DISP MENU SLATE
PUSH PUSHPUSH
REC
ZOOM
DISP
PGM
1
CFAST
IRIS
FOCUS
REC
IRIS
FOCUS PEAK DISP MENU SLATE
2
IRIS
SDI OUT
0
-6
-12
-18
-24
-30
-36
-42
-48
L R
SDI IN
REF IN
TIMECODE IN
TIMECODE OUT
12V
CH1
SOLO
CH1
MUTE
CH2
MUTE
CH2
SOLO
FOCUS PEAK DISP MENU SLATE
PUSH PUSHPUSH
8
9
10
21
74 5 63

Blackmagic URSA Overview20
Front Panel
1. LENS MOUNT
Lens mount for attaching lenses. EF mount shown in illustration.
Rear Panel
2. BATTERY PLATE MOUNT
Mounting points and connector for attaching a third party V-mount or gold mount plate. Page 52.
3. REAR PANEL CONNECTORS
Rear panel connectors such as SDI output, SDI input, reference input, timecode input, timecode output
and 12V power input. Refer to the 'Blackmagic URSA connectors' section for more information.
Top Panel
4. 3/8" MOUNTING POINTS and TOP HANDLE
Mounting points for attaching top handle and accessories.
Bottom Panel
5. USB 2.0
USB 2.0 Mini-B port for updating internal software. Pages 22 and 64.
6. 15mm LIGHTWEIGHT ROD and VCT-14 BASE PLATE SUPPORT
15mm LWS standard mounts for attaching rods, and mounting points for a VCT-14 quick release plate.
REC
ZOOM
DISP
PGM
1
CFAST
IRIS
FOCUS
REC
IRIS
FOCUS PEAK DISP MENU SLATE
2
IRIS
SDI OUT
0
-6
-12
-18
-24
-30
-36
-42
-48
L R
SDI IN
REF IN
TIMECODE IN
TIMECODE OUT
12V
CH1
SOLO
CH1
MUTE
CH2
MUTE
CH2
SOLO
FOCUS PEAK DISP MENU SLATE
PUSH PUSHPUSH
REC
ZOOM
DISP
PGM
1
CFAST
IRIS
FOCUS
REC
IRIS
FOCUS PEAK DISP MENU SLATE
2
IRIS
SDI OUT
0
-6
-12
-18
-24
-30
-36
-42
-48
L R
SDI IN
REF IN
TIMECODE IN
TIMECODE OUT
12V
CH1
SOLO
CH1
MUTE
CH2
MUTE
CH2
SOLO
FOCUS PEAK DISP MENU SLATE
PUSH PUSHPUSH
REC
ZOOM
DISP
PGM
1
CFAST
IRIS
FOCUS
REC
IRIS
FOCUS PEAK DISP MENU SLATE
2
IRIS
SDI OUT
0
-6
-12
-18
-24
-30
-36
-42
-48
L R
SDI IN
REF IN
TIMECODE IN
TIMECODE OUT
12V
CH1
SOLO
CH1
MUTE
CH2
MUTE
CH2
SOLO
FOCUS PEAK DISP MENU SLATE
PUSH PUSHPUSH
1 2 3
4
5
6
Blackmagic URSA Connectors21
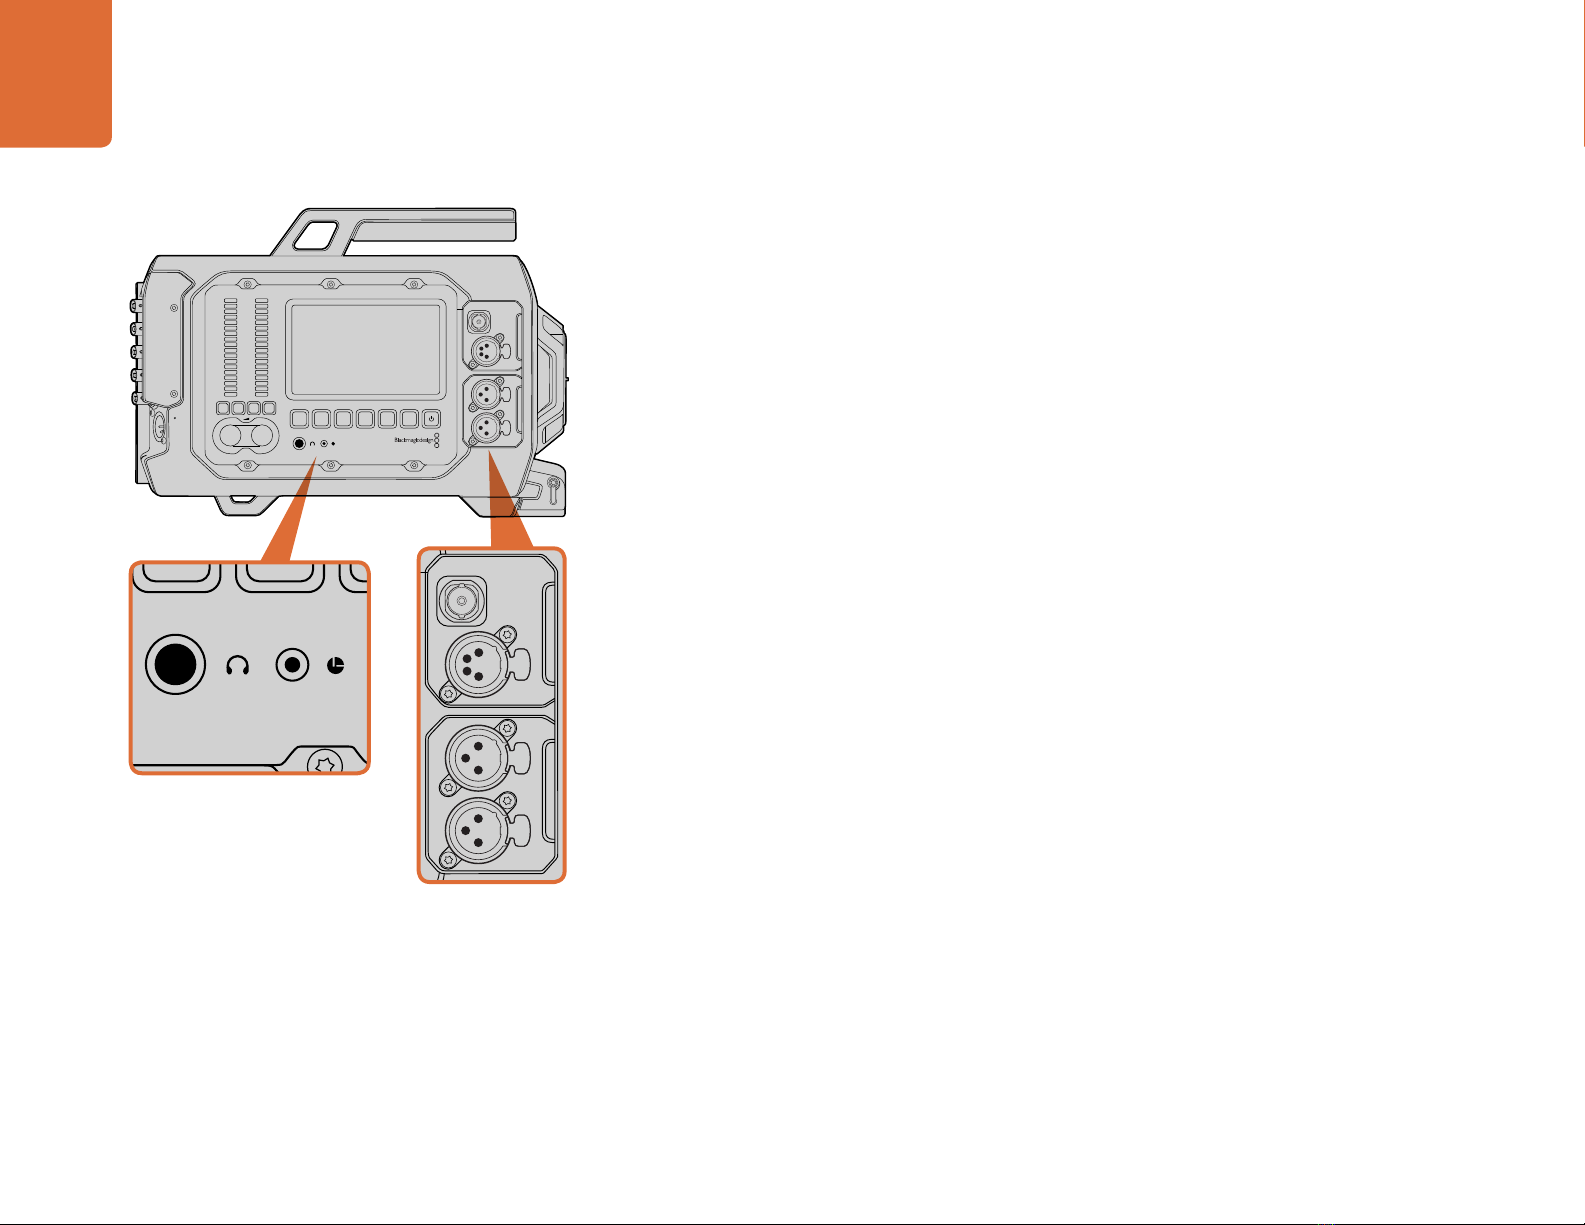
Camera Assist and Audio Station Connectors
Blackmagic URSA's connectors, such as headphones, LANC, +12 V power, 3G-SDI out and external
XLR audio are conveniently located on the camera assist and audio station. The rear panel provides
SDI in, SDI out, reference BNC, and timecode BNC in and out connectors. Use the USB 2.0 connector
located on the bottom panel for updating the internal software.
Headphones
Monitor audio while recording or playing back clips by plugging your headphones into the 1/4” TRS
stereo headphones jack.
LANC Remote Control
The remote port on your camera is used to remotely control record starting and stopping, iris and
focus adjustments when using a compatible lens.
The port is a 2.5 mm stereo jack using the standard LANC protocol.
3G-SDI Out
Use Blackmagic URSA’s down converted 3G-SDI output to send 1080 HD video to an external viewfinder
such as the Blackmagic URSA Viewfinder. This output can also be connected to routers, monitors,
SDI capture devices, broadcast switchers and other SDI video equipment.
+12 V Power Output
Use the 4 pin 12 Volt XLR connector for powering accessories, such as an external viewfinder.
XLR Audio In
Use the balanced XLR inputs to plug in external analog audio from professional equipment such
as audio mixers, PA systems or even external microphones. The XLR connectors supply phantom
power so you can use microphones that aren’t self powered. To enable phantom power select 'input
levels/mic low' or 'mic high' on the 'audio' settings touchscreen menu. Scroll the menu to reveal the
'phantom power' setting and select 'on'. To disable phantom power, select 'off'.
Phantom power is active when 'audio input/inputs' is selected.
The camera assist and audio station features headphones,
LANC remote control, 3G-SDI out, +12 V power out and XLR
'audio in' connectors.
Blackmagic URSA Connectors
REC
ZOOM
DISP
PGM
1
CFAST
IRIS
FOCUS
REC
IRIS
FOCUS PEAK DISP MENU SLATE
2
IRIS
SDI OUT
0
-6
-12
-18
-24
-30
-36
-42
-48
L R
SDI IN
REF IN
TIMECODE IN
TIMECODE OUT
12V
CH1
SOLO
CH1
MUTE
CH2
MUTE
CH2
SOLO
FOCUS PEAK DISP MENU SLATE
PUSH PUSHPUSH
REC
ZOOM
DISP
PGM
1
CFAST
IRIS
FOCUS
REC
IRIS
FOCUS PEAK DISP MENU SLATE
2
IRIS
SDI OUT
0
-6
-12
-18
-24
-30
-36
-42
-48
L R
SDI IN
REF IN
TIMECODE IN
TIMECODE OUT
12V
CH1
SOLO
CH1
MUTE
CH2
MUTE
CH2
SOLO
FOCUS PEAK DISP MENU SLATE
PUSH PUSHPUSH
REC
ZOOM
DISP
PGM
1
CFAST
IRIS
FOCUS
REC
IRIS
FOCUS PEAK DISP MENU SLATE
2
IRIS
SDI OUT
0
-6
-12
-18
-24
-30
-36
-42
-48
L R
SDI IN
REF IN
TIMECODE IN
TIMECODE OUT
12V
CH1
SOLO
CH1
MUTE
CH2
MUTE
CH2
SOLO
FOCUS PEAK DISP MENU SLATE
PUSH PUSHPUSH
Other manuals for Blackmagic URSA
3
This manual suits for next models
1
Table of contents
Other Blackmagicdesign Camcorder manuals

Blackmagicdesign
Blackmagicdesign Blackmagic Cinema Camera User manual

Blackmagicdesign
Blackmagicdesign Cameras User manual

Blackmagicdesign
Blackmagicdesign URSA Setup guide

Blackmagicdesign
Blackmagicdesign Blackmagic Cinema Camera User manual

Blackmagicdesign
Blackmagicdesign URSA BROADCAST User manual

Blackmagicdesign
Blackmagicdesign Blackmagic URSA User manual

Blackmagicdesign
Blackmagicdesign Intensity Pro User manual

Blackmagicdesign
Blackmagicdesign Pocket Cinema Camera 4K Operating instructions

Blackmagicdesign
Blackmagicdesign Blackmagic Cinema Camera User manual

Blackmagicdesign
Blackmagicdesign URSA Mini 4K User manual


