Blackmagicdesign URSA Mini Pro 4.6K User manual

Welcome
Thank you for purchasing Blackmagic URSA Mini!
Since we released our first digital film camera a few years ago we have been privileged to have
received some of the best guidance and feedback we have ever had for a new product! We all
grew up admiring the work of the world’s leading cinematographers and DOPs and it’s been an
honor to spend hours in conversations with these legendary experts on the features we need
to add to our cameras. Of course, everyone we speak to has good ideas also!
With URSA Mini, we've packaged our incredible wide dynamic range sensors into a super small,
light and sturdy metal chassis.
URSA Mini’s beautiful user interface is designed for single operators who need quick, easy
access to all of their camera’s functions, while comprehensive ATEM switcher integration makes
the amazing image quality of this Super 35mm digital film camera available to live production
studios.
Best of all, URSA Mini is available with the impressive 4K URSA sensor or 4.6K sensor with
even greater dynamic range! We also listened to single operators when we developed our
new URSAViewfinder which is perfect when you need extra precision and for shooting on
theshoulder.
We're also proud to introduce our URSA Mini Pro 4.6K. This camera offers the same amazing
image quality with additional features including ergonomic controls, interchangeable lens
mounts and internal ND filters. If you are familiar with ENG cameras, we believe you will find
these ergonomic controls and the built in ND filters extremely powerful.
We hope you use your URSA Mini or URSA Mini Pro 4.6K to produce some of the world’s most
exciting films and television programming, music videos and commercials! We are extremely
excited to see what creative work you produce and to get your feedback on new features you
would like to see us add to URSA!
Grant Petty
CEO Blackmagic Design
English

Contents
Blackmagic URSA Mini
Which camera are you using? 6
URSA Mini 7
URSA Mini Pro 4.6K 7
Getting Started 8
Attaching a Lens 8
Powering your Camera 11
Storage Media 14
CFast Cards 14
SD Cards 16
Preparing Media for Recording 19
Preparing Media on
Blackmagic URSA Mini 20
Preparing Media on
Blackmagic URSA Mini Pro 4.6K 20
Preparing Media on Mac 21
Preparing Media on Windows 22
Recording 23
Recording Clips 23
Trigger Record 29
Record Duration Table 29
Playback 33
Introduction to URSA Mini 35
Camera Front 35
Left Side – URSA Mini 36
Left Side – URSA Mini Pro 4.6K 36
Right Side 38
Rear Panel 39
Top Panel 40
Underside 40
URSA Mini Controls 41
Control Buttons 41
Side Handle 43
URSA Mini Pro 4.6K Control Buttons 45
Forward Control Panel 45
Ergonomic Control Panel 48
Internal Control Panel 53
Touchscreen Controls 55
Touchscreen 55
Touchscreen Features 55
Settings 73
Record Settings 73
File Naming Convention 78
Monitor Settings 78
Audio Settings 87
Audio Settings – URSA Mini 87
Audio Settings – URSA Mini Pro 4.6K 89
Setup Settings 91
Presets 98
LUTS 100
Entering Metadata 103
Camera Video Output 109
HD Monitoring Output 109
12G-SDI Output 109
URSA Mini Shoulder Mount Kit 111
Blackmagic URSA Viewfinder 115
Mounting and Connecting
toBlackmagic URSA 115
Adjusting the Eyepiece 116
Button Features 116
Menu Settings 117
Blackmagic URSA Studio Viewfinder 122
Mounting and Connecting
toBlackmagic URSA Mini 123
Adjusting the Blackmagic
URSA Studio Viewfinder 125
Button Features 128
Menu Settings 130
Interchangeable Lens Mount 135
Blackmagic URSA Mini Pro PL Mount 136
Blackmagic URSA Mini Pro B4 Mount 138
Blackmagic URSA Mini Pro EF Mount 140
Blackmagic URSA Mini Pro Shim Kit 142

Mounting Batteries 143
Mounting V-mount or
GoldMount Batteries 143
Using your own Battery Plate 144
Using DaVinci Resolve 146
Importing your Clips 147
Working with RAW files 148
Editing your Clips 149
Trimming Clips 150
Mapping Keyboard Shortcuts 151
Adding Transitions 152
Adding Titles 153
Adding Audio Tracks 153
Color Correcting your Clips 154
Using Scopes 155
Secondary Color Correction 156
Qualifying a Color 157
Adding a Power Window 157
Tracking a Window 158
Using Plugins 159
Mastering your Edit 160
Understanding Studio
CameraControl 161
Using Camera Control 162
Zoom Control 164
DaVinci Resolve Primary
ColorCorrector 168
Blackmagic Camera Setup Utility 171
Post Production Workflow 173
Working with Files from
CFast2.0 and SD cards 173
Working with 3rd Party Software 173
Using Final Cut Pro X 174
Using Avid Media Composer 174
Using Adobe Premiere Pro CC 175
Using Autodesk Smoke 2013 176
Blackmagic URSA Mini B4 Mount 177
Using B4 Lenses 179
Shimming Lens Mounts 180
Shimming URSA Mini PL 180
Shimming URSA Mini Pro 4.6K 182
Help 183
Regulatory Notices
andSafetyInformation 184
Warranty 185
Contents

Which camera are you using?
You’ll notice while reading this manual that occasionally a feature will be specific to a particular
Blackmagic URSA Mini camera. All URSA Mini cameras produce incredible, wide dynamic range
images and share the same basic chassis. There are some differences between different
models, though.
The available models are
URSA Mini 4K
URSA Mini 4.6K
URSA Mini Pro 4.6K
URSA Mini 4K EF
4K
SDI OUT
12VOUT
URSA Mini 4.6K PL
4.6K
LENS
SDI OUT
12VOUT
ND
FILTER
4.6K
AUTO
W/B
LENS
SDI OUT
12V OUT
12 pin broadcast
connector
URSA Mini Pro 4.6K
ND
FILTER
4.6K
AUTO
W/B
LENS
SDI OUT
12VOUT
ND
FILTER
4.6K
AUTO
W/B
LENS
SDI OUT
12V OUT
ND filters
ND
FILTER
4.6K
AUTO
W/B
LENS
SDI OUT
12V OUT
12 pin broadcast
connector
6Which camera are you using?

URSA Mini
Aside from the sensors used, URSA Mini 4K and 4.6K models are nearly identical. The control
buttons and software menus are laid out the same way, and operating the cameras is
essentially the same. You’ll simply find a few more resolution options on cameras using the 4.6K
sensor, together with a greater range of ISO settings. An easy way to tell which sensor your
camera has is to look for a ‘4K’ or ‘4.6K’ icon above the lens mount.
It’s also worth noting that URSA Mini cameras are available with EF and PL lens mounts. An
easy way to tell the difference between these is the presence of a 12 pin broadcast lens
connector near the lens mount on PL models, and of course, the mounts themselves if you are
familiar with EF and PL mounting systems. See the ‘getting started’ section for more information
on these mounts.
URSA Mini, left side
URSA Mini Pro 4.6K
Blackmagic URSA Mini Pro 4.6K is a little different. This camera is only available as a 4.6K model
with an EF mount, but it can accept other lens types via its interchangeable lens mount. Formore
information on the interchangeable lens mount, see the 'interchangeable lens mount' section.
URSA Mini Pro 4.6K is easy to recognise by the additional control buttons and LCD status
screen on the left side of the chassis, as well as the ND filters near the lens mount. Naturally,
the additional control buttons will mean that you have different options for controlling your
camera and changing settings.
URSA Mini Pro 4.6K, left side
Now that you know how to identify the different URSA Mini models, you can now get started
using your camera!
F1 F2
7Which camera are you using?

Getting Started
Getting started with your Blackmagic URSA Mini is as simple as attaching the side handle,
mounting a lens, and powering your camera.
Attaching a Lens
Attaching a lens to your camera is the same process for URSA Mini 4K, URSA Mini 4.6K and
URSA Mini Pro 4.6K, however the EF, PL and B4 mounts have slightly different ways of
operating. In all cases, the first step is to remove the protective dust cap.
To remove the protective dust cap from the EF lens mount, hold down the locking button and
rotate the cap counterclockwise until it is released. For the PL mount, rotate the PL locking ring
counterclockwise and pull the protective dust cap away from the mount.
To attach an EF mount lens:
1 Align the dot on your lens with the dot on the camera mount. Many lenses have a visual
indicator, for example a blue, red or white dot.
2 Twist the lens clockwise until it locks into place.
3 To remove the lens, hold down the locking button, rotate the lens counterclockwise
until its dot or indicator reaches the 12 o’clock position, and gently remove.
Attaching and removing an EF mount lens on Blackmagic URSA Mini EF
NOTE Blackmagic URSA Mini Pro 4.6K features an interchangeable lens mount
capable of accepting EF, PL and B4 lenses, as well as additional lens mounts with
accessories. Formore information on switching between mount types on
URSAMiniPro 4.6K, refer to the 'interchangeable lens mount' section in this manual.
TIP URSA Mini Pro 4.6K comes out of the box configured to accept EF lenses.
To get shooting right away, simply attach an EF mount lens as detailed below.
LENS
12V OUT
SDI OUT
88Getting Started

To attach a PL mount lens:
1 Open your camera’s PL locking ring by rotating it counterclockwise until it stops.
2 Align one of the lens’ four flange notches with the locating pin on the camera mount.
Be sure to align the lens for easy viewing of the lens marks.
3 Tighten the PL locking ring by rotating it clockwise. If attaching a PL lens with a servo
unit to URSA Mini PL or URSA Mini Pro 4.6K, you can also connect the 12 pin broadcast
connector for servo control.
4 To remove the lens, rotate the locking ring counterclockwise until it stops, then gently
remove the lens by pulling it directly out from the camera body. There is no need to
rotate the lens.
Attaching and removing a PL lens on Blackmagic URSA Mini PL
LENS
TIP URSA Mini Pro 4.6K PL and URSA Mini PL support PL 35mm lenses with servo
handgrips, such as Fujinon Cabrio lenses, Canon CN7x17KAS S and Canon CN20x50
CINE-SERVO 50-1000mm T5.0-T8.9 lenses. The 12-pin broadcast connector on the
lens must be plugged in to the broadcast lens control connector on the camera to
provide power and control signals from your URSA Mini to the lens.
NOTE When no lens is attached to the camera, the glass filter covering the sensor
isexposed to dust and other debris so you should keep the dust cap on
whenever possible.
99Getting Started

To attach a B4 mount lens:
1 Turn the B4 lens locking ring counterclockwise to reveal the alignment pin inside the
top of the mount. Align the B4 lens to your URSA Mini’s B4 mount so the registration
slot on the lens mount matches the position of the alignment pin.
2 Hold the lens against the B4 mount so the mount plates are against each other.
Make sure the alignment pin is secured inside the registration slot.
3 Turn the locking ring clockwise to tighten the lens against the mount and lock it
into position.
Attaching and removing a B4 lens on Blackmagic URSA Mini PL with B4 mount
To power the lens and provide lens control, simply plug the lens cable into the connector
marked ‘Lens’ on the front of your URSA Mini PL or URSA Mini Pro 4.6K's turret. Most B4 lenses
will have the hirose 12 pin connector and cable built in. This will provide power and control
signals from your URSA Mini to the lens. For information on the types of B4 lenses and how to
use them with your camera, refer to the 'Using B4 Lenses' section towards the end of
the manual.
ZOOM
F1
F2
F3
DISP
PEAK
LENS
URSA Mini Pro 4.6K
URSA Mini Pro 4.6K's PL mount features four pins at the 12 o'clock position that are
used to communicate with Cooke lenses featuring Cooke’s /i Technology interface.
Thislets you record lens information in your clips’ metadata such as the lens model,
focal length, aperture setting, focus distance and other lens specific information.
ND
FILTER
4.6K
AUTO
W/B
LENS
SDI OUT
12VOUT
When mounting a PLlens with
/iTechnology to URSAMini Pro 4.6K,
make sure the lens pins align withthe
mount pins at the 12o'clock position
1010Getting Started

The information that is recorded as metadata via Cooke's /i Technology interface can be very
helpful in post production and VFX. Knowing the lenses used in production and their precise
settings can be helpful in the event that the setup needs to be replicated at a later date.
This detailed information can also be utilised by powerful applications such as DaVinci
Resolve and Blackmagic Fusion for a wide variety of advanced functions. For example, the
recorded metadata can be used to simulate the specific lens in 3D space, or correct
lensdistortions.
Powering your Camera
Now that you’ve attached a lens, you will need to supply power. The quickest way to power
your camera is to connect external power using the supplied AC to 12V DC adapter.
To plug in external power:
1 Connect the AC to 12V DC adapter plug to your mains power socket.
2 Connect the AC to 12V DC adapter’s 4 pin XLR connector to the 12-20V DC power
connector on the camera.
If you have both external and battery power connected, only external power will be used. If you
remove external power while a charged battery is connected, your camera will switch to battery
power without interruption.
Use the supplied 12V AC adapter to
power your Blackmagic URSA Mini
You can use industry standard third party external batteries such as V mount or gold mount
batteries with your URSA Mini. Refer to the ‘mounting Batteries’ section for more information
about mounting the different types of battery plates to support different batteries.
SDI OUT
SDI IN
REF IN
TC IN
12V
SDI OUT
SDI IN
REF IN
TC IN
12V
1111Getting Started

To turn on URSA Mini:
1 Press and release the ‘power’ button. On Blackmagic URSA Mini, the power button is
located on the control panel behind the fold out LCD. Simply open the LCD to access
the control panel.
2 Press and hold the ‘power’ button to turn your camera off.
You are now ready to insert CFast 2.0 cards and start recording!
To turn on your URSA Mini, open the fold out LCDtouchscreen, then press and
release the power button on the control panel. Press and hold to turn off
To turn on URSA Mini Pro 4.6K:
1 On Blackmagic URSA Mini Pro 4.6K, a power switch is also located above the fold out
LCD. Move the switch to the 'on' position to power your camera.
2 To turn the camera off, move the switch to the 'off' position.
Move the power switch to 'on' to power your camera
IRIS
REC
FOCUS
PEAK
DISP
MENU
TIP When turning the camera on, make sure you promptly press and releasethe
button. Your camera will take approximately 10 seconds to boot up, but there is no
need to press the button again. When turning off, press and hold the button until the
camera powers off.
1212Getting Started

URSA Mini Pro 4.6K also features a redundant power switch, which allows the camera to be
turned on and off by holding down the 'rec' and 'forward step' buttons on the inside control
panel. While you wouldn't normally power your camera using this method, it is provided as a
helpful alternative if the power switch along the top edge is obscured, for example when
mounted on a custom rig.
If you need to, you can also hold down the record
and forward step buttons on the control panel behind
the LCD to power your camera on or off
XLR 1 XLR 2
XLR 1 XLR 2
TIP If your URSA Mini Pro 4.6K's power switch is set to 'on' and your camera is
turned off, it may have been powered down by holding the control panel
buttons. Simply toggle the power switch 'off' and 'on,' or hold the control panel
buttons to power the camera on.
1313Getting Started

Storage Media
URSA Mini uses CFast 2.0 cards to record 4.6K, 4K, Ultra HD, 2K or HD video.
URSAMiniPro4.6K can also record video using fast UHS-II and UHS-I SD cards.
CFast Cards
CFast 2.0 cards are capable of supporting very high data rates, so are perfect for recording
HDand 4K video at high frame rates. Refer to the record duration table in the ‘recording’
section for details on the maximum frame rates that can be recorded in each format.
Inserting a CFast Card
If you're using URSA Mini Pro 4.6K, your camera can also record on SD cards. To record using
CFastcards you need to set your camera accordingly. To do this, simply set the storage
mediaswitch above the media slots to the 'CFAST' position.
To insert a CFast card.
1 Open the fold out monitor to access the CFast slots.
2 With the label on the CFast card facing the touchscreen, insert the card until you feel it
lock into place. Push the CFast card ejector button to eject the card.
The storage information at the bottom of the LCD touchscreen will show the name and
record time remaining of the detected CFast cards.
Blackmagic URSA Mini has two CFast
slots for continuous recording
NOTE While CFast 2.0 cards are generally high speed cards, some cards have slower
write speeds compared to read speeds, and maximum data rates can differ between
models. Toensure reliable recording in your chosen frame rates, use only the
recommended cards listed in this section.
IRIS
REC
FOCUS
PEAK
DISP
MENU
IRIS
REC
FOCUS
PEAK
DISP
MENU
14Storage Media

Choosing a CFast 2.0 Card
When working with high data rate video it’s important to carefully check the CFast card you
would like to use. This is because CFast 2.0 cards have different read/write speeds. Some
cards can record sustained RAW video, and some are suited to compressed recording using
ProRes and compressed RAW formats. The tables below identify the CFast cards
recommended for use when shooting with Blackmagic URSA Mini.
Which CFast cards should I use with the Blackmagic URSA Mini and
URSA Mini Pro Cameras?
The following CFast 2.0 cards are recommended for 2160p RAW up to 30 fps.
Brand Card Name Storage
Angelbird AVpro CF 160GB
Angelbird AVpro CF 240GB
KomputerBay 3400x CFast 2.0 Card 64GB
KomputerBay 3400x CFast 2.0 Card 128GB
KomputerBay 3600x CFast 2.0 Card 64GB
Lexar Professional 3500x 128GB
Lexar Professional 3500x 256GB
Lexar Professional 3600x 128GB
Lexar Professional 3600x 256GB
SanDisk Extreme Pro. SDCFSP-128G-x46D 128GB
SanDisk Extreme Pro. SDCFSP-256G-x46D 256GB
Transcend CFX650. TS128GCFX650 128GB
Transcend CFX650. TS256GCFX650 256GB
Transcend CFX650. TS128GCFX650BM 128GB
Transcend CFX650. TS256GCFX650BM 256GB
Wise CFast 2.0 3400x 128GB
Wise CFast 2.0 3400x 256GB
The following CFast 2.0 cards are recommended for 4K RAW up to 30 fps but have
beendiscontinued by the manufacturer.
Brand Card Name Storage
Lexar Professional 3400x 128GB
Lexar Professional 3400x 256GB
NOTE Only the 'D-series' of SanDisk CFast2.0 cards have been certified for use with
Blackmagic URSA Mini. These cards can be identified by a large ‘D’printed on the back
of the card in the lower left corner, and we have also listed the model numbers to make
them easier to identify. This model number varies slightly fromregion to region, with the
'x' in the model number changing in different markets. Forexample, an 'A' in the US and
a 'G' in the Asia Pacific and Europe region.
15Storage Media

The following CFast 2.0 cards are recommended for 2160p ProRes 422 HQ up to 60 fps.
Brand Card Name Storage
Angelbird AVpro CF 160GB
Angelbird AVpro CF 240GB
KomputerBay 3400x CFast 2.0 Card 64GB
KomputerBay 3400x CFast 2.0 Card 128GB
KomputerBay 3600x CFast 2.0 Card 64GB
Lexar Professional 3500x 64GB
Lexar Professional 3500x 128GB
Lexar Professional 3500x 256GB
Lexar Professional 3600x 128GB
Lexar Professional 3600x 256GB
SanDisk Extreme Pro. SDCFSP-128G-x46D 128GB
SanDisk Extreme Pro. SDCFSP-256G-x46D 256GB
Transcend CFX650. TS128GCFX650 128GB
Transcend CFX650. TS256GCFX650 256GB
Transcend CFX650. TS128GCFX650BM 128GB
Transcend CFX650. TS256GCFX650BM 256GB
Wise CFast 2.0 3400x 128GB
Wise CFast 2.0 3400x 256GB
Wise CFast 2.0 3500x 512GB
The following CFast 2.0 cards are recommended for 4K ProRes 422 HQ up to 60 fps
buthavebeen discontinued by the manufacturer.
Brand Card Name Storage
Lexar Professional 3400x 32GB
Lexar Professional 3400x 64GB
Lexar Professional 3400x 128GB
Lexar Professional 3400x 256GB
For the most up to date information on supported CFast cards for Blackmagic URSA Mini please
refer to the Blackmagic Design support center at www.blackmagicdesign.com/support.
SD Cards
In addition to CFast 2.0 cards, Blackmagic URSA Mini Pro 4.6K can record on high speed UHS-I
and UHS-II type SD cards. Using high end SDXC UHS-II cards, you can even record ProRes HQ
footage in 2160p for Ultra HD content!
With SD cards, you can use more affordable storage media when shooting compressed video
formats in HD. SDXC and SDHC are a very common media storage format for consumer still and
video cameras.
If you've ever shot video using a DSLR, or use a Blackmagic Micro Cinema Camera, Pocket Cinema
Camera or Blackmagic Video Assist, you probably already have compatible SDcards to use.
16Storage Media

For projects that don't require the highest resolution RAW files, or for when long recording
durations are needed, using SD cards can be very economical. Lower capacity and lower
speed SD cards can also be used for storing and loading LUT's and Presets.
Inserting an SD Card
To insert an SD Card.
1 Open the fold out monitor to access the SD card slots. These are the smaller slots
located between the CFast slots.
2 Set the storage media toggle switch above the slots to 'SD'.
3 With the label on the SD card card facing away from the touchscreen, insert the card
until you feel it lock into place. To remove an SD card, push the SD card in to eject it.
4 The storage indicator at the bottom of the LCD touchscreen will show the name and
record time remaining of detected cards.
When recording to SD cards on URSA Mini Pro 4.6K make
sure the storage media selection switch is set to 'SD'
Choosing a fast SD Card
If you are recording Ultra HD on Blackmagic URSA Mini Pro 4.6K, then we recommend using the
fastest high speed UHS-II type SD cards available. It’s important to use high speed UHS-II
SDcards for Ultra HD and HD recording, or UHS-1 cards for HD recording. These cards are
rated for fast data speeds and support larger storage sizes. Generally the faster the cards,
thebetter. Refer to the recommended SD cards table earlier in this section for more information.
Before using your cards, you will need to format them to either HFS+ or exFAT formats. It’s easy
to format your media via the ‘storage’ settings. Refer to the ‘settings’ section for more
information on storage settings.
If you want to, you can format your cards using a Mac or Windows computer. When using your
media on Mac OS then you can use HFS+ which is the Mac disk format. If you are using
Windows then you should use exFAT format, which is the Windows disk format and Mac
computers can also read exFAT format.
The tables below identify the SD cards recommended for use when shooting with Blackmagic
URSA Mini Pro. It’s worth regularly checking the latest version of this manual for more up to date
information, which is available for download from the Blackmagic Design website at
www.blackmagicdesign.com/support
XLR 1 XLR 2
XLR 1 XLR 2
17Storage Media

Which SD cards should I use with URSA Mini Pro?
The following SD cards are recommended for recording up to 2160p30 ProRes HQ.
Brand Card Name Storage
Delkin Devices UHS-II 250MB/s SDHC 32GB
SanDisk Extreme Pro UHS-II 300MB/s SDXC 128GB
Toshiba Exercia Pro UHS-II 270MB/s SDXC 64GB
Transcend Ultimate UHS-II180MB/s SDXC 64GB
The following SD cards are recommended for RAW Lossless recording up to 1080p30
Brand Card Name Storage
Delkin Devices UHS-II 250MB/s SDHC 32GB
Lexar Professional 2000x UHS-II 300MB/s SDXC 64GB
SanDisk Extreme Pro UHS-I 95MB/sSDXC 64GB
Toshiba Exercia Pro UHS-II 270MB/s SDXC 64GB
Toshiba Exercia Pro UHS-II 270MB/s SDXC 256GB
Transcend Ultimate UHS-II180MB/s SDXC 64GB
The following SD cards are recommended for recording up to 1080p ProRes HQ
Brand Card Name Storage
Delkin Devices UHS-II 250MB/s SDHC 32GB
Lexar Professional 2000x UHS-II 300MB/s SDXC 64GB
Lexar Professional 1000x UHS-II 150MB/s SDXC 64GB
SanDisk Extreme Pro UHS-I 95MB/sSDXC 64GB
SanDisk Extreme Pro UHS-II 300MB/s SDXC 64GB
SanDisk Extreme Pro UHS-II 300MB/s SDXC 128GB
Toshiba Exercia Pro UHS-II 270MB/s SDXC 64GB
Toshiba Exercia Pro UHS-II 270MB/s SDXC 256GB
Transcend Ultimate UHS-II180MB/s SDXC 64GB
For the most up to date information on supported SD cards for URSA Mini Pro please refer to
the Blackmagic Design support center at www.blackmagicdesign.com/support.
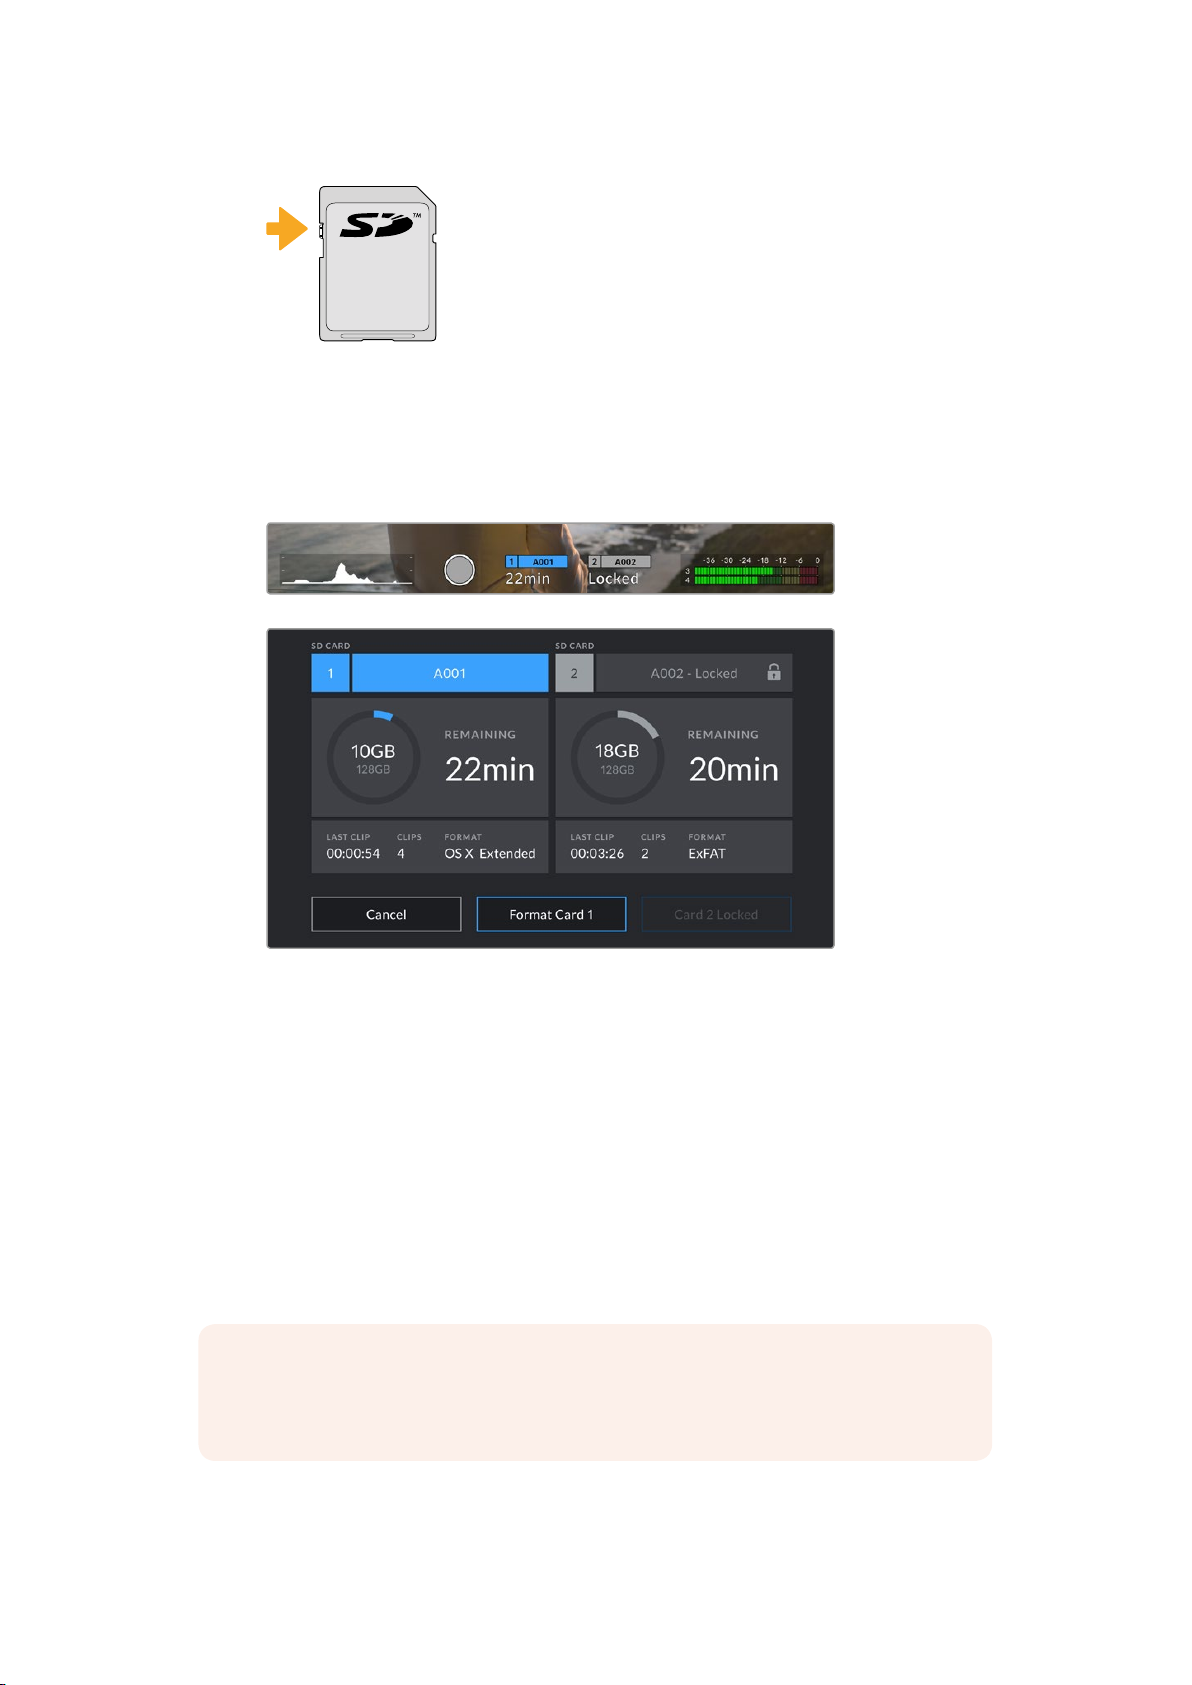
Locking and Unlocking SD Cards
SD cards can be write protected, or 'locked', to prevent data from being overwritten.
When inserting an SD card, make sure the card is not write protected. Write protection is
disabled by moving the plastic switch on the left side of the card to the position closest to
theconnectors. After recording, you can then write protect the card by sliding the switch
backdown to the bottom position.
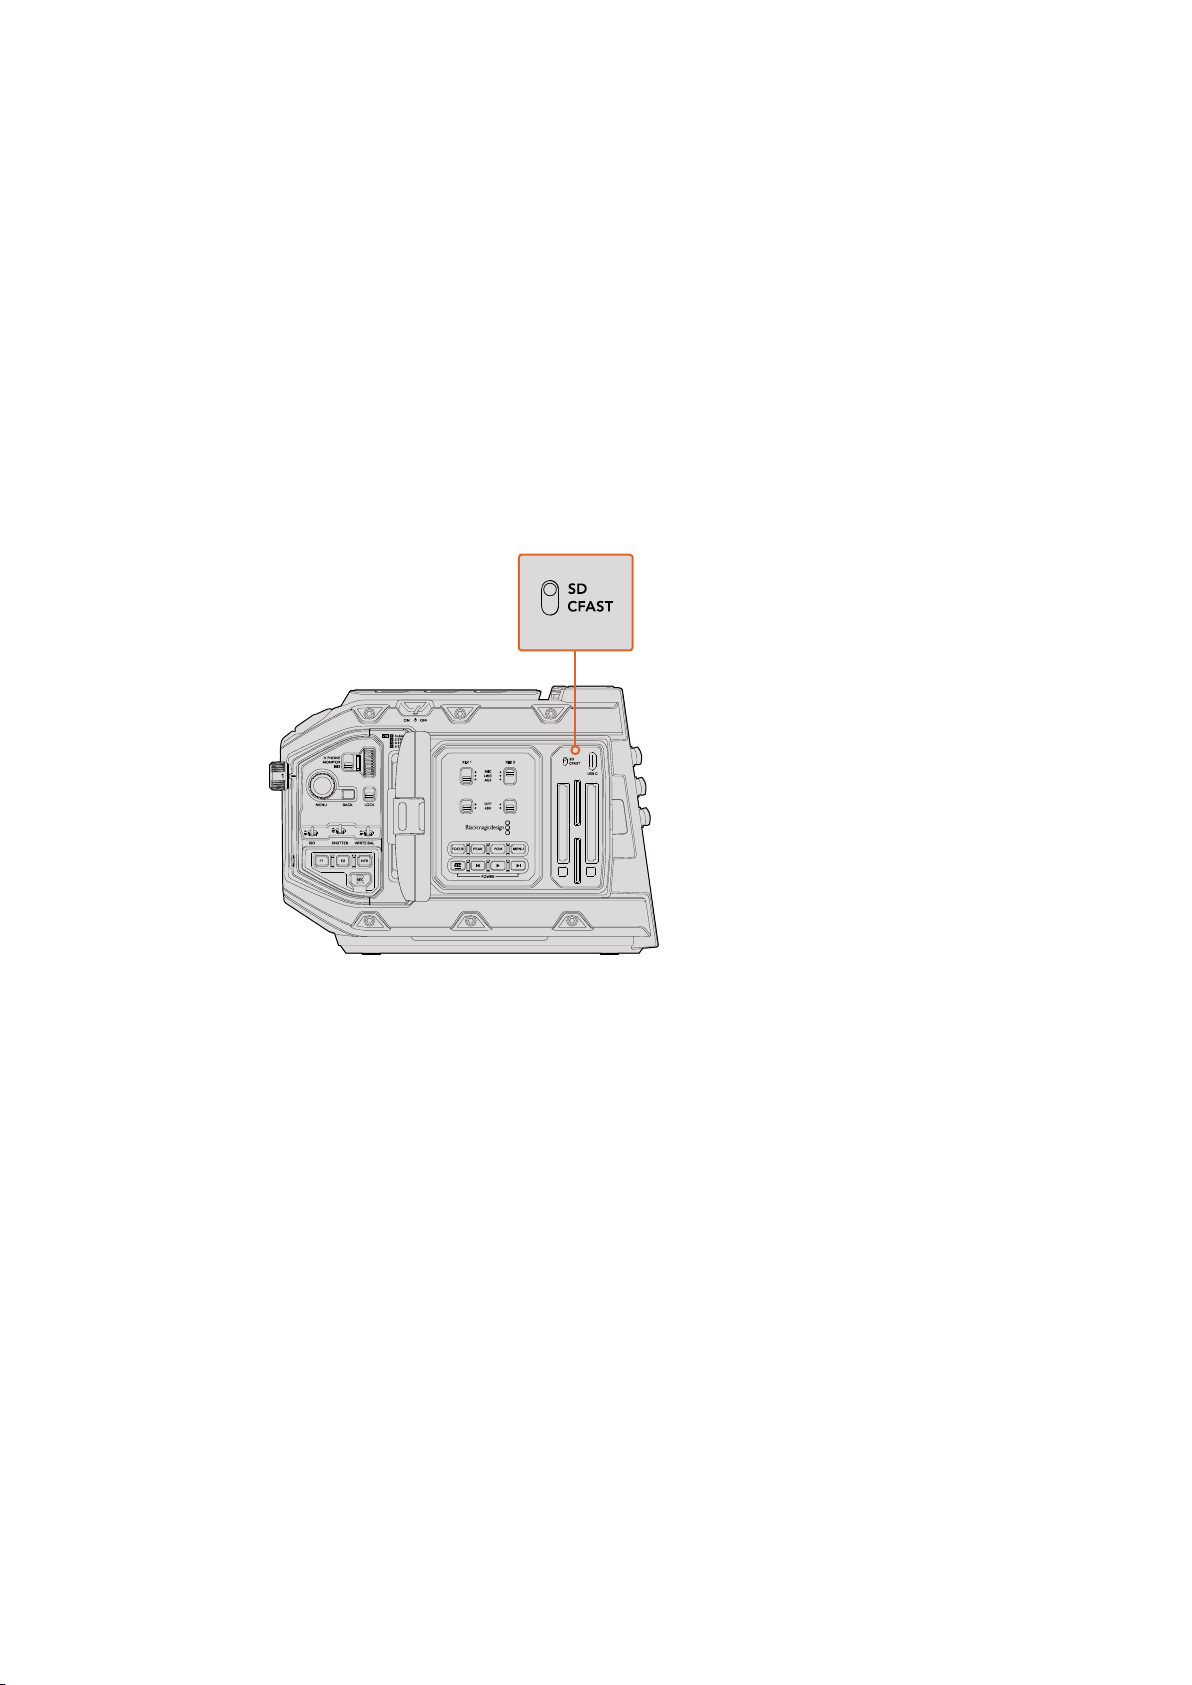
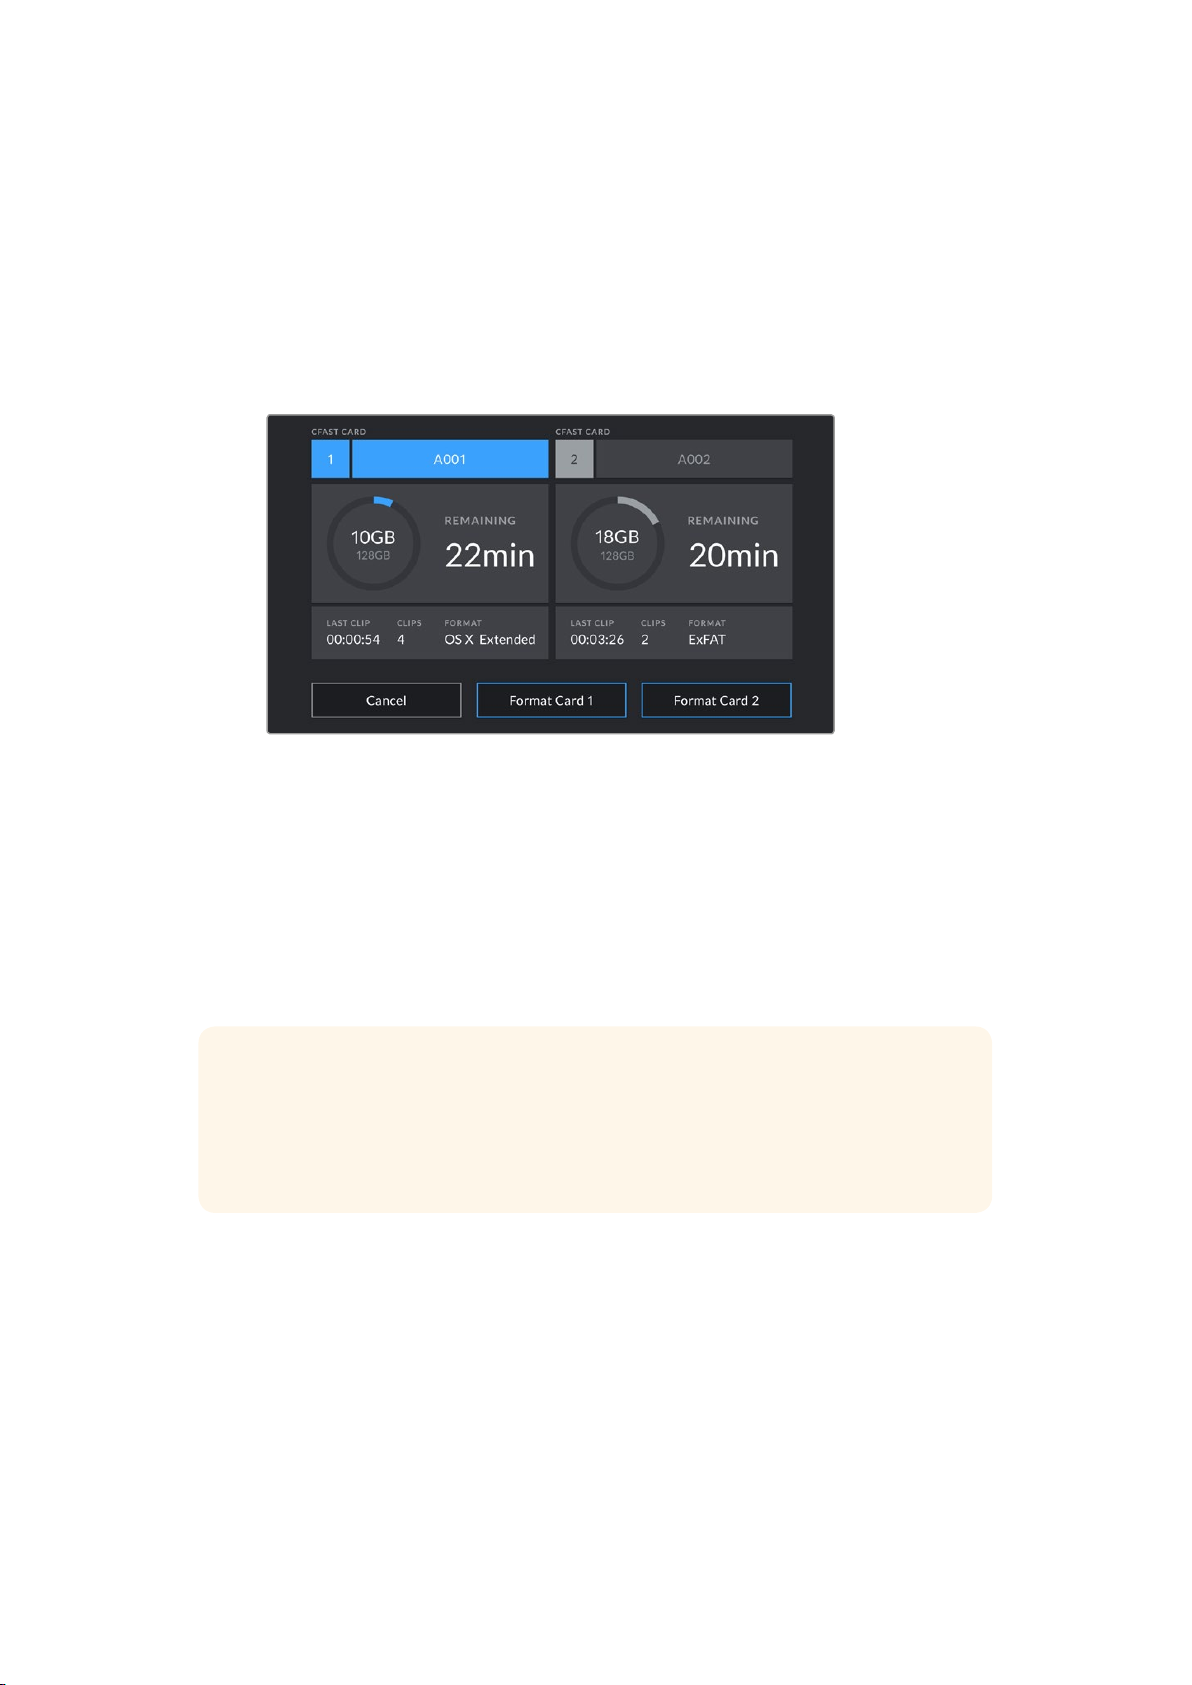
NOTE For high resolution, high frame rate and RAW recording, we recommend using
CFast 2.0 media, which is typically faster and is available in higher capacities.
18Storage Media

Move the lock tab up or down
to lock or unlock an SD card
Your URSA Mini Pro 4.6K will let you know if you've inserted a locked SD card by displaying a
'locked' icon on the LCD touchscreen and storage menu. If the card is locked, you won't be able
to export LUTs and presets until it is unlocked.
Your URSA Mini Pro 4.6K will indicate when locked SD storage media is inserted
Preparing Media for Recording
You can format your CFast or SD cards using the ‘format card’ feature on URSA Mini’s storage
and formatting screen, or via a Mac or Windowscomputer. We recommend formatting storage
media using URSA Mini for best performance.
HFS+ is also known as Mac OS extended and is the recommended format as it supports
'journaling'. Data on journaled media is more likely to be recovered in the rare event that your
CFast card becomes corrupted. HFS+ is natively supported by Mac OS.
ExFAT is supported natively by Mac OS and Windows without needing to purchase any
additional software. However, exFAT does not support journaling.
LOCK
▼
NOTE Before formatting your media, it's important to make sure the media storage
switch has been set correctly to either SD card or CFast card. Always carefully check
the settings before formatting.
19Storage Media

Preparing Media on Blackmagic URSA Mini
1 Tap either storage indicator at the bottom of the LCD touchscreen to enter the
storage manager.
2 Tap 'Format Card 1' or 'Format Card 2' to format the CFast card in slot 1 or 2, respectively.
3 Choose OS X Extended or exFAT format and tap the 'format card' button.
4 You will be asked to confirm your selection. Tap 'format card' again to continue or
'cancel' to cancel the format.
Use your URSA Mini's storage manager to format your camera's CFast cards
5 A progress bar will show you the status of the format. You will be notified when the
format is complete.
6 Tap 'ok' to return to the storage manager.
7 Tap 'exit' to leave the storage manager.
When formatting CFast cards or SD cards using the storage manager,your URSAMini will use the
Camera ID and reel number in the slate to name the card. See the 'entering metadata' section of
this manual for moreinformation.
Preparing Media on Blackmagic URSA Mini Pro 4.6K
The process for preparing storage media on your URSA Mini Pro 4.6K is exactly the same as the
URSA Mini process outlined above. The only difference is the added option to format SD cards
as well as CFast cards. It's worth mentioning that if your camera's media storage switch is set to
SD or CFast, only the selected card type will be formatted when you tap 'format card'.
TIP If your URSA Mini Pro 4.6K is set to record to SD cards and you have inserted
alocked card, you will be unable to format that card. A padlock icon and 'locked' will
appear next to the card's name in the storage manager. Simply unlock thecard to
format and record. For more information on locking SD cards, see the 'SDcards' section
of this manual.
20Storage Media
This manual suits for next models
1
Table of contents
Languages:
Other Blackmagicdesign Camera Accessories manuals

Blackmagicdesign
Blackmagicdesign Blackmagic URSA User manual

Blackmagicdesign
Blackmagicdesign Video Assist User manual

Blackmagicdesign
Blackmagicdesign Video Assist 12G HDR User manual

Blackmagicdesign
Blackmagicdesign URSA User manual

Blackmagicdesign
Blackmagicdesign Blackmagic URSA User manual

Blackmagicdesign
Blackmagicdesign Design 3G-SDI Arduino Shield User manual