Bliss Tubs B2645 User manual

Walk-in Bathtub
Installation Manual
QUESTIONS?
Please call your dealer rst:
Telephone:
MODELS
B2645 B2651 B2653
B2848 B2851 B2948
B3048 B3052 B3054
B3150 B3153
B3060 B3260
B3052HC B3252HC
B3355 B3555 B3237
B305546 B315546 B306022
SAVE THESE INSTRUCTIONS
Image shown is a dual system tub. This manual also covers Bliss Walk-in
Tubs with air or water jets only, or without jets.
© 2015 - 2017 Bliss Walk-in Bathtubs. All Rights Reserved.

BLISS TUBS
SAVE THESE INSTRUCTIONS1
© 2015 - 2017 Bliss Walk-in Bathtubs. All Rights Reserved.
INTRODUCTION .......................... 2
SAFETY AND WARNINGS ............ 3
PRE-INSTALLATION .................... 4
A. Receiving the tub
1. Initial Inspection
2. Damage Procedure
B. Water Test
C. Site Preparation
1. Inspect for Existing Damage
2. Site Protection
3. Demolition
4. Structural
5. Plumbing
6. Electrical
7. Ventilation
8. Additional Service Access
INSTALLATION ............................ 8
A. Walk-in Bathtub Preparation
1. Faucets
2. Bath Drain and Overow Kit / Door Drain
3. Extension Kit Pre-Fit
B. Tub Install
1. Leveling the Tub Feet
2. Secure to Walls / Floor
3. Supply / Drain Plumbing Connection
4. Electrical Connection
5. Test
C. Finishing Work
1. Extension Panel Finish
2. Surround Installation
3. Trim
4. Final Seal
TABLE OF CONTENTS
POST INSTALLATION ................. 20
A. Clean Up
B. Functional Review with Customer
C. Final Checklist
D. Warranty Card
APPENDICES ............................. 22
A. Warranty
B. Dimensional Diagrams
1. Tub Model Dimensions Comparison
2. Tub Model Diagrams
C. Reverse Drain Installation Instructions
D. Electrical System Operations and
Requirements
1. Air / Hydro
2. Dual (Including Ozonator)
3. Aromatherapy & Chromatherapy
4. Electrical Requirements Chart
E. Maintenance and Cleaning Guide
1. Door
2. Maintenance Panel
3. Tub Finish
4. Faucet, Handspray, Grab Bar, Drain and
Overow
5. Hydro System
6. Air System
F. Troubleshooting Guide
G. Accessories (if included)
BLISS TUBS
SAVE THESE INSTRUCTIONS 2
© 2015 - 2017 Bliss Walk-in Bathtubs. All Rights Reserved.
INTRODUCTION
Thank you for your Bliss Tub purchase!
Bliss Tubs is committed to providing walk-in bathtubs known in the industry for high quality backed up by excellent
service. Our team of expert technicians created this manual to help the installation go as smoothly as possible
providing step by step instructions.
Please completely read this manual before starting any installation work.
DANGER... Indicates a denite hazard likely resulting in bodily harm, serious injury or death.
WARNING... Indicates a potential hazard that could result in bodily harm, serious injury or death.
CAUTION... Indicates a situation in which property damage could occur.
IMPORTANT... Indicates important information related to the use and/or installation of the product.
Failure to follow highlighted specic instructions could drastically effect the use, function, and/or
reliability of the product.
LEGEND
BLISS TUBS TECHNICAL SUPPORT
(800) 398-9639

BLISS TUBS
SAVE THESE INSTRUCTIONS3
© 2015 - 2017 Bliss Walk-in Bathtubs. All Rights Reserved.
WARNING... When using this unit, basic precautions should be followed, including the following:
READ AND FOLLOW ALL INSTRUCTIONS TO
REDUCE THE RISK OF INJURY:
DANGER... Injury: To reduce the risk of injury, do not permit children to use this unit
unless they are closely supervised at all times. Supervision is also recommended when
an elderly or handicapped individual uses a walk-in bathtub.
• Use this unit only for its intended use as described in this installation manual and the corresponding
operating manual. Do not use attachments not recommended by the manufacturer.
• Never drop or insert any object in any opening within the whirlpool system.
• Donotoperatethisunitwithouttheguardoverthesuctiontting.Theguardisasafetydevicethatreduces
the potential hazard of hair or body entrapment. Keep hair and body away from suction guard while the
water pump is running. Should the suction guard be covered by an object, the integrated air line will vacate
the suction and release the object.
• This unit must be connected only to a supply circuit that is protected by a ground-fault circuit-interrupter
(GFCI). Such a GFCI should be provided by the installer and should be tested on a routine basis. To test
the GFCI, push the test button. The GFCI should then interrupt power. Push the reset button. Power should
be restored. If the GFCI fails to operate in this manner, the GFCI is defective. If the GFCI interrupts power
withoutthetestbuttonbeingpushedthereisagroundcurrentowing,indicatingthepossibilityofanelectric
shock. If this should occur, do not use this hydromassage bathtub. Disconnect the hydromassage bathtub
andhavetheproblemcorrectedbyaqualiedservicerepresentativebeforefurtheruse.
• BlisstubsareULcertiedforinstallationandusewithintheUnitedStates.Theelectricalconnectionsmust
remain the standard three-prong (NEMA) connections and are not to be permanently installed or altered in
any way. More detailed electrical installation and use instructions are provided later in this manual.
DANGER... Alcohol, Drug, and Medication Use
The use of alcohol, drugs or medications can greatly increase the risk of medical complications, fatal
hyperthermia, serious bodily injury or death. The material provided in this manual is not intended to
replace the advice of a physician. Seek advice from a competent medical professional or doctor prior to
theuseofthisproductwithregardtotheuser'sspecicsymptomsorconditions.
DANGER… Hyperthermia
Prolonged immersions in hot water may induce hyperthermia. Hyperthermia occurs when the internal
temperature of the body reaches a level several degrees above normal body temperature of 98.6°F. The
symptoms include an increase in internal temperature of the body, dizziness, lethargy, drowsiness, and
fainting.Theeectsofhyperthermiainclude:
• Failure to perceive heat
• Failure to recognize a need to exit the bathtub
• Lack of awareness of impending hazard
SAFETY & WARNINGS
IMPORTANT SAFETY INSTRUCTIONS
INSTRUCTIONS PERTAINING TO RISK OF FIRE,
ELECTRIC SHOCK, OR INJURY TO PERSONS
• Fetal damage in pregnant women
• Physical inability to exit the bathtub
• Unconsciousness and danger of drowning

BLISS TUBS
SAVE THESE INSTRUCTIONS 4
© 2015 - 2017 Bliss Walk-in Bathtubs. All Rights Reserved.
IMPORTANT... INSTALLATIONS SHOULD BE PERFORMED ONLY BY A LICENSED CONTRACTOR.
BLISS TUBS DOES NOT WARRANTY THE INSTALLATION OF ANY OF ITS PRODUCTS. FOR MORE
INFORMATION REGARDING BLISS TUBS 10 YEAR LIMITED WARRANTY SEE APPENDIX A (PAGE 22).
RECEIVING THE TUB
It is the consignee’s sole responsibility to ensure that the shipment is complete and undamaged prior to signing
for the shipment or releasing the driver. Bliss Tubs will not be liable for the cost of repairing damage to the
tub, replacing missing product or for any related freight or parcel shipping costs if the required inspection and
reporting steps are not followed. However, if there is any freight damage discovered after the initial delivery or
terminal pickup, Bliss Tubs will help to facilitate the repair of the product.
Common Exterior Signs of Shipping Damage
• Excess splintering of the pallet or missing pallet supports
• Missing edge protectors or straps
• Gashes, impressions, dents, holes, or excess packing tape
on the cardboard packaging
Initial Inspection
1. Removethestrapsandcarefullyliftotheboxtop.Donotcutthepackagingopen!Doingsomayscratchthe
berglasssurfaceandintheunfortunateeventthatthetubisdamagedandthefreightneedstoberetained
by the driver/terminal, you will have to use that same box to send it back.
2. Carefully inspect the entirety of the gel-coat surface for cracks, spidering, gouges, etc.
3. Next, carefully inspect the stainless steel frame for dents, bent sections, gouges, or separation from the
berglassjointsupports.
4. Next, carefully inspect the massage systems to ensure no damage has occurred to the integrated plumbing
or air lines.
5. Finally,ndtheshipment’spackinglistandconrmthateachitemlistedthereispresentandaccountedfor
(pleasenotethattheextensionpanelisoftencompactenoughtotunderneaththetubandmaybedicult
to see).
IMPORTANT... Damage Procedure
In the rare event of damage, no matter whether the tub is being delivered to a business/residence
orbeingheldatthedestinationterminal,pleasefollowtheprocedurelistedbelow:
1. Call the Bliss Tubs customer service line at (800) 398-9639 immediately to inform us of the
damage. Await instructions from a Bliss Tubs representative.
2. If instructed to refuse the tub by Bliss Tubs, on the original freight bill, clearly notate “REFUSED
DUETODAMAGE”,notatethespecicdamagetothetub,andsign&printyournameandthe
date next to your notes.
3. If possible, take photos of the tub and clear pictures of the damage. Send these and a copy of
the freight bill to Bliss Tubs as soon as possible.
4. After speaking with Bliss Tubs, leave the pallet in the driver’s/terminal’s custody to be returned to
Bliss Tubs.
PRE-INSTALLATION
CallBlissTubsImmediately!

BLISS TUBS
SAVE THESE INSTRUCTIONS5
© 2015 - 2017 Bliss Walk-in Bathtubs. All Rights Reserved.
PRE-INSTALLATION
WATER TEST
All Bliss walk-in baths are water tested and operated in our factory prior to shipment. However, rough handling
may cause leaks which can be detected if water tested again prior to installation.
CAUTION... NEVER LIFT THE TUB BY ANY PORTION OF THE HYDRO MASSAGE SYSTEM,
AIR MASSAGE SYSTEM OR PLUMBING.
1. Placethetubonaatsurfaceinanareawhereitmaybedrainedaftertesting,useaplugortapetosealthe
drain,lltheunittotheoverow,thentestthetubforproperdooroperationandlookforleaksfromthedoor
or anywhere else on the tub body.
2. Using an extension cord, plug in the pump and the blower cord and run the system for 10 minutes, checking
forleakswhilethesystemisrunning.Afterthetubhasrunfor10minutesturnthesystemothenletstand
for10minutes.Inspecttubcompletely(aroundpump,allplumbingttingsanddoorforleaks.)Any defect
must be reported to your dealer prior to installation in order to have it covered under warranty.
IMPORTANT... IN EVENT OF FAILURE TO FOLLOW THE PRE-INSTALLATION PROCEDURES,
MANUFACTURER WILL NOT BE LIABLE FOR THE REMOVAL OR RE-INSTALLATION OF
THE BATHTUB OR ANY COSTS INCURRED THEREIN. SUCH FAILURE COULD RESULT IN
TERMINATION OF THE WARRANTY.
SITE PREPARATION
Check to ensure that the installation will conform to all applicable state and local codes and secure all necessary
permits.Allelectricalandplumbingconnectionsshouldbemadebyaqualied,licensedcontractor.
1. Inspect Site for Existing Damage
It is very important to make a thorough inspection of the installation site before any work is started. Pre-existing
conditions should be discovered and addressed immediately. If the tub is installed over existing problems it
mayneedtoberemovedatalaterdatetoxtheproblemsandcanpotentiallybeagreatcosttothecontractor/
homeowner. If an existing problem is discovered, bring it to the home/building owner's attention immediately.
Problems to look for: •Mold and Mildew
• Bad piping/leaks
• Water damage and rot
IMPORTANT...IT’S ALWAYS A GOOD IDEA TO DOCUMENT WITH PHOTOS.
2. Site Protection
Minimize dust, damage, and noise in the installation location through proper preparation. Plan the pathway to
beusedtobringthetubtoitsnallocation.Measuretomakesuretheunitwilltthroughdoorways,hallways,
around corners and stairwells. Protect the walls and doorways where there is a possibility of damage. See
appropriate dimensional diagram for tub being installed in Appendix B2 (page 24). The dimensional diagram
mayeectthemaneuverabilityofthetubwithinthehome,especiallyinthebathroomitself.Doorways may need
tobewidenedinsomeolderhomesdependingonthetubmodeltobeinstalled.Commondoormodications
include door stop or door jamb removal and replacement, door framing removal and replacement, or complete
door widening (recommended). Floors should be covered and dust curtains installed to contain dust and debris
in the work area. Doing so will protect the rest of the house and will save time on clean up.
• Termite damage
• Poor structure
• Galvanized Plumbing

BLISS TUBS
SAVE THESE INSTRUCTIONS 6
© 2015 - 2017 Bliss Walk-in Bathtubs. All Rights Reserved.
PRE-INSTALLATION
3. Demolition
Once the site is inspected and protected it is now time to do any necessary demolition. The amount of work
required will vary according to each job and location. Typical demolition may include tub removal, shower
removal,tileandooringremoval,wideningofdoorways,cuttingoutaccesspanellocations,movingtoilets,and
removingvanities.Planacostandlabor-ecientwastedisposalstrategyaheadoftimetominimizeunsightly
and unsafe debris piles inside or outside the home.
4. Structural
Beforeinstallinganywalk-inbathtubmakesuretheoorinthedesirednewtublocationisadequatetobearthe
load of the tub, water, and user. Bliss Tubs vary in weight between 150-300 pounds depending on the model.
Their operating capacities range from 38 to 100 gallons depending on the model and size of the user. An average
expectedtotalweightduringnormaloperationisroughly750lbs.Reinforcethesuboorasnecessaryandrequired
bycode.Makesuretolevelthesurfaceofthesuboor.Althougheachtubisequippedwithlevelingfeet,leveling
theoorrstwillsavetimeandeortinadjustingthefeetonthetubwhilealsoaddingtotheoverallstabilityofthe
installation.
IMPORTANT... A LEVEL INSTALLATION HAS A HUGE EFFECT ON PREVENTING THE TUB
DOOR FROM LEAKING OVER TIME DUE TO SETTLING OR SHIFTING OF THE TUB BODY,
FRAME, AND/OR HOME.
5. Plumbing
All plumbing work should be done by a licensed professional contractor. Bliss Tubs does not warranty any part
of the installation and is not responsible for any incidental damages due to improper installation.
• It is the installers’ responsibility to ensure that the installation conforms to all applicable state and local codes.
• Before any plumbing work is started, check the current home water pressure at the tub location. The
manufacturer’s recommended range is between 50-70 psi. The supply hoses provided are rated for use
under100psi.Also,makesurethecoldsupplypressureandhotsupplypressurearenotdrasticallydierent.
• Check current water heater capacity – Ratio of hot to cold water should be roughly 2/3 hot to 1/3 cold – refer
to tub capacities in Appendix B2 (page 24). Tub water capacities are estimated and will vary depending on
the size of the user. Ensure that the water heater size is adequate to provide enough hot water for a warm
bath.
• Ensure proper drain location and rough-in. See appropriate dimensional diagram for tub being installed in
Appendix B2 (page 24). Note: Take into account a reverse drain situation which is illustrated in Appendix C
(page 30).
• AP-Trapisrequiredinnearlyalllocalitiesforplumbingxturesincludingwalk-intubs.
• Rough-in hot/cold water supply lines. Keep in mind that Bliss Tubs come standard with faucets with ¾”
valves. Most residential plumbing is ½”. If feasible, it is recommended to run ¾” supply lines back to the
sourceasthismaydrasticallyreducethelltimeofthetub. Be sure the water supplies are run in keeping
with applicable codes.
• Besuretoincludepoint-of-usewatershut-ovalves(tobeprovidedbyinstaller).Theheightofthetubmay
impactthenecessaryinstallationheightoftheshut-ovalves.Theoutletoftheshutovalvesshouldbe
¾” NPS in order to receive the braided stainless steel supply lines (provided). This step is critical for ease
of post-installation maintenance, especially in the instance of installation in an apartment or condominium.
IMPORTANT... BEFORE HOOKING UP FAUCETS, FLUSH BOTH HOT AND COLD LINES TO
CLEAR ANY AIR, SEDIMENT, DEBRIS AND SOLDER SO THAT THE FAUCET COMPONENTS
DO NOT BECOME CLOGGED OR DAMAGED.

BLISS TUBS
SAVE THESE INSTRUCTIONS7
© 2015 - 2017 Bliss Walk-in Bathtubs. All Rights Reserved.
PRE-INSTALLATION
• Galvanized plumbing should be replaced when possible to prevent sediment from damaging the faucet
valves.
• Although it may not be possible in every circumstance, consider running a 2” drain line back to the main
drain. This may substantially reduce the drain time of the bathtub.
6. Hot Water Heater Considerations
The customer’s hot water heater should be assessed during the walk-in tub planning process. For a regular size
tubmodelsuchastheB3052andB3054models,mostBlissTubspurchasershavebeensatisedwiththehot
water delivery from their existing 40 gallon tanks. However, based on the input from several major hot water
heater manufacturers, a 50 gallon water heater is recommended in most circumstances.
Inadditiontothecurrentheater’scapacity,theheater’sageandlocationcanaecttheamountofhotwaterthat
can be delivered to the walk-in tub. As water heaters age, their performance declines. Location of the water
heater relative to the location of the walk-in tub can also have an impact. The further the hot water a run, the more
heatislost.Re-circulatingsystemshaveproveneectiveinnegatingthiscoolingeect.
Tank Heaters
For a regular size tub model such as the B3052 and B3054 models, the recommended minimum tank size for
electric or gas tank water heaters is 50 gallons. Normally one can assume a 70% hot water output from any tank
heater. (Tankheatermanufacturerscan providespecications andrecommendations.)A 70%outputshould
provide roughly 35 gallons of hot water from a 50 gallon tank with the thermostat set to the industry standard of
120°F.
As a construction industry rule of thumb, the water mixture for a comfortable bath is roughly two-thirds (2/3) hot
watertoone-third(1/3)coldwater.SincethetypicalwaterrequirementtollaregularsizeBlissTubmodelis
40to50gallonsdependingontheuser’ssize,roughly30to35gallonsofhotwaterwillbeneededtofullyllan
occupied tub. Refer to the Appendices B1 or B2 beginning on page 23 for the tub model operating capacities.
Note that the BTU rating (for gas heaters) and the wattage (for electric heaters) only have an eect on the
recovery rate of the hot water level for the heater, not the total possible hot water output.
Tankless Heaters
Tanklesswaterheatersrequirespecialconsiderationwithregardstowaterowrateandtemperaturerisefrom
the source. When opting for a tankless water heater, both ratings should be as high as possible. Flow rates
vary by heater manufacturer and model. Contact the tank heater manufacturer for exact specications and
recommendations. On average, the rise needs to be around 70°F. For example, this will take 50°F incoming cold
water and raise it to 120°F hot water output. These two factors should be chosen based on the homeowner’s
budget,currentelectricalsetup,anddesiredlltime.Asapointofreference,BlissTubsequipsitstubs with
faucetscapableof18gallonsperminuteowrate.
7. Electrical (if so equipped)
All electrical work should be done by a licensed professional contractor. Bliss Tubs does not warranty any part
of the installation and is not responsible for any incidental damages due to improper installation.
• Check electrical requirements for tub systems (see Appendix D [page 32]).
• Run appropriate number of dedicated 15 or 20 amp, 110V (not 220V) electrical lines – rating matches load
requirement of the tub being installed.
• Install easily-accessible GFCI outlets (required).
WARNING... ENSURE THAT ELECTRICAL PREPARATION IS DONE IN CONFORMANCE
WITH FEDERAL, STATE, AND LOCAL CODES.
8. Ventilation
Ensure the bathroom has proper ventilation through ductwork or available window(s) in conformance to state and
local codes.

BLISS TUBS
SAVE THESE INSTRUCTIONS 8
© 2015 - 2017 Bliss Walk-in Bathtubs. All Rights Reserved.
INSTALLATION
9. Additional Service Access
Bliss Tubs has gone to great lengths to ensure ease in maintenance and repair work through strategic placement
of all plumbing and electrical systems. However, it is the installer’s responsibility to ensure tub-integrated access
panelscanbeeasilyremovedandarenotimpededbyotherbathroomxtureswhenthetubisinplace.Ifspace
restrictions are a factor, it is also the installer’s responsibility to provide adequate access to electrical and plumbing
components for any future service-related needs.
IMPORTANT... ADD AN EXTRA WALL ACCESS PANEL AS NEEDED. THIS IS OF PARTICULAR
IMPORTANCE WHEN INSTALLING ONE OF BLISS TUBS’ MORE COMPACT UNITS WHICH ARE NOT
EQUIPPED WITH INTEGRATED FRONT-ACCESSIBLE ACCESS PANELS (I.E. B3237 OR B306022).
After pre-installation procedures are complete, bring the tub inside the home. Be sure to measure the tub
diagonal dimension prior to moving the tub into the home so you don’t hit walls when maneuvering in the home.
Be extremely cautious when maneuvering the bath tub. Units can weigh upwards of 300 lbs. so ensure you
have adequate space and assistance. Never lift the bathtub by any portion on the integral plumbing or electrical
systems. Bliss Tubs does not warranty any damage to the tub or its plumbing or electrical system due to improper
handling or care.
IMPORTANT... IT IS EASIER TO INSTALL THE FAUCETS, INSTALL THE BATH DRAIN AND
OVERFLOW KIT AND PRE-FIT THE EXTENSION KIT ON THE TUB BEFORE MOVING THE
TUB INTO ITS FINAL INSTALLATION LOCATION.
WALK-IN BATHTUB PREPARATION
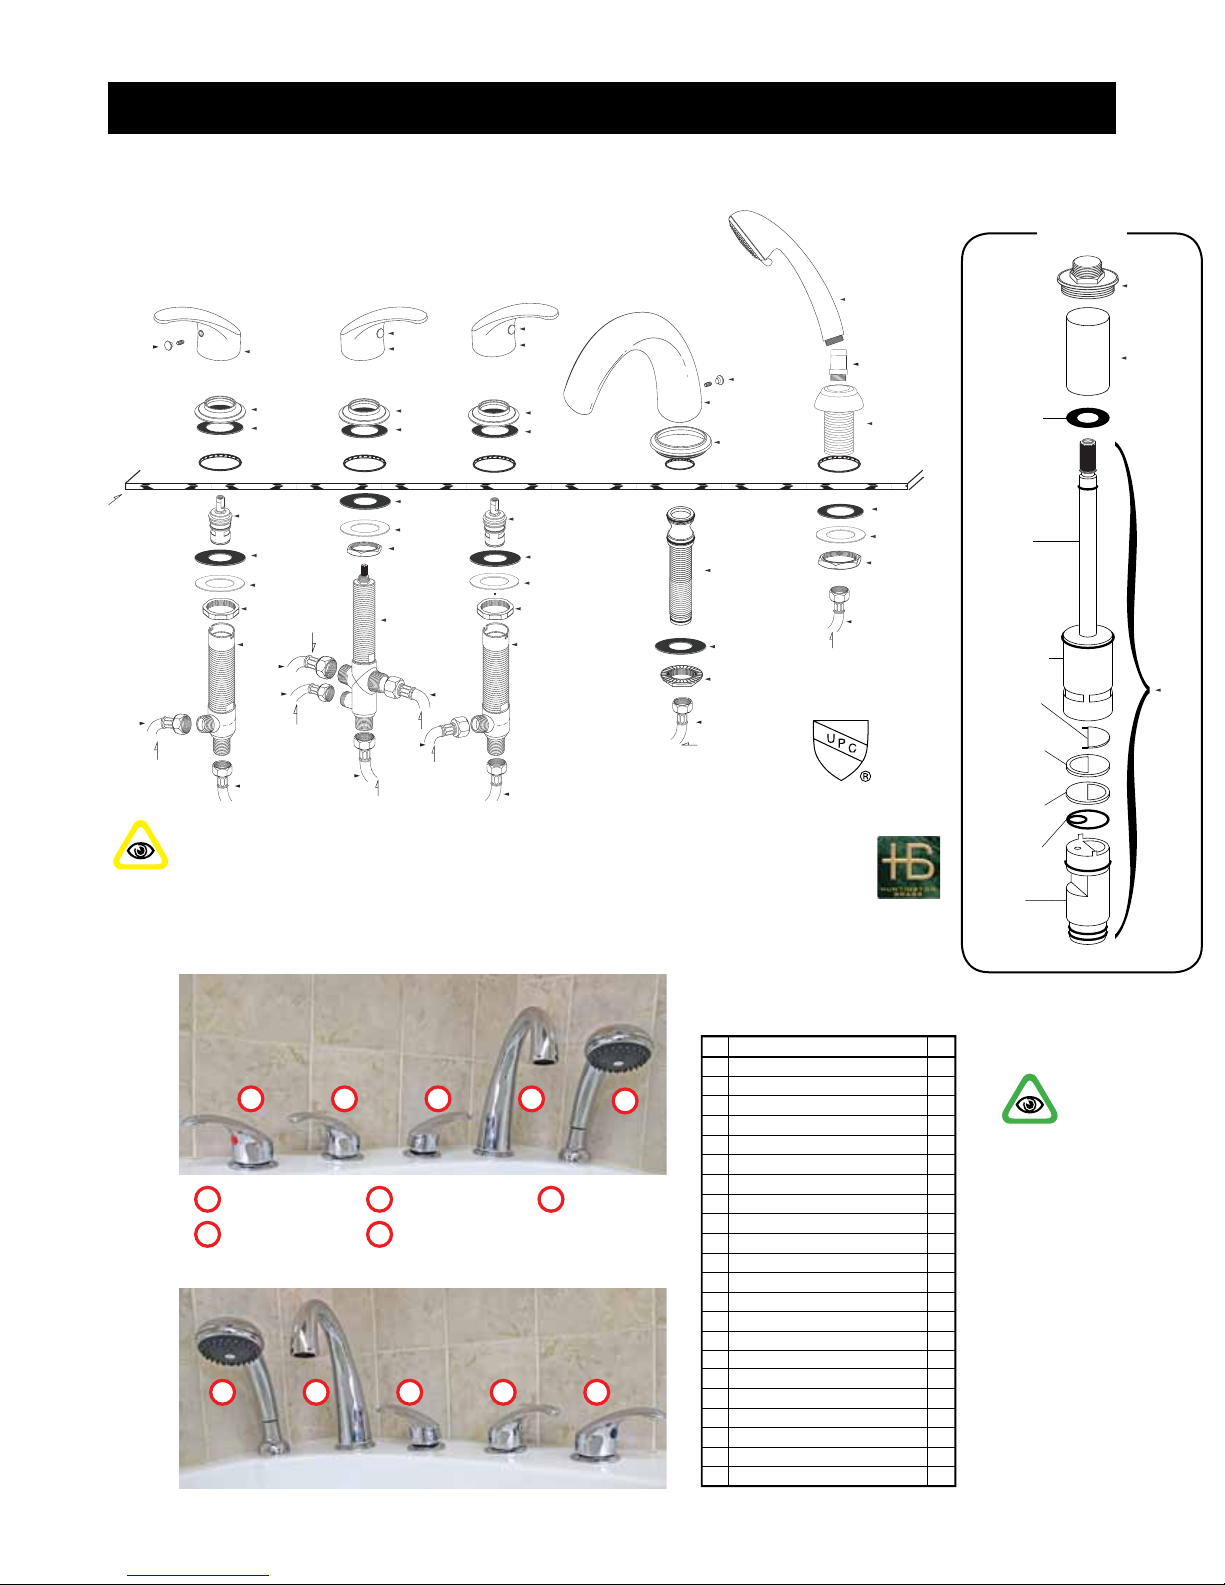
1. Faucets
Faucets are thoroughly inspected for appearance and function by our factory-trained technicians. For best
results, install the faucet set on the deck in the order it appears on the following page. The holes are pre-drilled
and the lengths of hoses supplied accommodate this line up. The arrangement shown also allows maintenance
accesstothemostcommonlyusedttingsonthetub–themechanicalvalvesanddiverter.Havingaccessto
these components is very important as they are the most prone to abuse and/or misuse more so than other tub
components. Hook up all the lines once the faucet set is in place on the deck leaving only the hot and cold supply
lines to be connected after the tub is installed. Ensure there are no kinks in the supply lines as this will restrict the
waterowandincreaselltime.Besuretoushthesupplylinesbeforemakingthenalconnections.Although
thesupplyhoseshaveintegratedwashers,itisstillrecommendedthatteontapeorthreadsealantbeusedon
thethreadstoensureacompleteseal.Becarefulnottoscratchplatednishesduringinstallation.
CAUTION... SEDIMENT, DEBRIS AND SOLDER FROM UNFLUSHED LINES WILL CAUSE
DAMAGE TO THE VALVES. ANY RESULTING DAMAGE WILL NOT BE COVERED UNDER
WARRANTY.
CAUTION... FAUCETSETCONTAINSVERYSMALLCOMPONENTS.BECAREFULTOCONTAIN
PARTS DURING INSTALLATION TO REDUCE THE RISK OF LOST COMPONENTS. BLISS
TUBS DOES NOT COVER THE COST OF LOST COMPONENTS OR ANY CORRESPONDING
SHIPPING COSTS.
IMPORTANT... IF A SLIDEBAR IS ORDERED
ALONG WITH THE FAUCETS, THE HANDSPRAY
HOLDER WITH WASHER (PART 13 ON PAGE 9)
WILL BE SWAPPED OUT BY BLISS TUBS FOR
A DECK-MOUNTED ELBOW WITH HOLDER,
PERMANENTLY EXPOSING THE FLEXHOSE. THIS
PART WILL BE FOUND IN THE SLIDEBAR BOX.
SEE APPENDIX G FOR DETAILS.
BACK VIEW OF RIGHT-HAND TUB
BLISS TUBS
SAVE THESE INSTRUCTIONS9
© 2015 - 2017 Bliss Walk-in Bathtubs. All Rights Reserved.
INSTALLATION
10
09
13
14
18
07
08
01
19 (red cap)
02
03
06
05
03
06
05
05
05
15
16
01
02
01
02
04 04 04
12
15
15
15
Tub Deck
From Diverter
From Diverter
11a
To Diverter
From Tap
11a
Cold Water Supply
HotWater Supply
11b
17
17
To HandSpray
ToDiverter
11b
ToSpout
From Tap
11a
11a
11a
11a
16
16
16
16
19 (blue cap)
19 (chrome cap)
19 (chrome cap)
Hot Valve Cold Valve Fill Spout
Hand Shower
Diverter
Tub Door Back
Wall
YTQEMANTRAP#
3LEVER HANDLE1
3FLANGE
STEP
3 1 ea.HOT AND COLD CARTRIDGES
4SMALL RUBBER WASHER
5
3
LOCK NUT
6
4
7
8
9
10
HOT AND
COLD
SHANKS 1 ea.
SPOUT 1
SPOUT RING 1
QUICK CONNECT SPOUT SHANK 1
11
FLANGED LOCK NUT 1
12
13
14
15
16
DIVERTER VALVE BODY
HAND SPRAY HOLDER W/ WASHER
HAND SPRAY
HOSE: a(3x 25”) b(2x 30”) 5
1
1
1
17
ROUND METAL WASHER 4
18
LARGE RUBBER WASHER 5
HAND SPRAY FLEX HOSE - CHROME 1
19
BACKFLOW PREVENTER CHECK VALVE 1
TRIM CAP & SET SCREW 4
2
PARTS LIST
12a DIVERTER VALVE CAP 1
12b INTERNAL SPACER 1
12c DIVERTER SHAFT WITH CARTRIDGE 1
*Orientation for a left-hand tub is illustrated below. A right-hand tub would require orientation in the order shown in the
picture at the very bottom of this page.
CAUTION...
DO NOT OVER TIGHTEN FLEX HOSE CONNECTIONS. THE
MANUFACTURER RECOMMENDS HAND TIGHTENING AND THEN AN
ADDITIONAL QUARTER TURN WITH A WRENCH. OVER-TIGHTENING WILL
CAUSE LEAKS.
12a
12c
12b
Shaft
Actuator
Cartridge
Housing
Plastic
Spacer
Upper
Ceramic
Disc
Lower
Ceramic
Disc
Internal
Washer
Shaft
Butt
Diverter Detail
(for reference)
(diverter provided fully assembled)
Rubber
Washer
IMPORTANT...
BLISS TUBS
STANDARD
BELLEVUE FAUCET
SET SHOWN
HERE. IF TUB
COMES WITH A
DIFFERENT MODEL
FAUCET SET,
REFER TO THE
MANUFACTURER'S
INSTALLATION
INSTRUCTIONS
INCLUDED IN THE
FAUCET BOX.
LEFT-HAND TUB
12345
RIGHT-HAND TUB
1 2 345
1 Hot Tap 2 Diverter 3 Cold Tap
4 Fill Spout 5 Hand Shower
BLISS TUBS
SAVE THESE INSTRUCTIONS 10
© 2015 - 2017 Bliss Walk-in Bathtubs. All Rights Reserved.
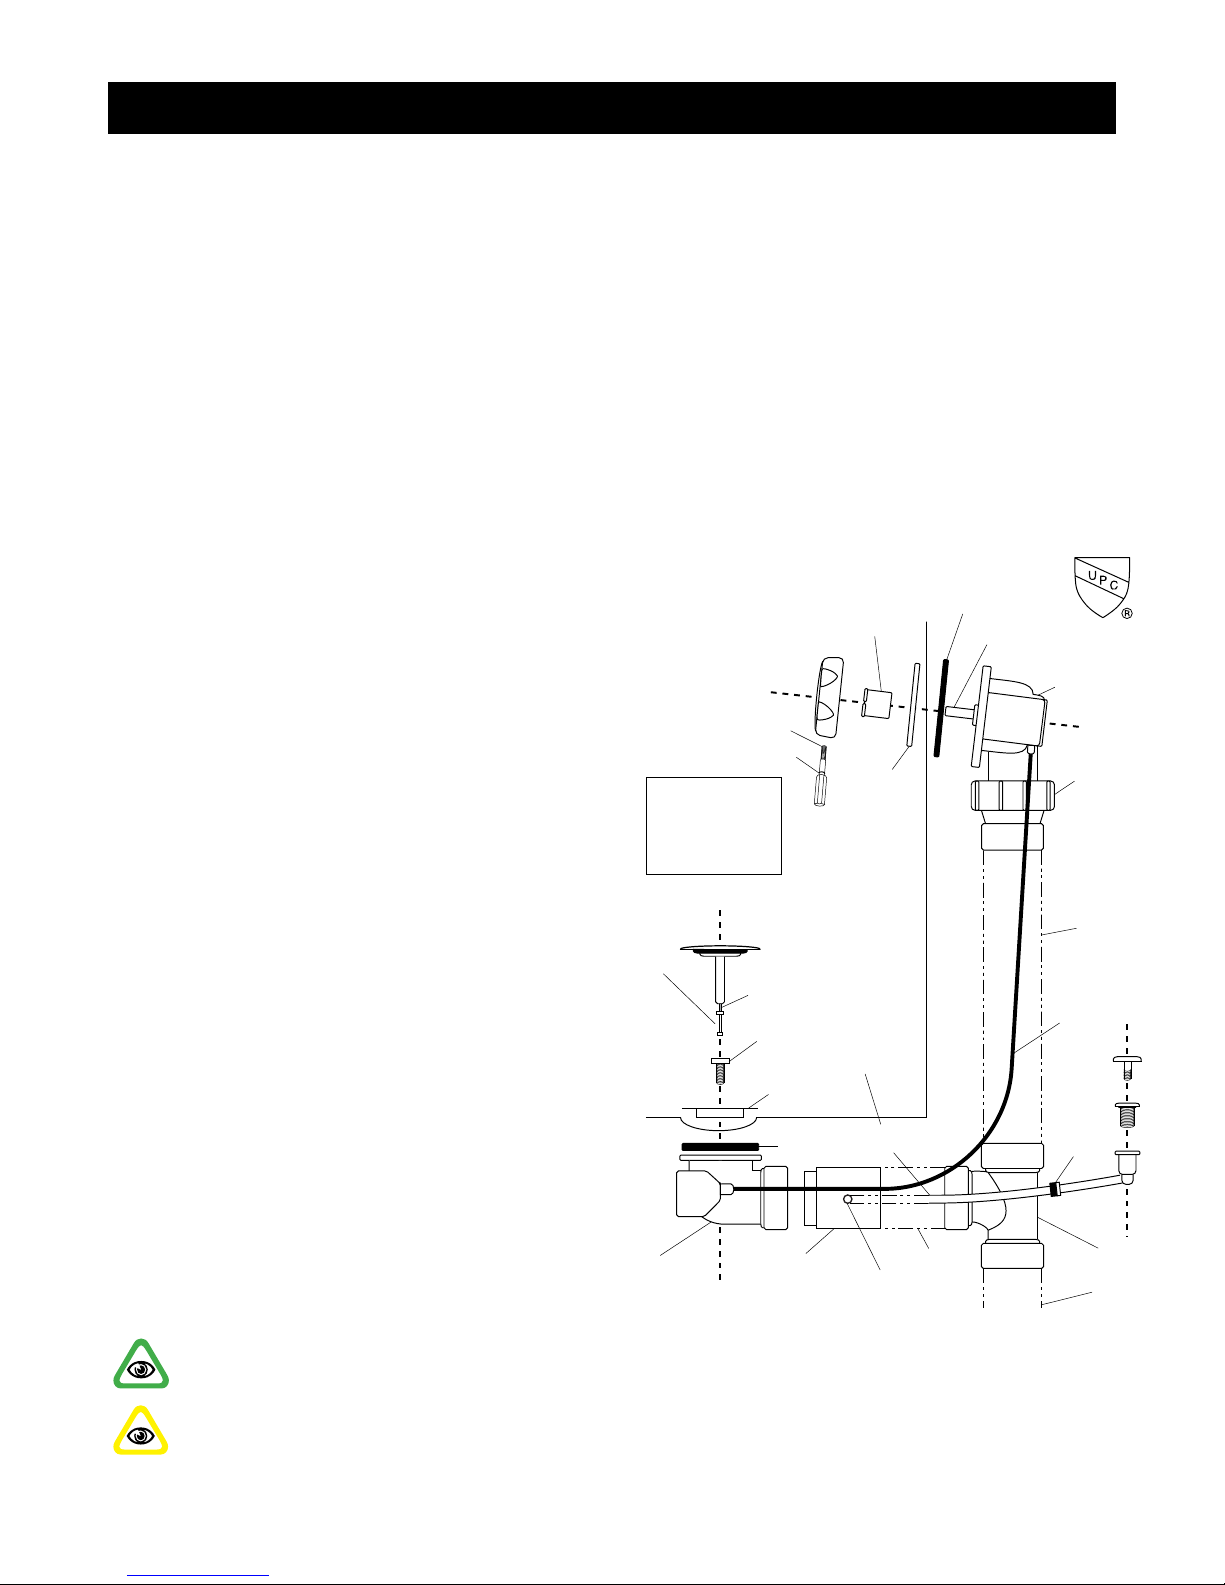
2. Bath Drain & Overow Kit and Door Drain
The bathdrainandoverowkitshouldbeinstalled up to thenal connectionbefore thetub isinstalled (for
reverse drain kit installation see Appendix C [page 30]). The drain shoe is most easily installed when the bathtub
isstandingonitsend.Whentippingthetubonitsendmakesuretheberglasscornerofthetubiswellprotected.
Donotrotatethetubwhileitisstandingonitsendasthismaydamagetheberglasscornerandedge.Make
sure that any moving parts (i.e. the door and door handle) are secure to avoid any unnecessary jarring of the
components. Never lift the bathtub by any portion of the integrated plumbing or electrical systems.
• Install the drain shoe piece with the 1½” outlet facing towards the faucet side of the tub, as shown below.
Two ferrule bolts are provided, one 1” long and one 1¼” long. The bolt used will depend on the thickness of
theberglassdrainhole.Onlyoneisrequired.
• Applyabeadofsiliconeorplumber’sputtybetweenthedrainangeandthetubbody.
• Screwthesmallferruleboltthroughtheangeandintothedrainshoepiece.
• Make sure the rubber gasket has not bulged out on the side. If it
has, then loosen the ferrule bolt, adjust the gasket, and re-tighten.
Apply a second even coating of silicone around the drain shoe
connection on the underside of tub body to ensure a proper seal.
Smoothwithngertiptocloseanygapsinthewatertightseal.
• Installoverowportionofdrainkitasshowntotheright
and silicone around the back side to prevent leaks.
• Ensure the overow knob is well secured
into the groove of the actuator shaft. A loose
setscrewcaneectdrainoperation.
• Theedgesoftheoverowwallttingcanbe
ledasneededtoimproveknobfunction.
• Use 1½” PVC pipe to connect the overow
outlet to the sanitary tee, door drain tie-in,
and drain shoe as shown in the diagram
below. If feasible, it is recommended to use a
reducerandexiblePVCpipe(notprovided)
between the overow shoe and lower
connections. This step will make any future
maintenance of the faucet valves simpler.
• The ⅜" vinyl tubing coming from the door
drain is supplied with excess length and
needs to be cut to the appropriate length
oncethedrainshoeisaxedtothetub.Cut
the tubing so that there is a downward slope
inthe⅜"tubingfromthedoordrainttingto
the drain shoe. DONOTcutotheintegrated
checkvalve!
INSTALLATION
IMPORTANT...
USE APPROPRIATE BONDING GLUE. THE KITS SUPPLIED ARE PVC. ENSURE
THAT IF SECURING TO AN EXISTING ABS DRAIN LINE, THE APPROPRIATE BONDING GLUE IS USED.
CAUTION...
STOPPER SET SCREW ADJUSTMENT IS EXTREMELY IMPORTANT AND IS
DETAILED IN THE TEST PROCEDURES ON PAGE 19.
© copyright Bliss Tubs2015 | © copyright Bliss Tubs 2015 | © copyright Bliss Tubs2015
© copyright Bliss Tubs2015 | © copyright Bliss Tubs 2015
© copyright Bliss Tubs2015 | © copyright Bliss Tubs 2015 | © copyright Bliss Tubs2015 | © copyright Bliss Tubs 2015 | © copyright Bliss Tubs 2015
© copyright Bliss Tubs2015
Overflow
Knob
Overflow
Set Screw
1½” PVC Pipe*
Swivel Ball Joint
Stopper
Actuator
Cable
Tub
Wall
Overflow
Shoe
Stopper
Tub
Floor
Large
Ferrule
Bolt
Overflow
Wall
Fitting
Gasket
Door
Drain**
Gasket
1½” PVC
Drain
Shoe
Drain
Flange
*PVC Pipe for plumbing
connections is to be
provided by installer
**Door Drain
pre-installed on tub
1½” PVC Pipe*
Check
Valve
1½” PVC Door
Drain Tie-In
Adjustable
Stopper Set
Screw & Bolt
1½” Sanitary Tee
Tie-In to
P-Trap*
Small
Ferrule
Bolt
O-ring
Actuator Shaft
with Groove
Loctite™
Tape
Loctite™
Tape
⅜” tubing from door drain (to
be connected by installer)
Shorten ⅜” tubing as
needed to prevent
sagging line
⅜” Barb Door
Drain Tie-In
BLISS TUBS
SAVE THESE INSTRUCTIONS11
© 2015 - 2017 Bliss Walk-in Bathtubs. All Rights Reserved.
• Theplumbingisnowreadyforthenalconnectiononcethetubisputintoplace.Inthe
case of a reverse drain installation refer to Appendix C (page 30).
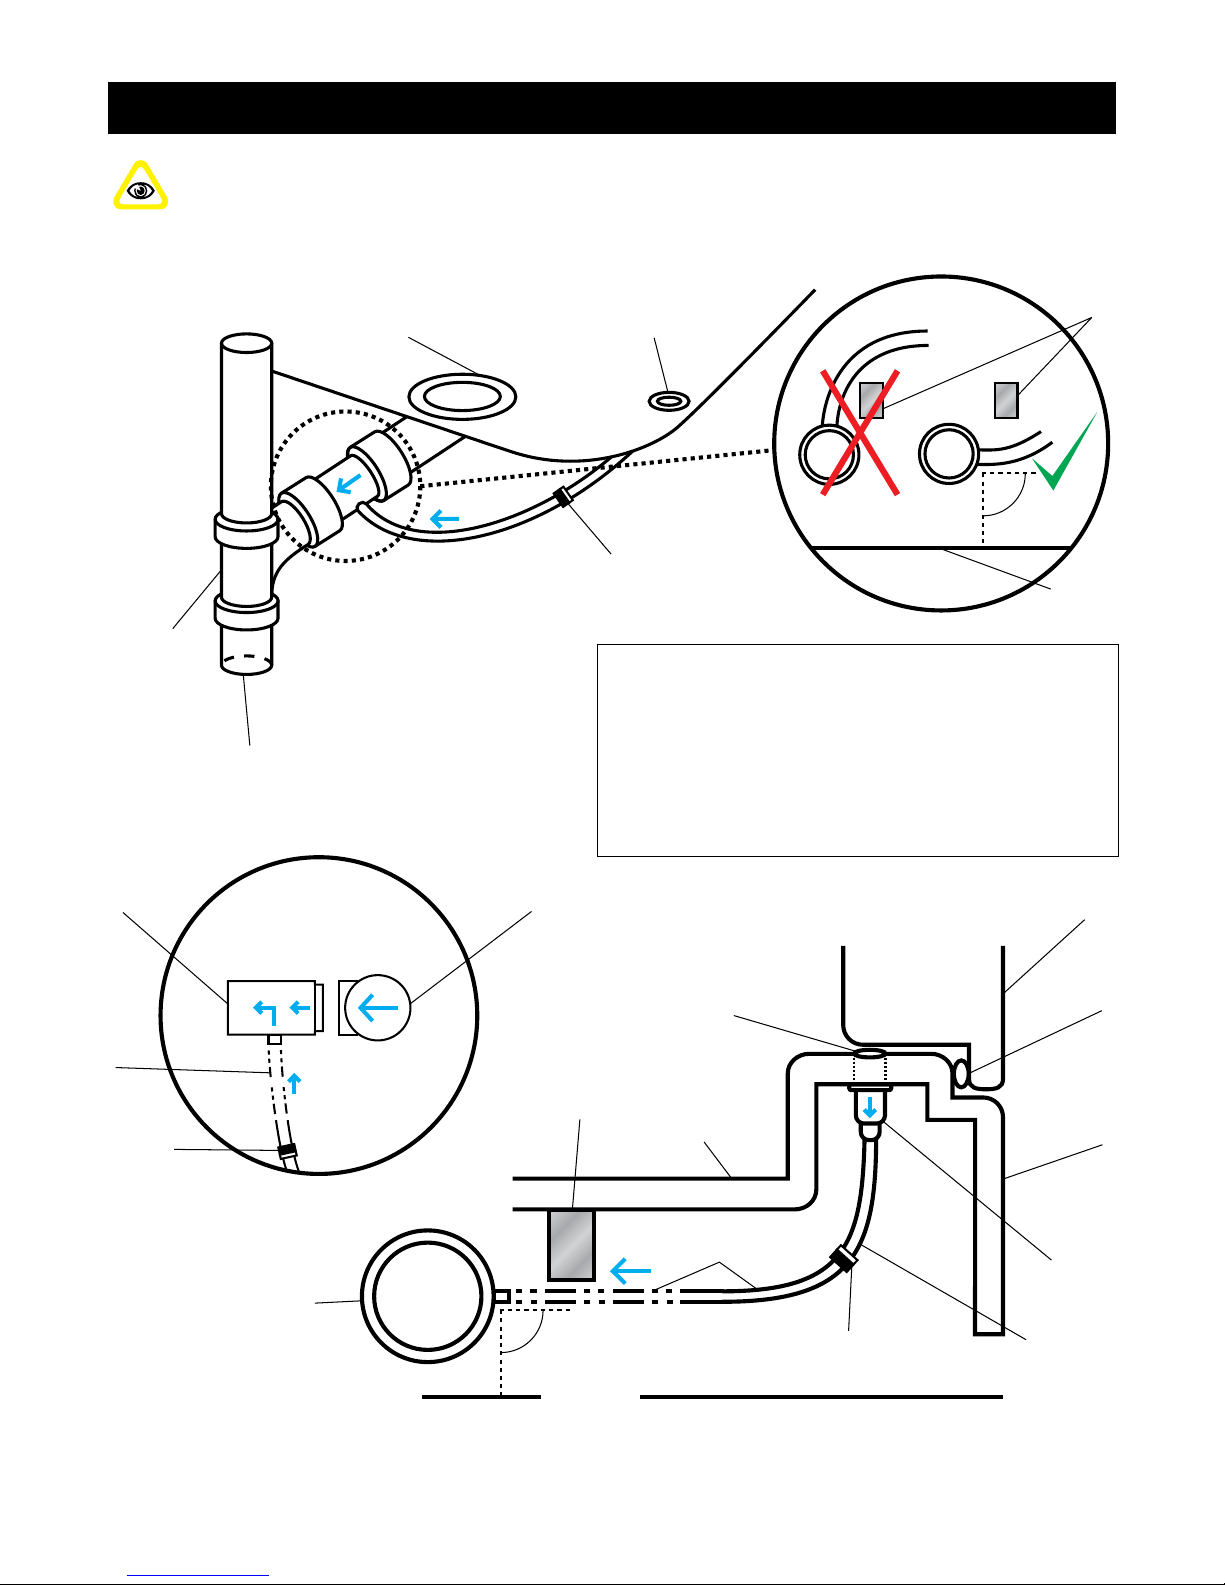
INSTALLATION
CAUTION...
DOOR DRAIN TUBING NEEDS TO RUN PARALLEL TO THE SUBFLOOR AND THEN
RUN UPWARD TOWARD THE DOOR DRAIN BODY TO ALLOW ACCUMULATED WATER IN THE
DOOR DRAIN TO DRAIN PROPERLY INTO THE DOOR DRAIN TIE-IN. SAGS IN THE DOOR DRAIN
TUBING WILL CAUSE WATER TO BE TRAPPED AT THE LOW POINTS.
© copyright Bliss Tubs2015
© copyright Bliss Tubs2015
© copyright Bliss Tubs2015
Drain Shoe
Check Valve
1½” PVC Door
Drain Tie-In
Door
Drain
Tubing
TOP VIEW
Door DrainTub Drain
Check Valve
Drain Piping
Tie-In to P-Trap
Sanitary Tee
Subfloor
Tub
Frame
Note: Door Drain Tie-In should be installed
angle parallel with the subfloor.Tubing should
be routed under the tub frame, not over. Cut
door drain tubing to length. Do not cut off
check valve!
SIDE VIEW
1½” PVC Door
Drain Tie-In
Check Valve
Door Drain Tubing
(cut to length)
Tub Entrance
Threshold (6”)
Door Drain
Body
Tub
Door
Door Seal
Door Drain
Tub Floor
Tub
Frame
Subfloor
Downward
Slope to Drain
Plumbing
BLISS TUBS
SAVE THESE INSTRUCTIONS 12
© 2015 - 2017 Bliss Walk-in Bathtubs. All Rights Reserved.
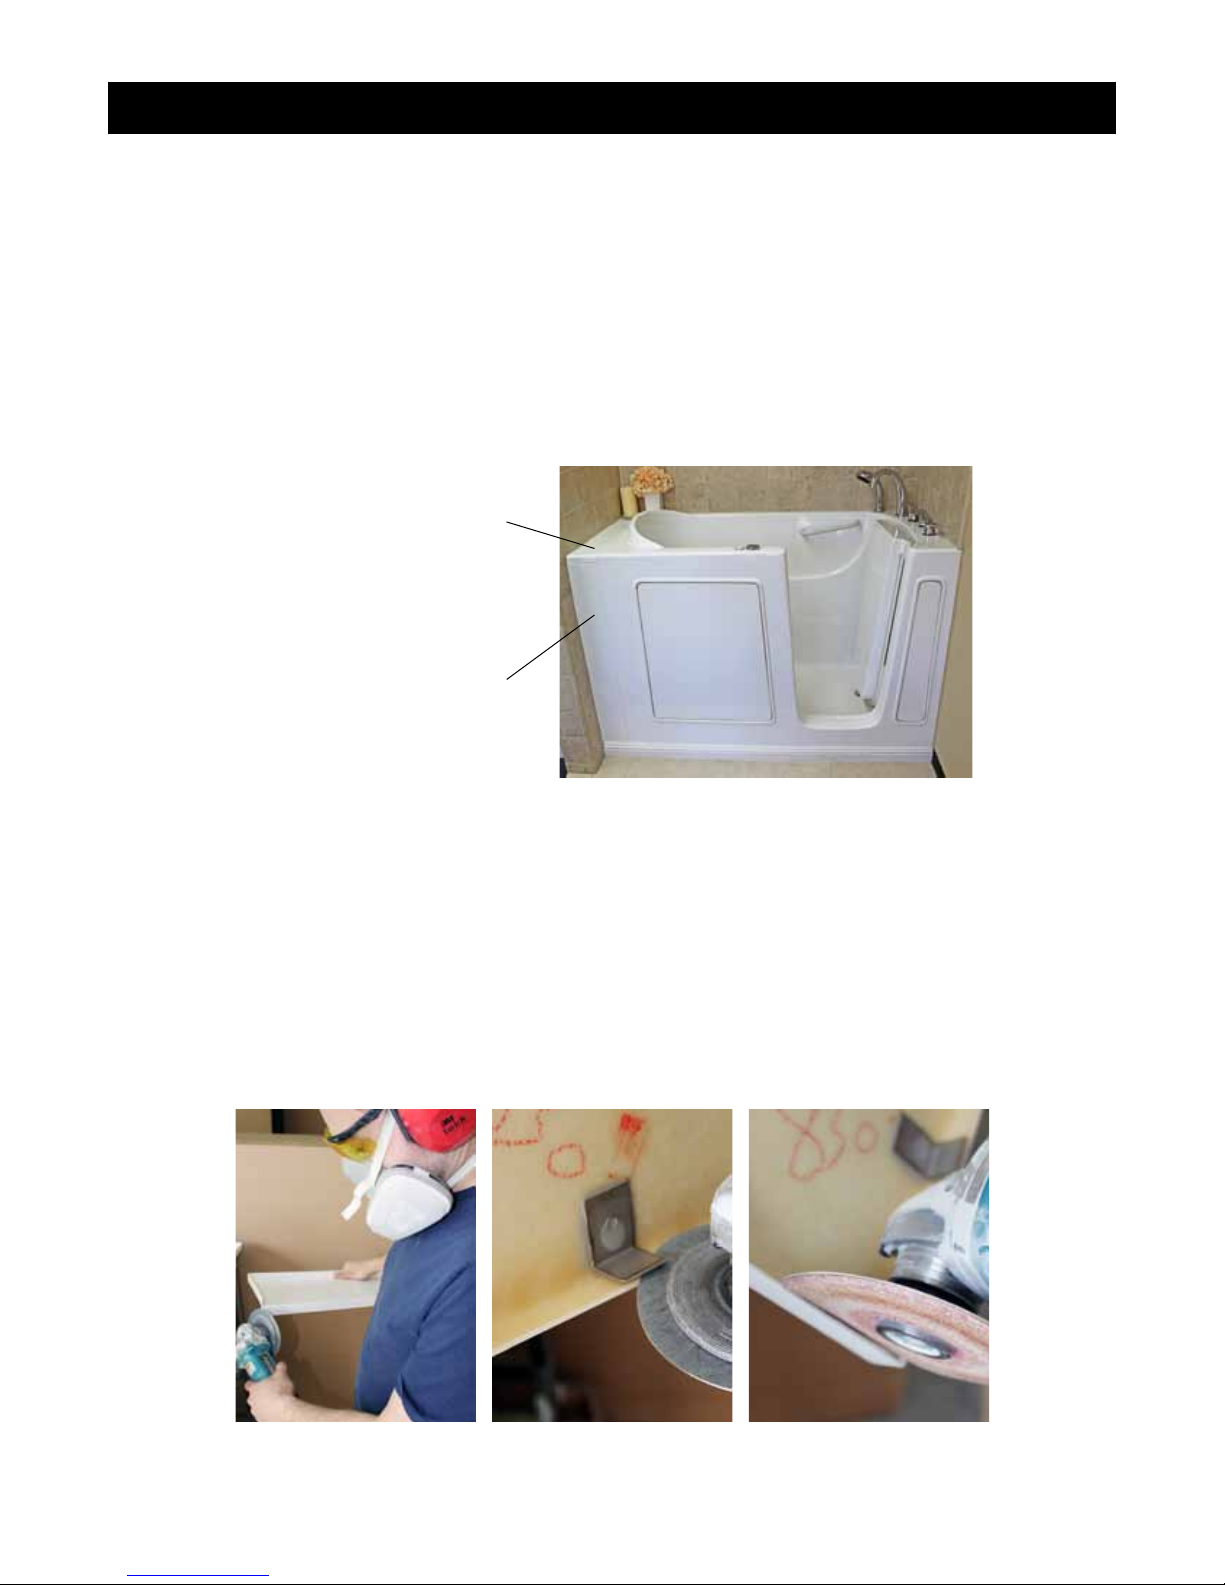
3. Extension Panel Kit Pre-Fit
BlissTubs’two-pieceextensionpanelkitsaredesignedtobringourdierentsizetubsouttoatotallengthof
60 inches (or 5 feet), the standard stud to stud dimension for a bathtub/shower space. But tub spaces are rarely
either square or exactly 60 inches long if and when tile, cement, backer board, wall panel, or sheet rock are
added. So in most cases some trimming of the extension panel will be necessary.
Extension panel kits are designed and intended to be installed behind the seat. When installing a right hand tub
(door is on the right side) then a right hand extension panel kit is included and intended to be installed behind
theseat(whichwouldbeagainsttheleftwallasshownbelow).Wheninstallingaangedowntub,theextension
panels are “universal” and can be installed on either end of the tub.
INSTALLATION
Extension Panel Front Piece
Extension Panel Top Piece
Cutting the extension panels:
1. Mark the panel with a scribe following the contour of the wall it will be installed against.
2. Ananglegrinderwithamediumtonegritbladeisrecommendedforcuttingtheberglassandgelcoat
parts.Areciprocatingsawwithanetoothmetalbladeorajigsawwithanetoothmetalbladeorcarbide
gritbladeatalowspeedcanalsobeused.Ifthespeedistoohightheblademaychipthegelcoatnish
along the cutting edge. The ideal blade for long term use is a carbide or diamond grit blade.
3. Finishthecutedgewithacouplelightpasseswithaneormediumgritsandpapertoremoveanysharp
edgesorsplintersontheundersideofthepanel.Becarefulnottodullthenishofthegelcoat.
BLISS TUBS
SAVE THESE INSTRUCTIONS13
© 2015 - 2017 Bliss Walk-in Bathtubs. All Rights Reserved.
INSTALLATION
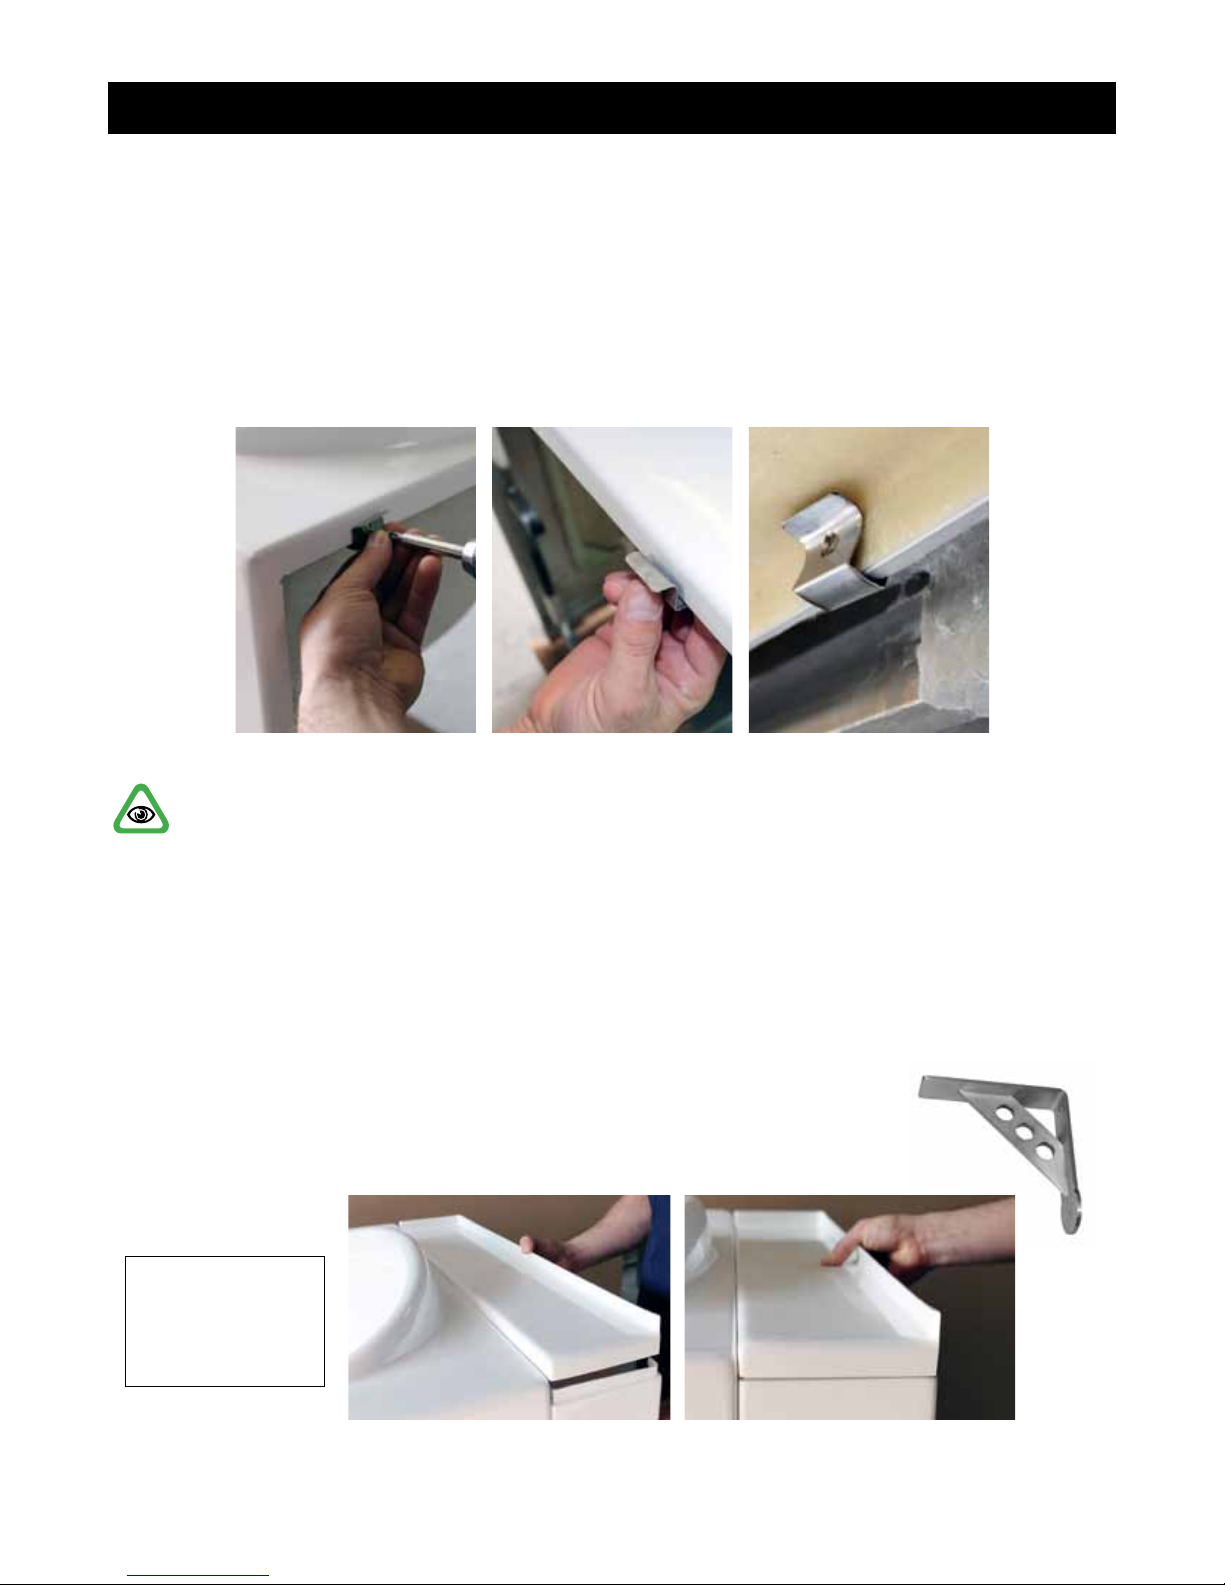
Extension Panel Kit Pre-Fit (continued)
Pretting the extension panel clips:
Installtheclipsontheangeofthetubbehindtheseat.Dependingonthetubmodelbeinginstalled,thepanel
may have clips that are either pre-attached (seen on previous page) or come separately with the packaging
(seebelow).Iftheyworkforthegivenapplicationthenusethem.Iftheydonottforaparticularsituationthen
screwsorboltscanbeusedtojointheextensionpaneltothetubange.
IMPORTANT... DO NOT ATTACH THE PANEL YET, JUST GET EVERYTHING PRE-FIT.
Bracing the extension panels:
Attach a support to the wall for the wall edge of the extension panel. You may use any appropriate material to
properly brace the extension panel as long as it complies with local, state, and any federal codes. The most
commonly used bracing material is a section of 2x4 lumber nailed or screwed to the wall studs. Make sure the
material is level and stable.
Steel hanger brackets (not provided) similar to the one shown here can also be used and are available for
purchase at most local retail hardware supply stores.
Example 1:
2-Flange Up
BLISS TUBS
SAVE THESE INSTRUCTIONS 14
© 2015 - 2017 Bliss Walk-in Bathtubs. All Rights Reserved.
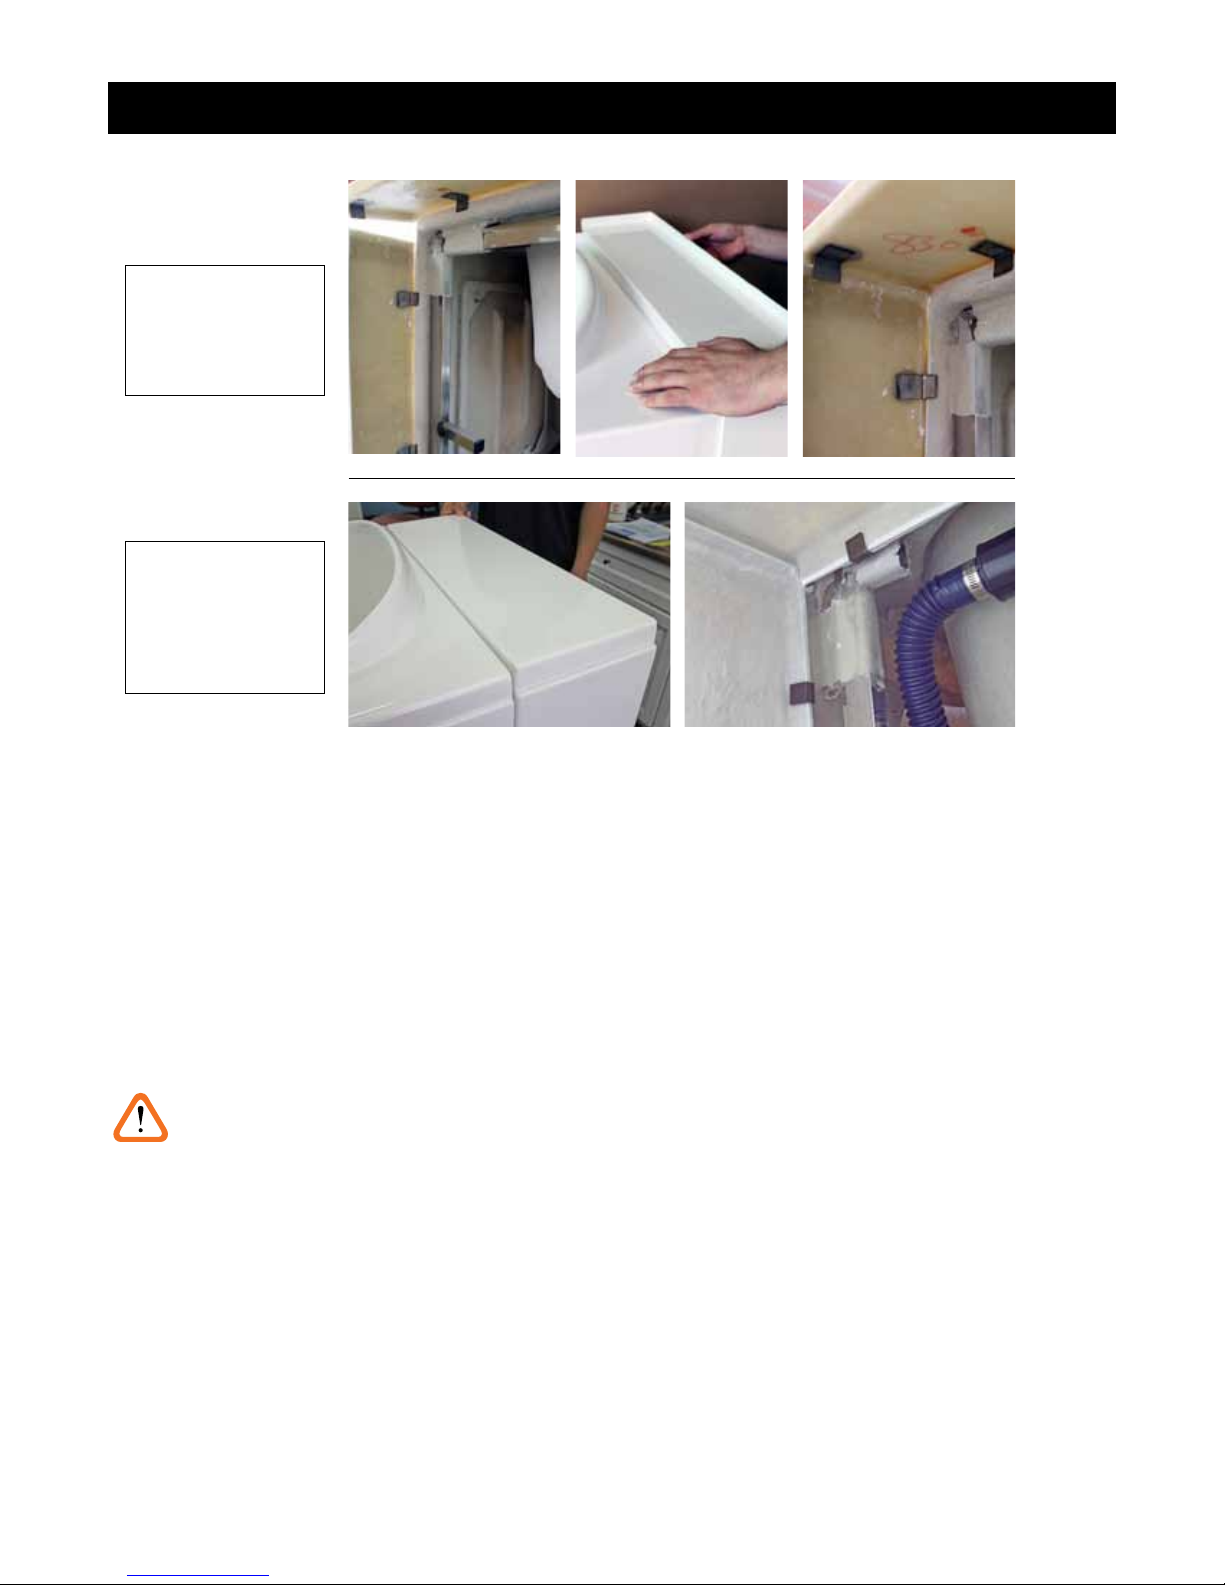
INSTALLATION
Nowtheextensionkitispreppedsothatwhenthetubisinplacethepre-textensionkitcanslideintoplace
and install. This is described in more detail on Page 19
TUB INSTALLATION
Before installing the tub, clean the area where the tub will be installed so that no dust or debris will be pulled into
theblower(ifequipped).Oncethesiteispreparedandthetubisttedwithfaucets,bathwasteandoverow,and
pre-ttedwiththeextensionkit,slidethetubintoplace.
1. Leveling the Tub Feet
WARNING... DO NOT SKIP THIS STEP. IT IS VERY IMPORTANT TO LEVEL THE TUB FRONT
TO BACK AND SIDE TO SIDE AND TO HAVE ALL OF THE TUB FEET TOUCHING THE GROUND.
FAILURE TO DO SO MAY RESULT IN DOOR LEAKS, FLOODING AND/OR BOWING OF THE
TUB FRAME AND SHELL. BLISS TUBS DOES NOT WARRANTY ANY INSTALLATION OR
COVER ANY DAMAGES RESULTING FROM AN IMPROPER INSTALLATION.
• Checktheleveloftheoorwherethetubistobeinstalled.Ifitisdrasticallyoutoflevelthentheoorneeds
tobeleveledrst.
• Takenoteofthehighestandlowestcornersoftheoorwherethetubwillbeplaced.
• Slidethetubintoplaceontoproperlybracedooring(describedearlier)andchecktheframewithalevel.
• Raise and lower the six (6) feet until the frame is level and all feet are touching the ground.
• You may need to slide the tub in and out to adjust the back corner feet.
Example 2:
3-Flange Up
Example 3:
All Flanges
Down
BLISS TUBS
SAVE THESE INSTRUCTIONS15
© 2015 - 2017 Bliss Walk-in Bathtubs. All Rights Reserved.
• Once the tub is in the correct position, the frame is level side to side and front to back, and all feet are
touching the ground, lock down the locking nuts on the bolts holding the feet.
• Donotforgetthetwomiddlelevelingfeet!
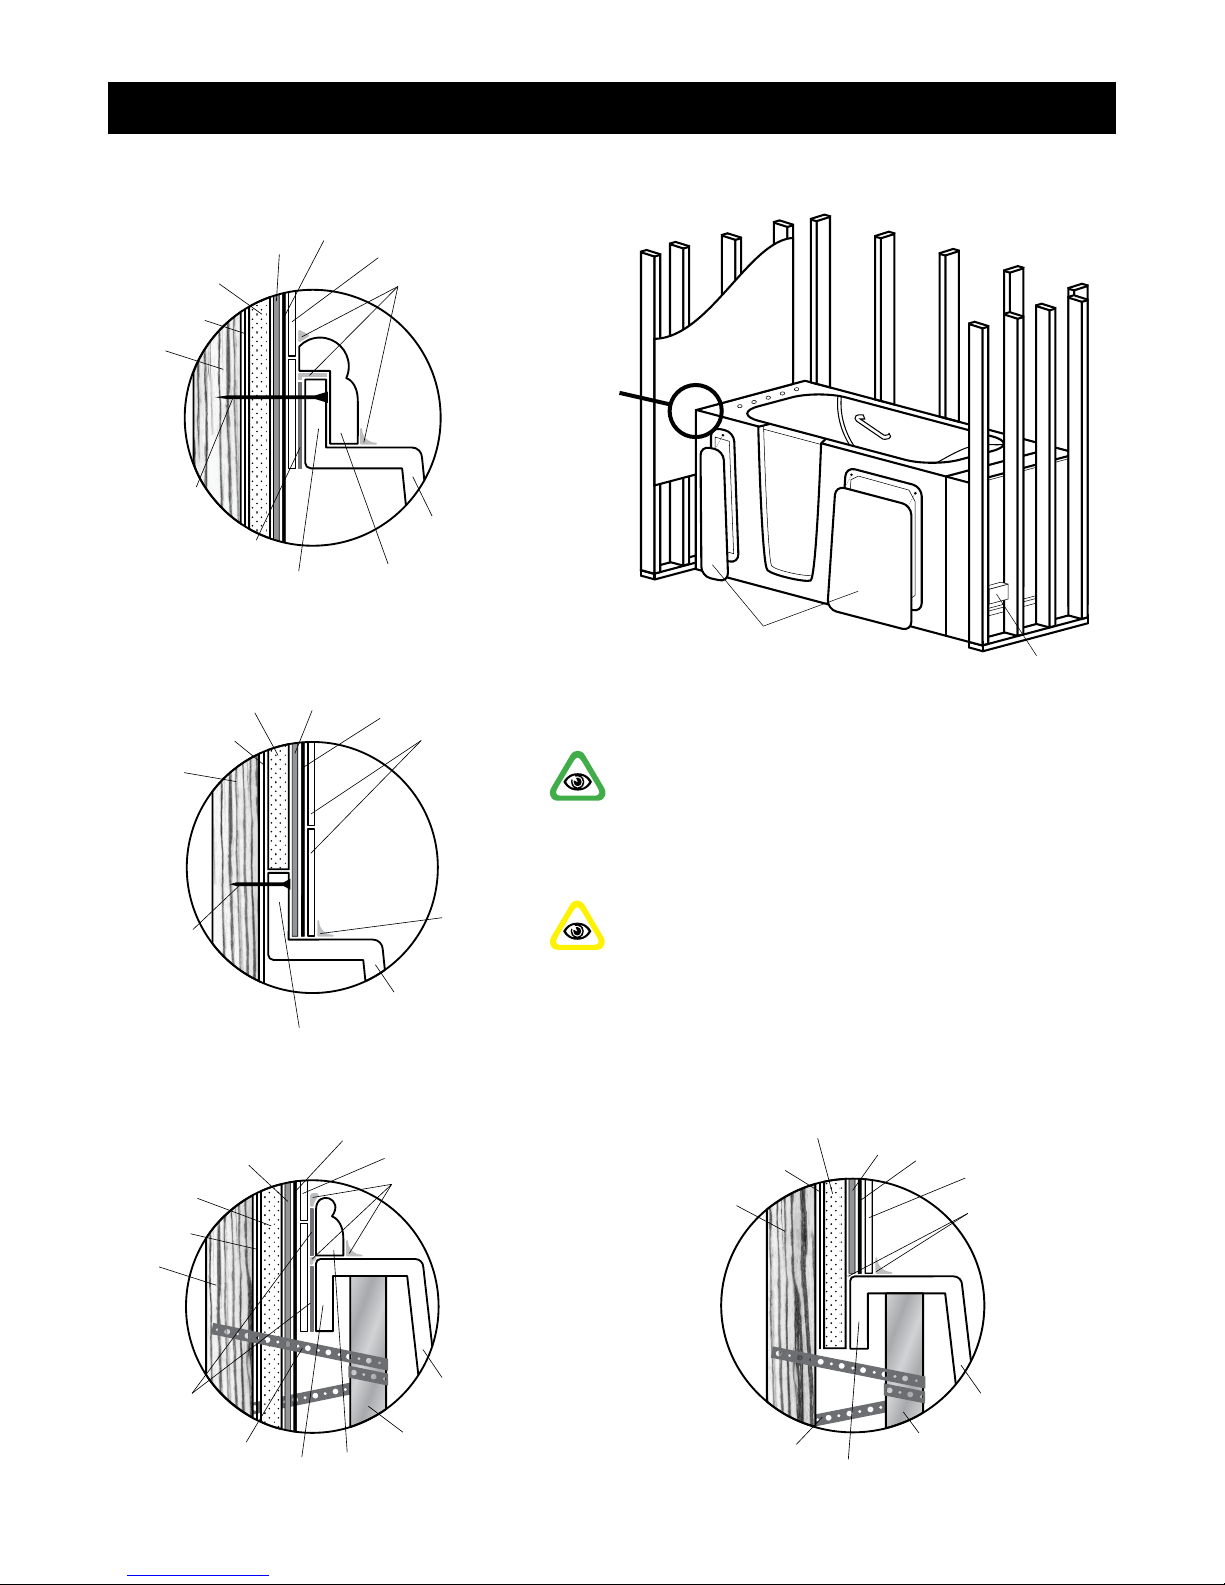
2. Securing to Walls & Floor
Securethetopofthetubtothewallstudsbyscrewingthroughtheangeorusingmetalstrappingorbrackets(not
provided;seephotoonpage13).Thetubfeethaveholesthatallowthemtobescrewedtothewoodensuboor.For
securingthetubonconcretesubooruseboltsandsteelstrappingovertheframetosecurethetubtotheoororuse
heavy-duty masonry screws that won't loosen over time.
Bothangeuptubsandangedowntubscanbeadaptedtoanyinstallationsituation.Tubscanbeinstalledagainst
existing tile, existing wall, or directly to the studs in new construction. See the next page for further details.
CAUTION... IN EVERY SITUATION IT IS THE CONTRACTOR’S RESPONSIBILITY TO ENSURE
A PROPER MOISURE BARRIER IS ESTABLISHED IN COMPLIANCE WITH STATE AND LOCAL
CODES.
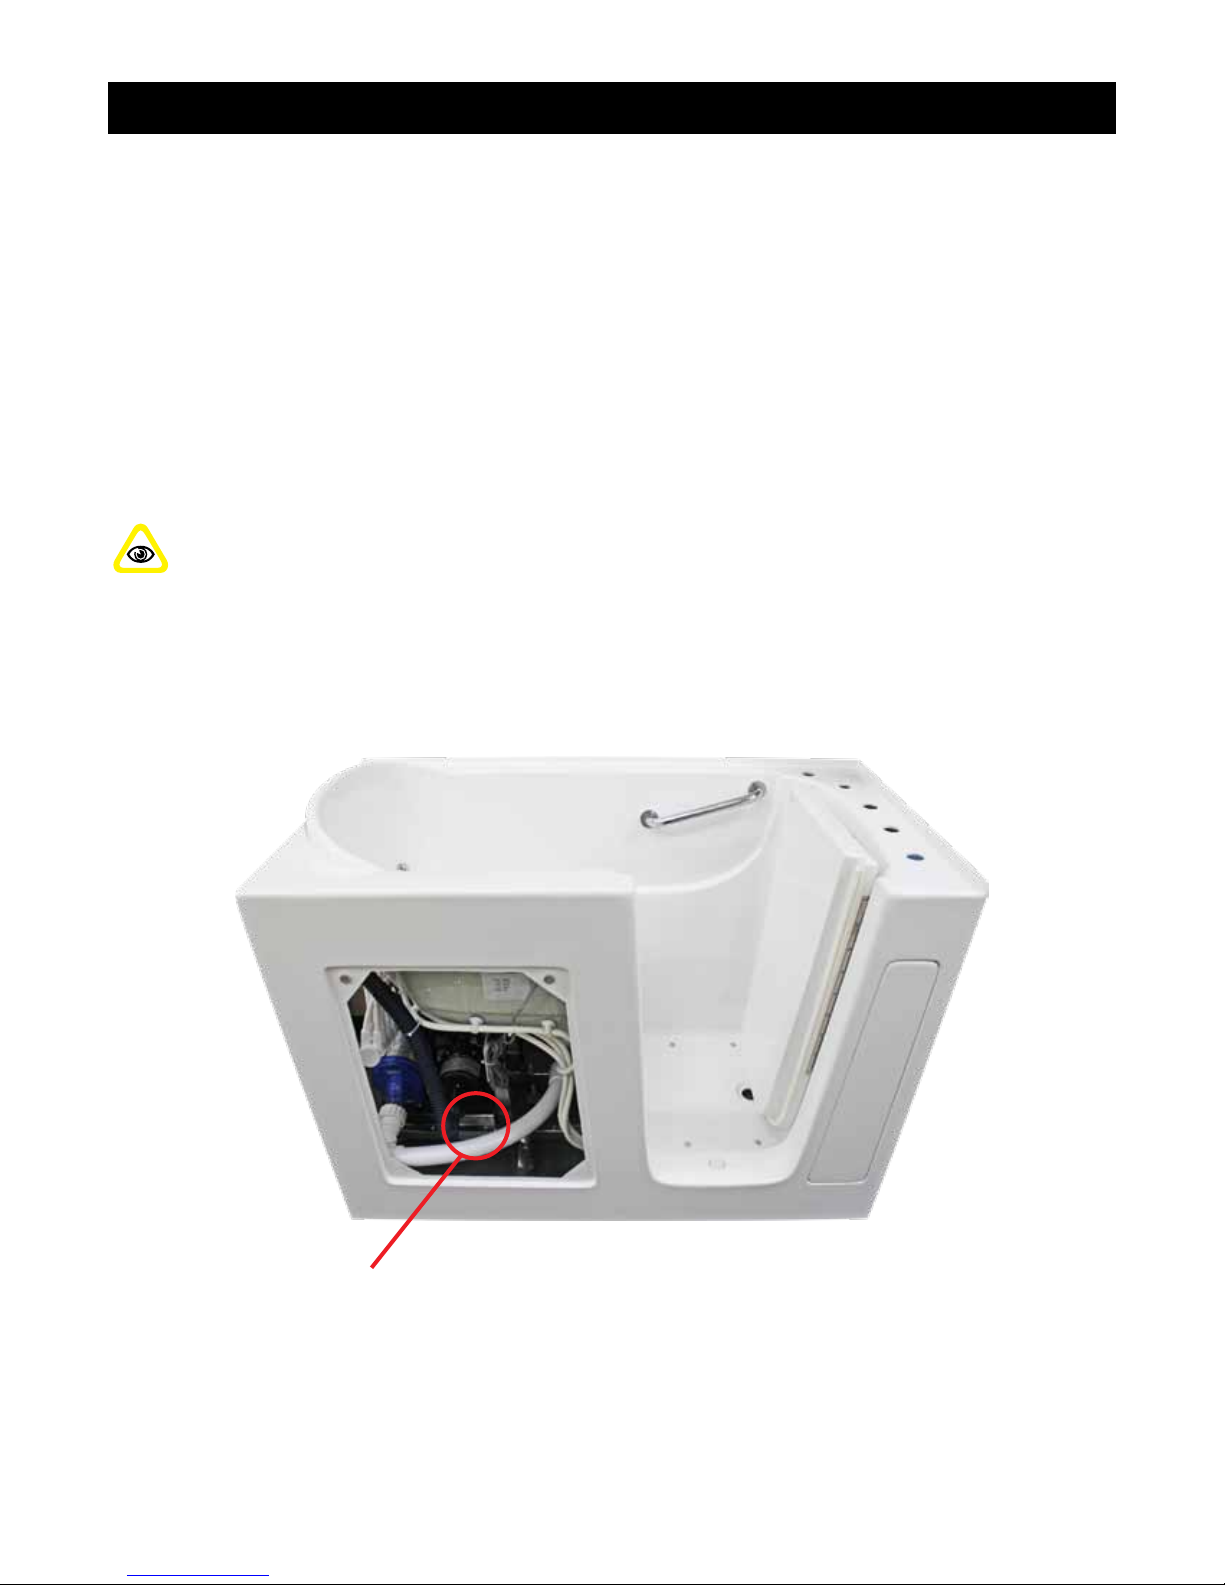
Special Note
Forinspectionandreferencepurposes,UPC&ULcerticationlabelsarepermanentlyadheredtothetub
frame behind the large access panel. Location of the label for inward-swinging door is shown below.
INSTALLATION
Certication labels attached here
BLISS TUBS
SAVE THESE INSTRUCTIONS 16
© 2015 - 2017 Bliss Walk-in Bathtubs. All Rights Reserved.
INSTALLATION
© copyrightBliss Tubs 2015 | © copyright Bliss Tubs 2015 | © copyright BlissTubs 2015
© copyrightBliss Tubs 2015 | © copyright Bliss Tubs 2015 | © copyright BlissTubs 2015 | © copyright Bliss Tubs 2015 | © copyright BlissTubs 2015 | © copyright Bliss Tubs 2015 | © copyright BlissTubs 2015 | © copyright Bliss Tubs 2015
Molding
Wall
Stud
Moisture
Barrier
Drywall
Cement
Board
Thinset
Tile
Tub
Body
Tub Tile
Flange
Silicone
Mastic or
Construction
Adhesive
Stainless
Steel
Screw
Electrical Supply
Location
Removable Access Panels
© copyrightBliss Tubs 2015 | © copyright Bliss Tubs 2015 | © copyright BlissTubs 2015 | © copyright Bliss Tubs 2015 | © copyright BlissTubs 2015 | © copyright Bliss Tubs 2015 | © copyright BlissTubs 2015 | © copyright Bliss Tubs 2015
Wall
Stud
Moisture
Barrier
Drywall
Cement
Board
Thinset
Tile
Plumber’s
Tape
Tub
Body
Tub Tile
Flange
Stainless
Steel Frame
Silicone
Optional
Molding
Mastic or
Construction
Adhesive
© copyright BlissTubs 2015
© copyrightBliss Tubs 2015 | © copyright Bliss Tubs 2015 | © copyright BlissTubs 2015 | © copyright Bliss Tubs 2015 | © copyright BlissTubs 2015
Wall
Stud
Drywall
Cement
Board Thinset
Tile
Silicone
Tub
Body
Tub Tile
Flange
#6 x 1½”
Stainless
Steel Screw
Moisture
Barrier
© copyright BlissTubs 2015 | © copyright Bliss Tubs 2015 | © copyright BlissTubs 2015
Wall
Stud
Moisture
Barrier
Drywall Cement
Board Thinset
Tile
Plumber’s
Tape
Tub
Body
Tub Tile
Flange
Stainless
Steel
Frame
Silicone
Detail
Detail A: Flange Up
Detail B: Flange Up
Detail D: Flange DownDetail C: Flange Down
IMPORTANT... If drilling through the ange
to secure tub, ensure that the proper pilot
holes are drilled and the screw extends all the
way into the wall stud.
CAUTON... If drilling through existing tile,
ensure that appropriate drill bits and pilot
holes are used to prevent damaging the tile.
Existing Tile / Surround
New Tile / Surround
Existing Tile / Surround New Tile / Surround

BLISS TUBS
SAVE THESE INSTRUCTIONS17
© 2015 - 2017 Bliss Walk-in Bathtubs. All Rights Reserved.
Flange Up, Existing Tile / Surround (Refer to Detail A on Previous Page)
Moldingscanbeusedtocovertheange.ThesemoldingsareavailableatHomeDepot,Lowe’sandsimilar
outlets.
• Prenishedinbonewhiteandreadytoinstall
• Moisture-, termite- and rot-resistant for a long lasting accent
• Easily installs using nails or construction adhesive
IMPORTANT... BE SURE TO USE QUALITY GRADE CAULKING. YOU SHOULD SEAL THREE
TIMES:
1. Putacaulkingbeadonthebackoftheangebeforepushingthetubagainstthewallorliner.
2. Sealagainbyrunninganotherbeadacrosstopofangelip.
3. Aftertrimissecuredagainstthetileange,caulkandsealtopoftrim.
Flange Up, New Tile / Surround (Refer to Detail B on Previous Page)
1. Aftertubissecuredtowallstuds,installmoisturebarrier,cementboard,thinsetandtileinfrontoftheange
as shown in Detail B on the previous page.
2. Besuretoleavea⅛”(one-eighthinch)gapbetweenthetileandthetubbodytoallowforanyexing.
3. Thenalsiliconesealwillbedoneattheendoftheinstallationprocess.
Flange Down, Existing Tile / Surround (Refer to Detail C on Previous Page)
AND
Flange Down, New Tile / Surround (Refer to Detail D on Previous Page)
Awalk-inbathtubwithnotileangesoersinstallersexibilityintheinstallationprocess.Walk-inbathtubsthat
are fully ange down will have all three (3) anges (behind the seat, along the edge and behind the faucet)
pointed downward.
Aangedowntubcanbeeasilyinstalledagainstexistingtileorsurround.Similarly,aangedowntubcanbe
installed in the same manner against new tile or surround.
Similartoinstallingawalk-inbathtubwithanges,aangedowntubmustbesecurelypositionedagainstthewalland/
ortotheoorduringoratcompletionofinstall.Regardlessofsequence,besuretouseQUALITYGRADEcaulking.
Wheninstallingaangedownwalk-inbathtubagainsttileorasurround:
1. Putacaulkingbeadonthegel-coatnishsideoftheangeswhichwillpressagainstthesurround.
2. Oncepositionedagainstthewall,sealagainbyrunninganotherbeadacrosstheseambetweentheange
ridge and the tile/surround.
3. Smooth out and distribute the beaded caulk evenly along the seam.
4. If the tiled walls are not square and the gap is too wide for a visually clean installation, molding may be used
to cover the gap around the tub.
CAUTION... IN EVERY SITUATION IT IS THE CONTRACTOR’S RESPONSIBILITY TO ENSURE
A PROPER MOISURE BARRIER IS ESTABLISHED IN COMPLIANCE WITH STATE AND LOCAL
CODES.
INSTALLATION

BLISS TUBS
SAVE THESE INSTRUCTIONS 18
© 2015 - 2017 Bliss Walk-in Bathtubs. All Rights Reserved.
3. Supply & Drain Plumbing Connection
Thenalconnectionneededforthesupplyplumbingarethetwostainlesssteelexhosesthatconnectfromthe
wallshutovalvestothehotandcoldvalvesonthedeckofthetub.
1. Makesuretheshutovalvesatthetubareshuto.
2. Turn the water supply to the house back on.
3. Connectthesupplyexhosestothewallvalves.Althoughthesupplyhoseshaveintegratedwashers,itis
stillrecommendedthatteontapeorthreadsealantbeusedonthethreadstoensureacompleteseal
4. DONOTCONNECTthesupplylinestothetubyet.Besuretoushthelinesofanydebristhatmayhave
beenloosedbyshuttinghousesupplyonando.Placetheotherendofthesupplyhoseinthedrainand
slowly open the wall valve. Let it run for a couple minutes to clear out air and debris. Once there is a clean
andconstantow,turnthewallvalveoandconnectthesupplyexhosetothevalveonthetubdeck.These
steps need to be done for both the hot and cold lines.
CAUTION... BE SURE TO FLUSH SUPPLY LINES PRIOR TO HOOKUP. RELEASED DEBRIS
AND SEDIMENT IN LINES CAN DAMAGE OR CLOG THE CERAMIC CARTRIDGES IN THE
VALVES AND DIVERTER AND CAN DAMAGE THE HAND SHOWER.
5. Connectthedraintothep-traplocatedintheooraccordingtolocalplumbingcodes.
6. Now test both the faucets and the drain function checking for any leaks at any of the plumbing connections.
It is the responsibility of the contractor/installer to make sure all plumbing connections are water tight.
4. Electrical Connection (if so equipped)
Allelectricalworkshouldbedonebyaqualiedlicensedelectrician.BlissTubsystemscomewithstandard
three-prong NEMA plugs and are not manufacturer approved for hardwiring to a junction box. Hardwiring of
any kind or tampering with the integrated electrical systems will void the warranty. Plug in each of the electrical
systems to a dedicated GFCI (Ground Fault Circuit Interrupter) three-prong outlet. All systems require 110 V, 60
HZ cycle and vary in their amperage draw.
Air Blower – 9.5 amps
Hydro Pump – 9.4 amps
Tee-heater – 12.5 amps
WARNING... BE SURE NOT TO OVERLOAD THE CIRCUIT BY PLUGGING IN TOO MUCH
AMPERAGE DEMAND WHICH COULD RESULT IN TRIPPED GFCI OUTLETS, TRIPPED
BREAKERS, OR FIRE. FOR EXAMPLE, IF A 12 GAUGE WIRE IS RUN TO A 20 AMP BREAKER
FOR THE 2 GANG GFCI OUTLET AND BOTH THE TEE-HEATER AND THE HYDRO PUMP ARE
PLUGGED INTO THAT OUTLET, YOU WOULD BE DRAWING 21.9 AMPS (HEATER 12.5 AMPS +
PUMP 9.4 AMPS = 21.9 AMPS) ON A 20 AMP CIRCUIT. IN THIS CASE, YOU WOULD NEED TO
RUN A SECOND CIRCUIT. MAKE SURE ALL ELECTRICAL CIRCUITS AND CONNECTIONS
(IF APPLICABLE) ARE SET UP TO LOCAL CODES. FOR MORE INFORMATION ON
ELECTRICAL SYSTEMS SEE APPENDIX D (PAGE 32).
INSTALLATION
Chromatherapy – .055 amps
Aromatherapy – .05 amps
Ozone system – .05 amps
BLISS TUBS
SAVE THESE INSTRUCTIONS19
© 2015 - 2017 Bliss Walk-in Bathtubs. All Rights Reserved.
INSTALLATION
5. Test
Now that the tub is in place and everything is hooked up, run the tub and test all the features before installing the
surround and extension kit.
1. Clean the door seal and jamb of any dust or debris by wiping with a soft cloth and shut the door.
2. Checkthefunctionandowfromthehotandcoldvalvesmakingsuretheyturnfreelywithoutrubbingonthe
tub deck or the bell housing. Tighten as necessary.
3. Test the function of the diverter and make sure there are no leaks from the handspray and ex hose
connection.
4. Look underneath the tub deck and make sure there are no leaks from any of the plumbing.
5. Test the function and feel of the drain hand control. If it is tough to turn or sounds like its grinding it may need
to be adjusted.
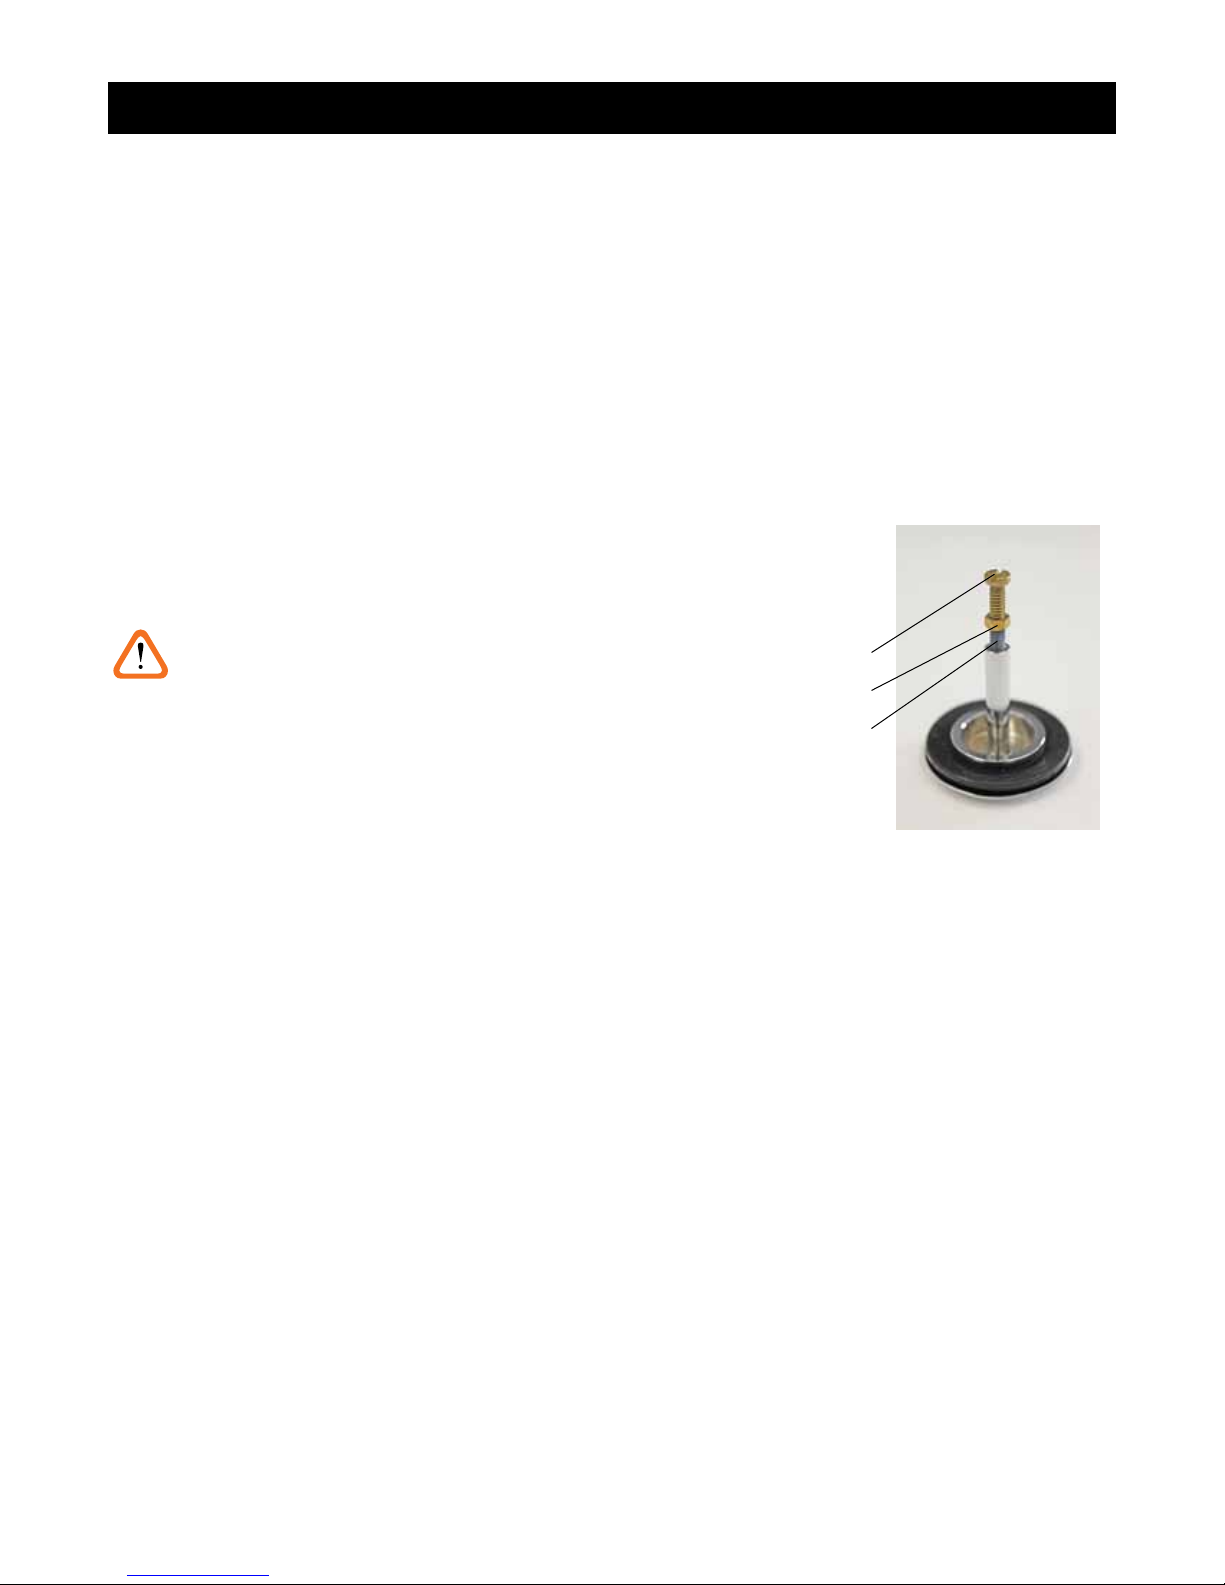
6. Make sure the stopper holds water when in the down position and pops up
as high as possible to allow for the fastest drain time. The screw height in the
bottom of the stopper needs to be adjusted for each tub and the locking nut
MUST be tightened after correct height is determined.
WARNING... FAILURE TO LOCK THE NUT ON THE
DRAIN STOPPER COULD RESULT IN DRAIN FAILURE
AND ENTRAPMENT OF TUB USER. IF STOPPER DOES
NOT RESPOND TO HAND DIAL, THE STOPPER CAN BE
LIFTED OUT BY HAND AT ANY TIME.
7. Once the drain is working properly, ll the tub with water to
above the highest water jet (if equipped).
8. Asthetubislling,continuallycheckthedoorsealandalltheplumbingforanyleaks.
9. Oncethetubislled,testthesystemsandalltheirfunctions.Checkallintegralandnon-integralpipingfor
leaks while the systems are operating. See Appendix D (page 32) for details on the operation of each system.
10. Drain the tub and make sure the stopper stays up until the tub is completely drained. Continue to check for
leaks as you drain the tub. Pay special attention to the waste plumbing connections as the tub is draining.
11. If the tub is equipped with an air system, there will be a blinking light on the control head after the water
drains signifying the 20 minute timer is activated. In 20 minutes the air system will turn itself on for one minute
topurgethelinesofanymoistureandwillturnitselfoattheendofoneminute.
FINISHING WORK
1. Extension Panel Finish
Add some construction adhesive (i.e. Loctite Power Grab, Liquid Nails or comparable adhesive) between the
joining surfaces in addition to the screws/bolts for added strength. Please note that in most situations, the
extensionpanelkitcanbedisregardedinfavorofatiledorotherwisenishedshelf(ifapplicable).Alwaysensure
a proper moisture barrier in compliance with state and local codes.
2. Surround Installation
TherearemanydierentsurroundoptionsavailableandineverycaseBlissTubsrecommendsthattheproper
moisture barrier be installed in compliance with state and local codes.
Set Screw
Locking Nut
LoctiteTape
This manual suits for next models
20
Table of contents
Popular Hot Tub manuals by other brands


Aquatic
Aquatic AI31AIR6636TO Specification sheet

Takara Belmont
Takara Belmont Yume Oasis installation instructions

Canadian Spa
Canadian Spa Winnipeg UV Spa KH-10159 owner's manual

treesse
treesse Fusion Spa 200 Preinstallation manual

Aquatic
Aquatic HOTSOAK 66 AI7AIR6042HS Specification sheet

Evolution Spas
Evolution Spas 6-1000 owner's manual