Blue Raven MediaMate 7040 User manual
Quick Start Guide
BLUERAVEN MediaMate
™
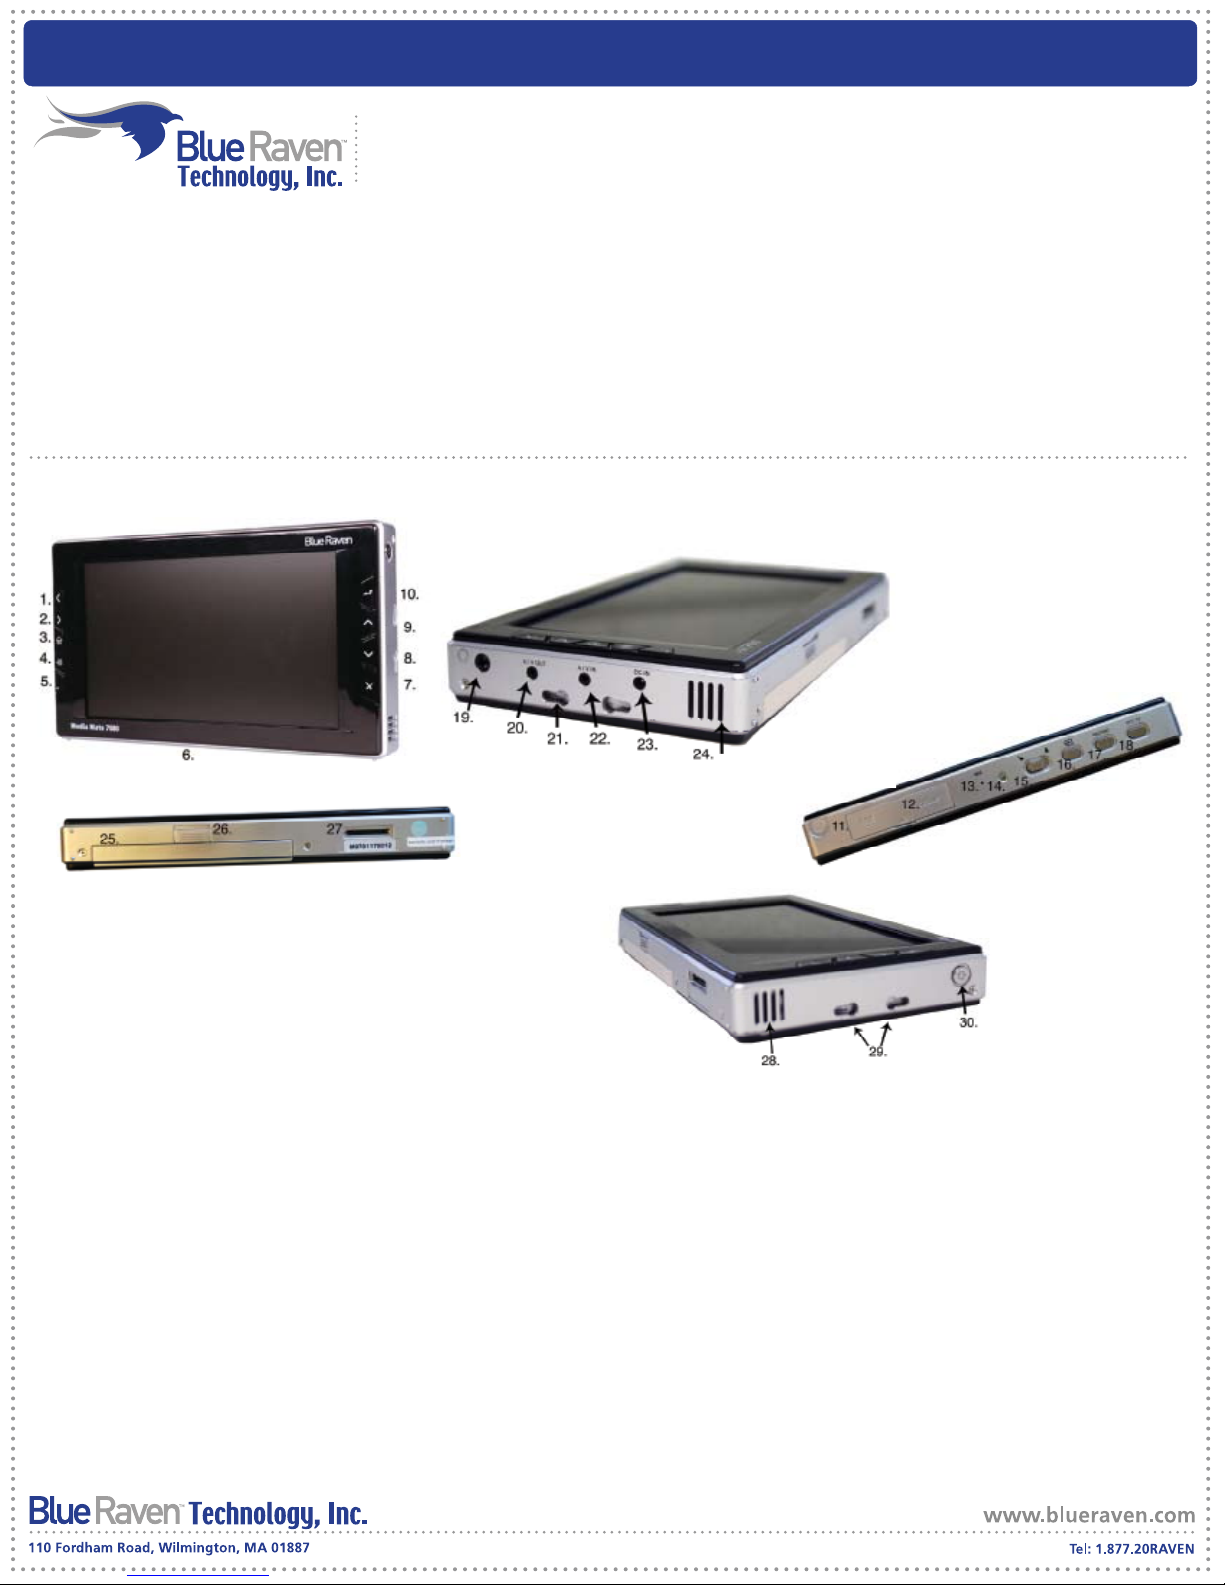
1. LEFT Arrow: Moves highlighted item left/previous page/previous song
2. RIGHT Arrow: Moves highlighted item right/next page/next song
3. HOME Button: Main menu (when it is not in use.)
4. TOOLS Button: Pop up the tools menu.
5. Remote Control Reciever
6. TFT-LCD: 7-inch color TFT-LCD screen
7. EXIT Button (X): Cancel/exit.
8. DOWN Button: Moves highlighted item down/decreases volume.
9. UP Button: Moves highlighted item up/increases volume.
10. ENTER Button: Enter/Play/Pause
11. CARD Slot: Support MS, MMC and SD card.
12. USB 2.0 Port
13. Microphone for digital recording
14. Indicator Light (green): In working mode, the indicator is bright all the time; in charging and copying mode, the indicator will flash.
15. HOLD Switch: In HOLD mode, the buttons on the MediaMate are disabled. The remote control will still work.
16. A/V IN Button: Preview the A/V signal on the LCD screen.
17. REC Button: Begins A/C recording when in recording mode.
18. TFT/TV Button: Press this button to switch among A/V OUT and the LCD screen.
19. Earphone Jack
20. A/V OUT Jack: Attach the A/V OUT cable here when you’re connecting the MediaMate to a TV or other display devices.
21. Left Bracket Jack
22. A/V IN Jack: Attach the A/V IN cable here when you’re connecting the MediaMate to a TV or other components.
23. DC IN Jack
24. Left Built-in Speaker: Functions when earphone is not used.
25. Battery
26. Battery Lock Switch
27. Expansion I/O Port
28. Right Built-in Speaker: Functions when earphone is not plugged in.
29. Right Bracket Jack
30. Power Button: Turns the MediaMate on/off.
I. BUTTON AND PORTS OVERVIEW:
INDEX:
I. Button And Ports Overview
II. Getting Started
III. Set-Up
IV. Advanced Set-Up
V. Transferring Music and Photos
VI. Play Music
VII. Create Playlists
VIII. Record Videos
IX. Play Videos
X. Display Photos
XI. Voice Recording
XII. Viewing Videos on a TV

Quick Start Guide
BLUERAVEN MediaMate
™
II. GETTING STARTED:
IV. ADVANCED SET-UP:
V. TRANSFERRING MUSIC AND PHOTOS:
III. SET-UP:
Power connection:
Insert the plug of AC adaptor into the DC IN jack of
the MediaMate. Then, insert the adaptor into the AC
power plug.
Charging the MediaMate:
It takes 4 hours to fully charge the battery.
Before the first usage, please charge the
battery for at least 5 hours to fully activate the
battery. You may operate the MediaMate
while its battery is being charged. The green
indicator will start flashing when the battery is
charging and will stop flashing when the
battery is fully charged.
Car adapter connection:
Plug one end of the car adapter into the
DC-In port on the MediaMate. Plug the
other end of the car adapter into your cars
cigarette lighter/power adapter to charge
and use your MediaMate on the road.
Turning the MediaMate on/off:
To turn on the MediaMate, press and hold
the “POWER” button for 2 seconds and the
indicator will turn green. It will take 10
seconds for the MediaMate to boot up
completely and enter the main menu.
To turn off the MediaMate, press and hold
the “POWER” button for 2 seconds.
Setup mode:
In the main menu interface,
select “Setup” to enter the
setup interface. After
entering this mode, you will
be able to change your
MediaMates setup options
including language, display,
sound, applications, system
options and output options.
Card mode:
In the main menu
interface, select “Card” to
enter the memory card
interface. After entering
this mode, you will be able
to copy your memory
cards contents directly
onto your MediaMate.
When the MediaMate
prompts you “Start card
copy?”, select yes and
press the “ENTER” button to
copy the contents of your
memory card onto your
MediaMate.
Memory Card connection
Memory cards can be
used by inserting the
memory card into the card
slot on the MediaMate.
After inserting the card
properly, you can press the
copy button to copy all
the contents on the
memory card over to the
MediaMate.
Browser mode:
In the main menu interface,
select “Browser” to enter into
browser mode. From here, you
can browse the different
partitions on your MediaMate.
Press the “ENTER” button to
select a partition and browse
the contents.
Press the “TOOL” button to
view the different options in this
mode.
CCP: Copy, cut, and paste files
and directories to other
directories or partitions.
Create folder: Create a new
folder in the current directory.
Name ascend: The files will be
sorted by name.
Delete: Delete the selected file
or folder.
Sort: Sort files by size, name, or
in reverse.
Send to: Send the files to the
corresponding folders.

Quick Start Guide
BLUERAVEN MediaMate
™
Music mode:
In the main menu
interface, select “Music” to
enter into music mode.
After entering this mode,
the MediaMate will display
your valid music files.
Highlight the file you want
to play and press “ENTER”
to begin listening to music.
Press the “TOOL” button to
view the different options
in this mode.
Name ascend: The files will
be sorted by name.
Add to playlist: Add files to
one of the 7 playlists.
Highlight the song or folder
to add the supported files
to the playlist. You can
view your playlists in Playlist
mode.
Delete: Delete the
selected file or folder.
Playlist mode:
In the main menu
interface, select “Playlist”
to enter into playlist mode.
After entering this mode,
the MediaMate will display
your playlists. Highlight the
playlist to play and press
“ENTER” to begin playing
your music.
A/V Input connection:
First, plug the single
connector of the A/V IN
cable to the A/V IN jack of
the MediaMate.
Next, plug the 3 color
connectors of the A/V IN
cable to the A/V OUT jacks
of your TV or other display
devices. With this
connection, you can
record TV shows to the
player’s HDD.
DVR mode:
In the main menu
interface, select “DVR” to
enter into DVR mode. From
here, you can easily
record from your TV, DVD’s
and video recorder’s A/V
outputs, etc. onto your
MediaMate. You can even
set up the Scheduler to
record TV at the selected
time.
From here, you will see the
DVR functions menu:
Start TV record: Start
recording video.
Parameters Setup: Setup
the recording parameters
and options.
Scheduler: Setup the
recording schedule.
Play: Playback the
recorded file.
After selecting the “Start TV
record” function, the
MediaMate will enter the
video preview mode, and
automatically detect the
incoming video signal. In
the video preview mode
you will be able to see the
A/V IN preview screen.
After the record function
“initializes”, the status will
display “ready” and you
will be able to record.
Note: You can press the
“RECORD” button at any
time to start recording.
VI. PLAY MUSIC:
VIII. RECORD VIDEOS:
VII. CREATE PLAYLISTS:

Quick Start Guide
BLUERAVEN MediaMate
™
Video mode:
In the main menu interface,
select “Video” to enter into
video mode. After entering this
mode, the MediaMate display
your valid video files. Highlight
the file you want to play and
press “ENTER” to begin playing
a movie.
Press the “TOOL” button to view
the different options in this
mode.
Name ascend: The files will be
sorted by name.
Delete: Delete the selected file
or folder.
A/V output connection:
First, plug the single connector
of the A/V OUT cable to the
A/V OUT jack of the Media-
Mate. Next, plug the 3 color
connectors of the A/V OUT
cable to the A/V IN jacks of
your TV or other display
devices. Now you can view
the contents of your Media-
Mate using the TV or other
display devices.
Record mode:
In the main menu
interface, select
“Recorder” to enter into
recorder mode. Using the
MediaMates sound
recording function, you
can record your voice by
the built-in microphone, or
through the line-in
function to record TV or
DVD player’s A/V sound
channel onto the
MediaMate.
From here, you will see
two options:
Record: You can choose
to record from the
microphone by choosing
“Mic in” and pressing
“ENTER”.
Line in: You can use the
A/V cables to connect to
any peripheral equipment
and record the sound
channel from your TV,
DVD, etc. Press “ENTER” to
start recording.
Play: From here you can
view, select, and press the
“ENTER” button to
playback your recorded
sounds. You can press the
“TOOLS” button and
choose:
Name ascend: Sort files by
name.
Delete: Delete the
selected file or folder.
Photo mode:
In the main menu interface,
select “Photo” to enter into
photo mode. After entering this
mode, the MediaMate will go
over all the files and display
your picture files. Highlight the
file you want to view and press
“ENTER” to look at the photo.
Press the “TOOL” button to
view the different options in this
mode.
Name ascend: The files will be
sorted by name.
Slide show: Show pictures one
by one in a slide show.
Interval: Set the duration of
each picture shown on the
screen in a slide show. The
options are 3, 5, and 7 seconds.
Delete: Delete the selected file
or folder.
IX. PLAY VIDEOS: X. DISPLAY PHOTOS:
XI. VOICE RECORDING: XII. VIEWING VIDEOS ON A TV:
Other manuals for MediaMate 7040
2
This manual suits for next models
1
Table of contents
Other Blue Raven Media Player manuals


