Blue Square Labs Q360 Product manual

Page | 1
V2516INSLM
Q
Q3
36
60
0
T
Te
el
le
es
sc
co
op
pi
in
ng
g
B
Bu
ub
bb
bl
le
er
r
I
In
ns
st
ta
al
ll
la
at
ti
io
on
n
a
an
nd
d
M
Ma
ai
in
nt
te
en
na
an
nc
ce
e
G
Gu
ui
id
de
e

Page | 2
V2516INSLM
IMPORTANT SAFETY INFORMATION
When installing and using this equipment, basic safety precautions should always be followed.
**READ AND FOLLOW ALL INSTRUCTIONS**
To reduce risk of injury, do not permit children to use this product unless they are
closely supervised at all times.
Swimming Pool equipment can generate high pressures capable of causing injury.
Always use caution when manipulating valves associated with the pool equipment
and turn off the pump if pressures exceed manufacturer’s specification. Always turn
off the pool equipment when disassembling or servicing your circulation system.
Swimming Pool equipment can create suction sufficient to entrap even adults. If pool
fittings are broken or missing, turn off your equipment and contact a certified
swimming pool expert to make the needed repairs.
Components
SAVE THESE INSTRUCTIONS
For customer service or support:
For on-line support: www.bluesquaremfg.com
To contact Blue Square: (800) 277-4150
Contents
IMPORTANT WARNINGS AND SAFETY INSTRUCTIONS
•Introduction
•Installation
oPlumbing Instructions
oPlumbing Detail
oConcrete Detail
oStartup Instructions
•Maintenance
WARNING
WARNING
WARNING

Page | 3
V2516INSLM
INTRODUCTION
The Q360 Telescoping Bubbler is designed to add additional beauty to any pool or spa. When the
bubbler is extended, the bubbling effect and tranquil sound of falling water can instantly relax and
rejuvenate you, adding a sense of peace and tranquility to your outdoor pool environment.
When retracted, the bubbler sits flush with your pool or spa floor, steps, benches, or sun decks making it
virtually undetectable. Two color options, grey and white, are available to further help match your pool
finish and make the Q360 Telescoping Bubbler nearly invisible.
Failure to follow recommended installation methods could void warranties and cause
injury.
Installation
Plumbing Instructions
1. Choose the Location –The maximum water depth that the bubbler can be installed is 38 inches.
The minimum water depth that the bubbler can be installed is 6 inches. In order to minimize
water splashing outside the body of water, the bubbler can be plumbed no closer than 6 inches
from the front edge of a step or shelf area or 8 inches from the back or side of the wall. (Fig. 1)
2. Dig trenches for 2“ Sch. 40 plumbing
to the location of the Fountain.
Plumb into the bottom of the
bubbler using 90° elbows and
connects into a vertical riser.
3. The top of the riser should extend
beyond the top of the finished
gunite level by at least 6-8 inches.
Glue a cap on top of the riser that
will remain in place until after
pressure testing is complete and the
gunite has been applied and cured.
4. Pressure-test the bubbler housing in
accordance with local codes
(pressure to remain on system until
plaster).
5. Backfill the plumbing trenches with dirt to maintain its vertical alignment. Pack dirt around the
bottom end of the riser to hold it plumb and stabilize it.
If the Fountain Housing is not plumbed vertically, it will not retract properly
6. The depth of the pipe should be calculated by using 1/2WD+4” (Fig. 1) This will guarantee the
bubbler can fully retract and sit flush with the pebble finish. After the completion of gunite
application, use a reciprocating saw to cut the riser flush with the level of the finished gunite.
After the riser has been cut flush, remove any burrs off the edges of the cut surface with coarse
sandpaper or a utility knife.
Left attached, burrs can compromise the effectiveness of the seal.
NOTE
NOTE
NOTE
Figure 1

Page | 4
V2516INSLM
7. Before installing the collar, first dry fit it in the riser in order to insure fitment inside of the riser.
Install the provided Blue Square collar by first applying primer, and then a liberal amount of clear
medium/heavy bodied PVC glue and sliding it into the riser.
8. The chosen pool finish should be applied flush with the top of the collar. Ensure the protective
orange cap is in place during this step to prevent pool finish from getting into the collar and
possibly causing problems with bubbler installation, extension, and retraction. (Fig. 2)
9. Finally, the telescoping bubbler itself
is ready to be installed.
Ensure piping is adequately supported on undisturbed earth. Do not stress pipe or
skimmer port by lifting or moving pipe after skimmer port connections have been
made.
Plumbing Detail
Telescoping Bubbler Manifold Plumbing with a Q360 Infloor Cleaning System (Fig.3)
1. The feed line to the Q360 Telescoping Bubbler
should draw water from the line to the wall
returns. The Telescoping Bubbler should not be
plumbed in line with the infloor cleaning system
as it will rob flow from the cleaning system and
cause less than optimal performance. As with
all in-floor installations, a 3-way valve should be
plumbed between the flow line and the returns
such that flow can be directed to either the
returns or the infloor cleaning system.
2. Each bubbler should have its own Tee fitting
and out of the T fitting, each telescoping
bubbler should be run with its own 2“gate valve
to allow adjustment of water to achieve the
desired bubbler effect.
Blue Square does not recommend using a 2-way or 3-way valve in place of the gate
valve to the bubblers due to the inability to make minor flow adjustments which
CAUTION
NOTE
Figure 2
Figure 3

Page | 5
V2516INSLM
create the desired bubble effect.
3. It is recommended that a 2-way ball valve be plumbed between the last Tee fitting telescoping
bubbler and any additional features (pool wall returns, water features, spa returns, etc) so the
bubbler water heights may be adjusted individually.
Telescoping Bubbler Manifold Plumbing without a Q360 Infloor Cleaning System (Fig. 4)
1. Each bubbler should have its own Tee fitting
and out of the T fitting, each telescoping
bubbler should be run with its own 2“gate valve
to allow adjustment of water to achieve the
desired bubbler effect.
Blue Square does not
recommend using a 2-way or
3-way valve in place of the
gate valve to the bubblers due to the inability
to make minor flow adjustments which create
the desired bubble effect.
2. It is recommended that a 2-way ball valve be
plumbed between the last Tee fitting
telescoping bubbler and any additional
features (pool wall returns, water features, spa
returns, etc) so the bubbler water heights may
be adjusted individually.
Gunite Detail
1. After the gunite has been applied and pressure tests have been completed, utilize a
reciprocating saw to cut off the riser pipe flush with the gunite surface. (Fig. 5)
2. After the riser has been cut flush, remove any burrs off the edges of the cut surface with coarse
sandpaper or a utility knife. Dry fit the collar into the pipe riser. (Fig. 6)
3. Apply PVC primer to both the collar and the inside of the PVC pipe. Apply medium body PVC
glue to both the collar and the inside of the PVC Pipe. Push the collar into the pipe until the
bottom of the water stop on the collar bottoms out on the top of the pipe.
4. The finished product should look like Figure 7. As shown, leave the orange plaster cap in place
during plaster application.
Startup Instructions
NOTE
Figure 4
Figure 5
Figure 6
Figure 7

Page | 6
V2516INSLM
1. Remove the orange plaster cap from the collar and blow out the lines to remove any
construction debris that may be in the pipes.
2. Utilize Figure 9 to determine the desired bubbler effect.
3. After determining the
desired height of the
bubbler as well as the
preferred depth below
the water line by using
the calculations in
figure 10.
4. Dry fit the Q360
Telescoping Bubbler
together and measure
from the top of the
sleeve to the top of the
cap. Determine total
the total length that
needs to be removed
from both the 1/2” pipe
and the 1” pipe.
Note: Blue Square recommends cutting equal amounts of material from the 1” pipe
and the 1/2” pipe so the bubbler telescopes and retracts properly.
5. Utilizing PVC pipe cutters, cut the unneeded material from both lengths of pipe. (Fig. 10)
NOTE
Figure 10
Figure 9

Page | 7
V2516INSLM
6. Slide the retainer over the 1” pipe.
7. Utilizing primer and medium body clear pvc glue, glue the insert to the top of the 1” pipe.
8. Slide the ½ pipe up through the bottom of the 1” pipe until the top of the pipe is visible.
9. Glue the .5” bubbler top on the 0.5” PVC pipe utilizing primer and medium body clear PVC glue.
(Fig. 12)
Please allow
adequate cure time as per cement manufacturer before utilizing the telescoping
bubbler in water.
PLASTIC CEMENTS AND PRIMERS CAN BE FLAMMABLE, POISONOUS OR BOTH. CLOSELY
FOLLOW CEMENT MANUFACTURER’S INSTRUCTIONS.
MAINTENANCE
Bubbler: Periodically check the bubbler top to ensure debris is not impeding nozzle flow.
WARNING
CAUTION
Figure 11
Figure 12

Page | 8
V2516INSLM
NOTES
Blue Square Manufacturing, LLC
3344 N. Nevada St.
Chandler, AZ 85225
Office 480.612.6880 Toll Free 800.277.4150
Other manuals for Q360
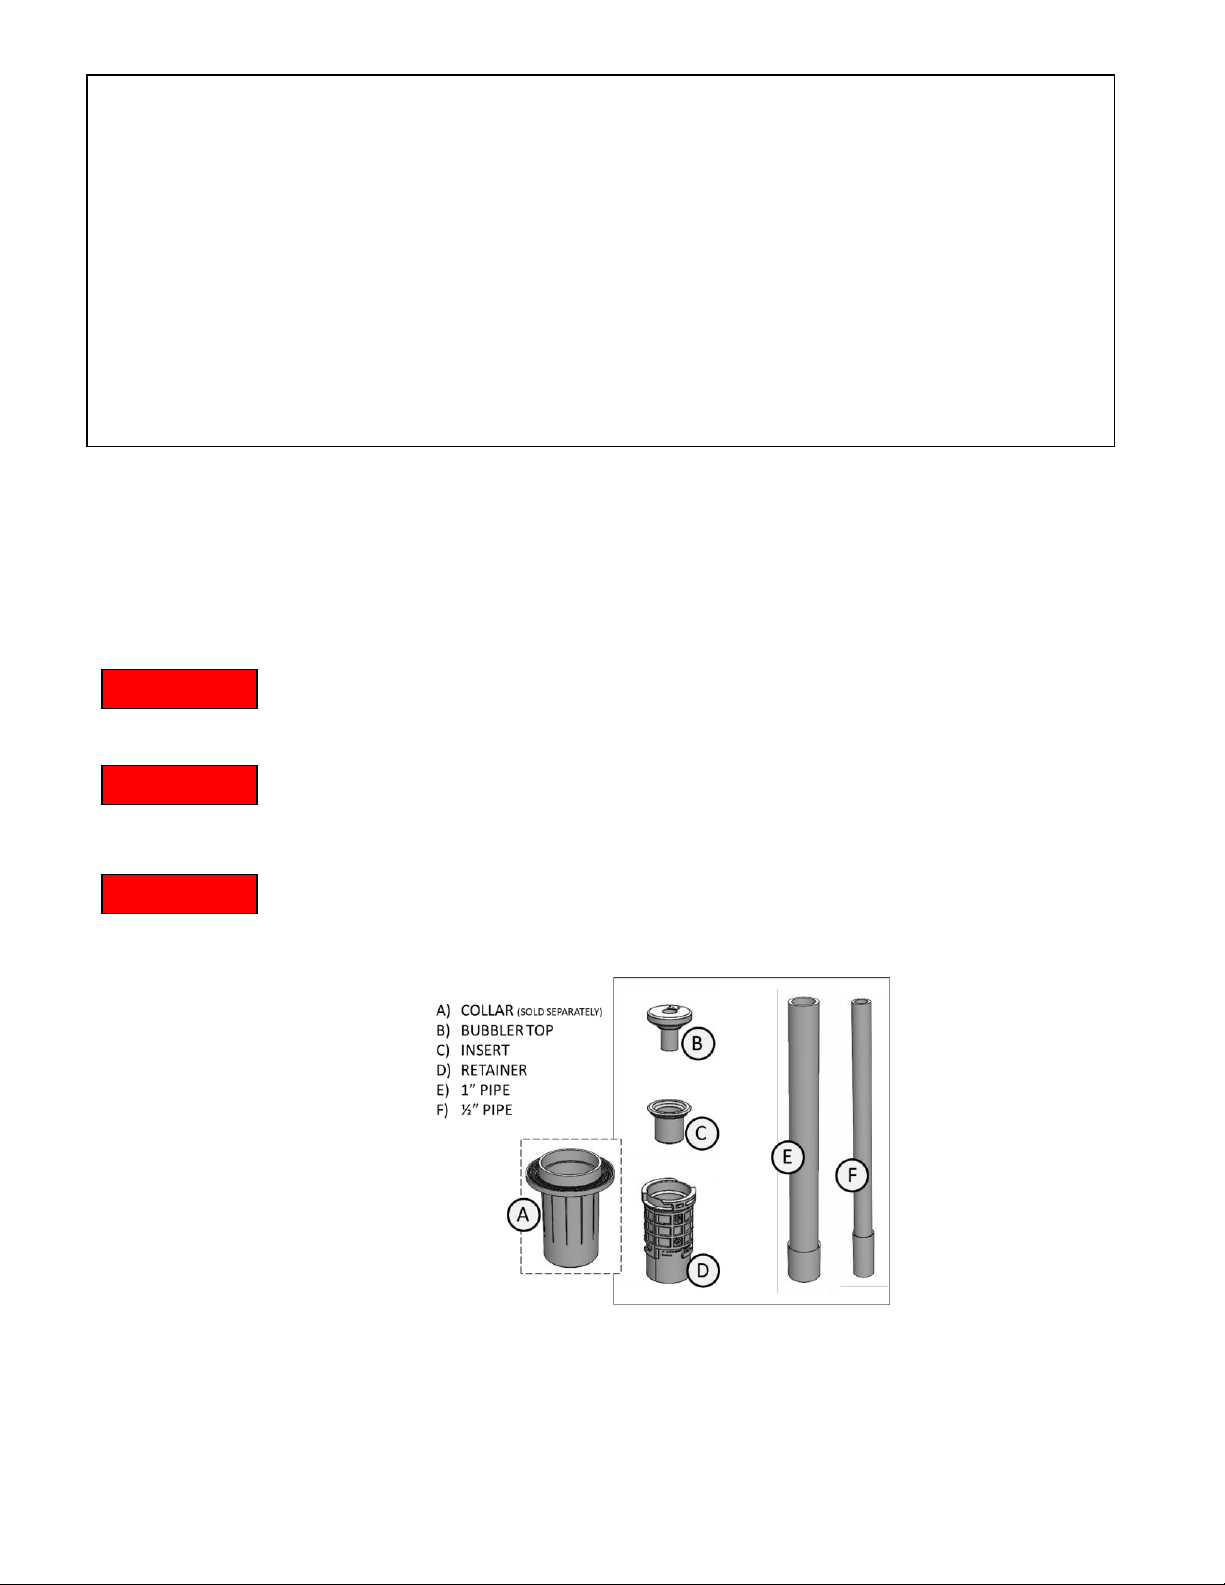
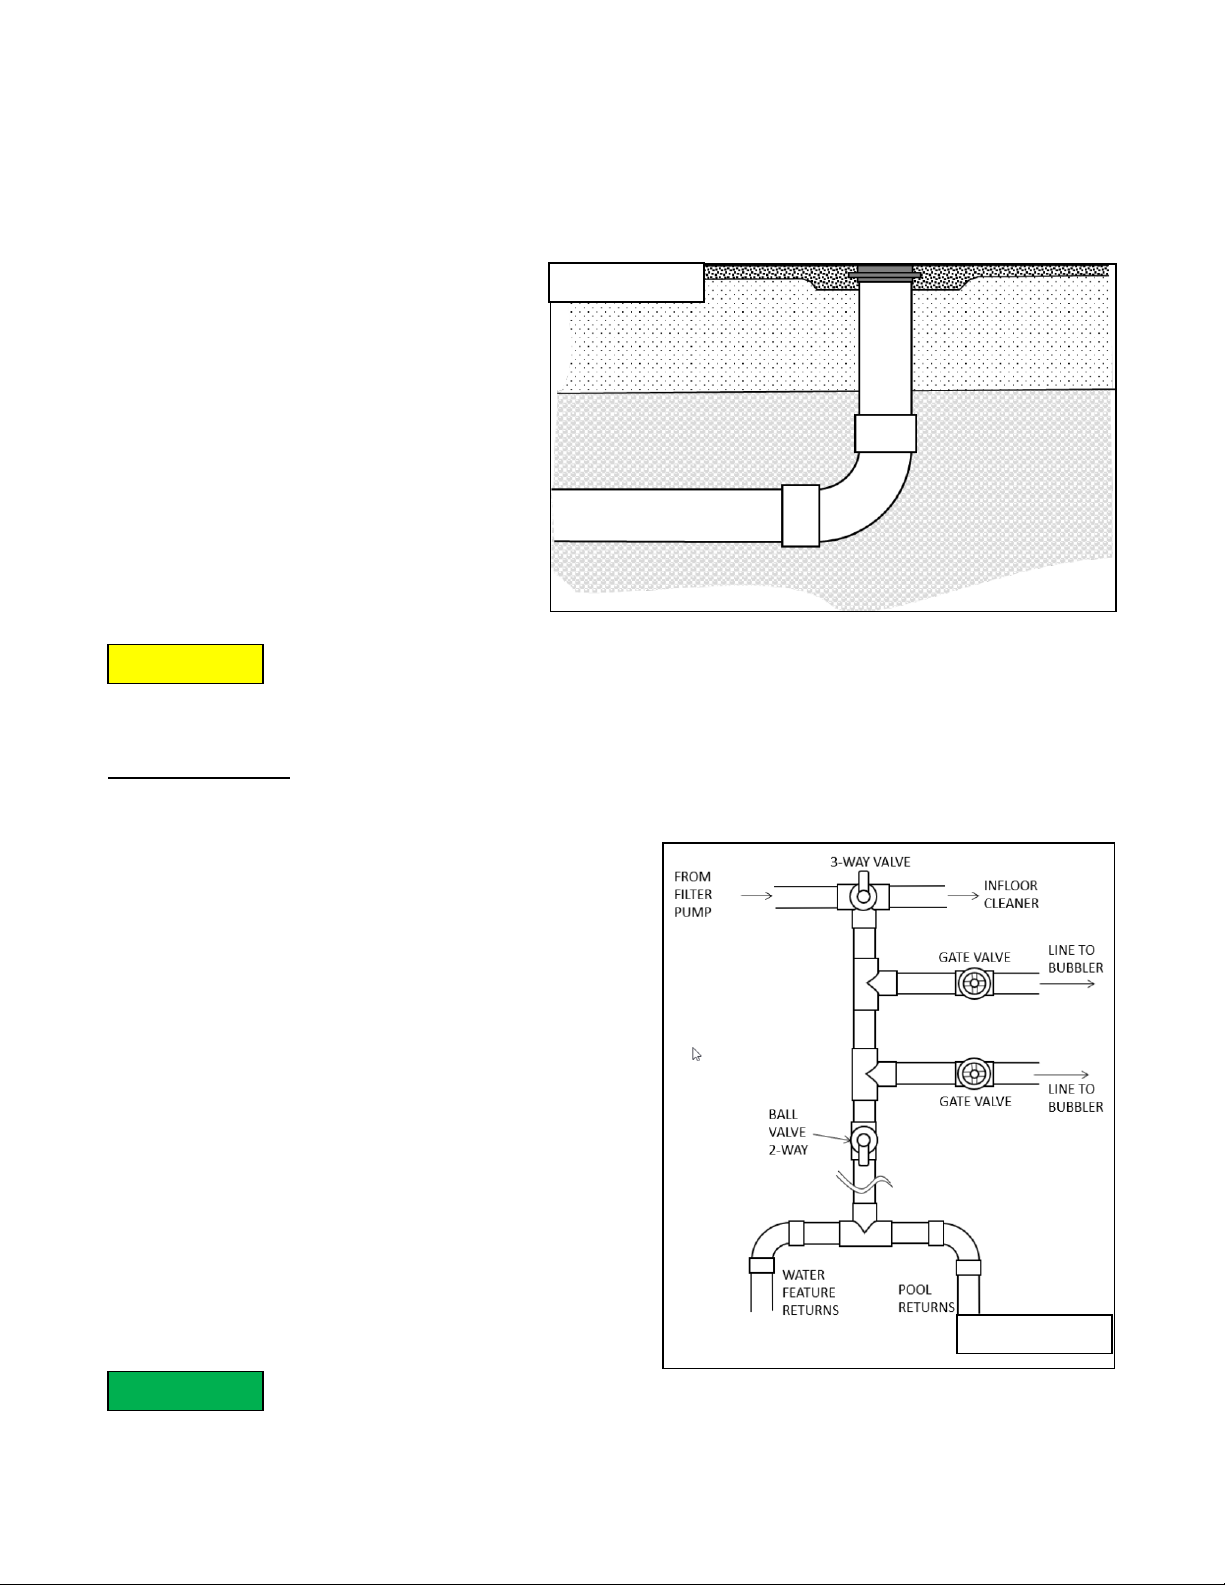
1
Table of contents
Popular Plumbing Product manuals by other brands

Franke
Franke F5LT1012 Installation and operating instructions

Separett
Separett 1270-01 quick start guide

VADO
VADO AXCES SIRKEL AX-SIR-MFSRK-DB-CP Installation & user manual

Kohler
Kohler K-20099T-Y installation instructions

Tenzo
Tenzo Pro GA11 Series Installation manual & users guide

KALE
KALE 410200503841 Installation instruction

American Standard
American Standard Colony Soft 2175.502 installation instructions

rba
rba RBA1882-100-001 Installation, operation and maintenance instructions

Isenberg
Isenberg PBV.1005A installation manual

Franke
Franke Eos Neo TA9600 Installation and service manual

PELHAM & WHITE
PELHAM & WHITE PWS200-B manual

emmeti
emmeti Gerpex Press Fit Installation and commissioning instructions