BlueCreation BC111-DISKIT-001 User manual
BlueCreation.St John’s Innovation Centre Cowley Road Cambridge CB4 0WS United Kingdom
t.+44 (0)1223 420 252 e.info@blue-creation.com www.blue-creation.com
BC111-DISKIT-001
Manual
Key Specifications
Bluetooth Low Energy dedicated development kit
4.0 Bluetooth Low Energy (BLE, Bluetooth SMART) Mode
Integrates BC111 module and Melody SMART software
Access to UART via USB (FTDI on board)
Direct access to GPIOs
GAP, ATT, GATT, L2CAP and SMP Bluetooth profiles
FCC, CE, IC and Bluetooth certified
Applications
Smart Phone Controlled Accessories
Fitness and Healthcare Accessories
Smart-Home Controllers
Smart Appliances
Remote Controls and Smart TVs
General Bluetooth Controllers
Melody
Smart App
Description
BC111-DISKIT-001 is a development board that
allows engineers to quickly prototype any
Bluetooth device using Melody SMART and high
level commands. It is the ideal kit to start
working with 4.0 Bluetooth Low Energy (BLE,
Bluetooth SMART)

BlueCreation.St John’s Innovation Centre Cowley Road Cambridge CB4 0WS United Kingdom
t.+44 (0)1223 420 252 e.info@blue-creation.com www.blue-creation.com
BC111-DISKIT-001
Manual
Setting Up the Board - Equipment
To start you need to have:
a) The BC111-DISKIT-001 and a USB cable. Please contact sales@blue-creation.com for more
information.
b) A PC or any other processor with a USB or parallel port. You should have a HyperTerminal installed
on your laptop. You can install for example Hercules HyperTerminal utility (http://www.hw-
group.com/products/hercules/index_en.html).
BlueCreation.St John’s Innovation Centre Cowley Road Cambridge CB4 0WS United Kingdom
t.+44 (0)1223 420 252 e.info@blue-creation.com www.blue-creation.com
BC111-DISKIT-001
Manual
Setting up the Board - Steps
Step1: Connect the board to your PC using the USB cable. The board will enumerate as a COM port. Your
PC will automatically find and install the required FTDI drivers.
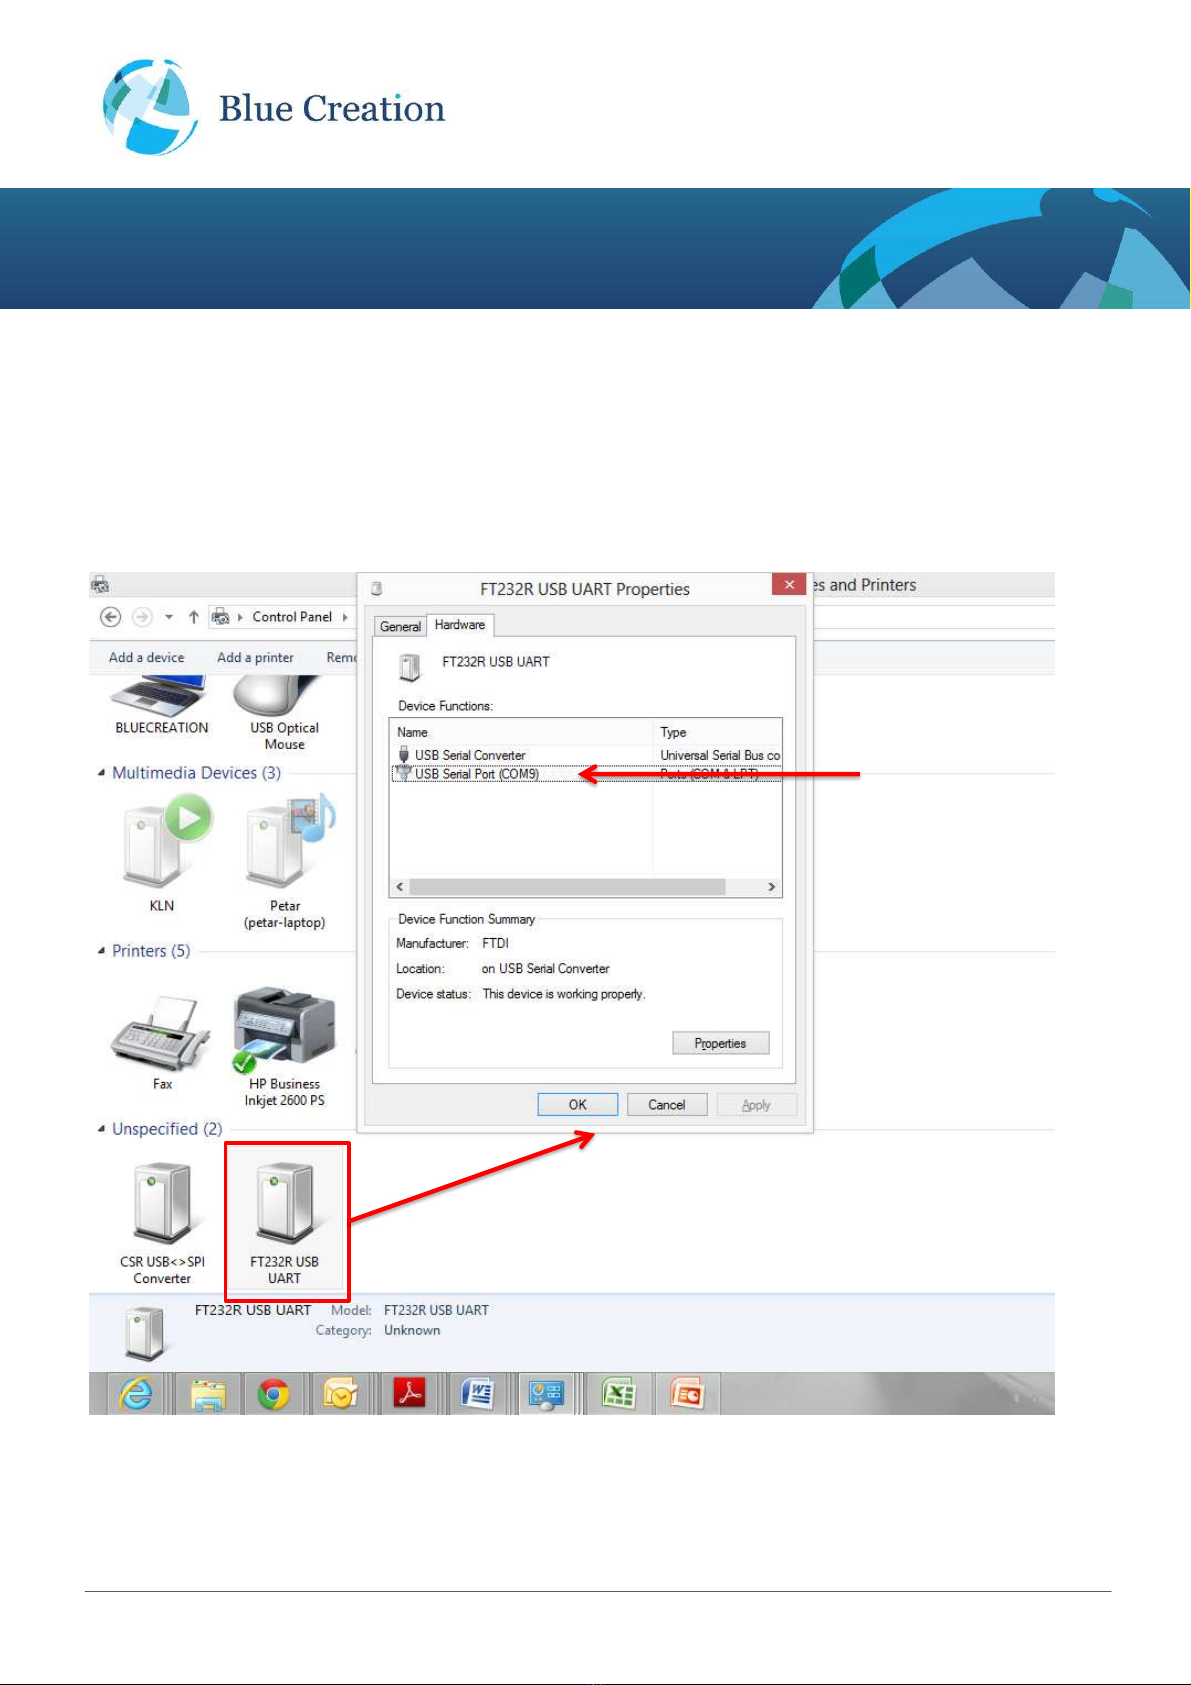
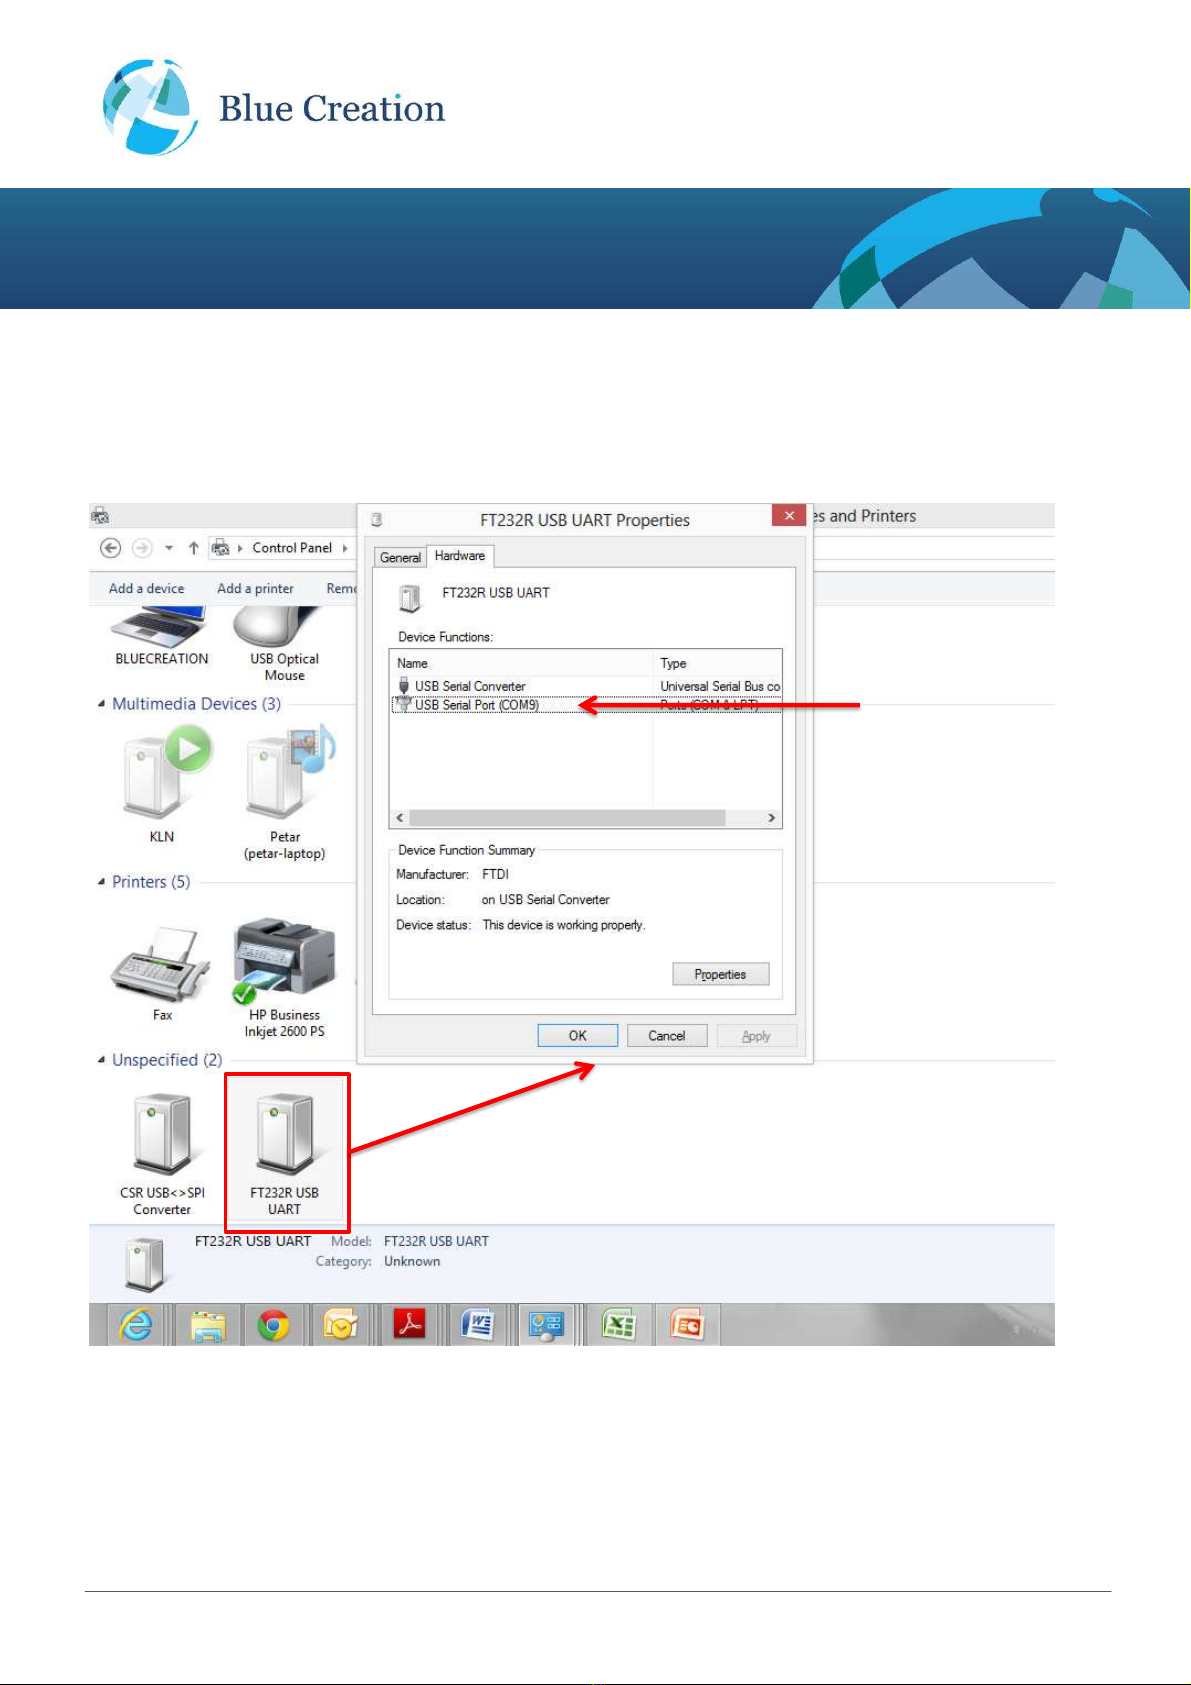
Step2: Go to StartUp/Devices and Printers. You will see your board will be under "FT232 USB UART". When
you look at Properties you will see under which COM port it has enumerated.
The board enumerates as
FT232R USB UART
In this example, the board
enumerates as COM9

BlueCreation.St John’s Innovation Centre Cowley Road Cambridge CB4 0WS United Kingdom
t.+44 (0)1223 420 252 e.info@blue-creation.com www.blue-creation.com
BC111-DISKIT-001
Manual
Step3: Launch your chosen HyperTerminal utility. Please use the following parameters for the UART setting.
Baud rate : 38400bps
Data bits : 8
Stop bits : 1
Parity bit : No parity
HW Flow Control : Disabled
In your HyperTerminal Window, type rst and then Enter. You should then see the BlueCreation Prompt. You
are now ready to use the board (note that if your typing isn't visible you should enable Echo On). Please refer
to the Melody Smart Manual for more information on the different commands you can use to control the board.

BlueCreation.St John’s Innovation Centre Cowley Road Cambridge CB4 0WS United Kingdom
t.+44 (0)1223 420 252 e.info@blue-creation.com www.blue-creation.com
BC111-DISKIT-001
Manual
Connecting to an Apple Application - Steps
If you want to use the BlueCreation's iOS sample application (Melody Smart) to connect to your board, please
follow the steps below.
Step1: Download Melody Smart app from the iTunes store. You can search ‘BlueCreation’ directly from your
iOS Device. You can also find it under https://itunes.apple.com/ca/app/melody-smart/id548603916?mt=8&ign-
mpt=uo%3D2
Step2: Turn on your board. It will be in Advertising mode for 5 minutes on default at boot. After that period you
can use the command ADV to enable Advertisement for 30sec. You will see the LEDs Flashing.
Step3: On your Apple device, launch your Melody Smart Application. You will see a device called Melogy
Smart - connect to it by choosing it. Using the Melody Smart Service will allow you to send messages between
the device and the board and to control and read the GPIO from the application.
BlueCreation.St John’s Innovation Centre Cowley Road Cambridge CB4 0WS United Kingdom
t.+44 (0)1223 420 252 e.info@blue-creation.com www.blue-creation.com
BC111-DISKIT-001
Manual
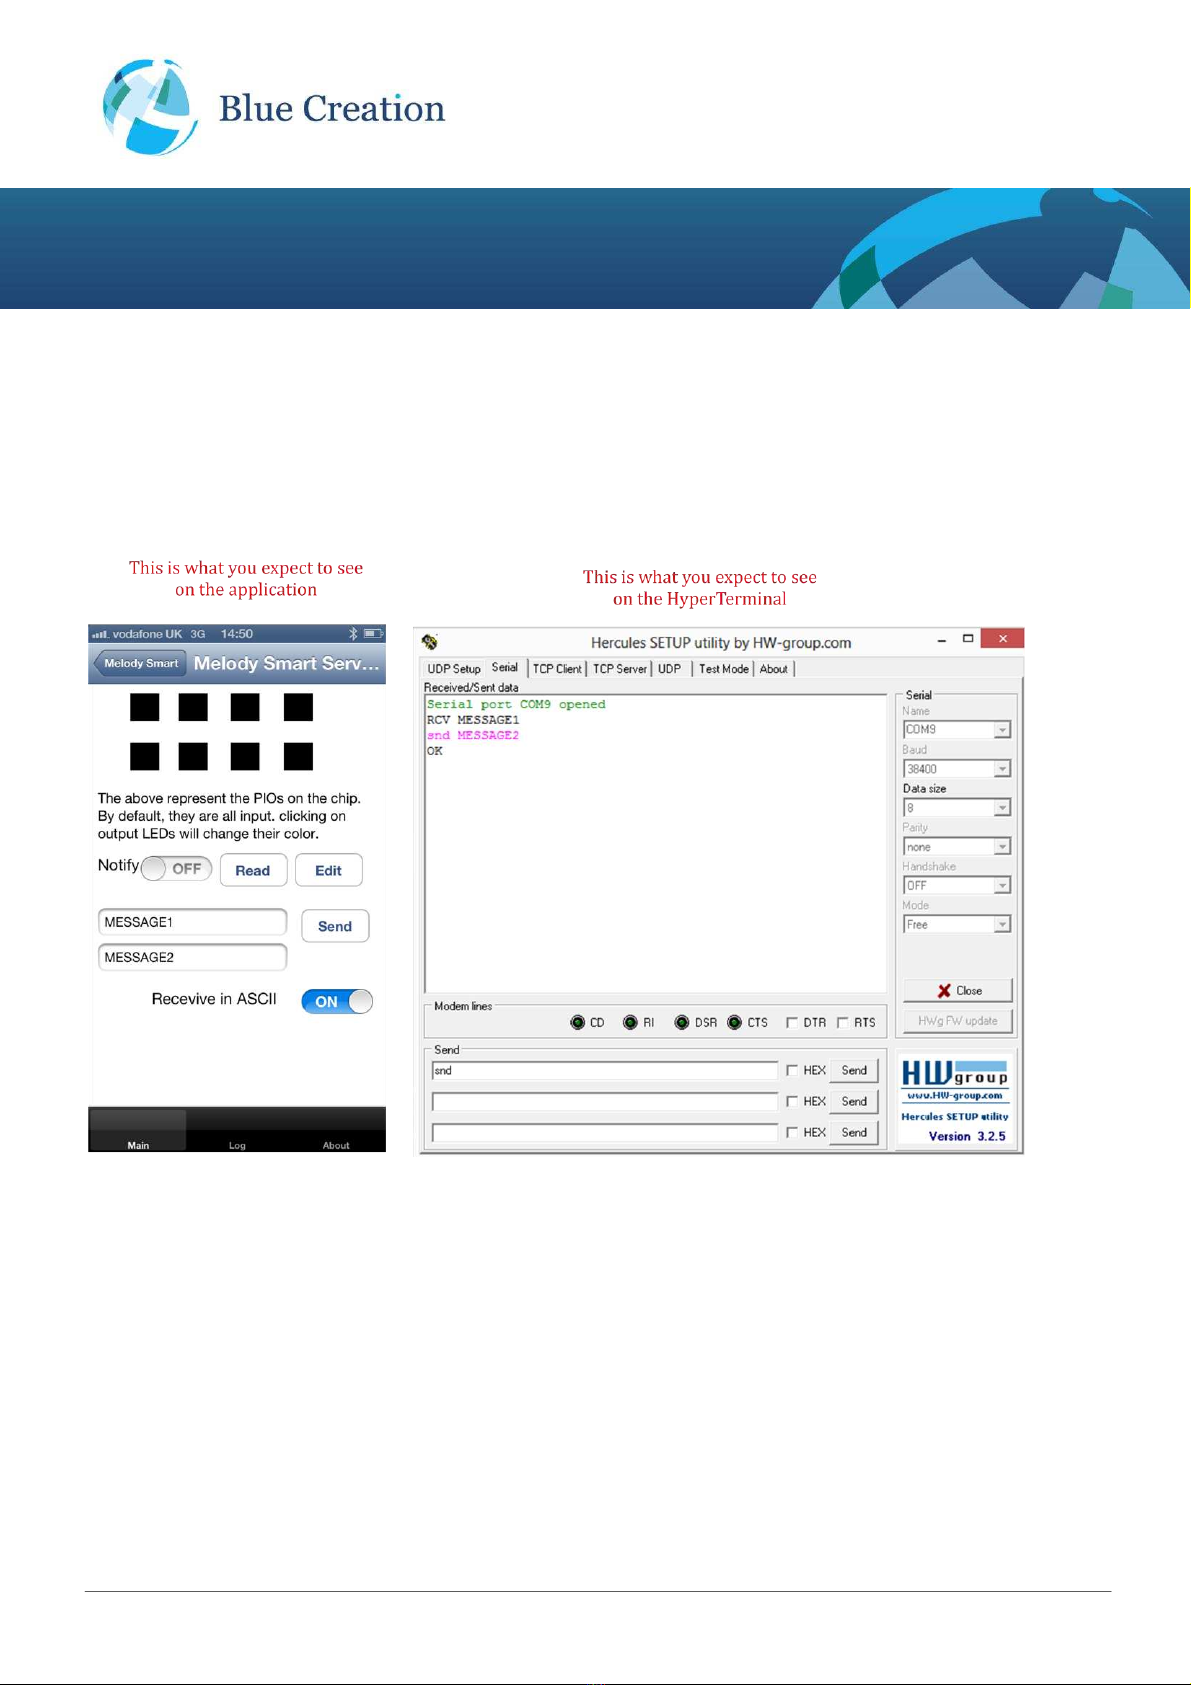
Exchanging messages between Bluetooth enabled device and the board
When you use the upper text box to send <MESSAGE1> from your application, you will receive a notification
‘RCV <MESSAGE1>' on the HyperTerminal. When you type in the command ‘SND <MESSAGE2>' and Enter
you will see on your Melody Smart application the <MASSAGE2> in the lower text box.

BlueCreation.St John’s Innovation Centre Cowley Road Cambridge CB4 0WS United Kingdom
t.+44 (0)1223 420 252 e.info@blue-creation.com www.blue-creation.com
BC111-DISKIT-001
Manual
Reading and Operating the GPIOs using Melody Smart app
Reading GPIOs Using Melody Smart
Using the Read button the App. will return the status of the module's GPIOs as mapped here:
The numbers for the actual GPIOs are clearly marked on the board and are also shown in here

BlueCreation.St John’s Innovation Centre Cowley Road Cambridge CB4 0WS United Kingdom
t.+44 (0)1223 420 252 e.info@blue-creation.com www.blue-creation.com
BC111-DISKIT-001
Manual
Each box on the represents a GPIO pin and indicates its direction (Input or output) and Logical state (High or
low):
Direction: A green border around a square indicates that this PIO is configured as an output rather than
an input. By default all PIOs are configured as inputs. No border around the square indicates that this PIO
is configured as input.
Logical State: The PIO state is indicated by the square colour: black means logical low and red means
logical high.
In this example:
P16: Input low
P17: Input low
P18: Input low
P19: Output high
P20: Input high
P21: Input low
P22: Input low
P23: Input low
Controlling GPIOs Using Melody Smart
To change a PIO's logical state from high to low and the other way press on the box representing the PIO.
To change a PIO's direction Press Edit and then press on the PIO - once direction changed press Done.
BlueCreation.St John’s Innovation Centre Cowley Road Cambridge CB4 0WS United Kingdom
t.+44 (0)1223 420 252 e.info@blue-creation.com www.blue-creation.com
BC111-DISKIT-001
Manual
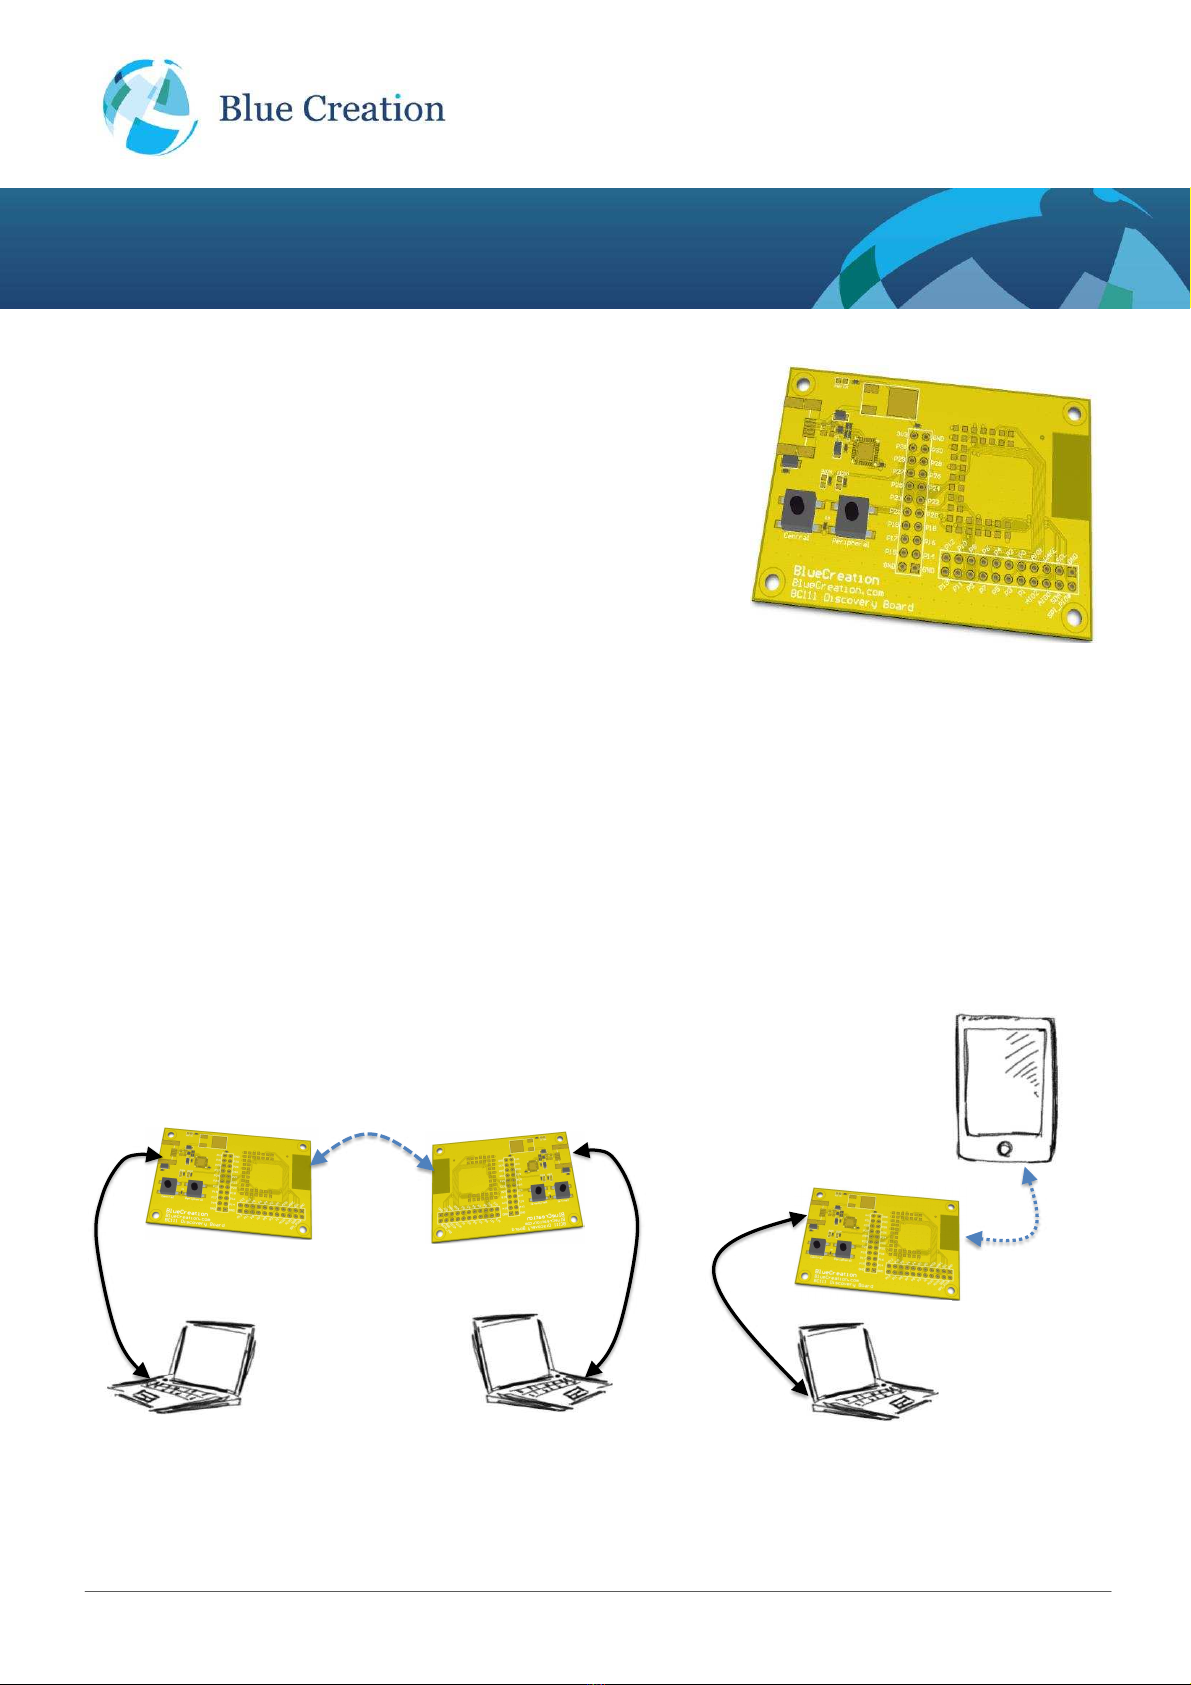
Connecting 2 Discovery boards - Steps
You can connect 2 BC111 modules and allow them to communicate using 2 Discovery boards. To do so,
please follow the steps below.
Step1: Set up each board connecting to a separate PC as is explained in the section titled "Setting up the
Board - Steps".
Step2: Once both are set up, connect the two devices by pressing on one board on the Peripheral button (will
connect as Slave) and on the other board on the Centre button (will connect as Master). The two devices will
be connected and the Leds will stop flickering - the in the Master board the blue Led will be lit and on the
Slave the green Led will be lit.
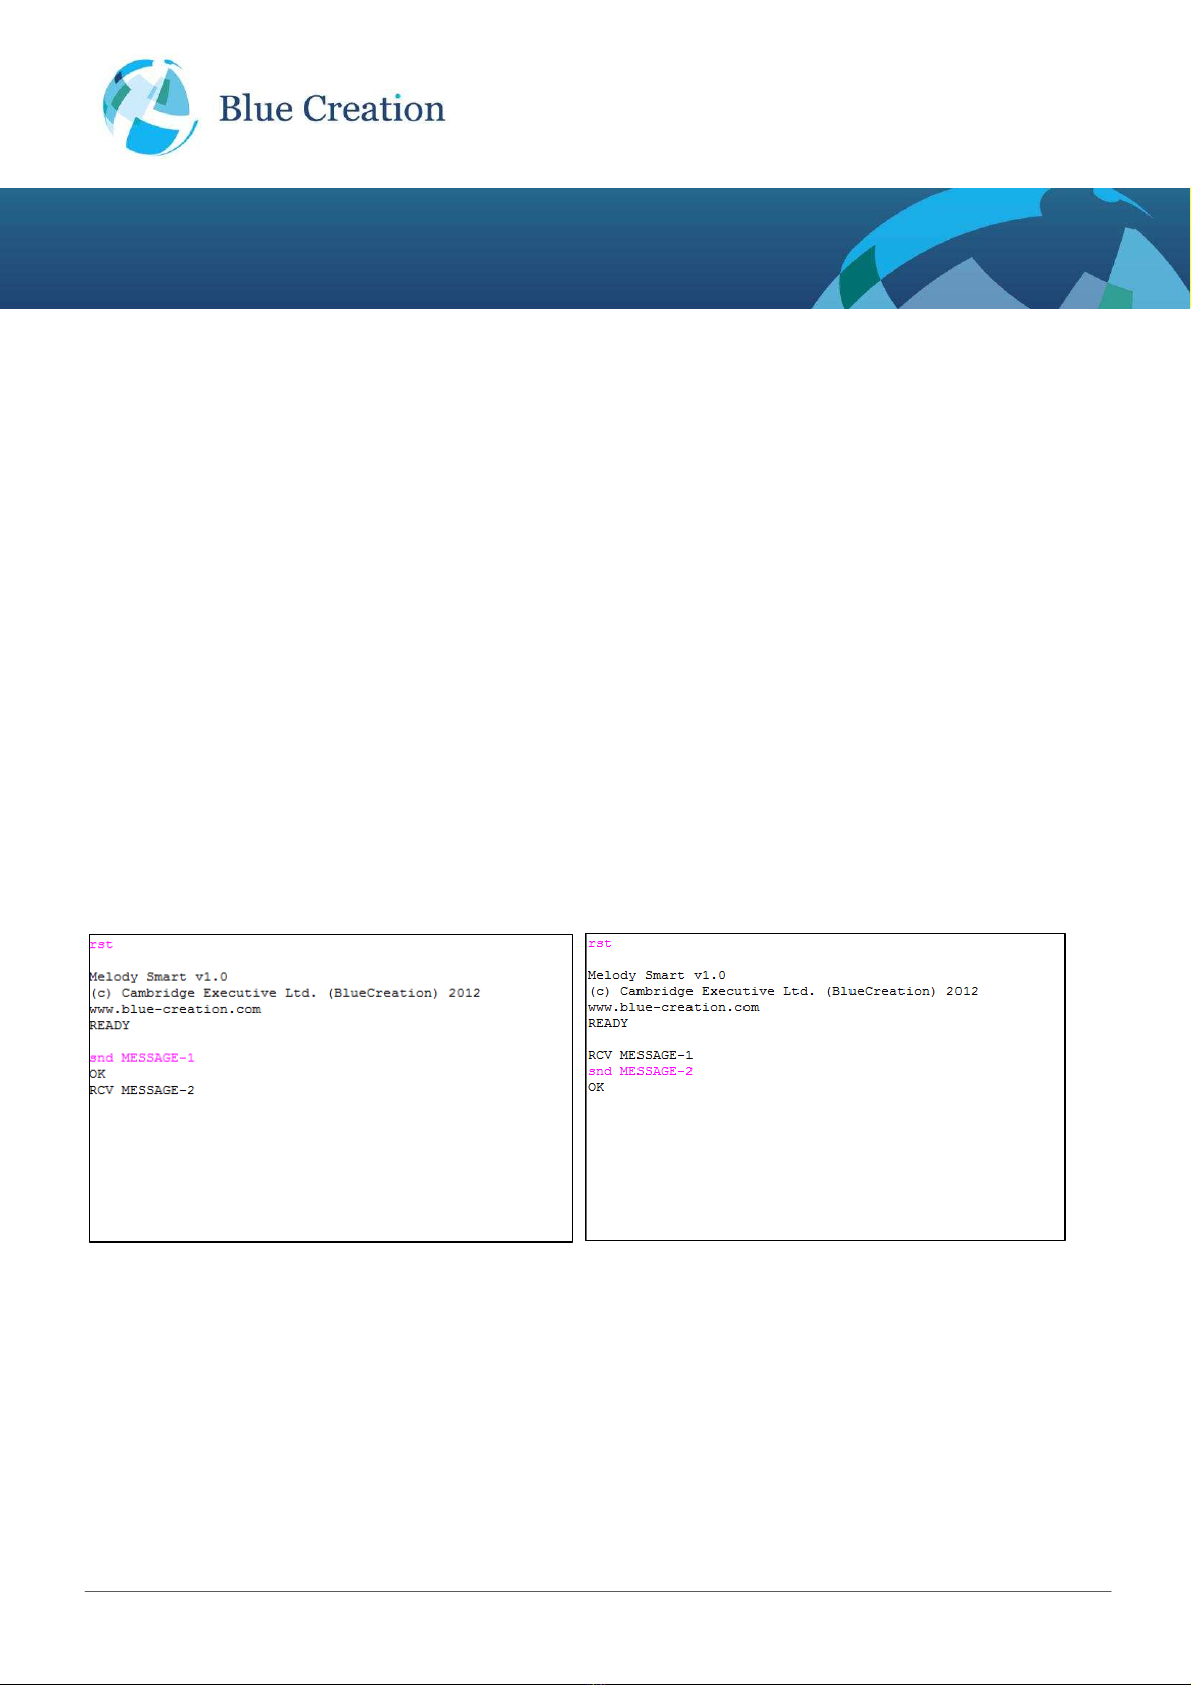
Now you can send messages from one board to another using the HyperTerminal programs on each
computer.
Messages from one board
Sending and then receiving
Messages from the second board
Receiving and then sending

BlueCreation.St John’s Innovation Centre Cowley Road Cambridge CB4 0WS United Kingdom
t.+44 (0)1223 420 252 e.info@blue-creation.com www.blue-creation.com
BC111-DISKIT-001
Manual
BC111-DISKIT-001 - Board Layout
The boards layout is explained in the figure below.
BC111 module
Mini USB Powers the Board
and provides UART connection.
Enumerates as a COM port.
GPIO Control
Connect as Central
GPIO Control
Connect as Peripheral

BlueCreation.St John’s Innovation Centre Cowley Road Cambridge CB4 0WS United Kingdom
t.+44 (0)1223 420 252 e.info@blue-creation.com www.blue-creation.com
BC111-DISKIT-001
Manual
Trouble-Shooting
If your board does not seem to work, please check the points below which are the most common problems
encountered. If you are still having issues, please contact techsupport@blue-creation.com.
1) POWER PROBLEMS: Check that the board is Turned ON. When you plug in the USB, the LEDs
should light up (ON) or flicker (ON and Advertising), indicating that the board is Turned ON.
2) FTDI DRIVERS: The PC usually automatically installs the USB FTDI Drivers when you first plug in the
board. If the Drivers are not successfully installed, unplug the board; delete any drivers that you have
previously installed. Then make sure you have an internet connection and re-plug the board. If this still
does not work, try and plug the board on a different USB port. If this still does not work, you can
bypass by using a USB/UART Cable and connecting directly to the RS232 port. You will need to set
Switch1 to Low. Refer to FTDI Trouble Shooting section
3) UART SETTINGS: The UART communication will happen with the parameters described at the
beginning of this manual. Please check that you have the right UART settings
4) BLUETOOTH COMMUNICATION: If you want to connect to your board, make sure that the module is
ADVERTISING. When you type STATUS in the command line the module should return
‘ADVERTISING ON’. If this is not the case, please type in ‘ADV’. Refer to the Melody Smart manual
for more options
BlueCreation.St John’s Innovation Centre Cowley Road Cambridge CB4 0WS United Kingdom
t.+44 (0)1223 420 252 e.info@blue-creation.com www.blue-creation.com
BC111-DISKIT-001
Manual
FTDI Trouble-Shooting
When the board is plugged-In, it should enumerate as a "FT232 USB UART" device and under rightclick-
>Properties->Hardware it should enumerate as a COM port.
The board enumerates as
FT232R USB UART
In this example, the board
enumerates as COM9

BlueCreation.St John’s Innovation Centre Cowley Road Cambridge CB4 0WS United Kingdom
t.+44 (0)1223 420 252 e.info@blue-creation.com www.blue-creation.com
BC111-DISKIT-001
Manual
If the device has not enumerated as a COM port, then you need to re-install the driver. This is done by going
to Properties/Change Settings/Update Driver as in the figure below. You can also try Properties/Change
Settings/Un-install. When you plug the board back in, the PC will look on Internet for the drivers.
If the FTDI driver still does not work, you might want to erase all registers. this can be done by following the
instructions below. Source: http://forums.parallax.com/showthread.php/139524-FTDI-Driver-problems-with-
Windows-7-64-bit-(Also-uninstalling-drivers-COM-entries):
Step1) If you need to clean a previous install of the FTDI driver from your system and/or clear any COM Ports
added to the registry then you should obtain the CDM Uninstaller from the following link:
http://www.ftdichip.com/Support/Util...aller_v1.4.zip
Extract the contents of this ZIP file into a folder on your desktop or elsewhere and run the
CDMuninstallerGUI.exe file.

BlueCreation.St John’s Innovation Centre Cowley Road Cambridge CB4 0WS United Kingdom
t.+44 (0)1223 420 252 e.info@blue-creation.com www.blue-creation.com
BC111-DISKIT-001
Manual
You should see the following dialogue box which already has the FT232R Product/Vendor IDs in the box.
Click the "Add" button to add this Product/Vendor ID to the list of devices to remove. Optionally you can check
the "Generate log file" checkbox for a record of what operations were performed and which COM Port entries
were removed. Now press the "Remove Devices" button. Once completed you should restart your computer
so that the O/S can clean things up. You should then be ready to re-install your drivers as listed above.

BlueCreation.St John’s Innovation Centre Cowley Road Cambridge CB4 0WS United Kingdom
t.+44 (0)1223 420 252 e.info@blue-creation.com www.blue-creation.com
BC111-DISKIT-001
Manual
Step2) Download the latest driver from the FTDI website at the following link:
http://www.ftdichip.com/Drivers/VCP.htm
In the row for Windows in the comments column are the words setup executable, which is a link to download
the setup installer. This is the preferred method for installing this driver. When running the driver, if you do not
see the command window above re-run it. If after three tries you still have not seen it you may have another
issue such as insufficient permissions, anti-virus software or even malware preventing the install.
Hope this helps. Sometimes driver installations don't go as planned and the reasons may not be anything we
can diagnose and/or help with. However this guide covers those we can help with. Take care!
Table of contents


