bluefin BrightSign 3008 Series User manual

BrightSign Built-in
Manual & Specifications
3008 Series / Version 3.0 / November 11th, 2019

Table of Contents
Overview.............................................................................. 3
BrightAuthor and Configuration ......................................... 4
BrightAuthor Setup ................................................................................................ 4
BrightSign Player Setup ........................................................................................ 5
BrightSign Player Publishing ................................................................................. 6
BrightSign Firmware Update.................................................................................. 7
Controlling Room Scheduler LED’s ....................................................................... 8
Screen Menu ....................................................................... 9
Ports.................................................................................. 10
Player Specifications ........................................................ 13
Video Engine Decoder:........................................................................................ 13
Media Formats: ................................................................................................... 13
Hardware Capable Interfaces: ............................................................................. 13
Screen Specifications ....................................................... 14
Parameters.......................................................................................................... 14
Absolute maximum ratings .................................................................................. 14
Installation and Safety ...................................................... 15
Choosing a Location............................................................................................ 15
Mounting ............................................................................................................. 15
Safe Operating Temperature............................................................................... 16
Recessed Mounting............................................................................................. 16
Support.............................................................................. 17
BrightAuthor Support........................................................................................... 17
Bluefin Support.................................................................................................... 17
Limited Warranty ................................................................................................. 17

Overview
BrightSign Built-In screens offer the power of a BrightSign HD media player and the
dependability of an industrial style LCD screen in a single unit built for convenience.
Screens are available in two form factors; Finished screens designed with a sleek
exterior for wall mounting, and Frameless screens which can be built into kiosks and
point of purchase displays.
Additional options include capacitive touch screens available in every size and power
over ethernet up to 32’’ screens. All BrightSign Built-In screens are fully compatible
with BrightSign’s ecosystem of services and partnered third-party CMS solutions.

BrightAuthor and Configuration
BrightAuthor Setup
BrightAuthor is a free content management and publishing desktop application which
can be used to configure players and upload playlists of scheduled content to one, or
a network, of players. To download BrightAuthor, visit:
https://www.brightsign.biz/downloads/dsm-series
And download the most recent official release.
Creating a Presentation
When starting a project in BrightAuthor, set the presentation to the following
parameters:
BrightSign Model: HS124
Connector Type: HDMI
Screen Resolution: 1920x1080x60 (1280x800x60 on 10.1’’ Screens)
Monitor Orientation: Landscape or Portrait (Bottom on Right)
Ultrawide Presentations
For Ultrawide screens, continue to use the 1920x1080x60p resolution. Within the
presentation, edit your zone to be the pixel height of the display and move it to the
top of your presentation.
Learn BrightAuthor
To learn more about creating BrightSign presentations, visit:
https://www.brightsign.biz/support/training/tutorial-videos
http://docs.brightsign.biz/
for tutorial videos, user guides, troubleshooting and documentation.

BrightSign Player Setup
To set up a BSBI player, navigate to Tools from the menu, and select Setup
BrightSign Unit.
Under Name Specification, select a name for your player. Select “Use name only” to
display only the selected name during local network publishing, or “Append unit ID” to
insert the player’s unique ID at the end of its name.
Under Network Properties, select Enable Wireless and fill out the SSID and
password if you want your player to communicate over a wireless network.
Further network settings, both Wired and Wireless, can be found under Advanced
Network Setup.
Under Unit Configuration, you may select one of three publishing options.
•Select “Standalone” to only allow the player to be updated directly from an SD
card or USB Drive
•Select “Networked with Local File Networking” to allow publishing directly
from BrightAuthor over a network connection
•Select “Simple File Networking” to publish from a web server
Select “Create Setup Files” when you are satisfied with your settings, and select a
folder, USB or SD card location to write the setup files. You may then insert the SD
card or USB drive containing the set-up files into your BrightSign player. A message
will display informing you that setup is complete, and you may reboot the player and
publish content to it.
Note: USB updating still requires an SD card to be present within the unit.

BrightSign Player Publishing
To publish a BrightAuthor presentation, navigate to the Publish Tab.
Select your publishing method from directly underneath the Publish tab, either Local
Storage, Local Network, or Simple File Network
Browse to the folder containing your project.
Select your project from the list. By default, the selected presentation will display
always, indefinitely. You may schedule this presentation to only play during certain
times via the schedule to the right or schedule the player to switch between multiple
presentations.
For Local Storage:
Browse to an SD card, USB drive or folder you wish to write the published
presentation to.
Select Standalone unit to only publish the presentation.
Select Standalone unit with setup to include player setup with the presentation.
For Local Network:
Select the unit or multiple units you wish to publish to from the populated list. The
units name and/or appended ID will appear if the player was set up for Local Network
publishing and is on the same network as your computer.
If your unit does not appear in the list, turn on the player without its micro SD card
inserted. At the start-up screen, note the players IP address.
Select the + icon under the Networked Units list in BrightAuthor and type the player’s
IP address.
For Simple File Network:
Select “Set Parameters”
Type the URL for the web folder to which you are publishing
Set the frequency at which the player will check for updates to that folder.
Browse to the SD card or folder you wish to publish to and place the published files in
your web folder.

BrightSign Firmware Update
For players which have not been published to before, or if you have downloaded a
new version of BrightAuthor, select “Specify Firmware Update” below your publishing
options.
1. Ensure the Update type at the top is set to “Standard”
2. Navigate to the top left-hand section with the label HS124
3. Select “Production Release”
4. Select “Okay” to finalize your settings.
The firmware update will be included with your published presentation.

Controlling Room Scheduler LED’s
These Instructions only apply to the BSBI Room Scheduler Screen.
The Room Scheduler unit comes with four LED strips on the sides of the screen,
which can display in green or red. These LED’s can be controlled via the GPIO
commands in BrightAuthor.
To enable LED control
Open a BrightSign presentation in BrightAuthor and select File > Presentation
Settings. Navigate to the I/O tab. Select “Output” next to GPIO 2 and 3. The lights will
be turned off by default when running this presentation.
To Activate LED’s within a Presentation
Double click the state or event where you want the LED to activate. Select the
Advanced tab from the window that appears. Click the + button to add a new
command.
To Display Green LED’s, set this command to “GPIO > On > 3”
To Display Red LED’s, set this command to “GPIO > On > 2”
To Display Yellow LED’s, set both commands
To Turn Off LEDs, set any On’s to Off.

Screen Menu
The screen menu provides configuration options for the monitor outside of
BrightSign’s configurations. This includes color correction, brightness, and CEC
controls. To enter the menu, press the MENU key four times.
(Note: If you received your screen before August 2018, the sequence may be MENU UP UP UP)
Use the UP and DOWN buttons to navigate up and down, and the VOL-and VOL+
to navigate left and right respectively. Return to the previous screen with MENU, or
select an option with SELECT.
Page 1: Color Correction
Picture Mode: Adjust settings for Contrast, Brightness, Saturation, and Sharpness.
Color Temperature: Adjust the RGB levels.
Backlight: Turn the LCD backlight on or off
Page 2: Accessibility
OSD Language: Choose your language for the menu options
Restore Factory Default: Restore factory default settings for the screen
HDMI CEC: Enable and configure CEC controls between the screen and the
BrightSign Built-In player. To enable CEC controls, select HDMI CEC from the menu,
and press VOL+ to enable. If necessary, navigate down and press VOL+ to disable
specific commands.
Page 3: Input
DMP and Input Source settings are not available on BrightSign Built-In units. These
settings should not be changed.
Page 4: Software Update
Configure a screen software update via the 6-pin JST connector. This feature should
not be utilized.
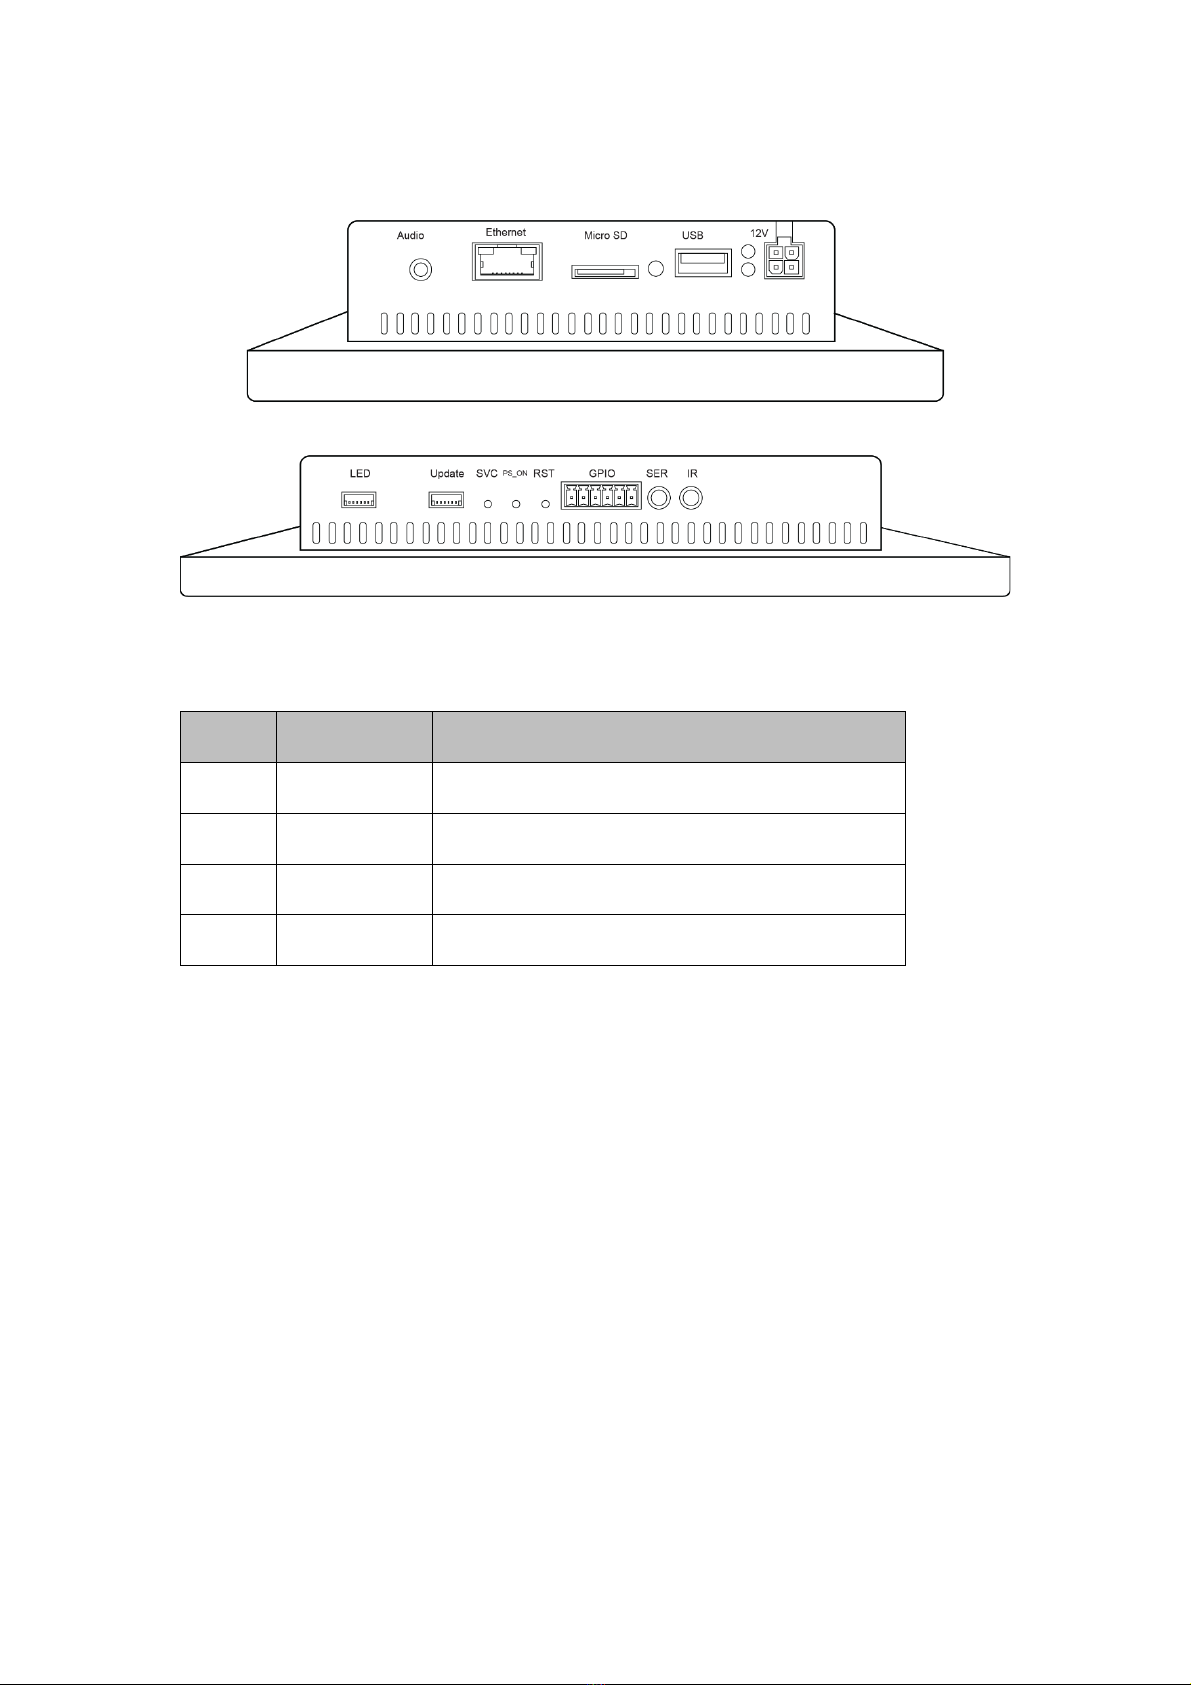
Ports
Power in
CN1: DC 12V Molex 4 pin input
NO. DEFINATION DESCRIPTION
1 12V +12V DC Power supply
2 GND Ground
3 12V +12V DC Power supply
4 GND Ground
Ethernet
RJ45 ethernet. POE+ power input on applicable screens up to 19.5’’. POE++ power
input on applicable screens up to 32.0’’
Micro SD
Micro SD card slot. Protective cover on Finished units.
USB
1x USB 2.0 host port
Status LEDs
Power, Error, Busy, Update
SVC, PS_ON, RST
Service, Power Signal, Reset
Wi-Fi / Bluetooth
M.2 (E) Keyed Wi-Fi/Bluetooth connector
External antenna connector optional
Audio
3.5mm Audio Out (Analog and Digital)
Power out /LED
J10: DC 12V 6 pin output
NO. DEFINATION DESCRIPTION
1 GND GND
2 GND GND
3 GND GND
4 VDD12V VDD12V
5 VDD12V VDD12V
6 VDD12V VDD12V
Update
Update port for LCD chipset
GPIO
CON4: general input and output with power supply
PIN1-6 from left to right have the following definition.
NO.
DEFINATION
DESCRIPTION
1 GND GND
2 3.3V 3.3V
3 GPIO GPIOX0
4 GPIO GPIOX1
5 GPIO GPIOX2
6 GPIO GPIOX3
Serial port
3.5mm RS-232 Serial Port
IR
BrightSign infrared remote-control input
SPK L / R
Amplified audio L / R output to 3W speaker – Only on Frameless screens

Player Specifications
Video Engine Decoder: Single 1080p60 video decoding
Media Formats:
Video Codecs: H.265, H.264 (MPEG-4, Part 10) MPEG-2, MPEG-1
Video Containers: .ts, .mpg, .vob, .mov, .mp4, .m2ts, .wmv
Images: BMP, JPEG, PNG
Audio: MP2, MP3, AAC, WAV (AC3 Pass Through)
HTML5: Mainstream Support
Hardware Capable Interfaces:
External micro SD Slot. SDHC up to 32GB, SDXC up to 2TB
USB 2.0 High Speed Host Port
Phoenix GPIO Port (4-pin bi-directional terminal block)
RS-232 Serial Port
IR In/Out
Audio Out (Analog and Digital)
Ethernet
M.2 (E) Keyed Wi-Fi/Bluetooth Connector (For Optional Wi-Fi Module)
Status LEDs: Power, Error, Busy, Update
Reset and Service Buttons
Real Time Clock
Screen Specifications
Parameters
Type
Description
Power Supply
+12V/24V @2A-5A
Audio Out
3.5mm Digital and Analog
Ethernet
1000BASE-T
SD/microSD
4-bit transfers, UHS-1 up to DDR50
USB 2.0
1x High Speed USB 2.0
LCD resolution
1920x1080
Brightness
>250 nits
Viewing angle
>85
Absolute maximum ratings
Parameters Value Unit
Power supply 12/24 Voltage
Storage temperature -10~+60 Degree C
Operating temperature 0~+40 Degree C
Humidity 20~80 %RH

Installation and Safety
Choosing a Location
Do not install the display in a location where a door or object could hit it.
Do not install the display in an area where it will be subjected to strong vibrations or
dust.
Do not install the display near strong light sources such as sunlight or strong
overhead lighting.
Do not install the display near the entry of the building’s main power supply.
Ensure adequate ventilation and climate. See “Safe Operating Temperature" for
details.
Mounting
This product does not ship with mounting accessories. Only use commercially
manufactured mounting accessories which meet the specifications of the screen and
follow the manufacturer’s installation instructions.
To prevent damage to the screen surface while installing mounting equipment, place
the screen face-down on a clean, cushioned surface.
Do not install the monitor near any heat sources such as radiators, heat registers,
stoves, amplifiers, or other devices which produce heat.
Do not place the monitor in areas exposed to direct sunlight, humidity, grease, dust,
rain, smoke or steam.
The screen may be rotated 90 degrees clockwise or counterclockwise as desired for
I/O placement.
Do not position the screen at an angle exceeding 15 degrees, as illustrated:

Safe Operating Temperature
BrightSign Built-In Screens require airflow in order to cool the HS124 chipset. Failure
to provide enough airflow can cause the unit to reach temperatures above 50
degrees Celsius, which may cause areas of permanent LCD discoloration.
To maintain a safe operating temperature:
Provide a minimum of 6.35mm (.25’’) Figure A between the back of the unit and the
wall it is mounted to.
Do not install the monitor near any heat sources including but not limited to:
radiators, heat registers, stoves, amplifiers, or other devices which produce heat.
Ensure the ambient temperature of the room containing the unit is kept below 35
degrees Celsius (95 degrees Fahrenheit)
Recessed Mounting
This item’s warranty does not cover damage resulting from improper ventilation
resulting in damage to the LCD.
Maintain a minimum of 10cm (4’’) Figure Bof space between the unit and the
recessed wall to enable ventilation. Ensure there is enough airflow to prevent the unit
from exceeding 50 degrees Celsius.

Support
BrightAuthor Support
For more information, troubleshooting, or support regarding BrightSign, BrightAuthor,
presentations, or content management, visit https://www.brightsign.biz/about/contact-
us
Bluefin Support
For information and support regarding a Bluefin product, contact
support@thebluefin.com or visit our website at http://www.thebluefin.com/
Limited Warranty
There are no warranties, which extend beyond the description on the face hereof. Bluefin
warrants products to be free of defects in material and workmanship for the specified warranty
period of 1 year from date of shipment from Bluefin. During this period, Bluefin will at its option,
repair or replace this product at no additional charge to the purchaser except as set forth below.
Bluefin, will, at its option, repair or replace products at no additional charge to the purchaser, if the
defect is related to the Bluefin manufactured product, such as Power Supplies, Disk Drives, CPU
Boards, Backplanes, Video Cards and other Peripheral Boards.
Bluefin warrants that the product is free from defects in material or workmanship under normal
operation.
Replacement parts that are furnished at no-charge to the purchaser in completion of this warranty are
warranted only for the unexpired time portion of the original warranty. Any repairs or services outside the
scope of this limited warranty policy shall be at Bluefin normal rates with standard terms and conditions
applicable.
Bluefin is unable to provide loaner units or advance replacements.
Repair parts and replacement products will be furnished on an exchange basis and will be either
reconditioned or new. All replacement parts and products become the property of Bluefin.
Bluefin is not responsible for damages outside of Bluefin's control including, but not limited to, physical
damage, modifications to products, or improper packaging and handling.
If items have been returned for warranty service and found not to be defective a nominal service
expense will be charged to cover diagnoses, testing, return shipping and other related costs.
This limited warranty does not include service to repair damage to product resulting from accident,
disaster, misuse, abuse, modification, alteration, or if unauthorized repairs have been attempted.

It is the customer's responsibility to back up the contents of their hard drive, including any data you have
stored or software you have installed on the hard drive. Bluefin shall not be responsible for i) any loss of
data due to storage media failure, ii) for any software programs, data or other information stored or used
on any media or part of any product returned to Bluefin for warranty and non-warranty servicing. If
during servicing the contents of the hard disk or any other data storage media are altered, deleted,
modified or lost, Bluefin will not be held responsible. It is solely the customers/purchaser’s responsibility
to back up any software programs, data, or information stored on any storage media or any part of a
product returned for servicing.
Limited warranty service may be obtained by returning the product during warranty period to Bluefin
along with proof of purchase and a Returned Material Authorization (RMA) number. The RMA number is
obtained in advance from Bluefin and is valid for 30 days. The RMA number should be clearly marked
on the exterior of the shipping container or equivalent.
The customer or Purchaser prepays all inbound freight charges for both Warranty and Non-Warranty
repairs. Bluefin is not responsible for damage during shipment. It is recommended that you either insure
the product or assume full liability for loss or damage during transit.
Bluefin will cover the return freight via ground/surface service only to the original ship to address for
warranty repairs within North America. If you require overnight, expedited or overseas shipments, this
service will be extra and at the purchaser's expense. You may pay freight by issuing a purchase order,
credit card or wire transfer. Return freight can also be covered by offering your own carrier account
number (freight collect) with your specified services.
In no event will Bluefin be liable for any damages, including lost profits, lost business, lost savings,
downtime, or delay, labor, repair or material cost, injury to person, property, or other incidental or
consequential damages arising out of use of or inability to use such product, even if Bluefin has been
advised of the possibility of such damages or losses, or for any claim by any other party. The above
warranty is the only warranty authorized by Bluefin and is in lieu of any implied warranties, including
implied warranty of merchant-ability and fitness for a particular purpose. Bluefin reserves the right to
waive its warranty policy if the customer fails to pay invoice in full and/or on a timely basis as set out on
the face of the invoice. How to Return Products for Servicing: To return products, you must obtain a
valid RMA number. RMA numbers can be obtained by calling 770-205-6636 or email us
at support@thebluefin.com.
This manual suits for next models
3
Table of contents


