manuals.online logo
Brands
  1. Home
  2. •
  3. Brands
  4. •
  5. Yosin
  6. •
  7. Media Player
  8. •
  9. Yosin DP540E3 User manual

Yosin DP540E3 User manual

DP540E3 Digital Player
1
 Front Panel /
Rear Panel
Description
4
3
2
1
Digital Player
VOL
TRACK
REC
A
B
C
D
E
12VDC
AUDIO
OUT IN
LI NE
Adapter
Red
Black
Yellow
Green
I
J
F
K
G
H
LA N
L
Blue White
Front Panel
Rear Panel
A. Output Volume Control Knob
B. Track Indicator – Green Lights
C. Track Selector – Green Button
D. Mode Indicator – ed Light
E. Mode Selector – ed Button
F. Power Transformer (12VDC 200mA)
G. AUDIO-IN
This audio input port is used for connecting to
the earphone jack of a PC (or CD player), to
input music/messages for recording M H.
H. AUDIO-OUT
This audio output port without transformer
isolation will be used if the M H input port of
the PBX is a standard M H input port of
impedance more than 150 ohms.
I. EXT-Port Interface
This output port with transformer isolation
will be used if the M H input port of the PBX
is an analog extension port.
J. T UNK-Port Interface
This Input utput port with electric current
supply will be used if the M H input port of
the PBX is a trunk port.
K. 8-ohm Interface
This output port without transformer isolation
will be used if the M H input port of the PBX
is a standard M H input port of impedance
between 8 ohms and 150 ohms.
DP540E3 Digital Player
2
 Feature Description
DP540E3 system contains four M H (music on-hold) tracks; each track can be used to record a
music/message. Total recording time is 18 minutes. The DP540E3 provides the following alternate
operation modes:
Playing
The red light is off.
Click the green button, to select a
track and re-start playing.
Selection
The red light is slowly blinking.
Click the green button, to select a
recording-track or
programming-item.
ecording
The red light is on steadily
during the recording process.
If the light is blinking fast, it
means DP540 is waiting for
inputting audio to start
recording
.
Programming
The red light is on steadily.
Click the green button, to
select an option.
Click the red button
* Press
the red
button
* Press the red button * Press the green button
Click the red button
Click
the red
button
Power On
* Note: “Press the red (or green) button” means “depress it until all of the five lights begin blinking.”
DP540E3 Digital Player
3
12VDC
AUDIO
OUT IN
LI N E


Adapter
Telephone
Earphone
PC
LA N
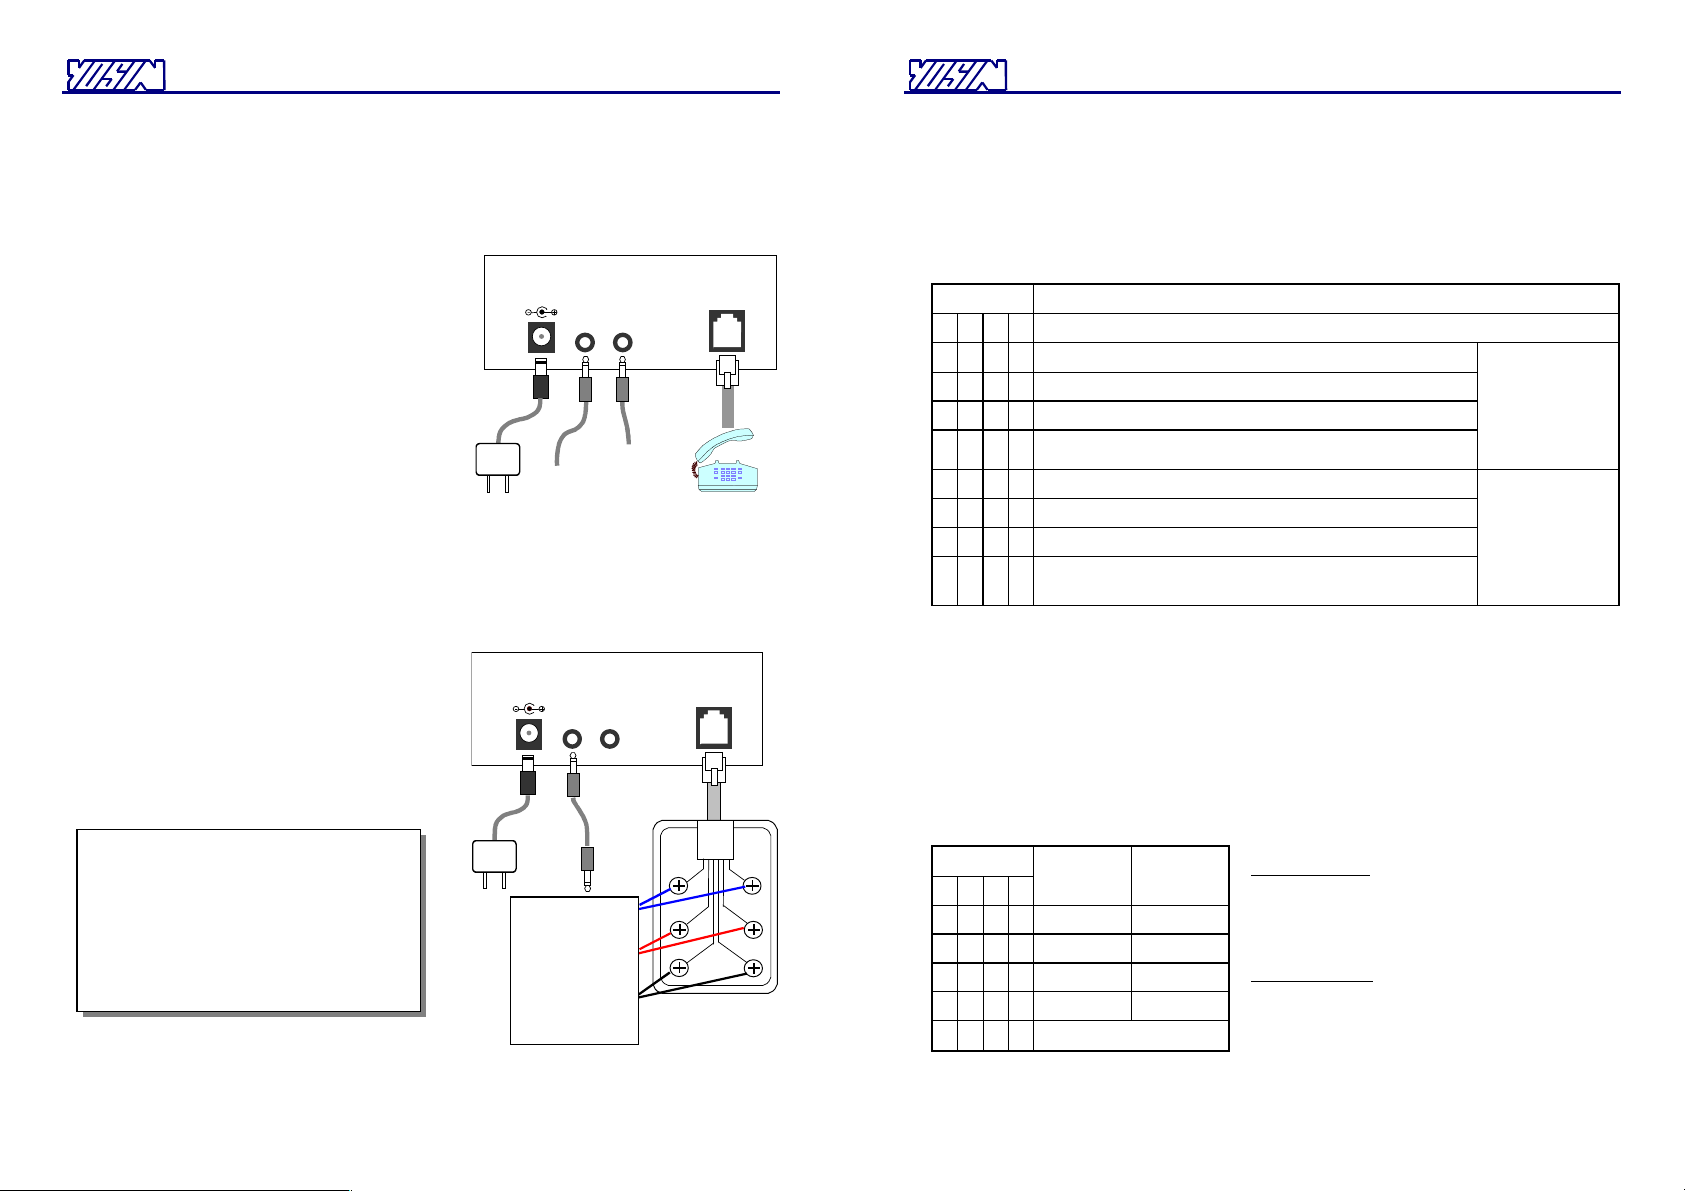
Connection for Recording
12VDC
AUDIO
OUT IN
LI N E
Adapter
Red
Black
Yellow
Green
Standard
MOH Port <
EXT Port <
COL Port <
PBX
Blue White
LA N
Connection for PBX MOH

Procedure of Recording Music/Message
In addition to using the downloading feature, to record a music/message into a track, you can use a PC to
transmit the music/message to the DP540E3, and/or a standard telephone to speak to. The earphone
included in the package is used to monitor the sound of recording.
Use the following procedure to record music/message.
1. If the red light is on, press the red button to turn it
off.
2. Press the red button until all the five lights begin
blinking.
3. Click the green button repeatedly until the green light
of the desired track blinks.
4. Press the red button until all of the five lights begin
blinking. (If you click the red button again
immediately on releasing it, you will only empty the
track.)
5. Let the PC start outputting the music/message, and
speak to the handset as needed.
6. You need to click the red button to finish the
recording if Ended-by-Silence feature is not used.
 Connection for PBX MOH
1. Connect the M H input port of the PBX to an audio
output port suitable to it.
2. Dial into the PBX from an external line, let the
called party hold the line and then adjust the volume
to proper position.
DO NOT install the unit in a place subject
to high-frequency equipment (switching
power system, radio broadcast system, etc.)
within one-meter distance.
DO NOT connect the AUDIO-OUT jack,
8-ohm Interface or T UNK-Port Interface
to any telephone line having voltages.
DP540E3 Digital Player
4
 Procedure of Changing the Playing Mode
1. If the red light is on, press the red button to turn it off.
2. Press the red button until all the five lights begin blinking.
3. Click the green button repeatedly until the green light of Track 1 blinks.
4. Press the green button until all the five lights begin blinking.
5. Click the green button repeatedly until the display of green lights corresponds to the desired option.
Green lights
●
= n
1
2
3
4
Playing Mode Options
0: The selected track is played back repeatedly. (Default)
●
1: The selected track is played back one time.
●
2: The selected track is played back twice.
●
●
3: The selected track is played back three times.
When the DP540E3
is in the playing
mode, clicking the
green button is to
start playing the
next track.
●
4: Each track is played back repeatedly in the track sequence.
●
●
5: Each track is played back in the track sequence of one cycle.
●
●
6: Each track is played back in the track sequence of two cycles.
●
●
●
7: Each track is played back in the track sequence of three
cycles.
When the DP540E3
is in the playing
mode, clicking the
green button is to
restart playing each
track.
6. Click the red button when finish.
 Procedure of Changing the Recording Mode
1. If the red light is on, press the red button to turn it off.
2. Press the red button until all of the five lights begin blinking.
3. Click the green button repeatedly until the green light of Track 2 blinks.
4. Press the green button until all of the five lights begin blinking.
5. Click the green button repeatedly until the display of green lights corresponds to the desired option.
Green lights
1
2
3
4
Started by
Audio
Ended by
Silence
Yes (default)
Yes (default)
●
No Yes
●
Yes No
●
●
No No
●
Recording Prohibited
6. Click the red button when finish.
Started-by-Audio: "Yes" means that the DP540E3
does not start recording until an audio signal is
detected after it is switched to the Recording mode.
"No" means that the DP540E3 starts recording in a
second when it is switched to the Recording mode.
Ended-by-Silence: "Yes" means that you may end
recording either by 1-second silence or clicking the
red button. "No" means that the only way to end
recording is to click the red button.

Other Yosin Media Player manuals

Yosin DP540T User manual

Yosin

Yosin DP540T User manual

Yosin DP540T User manual

Yosin

Yosin DP540T User manual

Yosin DP540 User manual

Yosin

Yosin DP540 User manual

Popular Media Player manuals by other brands

ViewSonic NMP-500 user guide

ViewSonic

ViewSonic NMP-500 user guide

Envoy Connect user guide

Envoy

Envoy Connect user guide

Samsung Home Sync user manual

Samsung

Samsung Home Sync user manual

RCA LYRA X3000 Specification sheet

RCA

RCA LYRA X3000 Specification sheet

VIA Technologies DSP-A45 manual

VIA Technologies

VIA Technologies DSP-A45 manual

Eminent EM7280 datasheet

Eminent

Eminent EM7280 datasheet

MultiQ Media Monitor 4 Getting started guide

MultiQ

MultiQ Media Monitor 4 Getting started guide

Tascam VS-R264 Reference manual

Tascam

Tascam VS-R264 Reference manual

Elan ViA! dj installation manual

Elan

Elan ViA! dj installation manual

Sony LocationFree LF-B20 Specifications

Sony

Sony LocationFree LF-B20 Specifications

AGPtek a02 user manual

AGPtek

AGPtek a02 user manual

IconBiT XD290HDMI user manual

IconBiT

IconBiT XD290HDMI user manual

Hyundai H-CCR8091 instruction manual

Hyundai

Hyundai H-CCR8091 instruction manual

Triotech Clearstream K5C quick start guide

Triotech

Triotech Clearstream K5C quick start guide

Philips NP1100/12 user manual

Philips

Philips NP1100/12 user manual

TIS X-5S1Z-AMP installation manual

TIS

TIS X-5S1Z-AMP installation manual

Philips Nexperia PNX1500 Reference design

Philips

Philips Nexperia PNX1500 Reference design

Pioneer DMP-555 operating instructions

Pioneer

Pioneer DMP-555 operating instructions

manuals.online logo
manuals.online logoBrands
  • About & Mission
  • Contact us
  • Privacy Policy
  • Terms and Conditions

Copyright 2025 Manuals.Online. All Rights Reserved.