Blueprint Reality MixCast Studio User manual

Want to start recording some awesome mixed reality video? MixCast Studio makes setup simple
and fast, just follow the steps below:
1. Set up your video device
2. Align the virtual camera with the physical camera
3. Isolate your subject/player
Now launch your VR title!
MixCast supports setups ranging from basic beginner streaming to full video production. The
below is simply a starting place of things everyone will need to make mixed reality video.
This guide also assumes you're already up and running with your VR headset including room
setup and the ability to launch VR experiences. If you're starting from scratch with your Vive or
Rift, please refer to the manufacturer's instructions for getting started!
Camera – this can be a webcam, video camera or any other HDMI camera through an HDMI
capture card
HTC Vive or Oculus Rift with Touch + 2 sensors
VR-ready PC
A VR title with the MixCast SDK integrated or that supports SteamVR’s quadrant mode for
mixed reality
MixCast™ Studio Setup
Guide
Overview
What You’ll Need

For the highest-quality mixed reality video production consider adding:
Green screen & lights
Vive Tracker or 3rd Vive controller
High-quality DSLR or Video Camera
Let’s get started...
Mixed reality requires a real-world camera to put you in the VR scene! MixCast Studio works with
a large number of consumer webcams, video cameras and capture cards.
1. Hook up your camera to your PC and install the necessary drivers
2. Launch MixCast Studio
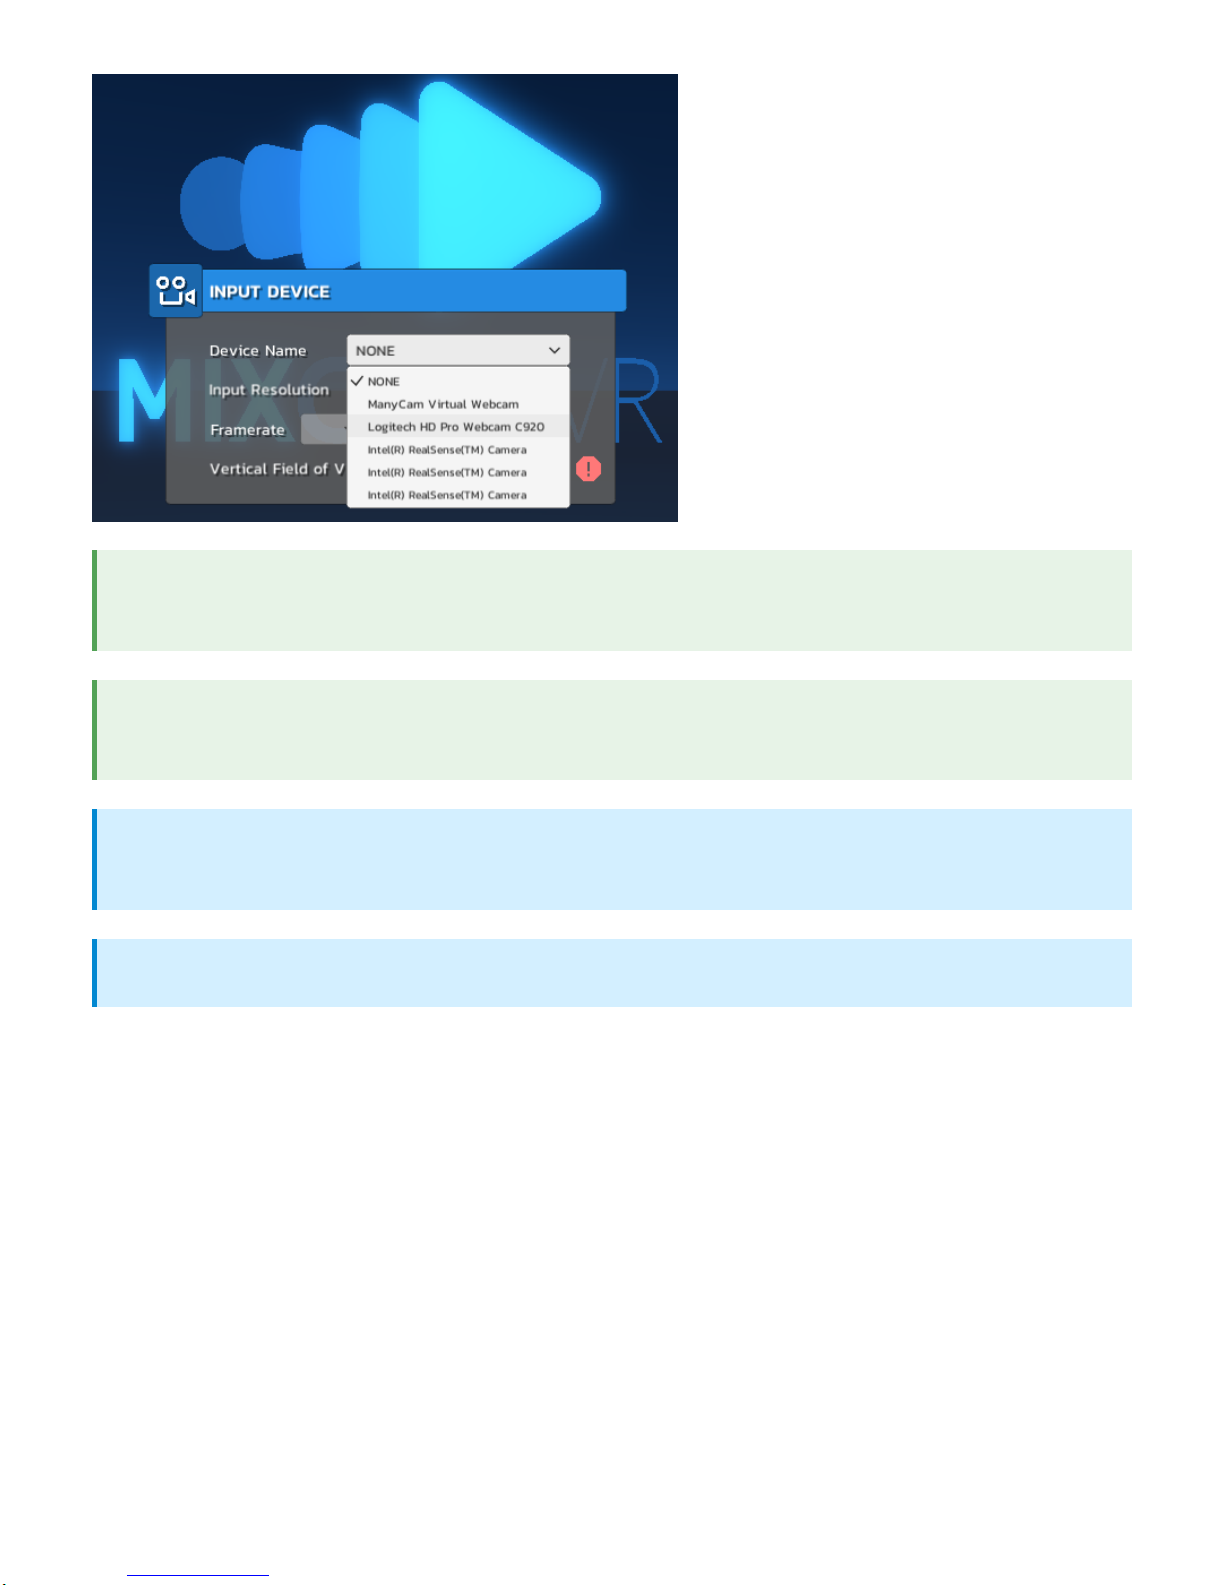
3. Go into “Input device” and select your device from the drop down menu
4. Select your input resolution from the “input resolution” menu
1. Setting up Your Video Device
MixCast needs to know where your camera is in the real world so it’s aligned with your virtual
camera. This is a core part of making mixed reality work and capturing your video from the right
perspective in the VR scene.
1. While in MixCast Studio, go into your VR Headset
2. Look around to find your virtual camera, usually directly in front of you
Tip: Go into your camera settings and make sure auto exposure, auto white balance, and
auto focus are disabled. These will interfere with your chroma key or static subtraction!
?
Tip: Make sure to disable any on-screen indicators on your camera otherwise your battery
indicator could show up in VR!
?
Note: Cameras will sometimes support higher resolutions but at lower framerates.
Experiment with different resolutions to find the right one for your videos.
?
Note: You can leave the FOV (Field of View) blank for now
?
2. Align Virtual Camera
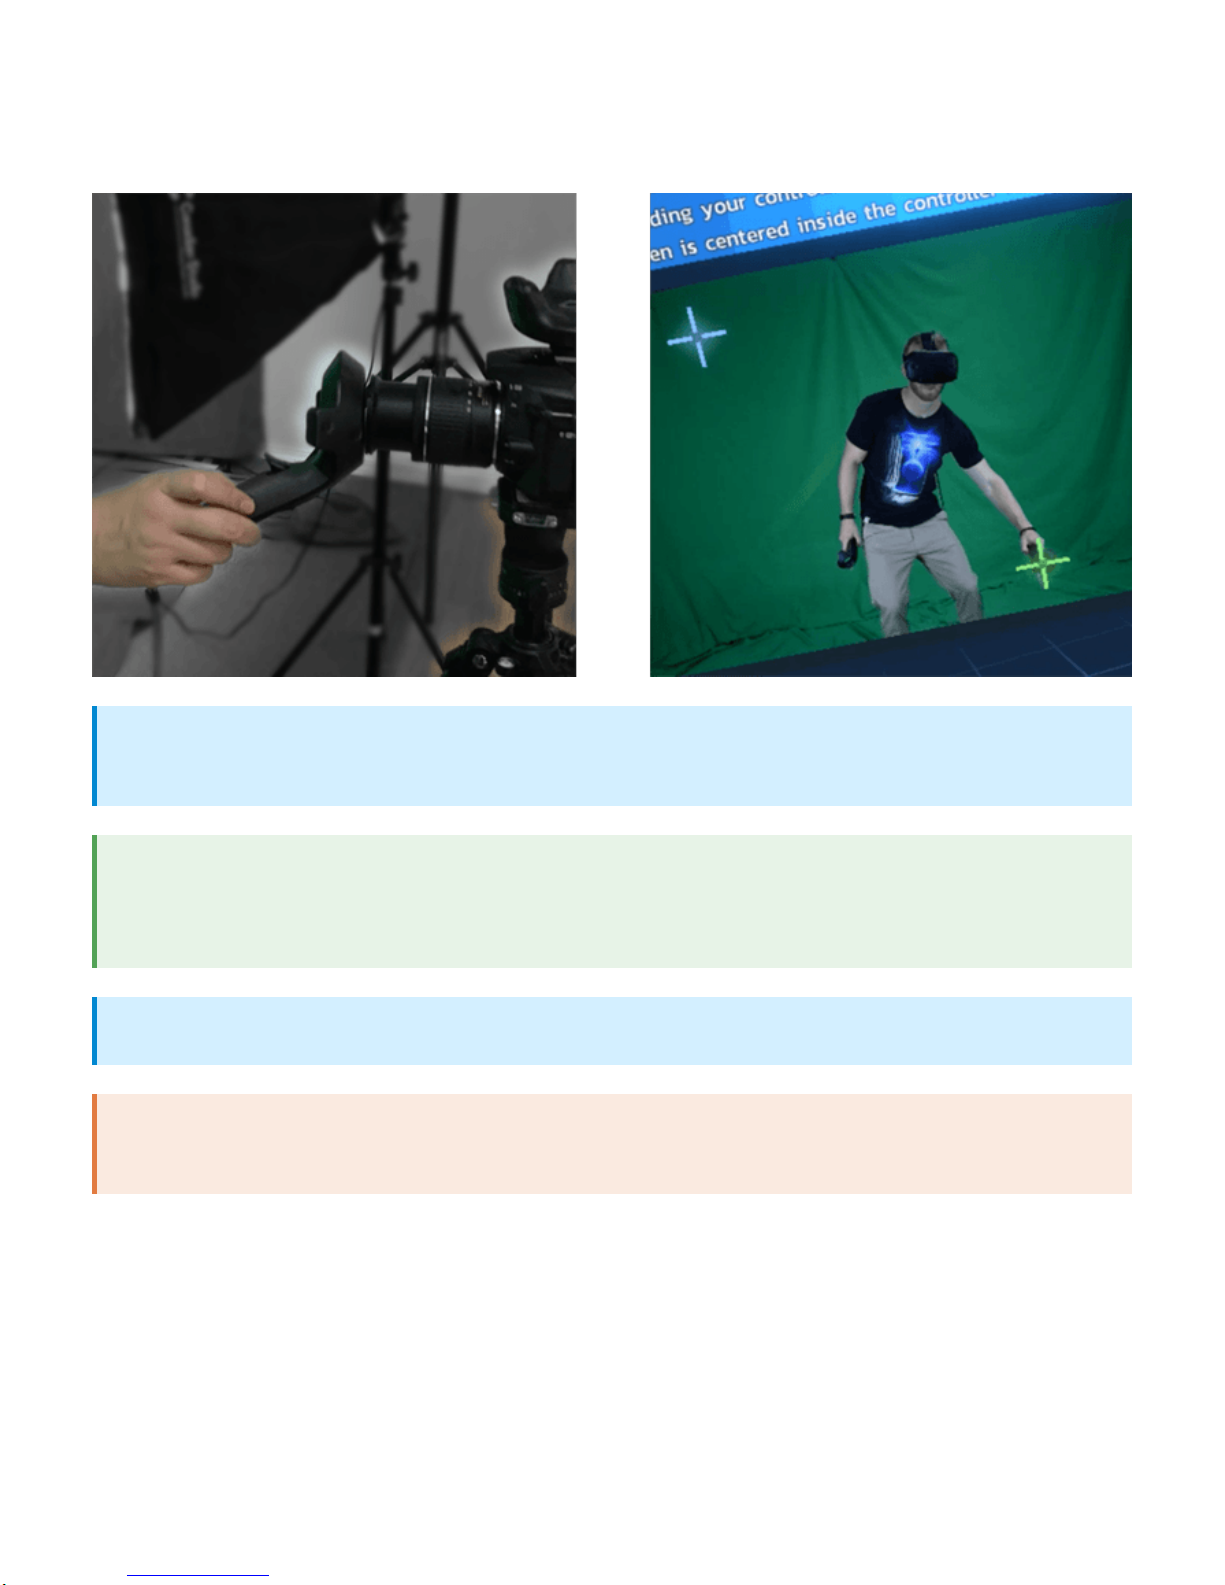
3. Point at the “Quick Setup” Button located below the camera and press the Trigger button to
start the Quick Setup process
4. Follow the prompts
Note: The first step is the most important – make sure your controller is centered and
right up against the lens of your camera
?
Tip: If you want more precision in your alignment, select the “+” button instead of the
green check mark after hitting the crosshairs. You'll be presented with more crosshairs to
further refine your alignment.
?
Note: The Quick Setup process automatically determines the FOV of your camera.
?
Warning: If you change the lens or zoom of your camera the FOV will no longer match the
virtual camera and you'll need to run Quick Setup again.
?
3. Isolate Your Subject/Player
We need to isolate the player in the video coming from your camera so your background doesn’t
show up in your mixed reality video. MixCast Studio offers two ways to do this, both with their
own strengths.
If you have a green screen or blue screen your best option is probably Chroma Keying. This
process removes a selection of colours from the background, resulting in only the player
appearing in the video.
1. Open the “Subject” menu
2. Change your isolation mode to Chroma Key
3. Click the eyedropper icon and then click and drag the dropper across the green area of your
screen
If you don’t have a single-colour background, use Static Subtraction. This process takes a
snapshot of your background (without the subject present) and ‘subtracts’ it. When the subject
steps back in front of the camera they appear because they differ in colour and lightness from
the background behind them.
1. Open the “Subject” menu
2. Change your isolation mode to Static Subtraction
3. Leave the scene so only the background is shown on video and click Capture Background
4. Like Chroma Keying, use Feathering to soften the edges of the subtraction
Option 1: Chroma Keying
Tip:Use Ctrl-Z to undo your last click if you accidentally key the wrong colours
?
Tip: Use Spill Feathering to soften the edges of the key and reduce visual noise
?
Option 2: Static Subtraction
Tip: Increase the time MixCast Studio samples the background to improve the subtraction
quality
?
Note: Tracked cameras are not supported when using static subtraction.
?

Below are several optional advanced features that can make a big difference in the quality of
your mixed reality video.
Does your video feed lag behind the virtual objects in Studio? Some cameras and setups
introduce delay resulting in the video lagging behind the virtual scene. If you notice this, enable
Buffered Mode to compensate for the delay.
1. Go into the “Compositing” menu
2. Change Display Mode to Buffered
3. Adjust the delay (in milliseconds) until you’re happy with the results
If you have a third Vive controller or a Vive Tracker you can use it to track your real-world
camera. This means you can pick up your camera, move it around and get different angles on the
action in real-time!
1. Ensure the Vive controller or Vive Tracker is firmly secured to the camera – any looseness
can introduce camera shake in your video
2. Open the Camera Placement menu
3. Choose your tracked camera device in the dropdown menu or use ‘Choose Closest’
4. Now move your camera (along with the controller/tracker) and the VR scene will stay in sync
with the movement of the camera
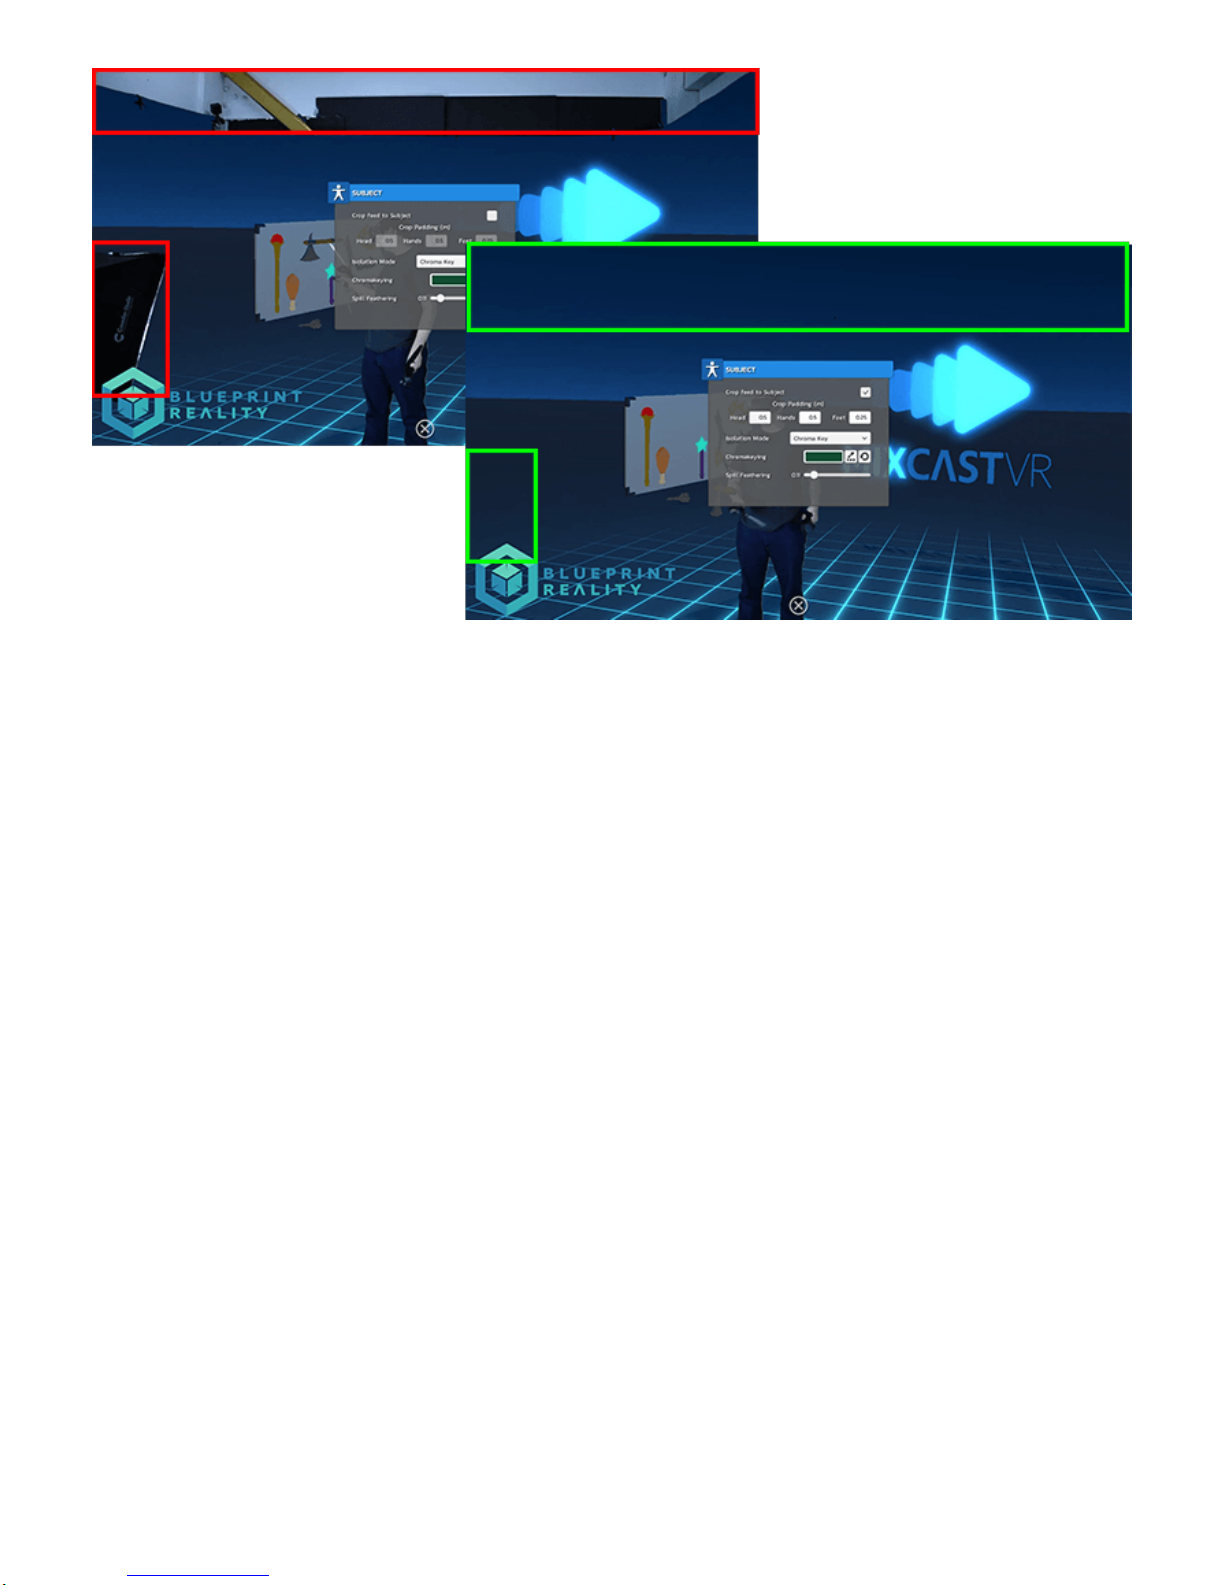
Automatic Cropping will automatically ignore any part of the video feed that is too far away from
your hands or head. Since you probably don’t want your lighting rig to show up on-screen,
automatic cropping ensures only the subject/player and their immediate surroundings are
displayed.
1. Open the Subject menu
2. Click to enable ‘Crop feed to Subject’
3. Adjust the padding so that the player/subject isn’t cropped out, but their surroundings are
Advanced Features
A. Buffered Mode
B. Tracked Camera
C. Automatic Cropping
Player Lighting adds another layer of depth to your mixed
reality video by allowing light sources in the VR scene to affect the subject. If you’re carrying a
torch through a dark forest, you’ll see the subject illuminated by its light along with the virtual
surroundings!
1. Open the Lighting menu
2. Adjust Take Lighting – this determines the percentage ofall lighting that will affect the
player, for instance 0.5 results in half as much light affecting the player. Think of it as a
modifier for the entire Player Lighting feature
3. Adjust the Base Amount – This is the amount of light applied to the video feed by default
even if other lights aren’t present. For instance, setting this to 0 will result in the player
D. Player Lighting

being completely unlit and dark
4. Adjust the Light Power – This is how any lights in the scene brighten and color the player
In most cases you'll see the MixCast logo appear in the bottom-right corner
of the game running on the desktop - click it to enable the MixCast mixed reality camera. In some
cases the developer has chosen to place MixCast options in their own settings menu, so check
there if the MixCast icon isn't visible on-screen.
Capture your footage using MixCast VR, or your desktop recording software of choice. We
recommend OBSbut XSplit, Shadowplay and many others exist so use what's best for your setup.
We'd love to hear from you! Let us know what you think of MixCast, what awesome projects
you're working on, and what crazy problems you're trying to solve in mixed reality! You can
contact us at...
Twitter
Facebook
Support Portal
Tip: In MixCast Studio grab the torch to test your lighting settings!
?
Note: Player Lighting can only be enabled on VR titles with the MixCast SDK integrated.
Please contact your favourite developers to enable support for Player Lighting and other
great MixCast features!
?
Launch Your VR Title!
Recording & Streaming
Questions? Comments?
Thanks for using MixCast!

Revision #14
Created 3 months ago by Sulli
Updated 2 months ago by Sulli
Table of contents
Popular Video Gaming Accessories manuals by other brands

Board-A
Board-A Boardmaster instruction manual

Acer
Acer ENERGY-GC1100 Assembly instruction

GLD Products
GLD Products STORMSTRIKE SPACE SAVINGBILLIARD TABLE Replacement parts

VR Entertainment
VR Entertainment VR Real Feel Baseball quick start guide

Deltaco Gaming
Deltaco Gaming GAM-139 user manual

Outdoor Play
Outdoor Play 0713046 instruction manual


